
Ankle joint: Anatomy, Function, Movement, Exercise
Table of Contents
Introduction of Ankle joint
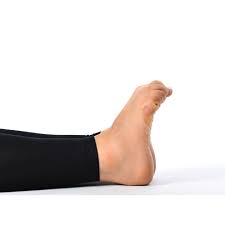
- The ankle joint is also known as the talocrural joint is a synovial joint located in the lower limb. It is connected by the bones of the lower leg and with the foot.
- Functionally, the ankle joint is a hinge type of joint, permitting dorsiflexion and plantarflexion movements of the foot.
What two joints make up the Ankle?
- Even though it is typically referred to as a single joint, the ankle is mainly two joints: The true ankle joint is composed of three bones: the first one is the tibia, the larger and stronger of the two lower leg bones tibia and fibula, which forms the inside part of the ankle.
Anatomy of the Ankle joint
- The foot and ankle are made up of the 26 individual bones of the foot, and together with the long bones of the lower limb form a total of 33 joints. Even though frequently referred to as the ‘ankle joint’, there are a number of articulations that facilitate movement of the foot. The ankle joint complex is comprised of the talocalcaneal which is also known as a subtalar joint, the tibiotalar second name is talocrural, and transverse-tarsal which is also known as a talocalcaneal navicular joint.
The subtalar joint
- The calcaneus is the largest, strongest, and most posterior bone of the foot, providing attachment to the Achilles tendon in the lower leg.
- This is located inferiorly to the talus bone and forms a triplanar, uniaxial joint with the talus in the lower leg. The talus bone rests on the anterior portion of the calcaneus bone.
- The two similarly articulated facets of the anterior talocalcaneal joint on the inferior aspect of the talus bone are convex, strong, and on the superior aspect of the calcaneus bone are concave, strong whereas the facets for the articulation of the posterior talocalcaneal joint on the inferior surface of the talus bone are concave, and on the superior surface of the calcaneus are convex.
- It is geometry allows inversion and eversion movements of the ankle, while another movement is permitted at this joint. A number of ligaments form attachments between the two bony aspects.
- The most important linkage between the two is the interosseous talocalcaneal ligament, a strong, wide, and thick ligament that extends from the articular facets of the inferior talus bone to the superior aspect of the calcaneus bone. Two further ligaments, the lateral talocalcaneal and the anterior talocalcaneal ligament also contribute to the connection of the subtalar joint. However, these are relatively weak and dull.
- The talocalcaneal joint is as well supported by the calcaneofibular part of the lateral collateral ligament in the ankle joint and the talocalcaneal ligament of the deltoid. Moreover, the long tendons of the peroneus longus muscle, peroneus brevis muscle, flexor hallucis longus muscle, tibialis posterior muscle, and flexor digitorum longus muscle provide additional support.
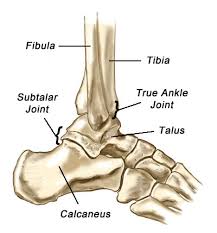
The tibiotalar joint
- Which is also famous as a talocrural joint. The tibiotalar joint or talocrural joint forms the junction between the distal tibia and fibula bones of the lower leg and the talus bone of the foot.
- The load-bearing part of this joint is the tibial-talar interface. The talus bone of the foot includes the head, neck, and body, and it has no direct muscle connection.
- The trochlea of the talus bone fits into the mortise formed from the distal ends of the long bones of the shin of the lower leg. The malleoli of the tibia and fibula bones act to constrain the talus bone, such that the joint functions as a hinge joint, and primarily contributes to the plantar flexion and dorsiflexion movement of the foot, but the geometry of the joint, namely the cone-shaped trochlear surface and the oblique rotation axis do indicate that it may not function simply as a hinge joint.
- The talus is at its widest anteriorly means that the joint is more stable in dorsiflexion motion. The final geometry of the tibiotalar joint is considered to contribute to the stability of the ankle joint. In the stance phase, the geometry of the ankle joint alone is sufficient to provide resistance to eversion motion; otherwise, stability is derived from the soft tissue structures of the ankle joint.
- The tibiotalar joint is a diarthrosis and it is covered by a thin capsule attaching superiorly to the tibia bone, the malleoli of the tibia, and inferiorly to the talus bone.
- Stability is given to the ankle joint through three groups of ligaments.
- The tibiofibular syndesmosis limits movement between the tibia and fibula bones while doing activities of daily living, maintaining stability between the tibia and fibula’s bone ends.
- The syndesmosis contains three parts – the anterior tibiofibular, the posterior tibiofibular ligament, and the interosseous tibiofibular joint. The medial surface of the ankle joint is supported by the medial collateral ligaments which are also known as deltoid ligaments and these are mainly for resisting eversion movement and valgus stresses within the joint.
- The deltoid ligament(medial collateral ligament) is in a fan shape and comprises the anterior as well as posterior tibiotalar ligaments, the talonavicular ligament, and the talocalcaneal ligament.
- The lateral collateral ligaments decline inversion movement of the joint, limiting varus stresses, and decreasing rotation. They consist of the anterior as well as posterior talofibular ligaments and the calcaneofibular ligament. The anterior, as well as posterior ligaments, withstand high tensile forces under plantar flexion and dorsiflexion respectively. These ligaments give stability to the lateral tibiotalar joint and are frequently damaged while inversion injuries, namely ankle sprain. The calcaneofibular ligament is the one and only direct connective tissue between the tibiotalar and subtalar joints.
Inferior tibiofibular joint
- In some literature Inferior tibiofibular joint is considered a core aspect of the tibiotalar joint, but it may also consider a distinct joint. It is not a synovial type articulating joint, but the interosseous membrane, and fibrous tissue, connect the two distal parts of the fibula and tibia bone.
- The primary function of the inferior tibiofibular joint is a stabilizing role, adding stability, rather than an additional movement to the foot and ankle in the lower limb. As previously detailed, the anterior, as well as posterior tibiofibular ligaments and interosseous ligaments, maintain the joint between the tibia and fibula bones.
- The ligamentous contains the joint making it highly susceptible to injury, and it is often involved in ankle fracture and eversion injuries in the ankle joint.
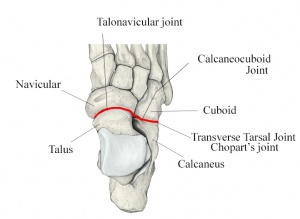
Transverse tarsal joint
- The transverse tarsal joint which is also known as Chopart’s joint combines the junction between the talus and navicular bones, where anteriorly, the talar head articulates with the posterior surface of the navicular bone, and the calcaneocuboid joint, the joint between the calcaneus and the cuboid bones. This joint is considered as a part of the same functional unit as the subtalar joint as they share a common axis of movement, also contributing to the eversion-inversion movement of the foot.
Articulating Surfaces of the ankle joint
- The ankle joint is a complex joint that is formed by three bones; the distal end of the tibia and its medial malleolus, the lateral malleolus of the fibula (bones of the leg), and the trochlear surface of the talus(bone of the foot). All of the articular surfaces of an ankle joint are secured with hyaline cartilage.
- There are mainly three articulations in the ankle joint:
- The tibia and fibula(leg bones) are bound together by strong tibiofibular ligaments(at the distal end of the lower leg). Together, the tibia and fibula form a bracket-shaped like socket, covered in hyaline cartilage. It is (socket) known as a mortise.
- The body of the talus fits snugly into the mortise formed by the bones of the lower leg. The articulating part of the talus is wedge-shaped that is broad anteriorly, and narrow posteriorly.
- The main action of the ankle joint is to allow the foot for dorsiflexion and plantarflexion, along with some degree of inversion and eversion with subtalar and midtarsal joints. The ankle joint also acts as a shock absorber as the heel strikes the ground while the first phases of gait.
The joint capsule of the ankle joint
- Superiorly, the capsule of the ankle joint is fixed with the margins of the articular surfaces of the tibias’ medial malleolus and lateral malleolus of the fibula. Inferiorly, the capsule is fixed with the margins of the talar trochlear surface. The ankle joint capsule is relatively weak and thin. However, strengthened medially and laterally by strong collateral ligaments. The internal aspect of the capsule of the ankle joint is lined by the synovial membrane that projects into the distal tibiofibular joint up to the interosseous tibiofibular ligament.
Ligaments of the ankle joint
- Due to the ankle joint having heavy load-bearing nature, the ankle joint must be stabilized, but to the extent to which it’s still permitted full mobility. The ligaments which stabilize the ankle joint are the medial collateral ligaments and lateral collateral ligaments.
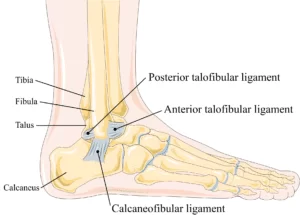
Lateral collateral ligament
- The lateral collateral ligament is a strong, wide compound ligament that reinforces the lateral aspect of the ankle joint. It is made of three distinct brands:
- Anterior talofibular ligament: A weak and flat band that originates from the lateral malleolus of the fibula and extends anteromedially to the lateral side of the talus’ neck. Most commonly damaged ligament of the ankle joint.
- Function: Restrain anterior displacement of the talus bone with respect to the fibula and tibia bones. Resists Inversion while doing plantarflexion.
- Posterior talofibular ligament: A strong band that extends medially and posteriorly from the fibula’s distal part of the lateral malleolar fossa to the lateral tubercle of the talus. It is also attached to the medial malleolus by a tibial slip of fibers. Rarely injured because of bony stability protects ligaments while ankle does dorsiflexion.
- Function: Forms the back wall of the recipient socket for the trochlear of the talus. Prevent posterior displacement of the talus bone.
- Calcaneofibular ligament: A long, strong band that originates from the apex of the lateral malleolus of the fibula, extends posteroinferiorly and attaches to a tubercle on the lateral aspect of the calcaneus.
- function: Aids talofibular stability while doing dorsiflexion. Restrain inversion of the calcaneus with respect to the fibula bone. Prevent talar tilt into inversion movement.
Medial collateral ligament
- The medial collateral ligament is also known as a deltoid ligament. It is a strong, triangular, and long band that reinforces the medial aspect of the ankle joint. It is essential to stabilize the ankle joint in eversion and prevent dislocations of the ankle joint (over-eversion). The medial collateral ligament has a proximal attachment to the apex and borders of the medial malleolus. From here, the ligament fans out and inserts onto the talus, calcaneus, and navicular bones of the foot. Although the medial collateral ligament can be quite variable containing three to six parts starting from the superficial to the deep parts, the medial collateral ligament is commonly organized into 3 continuous segments based on the distal attachment points:
- Tibionavicular ligament: Composes the superficial fibers of the medial collateral ligament of the ankle joint that descend from the medial malleolus to attach distally to the navicular tuberosity of navicular bone in the foot. From the attachment point, the talonavicular ligament blends with the medial margin of the plantar calcaneonavicular ligament.
- Tibiocalcaneal ligament: Composes the intermediate part of the medial collateral ligament of the ankle joint that passes almost vertically downwards from the medial malleolus and attaches to the sustentaculum tali.
- Tibiotalar ligament: This ligament comprises the deep part of the medial collateral ligament. It contains an anterior and posterior portion. They both originate on the apex of the medial malleolus of the tibia, after which the anterior tibiotalar ligament descends to attach onto the medial tubercle of the talus bone of the foot, while the posterior tibiotalar ligament joins onto the non-articular posterior part of the medial talar surface.
Muscles of the ankle joint
Which ankle muscles do plantarflexion at the ankle joint?
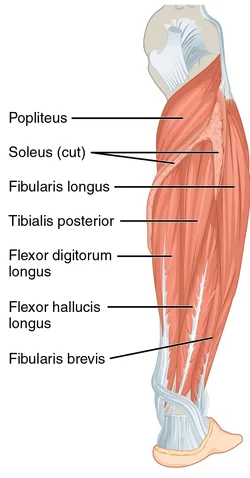
Gastrocnemius
Soleus
Flexor hallucis longus
Flexor digitorum longus
Tibialis posterior
Peroneus brevis
Peroneus longus
Which ankle muscles do dorsiflexion at the ankle joint?
Tibialis anterior
Extensor hallucis longus
Extensor digitorum longus
- Gastrocnemius
Origin: Lower posterior border of the femur bone, above the medial condyle, and lateral condyle of the femur.
Insertion: Posterior aspect of the calcaneus bone via the Achilles tendon.
Movement: Plantarflexion.
Nerve supply: Tibial nerve. - Soleus muscle
Origin: Upper half of the posterior surface of the tibia bone, along with the sole line, and upper third of the posterior fibula.
Insertion: Posterior aspect of the calcaneus bone via the Achilles tendon at the ankle.
Actions: Plantarflexion.
Nerve supply: Tibial nerve. - Flexor Hallucis Longus muscle
Origin: Lower 2/3 of the posterior surface of the fibula bone.
Insertion: Sole of the foot of the base of the distal (furthest) phalange of the first metatarsal.
Actions: Flexion of the big toe, Inversion, and Plantarflexion.
Nerve supply: Tibial nerve. - Flexor Digitorum Longus muscle
Origin: Lower 2/3 of the posterior surface of the tibia bone.
Insertion: Plantar (bottom) aspect of the base of the distal (furthest) phalanges of 2nd, 3rd, 4th and 5th metatarsal.
Actions: Plantarflexion, Inversion, and Flexion of the toes.
Nerve supply: Tibial nerve. - Tibialis Posterior
Origin: Interosseous membrane (between the tibia and fibula bones). Posterior aspect of the tibia and fibula bones of the lower leg, adjacent to the interosseous membrane.
Insertion: Navicular tuberosity of navicular bone, Cuneiforms, Cuboid, 2nd, 3rd, and 4th metatarsals bones of the foot.
Actions: Plantarflexion and Inversion of the ankle.
Nerve supply: Tibial nerve. - Peroneus brevis muscle
Origin: From the distal 2/3 of the lateral fibula, Its tendon passes downwards and loops posteriorly to the lateral malleolus of the fibula.
Insertion: On the styloid process at the proximal end of the 5th metatarsal.
Nerve supply: Superficial Peroneal nerve.
Action: Planterflexion and eversion. - Peroneus Longus muscle
Origin: Head of fibula bone, and upper 2/3 of the fibula.
Insertion: Base of the underside of 1st metatarsal, and undersurfaces of cuneiforms.
Actions: Eversion and Plantarflexion.
Nerve supply: Superficial peroneal (fibular) nerve. - Tibialis Anterior Muscle
Origin: Upper 1/2 of the lateral and anterior aspect of the tibia bone.
Insertion: Inner surface of the medial cuneiform bone of foot and 1st metatarsal.
Action: Dorsiflexion and inversion.
Nerve supply: Deep peroneal nerve. - Extensor Hallucis Longus muscle
Origin: Middle 2/3 of the inner surface of the front of the fibula bone.
Insertion: Distal phalanx of the1st metatarsal.
Actions: Extension of the big toe, dorsiflexion, and inversion.
Nerve supply: Peroneal (fibular) nerve. - Extensor Digitorum Longus muscle
Origin: Lateral condyle of the tibia bone, head and anterior surface of the fibula, and interosseous membrane (between tibia and
fibula).
Insertion: Dorsal (top) surface of the middle and last phalanges of the four outer toes.
Actions: Extension of toes, dorsiflexion, and eversion.
Nerve supply: Peroneal (Fibular) nerve.
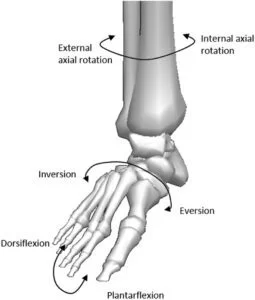
Movements at the ankle joint
- The ankle joint contains the tibia and fibula bones, which sit on the talus and calcaneus bones at the back of the foot. The foot itself contains twenty-six bones. The movements present are:
- Plantarflexion: Going up on your toes. Normal range of motion: 0-degree to 50-degree
- Dorsiflexion: Lifting your foot up. Normal range of motion: 0-degree to 20-degree
- Inversion: Turning the sole of the foot inwards. Normal range of motion: 0-degree to 15-degree
- Eversion: Flattening/turning sole of the foot outwards. Normal range of motion: 0-degree to 10-degree.
- Plantarflexion and dorsiflexion at the ankle joint are rarely performed single, but rather in combination with the movements at the subtalar and midtarsal joints. That means plantarflexion is most commonly followed by adduction and inversion allowing supination of the foot, whereas dorsiflexion, is followed by abduction and eversion allowing pronation of the foot.
- In the standing position, the ankle joint represents the 90-degree angle made between the foot and the leg. This is the neutral position, or the loose-packed position for the ankle joint, at about 0-10 degree plantarflexion. Because the weight of the body acts through a vertical line passing anteriorly to the joint, a strong and wide muscular support is required posterior to the joint to maintain stability and forward inclination or collapse while standing. This support is mainly brought by the soleus muscle and gastrocnemius muscles. The close-packed position of the ankle joint is at maximum dorsiflexion, and the position in which the stability of the ankle joint is the maximum.
Blood supply of the ankle joint
- The ankle joint obtains arterial blood supply from the anterior and posterior fibular and tibial arteries. These arteries form an anastomosis around the malleoli of the foot that gives off anterior lateral and medial malleolar branches to supply the ankle joint. Venous blood is drained through the corresponding veins around the ankle.
Innervation of the ankle joint
- The sensory and motor supplies of the ankle complex stem from the lumbar and sacral plexus in the body. The motor supply to the muscles comes from the tibial nerve, deep peroneal nerve, and superficial peroneal nerve, and the sensory supply comes from these three mixed nerves and two sensory nerves: the sural nerve and saphenous nerve. The lateral ligaments and the joint capsule of the talocrural joint and subtalar joint have been shown to be extensively innervated by mechanoreceptors which contribute to proprioception.
Mechanoreceptors
- Mechanoreceptors of the ankle joint send proprioceptive sensory input(PSI to the central nervous system (CNS). Muscle spindles are thought to be the chief type of mechanoreceptor responsible for proprioceptive attributes from the ankle joint. The muscle spindle provides feedback to the central nervous system on the current length of the muscle which innervates and to any alteration in length that happens. This was hypothesized that muscle spindle feedback from the ankle dorsiflexion motion played the most substantial part in proprioception relative to another muscular receptor that crosses the ankle joint. However, because of the multi-planar range of movement at the ankle joint, there is not 1 group of muscles that is responsible for this. It helps to explain the relationship between the ankle and balance.
Axis of rotation of the ankle joint
- Although many authors consider the ankle joint is to be a simple hinge joint, there has been some suggestion that the tibiotalar joint is multi-axial, and due to the internal rotation motion that occurs while performing dorsiflexion motion, and the external rotation motion that occurs in plantarflexion movement. However, there is evidence that suggests the tibiotalar joint is indeed a uniaxial joint, still, the simultaneous movement observed occurs as a result of its oblique axis.
- The axis of rotation motion of the ankle joint complex in the sagittal plane occurs around the line passing through the medial malleoli and lateral malleoli it is known as a dotted line.
- The coronal plane axis of rotation (motion)occurs around the intersecting point between the malleoli and the long axis of the tibia bone in the frontal plane.
- The transverse plane axis of rotation occurs around the long axis of the tibia bone intersecting the midline of the foot. Studies of the talar bone anatomy have highlighted the difference in radial curvature in the medial as well as lateral surfaces, indicating that the axis of rotation of the ankle joint will vary as movement changes.
- Based on this thing, a number of authors have proposed multiple axes of the movement for the ankle joint while doing normal activity. Since the 1950s, it has been observed that there is a plantarflexion motion axis, which points upwards means toward the lateral side of the ankle joint, and a dorsiflexion motion axis which is inclined means downwards and laterally. These are parallel in the transverse plane. However, it can differ by up to 30 degrees in the coronal plane. Movement about this axis cannot occur simultaneously, and the transition between axis while doing motion is around to occur close to the neutral(normal) position of the joint.
- The axis of the subtalar joint is an oblique axis, running from the posterior to anterior forming an angle of approximately 40 degrees with the anteroposterior axis in the sagittal plane, and forming an angle of 23 degrees with the midline of the foot in the transverse plane. In a similar way to the tibiotalar joint, the subtalar joint creates multiple movements while doing plantarflexion and dorsiflexion, resulting in pronation and supination movement.
Forces in the ankle joint
- The ankle joint complex takes a force of approximately 5 times body weight while stance in normal walking, and up to 13 times body weight while doing activities, namely running.
- The ankle joint moment obtained from gait analysis observes the motion at the ankle joint. Demonstrates the dorsiflexion moment while heel strike as the dorsiflexors eccentrically contracts to control the rotation of the foot onto the floor and prevent the foot from slapping the floor. While the second phase, there is a plantar flexor moment as the ankle dorsiflexors contract eccentrically to permit forward progression of the shank over the foot.
- While the third phase, the plantarflexion moment continues with the plantar flexors contracting concentrically towards toe-off motion. As the walking speed increases, the ankle kinetic patterns endure similar in profile. However, with greater magnitudes. The ankle joint moments gained from gait analysis do not commonly report ankle moments in the coronal or even transverse planes because of the complex nature of the motion of the ankle joint complex and also the high variability between persons.
- Ankle power varies when the major muscles acting on the ankle joint complex are either absorbing or generating power during gait. The negative rates correspond with the power absorption from the plantar flexors eccentrically contracting while doing the heel strike and ankle rocker phases as well.
- The maximum joint power of the ankle joint complex is originated at approximately 50 percent of the gait cycle while the forefoot rocker phase corresponds with the power origination of the plantar flexors essential for the lower limb to propel the body forward means toward toe-off motion.
- Experimental studies have explained that approximately 83 percent of the load is shifted through the tibiotalar joint, with the remaining 17 percent transferred through the fibula. The amount of the load transmitted through the fibula bone varies, with increased loading occurring while dorsiflexion. The load is carried across the tibial-talar joint, between 77 percentages as well as 90 percent is applied to the talar dome, with the remaining load divided across the medial and lateral aspects. This load division is a function of both ligamentous forces as well as positional effects, with the medial facet experiencing the highest load while doing an inversion, and the lateral facet exposed to the highest load while doing eversion.
Clinical importance of the ankle joint
- Both age and gender are influential factors that may change the range of motion of the ankle joint. One study compared gender differences within various age groups, between 20years and 80 years of age. This demonstrated that as compared to males, younger females (20–39 years old)have a higher ankle range of motion, but with increasing age, older females showed 8 degrees less dorsiflexion movement and 8 degrees greater plantar flexion movement as compared to male individuals in the oldest age group (70–79 years old). Additionally, there was a reduction in range of motion for both genders in the oldest age groups.
- Degenerative processes of the foot and the ankle joint, namely post-traumatic osteoarthritis may have an effective effect on the biomechanical function of the ankle joint. post-traumatic osteoarthritis is more prevalent compared to the hip joint and knee joint.
- There have been a number of studies have done to explore the effect of ankle surgery on ankle biomechanics. Therefore, common surgical interventions for end-stage of ankle osteoarthritis include total ankle replacement or even ankle arthrodesis, both this, aimed at improving the pain & function of the patient.
- Joint replacement has been transformative for hip osteoarthritis and knee osteoarthritis still for total ankle replacement, problems remain. Gait analysis can be used as an effective objective substance for measuring the functional(active) performance of the patients following surgical intervention. Patients with the last stage of ankle osteoarthritis typically walk more slowly, have a decreased ankle range of motion, and have altered ankle movements as compared to healthy controls.
- Traumatic injury
- As compared to all major joints, the ankle joint is the most commonly injured. If the outside aspect of the foot is twisted under the leg
- While in a weight-bearing position, the lateral ligament, especially the anterior talofibular ligament’s portion, is subject to tearing (maybe sprain) as it is weaker than the medial ligament & resists inward rotation of the talocrural joint.
- Fractures: An accident or any injury can cause a break in bones (fracture). Ankle fractures start from mild to severe. A broken ankle can cause ankle swelling, redness, and pain, for example, Stress fractures. The talus bone is most commonly fractured by 2 methods. The first one is hyperdorsiflexion, where the talus neck is forced against the tibia bone and fractures. The second one is that jumping from a height – the body is fractured as the talus bone transfers the force from the foot to the lower limb bones.
- Ankle Sprains: Sprained ankle is the most common cause of ankle pain. An ankle sprain happens when any ligaments stretch or tear. Sprained or twisted ankles happen when the ankle rolls forcefully out of its normal(neutral) position.
- Tendonitis: Irritated, and inflamed tendons are a soft-tissue injury called tendonitis. Tendon connects muscle to the bone. Sometimes, a tendon might be torn, such as an Achilles tendon rupture.
- Arthritis: Pain, redness, and stiffness in the ankle joint can result from ankle arthritis. Arthritis happens if cartilage (tissue in joints that cushions bones) breaks down. The breakdown can cause bones to rub together. Arthritis occurs owing to overuse, injuries, and obesity, and it is mostly seen in people over the age of 65. Many types of arthritis can affect the ankle joint. The common types include rheumatoid arthritis, osteoarthritis, and Septic arthritis.
- Flatfoot: A very low arch (or even no arch at all) can cause pain and swell in the ankle and feet. Many times, childrens’ feet arches do not develop normally as they grow up, resulting in the flatfoot condition.
- Gout: A type of arthritis, in which gout results from an increase of uric acid in the whole body. Mainly, uric acid leaves the body in urine. Extra(over) amount of uric acid origin crystals which is settled in the joints. The gout in the ankle joint is really painful.
- Infection: many types of infection, such as cellulitis, can cause swelling, redness, and pain in the ankle joint. A bone infection is called osteomyelitis.
Physiotherapy treatment
- Various types of physiotherapy treatment can be helpful to prevent some diseases and help to cure various types of problems, namely after fracture, sprain, and many more.
Electrotherapy
Ultrasound: Waves of ultrasound may reduce pain, and swelling.
wax therapy: Reduce pain.
TENS (Transcutaneous electrical nerve stimulation): For reduction of pain.
Exercises
- Daily exercise may help the patient to release pain and strengthen muscles.
- Physiotherapist starts treatment with stretching exercise, which relax the muscles and relieve the stress.
Stretching exercise:
- Achilles tendon stretching and plantar fascia stretching
- In the beginning, loop a towel around the ball of the foot and pull back towards the body with the knee straight. Hold this position for 30 seconds and do this exercise for each foot as well as do this exercise 3 times per session.
- Achilles stretch
- Embark by standing near a wall or other support, like a chair, with the patient’s hands on the wall at eye level. Tell the patient to place one leg a step behind and his/her other leg, then keep the patient’s one leg heel on the floor and then bend his/her right knee until the patient feels a stretch in his/her left leg. Tell the patient to hold this stretching position for 30 seconds, and repeat this 3 times on each leg.
- Towel stretch
- Tell the patient to sit on the ground with the patient’s legs extended straight out in front of the therapist. Then, wrap a towel around the patient’s toes on both feet. Then, pull back slightly till the patient starts to feel a stretch at the very lower point of his/her feet and the back of his/her lower legs. Tell the patient to hold this stretching position for 30 seconds and repeat this exercise 3 times per session.
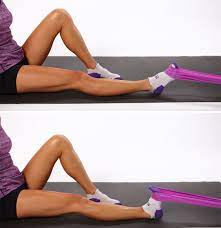
- Band stretch
- Tell the patient to sit with a towel or band, then wrap the band or towel around the affected foot. Then, firmly hold each end of the towel with the patient’s hands. Slowly turn the ankle inward, as the patient is facing the sole of his/her other foot. After that pull up with the other hand side of the towel to deepen the stretch. Repeat it 3 times per session and hold this position 30 seconds per repetition.
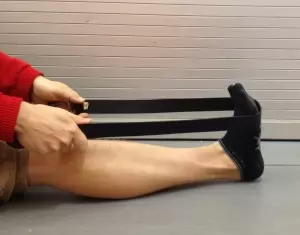
Band Stretch
- Standing calf stretch
- To embark with, take a position like a stand facing the wall or even other support, like a chair, with one foot in front of the patient by
around 12 inches. Then, Point the patient’s toes up. Tell the patient slowly lean forward until he/she feels the stretch in the back of his/her lower leg. Tell the patient, to hold this stretch for the next 30 seconds and repeat 3 times per session. - Standing soleus stretch
- Tell the patient to stand a few feet away from the wall or another support, but face it. Place one leg in the back with the patient’s heel flat on the ground. The patient’s other leg can come forward toward the support. Tell the patient gradually turn the foot on the patient’s injured leg inward toward the other foot. After that tell the patient to slightly bend his/her front knee into the support till he/she feels a stretch in his/her injured leg. Hold this stretch for 30 seconds as well as repeat 3 times per session.
- Cross leg ankle stretch
- Tell the patient to sit comfortably with his/her affected leg crossed over the other knee. Then, hold his/her unaffected foot with his/her hands. After that use his/her unaffected hand to bend his/her affected toes and ankle downward, like he/she is pointing his/her toes. The patient feels this stretch on the front ankle and foot. Hold this stretching position for 30 seconds and repeat this exercise three times per session.
- Chair Pose
- Tell the patient to stand straight, then give the command to inhale as he/she can. Raise both of his/her arms overhead, and palms inward. As he/she exhales, tell the patient to bend both of his/her knees slightly, working toward getting his/her thighs parallel with the floor. The patient’s torso should make a right angle with the tops of the thighs. After that try holding this pose for the next 30 seconds. To come out of it, take a breath and straighten your knees.
Range of motion exercise:
- Dorsiflexion
- This exercise patients can do in supine or sitting or even standing positions. Firstly, tell the patient to bend the foot toward his/her face side as long as he/she can. Do this exercise ten times per session without holding at the endpoint. Do it three times per day.
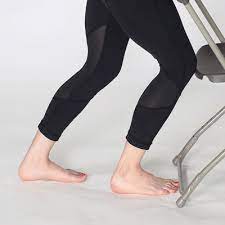
- Plantarflexion
- The patient can do this exercise supine or sit in a chair position. Firstly, tell the patient to bend their foot away from his/her body as far as he/she can. Repeat this exercise ten times per session without hold, and do it three times per day.

- Inversion
- According to the patient’s preference, he/she can take a supine or sitting position for doing this exercise. Tell the patient to turn the foot inward as far as the patient can. Repeat this exercise 10 times without any hold, and do it three sessions per day.
- Eversion
- The patient can do this exercise in a supine or sitting position. Tell the patient to turn the foot outward as far as he/or she can, but without hold. Repeat this exercise ten times per session, three sessions the patient should do per day.
- Alphabet
- The patient can do this exercise in a sitting position. Tell the patient to draw the letters of the alphabet in the air by imaging with his/her foot. Then do lowercase and uppercase letters, and make sure to move from the ankle joint, not from the hip joint. Repeat this exercise ten times per session without holding at the endpoint. Do it three sessions per day.
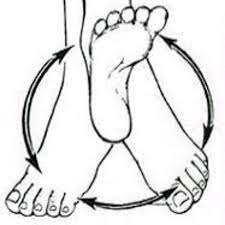
- Ankle circles
- In this exercise, the patient can do supine or in a sitting position. Tell the patient to turn his/her ankle around slowly in a circular motion to the left, then the right. Warn the patient to keep movements small and focus on only using the foot and ankle, not the entire leg. For circles, try doing ten in each direction with each foot. Do three sessions per day.
Isometric exercise
- Dorsiflexors isometric strengthening exercise
- This isometric resistance exercise assists to strengthen the anterior tibialis muscle, this muscle in the front of the shin. Firstly, tell the patient to take a supine position. Then therapist must place his/her hand on the dorsal surface of the foot. After that therapist should give the command to the patient to do dorsiflexion(move foot upward) but the therapist will not allow any foot movement and hold this position for the next ten minutes and then release the foot. Progress from mild to moderate to severe. Do this exercise ten times per session, and three sessions per day.
- Planterflexors isometric exercise
- Firstly, give the command to the patient to take a supine position. After that physiotherapist must place his/her hand on the dorsal surface of the foot. Then, the therapist should give the command to the patient to move their foot down but the physiotherapist would not allow any foot movement and tell the patient to hold this position for the next ten minutes and after that release the foot. Progress from mild to moderate to severe. Do this exercise ten minutes per session, and three sessions per day.
- Invertors isometric strengthening exercise
- First of all, give the command to the patient to take a supine position. After that therapist should place his/her hand on the medial surface of the foot. Then, the therapist should give the command to the patient to do inversion(move your foot inward) but the therapist would not allow any foot motion, and hold this position for ten minutes and then release the foot slowly. The progression starts from mild to moderate to severe. Do this exercise ten times in one session, and three sessions per day.
- Evertors isometric strengthening exercise
- Firstly, tell the patient to take the supine position. Then, the therapist must place his/her hand on the lateral surface of the foot. After that, the therapist should give the command to the patient to move their foot outside but the therapist will not allow any foot movement and give commands to the patient to hold this position for ten minutes, then release the foot and take a neutral position. The progression starts from mild to moderate to severe. Do this exercise for ten minutes in one session, and do three sessions in one day.
Strengthening exercise
- Seated foot, heel raise, and hold
- Start with the patient’s feet flat on the ground. Tell the patient to raise both the heels off the ground and then hold for ten seconds before placing the heels back on the floor. Next, raise the toes off the ground and hold for ten seconds before placing the toes back on the ground. Repeat this exercise ten times per session. Do three sessions per day.
- Toe bend and hold
- Start with the feet flat on the ground. Tell the patient to raise both the heels off the ground, and hold for ten seconds before placing the back heels on the floor. Then, tell the patient to raise their toes off the ground and hold them for ten seconds before putting them on the floor. Repeat this exercise ten times per session and three sessions per day.
- Big toe lift and hold
- Tell the patient to lift only the big toe while keeping the other toes on the floor, with the patient’s feet on the floor. Hold this position for the next ten seconds and relax the feet. Repeat this exercise ten times per session and do three sessions per day.
- Towel pickup
- First of all, the therapist should place a towel on the floor in front of the chair. Then, tell the patient to pick up the towel by grabbing it with the toes, but the heel should be fixed on the floor. Repeat this exercise 10 times per session and three sessions per day. After that, this exercise should be performed by adding a small weight to the towel.
- Dorsiflexors strengthening
- Tell the patient to sit in a chair and tie the theraband around something that would not move, such as a heavy table. Then tell the patient to extend the lower leg and wrap the other end of the theraband around the top of the foot. Give the command to do dorsiflexion of the foot, with the theraband resisting the movement. At the endpoint hold this position for 10 seconds. Repeat this exercise 10 times per session and three sessions per day.
- Planterflexors strengthening
- Tell the patient to sit in a chair and tie the theraband around something that would not move, such as a table or chair. After that tell the patient to flex the lower leg and wrap the other end of the band around the posterior surface of the foot. Tell the patient to do plantarflexion of the foot means tell him/her to move his/her leg down, with the band resisting the motion. At the endpoint hold it for 10 seconds. Repeat this exercise 10 times in one session and do three sessions per day.
- Invertors strengthening
- Tell the patient to sit on a chair and tie the band around a thing that would not move, namely a table or chair. Then, give the command to the patient to extend the lower leg and wrap the other end of the theraband around the posterior to the anterior surface of the foot. Tell the patient to do inversion of the foot means that tell the patient to move his/her leg inward, with the theraband resisting the movement. At the endpoint hold this position for ten seconds. Repeat it ten times per session and do three sessions in one day.
- Evertors strengthening
- Tell the patient to sit on a chair and tie the band around something that will not move, namely a table or chair. Then, tell the patient to extend the lower leg and wrap the other end of the theraband around the posterior to the anterior surface of the foot. Tell the patient to do eversion of the foot means tell the patient to move his/her leg outward, with the band resisting the movement. At the endpoint hold this position for 10 seconds. Repeat this exercise 10 times per session and do three sessions in one day.
- Step-ups
- Start with the affected foot on the lower stair and the unaffected foot on the floor. Straighten the knee so the patient can lift up the affected leg, then put it down. Repeat this exercise ten times per session and do three sessions per day.
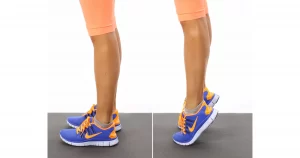
- Heel raises
- Sit in a chair or stable table with your feet flat on the ground. Even though raising the patient’s heels up slowly, keep the toes on the floor, and Lower heels back down. Repeat this exercise 10 times per session, and do three sessions per day. As muscles initiate to gain strength, do this exercise in a standing position also. When the patient is stronger, still do this exercise in standing with just one (you are injured) foot.
- Marble pickup
- First of all sit up straight in a chair, with the feet flat on the ground. Place an empty bowl as well as a bowl of 20 marbles on the ground in front of the feet. Then, pick up each marble and place it in the empty bowl using merely the toes of one-foot marble. Repeat this exercise 20 to 40 times per session and do three sessions per day. Also, do this exercise with the other legs too.
Balance and coordination Exercises
The last step for the patient is to work on balance as well as coordination
- Balance
- Tell the patient to do this balance exercise near a chair, table, or on a doorway-like stable surface, hence the patient will have proper support if the patient needs it. Try to straight stand on a chair or table means a stable base and balance on just the patient’s affected leg for 30 seconds. Repeat this exercise ten times per session. Try to do this for up to 1 minute. Repeat two sessions per day. In the upgrade stage, do this exercise in the same way but with your eyes closed position.
- Heel walk
Firstly, the therapist should give commands to the patient that walks forward and backward as far as the patient can on heels. - Tippy toe walk
First of all, give the command to the patient that walks forward and backward as far as the patient can on their toes.
Single-legged balance
Tell the patient to lift one foot off the floor, and try to balance on one foot for as far as the patient can, up to nearly 30 seconds. Repeat on the other side too. Repeat it ten times per session. Repeat three sessions per day.

- Single-Leg Balance with motion
- Tell the patient to stand up with their legs directly under their body as they feel the most natural. Then, shift the body weight from both feet onto just 1 foot. Give the command to the patient to lift the leg without weight on it off the ground, slowly. Instead of keeping the lifted leg still, like the single-leg balance, move the leg. Swing the leg back behind the body and then in front, bend the knee and lift it up towards the waist, and then back it down. If the patient is unsteady due to the movement, use the chair for added support.
- Walking Lunges
- Lunges may seem like an effortless exercise, still, for those who experiencing ankle pain, even this type of motion can be a struggle. Take this exercise easy and slow to avoid extra strain or sprain on the lower half. Tell the patient to take the standing position. Take one step forward as well as bend this leg till the knee is at a 90-degree of angle. Allow the back knee to dip down to the floor. Hold this position for thirty seconds. Firstly, use the leg in the back to step in. Repeat on the other leg too.
- Single-leg Roman Deadlifts
- For those patients who start to see improvements in their rehabilitation, try to add additional weights to it. If the patient feels ready to handle the additional weight, Stand up with the weight (preferably a kettlebell) in one hand. Then, slowly bend at the waist joint, with maintaining control of the body. Lower the weight down towards the ground (using one hand) while the patient raises the leg (on the same side of the body) off the floor. After that slowly return to a standing position. Do ten repetitions on each side per session, and three sessions per day.

- Single-leg Step Downs
- Tell the patient to stand on a stable surface, or elevated surface, namely a box, step, or bench. Hold affected foot off the edge. Bend the knee of the supporting leg, and bring the foot back up to its elevated position. Drive the weight through the heels. Repeat ten times on each side of the body. Do three sessions per day.


26 Comments