Stiffness of ankle
Table of Contents
What is Stiffness of ankle?
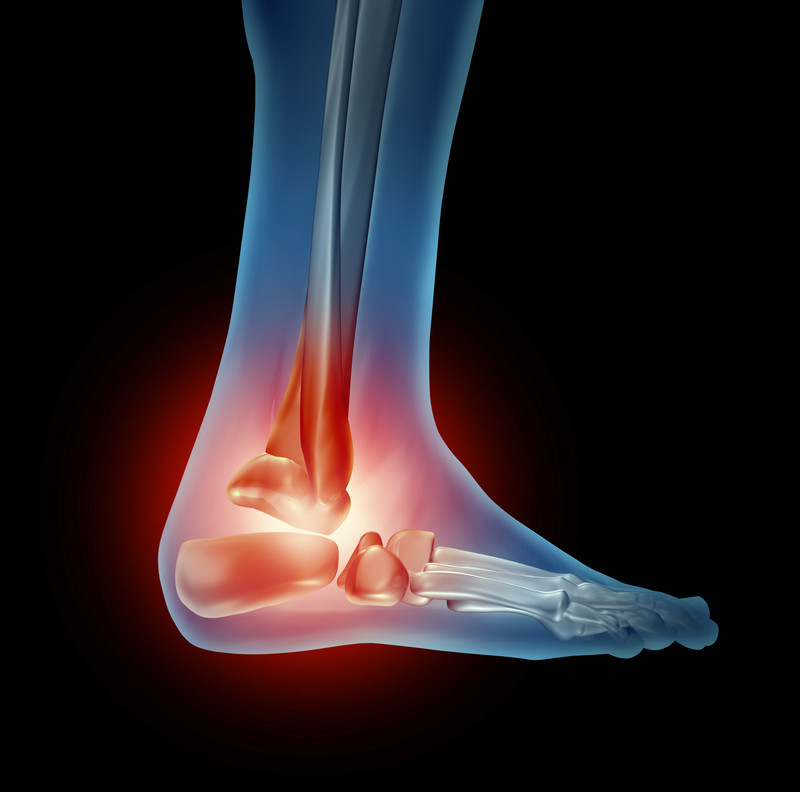
The ankle joint stiffness is a sensation of difficulty moving the joint or even the apparent loss of range of motion of the ankle joint. It often accompanies joint pain and/or swelling. The ankle joint damage including stiffness can also happen following injury to a joint.
Stiffness following surgery or even injury to the ankle joint develops as the progression of four stages: bleeding, edema, granulation tissue, and fibrosis. The ankle joint stiffness may be either the symptom of the pain of moving the joint, the symptom of loss of range of motion, or even the physical sign of a decreased range of motion.
Loss of motion: The patient notices that an ankle joint (or many joints) does not move as far as it used to or needs to. Loss of movement is a feature of more advanced stages of arthritis including osteoarthritis, rheumatoid arthritis as well as ankylosing spondylitis.
Loss of range of motion (sign): An examining medical professional notes that the range of motion of the ankle joint is less than normal. Routine examination by the orthopedic surgeon or rheumatologist will often pay particular attention to this. A range of motion can be measured as well as compared to another side and normal ranges. This sign is associated with the same causes as a symptom. In extreme cases when an ankle joint does not move at all it is said to be ankylosed.
The ankle stiffness is the restriction of an ankle joint that happens suddenly or as a result of the operation. It results in significantly restricted mobility in the ankle joint. Ankle stiffness is also known as ankylosis, owing to abnormal adhesion as well as the rigidity of the bones of the ankle joint, which can be the result of injury or even disease. The rigidity can be complete or even partial and maybe because of inflammation of the tendinous or muscular structures outside an ankle joint or of the tissues of the joint itself.
When the structures outside an ankle joint are affected, the term “false ankylosis” has been used in contradistinction to “true ankylosis”, in which the disease is within a joint. When inflammation has caused the joint ends of the bones to be fused, ankylosis is termed osseous or even complete and is the instance of synostosis.
Anatomy of the ankle joint
What two joints make up the ankle?
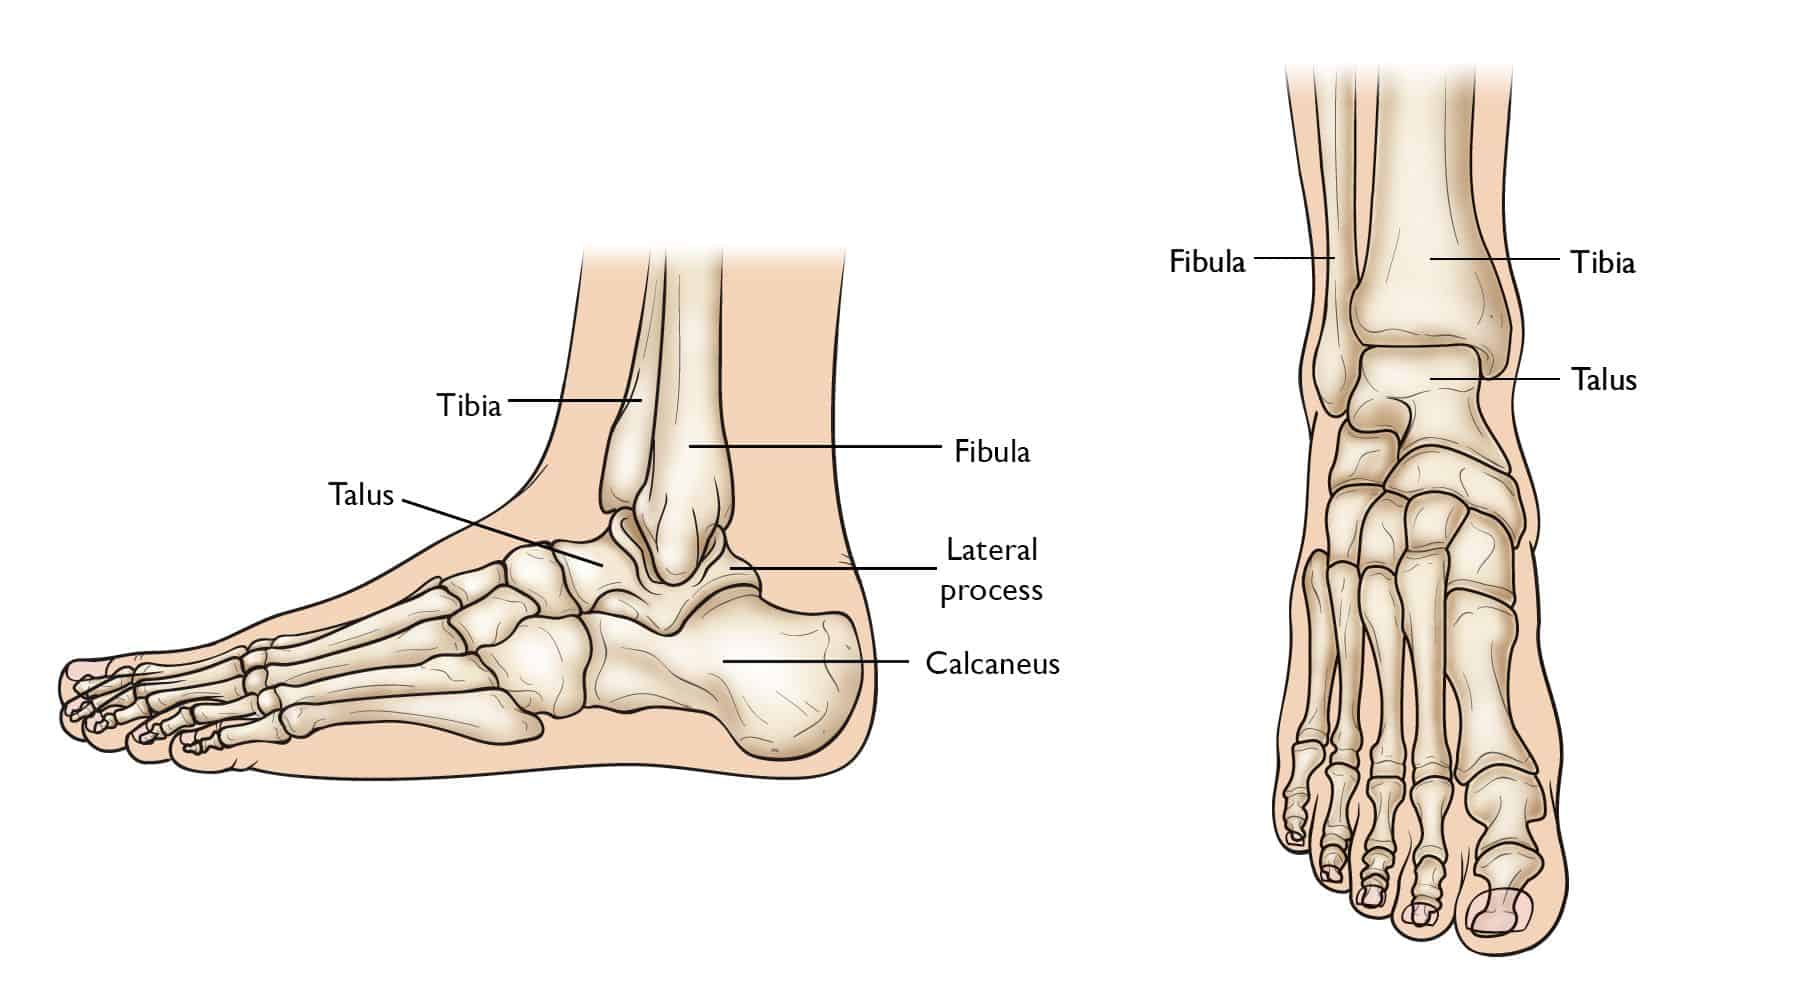
- Even though it is typically referred to as the single joint, an ankle is mainly two joints: A true ankle joint is composed of three bones: The first one is the tibia, the larger as well as stronger of the two lower leg bones tibia and fibula as well, that forms the inside part of an ankle.
Articulating Surfaces
- An ankle joint is a complex joint that is formed by three bones; the distal end of a tibia as well as its medial malleolus, a lateral malleolus of a fibula (bones of the leg), and the trochlear surface of a talus(bone of the foot). All of the articular surfaces of the ankle joints are secured with hyaline cartilage.
- There are mainly three articulations in an ankle joint:
- A tibia, as well as fibula(leg bones), are bound together by strong tibiofibular ligaments(at the distal end of the lower leg). Together, a tibia, as well as a fibula, form the bracket-shaped like socket, covered in hyaline cartilage. It is (socket) known as the mortise.
- A body of the talus fits snugly into a mortise formed by the bones of a lower leg. The articulating part of the talus is wedge-shaped that is broad anteriorly, as well as narrow posteriorly.
- The main action of the ankle joint is to allow the foot for dorsiflexion as well as plantar flexion, along with some degree of inversion and eversion with subtalar and midtarsal joints as well. An ankle joint also acts as the shock absorber as the heel strikes the floor while the first phases of gait.
Stages of the stiff ankle joint
- Stage 1 – Minor
Minor wear and tear in the ankle joint, as well as little to no pain in the affected area. - Stage 2 – Mild
More noticeable bone spurs in the ankle joint, an affected area that feels stiff after sedentary periods. Patients can need the brace. - Stage 3 – Moderate
Cartilage in an affected area starts to erode, as well as the ankle joint becomes inflamed and causes discomfort while doing normal activities. - Stage 4 – Severe
A patient is in a lot of pain, the cartilage is almost completely gone, leading to the inflammatory response from the ankle joint. Overgrowth of bony spurs (osteophytes) can cause severe pain.
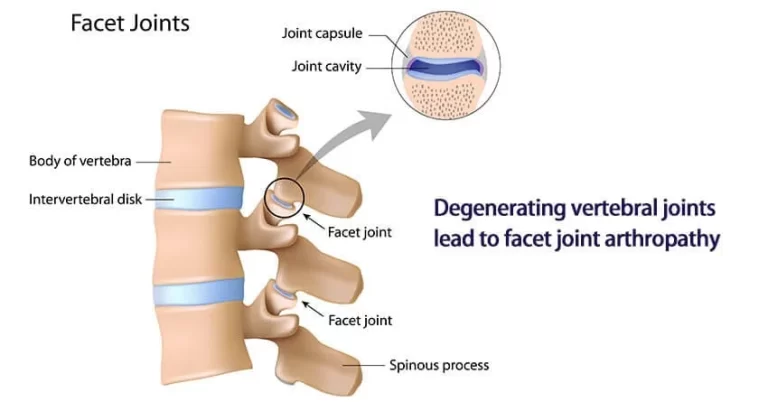
Joint capsule
- Superiorly, a capsule of the ankle joint is fixed with the margins of the articular surfaces of the tibias’ medial malleolus as well as the lateral malleolus of a fibula. Inferiorly, a capsule is fixed with the margins of a talar trochlear surface. An ankle joint capsule is relatively weak as well as thin. However, strengthened medially as well as laterally by strong collateral ligaments. An internal aspect of a capsule of the ankle joint is lined by a synovial membrane which projects into the distal tibiofibular joint up to the interosseous tibiofibular ligament.
Ligaments
- The main stabilizing ligaments of the ankle joints are:
- Medially a deltoid ligament consists of four ligaments that form the triangle connecting a tibia to a navicular, the calcaneus, and the talus bones, which stabilize the ankle joint while eversion of the foot as well as prevent subluxation of the ankle joint.
- The anterior, as well as posterior tibiotalar ligaments, connect the tibia to a talus.
- The last two ligaments of a triangle are the talonavicular ligament which attaches to a navicular anteriorly as well as the talocalcaneal ligament which attaches to a calcaneus inferiorly, Laterally the ankle has stabilization from three separate ligaments, the anterior and posterior talofibular ligaments, and the calcaneofibular ligament as well.
- The anterior talofibular ligament connects the talus bone to the fibula bone, the weakest of the three lateral ligaments and hence the most frequently injured.
- The posterior talofibular ligament connects the talus to the fibula bone.
The calcaneofibular ligament connects the fibula bone to the calcaneus bone inferiorly.
The lateral ligaments stabilize an ankle and serve as a guide to direct ankle movement by attaching the lateral malleolus to the bones below the ankle joint. They are responsible for resistance against inversion as well as internal rotation stress.
Pathophysiology of the ankle joint stiffness
The Four Stages of Stiffness of the ankle joint
Bleeding
Edema
Granulation Tissue
Fibrosis
- Stage 1: Bleeding
The first stage, happening within minutes to hours following articular surgery or even trauma, is caused by bleeding, that results in distension of a joint capsule and swelling of the periarticular tissues.
Depending on the single joint, the capsule achieves the maximum potential volume at a certain joint angle.
In the knee, the maximum capacity of a joint capsule has been found to happen at approximately 35° of flexion; in the elbow, it happens at 80° of flexion. Any attempt to flex or even extend the joint beyond its position of maximum capacity, when a joint and/or periarticular tissues are markedly swollen, creates extremely high hydrostatic pressures within joint and periarticular tissue as well.
Associated with these high pressures are severe pain as well as a marked increase in resistance to motion.
Immediately following injury or even surgery to a joint, the natural tendency is to hold a joint in the position of maximum articular volume to minimize painful stretching of a joint capsule and the pressure of an intra-articular hematoma as well. - Stage 2:- Edema
The second stage of stiffness, which happens during the next few hours or even days, is very similar but progresses less rapidly. It is because of the edema, caused by inflammatory mediators which are released by platelets as well as dead and injured cells.
These mediators cause nearby blood vessels to dilate as well as leak plasma, resulting in swelling of periarticular tissues, thereby diminishing their compliance. With swollen and less compliant tissues surrounding the joint, it becomes physically more difficult to move and movement becomes more painful.
Up to this point, stiffness, as well as loss of periarticular tissue compliance, are simply because of the accumulation of the fluid. In the next two stages, fluid is replaced by extracellular matrix deposition, marking the significant transition. - Stage 3:- Granulation Tissue
The third stage mainly consists of the formation of the granulation tissue of the region. This happens during the first few days or even weeks following trauma or surgery. Granulation tissue is the highly vascularized, loosely organized tissue with material properties somewhere between the highly organized blood clot and loose areolar fibrous tissue as well.
As this granulation tissue appears within and surrounding the ankle joint, the stiffness previously owing to fluid accumulation becomes increasingly because of the deposition of a solid extracellular matrix. - Stage 4:- Fibrosis
The fourth or last stage of stiffness represents fibrosis. During this phase, the granulation tissue matures, forming dense, rigid scar tissue. The scar tissue has a high concentration of collagen type I fibers in the extracellular matrix.
Causes of Stiffness of the ankle
Causes behind stiff ankle joint include:
- Osteoarthritis: This age-related form of arthritis develops because of the breakdown of the protective cartilage which assists in cushioning our joints as well as allows for smooth motion. Arthritis may develop in the ankles owing to a large amount of weight as well as pressure the ankles absorb on the daily basis. Without cartilage to protect them, the ankle joints may easily become inflamed and stiff, particularly in the morning time.
- Achilles tendinitis: This could be a more likely cause if stiffness is more pronounced in one ankle than another. Whereas the inflamed Achilles tendon is more closely associated with ankle pain, it can also be the source of stiffness after a night of sleep.
- Sprained ankle: Like tendinitis, the ankle sprain will also likely be accompanied by the pain, but stiffness is another symptom of inflamed ankle ligaments, as well as this, maybe more pronounced in the morning time.
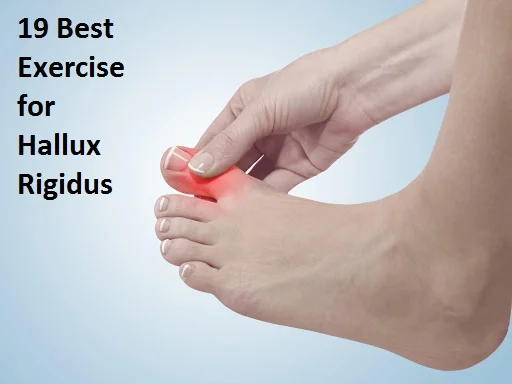
- Gout: This is one type of arthritis. Gout is a condition that happens when uric acid does not dissolve into blood like it is supposed to. Instead, it crystallizes, as well as accumulates in the joints, and can cause pain and stiffness. A patient can first notice pain in a big toe that may then move to an ankle, heel, and other joints.
- Bruising: If a patient has severely bumped an ankle, such as from a hit or kick, it can cause pain while walking. The pain from this type of trauma will go away in 2 to 3 weeks but after that, the chances of having stiff joints become enhanced.
- Sprain or strain: Sprains, and strains, occur from the injury to the softer tissues in an ankle. This injury could be a strained ligament or even a tendon. Most commonly, the sprain or strain will heal in a few weeks, which may stiff after a few weeks if the treatment cannot be done.
- Fractures or breaks: If the bone is broken or even fractured, a patient will likely have intense pain while walking. Breaks are usually accompanied by swelling, redness, or loss of feeling in the toes of the affected ankle. Ankle breaks may take weeks to heal completely as well as usually require the doctor’s care.
- Achilles tendon rupture:
Typically happens if a patient is active or participating in a vigorous sport. It happens when an Achilles tendon is torn or even ruptured. This is most likely due to an injury, such as falling or accidentally stepping into the hole while walking or even running on the uneven floor. - Heel bursitis:
The bursa is the pocket and a lubricant that acts as the cushion around the ankle joint. There is the bursa which protects the back of the ankle as well as the heel. This helps to shield the Achilles tendon, which can burst with overuse or strenuous activity. - Achilles tendinitis:
Along with a rupture, Achilles tendinitis is caused by injury to the Achilles tendon. Overuse or intense strain may cause a band that connects a calf muscle to the heel bone to stretch, which results in tendinitis. - Infection
The previous cut, trauma, or surgery may allow bacteria to enter into the skin or even joint around an ankle and cause the infection. - Plantar fasciitis
It is the band of tissue (fascia) that connects a heel bone to the base of the toes, which supports an arch of the foot and absorbs shock while walking. Tension, and stress on a fascia, may cause small tears in the ankle joint. Repeated stretching and tearing of a facia can irritate or even inflame it, although the cause remains unclear in many cases of plantar fasciitis. - Pseudogout:
It is a form of arthritis characterized by a sudden, painful swelling in the ankle joint. Pseudogout condition can give pain for days or even weeks. It is a condition most commonly affects the ankle and knee joints, which is also called a calcium pyrophosphate deposition disease or CPPD, the most common term “pseudogout” was coined for a condition’s similarity to gout. In this crystal deposits within a joint cause both conditions, although the type of crystal differs for each condition. This is not clear why crystals form in the joints as well as can cause pseudogout. However, the risk increases with age. - Rheumatoid arthritis:
Is condition is a chronic inflammatory disorder that can affect more than just the joints. In some patients, it can damage a wide variety of body systems, that includes the skin, eyes, lungs, heart, as well as blood vessels. The autoimmune disorder, rheumatoid arthritis happens when an immune system mistakenly attacks the own body’s tissues. Unlike wear as well as tear damage of osteoarthritis, rheumatoid arthritis affects the lining of the joints, causing painful swelling which can eventually result in bone erosion and joint deformity. An inflammation associated with the condition of rheumatoid arthritis mainly damages other parts of the body. while new types of medications have increased treatment options dramatically, even severe rheumatoid arthritis can still cause physical disabilities like joint stiffness. - Septic arthritis
Septic arthritis is a painful infection in a joint that can come from germs that travel through the bloodstream from the other part of the body. Septic arthritis may also happen when a penetrating injury, such as an animal bite or even trauma, delivers germs directly into an ankle joint. Individuals who have artificial joints also have a risk of septic arthritis. - Stress fracture
Tiny cracks of the bones may happen. This is caused by a repetitive force, often from overuse of an ankle joint and bones, such as repeatedly jumping up as well as down or even running long distances. Stress fractures may also occur from normal use of a bone that is weakened by a condition like osteoporosis. This type of fracture is more frequent in the weight-bearing bones of the lower leg and the foot. Track and field athletes as well as military recruits who carry heavy packs over long distances are at the highest risk, still, anyone can sustain a stress fracture. If the person starts a new exercise program, for instance, a patient may be developed stress fractures if a patient does activity too much too soon. - Chronic Ankle Instability
Chronic ankle instability happens when a patient had gone through multiple sprains or even other injuries to the ankles. As a result of the injuries to an ankle, the ligaments surrounding an ankle joint, whose job is to keep an ankle stable and supported, are weakened. Over time, it can lead to aching and pain when a patient is walking, given this is a time that these ligaments should be engaged to assist stop the ankle from rolling. If a patient has unstable ankles, he/she may notice that the pain is worse when he/she do walking over an uneven floor. - Sinus Tarsi Syndrome:
The sinus tarsi are simply a term for a tunnel between two of the bones just below an ankle, towards the outer side of the foot. Sinus tarsi syndrome describes the situation where damage to a tunnel, or the ligaments, blood vessels, or nerves in or around a tunnel, may result in some symptoms namely pain, burning, tingling or weakness in an ankle. - Bunions:
Bunions are important for the deformity of a big toe in the foot. Patients with bunions have the toe that points outwards as well as bumps on the inner side of the foot. As the bunion gets bigger and calluses form, it may force a patient to shift weight to avoid pain when a patient will walk. - Lupus:
It is a condition is an autoimmune disease that causes a body to attack healthy tissue. Patients with lupus often have joint pain, including ankle pain. It is from lupus-associated arthritis and tendinopathy. Furthermore, lupus may cause kidney problems which lead to fluid buildup in the joints. There is no cure for lupus, but, a doctor can give medications to a patient to keep it under control. A healthy diet, as well as regular exercise, can also assist. - Chronic lateral ankle pain
There are various causes for ongoing pain on the outside of the ankle joint. This is most likely due to the ligament which did not heal properly after the sprain as well as remains weak. This makes an entire joint less stable and leads to more injury and pain.
Signs and symptoms of Stiffness of ankle
- An ankle joint is the meeting of the bones of a leg as well as the foot and is responsible for the up and down movement of the foot.
In popular usage, an ankle is often considered to be the ankle joint plus the surrounding anatomic region, mainly including the lower end of the leg and the start of the flat part of the foot. - Pain in an ankle can result from inflammation or even injury to any of the structures in this part, including the bones, joint space, cartilage, ligaments, tendons, or muscles as well.
- Ankle pain can be associated with other symptoms which include
- Ankle swelling,
- Bruising,
- Redness,
- Numbness or even tingling,
- Instability,
- Burning pain,
- Inability to bear weight on the ankle,
- Stiffness,
- Weakness.
Normal Gait cycle
- A gait cycle is the time interval between the two successive occurrences of one of the repetitive events of locomotion. A human gait cycle is divided into two separate regions representing a period when the foot is in contact with the ground, which is known as a stance phase, and a period when a lower limb is not in contact with the ground, which is known as a swing phase.
- During the time of a stance phase, the foot contacts the ground, the mass of a body is supported, and then, the body is propelled forward during the later stages of stance. A stance phase has five events:
- Heel-strike (HS),
- Foot-flat (FF),
- Midstance (MS),
- Heel-off (HO), and
- Toe-off (TO).
- Heel-strike: A beginning instant of a human gait cycle is represented as the start contact of one foot with the ground, usually termed heel strike or even foot-strike.
- Foot-flat: The instant that the rest of the foot comes down in contact with the ground as well as usually is where full body weight is being supported by a lower leg.
- Midstance: This phase is defined when the center of mass is directly above an ankle joint center. This is also used as an instant when a hip joint center is above an ankle joint.
- Heel-off: Heel-off occurs when a heel begins to lift off the ground in preparation for the forward propulsion of a body.
- Toe-off: Toe-off happens as the last event of contact while the stance phase
- Various events of a gait cycle remarkably occur in similar sequences and are independent of time. That is why a gait cycle is commonly described in terms of percentage, instead of a time elapsed. The initial heel strike is designated as 0% as well as the subsequent heel strike of the same foot is 100% (0–100%). While the normal gait cycle, hip, knee, as well as ankle joints experience a range of motion. Illustrates these ranges of motion during different speeds. Hip movement may be categorized into two basic motions:
- The first is hip extension, which happens during a stance phase and has the primary role of stabilization of a trunk.
- The second is hip flexion, which happens during the swing phase. While the stance phase, the knee is the basic determinant of lower limb stability, as well as in the swing phase, knee flexibility is a primary factor in the freedom of the limb to advance. At midstance, total body weight is transferred into the flexed knee. A range of motion of the ankle is not large, but, it is critical for progression as well as shock absorption during stance.

- The gait cycle can also be divided according to functional phases by Inman, Ralston, & Todd, 1981; Levine et al., 2012; Perry and Burnfield, 2010; Rose and Gamble, 2005). From this approach, the following phases are noted:
- Initial contact (0%–2% of the gait cycle): This phase is the start of the loading response or the weight acceptance. It is also the starting of the stance phase as well as the first part of the initial double-leg support period. During the initial contact phase, a person will also have the presence of any impact phenomena presented very early in the floor reaction forces.
- Loading response (2%–12% of the gait cycle): This phase is the rest of the initial double-leg support phase. While this phase, a person continues as well as completes the task of weight acceptance. In terms of the anterior-posterior force, a person has the minimum (or maximum) braking peak.
- Midstance (12%–31% of the gait cycle): Midstance is the first part of the single-leg support period. Stability is the major concern as the base of support will reduce significantly as well as the center of gravity(COG) will move to its highest point through leg extension and kinetic energy transfers to the potential energy. The end of this period is distinguished by the occurrence of the “valley” or even the local minimum of the vertical floor reaction force.
- Terminal stance (31%–50% of the gait cycle): Terminal stance is the second part of the single-leg support period. Stability is still the concern and the heel strike of the other foot. The center of gravity(COG)“falls” from its highest point as well as potential energy transfers to the kinetic energy.
- Preswing (50%–60% of the gait cycle): It is the terminal double-leg support period as well as it is our second loading period. In terms of the vertical ground reaction force(VGRF), a person has the occurrence of the second loading peak or even the second local maximum or the second “hump.” During this phase time, a person also has our maximum propulsion peak in the words of the anterior-posterior force as a person prepares to propel our foot off the floor.
- Initial swing (60%–73% of the gait cycle): This phase is the first part of the swing period, as well as our major concern, is to clear the ground by flexing the entire leg. The overall flexion reduces the moment of the leg of inertia as well as increases the angular velocity of the swinging leg.
- Midswing (74%–87% of the gait cycle): This phase is the second part of the swing period, as well as our major concern, is that the opposite or contralateral leg is in single support with a small base of support thus stability is the concern. A person is also getting ready for the upcoming foot contact at the end of our swing.
- Terminal swing (85%–100% of the gait cycle): This phase is the third and last phase of the swing period, as well as our major concern, is our upcoming foot contact.
Diagnosis:
- While the physical examination, a doctor will examine a patient’s ankle, foot, and lower limb. A doctor will touch an area of skin around the injury to check for proper points of tenderness as well as move the foot of a patient to check a range of motion and to know what positions cause discomfort or even pain in the ankle.
If an injury is severe, a doctor can recommend one or more of the following imaging scans to find out the broken bone or to evaluate in more detail the extent of ligament damage: - X-ray:-While the X-ray, a small amount of radiation passes through a patient’s body to produce images of the bones of a whole ankle joint as well as surrounding areas. It is the best for finding bone fractures.
- Magnetic resonance imaging (MRI):-Magnetic resonance imaging is use radio waves as well as a strong magnetic field to produce detailed cross-sectional or even 3-D images of the soft internal tissue of the ankle joint, including ligaments.
- Computed tomography scan:- Through computed tomography scans a doctor can get more detail regarding the bones of an ankle joint. CT scan takes X-rays from many angles as well as mixes them to make cross-sectional or even 3-D images.
- Ultrasound(US):- The ultrasound uses sound waves to produce images of an ankle. These images may assist a doctor to find out the condition of the ligament/tendon when the foot is in different positions.
Treatment of Stiffness of ankle
Medical treatment
- In most cases of ankle pain although mild or severe painful condition, pain relievers are used, such as ibuprofen (Advil, Motrin IB, others) or naproxen sodium (Aleve, others), or acetaminophen (Tylenol, others).
Physiotherapy treatment of Stiffness of ankle
Electrical modalities
- Ultrasound(US): The US is mainly used for the tender points to reduce pain.
- Transcutaneous electrical nerve stimulation(TENS): This modality is used for pain relief, reducing redness, and for the reduction of swelling.
- Wax therapy: This method mainly helps the patient with the reduction of pain, and when the pain will decrease the range of motion will increase.
Exercise for Stiffness of ankle
Mobilization exercise to improve Ankle mobility
Ankle joint mobilizations are used to reduce pain, increase range of motion, and treat joint dysfunction after the injury.
- Ankle Anterior Glide
Purpose: Improve plantarflexion
Position: Prone with the foot hanging just over an edge of a table; after that, stabilizing hand under an anterior distal tibiofibular joint; mobilizing hand on the posterior calcaneus, just distal to the joint line.
Mobilization: Apply a downward, anteriorly directed force to the calcaneus during applying gentle traction. - Ankle Posterior Glide
Purpose: Improve dorsiflexion
Position: supine with the foot just over an edge of a table; stabilizing hand under a posterior distal tibiofibular joint; mobilizing hand grasps anterior ankle just distal to the joint line.
Mobilization: Apply the downward, posteriorly directed force to an ankle while applying gentle traction.
- Intertarsal as well as Tarsometatarsal Plantar glide
Indication: To increase an accessory movement of plantar flexion necessary for supination
Position of a patient as well as hand placement; supine lying with flexion of the hip as well as a knee joint. The alternative position is high sitting with feet supported on a physical therapist’s lap.
Position of a physical therapist and hand placement: The proximal bone is fixed with an index finger on a plantar surface of a bone.
A physical therapist is positioned at a lateral side of the foot to mobilize the foot on the medial aspect of the lower limb. A proximal hand is placed over a dorsal aspect of the foot with fingers on the medial side of the lower limb.
The mobilization is provided by a distal hand using the thenar aspect wrapping around a plantar aspect.
Mobilization: A distal bone is pushed in a plantar direction from the dorsum of the foot. - Intertarsal and Tarsometatarsal Dorsal Glide
Indications: To improve a component of dorsal gliding during performing pronation.
Patient’s position: Prone lying with knee flexion of 90 degrees. Position of a physical therapist with the hand placement. If a lateral part (lateral tarsal joint like cuboid) is to be mobilized a physical therapist has to stand on a medial side as well as the fingers are wrapped around a lateral side. A physical therapist places the second metacarpal joint against the bone to be mobilized. Mobilization: A force is given in a dorsal direction from a plantar surface.
Massage therapy to reduce stiffness
- Massage therapy is an age-old technique that uses both stretching as well as pressure in the rhythmic flow. Massage therapy helps in reducing tension in specific muscles which have built up due to injury or stress. Massage therapy helps a patient to get the blood flowing which speeds up the recovery process at any level.
- Some benefits of massage:-
- Reducing stress as well as increasing relaxation.
- Decrease pain and muscle soreness as well as tension.
- Improving circulation, energy, and alertness.
- Lowering heart rate and blood pressure.
- Improving the immune function of a body.
- Effleurage (Stroking) massage
The hands are passed rhythmically as well as continuously over the patient’s affected part, in one direction and straight only, to increase blood flow in that direction, stretching tissues, relaxing a patient and aiding the dispersal of waste products. This technique involves the stroking motion of the hands sliding over the skin of the wrist and is always the first as well as last technique applied in a massage session. Effleurage can be used with varying tempo as well as pressure according to the stage of a situation and whatever the desired effect of the massage is. - Petrissage (Kneading) technique
Affected skin is lifted up, pressed down as well as squeezed, pinched, and rolled. Alternate squeezing, as well as relaxation of the tissues, stimulates the local circulation which may have a pain-relief effect with some muscular disorders. The basic motion is to compress, pick up, and after that release soft tissues. It is generally used when a deeper effect than effleurage is wanted, and it is techniques include: - Squeezing
To start with, a physical therapist tells the patient to take a relaxed position, supine or sitting. Next, the therapist applies
the squeezing technique, the circular hand stroke is used for the whole foot for this technique using the circular motion. The therapist will bring the tissue between the patient’s two hands lifting it up as well as away from the body. - Picking up
First of all, a physical therapist gives the command to the patient that takes a relaxed position, and after that pickup, the technique applies equal pressure on the sides of the tissue as well as lifting it away from the body. The hands of the therapist are parallel to the limb being treated to avoid hyperextension of the outer foot. - Shaking
The vibration or shaking massage technique is the fine, gentle, trembling motion performed with hands or fingers.
Shaking may be used to stimulate soft tissues in the body. Vibration movements may help stimulate nerves, relieve muscular tension as well as decrease stress. This technique is performed by hand, the therapist should put one hand on another hand and place it on an affected side while stroking gives vibrations. - Rolling
The skin rolling technique is performed using the thumb as well as fingers to pull the skin away from the tissue. It is then rolled forwards in constant movement to help separate it from being stuck in muscle. Skin rolling can be used around areas of scar tissues to help break them down. - Wringing
The wringing consists of lifting as well as squeezing the muscle forwards and backward motion. Wringing is used to treat tight muscles, for relaxation as well as part of a post-event massage. The benefits of the technique are relief of tight muscles, decreased stiffness as well as increased recovery.

Stretching exercise
Stretching exercises may improve the performance in physical activities, reduce the risk of injuries, assist the joints to move through their full range of motion, improve muscle blood flow, enable the muscles to work most effectively, as well as improve the ability to do daily activities.
- Achilles tendon as well as plantar fascia stretch
To start with, the therapist tells a patient to take the loop of the towel around the ball of the foot as well as pull back towards the body, during this the knees should be straight. Hold it thirty seconds in one repetition. Do three repetitions per session. Do three sessions in one day. - Sitting plantar fascia stretching exercise
To begin with, tell a patient to cross the foot over the contralateral knee, as well as the base of the toes put on the ground, and gently pull back until a patient feels a stretch along the underside of the foot. Hold this position for thirty seconds in one repetition. Repeat three times per session. Do three sessions in one day. - Standing calf stretch
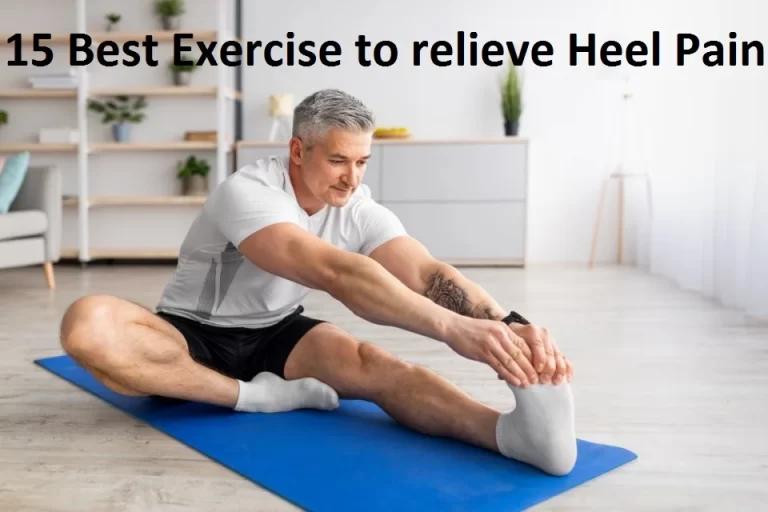
A patient must stand facing the wall and then put both hands on a wall that is in front of the patient. Place one foot anterior to the opposite foot with the anterior foot about 30cm away from a wall, and keep the back knee straight with a back heel flat on the ground. Slowly bend the front knee till a patient can feel the stretch in the calf of the back or lower leg, after holding for 30 seconds return to the neutral position. Repeat three times in one session. Do three sessions in one day.

- Deep calf stretch
The patient must stand on the step with the heel hanging off the edge. The patient may allow holding onto something for support, then allow the patient heels to drop towards the ground and feel the stretch in the calf muscles and Achilles tendon. Hold this position for 30 seconds. Repeat this exercise 3 times in one session. Do three sessions per day. - Evertors stretching
- To do an inward towel stretch: Tell a patient to sit with a towel or even a band around the affected foot. Firmly hold each end of a towel with the patient’s hands. Slowly turn an ankle inward, like a patient is facing the sole of the foot to the opposite. Then, pull up with the unaffected hand side of a towel to deepen the stretch. Repeat on the other side if a patient has a problem. Hold for 30 seconds in one repetition. Do three repetitions in one session. Do three sessions in one day.
- To do the outward towel stretch (invertors stretching)
To embark with, ask a patient to sit with a towel or band around the affected foot. Firmly hold each end of a towel with your hands. This time, slowly turn an ankle outward, like a patient is facing the sole of the foot to the affected foot. Next, pull up with the left-hand side of the towel to deepen the stretch. Repeat on the other side too if any tightness is present. Try to hold these stretches for thirty seconds as well as repeat them three times per session. Do three sessions in one day. - Standing calf stretch to dial-up a tension in the stretch, a patient can move to the standing position:
To start with, stand facing the wall or other support, like a chair, with one foot in front of a patient by around 12 inches. Point the toes up. Slowly lean forward until a patient feels a stretch in the back of the lower leg. Hold it for thirty seconds. Do three repetitions per session. Do three sessions in one day. - Cross leg ankle stretch
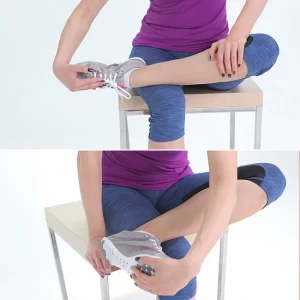
To begin with, the therapist should tell a patient to sit comfortably with an affected leg crossed over the unaffected knee. After that, hold the right foot with the hands, next use the right hand to bend the left toes and ankle downward, like a patient is pointing the toes. A patient should feel this stretch on the front of an ankle as well as the foot. Hold it for thirty seconds. Repeat three times in one session. Do three sessions per day.
- Chair Pose
To embark with, stand tall in the tadasana position. Inhale as a patient raise both of the arms overhead, palms inward. As a patient exhale, bend both of the knees slightly, working toward getting the thighs parallel with the ground. The torso should make the right angle with the tops of the thighs. Try holding this action for 30 seconds. To come out of it, inhale as well as straighten the knees. Do three repetitions in one session. Do three sessions per day. - Seated foot and heel raise exercise
To start with, the feet are flat on the floor. Raise both heels off the floor and hold for 30 seconds before placing the heels back on the floor. Then, raise the toes off the floor as well as hold them for thirty seconds before returning them to the floor. Repeat three times in one session. Do three sessions in one day. - Toe bend
To begin with, tell a patient to place the heels on the floor with the toes pointing in the air in front of the patient. Bend the toes downwards as well as hold for 30 seconds, then relax. After that, bend the toes upwards as well as hold for 30 seconds before relaxing. Repeat three times in one session. Do three sessions per day. - Toe raise, point, as well as curl
Toe raise, point, and curl exercise have three steps as well as it will assist strengthen all parts of the feet and toes. To do this exercise: The patient should sit up straight in a chair, with the feet flat on the floor. After that, keeping the toes on the floor, raise the heels. Stop when only the balls of the feet remain on the ground. Hold it for thirty seconds before lowering the heels down. For the next stage, raise the heels and point the toes so that only the tips of the big and second toes are touching the floor. Hold for thirty seconds before lowering the heel down. For the last stage, raise the heels and curl the toes inward so that only the tips of the toes are touching the floor. Hold it for thirty seconds. Build flexibility and mobility by repeating each stage three times in one session per day. - Big toe stretch
Keeping a wide range of motion in the big toe is mandatory. A big toe stretch exercise also has three steps as well as it is designed to stretch and relieve pain in the toes from wearing tight shoes. To do this exercise: Tell a patient to sit up straight in a chair, with the feet flat on the floor. Bring the left (affected) foot to rest on the right thigh. Using the fingers, gently do stretching of a big toe up, down, as well as to the side. Keep a big toe in each position for 30 seconds. Repeat it three times per session before switching to the other foot. Do three sessions in one day. - Toe splay
First of all, doing the toe splay exercise can improve control over the toe muscles. The patient can do it on both feet at once or even on alternate feet, it totally depends on which the patient finds more comfortable.
To do this exercise: the therapist should give the command to the patient to sit in a straight-backed chair, with the feet gently resting on the ground. Spread the toes apart as long as possible without straining. Hold this position for thirty seconds. Repeat this exercise or motion three times per session. Do three sessions per day. Once an individual has built up their strength, he/she can try looping a rubber band around the toes. This will provide resistance and make the exercise more challenging in a later stage. - Golf ball roll
Rolling the golf ball under the foot may assist a patient to relieve discomfort in the arch and easing pain associated with plantar fasciitis. To do this exercise: Ask a patient to take a sitting up straight in the chair position, with the feet flat on the floor. Next, place the golf ball or another small, or hard ball on the floor next to the feet. Lay one foot on the ball and move it around, pressing down as hard as is comfortable. A ball should be massaging the bottom of the injured foot. Continue for 30 seconds, the frozen bottle of water can be a soothing alternative if there are no suitable balls available. Do this exercise three times in one session. Do three sessions in one day. - Ankle Stretch exercise
Place one end of the sports cord over the right foot at an instep (not the tip of the shoe). Extend the right leg and pull up the Sportcord until a patient has the desired resistance and difficulty. Extend the right toe downward, as if a patient is pressing on the gas pedal in the car. Hold extended for thirty seconds. Repeat three times in one session. Do three sessions per day.
Passive ankle range of motion exercise
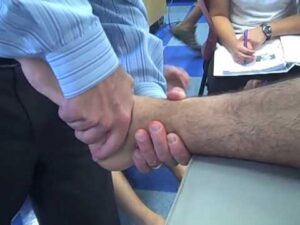
- Passive dorsiflexion
To start with, a physical therapist should tell the patient to take a relaxed position, namely lying on the bed with the knee straight and the foot should out of the bed. Next, the therapist cups the heel with one hand as well as places another hand on the bottom of the foot. After that, the physiotherapist gently pushes the foot up so that the toes point toward the head of the patient. Perform it ten times per session. Do three sessions per day. - Passive plantarflexion
To begin with, the therapist should give the command to the patient, to take a relaxed position, such as lying on the bed with the knee straight and the foot should out of the bed. After that, the clinician cups the heel of the affected foot with one hand as well as places the other hand on the bottom of the foot. Next, the physical therapist gently pushes the foot down so that the toes point away from the body. Do it ten times in one session. Do three sessions in one day.

- Passive inversion
To embark with, ask a patient to take a comfortable position, namely lying on a bed with the knee straight the foot should out of a bed. After that, a therapist cups the heel with one strong hand and places another hand on the bottom of the foot. Next, a therapist gently turns the foot inward, not allowing a leg to rotate. Do it ten times per session. Do three sessions per day. - Passive eversion
To start with, a physical therapist should give a command to a patient to take a comfortable position, such as lying on a bed with the knee straight as well as the foot should out of a bed. After that, the therapist cups the heel with one strong hand as well as places another hand on the bottom of the foot. Then, a therapist gently turns the foot outward but does not allow the leg to rotate. Do it ten times in one session. Do three sessions in one day. - Passive toe extension
To start with, sit on the chair, and place the foot to be exercised across the opposite knee. Then, the patient place one hand on the heel as well as the other hand on the toes, then, move the toes up towards the shin of a tibia as far as comfortable. Do it ten times per session. perform three sessions per day. - Passive toe flexion
To begin with, the therapist tells the patient to take a sitting position on the chair as well as put the foot to be exercised across the opposite knee. After that, the patient put one hand on the bottom of the heel and another hand on the toes, then moves the toes down towards the shin of the tibia as far as comfortable. Do it ten times per session. Perform three sessions per day.
Active-assisted ankle range of motion exercise
- Active-assisted inversion
To start with, tell a patient to take a relaxed position, namely lying on the bed with the knee straight as well as the foot should be out of the bed. Next, the therapist cups the inner border with one strong hand as well as places another hand on the bottom of the foot. Next, the therapist gives the command to a patient that moves the foot inward as far as the patient can, and when a patient is not able to move the foot inward in between the motion, the clinician assists the patient to reach the full range of the motion. Perform it ten times per session. Do three sessions per day.

- Active-assisted eversion
To embark with, tell the patient to take a relaxed position, such as lying on the bed with the knee straight and the foot should be out of the bed. Next, the clinician cups the inner border with one strong hand and places another hand on the bottom of the foot. After that, the physical therapist gives the command to the patient that moves the foot outward as far as the patient can, as well as when the patient is not able to move the foot outward in between the action, the therapist assists the patient to reach the full range of the motion. Do it ten times per session. Do three sessions in one day. - Active-assisted dorsiflexion
To begin with, tell the patient to take a relaxed position, namely lying on the bed with the knee straight and the foot should out of the bed. After that, the clinician cups the heel with one strong hand as well as places another hand on the bottom of the foot. Next, the physical therapist gives the instruction to the patient that moves the foot upward as far as the patient can, as well as when the patient is not able to move the foot during the movement, the clinician assists the patient to reach the full range of the dorsiflexion. Thus, the toes move towards the face. Perform it ten times in one session. Do three sessions in one day. - Active-assisted plantarflexion
To embark with, ask the patient to take a relaxed position, namely lying on the bed with the knee straight as well as the foot should out of the bed. Next, the therapist cups the heel with one strong hand as well as places another hand on the bottom of the foot. Then, the physical therapist gives the command to a patient that moves the foot down as far as the patient can, and when a patient is not able to move the foot between the movement, the examiner assists the patient to reach the full range of the motion. Be careful about the thing which is, the toes should be away from the face. Do it ten times per session. Do three sessions per day. - Active assisted toe flexion
To embark with, tell a patient to take a relaxed position, namely lying on the bed with the knee straight and the foot should out of the bed. Next, the clinician cups the toes with one strong hand as well as places another hand on the bottom of the foot. After that, the physical therapist gives the command to the patient to move the toes toward the floor as far as the patient can, and when the patient is not able to bend the toes in between the movement, the physical therapist assists the patient to reach the full range of the toe movement. Do it ten times in one session. Do three sessions one day. - Active-assisted toe extension
To start with, ask the patient to take a relaxed position, such as lying on the bed with the knee straight as well as the foot should out of a bed. After that, the therapist places one hand on the backside of the toes and places another hand on the bottom of the foot. Then, the clinician gives the command to a patient to move the toes upward meaning toward the face side as far as the patient can, and when the patient is not able to extend the toes in between the movement, the therapist helps the patient to reach the full range of the toe extension movement. Do it ten times in one session. Perform three sessions per day.
Active range of motion exercises
- Active ankle circles
This exercise may help with the range of motion. A patient can do ankle circles from either a sitting or lying position:
To start by turning the ankle around slowly in circles to the left, after that the right side. A patient can find this exercise easier to try drawing the alphabet in the air with an affected foot. Lead it with the big toe. Keep the motion small initially as well as focus on only using the foot and an ankle, not the whole leg. For circles, try doing ten in every direction with the affected foot. If a patient is doing the alphabet, complete three sessions of it on the injured foot per day.
- Toe extension
To do this exercise: Tell the patient to take the sit-up straight in the chair, with the feet flat on the floor. Next, place the affected foot on the normal thigh. After that, pull the toes upward toward the ankle. There should be a stretching feeling along with the bottom of the foot as well as the heel cord. Massaging an arch of the foot while stretching will help ease tension as well as pain. Repeat this exercise ten times in one session. Do three sessions per day. - Toe flexion
To begin with, tell a patient to take the sit-up straight on the chair, with the feet flat on the floor. After that, place the affected foot on the unaffected thigh. Then, move the toes down toward the floor. Do ten repetitions in one session. Do three sessions in one day. - Active dorsiflexion
To embark with, ask the patient to take a relaxed position, such as lying on the bed. After that, the therapist should give the command to the patient to bend the foot toward the face side meaning upward as far as the patient can. Perform ten repetitions in one session. Do three sessions in one day. - Active plantarflexion
To embark, tell a patient to take a comfortable position, namely supine on the bed. Then, a physical therapist should give a command to a patient to move the foot away from a body meaning downward as long as a patient can but at the endpoint, a hold should not be taken. Do ten times per session in one set. Do three sessions in one day.

- Active ankle inversion
First of all, tell the patient to take a relaxed position, such as lying on the bed. Next, the physical therapist should give the command to a patient to move the foot inside as far as the patient can. Repeat ten times in one session. Do three sessions in one day. - Active ankle eversion
To start with, the therapist should tell a patient to take a relaxed position, such as lying on a bed. After that, the clinician should give the command to the patient to move the foot outside as far as the patient can. Do ten repetitions in one session. Do three sessions in one day. - Heel raises
To perform heel raises, start with the feet flat on the ground. Next, point the toes and lift the heels off the ground. Repeat ten times in one session. Do three sessions in one day.
Strengthening exercises of the ankle
- Dorsiflexors strengthen with the theraband
To begin with, tell a patient to sit on the chair and tie the theraband around a stable surface that would not move, like a heavy table. Extend the lower leg and wrap the other end of the band around the top of the foot. Do flexion of the foot, with a theraband resisting the movement. Hold for ten seconds. Repeat ten times in one session. Do three sessions in one day for strengthening. After 5 days increase the weight from 500 gm to 1 kg as well as also increase repetitions. - Planterflexors strengthening with the theraband
To start with, tell a patient to sit on the chair. Next, take one side of the band in each hand, as well as wrap it around the ball of the affected foot, and stretch the leg out in front of you. After that, extend the foot away from the face. Hold this position for the next ten seconds. Repeat ten times per session. Do three sessions in one day.

- Inversors strengthen with the use of the theraband
To embark, tie the band around the leg of the chair or with the table on the same side of the affected foot. Next, wrap the other end of the band around the inside of the affected foot. Then, try to turn the foot inside. Hold it for the next ten seconds. Do this exercise ten times per session. Do three sessions in one day. When a patient is adapted with the 500gm weight, increase weight to 1 kg and increase the repetitions. - eversors strengthening exercise with the use of the theraband
To embark with, tie a band on the leg of the chair opposite to an affected foot. Next, wrap the other end around the outside
of an affected foot. After that, a physical therapist should give a command to a patient that tries to turn the foot outside, as well as hold for ten seconds, repeat it ten times per session. Do three sessions in one day. When a patient is adapted to the 500gm weight, increase the weight to 1kg and increase the repetitions. - Towel pickup exercise
To begin with, place the towel on the floor in front of a chair. Next, tell a patient that with the heel on the ground, try to pick up the towel by grabbing it with the toes. Repeat the exercise ten times in one session. Do three sessions in one day. This exercise can be increased by adding a small weight to a towel. When a patient is able to pick up a towel ten times, increase the number of repetitions by 10 to 15 to 20. - Step-ups
To start with, an affected foot on the bottom stair as well as the good foot on the ground. Straighten the knee so he/she can lift herself up on an affected leg, then put it down. Repeat it ten times per session. Minimally three sessions per day. When a patient is comfortable with the low repetition, then increase the number of repetitions. - Heel raises
First of all, tell a patient to sit on a chair with their feet flat on the ground. Although raise the heels up slowly, keep the toes on the ground. Lower the heels back down. Repeat it ten times per session, minimally three times in one day. As muscles start to gain strength, do this exercise in embarking position also. When the muscles are stronger still, do this standing on just the affected foot. - Single leg stands
Standing on one foot is another best way to exercise ankle eversion and the challenge to ankle stability in general.
To start with, a patient with a foot drop who has enough strength as well as the balance can try to stand on their affected leg for ten seconds at a time. Be sure to hold onto a back of a chair for stability so that a patient does not fall. The risk of falling is greater in a patient with foot drop, so does skip this step. Do it ten times in one session. Perform three sessions in one day. - Toe-to-heel rocks
Stand in front of a table, chair, wall, or even another stable object a patient can hold onto for support. Rock the weight forward and rise up onto the toes. Hold the position for ten seconds. Next, rock the weight backward onto the heels as well as lift the toes off the ground. Hold for ten seconds. Repeat the sequence ten times in one session. Do three sessions in one day. - Marble Pickup
To begin with, a physical therapist should tell a patient to sit on a chair with both feet flat on the floor. Place 20 marbles and the bowl on the floor in front of a patient. Using the toes of the affected foot, pick up each marble and place it in the bowl. Repeat till a patient has picked up all the marbles.

- Ball lift
To embark with, sit on a chair with both feet flat on the floor. Place the small round object on the floor in front of a patient
(about the size of a tennis ball). Hold the object between the feet as well as then slowly lift it by extending the legs. Hold for ten seconds then slowly lower. Repeat ten times in one session. Do three sessions per day. - Toe splay
Doing the toe splay exercise may increase control over the toe muscles. People may do it on both feet at once or on alternate feet, mainly depending on which a patient finds more comfortable.
To do this exercise:
To start with, sit in the straight-backed chair, with the feet gently resting on the floor. Next, spread the toes apart as far as
possible without straining. Hold it for ten seconds. Repeat the movement ten times in one session. Do three sessions in one day. Once a patient has built up their strength, he can try looping the rubber band around the toes. This will provide resistance and make the exercise more challenging. - Toe curls
Doing toe curls builds up the flexor muscles of the toes and the feet, and increases overall strength.
To do this exercise:
To start with, sit up straight in a chair, with the feet flat on the floor. Next, lay the small towel on the floor in front of the body, with the short side facing the feet. After that, place the toes of one foot on the short side of a towel, and try to grasp the towel between the toes as well as pull it toward oneself. Repeat it ten times in one session. Do three sessions in one day. To make the exercise more challenging, try weighing down the opposite end of the towel with an object.

- Sand walking
Walking barefoot on sand is the best way to stretch and strengthen the feet as well as calves. This is the best exercise in general owing to the sand’s soft texture makes walking more physically demanding.
To do this exercise:
To start with, head to the beach, a desert, a volleyball court, or any other location with sand. Remove the shoes and socks. Walk as far as possible. Try increasing the distance slowly over time to avoid overexerting the muscles in the feet as well as calves. - Seated ball lift
To begin with, the therapist tells a patient to sit on a chair with their feet flat on the floor. Next, place a small ball (e.g., a tennis ball) on the floor in front of a patient. Grab the ball using both the feet and slowly extend the legs to lift it. Hold for ten seconds, lower back to the ground. Repeat ten times in one session. Do three sessions in one day. - Toe-to-heel rocks
Rock the weight forward to rise onto the toes and hold the position for ten seconds. Then, rock the weight backward as well as lift the toes off the ground and hold for ten seconds. Repeat ten times in one session. Do three sessions in one day. For more of the challenge, a patient can do this standing on one leg. A patient may want to do it near a wall or with the chair or counter in front of the physical therapist so a physical therapist can hold on for added support.
Home exercises
- Rest: First of all, try to avoid putting weight on an affected foot or even ankle. Do not exercise during this time, instead of trying to gently move the affected part from time to time to stop the area from getting stiff even more.
- Ice: Place the ice pack or even frozen vegetables, covered in a damp cloth, on the painful(affected) area for ten minutes every two to three hours.
- Compression: Wrap the crepe bandage around the affected part. It should be tight enough to support an affected part, but not so tight that it restricts the blood flow. If a bandage is hurt the toe place the small piece of cotton wool between the skin as well as the bandage and the next toe, then tape them together.
- Elevation: Elevate the foot to reduce swelling.
Self-stretching technique for reduction of the stiffness
The stiff ankle joint mobilizations are used to reduce pain, enhance range of motion, as well as treat joint dysfunction after the injury; they should not be used in patients with bone fractures, osteoporosis, bone disease, extreme inflammatory conditions, or even pathologies with neurological involvement. Manual ankle joint mobilizations are typically graded on a 5-point scale.
Grades I to IV are used to describe the management movements: grade I joint mobilizations are small-amplitude motions performed at the beginning of the range of motion; grade II joint mobilizations are large-amplitude motions performed within the resistance-free part of a range of motion; grade III joint mobilizations are large-amplitude motions performed into resistance or even up to the limit of a range of motion; as well as grade IV joint mobilizations are small-amplitude motions performed well into tissue resistance.
Typically, grade I as well as II joint mobilizations are used to modulate pain, while grades III, as well as IV, are used to increase joint mobility. Grade V treatments consist of the small amplitude quick thrust and may also be known as manipulation. Manipulations, as well as mobilizations, should only be performed by a professional who is licensed and/or trained to perform manual therapy.
The self-mobilization ankle technique may be used while subacute as well as in chronic phases of healing when pain is no longer the limiting factor as well as the goal of treatment is to increase posterior talar glide and decrease talocrural restrictions. Self-mobilizations should not be used in patients with suspected fracture, hypermobile joints, neurological signs, or even in people who are not comfortable performing the self-mobilization intervention.
A talocrural joint self-mobilization technique is performed in the weight-bearing staggered stance (lunge) position with the lead ankle being mobilized. During an ankle self-mobilization technique, the strap is placed across the anterior aspect of a talocrural joint as well as secured to the stable object, located in the back of a patient. The purpose of the strap is to provide the fulcrum during the self-mobilization to facilitate the posterior glide of the talus on an ankle mortise.
While a patient is in the neutral position, they are asked to translate the knee forward through pain-free ankle dorsiflexion. A strap is used as the fulcrum for the mobilization and is similar to the use of the foam roll or even the towel when performing the self-mobilization of the thoracic spine.