
Shoulder Dislocation
Table of Contents
Overview
A Shoulder Dislocation is an injury in which the upper arm bone comes out of the cup-shaped socket that is part of the shoulder blade. The shoulder is the body’s most pliable joint, which assembles it more likely to dislocate.
If a person suspects a dislocated shoulder, look for medical attention. Most individuals regain full use of their shoulders within some time. Although, once the shoulder dislocates, the joint might be prone to repeat dislocations.
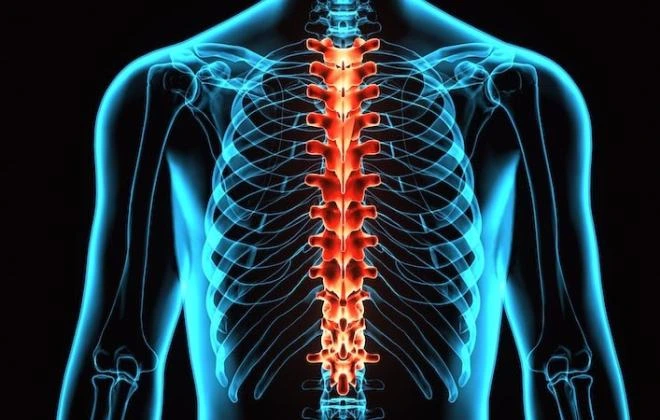
Clinically Relevant Anatomy
Ligaments of the shoulder
- The shoulder is a synovial joint collected of three bones: humerus, scapula, and clavicle.
- In general, stability is brought off through static and dynamic restraints.
- Generally, the head of the humerus is leftovers centered in the glenoid fossa.
- This permits the joint surfaces to line up congruently with one another.
- In addition, the glenohumeral joint reaction force is contained within the glenoid arc.
Bankart Lesion
- In spite of the fact that, in the case of shoulder dislocation, there is a disturbance in the net glenohumeral joint reaction force.
- This causes the humeral head to fall outer side of the glenoid arc.
- The static restraints are made up of joint conformity, adhesion/cohesion, finite joint volume, and ligamentous stability incorporating the labrum.
- The inferior glenohumeral ligament(IGHL) is the first ligamentous restraint to anterior glenohumeral translation, especially with the arm abducted and externally rotated.
- As an outcome of this anterior translation, the anterior inferior labrum and capsule may detach.
- This is known as a Bankart lesion.
- The dynamic restraints are composed initially of the rotator cuff muscles, but also incorporate the scapular stabilizer musculature and the biceps.
Mechanism of Injury / Pathological Process
Shoulder dislocations may take place in the anterior and posterior. The most common is because of trauma from a direct posterolateral force on the shoulder. The person can also come up with a direction of instability that may predispose them to dislocation. In this case, the muscles are not prepared or the force “overwhelms” the muscle. Its incidence differs between 15.3 and 56.3/ 100 000 individuals a year for primary shoulder dislocation.
Anterior Shoulder Dislocation
- An anterior dislocation report for 97% of recurrent or foremost-time dislocations.
- It is the most usual dislocation and is caused by the arm being positioned in an immoderate amount of abduction and external rotation.
- In this situation, the inferior glenohumeral complex work as the primary restraint to anterior glenohumeral translation.
- Due to a lack of ligamentous support and dynamic stabilization, the glenohumeral joint is most vulnerable to dislocation in the 90° abduction and 90° external rotation.
- Hold-up structures that can be deficient in an anterior dislocation are the anterior capsule, long head of biceps, subscapularis, and superior and middle glenohumeral ligaments.
- When there is a thinning in the anterior capsule, it may come up between the superior and middle glenohumeral ligaments.
- As a result of its inherent weakness, the humeral head is more common to dislocate at this interval.
- When an anterior dislocation results from a traumatic accident, the anteroinferior displaced humeral head stretches and typically tears resulting in a loss of integrity of the anterior ligamentous capsule, frequently resulting in a detachment of the anterior inferior labrum and can have a Hill-Sachs lesion present.
- In severe cases, concurrent rotator cuff injuries can take place.
Posterior Shoulder Dislocation
- Posterior dislocation is list common as it reports 3% of shoulder dislocations.
- It is caused by an external trauma to the front of the shoulder.
- There is an indirect pressure applied to the humerus that combines flexion, adduction, and internal rotation.
- This is generally the outcome of one falling on an outstretched hand (FOOSH injury), MVA, or seizures.
- Because of the traumatic mechanism of injury, posterior dislocations can also have concurrent labral or rotator cuff pathology.
What is the Symptoms of Shoulder Dislocation?
Anterior Dislocation
- Arm clasp in an abducted and ER position.
- Loss of usual contour of the deltoid and acromion prominent posteriorly and laterally.
- Humeral head palpable anteriorly.
- All movements are limited and painful.
- Palpable fullness beneath the coracoid process and towards the axilla.
- On thorough examination, the patient can also come up with damage to rotator cuff musculature, bone, vascular, and nervous structures.
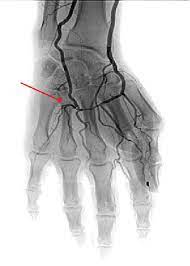
- Vascular structure damage is an outcome of traction of the brachial plexus and axillary blood vessels that happen during a dislocation.
- A clinician may determine if an axillary artery injury is present by looking for decreased pulse pressure or transient coolness in the hands.
- Peripheral nerve injuries following an anterior dislocation are usually because of the proximity of the brachial plexus.
Posterior Dislocation
- With acute posterior glenohumeral dislocation:
- The arm is abducted and IR.
- can or can not lose deltoid contour.
- Can notice the posterior prominence head of the humerus.
- Tear of subscapularis muscle (weak or may not internally rotate).
- Literature reviewing the most current research recommends that individuals between the ages of 15-25 should undergo surgical repair of a dislocation because people in this group are considered high risk. However, little evidence exists in this population.
- The recurrence rate of dislocations in adolescent active individuals may be as high as 92-96%.
- In the age group 25-40, primary suggestions are to try conservative rehabilitation because the risk of redislocation is lower, around 40%.
- People who are 40 and older also have a low recurrence rate of less than 15%.
- The recommended management is nonoperative and addresses associated issues.
- With surgical repairs, it is great to operate within 2 weeks because tissue conditions are still optimal.
Diagnosing a Dislocated Shoulder
To diagnose a shoulder dislocation, one of our orthopedic specialists will discuss any past injuries, evaluate the symptoms, examine the shoulder and arm, and take a full medical history. You will likely need further imaging tests to see if there are other accompanying fractures or soft tissue injuries. These imaging tests include:
- X-ray
- CT scan
- MRI
- Musculoskeletal ultrasound
Musculoskeletal radiologists, who are specialists in interpreting advanced imaging technology, carefully review scans. The highly advanced imaging technology available at Penn leads to better diagnosis and optimal treatment plans. Treatment options can include a combination of conservative therapies. If the shoulder dislocation is severe and accompanied by other types of shoulder injuries, you can require surgery.
Differential Diagnosis
- Fractures (clavicle, glenoid, humeral head, greater tuberosity, and proximal humerus).
- Rheumatoid Arthritis.
- Rotator Cuff Injury.
- Acromioclavicular Joint Dislocation.
- Labral Pathology.
- Shoulder Subluxation.
- Axillary Nerve/Suprascapular Nerve Palsies.
Management / Interventions
Anterior Dislocation
- There is limited proof or consensus on optimal treatment.
- Non-surgical management may be suggested initially, but a surgical repair can be warranted for those who fail conservative care or needs extreme usage of the upper extremity (i.e.-elite level athletes).
- Post-operative protocols are largely surgeon-dependent and can vary depending on too many factors involving age, tissue quality, repair type, and fixation.
- For an anterior dislocation, the suggested intervention non-surgically would be to have a closed reduction via a physician.
- An anterior dislocation may be surgically repaired via stabilization procedures.
- Following either intervention plan, the doctor should be contacted for a specific protocol.
- Furthermore, after either intervention the management is similar.
- Although, if it is a surgical procedure, knowing what kind of surgery was performed as well as the precautions post-surgery.
Typical precautions are:
- If the subscapularis was cut, no resisted internal rotation for 3-6 weeks.
- The external rotation is generally limited to 30 degrees initially, then 45 degrees at 6 weeks.
- Wang and colleagues, recommend a three-phase protocol discussing some recommendations for this phasic approach.
Phase 1 (up to 6 weeks)
The aim is to maintain anterior-inferior stability
Immobilization
- It has typically been thought to be immobilized with internal rotation, but according to surgeons, immobilization has been beneficial in the external rotation because there is more contact force between the glenoid labrum and the glenoid.
- Research by the surgeon suggests immobilization at 10 degrees of external rotation has a lower recurrence rate than internal immobilization at 10 degrees.
- There is currently no consensus at the time of immobilization in a sling.
- But, typical time periods in a sling range from 3-6 weeks if under the age of 40 and 1-2 weeks if older than the age of 40.
- At the time of the immobilization period, the focus is on the AROM of the elbow, wrist, and hand and the reduction of pain.
- Isometrics can be suggested in the rotator cuff and biceps musculature.
Codman Exercises
- AROM for external rotation (0-30º) and forward elevation (0-90º)
Phase 2 (6-12 weeks)
The aim is to restore adequate motion, specifically in external rotation.
- AAROM to achieve a full range of motion when stretching is allowed, passively stretch the posterior joint capsule through the use of joint mobilizations or self-stretching.
- No strengthening or repetitive exercises should initiate until the achievement of the full range of motion.
Phase 3 (12-24 weeks)
Fortunately returns to sports or physical activities of daily living.
- Start strengthening exercises, strengthening exercises should be impairment-based.
- Typically begin strengthening exercises in a pain-free motion with exercises for stability.
- A possible progression could initiate by focusing on the rotator cuff musculature and scapular stabilizers, which involve the trapezius, serratus, levator scapulae, and rhomboid.
- Then, progress to the larger musculature like the deltoids, latissimus dorsi, and pectorals.
- Initially focusing on functional exercises including proprioceptive training, tailored to promote the patient’s activities and participation in society
Posterior Dislocation
Management for posterior dislocation follows the equal progression as anterior protocol, except for the following guidelines:
- Posterior glide is contraindicated
- Do not permit flexion with adduction and internal rotation
- Immobilized for 3-6 weeks if less than forty years of age and 2-3 weeks if more than 40 years of age
- Strengthening will focus initially on posterior musculatures like infraspinatus, teres minor, and posterior deltoid.
How can Physiotherapy help?
Once the shoulder has been restored to its normal position the rehabilitation process may commence. To ensure full recovery,
Physiotherapy will help to :
- Regain shoulder movement.
- Strengthen the surrounding muscles.
- Regain shoulder control.
Giving initial relief of pain by using an ice pack muffled in a damp towel and placed on the shoulder for 10-12 mins may help to
decrease shoulder soreness. Some patients need moist heat for pain relief.
When to Start Exercises?
- This is dependent on the specific injury and symptoms.
- Ultimately, with moderate to severe cases, it is necessary to be cleared by the doctor first before initiating any kind of exercise.
- If the shoulder is managed conservatively, you may expect to get started within a few days or weeks once the symptoms have started decreasing.
- If you end up needing surgery because of an unstable shoulder, the surgeon will give a specific protocol to follow based on the shoulder’s specific needs.
- In general, you may begin assisted shoulder range of motion around 3 to 4 weeks postoperatively with the help of a physical therapist (while still wearing the sling most of the day).
- It is necessary to avoid overhead reaching and rotation of the shoulder until approximately 6 weeks.
- After that, it generally comes down to comfort.
- In the end, avoid anything that feels excessively straining or painful until the shoulder is strong enough since this will come with time and healing.
Elements of Physical Therapy for a Shoulder Injury-
In order to get the shoulder back to health after a dislocation, physical therapy will be required to focus on several factors.
Pain relief, Shoulder injuries hurt; so perform shoulders that have been operated on. Besides pain, you will likely have swelling and bruising.
Part of the PT can involve icing and or heat to help decrease pain and decrease inflammation. Some therapists use modalities like ultrasound and transcutaneous electrical nerve stimulation (TENS) for pain, but research studies have shown that these treatment methods are not very effective, so many PTs no longer offer them.
Range of motion
- In order to loosen up muscle tightness in the shoulder that may limit how far the person is able to move the arm, the therapist will likely perform some passive motion work with you, in which they move and slowly stretch the arm in various directions.
- They also can teach you ways to do this kind of stretching yourself.
Strength
- Regaining the strength of the muscles that surround and support the shoulder joint is vital to giving it the stability it needs to function normally.
- These are the rotator cuff muscles, the biceps and triceps, and the muscles that hold up the shoulder blade.
- Occasionally, the muscles nearby the shoulder are not able to contract properly.
- The physical therapist can choose to use an electrical stimulation device called neuromuscular electrical stimulation (NMES) to help the muscles regain the ability to contract.
Posture
- Rounded shoulders and other improper postures may interfere with how well the shoulders work, so the therapist can have you work on improving the posture.
- The better aligned the skeleton is overall, the more easily you will be able to move and function.
Physiotherapy management according to phase vise
Dislocations heal in three phases and should incorporate treatment that addresses the need for:
- Pain management
- Reduction in swelling and edema
- Re-strengthening of the shoulder
The three phases of rehabilitation after shoulder dislocation involve specific needs in each phase including:
- Phase 1-Reduce pain and lessen swelling
- Phase 2-Improve range of motion
- Phase 3-Back to function in day-to-day activities
- Rehab of the shoulder starts after the shoulder has been put back into place and consists of,
Phase 1
The patient is given polling to minimize movement of the arm and shoulder. Pain and subsequent swelling may present a problem at the time of this phase of rehabilitation. Furthermore, to some usual exercises intended to prevent stiffness, specific modalities will be used as part of the rehabilitation regimen for pain management.
Cold Compression Therapy
- Cold compression therapy is an excellent modality to use when choosing a non-invasive modality that may reduce the pain and swelling a patient can feel as a result of a shoulder dislocation.
- Further, the easy-to-use cold compression device is good for patients to use on their own at home as an alternative to oral pain medication.
Ultrasound therapy
- A study published in the International Journal of Scientific and Research Publications found that ultrasound therapy treatment used in combination with gentle shoulder exercises exhibits greater improvement in range of motion and reduction in pain.
Transcutaneous electrical nerve stimulation (TENS)
- TENS is another treatment modality that is a perfect choice for pain management.
- By blocking nerve impulses from the brain, TENS is able to quickly decrease acute pain connected with a dislocated shoulder.
- TENS is another pain management modality that may be offered as a portable device for patients’ home use.
Heat therapy
- Heat therapy in the form of hot packs, heating pads, whirlpools, etc. may also be used in physical therapy in order to decrease pain, reduce resulting stiffness and slowly increase the range of motion in dislocated shoulder patients.
- These pain management modalities are primarily utilized in Phase 1 because that is the period of time with the most acute pain for dislocated shoulder patients.
- However, residual pain may take place as patients move through Phase2 and 3 of their physical therapy treatment, making these modalities safe pain management options throughout their recovery process.
Phase 2
The goal of Phase 2 is to help a dislocated shoulder patient regain range of motion and strength while also re-establish muscle balance within the shoulder. Therapeutic exercise, gentle stretching, and joint mobilization are added to the pain and swelling management modalities.
Dislocated shoulder exercises incorporate mobility, strengthening, and functional or sports-related exercises as part of a full rehabilitation program. It is too important to avoid any movement that combines lateral rotation and abduction as this is where a dislocated shoulder is most vulnerable.
Dislocated shoulder mobility exercises-
Exercises will involve a passive range of motion and gradual progression to more active and bigger ranges as tissues heal and pain tolerance improves. Ensure dynamic shoulder strengthening exercises that build muscle and coordination within a
functional range of motion.
Shoulder Pendulums
This is the most basic exercise the patient can do with the shoulder once you are cleared to have the shoulder out of the sling. It is designed to simply get the shoulder used to moving without pain while promoting relaxation and decreasing stiffness.

- Take the shoulder sling off.
- Let the arms dangle in a relaxed position by the side.
- Stand near a chair or counter.
- Stand in a small staggered lunge position as you lean forward with the trunk to approximately 45 degrees or more.
- Keep the arms relaxed and passively dangled as you begin to sway and shift the weight forwards and backward.
- As you move back and forth, the arm should passively follow the motion of the entire body back and forth.
- The key is to keep the shoulder relaxed so that the movement is completely passive and led by the trunk movement.
- The patient may change the positioning of the legs to a wider stance to also shift side to side, or even in a circle.
- Repeat for 1-2 minutes in all directions that you may tolerate.
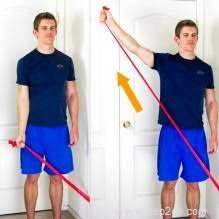
Shoulder Pulley
Buying a cost-efficient shoulder pulley is a perfect rehab tool for any type of shoulder injury. It is one of the great ways you can safely move the shoulder with minimal pain. You simply use the opposite hand to passively move the bad shoulder. With time, you may slowly progress to a more active range.
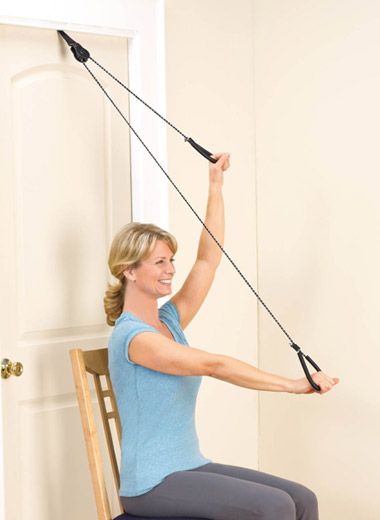
- Shut the top of the pulley into a door. Depending on the height and the door frame-
- The patient can stand or place a chair directly below the pulley with the back of the.
- Chair touching the door. Grasp one handles with each hand- pointing the palms either down toward the floor or at each other (whichever is more comfortable).
- Keep good posture with the neck relaxed, Use the good hand to guide the injured shoulder up above the head.
- Begin with a goal of shoulder height and slowly progress to the full range of motion while staying relaxed and relatively pain-free.
- Hold for 10-115 seconds at the end range before returning to the.
- Starting position. Repeat 12 times for 3-4 sets.
Isometric Shoulder Abduction
Isometric exercise is defined as exercise that works for a particular muscle group without any actual movement. This is a perfect beginning point for a recovering dislocated shoulder, since you may keep local muscles active while still in a sling and permitting appropriate rest time. That way the transition to more active motion will be easier when the patient is ready.
- Stand near a wall with the side of the injured arm facing it and touching the wall.
- Put a small pillow or folded towel between the elbow and the wall for cushioning.
- Push the elbow into the wall as if you’re going to lift your arm straight up to the side.
- Press as hard as you may without pain or tension in the neck and hold for 5 seconds.
- Repeat 12 times for 3-4 sets.
- In addition, you can turn and face the wall while placing the fist on the wall and push straight forward to strengthen flexion as well.
- With time passes, progress to more active motion with the shoulder.
Isometric Shoulder Rotation
When the shoulder feels weak and active or the full shoulder range of motion is not permitted, once again isometric exercises for rotation are a great beginning option. As time passes, you may improve the pressure and eventually start using resistance bands when you are cleared to do more with the arm actively. These basic exercises target some of the important rotator cuff muscles.
- Stand or sit in a comfortable position.
- Keep the injured arm tucked at your side with your elbow bent to 90 degrees.
- If needed, you can tuck a small pillow or towel in between the side and elbow for comfort.
- Take the opposite hand and place the palm on the outside of the injured hand to create resistance for external rotation.
- With the opposite hand in place, pull on the injured hand as if you are going to pull it across the body toward the belly button (without actually moving the shoulder).
- Hold at a bearable amount of pressure while keeping the neck relaxed for up to 10 seconds.
- Repeat 12 times for 3-4 sets.
- In addition, you can switch directions to address internal rotation as well.
- Be sure to talk to the sports medicine doctor about any restrictions on muscle use if you have had surgery first.
- For example, surgery following anterior shoulder dislocation (the most common type) often includes eternal rotation restrictions for the first 4 to 6 weeks.
Shoulder Flexion on Hands and Knees
Once you are cleared to increase the shoulder range of motion, there are several different ways outside of using a pulley that you may use to stretch the shoulder. This exercise is designed to improve shoulder flexion without having to fully activate the muscles in the arms which might cause pain.
- Start with getting the on hands and knees with the hands directly under the shoulders.
- Keeps the palms resting in place on the floor as you shift your butt back toward the heels.
- This move inadvertently puts the shoulders into a flexed position- move as far as is comfortable and hold for 10+ seconds
- Do it further for up to 10 repetitions for 2-3 sets
- Progress the range of motion as tolerated by bringing the chest closer to the ground.
- If you are having trouble tolerating this position, you may also try lying on the back with a wand.
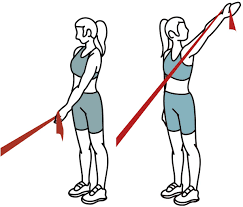
Shoulder Blade Squeezes
The patient can start this exercise without resistance and then slowly progress to the use of a band. The strength and coordination of the scapula, or shoulder blade, and muscles play a crucial role in shoulder balance and function. This is a great one to get initiated with and build from there.
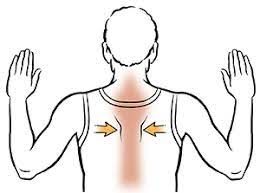
- Stand or sit in a comfortable posture- with the shoulders back and head aligned over top of the shoulders rather than slouching forward.
- Squeeze the shoulder blades together as if you were going to hold a quarter in the center of the mid-back
- Keep the neck relaxed and shoulders down.
- Hold for 5-10 seconds.
- Repeat 12-12 times for 3-4 sets.
- To progress, muffle a band around a sturdy surface and hold each end with the hands at your sides.
- These are all perfect exercises for getting started in the first 3-4 weeks of recovery.
- Ultimately, the patient will want to progress to more functional movements.
- This should involve a full active shoulder range of motion, weighted or resistance-based moves(rows, biceps curls, tricep curls, side raises, etc.), and scapular exercises (prone supermans, planks, etc.).
Dislocated shoulder strengthening exercises
A strengthening program for an anterior dislocated shoulder may begin as soon as pain allows. It is necessary to avoid any movements which raise the arm up above the shoulder and rotates it outwards (abducted and laterally rotated). In the primary stages, as this is the position, the shoulder is most likely to dislocate further. Primarily, static exercises including no movement should be done in the ‘inner range’ and progressed slowly.
Isometric shoulder exercises
Isometric means without movement, also identify as static contractions. These are exercises where the muscles are being worked without moving the joint and are frequently quite useful if the joint itself is still healing.
Isometric extension
- Standing with the back against a wall, with the arms by the side.
- Utilizing the elbows and wrists straight, push back into the wall and hold for 15 seconds.
- Work to improve this to 20 seconds.
- Repeat this 5-10 times.
Isometric flexion
- To perform the identical isometric flexion face the wall and use it as resistance in an equal way as for extension exercises.
Isometric adduction
- With a small pillow or a rolled-up newspaper between the injured arm and the torso, squeeze inwards and try to hold it in position.
- Start with a tiny item and slowly move to larger sizes to work through a larger range of movements.
- Hold for 10-15 seconds (work to increase to 20).
- Repeat this five to ten times (work to increase to 15).
Isometric Abduction
- Start with standing side-on to a wall, with the arm to be worked next to it.
- Put the back of the wrist against the wall and push the outer side as if trying to raise the arm to the side.
- Hold for 5 -10 seconds (work to increase to 15).
- Repeat this 10 times (work to increase to 15).
External Rotation
- Stand facing a door frame.
- Put the elbow bent to 90 degrees and place the back of the hand against the frame.
- Push against it.
- Hold for 5-10 seconds (work to increase to 15) and repeat 5-10 times (work to increase to 15).
Internal Rotation
- Stand facing a door frame.
- Bend the elbow to 90 degrees, put the palm of the hand on the side of the doorframe, and push against it.
- Hold for 5-10 seconds (work to increase to 15) and repeat 5-10 times (work to increase to 15).
Rotator cuff exercises
Internal rotation
This is the most crucial exercise as it strengthens the muscles which help prevent anterior shoulder dislocation. 3 out of the 5 muscles which medially or internally rotate the shoulder are- the pectoralis major, subscapularis, and latissimus dorsi.
- In the initial stages, it is important to keep the shoulder joint in the inner range of motion.
- This means working from the position where the hand is out in front so its functions across the body.
- Moving the shoulder into the outer range of motion puts it at risk of dislocation.
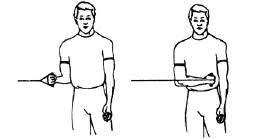
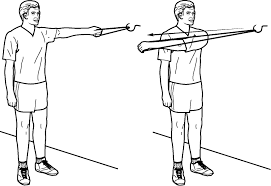
External rotation
Function the muscle which externally rotates the shoulder. perform this with an elastic band or a dumbbell. Avoid this exercise in the beginning stages. When the shoulder has healed properly to begin external rotation exercises it is important to remain within the internal range of movement until told otherwise by the therapist.

- Externally rotating the shoulder prior to it being ready puts it at risk of dislocation.
- Muffle the resistance band around something stable and grip the other end standing so that the band crosses the body.
- Keep up the elbow bent to 90 degrees and the upper arm by the side, and rotate the shoulder to pull the band away from the body.
Abduction
- Stand on one edge of the band and grasp the other end.
- Keeping the elbow straight, pull the arm out to the side so that the hand ends up level with the shoulder.
Flexion
- Stand on the band holding the other end in the hand of the involved arm.
- Keeping the elbow straight, pull the hand straight up in front of you to about shoulder height.
- Once you are comfortable with the exercises above, the resistance band may be replaced with weights to progress the strengthening exercises described above.
- Again, ensure exercises are done pain-free.
Adduction
- Muffle the band around something secure, grasp the other end and stand with the affected side closest to the attachment.
- Keeping the elbow straight, pull the hand across the body as far as is comfortable.
Phase 3
Phase 3 is working towards full function within daily activities, including exercise and sports regimens. Rehabilitation in this phase focuses on helping dislocated shoulder patients to regain neuromuscular control of their shoulder with exercises that strengthen and challenge the unstable shoulder.
Dislocated shoulder functional exercises
Functional exercises are those which reproduce everyday, movements, or sports-specific movements. They are more modern rehab exercises to bridge the gap between injury and returning to full sports-specific training. It is necessary to check with the doctor or trainer prior to attempting these exercises as there is a risk, of re-injuring a dislocated shoulder if the joint is not that much strong enough.
Wobble board exercises
The goal of wobble balance board exercises for the shoulder is to increase joint awareness. A wobble board or cushion may be used, just as you would if you were rehabilitating an ankle injury.
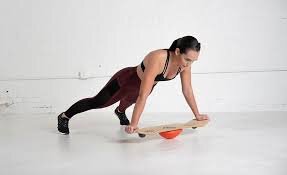
- Initiate on all fours, knees on the floor, and hands on the wobble board.
- Goal to hold the board still for 1 minute.
- Progress to performing circles with the board.
- Try doing mini push-ups, while still maintaining the central position.
- Progress further by balancing with the hands on the board, legs straight, and toes on the floor (like the full push-up position).
Swiss ball shoulder stability
This exercise dispute the shoulder stability further as well as the core muscles of the trunk.
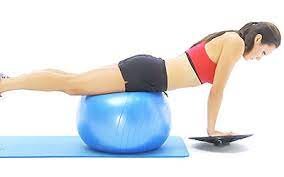
- The sportsperson positions themselves on the ball at the hips and places their hands on the wobble board.
- Maintain balance whilst moving the arms
- Note: can be progressed by positioning the ball lower down the body.
Rebound exercises
- These are plyometric-type shoulder stability exercises and will dispute the coordination and dynamic strength of the shoulder joint.
- Start to withstand facing a wall and throw a light ball at chest height with both hands against the wall and catch it further.
- Advancement by using a heavier ball Progress again by using one hand only.
- Advancement again by moving further back and throwing higher.
One-handed rebound
- Rebound exercises using one hand may also be done.
- This is specifically useful for individuals who compete in throwing or racket sports.
- It is too late-stage strengthening exercise for shoulder dislocations.
- It should not be done until given the go-ahead by the trainer.
- The shoulder is most endangered of dislocation in this position if it is not strong enough.
Surgical treatment
Shoulder dislocation surgery repairs the injury that occurred when the shoulder came out of the socket. This may involve repairing torn ligaments and tendons or repairing other bone fractures that can have occurred during the injury.
The orthopedic specialists/surgeons are highly experienced in performing complex surgical treatments for shoulder injuries, incorporating tendon and ligament reconstruction and/or transfers. Orthopedic surgeons do very high numbers of this specialized surgical procedure, which works to restore function and shoulder strength and decrease shoulder pain. Surgeries we perform for shoulder dislocation include:
Advanced Arthroscopic Techniques
- Orthopedic surgeons often use minimally invasive arthroscopic techniques to repair soft tissues and fractures that happen as a result of shoulder dislocation.
- The surgeon will make a small incision in the shoulder area and insert a very thin tube called an arthroscope with a tiny light and camera at the end.
- This permits surgeons to see the structures within the shoulder joint and surrounding area, then repair and reconstruct ligaments and tendons, and other bone fractures.
- Arthroscopic surgical techniques permit quicker recovery times and less pain.
Ligament and Tendon Reconstruction and Repair
- Torn tendons and ligaments frequently accompany a dislocated shoulder.
- Tendon and ligament reconstruction can be important to repair the damage.
- Using advanced arthroscopic techniques, orthopedic surgeons do tendon and ligament reconstruction and/or transfer to increase function and reduce shoulder instability.
- Strengthening and repairing the shoulder tendons and ligaments decreases the risk of future shoulder dislocations.
Bone Transfer and Grafting
In some situations following shoulder dislocation, the bone of the shoulder socket (glenoid) or ball (humeral head) can be damaged. In order to stabilize the shoulder and prevent further dislocation, a piece of bone from elsewhere in the shoulder or body can require to be transferred to the glenoid or humeral head.
- This is often performed in conjunction with tendon and ligament reconstruction, and it can be performed arthroscopically or through an incision on the shoulder.
- The orthopedic surgeons are experienced in these surgical techniques and will discuss the best treatment option with you to increase function and decrease shoulder instability.
FAQ
One of the general questions an individual ask is if shoulder dislocations go away on their own. The short answer: is no. Unless the humerus is popped back in by the doctor, you will continue to feel the pain. The longer you leave the injury untreated, the more damage you do to the nearby muscles and ligaments.
Simply put, no. The patient should not attempt to relocate a dislocated shoulder, as it may easily cause additional injuries to the joint and the nearby muscles, blood vessels, or nerves.
How quickly the patient recover depends on how serious the shoulder injury is. Separated shoulders can heal over a period of 6 weeks. Dislocated shoulders may take usually longer — more like 3 to 12 weeks. But these lengths of time are just estimations.
Dislocated joints, unless they are aligned further quickly, are more likely to damage blood vessels and nerves than fractures. Some complications (Like blood vessel and nerve damage and infections) happen at the time of the first hours or days after the injury.
Driving may resume once the injured arm is no longer in a sling and the shoulder muscles have recovered, realistically after 4 to 6 weeks. If the person is unsure, please confirm this with the doctor.


11 Comments