

Psoriatic arthritis
Table of Contents
What is a Psoriatic arthritis?
Psoriatic arthritis is a chronic progressive inflammatory joint disease associated with psoriasis. A condition can affect both peripheral joints as well as an axial skeleton causing pain, stiffness, swelling, as well as possible joint destruction. The joint pathology progresses slowly & may be more of a nuisance than disabling.
Psoriatic arthritis is considered seronegative spondyloarthropathy.
The fact that it is “seronegative” means that a blood test is negative for the certain factor that is present in rheumatoid arthritis.
Spondyloarthropathy is the word that describes the group of conditions that all share two common characteristics. First, there is a presence of arthritis that affects the spine or even extremities with evidence of family inheritance. Secondly, inflammation happens in the ligaments, and tendons, as well as occasionally in organs namely the eye.
Prevalence
- Happens in 6%-42% of individuals that have psoriatic arthritis.
- Approximately 2% of the general population has psoriatic arthritis.
- Psoriatic arthritis is estimated to have a prevalence of 0.1%-0.25% in the US.
- Equal prevalence in both males as well as females.
- Can happen at any age but typically occurs between the ages of 30-50 years old.
- 80-90% chance of having psoriatic arthritis if one of the first-degree relatives has the disorder.
Characteristics/Clinical Presentation
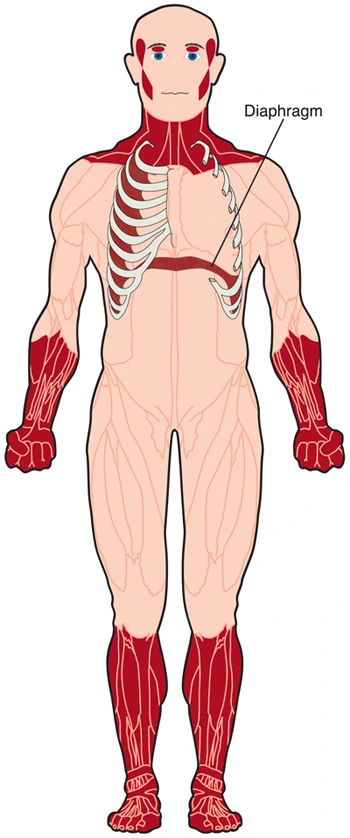
- Psoriatic arthritis causes inflammation, pain, stiffness, as well as swelling in joints & ligaments, and tendons at their insertion sites. Bone, tendons, enthesis, cartilage, synovial membrane, skin, as well as nails, can all be affected by a condition. During the initial stages, this is the tendons, synovia, & articular capsules are primarily affected. As a condition progresses, tendon, as well as bone, become altered. Marked joint destruction can happen in some people.
- Psoriatic arthritis is a condition that may often be misdiagnosed owing to a wide variety of clinical presentations. Although this is associated with psoriasis, in 15% of cases arthritis appears first. In cases where psoriasis appears first, this usually occurs 8-10 years before. Mild cases of psoriasis might be incorrectly diagnosed as eczema, seborrheic dermatitis, or even atopic dermatitis. It may further complicate diagnostic accuracy.
- An Expression of the disease varies greatly from one person to the next. Its course is unpredictable, ranging from mild to severe & destructive. In around 70% of cases, psoriasis precedes arthritis. For the majority, joint symptoms do not appear till approximately ten years after the first signs of psoriasis. Both happen simultaneously in 15% of cases.
- Extra-articular manifestations of psoriatic arthritis include inflammatory eye diseases, namely vitis as well as iritis, renal disease, mitral valve prolapse, & aortic regurgitation. A urethra can also become inflamed as well as fatigue may be a significant issue for individuals with psoriatic arthritis.
Five types of the Psoriatic arthritis
- Distal interphalangeal
This type of psoriatic arthritis affects the joints in the fingers. This can cause nail changes, like pitting, flaking, or even separation from a nail bed.
The pain usually happens in the finger joints is often one of the first symptoms which people experience. However, only about 5%Trusted sources of people with psoriatic arthritis experience symptoms in these joints. A rest experiences pain or even stiffness in other joints throughout a body. - Asymmetric oligoarticular
Asymmetric oligoarticular Psoriatic arthritis affects less than five joints. This gets the name asymmetric due to it affects joints on one side of a body only. For instance, an individual may experience pain in the right but not their left elbow.
According to a recent study, asymmetric Psoriatic arthritis accounts for up to 70%Trusted Source of all PsA occurrences. Symptoms typically start in one knee.
According to one study trusted Source, even though experts typically agree that oligoarticular Psoriatic arthritis affects five or fewer joints, some doctors have difficulty diagnosing it & may conclude that the individual has polyarthritis. - Symmetric polyarthritis
Polyarthritis affects five or more joints in a body & accounts for about 15%Trusted sources of all cases of Psoriatic arthritis About 50- 60%Trusted sources of the individuals with Psoriatic arthritis have symmetric polyarthritis, meaning this affects joints on both sides of a body. Sometimes, individuals confuse this type of PsA with rheumatoid arthritis(RA). - Spondylitis
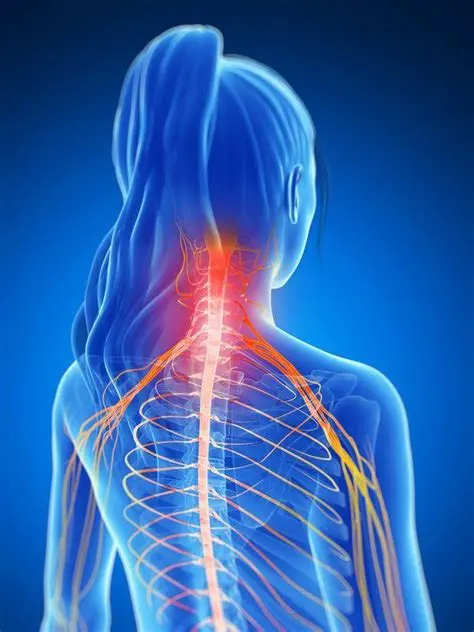
Spondylitis refers to inflammation as well as degenerative changes in the joints of a spine & sacroiliac joints (located in the pelvis as well as the lower spine).
Individuals with other types of arthritis, namely enteropathic arthritis, can also have spondylitis. When spondylitis happens in individuals with Psoriatic arthritis this is known as psoriatic spondylitis. About 20% of individuals with PsA experience spondylitis.
People with psoriatic spondylitis most often have symptoms in the lumbar (lower) spine, even though pain and stiffness can happen anywhere in the spine, neck, or even pelvis. Untreated, this can lead to a fusion of the vertebrae. - Arthritis mutilans
This severe condition affects between 1–5% of people living with Psoriatic arthritis. Arthritis mutilans damage the joints of the hands, feet, fingers, as well as wrists. Joints can eventually fuse.
10 Early Symptoms of the Psoriatic Arthritis
Some common first signs of Psoriatic Arthritis. If the patient experiences any of these, talk to the primary care provider. Early detection & treatment of a disease may assist prevent future joint damage.
- Sausage fingers: Individuals with Psoriatic Arthritis often have painful swelling in the fingers as well as toes. Dactylitis is a proper medical term, but some individuals call this swelling “sausage fingers” or even “sausage digits.” About 40% of individuals with Psoriatic Arthritis have dactylitis.
- Nail changes: The patient may notice nail pitting, or holes developing in the nails. Other nail changes include deformity, discoloration, thickening as well as separation of a nail bed.
- Scaly patches: It is mainly visible on elbows as well as knees. Psoriatic Arthritis causes itchy, painful, red patches or even a buildup of dead skin cells on a body. This happens most commonly on the knees, elbows as well as scalp.
- Eye pain and redness: The patient may have eye inflammation, especially in the middle layer of the eye, the condition known as uveitis. Psoriatic Arthritis causes additional vision symptoms, including eye pain, redness as well as blurry vision. Vision loss can happen if eye inflammation is not treated quickly.
- Joint pain and stiffness: Psoriatic Arthritis causes mild to severe joint pain as well as stiffness in the joints. It may get worse if a disease goes unchecked.
- Fatigue: Fatigue is common for individuals with psoriasis and Psoriatic Arthritis.
- Stomach issues: Psoriatic Arthritis may cause inflammation in the digestive tract. Many individuals with Psoriatic Arthritis also have inflammatory bowel disease.
- Tenderness: Individuals with Psoriatic Arthritis have tenderness in areas where tendons or even ligaments attach to bones. Pain, as well as swelling in the toes, ankles, heels & soles, are also common.
- Difficulty moving: If the patient has Psoriatic Arthritis, he/she may have decreased range of motion. With time, this can be more difficult to move, & the disease can cause disability.
- Low Back pain: Individuals with Psoriatic Arthritis may develop pain in the lower back. Back pain with Psoriatic Arthritis can cause the patient to wake up in the middle of the night or even feel stiff for thirty minutes or longer in the morning. Pain may also travel down into the hips and buttocks as well.
Causes of Psoriatic arthritis
- Genetic
- Psoriatic arthritis seems to have a genetic cause, even though exact marker genes have not been identified. Having a first-degree relative with psoriatic arthritis increases the likelihood of contracting a disease by 80-90%. There are currently genome studies being done to determine the biomarkers associated with psoriatic arthritis of the joint.
- Environmental
- Trauma, as well as infection, can trigger the development of psoriatic arthritis.
- Immunologic
- An immune system is believed to play a key role in the development of psoriatic arthritis. Cytokines are in high abundance in the joints of individuals with psoriatic arthritis. Cytokines are inflammatory messengers of the body that are released when T-cells are activated. Tumor necrosis factor is a specific cytokine that is abundant in the skin, blood, as well as joints of patients with psoriatic arthritis & psoriasis. The job of the tumor necrosis factor is to regulate inflammation in a body, & it should be present at low levels. Continued high levels of tumor necrosis factors may lead to inflammation in the body. Blocking this particular cytokine often leads to significant improvement in psoriatic arthritis of the particular joint.
Clinical Signs as well as Symptoms
- Skin lesions: These include well-defined, dry, red, & usually over-lapping papules as well as plaques that characterize psoriasis. The patches are usually not itchy & are found most commonly on extensor surfaces of elbows, knees, back, and buttocks as well.
- Nail lesions: Include pitting, ridging, brown/yellow discoloration, cracking, separation, or even loosening of the nails (onycholysis). Presentation of the nail impairments can be mistaken for fungal infection & may be the only clinical feature in patients who are more likely to develop arthritis.
- Arthritis: Can appear early on & as a severe sign in half of all patients with psoriatic arthritis. Wrists, ankles, knees, as well as elbows, are likely to be involved. A client can report morning stiffness lasting for more than 30 minutes, tenderness, and inflammation as well.
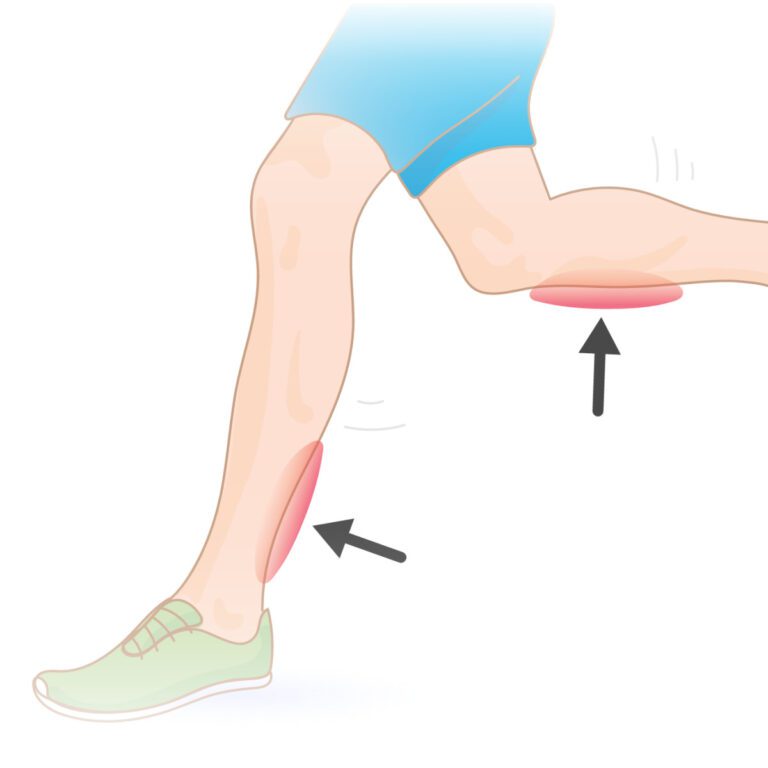
- Soft-tissue involvement: Can include tenderness at a site of tendon insertion or muscle attachment. Commonly seen in the Achilles, plantar fasciitis, as well as flexor tendons in the hand.
- Dactylitis: This happens in one-third of a psoriatic arthritis population that presents as swelling of the whole finger making them appear “sausage-like”.
- Extraarticular features: Include iritis, urethritis, mouth ulcers, colitis, as well as aortic valve disease.
Risk factors
- Several factors may increase the risk of psoriatic arthritis, including:
- Psoriasis: Having psoriasis is the single greatest risk factor for developing psoriatic arthritis.
- Family history: Many individuals with psoriatic arthritis have a parent or a sibling with a disease.
- Age: Even though anyone can develop psoriatic arthritis, it happens most often in adults between the ages of 30 & 55.
Complications
- A small percentage of individuals with psoriatic arthritis develop arthritis mutilans, a severe, painful as well as disabling form of psoriatic arthritis. Over time, arthritis mutilans destroy the small bones in the hands, especially the fingers, leading to permanent deformity as well as disability.
- Psoriatic arthritis also puts some individuals at higher risk of developing hypertension, metabolic syndrome, diabetes as well as cardiovascular disease.
How Psoriatic arthritis is diagnosed?
- During an examination, the doctor might:
Examine the joints for signs of swelling or even tenderness.
Check the fingernails for pitting, flaking as well as other abnormalities.
Press on the soles of the feet & around the heels to check for tender areas.
No single test may confirm the diagnosis of psoriatic arthritis. But some types of tests may rule out other causes of joint pain, such as rheumatoid arthritis or even gout. - Imaging tests
X-rays: These may help pinpoint changes in the joints that happen in psoriatic arthritis but not in other arthritic conditions.
MRI: It uses radio waves & a strong magnetic field to produce detailed images of both hard as well as soft tissues in the body. MRI may be used to check for issues with the tendons as well as ligaments in the feet & lower back. - Laboratory tests
Rheumatoid factor (RF): RF is the antibody that is often present in a blood of a person with rheumatoid arthritis but not usually in a blood of a person with psoriatic arthritis. This test may assist the doctor to distinguish between the two conditions.
Joint fluid test: Using a needle, a doctor may remove the small sample of fluid from one of the affected joints — often a knee. Uric acid crystals in the joint fluid might indicate that the patient may have gout rather than psoriatic arthritis. It is also possible to have both gouts as well as psoriatic arthritis.
Treatment of Psoriatic arthritis
Medical treatment
- This is ideal for patients to have coordinated care between the dermatologist & rheumatologist since the majority have both skins as well as joint manifestations of a disease. Since disease manifestations first start within the skin as well as nails, it is likely a patient’s first point of contact is a dermatologist, putting them in the optimal position to be the first to screen for Psoriatic arthritis.
- There are several screening questionnaires available for Psoriatic arthritis, including the TOPAS, PEST, PASE, and the EARP, all of which are filled out by a patient. Some of which have been tested to show good sensitivity as well as specificity.
- When determining treatment for Psoriatic arthritis, an assessment is done to assist focus in on the clinical domains present in a patient. They include arthritis, enthesitis, dactylitis, spondylitis, psoriasis, as well as nail disease.
- Usually, measures have been used that focus on the skin or joints that result from RA and psoriasis as well. However, more recently, the Group for Research & Assessment of Psoriasis as well as Psoriatic Arthritis (GRAPPA) has been working on a composite measure that attempts to take the whole patient into account. The measure will allow them to assess the several domains of disease & monitor its activity & a patient’s response to therapy.
- Moreover, GRAPPA has developed the grid to assist determine treatments based on the severity of a disease. Currently, there are two sets of Psoriatic arthritis treatments.
- The first one is the EULAR, which is the set of recommendations to guide a clinician on management steps as well as medication. And the second is the GRAPPA group recommendations, based on the literature review of the treatment of domains & skin. Treatment choices are based on the grid method that assists a clinician to determine disease severity & the impact of a domain on the patient’s quality of life.
Physical Therapy treatment of Psoriatic arthritis
A patient should be referred to the rheumatologist immediately if undiagnosed psoriatic arthritis is suspected. All patients with manifestations of arthritic type conditions may be asked if a patient has any type of skin condition or patches of dry skin. The patient should also be encouraged to see a rheumatologist that may verify the type of arthritis that the patient has. Physical therapy may play an important role in improving the lives of the person with psoriatic arthritis. Physical therapy treatment should focus on education, improvement of the range of motion, strengthening, as well as general cardiovascular conditioning. Physical therapists can also provide UV therapy as well as modalities to reduce pain.
Elecrotherapy
- Ultraviolet rays (UVR)
Narrowband UVB light therapy may be very effective in clearing skin lesions. Bulbs with a narrow emission between 311 & 313 nm have been shown in studies to be superior to broadband UVB light. Treatment may be done in the outpatient setting or at home. Both small handheld devices are available and larger full-body light units. UV light lamps designed specifically for psoriasis are more effective than commercial tanning beds or sunlight since they give narrowband UVB light. Commercial tanning beds often give off much higher levels of UVA radiation that has been proven to be less effective in treating psoriasis unless combined with the psoralen. Exact ratios of UVA, as well as UVB, are very difficult to determine with both sunlight & tanning beds. Generally, light treatments may be done 2-3 times per week for a total of around twenty-five treatments. The skin may be exposed to UVB light from 20 seconds up to around 2 minutes while each treatment is based on the Fitzpatrick skin type or minimal erythema dose.

- Cryotherapy may assist to decrease swelling as well as tenderness in affected joints.
- Heat can be used to relieve joint pain.
- Paraffin baths tend to be soothing for the hands as well as feet. Splinting can be of benefit to prevent deformity.
- Recently studies have shown that hydrotherapy is also an effective treatment for patients with psoriatic arthritis. Hydrotherapy has been shown to increase physical function, energy, sleep as well as relaxation, cognitive function, work, & participation in patients with psoriatic arthritis.
- TENS: Pain intensity & perception of pain is sometimes relieved through the use of the implanted transcutaneous electrical nerve stimulation (TENS) unit. Electrical stimulation of a spinal cord may decrease pain intensity & improve health-related quality of life. Spinal cord stimulation was more effective compared to conventional medical management in decreasing pain in patients with RSD type I & was also shown to be effective in completely eliminating pain in adolescent females two to six weeks after stimulation.
Exercises for Psoriatic arthritis
According to the signs and symptoms, the physical therapist instructs the patient to perform various types of exercises. In psoriatic arthritis wrist joint, metacarpophalangeal joint, phalangial joint, ankle joint, and knee joint are mainly involved. Therefore, some basic exercises improve range of motion, flexibility, strength, and blood supply to the affected parts.
Stretching exercises
- Lying Hamstring Stretching
This stretch is ideal for those with a tight hamstrings muscle, who can not handle a forward fold or even a single-leg hamstring pull.
This described stretching exercise procedure will permit a patient to fully relax as the legs rest against the wall, gently stretching the hamstrings & making space in the lower back. This stretching exercise may be done as many times in a day as a patient see fit, as far as per the preference.
Start by finding the wall that an individual may rest the legs against. Next, lay on a floor and place both feet on the wall above the patient’s head. Then, move closer to a wall slowly, & try to get the back of the legs to rest fully against a wall. Next, stop when a patient feels the stretch, after that slowly move closer to the wall as the patient feels ready. Hold the described stretching for 30-second intervals, moving closer as he/she sees fit.

- Lying Spinal Twist
The stretching exercise is the best way to release, stretch, & reduce pain along a side of the back as well as the spine. These muscles are most likely tight on everyone, as individuals are affected by everyday activities.
It is a more advanced stretching, as it may feel intense for those with tight back muscles or a lack of mobility. If the individual deals with chronic back pain, he/she can require to work the way through some of the other back stretches before progressing to this stretching. For the stretching, a patient will need a space to lie down & extend the arms on a flat surface, once a day on each side. Start by lying on the back, with both legs extended straight out, & the arms out in the T for the embarking position. Pick a right leg up to the ninety-degree angle, parallel to a roof as well as place the left hand on the right knee. Slowly, twist the right leg to the left side of the body, while turning the head to the right. Make sure to stop when the patient feels a light stretch, & ease slowly into the deeper stretch. Allow gravity to pull the knee towards the ground, while keeping the right arm as well as both shoulders on the floor.
Hold till the spine has released & repeat on the opposite side. - Standing Calf Stretch
Stand about three feet from the wall as well as place the palms flat on a wall, shoulder-width apart. Then, place the right foot behind the patient with toes facing forward. After that, keep the right knee straight, a heel on the floor & lean forward. Hold a stretch for a few seconds & repeat with the other leg as well. Do three repetitions per day. - Shoulder Stretch
To begin with, stand straight & grab one elbow with the opposite hand & pull the elbow across a chest. Hold for thirty seconds as well as repeat on the other side too. Do it ten times per day. - Butterfly Groin Stretch
To start with, sit on the ground upright, bend the knees, press the soles of the feet together, & pull them toward the groin.
Then, grasp the feet, drop the knees to the sides & gently apply pressure till he/she feels the stretch on the groin as well as inner thighs. Turn the chest to the left & then right. Do three times in a session with 30 seconds of rest on each side. - Triceps Stretch
The triceps stretching is one of the most popular upper-body stretches, which loosens up the muscles on the back of the upper arms, making it great to do after the chest or even shoulders workout. Kneel, sit, or stand tall with feet hip-width apart, & arms extended overhead. Next, bend the right elbow as well as reach a right hand to touch the top middle of the back. Then, reach the left-hand overhead & grasp just below the right elbow. Slowly, pull a right elbow down as well as toward a head. Switch arms & repeat. Stretches neck, shoulders, back, & triceps. Do three repetitions per day.

- Lying Pectoral Stretch
To embark with, lie on the stomach(prone position) with both arms extended to the sides so the body is in the T shape. Next, push off the floor with the left hand & bend a left knee for balance as the patient start to roll to the right side. The patient should feel this in the right-side pectoral muscles. As mobility increases, the patient can be able to stretch further & roll the body further. Repeat on the other side as well. Do three repetitions per day. - Knee to Chest Stretch
To begin with, lie on the back(supine position) with both legs extended. Then, pull the right knee into the chest, while keeping the left leg straight and the lower back pressed to the ground. Next, hold for thirty seconds. Repeat on the other leg too. Stretches lower back, hips, as well as hamstrings. Do three sessions per day. - Seated Neck Release
To start with, stand with feet shoulder-width apart, or even sit down with the back straight & chest lifted. Next, drop the left ear to the left shoulder. Then, to deepen the stretch, gently press down on the head with a left hand. Hold for thirty seconds in a repetition. Do three repetitions per day. - Biceps Stretch
To begin with, take the arms out to the sides, mildly behind a patient, with the thumbs up, like a hitchhiker. Then, rotate the
thumbs down & back till they are pointing to the back wall to stretch the biceps muscle. Hold for 30 seconds, repeating one to three times in a session. - Chest stretch in the door
Tightness in the chest, as well as shoulders, is often found in people with poor posture. It may lead to bigger problems later in life.
Doing daily chest-opening stretches can assist prevent tightness as well as promote proper posture & better breathing.
Equipment required: Doorway.
Muscles used: Chest, anterior deltoid, & biceps.
To start with, a therapist instructs the patient that stands in the middle of the open door. After that,
place the forearms on each side of the doorframe, if possible by a patient. If the doorway is also wide, do one arm at a time. Next, slowly lean forward into a doorway until the patient feels the stretch through the front of the chest as well as shoulders.
Only go as far as comfortable. Hold this position for nearly 30 seconds. Do it three times per day. Repeat on the other side also. - Praying position stretching
Tell the patient to take a standing position, & place the palms together in a praying position. Have the elbows touch each
other. Patient hands should be in front of the face. A patient’s arms would be touching each other from the tips of the fingers to the elbows. With the palms pressed together, gradually spread the elbows apart. Do it while lowering the hands of the patient to waist height. Give the command to the patient to Stop when the hands are in front of the belly button or the patient feels the stretch. Hold the stretch for 30 seconds, after that repeat three times per session. Do three sessions per day.

- Clenched fists
Tell the patient to take a sitting position, & place the open hands on the thighs with palms up. Close the hands slowly into fists, but do not clench the fingers too tightly. With the forearms touching the legs, raise the fists off of the patient’s legs & back toward the patient’s body, bending at the wrist. Hold for 30 seconds. Lower the fists & slowly open the fingers wide. Repeat three times per session. Do three sessions per day. - Hooked stretching exercise
To start with, to do the stretching exercise, hook one elbow under another & pull both arms towards the center of the torso. The patient feels a stretch in the shoulders & wraps one arm around another arm so that the palms are touching each other. Hold a position for 30 seconds. Do three repetitions per session. Do three sessions per day. - Finger stretching exercise
To start with, to do the stretching exercise, bring the pinky finger & ring fingers together. Separate the middle finger as well as index fingers from a ring finger. Hold for 30 seconds in a repetition. Do three repetitions per session. Repeat three sessions per day. - Fist-opener
To start with, Make a fist & hold it for 30 seconds in front of the physical therapist. Stretch the fingers until the hand is flat & open, with the fingers together. Repeat the action three times per session. Do three sessions per day. Hold for 30 seconds. - Thumb pull
To do a stretching exercise, grab the thumb with the other hand. Gently, pull the thumb backward, mild away from the hand. Hold a stretching position for 30 seconds while one repetition. Do 3 repetitions per session. Do 3 sessions in one day. Repeat it on the other thumb as well. - Alternate finger stretch
To do this stretching exercise, bring a middle finger as well as ring fingers together. Separate the pinky finger & index fingers from them. Repeat this stretching three times per session. Do 3 sessions in a day. - Wrist Extensor Stretch with extended arm
To embark with, by extending both of the arms in front of the patient’s face. Make two fists, like the patient is punching the air. Move the fists downward, during keeping the arms straight. Hold for 30 seconds & do three repetitions in a session. Repeat three sessions in a day. - Wrist Flexor Stretching exercise
To start with, a therapist tells the patient to put the arms in front of the patient himself/herself as well as make a fist with the
hands. Open both of the hands, as if the patient was pushing on a wall in front of himself/herself. Take a right hand & pull the fingers back on the patient’s left hand & hold for 30 seconds. Repeat on the other hand as well. Repeat 3 times in a session. Do three sessions per day. - Side to Side Stretching
First of all, a clinician tells the patient to take the tabletop position with the knees & hands on the ground. Move the fingers outwards, they should be facing away from each other hands. Move from side to side, as well as hold for thirty seconds. Do it three times in one session. Do three sessions in a day.
Passive range of motion exercise
These assist for joints that have become inactive owing to injury or paralysis. In a passive range of motion exercises, the patient does not do any action themselves; instead, the physiotherapist moves a limb or even body part around the stiff joint, gently stretching muscles & reminding them how to move correctly. In most cases, therapeutic stretching exercises are also combined with passive range of motion exercises to get faster recovery. Here, the therapist stretches a patient’s soft tissue to relax the surrounding muscles as well as relieve tension. Passive range of motion exercises also helps minimize stiffness and rigidity in the joints that have been immobilized. According to the involvement of a joint, a clinician can do passive range of motion exercise.
- Passive shoulder internal rotation & external rotation
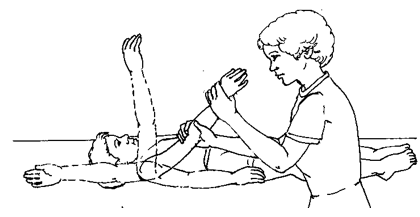
To start with, a physical therapist should tell the patient to take a relaxed position, namely supine. A clinician should move an arm inward to a side at the shoulder level, & the elbow bent to the 90degrees, with the arm should be held at the elbow & the wrist as well. Do ten repetitions per session. Do three sessions per day. After that, move the hand outward for external rotation and do as same as do for internal rotation, ten repetitions in a session with three sessions in a day. - Passive shoulder flexion and extension
To begin with, the physical therapist tells the patient to take a relaxed position, such as supine. Next, a clinician should hold the arm at the elbow as well as the wrist. The physical therapist moves it straight forward & upward toward the ear side, and brings it back to the starting position. Do ten repetitions in a session. Do three sessions in a day.
- Passive shoulder abduction as well as adduction
To embark with, a physical therapist tells the patient to take a comfortable position, like supine. The clinician should hold an arm at the elbow & wrist as well. The physical therapist moves it away from the body’s midline & the physical therapist tries to touch an ear. After that, bring back to the embarking position. Do ten repetitions per session. Do three sessions per day. - Passive elbow flexion and extension
To start with, a clinician may support a patient’s elbow or upper arm with one hand & hold the wrist or forearm with the other hand. Next, a clinician should gradually bend from an elbow and have the hand touch the elbow if possible, after that come back to the starting position. Do it ten times in a session. Do three sessions in a day. - Passive elbow supination & pronation
First of all, the physical therapist tells the patient to take a supine or sitting position with the supported back. Next, a clinician should grasp the hand by shaking the hand. A physical therapist moves the hand in supination which is in pronation, so the palm of a hand should face the roof. Do it ten times in a session. Do three sessions in a day. Place a hand in full supination & then rotate in a pronation meaning outward side. Do the same action and repetitions as do as supination. - Passive wrist extension
First of all, a physical therapist tells a patient to take a relaxed position, such as sitting on a chair & affected hand hanging on the edge of the table with full pronation. Place a rolled towel under an affected hand. A physical therapist takes his/her position opposite a patient. The physiotherapist tells a patient that tries to move the wrist upward, but if a patient cannot move the wrist then a physical therapist moves the hand in the upward direction till the stretch may be felt by a patient. Do it ten times in a session. Do three sessions in a day. - Passive wrist flexion
First of all, the physiotherapist tells a patient to take a comfortable position, namely sitting on a chair & the affected hand hanging on the edge of a table with full supination. Place a rolled towel under the injured hand. The clinician takes his/her position opposite a patient. While the therapist performs the motion, he/she gives the command to a patient to try to move the wrist down & a clinician moves the wrist downward direction till a stretch should be felt by a patient. Do it ten times in one session. Do three sessions in one day. - Passive wrist ulnar deviation
First of all, the therapist tells a patient to take a relaxed position, such as sitting on a chair and the affected hand should be in mid-pronation. Place a rolled towel under the affected hand. A physical therapist takes his/her position opposite the patient. After that, a therapist gives a command to the patient that tries to move a wrist down while the clinician performs a motion, & then the physiotherapist moves a wrist in the downward direction till a stretch should be felt by the patient. Do it ten times in a session. Do three sessions per day.

- Passive wrist radial deviation
To begin with, a clinician asks a patient to take a comfortable position, like sitting on a chair and the injured hand should be in mid supination position. Place a rolled towel under the affected hand, & a clinician takes his/her position opposite a patient. A therapist gives the command to a patient that tries to move the wrist upward while a clinician performs the motion and the clinician moves a wrist in an upward direction till the stretch should be felt by a patient. Do it ten times in a session. Do three sessions in a day. - Passive finger flexion
First of all, a clinician gives a command to a patient that places the hand with an affected finger flat on a table, with palm up. A clinician places his/her free hand on the back of the fingers & moves the fingers inward like bending the fingers. After that, the affected finger will be free to move & then straighten a finger. Repeat it ten times per session. Do three sessions in a day. - Passive thumb flexion
To start with, a therapist tells a patient to take a comfortable position, such as sitting on a chair and the hand should be in mid pronation. A rolled towel is put under an affected hand. Next, use one hand of a clinician to bend a thumb down hence a gentle stretch is felt. Repeat it ten times in a session. Do three sessions per day. - Passive thumb abduction
First of all, a therapist tells a patient to take a comfortable position, such as sitting on a chair with a rolled towel under an affected hand, but the hand should be in mid-pronation. Stretch the thumb out from the palm as if a patient is opening it up to hold a large jar, but remember to stretch at a big thumb knuckle, not the tip. Repeat ten times in a session. Do three sessions in one day. - Passive thumb opposition
To begin with, a clinician gives a command to the patient to take a relaxed position, such as sitting on a chair. Touch the thumb to the tip of each finger. When a patient can do the thumb opposition exercise easily, after touching further down on each finger until a patient can touch the base of each finger. Repeat it ten times in one session. Do three sessions in a day. - Passive hip with knee flexion
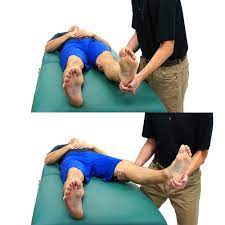
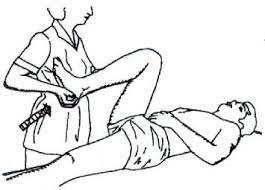
First of all, a patient should take a comfortable position, such as supine. Cradle a leg by placing one hand under the bent knee, and then another hand grasps the heel for stabilization. Lift a knee and bend it toward a chest side, with the kneecap pointed toward a roof. Do not allow a hip to twist during the motion. The foot should stay in a straight line with the hip, but not swing in or even out. A leg is lowered to the starting position. Do it ten repetitons in a session. Do three sessions in a day. - Passive hip abduction and adduction
To begin with, the patient may take a relaxed position, like supine. A physical therapist cradles the leg by placing a hand under a knee as well as holding it. Place another hand under the heel to stabilize a hip joint. Keeping a knee straight, move the leg along a surface of the bed, away from another leg, to around 45 degrees, and then bring the leg back towards another(healthy) leg. Do ten repetitions per session. Do three sessions per day.
- Passive hip external rotation & internal rotation
First of all, a physical therapist tells a patient to take a relaxed position, such as supine with the back supported. After that, a clinician grasps a knee which is 90 degrees flexion position along with the hip at 90 degrees flexion. A therapist rotates a leg outside as well as inside. Do it ten times per session. Do three sessions in a day. - Passive knee flexion in supine
First of all, the physical therapist tells the patient to take a relaxed position, such as supine. A clinician places one strong hand on a front of a thigh and grasps an ankle joint with the second hand. The physiotherapist bends the knee as well as the hip toward the face, when a therapist moves a leg, the patient should also try to help in bending the knee & hip, which assists in the strengthing of the knee flexors. A clinician holds the affected leg at the endpoint for five seconds. Do it ten times in a session. Do three sessions per day.

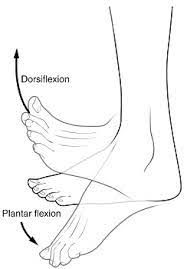
- Passive dorsiflexion
To start with, a therapist instructs a patient to take a comfortable position, like lying on a bed with a knee straight as well as the foot should out of a bed. A clinician cups a heel with one hand as well as places another hand on the bottom of the foot. A physical therapist gently pushes the foot up so that the toes point toward a head of a patient. Try to do the exercise ten times in a session. Do three sessions in a day. - Passive plantarflexion
To begin with, a physical therapist should give a command to a patient, to take a comfortable position, namely lying on a bed with a knee straight & the foot should out of a bed. A therapist cups the heel of the unaffected foot with one hand and places the other hand on the bottom of the foot. A physical therapist gently pushes the foot down so that the toes point away from the body. A clinician should make sure, do not to hold this action at the endpoint. Do it ten times per session. Do 3 sessions per day. - Passive inversion
First of all, ask a patient to take a comfortable position, namely lying on a bed with the knee straight as well as the foot should out of a bed. Next, a clinician cups a heel with one strong hand & places another hand on the bottom of the foot as well. A clinician gently turns the foot inward, not allowing a leg to rotate. Do it ten times per session. Do three sessions per day. - Passive eversion
A physical therapist should give a command to a patient to take a comfortable position, namely lying on a bed with a knee straight as well as the foot should out of the bed. A physiotherapist cups a heel with one hand and places another hand on the bottom of the foot. A therapist gently turns the foot outward but does not allow a leg to rotate. Do it ten times in a session. Do three sessions in a day.
Active-assistive range of motion exercises
As the name suggests, these exercises involve some assistance from the physical therapist. The patient does most of the movement, but they get partial assistance to complete a movement correctly. In most cases, this restricted motion is a result of weakness or pain caused due to falls, bruises, or accidents, up to serious injuries. The physical therapist mostly uses a strap or even a band to secure the joint before helping the movements. Initially, the patient may suffer a great deal of pain as well as a weakness when performing these exercises. However, with time, they have great scope for gradual & lasting improvement in the range of motion around the affected joint.
- Active-assisted shoulder flexion & extension
First of all, a physical therapist should tell a patient to stand in front of a finger ladder. Place the affected hand on a finger ladder as well as move the fingers upward on the ladder meaning as far as possible improve the steps of the ladder and do shoulder flexion after that come back to the starting position. Do it ten times in a session. Do three sessions in a day. - Active-assisted shoulder abduction as well as adduction
To start with, a therapist may tell the patient to stand at a 90degrees angle from a finger ladder. However, an affected side should be in front of a ladder. Place the affected hand on the finger ladder & move the fingers upward on a ladder meaning as far as possible increase the steps of a ladder and do shoulder abduction, after that come back to the starting position. Do it ten times per session. Do three sessions per day. - Active-assisted elbow flexion as well as extension
To begin with, a clinician should give a command to a patient that takes a comfortable position, such as sitting on a chair with the back supported. A physical therapist should support the patient’s elbow or upper arm with one hand and hold a wrist or forearm with another hand. A clinician should tell a patient to move the forearm to the face side, meaning bend the elbow, but when a patient stops to do this movement, a physical therapist helps in completing the full range of elbow flexion and return to the embarking position. Do ten repetitions per session. Do three sessions per day.

- Active-assisted forearm supination and pronation
First of all, a clinician should give a command to the patient to take a comfortable position, such as sitting on a chair with a supported back, & an elbow should be 90 degrees flexed with full pronation. A therapist should support the patient’s elbow or upper arm with one strong hand and hold a wrist or forearm with another strong hand as well. A physical therapist should tell the patient to rotate the forearm outward so a palm will be facing a ceiling, but when the patient stops doing the action, the clinician assists to complete a full range motion after that return to the embarking (pronation) position. Do ten repetitions in a session. Do three sessions in a day. - Active-assisted wrist flexion as well as extension
To embark with, a therapist gives commands to a patient to take a comfortable position, namely sitting on a chair as well as the affected hand relaxed on an edge of the table with full pronation. Place the rolled towel under an affected hand. A physiotherapist takes his/her position opposite the patient. The physical therapist gives commands to the patient that tries to move the wrist down, when a patient is unable to move his/her hand during that time the clinician provides help to a patient to reach a full range. Do it ten times per session. Do three sessions per day. - Active-assisted wrist ulnar deviation as well as radial deviation
To begin with, a clinician tells a patient to take a comfortable position, such as sitting on a chair, and the affected hand should be in mid-supination. A clinician places a rolled towel under an affected hand. An examiner takes his/her position opposite the patient. The physical therapist gives a command to a patient that tries to move the wrist down, and when a patient stops performing a movement, then the physical therapist helps a patient to reach the end range. Do it ten times in a session. Do three sessions per day. Next, come back to the normal position, & then move the affected hand upward towards the ceiling. - Active-assisted hip abduction as well as adduction
A patient lays on the uninjured hip in the side-lying position, and an injured hip is on the top. For comfort, the small pillow can be placed between the two knees. A therapist should apply for additional helps in lifting the injured leg to the side with support above the knee joint as well as at the ankle, if needed. Remember, a movement is straight up as well as slightly back towards a physical therapist. A physical therapist makes sure that the top hip is rolled forward of an imaginary vertical line drawn straight through both hips, and does not let the patient roll backward at the hip when completing this exercise. - Active-assisted hip flexion as well as extension
A patient lies on a back to perform the hip flexion with straight knees, then a clinician supports a patient’s thigh above the knee joint as well as the ankle joint. A clinician should give a command to the patient that moves a leg upside towards the roof, and the physical therapist should apply additional help is only needed for a patient to lift the thigh off the supporting surface & a leg back to the bed, in the event a patient fatigues and is unable to independently lower the leg slowly. A therapist should watch for signs of muscle fatigue which includes quivering or shaking muscles around a hip & increased feeling of weight in the affected limb; additional support can be needed. Do three sessions in a day. Do three sessions in a day.
- Active-assisted hip internal rotation as well as external rotation
The patient lays on a back to perform a hip internal rotation with straight knees, next the therapist supports a patient’s thigh above the knee joint & the ankle joint. The clinician should give a command to the patient that moves a leg inward towards another leg side & outward meaning away from the unaffected leg & a physical therapist should apply external help which is only required for the patient to move the thigh inward and then a leg back to the embarking position, in the event patient fatigue and is unable to independently move the leg back slowly. A therapist should watch for signs of muscle fatigue which includes quivering or it may see shaking muscles around the hip & an increased feeling of weight in an affected limb; additional help can be needed. Do three sessions per day. Do three sessions per day. - Active-assisted knee flexion and extension in supine
A physical therapist should tell a patient to take a comfortable position, like supine. the physical therapist places one strong hand on the high and grasps an ankle joint with another hand. The clinician gives a command to a patient that bends the knee & the hip toward the face side. When a patient stops to complete the entire range, then a physical therapist assists to complete a knee flexion. Do it ten times in a session. Do three sessions in a day. - Active-assisted dorsiflexion as well as plantar flexion
First of all, tell a patient to take a comfortable position, such as lying on a bed with a knee straight & the foot should out of a bed. A therapist cups a heel with one hand as well as places another hand on the bottom of the foot. A clinician gives a command to a patient that moves the foot upward & downward as far as a patient can, when a patient is not able to move the foot between the motion, a therapist helps a patient to reach an entire range of the motion. Hence, the toes move towards the face. Do this exercise ten times per session. Do three sessions per day. - Active-assisted inversion & eversion
To begin with, a therapist tells the patient to take a comfortable position, namely lying on a bed with a knee straight and the foot should out of the bed. A physiotherapist cups an inner border with one hand & places another hand on the bottom of the foot. The clinician gives a command to the patient that moves their foot inward & outward as far as the patient can, when the patient is not able to move the foot inward in between the action, the clinician helps the patient to reach the entire range of the motion. Do it ten times in a session. Do three sessions in a day. - Active assisted toe flexion as well as extension
To start with, a therapist tells the patient to take the relaxed position, namely lying on a bed with a knee straight as well as the foot should out of a bed as well. A therapist cups the toes with one strong hand and places another hand on the bottom of the foot. A clinician gives a command to a patient that moves the toes toward the ground as far as a patient can, & when a patient is not able to bend the toes in between the motion, a therapist helps a patient to reach the full range of toe flexion. Do it ten times per session. Do three sessions in a day.
Active range of motion exercises
These exercises purely involve very small help from a physiotherapist. The patient is entirely capable of performing these exercises, and most often, the clinician’s involvement is limited to verbal cues and directions on how to improve the posture & movement involved in the exercises. It is most useful in cases of minor(small) injuries that do not severely restrict a motion of body parts but are painful, uncomfortable or hindering nevertheless.
- Shoulder Flexion as well as extension
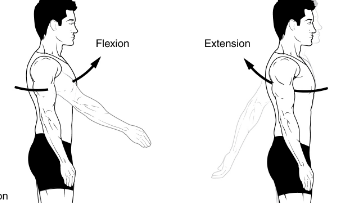
First of all, a therapist should instruct a patient to take a relaxed position, such as sitting. A patient should be commanded by a physical therapist to start with the arm by an injured side and slowly lifts a hand toward the ceiling with an elbow straight. Slowly bring an arm back down by the side with a straight elbow. Repeat it ten times in a session. Do three sessions in a day.
- Shoulder abduction and adduction
To start with, a physical therapist should tell the patient to take a relaxed position, namely supine, side-lying, or even sitting. The patient should be commanded by a therapist that begins to do this exercise with an arm by an affected side, gradually lift a hand but move by a side toward the floor with the elbow straight. Gradually, embark to back down the arm by the side with the elbow straight and come back to starting position. Repeat it ten times per session. Do three sessions per day. - Shoulder internal rotation and external rotation
First of all, a therapist tells a patient to take a relaxed position, namely supine or even standing. A patient should be instructed by a physical therapist to raise an arm to shoulder height at a 90- degrees angle to the body, next rotate the hand inward in standing or even upward in supine till a hand is even with the elbow. Let the hand rotate to the embarking position. Do it ten times per session. Do three sessions per day. - Active elbow flexion as well as extension
To begin with, a therapist tells a patient to take a comfortable position, such as sitting or even standing. A clinician gives the command to a patient that bends an elbow meaning moving the forearm toward the face side after that return to an embarking position which is the extension. Do it ten repetitions in a session. Do three sessions in a day. - Active forearm supination as well as pronation
First of all, the therapist tells a patient to take a comfortable position, namely sitting or standing with the elbow around 90 degrees of flexion. A physiotherapist should give a command to a patient that moves a forearm outward so a palm
will face the roof, and then return to the embarking position of the forearm pronation. Do it ten times in a session. Do three sessions per day. - Active wrist flexion as well as extension
To start with, a therapist tells the patient to place a forearm on the table on a rolled-up towel for padding with the hand
hanging on an edge of a stable surface, such as the table with the wrist in full pronation. A physical therapist should give a command to the patient to move a hand down till the patient feels a mild stretch, & come back to the embarking position. Do it ten times in a set. Do three sets per day. A physical therapist tells a patient to move a hand upward towards the roof for wrist extension.

- Active wrist ulnar deviation as well as radial deviation
This is a responsibility of a therapist to give a command to the patient to take a comfortable position with the support of the forearm on the table on a rolled-up towel for padding or on a knee, along with the thumb upward in a position. Move the wrist down through its full range of movement. Do it ten times in a session. Do three sessions per day. Move a wrist upward for a wrist radial deviation towards the ceiling side. - Active thumb flexion & extension
The physical therapist gives a command to a patient to take a comfortable position with the forearm supported on a table on the rolled-up towel for padding or on the knee. A thumb is positioned outward and moving a thumb across the palm & back to a starting position. Do it ten times per session. Do three sessions per day. - Active thumb abduction as well as adduction
First of all, a clinician tells the patient to take a comfortable position, like sitting on a chair with the rolled towel under an injured hand, but the hand should be in mid-pronation. Ask the patient to stretch a thumb out from a palm as if a patient is
opening it up to hold the large jar, but remember to stretch at the big thumb knuckle, not at the tip. Repeat it ten times in a session. Do three sessions per day. - Active thumb opposition
To start with, tell a patient to take a comfortable position, such as sitting on a chair. A therapist gives the command to touch the thumb to the tip of each finger. When a patient iscano it effortlessly, touch further down on each finger until a patient iscanouch the base of each finger. Repeat it ten times per session. Do three sessions in a day. - Active finger flexion and extension
First of all, a therapist places the hand with an affected finger flat on a table, with palm up. The therapist gives
a command to the patient to bend the fingers inward. Straighten the fingers. Repeat it ten times per session. Do three sessions in a day. - Active thumb opposition
To embark with, tell a patient to take a comfortable position, such as sitting on a chair. The therapist gives the command to the patient that touches a thumb to the tip of each finger. When a patient iscano this effortlessly, touch further down on each finger till the patient iscanouch the base of each finger. Repeat it ten times per session. Do three sessions in one day. - Active hip flexion with knee flexion
First of all, the therapist tells a patient to take a supine position. A clinician should give a command to the patient that bends the healthy hand. Do it ten times in a session. Do three sessions in a day. - Active hip abduction as well as adduction
To start with, a therapist should give the command to the patient that takes a relaxed position, such as side-lying with an affected leg up. A physical therapist tells a patient to move a leg up towards the roof as far as possible, but without any extra support, and then come back to the starting position. Do it ten repetitions per session. Do three sessions in one day. - Active hip internal rotation & external rotation
First of all, the physical therapist gives a command to the patient to take a relaxed position, such as supine. A physical therapist gives a command to the patient that rotates a leg inward towards the unaffected leg side as far as possible, without any extra support. Do it ten times in a session. Do three sessions in a day. After that, move the affected leg outside for the external rotation and do similar repetitions as internal rotation. - Active knee flexion in supine
To embark with, the clinician should tell the patient that takes a comfortable position, namely supine. A physical therapist gives a command to the patient that bends a knee with the hip as far as possible but does not hold at the endpoint. Do it ten times in a session. Do three sessions per day. - Active toe flexion
To do the exercise: To begin with, a physical therapist tells the patient to take a sit-up straight on a chair, with the foot flat on the ground. Place a left foot on the right thigh. Then move the toes down toward the ground. Do ten repetitions per session. Do three sessions per day. - Active dorsiflexion
First of all, a physiotherapist tells a patient to take a comfortable position, such as lying on a bed. A physical therapist should give a command to a patient to bend the foot toward the face side meaning upward as far as a patient can. Repeat it ten times in a session. Do three sessions per day.
- Active ankle inversion
To start with, a therapist tells a patient to take a relaxed position, such as lying on a bed. A physical therapist should give a command to the patient to move the foot inside as far as the patient can. Repeat it ten times in a session. Do three sessions per day. - Active ankle eversion
First of all, a therapist gives the command to the patient to take a comfortable position, such as lying on a bed. A clinician should give a command to a patient to move the foot outside as far as the patient can, but at the endpoint, the hold should not be taken. Repeat it ten times in a session. Do three sessions per day.
Strengthening exercise
- Grip strengthening
Grippers come in several types of tensions. The patient may start with the one that is only a little difficult to move. When the low weight becomes easy, improve the gripper tension. Grippers range embarks from light to ones requiring 365 pounds of pressure to close(move). Tell the patient to sit comfortably with the arm bent at 90 degrees, with palm facing in, holding a gripper in one hand. Squeeze slowly, and release it without holding at the endpoint. Repeat 10 to 20 times in one session, & do three sessions per day. Only the hand should be moving, not a whole arm. Switch the hand & repeat. When the patient can comfortably do three to four sets, try a gripper with more tension.

- Rubber band strengthener
A rubber band strengthening exercise is simple, but, this works the smaller hand muscles. This is also one the patient may do sitting at a desk or even anywhere else. Tell the patient to take an ordinary rubber band available at home & stretch it around the tops of the fingers & thumb. Gradually, open the hand to stretch against the rubber band, and slowly close the hand. Keep a motion controlled. Repeat 10 times per session. Do three sessions per day.
- Fist to jazz hand
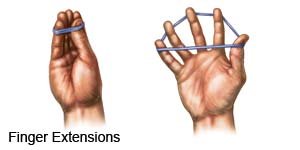
First of all, tell the patient to rest one arm on the table such as if the patient is about to arm-wrestle someone. Make a fist. Slowly open the fist & stretch the fingers out as wide as the patient may comfortably go (do a jazz hand). Repeat 10 times in a session. Do three sessions per day. - Finger spread-apart with theraband
To start with, wrap a theraband around each of the fingers. Push against resistance from the band, & then spread fingers as far apart as possible. Hold it for ten seconds, after that release it. Continuously do it ten times, then switch the theraband to another hand as well as repeat. Do it ten times per session. Do three sessions per day. - Dumbbell Windshield Wipers
First of all, place a forearm on a stable & flat surface like a table or a chair. Hold one end of a lightweight dumbbell (around two to five pounds) in the affected hand. Rotating the wrist from right to left, lift & lower a dumbbell in the windshield wiper motion. Do continuously for ten repetitions in a session. Do three sessions per day. - Ball Squeeze
To begin with, telling the patient to grasp a ball in one hand means an affected hand that can be squeezed, such as a stress ball, tennis ball, or even racquetball. Squeeze the ball with all the affected fingers for ten seconds & then relax. Repeat it ten times per session. Do three sessions per day. After 5 to 6 days improve repetitions from 10 to 20, according to the patient’s ability. - Wrist supination with dumbbell
To perform an exercise, tell the patient to take a sitting position on a chair with the forearm resting on a table. Make sure that the wrist, & the hand, is over the edge of the table. Hold the end of a small 1- to 3-pound dumbbell in the hand, such as the patient would hold a hammer. Slowly allow the hand & wrist to rotate over so a palm is facing up towards the roof, then slowly rotate a hand back up, hence a dumbbell is straight up again. Do ten repetitions per session, but without hold at the endpoint. Do three sessions per day. After 5 to 6 days of the exercise, tell the patient to take hold at an endpoint for ten seconds in a repetition.

- Wrist pronation with dumbbell
To strengthen wrist pronators, tell the patient to sit on a chair with a forearm supported on a table & a wrist & hand over an edge. Hold the dumbbell with a weight pointing up towards the ceiling. Slowly rotate a hand, so a wrist, & palm, are facing down towards the floor, then slowly turn a hand back to the beginning position with a weight pointing up towards the roof. Do it ten times in a session. Do three sessions per day. - Wrist ulnar deviators strengthening with theraband
First of all, telling the patient to take a comfortable position means sitting on the chair with a hand in mid-pronation position at the edge of a table & the hand should be put over the rolled towel. Wrap one end of a theraband in a patient’s hand, & the second end in a clinician’s hand. Ask the patient to move their hand in a downward direction agaist the theraband. Do it ten times per session. Around three sessions should be done by the patient per day. After 5 days held at the end position for ten seconds per repetition. Slowly come back to the normal position. When a patient is adapted to a light-weighted band after upgrading the color of the band for strengthening. - Wrist radial deviators strengthening with a theraband
To embark with, tell the patient to take a relaxed position, namely sitting on the chair with the hand in the mid-supination position at an edge of a table & a hand should be placed over a rolled towel. Wrap the one end of a band on the patient’s hand, & the second end on the physical therapist’s hand. Ask the patient to move their hand in the upward direction agaist the theraband. Do it ten times per session. Around two sessions may be done by the patient in a day. After 5 to 6 days hold a position at the endpoint for ten seconds in a repetition. Slowly to the normal position. - Wrist extensors strengthen with the use of a theraband in pronated hand
To start with, tell the patient to take a relaxed position, which means sitting on a stable surface(chair) with a hand hanging on the rolled pillow at the edge of a table, and a palm should be facing the floor. Wrap the one end of a theraband on the patient’s hand, whereas the second end is on the clinician’s strong hand. Give the command to the patient to move their hand in the upward direction against a band. Do it ten times in a session. Around three sessions would be done by the patient in one day. - Single leg stands
Standing on one foot is another best way to exercise ankle eversion & the challenge to ankle stability in general.
To start with, a patient with an intersection syndrome of the foot has enough strength & balance and may try to stand on their affected leg for ten seconds at a time. Be sure to hold onto a back of a chair for stability so that the patient does not fall. Do it ten times in a session. Perform three sessions in a day.

- Toe-to-heel rocks
Stand in front of a table, chair, wall, or even another stable object the patient may hold onto for support. Rock the weight forward & rise onto the toes. Hold the described position for 10 seconds. Rock the weight backward onto heels & lift the toes off the ground. Hold it for 10 seconds. Repeat a sequence ten times in a session. Do three sessions in a day. - Marble Pickup
First of all, a physical therapist should tell the patient to sit on the chair with both feet flat on the ground. Place 10 to 20 marbles & the bowl on the floor in front of a patient. Using the toes of the affected foot, pick up each marble & place it in a bowl. Repeat this exercise until the patient has picked up all the marbles. Do it three times in a session. Do two sessions in a day. - Ball lift
To begin with, a patient can sit on a chair with both feet flat on the floor. Place the small round object on the floor in front of a patient (about the size of a tennis ball). Hold the object between the feet & then slowly lift it by extending the legs. Hold it for ten seconds after that slowly lower. Repeat 10 times in a session. Do three sessions per day. - Toe splay
Doing the toe splay exercise may increase control over the toe muscles. People may do it on both feet at once or on alternate feet, mainly depending on which a patient finds more comfortable.
To begin with, sit in the straight-backed chair, with the feet gently resting on the ground. Spread the toes apart as long as
possible without straining. Hold a position for 10 seconds. Repeat this motion 10 times in a session. Do three sessions in a day. Once a patient has built up their strength, he/she may try looping a rubber band around the toes. This will provide resistance & make the exercise more challenging. - Toe curls
Doing the toe curls build up the flexor muscles of the toes & the feet, as well as increases overall strength.
To do this exercise:
First of all, sit up straight in a chair, with the feet flat on the floor. Lay a small towel on the floor in front of the body, with a short side facing the feet. Place the toes of one foot on the short side of a towel, & try to grasp a towel between the toes as well as pull it toward oneself. Repeat it ten times in a session. Do three sessions in a day. To make this exercise more challenging, try weighing down the opposite end of a towel with an object. - Sand walking
Walking barefoot on the sand is the best way to stretch & strengthen the feet as well as calves. It is the best exercise, in general, owing to the sand’s soft texture making walking more physically demanding.
To start with, head to the beach, the desert, the volleyball court, or even any other location with sand. Remove the shoes & socks. Walk as far as possible. Try increasing a distance gradually over time to avoid overexerting the muscles in the feet & calves as well. - Seated ball lift
To embark with, the physical therapist tells a patient to sit on a chair with their feet flat on the floor. Place the small ball (e.g., a tennis ball) on the floor in front of a patient. Grab the ball using both feet & slowly extend the legs to lift it. Hold it for 10 seconds, and lower back to the ground. Repeat it ten times in a session. Do three sessions in a day. - Toe-to-heel rocks
To start with, rock weight forward to rise onto the toes & hold a position for 10 seconds. Rock a weight backward & lift the toes off the floor and hold for 10 seconds. Repeat ten times in a session. Do three sessions in a day. For more difficulty, a patient may do the described standing on one leg. A patient may want to do it near a wall or even with the chair or counter in front of the clinician so a physical therapist may hold on for added support. - Towel pickup exercise
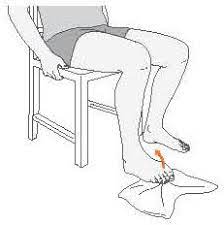
To begin with, place the towel on the floor in front of a chair. Next, tell a patient that with a heel on the ground, try to pick up a towel by grabbing it with the toes. Repeat described exercise 10 times in a session. Do three sessions in a day. The exercise may be increased by adding a small weight to a towel. When a patient can pick up the towel 10 times, increase the number of repetitions by 10-15-20.
- Step-ups
First of all, an affected foot on a bottom stair & the good foot on the floor. Straighten the knee so he/she may lift herself on an affected leg, then put it down. Repeat the described exercise 10 times in a session. Minimally 3 sessions per day. When the patient becomes comfortable with low repetition, then increase the number of repetitions. - Heel raises
To embark with, a therapist tells a patient to sit on the chair with their feet flat on the floor. Although raising the heels slowly, keep the toes on the ground. Lower the heels back down. Repeat this described exercise 10 times per session, minimally 3 times per day. As muscles start to gain strength, do this exercise in the standing position also. - Dorsiflexors strengthen with a theraband
To begin with, a therapist may tell the patient to sit on a chair & tie a theraband around a stable surface that would not move, like a heavy table. Extend the lower leg & wrap the other end of a band around the top of the foot. Do flexion of the foot meaning taking the foot towards a face side, with a theraband resisting the movement. Hold it for 10 seconds. Repeat 10 times in a session. Do three sessions in a day for strengthening. After 5-6 days increase weight from 500 gm to 1 kg & also increase repetitions. - Planterflexors strengthening with a theraband
First of all, a physical therapist tells the patient to sit on a chair, & take one side of the theraband in each hand, & wrap it around a ball of the affected foot. Stretch a leg out in front of a patient face side. Extend the foot away from the face. Hold it for the next 10 seconds. Repeat ten times per session. Do three sessions in a day. - Inversors strengthen with the use of a theraband
To start with, a physical therapist ties a theraband around a leg of a chair or with the table on the same side of the affected foot. Wrap another end of a theraband around the inside of an affected foot, & try to turn the foot inside. Hold it for the next 10 seconds. Do the described exercise 10 times per session. Do 3 sessions in a day. When a patient is adapted to the 500gm weight, increase the weight to 1 kg and increase the repetitions. - eversors strengthen with the use of a theraband
To begin with, tie a theraband on the leg of a chair opposite to an affected foot. Wrap another end around the outside of an affected foot. The clinician should give a command to a patient that tries to turn the foot outside, & hold for 10 seconds, repeating it 10 times per session. Do 3 sessions in a day. When a patient is adapted to the 500gm weight, increase the weight to 1kg & increase the repetitions. - Squat
Stand with a foot slightly wider as compared to hip-width apart. Lower the hips into a squat as the patient bend the knees and keep the back flat. Continue to lower yourself till the thighs are parallel to the floor. Push into a floor through the heels to come back to embark. It is one repetition. Keep the heels flat & knees aligned with the second toe so they do not cave in. The squat targets the glutes, quads, and core muscles. If it is too challenging, try embarking with a chair squat: Squat in front of a chair (or bench) and lightly tap a butt to a chair with each repetition. Do it ten times in a session. Do three sessions in a day. - Glute Bridge
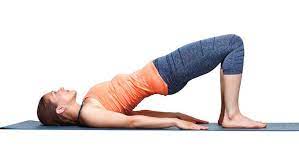
To start with, lie on a back with the knees bent as well as feet flat on the floor, hip-width apart. Hold a dumbbell in each hand and rest the weights right under the hip bones. This is the embarking position. Squeeze the glutes and abs, as well as push through the heels to lift the hips a few inches off the floor, till a body forms a straight line from the shoulders to the knees. Hold for the second & then slowly lower the hips to return to the starting position. It is one repetition. Do 10 repetitions in a session. Do 3 sessions in a day.
- Reverse Lunge
Stand with a foot about shoulder-width apart & engage the core. Step backward with a right foot, landing on a ball of the right foot and keeping the right heel off the ground. Bend both knees to 90 degrees as he/she sinks into a lunge. Focus on keeping a core engaged as well as the hips tucked ( do not stick a butt out). Sometimes this may be useful to place the hands on the hips so the patient can make sure the hips are not tilting to the side or forward & back as well. Push through a heel of the left foot to return to the embarking position. A patient may do all of the repetitions in the row, or the patient can alternate sides.
Living with Psoriatic Arthritis
- Stiff joints, as well as muscle weakness, may happen in patients with psoriatic arthritis owing to lack of use. Exercise may be an important intervention that patients may use to prevent or decrease these impairments from happening Examples of exercise which may be done include walking (a walking aid or even shoe inserts can be needed to reduce the stresses on the affected joint), bikes, yoga, as well as stretching (for relaxation). Water therapy can also be beneficial, namely swimming or walking laps, in order to decrease the stress on the joints.
Lifestyle Changes
- Do not underestimate the positive impact of a healthy lifestyle if the patient has a chronic disease. Commit to lifestyle habits that decrease pain as well as improve the quality of life. These include:
- Avoid ingredients in clothing, skincare products as well as laundry detergents that could irritate the skin.
- Eating a healthy, and balanced diet with plenty of anti-inflammatory foods.
- Get enough exercise to keep joints healthy and flexible.
- Managing stress with fun activities or support group exercises.
- Soothing skin with gradual moisturizers.
- Use hot as well as cold packs to decrease swelling & stiffness.
Home remedies
- Home remedies include lifestyle modifications that assist address psoriatic arthritis symptoms as well as improving outcomes. Examples of lifestyle changes include:
- Managing stress at home as well as at the office.
- Practicing meditation & other forms of relaxation.
- Regular exercises.
- Avoid smoking or even drinking too much alcohol.
- Eating a balanced diet that is low in sugar, fat, & salt.
- Applying hot as well as cold therapies to the joints.
- Protecting skin, avoiding skin irritants, & managing psoriasis, if present.


13 Comments