Midfoot Sprain
Table of Contents
Introduction:
The human foot is a remarkable structure comprised of numerous bones, joints, ligaments, and tendons working in tandem to facilitate movement and support the body’s weight. Among its intricate components, the midfoot plays a vital role in maintaining stability and enabling efficient mobility. A midfoot sprain, an injury commonly encountered, affects this crucial region, causing discomfort, limited function, and potential complications if left untreated.
A midfoot sprain occurs when the ligaments connecting the midfoot bones are subjected to excessive force or trauma, leading to varying degrees of damage. This injury can result from sudden twists, falls, overuse, or high-impact activities. Understanding the classification and severity of midfoot sprains is essential in devising appropriate treatment strategies, as milder cases may require rest and conservative care, while severe instances might demand surgical intervention and extended rehabilitation.
What is a Midfoot sprain?
A frequent form of foot sprain that affects the ligaments in the middle of your foot is called a midfoot sprain. The Midfoot Sprain may begin as a minor injury, but it has the potential to get worse when instability arises from torn ligaments.
The area in the middle of the foot that joins the forefoot and the rear (hindfoot) is known as the midfoot. The ligaments and bones in the midfoot shape the foot’s arch. Five bones—the cuboid, navicular, and three cuneiform bones—as well as a number of ligaments—support the midfoot.
An injury to one or more of the ligaments connecting these bones is known as a midfoot sprain. The area in the middle of the foot that joins the forefoot and the rear (hindfoot) is known as the midfoot.
Along with the spatial arrangement of the bones in the midfoot, ligaments bind bones to one another to give stability and maintain the structural integrity of the midfoot. A midfoot sprain, on the other hand, happens when these ligaments are overstretched as a result of repeated motion or a rapid twist. The cuboid, navicular, medial, intermediate, and lateral cuneiform bones comprise the midfoot, which is the portion of the foot that connects the heel bones to the forefoot.
A midfoot sprain is an injury to the midfoot’s ligaments located in the middle of the foot. It is a common injury that happens during athletics, especially in those activities where cutting and twisting are involved. An athlete could miss a significant portion of the season as a result.
Broken bones in the midfoot or ruptured foot ligaments are two common causes of midfoot injuries. These injuries can be far more complicated than simple sprains, which is how they are sometimes misdiagnosed. It can be severe, take months to heal, and possibly necessitate surgery if several bones and/or ligaments are involved.
The bones and joints that connect the forefoot to the front of the ankle make up the midfoot. A midfoot sprain is an injury to this part of the foot that can harm the tendons, ligaments, and joints. This harm might range from a little ligament strain to a bone fracture or joint dislocation. A midfoot sprain, also known as a Lisfranc injury, occurs when there is damage to the ligaments and/or bones in the midfoot region.
It takes the name of French physician Jacques Lisfranc de St. Martin, who described the injury in the early 19th century. The Lisfranc injury is one such injury that has the potential to be severe and can result in long-term arthritis.
What are the causes of Midfoot sprain?
Midfoot sprains are relatively rare but can be serious and require prompt medical attention. The following are some typical causes of midfoot sprains:
- Trauma or direct impact: A sudden and forceful impact to the midfoot, such as during a fall, car accident, or sports collision, can lead to a midfoot sprain. This is a common cause of Lisfranc injuries in athletes involved in contact sports like football or rugby.
- Twisting or pivoting: Rapid twisting or pivoting of the foot, while the foot is planted on the ground, can put significant stress on the midfoot ligaments and cause a sprain. This type of injury is often seen in sports that involve quick changes in direction, such as soccer or basketball.
- Falls from height: Falling from a significant height and landing on the feet can lead to compression and twisting forces on the midfoot, resulting in a sprain.
- Tripping or missteps: Tripping over an object or taking an awkward step can cause the foot to be forced into an unnatural position, leading to midfoot ligament damage.
- Accidents during high-impact activities: Activities such as skiing, snowboarding, or skateboarding can sometimes lead to midfoot sprains if there’s a fall or collision during the activity.
- Overuse or repetitive stress: Although less common, midfoot sprains can also result from overuse or repetitive stress on the foot, particularly in activities that involve repetitive impact on the midfoot, such as running or jumping.
- Weak foot arches and ligaments: People with weak foot arches or lax ligaments may be more prone to midfoot sprains due to reduced stability in the midfoot region.
- Improper footwear: Wearing shoes that do not provide sufficient support or protection for the midfoot can increase the risk of injury during physical activities.
- Sports: Typically, cutting and twisting actions of the foot cause an injury, such as when the foot is planted as the athlete rotates and pushes off. These sports frequently involve midfoot sprains: Soccer, Basketball, Football, and Hockey.
Symptoms of Midfoot sprain:
The following are a few typical signs that might indicate a midfoot injury:
Symptoms of a midfoot sprain typically include:
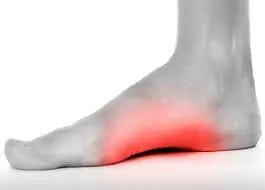
- Pain: Moderate to severe pain in the middle of the foot, often worsening with movement or pressure. Pain that gets worse when standing and moving about. Crutches may be needed if you push off with the hurt foot since doing so might make the discomfort worse.
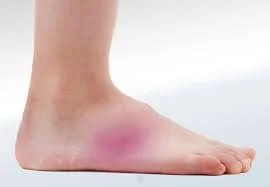
- Swelling: Foot soreness and swelling on the top. The affected area may become swollen, making it appear larger than the other foot.
- Bruising: Bruising or discoloration around the midfoot can occur due to blood vessel damage. Visible bruises on the foot’s top or bottom. There is a higher likelihood that it is a true Lisfranc injury if the bottom has more bruising.
- Tenderness: The midfoot area may be tender to touch.
- Difficulty bearing weight: Walking or putting weight on the injured foot may be challenging and painful.
- Limited range of motion: Reduced ability to move the foot due to the injury.
- Instability: The midfoot may feel unstable or weak, making it difficult to walk or stand.
Risk factors:
Several factors can contribute to an increased risk of midfoot sprains (Lisfranc injuries). Being aware of these risk factors can help individuals take preventive measures to reduce the likelihood of such injuries. Some common risk factors for midfoot sprains include:
- Sports and Physical Activities: Participating in high-impact sports or activities that involve rapid changes in direction, jumping, or potential collisions increases the risk. Sports like soccer, football, basketball, and skiing, which require quick and forceful movements, can put stress on the midfoot and raise the risk of injury.
- Improper Footwear: Wearing inadequate or poorly-fitting footwear during physical activities can contribute to midfoot injuries. Shoes with insufficient arch support, stability, or cushioning may fail to protect the midfoot from sudden impacts or movements.
- Training Intensity and Technique: Poor training techniques, sudden increases in training intensity or volume, and inadequate warm-up can all contribute to midfoot injuries. When the foot is not properly conditioned for the demands of an activity, the risk of sprains increases.
- Foot Structure and Alignment: Individuals with certain foot structures or alignment issues might be more prone to midfoot injuries. People with high arches or flat feet, for example, might have altered biomechanics that increase stress on the midfoot ligaments.
- Previous Injuries: Having a history of foot injuries, especially those that were not adequately rehabilitated, can weaken the ligaments and structures in the midfoot, making them more susceptible to sprains.
- Overuse and Fatigue: Overuse of the foot due to excessive or repetitive activities without proper rest and recovery can weaken the ligaments and increase the risk of injury. Fatigued muscles and ligaments are less able to provide proper support to the foot.
- Occupational Factors: Certain occupations that involve prolonged standing, heavy lifting, or exposure to uneven surfaces can increase the risk of midfoot injuries. Healthcare workers, construction workers, and others who spend long hours on their feet are particularly susceptible.
- Age and Gender: Lisfranc injuries are more common in younger, active individuals due to their engagement in sports and physical activities. However, older individuals might also be at risk due to factors like reduced bone density and decreased flexibility.
- Trauma and Accidents: Traumatic incidents, such as falls from heights or motor vehicle accidents, can subject the midfoot to sudden and intense forces that increase the risk of sprains.
- Inadequate Warm-up: Failing to properly warm up before engaging in physical activities can lead to stiff and less flexible ligaments, making them more prone to injury.
- Biomechanical Factors: Any abnormal foot biomechanics, such as excessive pronation (inward rolling of the foot) or supination (outward rolling of the foot), can alter the distribution of forces in the foot and increase the risk of midfoot injuries.
- Genetic Predisposition: While not fully understood, genetics might play a role in ligament laxity and overall foot structure, potentially increasing the susceptibility to midfoot injuries.
Taking steps to address these risk factors, such as wearing appropriate footwear, gradually increasing activity levels, maintaining proper training techniques, and ensuring proper warm-up, can help reduce the likelihood of midfoot sprains. If you’re engaging in activities with a higher risk of midfoot injury, consider consulting a doctor for guidance on injury prevention strategies.
Classification of Midfoot sprain:
Ankle sprains can be graded using many grading systems, each with its own set of strengths and limitations. Therapists use different systems based on the patient’s condition and their previous knowledge to provide successful continuity of care.
Midfoot sprains involve the injury of ligaments and tissues in the midfoot region, which is composed of a complex arrangement of bones and joints. These injuries can range from mild to severe, and they are typically classified based on the extent of ligament damage and the severity of the sprain. The classification systems might vary among medical professionals, but here’s a general overview:
Midfoot sprains are typically classified into three grades based on the severity of the injury:
Mild Grade 1 Midfoot Sprain:
- Ligament fibers are stretched but not torn.
- Mild swelling and tenderness are common.
- Minimal loss of function or stability.
- Generally heals with rest, ice, compression, and elevation (RICE), along with some limited weight-bearing.
Moderate Grade 2 Midfoot Sprain:
- Partial tear of ligament fibers.
- More pronounced swelling, bruising, and pain.
- Moderate loss of function and stability.
- Can require a period of immobilization (such as a cast or brace) and possibly physical therapy.
Severe Grade 3 Midfoot Sprain:
- Complete tear or rupture of ligament(s).
- Severe swelling, bruising, and pain.
- Significant loss of function and stability.
- Often requires more intensive treatment, which might include casting, possible surgical intervention, and a longer period of rehabilitation.
Additionally, some classification systems use specific terms to describe the location and nature of the midfoot sprain:
- Lisfranc Injury: A specific type of midfoot sprain involving the ligaments supporting the tarsometatarsal joint complex. This injury can be more complex due to the involvement of multiple joints and bones. It often requires more careful diagnosis and treatment.
- Dorsal Midfoot Sprain: Involves the ligaments on the top (dorsal) part of the foot, often caused by sudden hyperextension of the midfoot.
- Plantar Midfoot Sprain: Involves the ligaments on the bottom (plantar) part of the foot, usually due to forceful dorsiflexion.
Relevant anatomy of a midfoot sprain:
The midfoot is a complex region of the foot that plays a crucial role in supporting the body’s weight, facilitating movement, and maintaining stability. It consists of a combination of bones, joints, ligaments, and muscles that work together to enable various functions.
The human foot is a very intricate structure with 26 different bones, 33 joints, and a large number of muscles, tendons, nerves, and blood vessels. There are two distinct arches in the foot due to its structure: a longitudinal arch that runs the length of the foot, and a transverse arch that runs along the center of the foot. The plantar fascia, a strong ligament on the bottom of the foot that joins to the heel bone (calcaneus) on one end and the toes on the other, forms them by the shapes of the bones themselves and holds them in place.
The plantar fascia uses a “windlass mechanism” similar to that of a sail, where each end is fixed and the sail itself develops an arch shape in the wind, to preserve the shape of the arch.
Forefoot (front-toes), midfoot (middle), and hindfoot (back-ankle and heel regions) are the three divisions of the foot. The three cuneiforms, navicular, and cuboid are among the five little bones that make up the midfoot. Each of these bones is connected to the forefoot and the hindfoot by a very intricate network of ligaments. The transverse and longitudinal arches meet in the midfoot, which also serves as the apex of each arch. Any of these ligaments that have been stretched may have a midfoot sprain.
Soft tissue support is provided by the intertarsal ligaments, dorsal and plantar TMT ligaments, and transverse ligaments.
The second metatarsal base and the medial cuneiform are joined by the Lisfranc ligament, a broad band of plantar collagenous tissue.
The first and second metatarsal bases are not connected by a transverse ligament, whereas the bases of the lateral four metatarsals are. The only modest support for the Lisfranc joint’s dorsal surface is provided by the joint capsule and dorsal ligaments.
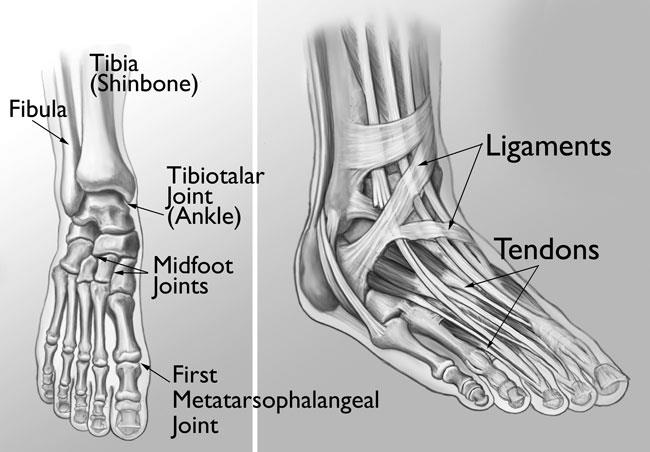
- Bones: The midfoot is composed of several bones, including:
- Navicular Bone
- Cuboid Bone
- Cuneiform Bones (Medial, Intermediate, and Lateral)
- Talus Bone (although it’s part of the hindfoot, it contributes to the midfoot joint)
- Joints: The midfoot joints are responsible for allowing movement and maintaining stability. These joints include:
- Chopart’s Joint (Calcaneocuboid and Talonavicular Joints): Connects the hindfoot to the midfoot and allows inversion and eversion (side-to-side movement).
- Lisfranc’s Joint (Tarsometatarsal Joints): Connects the midfoot to the forefoot and plays a significant role in supporting the arch of the foot.
Ligaments of the Midfoot: The midfoot contains various ligaments that connect the bones of the foot and provide stability. Ligaments susceptible to sprains in the midfoot include the plantar calcaneonavicular (Spring) ligament, dorsal calcaneocuboid ligament, dorsal cuneonavicular ligament, interosseous ligaments, long plantar ligament, calcaneocuboid ligaments, and cuneocuboid ligaments.
Function of Ligaments: Ligaments in the midfoot stabilize the joints and bones, ensuring proper alignment during weight-bearing activities. They provide stability to the arch and help maintain the integrity of the foot’s structure.
The focal point that supports the whole tarsometatarsal articulation is formed by the basic architecture of this joint, notably the ‘keystone’ wedging of the second metatarsal of the cuneiform.
Differential Diagnosis:
Several conditions can cause symptoms similar to those of a midfoot sprain (Lisfranc injury). It’s important to consider these potential differential diagnoses to ensure an accurate diagnosis and appropriate treatment. A healthcare professional will assess your medical history, conduct a physical examination, and use imaging tests to differentiate between these conditions. Here are some common differential diagnoses for a midfoot sprain:
- Midfoot Fractures: Fractures of the metatarsal bones, cuneiforms, or other midfoot bones can cause similar symptoms to midfoot sprains. X-rays and other imaging tests can help distinguish between fractures and ligament injuries.
- Midfoot Dislocations: Complete or partial dislocations of the midfoot bones can lead to instability and pain. A dislocated bone might have shifted out of its normal position, causing symptoms similar to a sprain.
- Stress Fractures: Stress fractures are tiny cracks in bones that often occur due to repetitive stress. They can cause localized pain and may be mistaken for a sprain. Imaging, like MRI or bone scans, can help diagnose stress fractures.
- Tendon Injuries: Injuries to tendons in the midfoot, such as the peroneal tendons, can cause pain and swelling. These injuries might occur from overuse, trauma, or abnormal foot mechanics.
- Plantar Fasciitis: This condition involves inflammation of the plantar fascia, a band of tissue that runs along the sole of the foot. It can cause heel and arch pain that might radiate to the midfoot.
- Tarsal Tunnel Syndrome: The tibial nerve is squeezed in this disease when it travels through the tarsal tunnel, a passageway that runs down the inside of the ankle and into the foot. It can cause pain and tingling sensations that might be felt in the midfoot area.
- Morton’s Neuroma: A neuroma is a thickening of nerve tissue, often occurring between the third and fourth metatarsal bones. It can cause pain and discomfort in the ball of the foot, which might radiate to the midfoot.
- Rheumatoid Arthritis: Inflammatory conditions like rheumatoid arthritis can affect the joints of the midfoot, leading to pain, swelling, and deformities.
- Gout: Gout is a form of arthritis caused by the buildup of uric acid crystals in joints. It can cause sudden and intense pain, often affecting the big toe joint, but also potentially impacting the midfoot.
- Other Ligament Injuries: Ligaments in areas other than the midfoot, such as the ankle ligaments, can also be injured and cause similar symptoms.
- Nerve Compression: Nerve compressions, such as from a pinched nerve in the lower back (sciatica) or other areas, can cause pain radiating down into the foot and be mistaken for a foot injury.
- Bone Spurs: Bone spurs or other bony growths can develop in the midfoot region, causing pain and discomfort.
- Other Foot and Ankle Injuries: Other injuries involving the foot and ankle, such as ankle sprains or Achilles tendon injuries, can sometimes refer pain to in the midfoot.
Mechanism of Injury:
A midfoot sprain, also known as a Lisfranc injury, involves the ligaments connecting the midfoot bones to each other and the metatarsal bones (the long bones connecting to the toes). This type of injury typically occurs due to a sudden or significant force that disrupts the stability of the midfoot region. The mechanism of injury for a midfoot sprain is often related to a twisting or compressive force applied to the midfoot. Here are some common mechanisms of injury for midfoot sprains:

- Twisting or Rotational Forces: Sudden twisting or rotational movements of the foot, especially when the foot is fixed or caught in an awkward position, can cause the ligaments in the midfoot to become overstretched or torn. This can occur during activities like pivoting, sudden changes in direction, or stepping on an uneven surface.
- Direct Impact: A direct impact to the midfoot, such as in a car accident or a fall from a height, can transmit significant force through the midfoot bones and ligaments, leading to injury. The impact can cause the midfoot bones to move in ways they aren’t designed to, damaging the ligaments.
- Hyperextension or Hyperflexion: Forceful hyperextension (overarching) or hyperflexion (over-bending) of the midfoot can also contribute to ligament injuries. This can happen when the midfoot is forcefully bent upward or downward beyond its normal range of motion.
- Falls: Falling from a height or landing on the foot in an awkward manner can subject the midfoot to excessive force, resulting in sprains. This is particularly true if the foot is forcefully plantarflexed (toes pointed downward) upon impact.
- Sports and Physical Activities: Participating in sports that involve high-impact movements, such as soccer, football, or basketball, can put the midfoot at risk of sprain due to the combination of changes of direction, cutting motions, and potential collisions with other players all possible.
- Tripping or Missteps: Tripping over an obstacle or taking an unexpected step can lead to midfoot sprains. The sudden force applied to the midfoot can disrupt the ligaments’ integrity.
- Repetitive Stress: Although less common, chronic overuse or repetitive stress on the midfoot, such as from activities that involve repetitive impact, can weaken the ligaments over time and make them more susceptible to injury.
Midfoot injuries can range in severity from mild ligament strains to complete dislocations of the midfoot bones. They can be challenging to diagnose and may require imaging, such as X-rays or CT scans, to accurately assess the extent of the injury.
Diagnostic Procedures:
Diagnosing a midfoot sprain, also known as a Lisfranc injury, involves a combination of clinical evaluation, imaging studies, and potential consultation with a specialist. Here’s a typical diagnostic procedure for midfoot sprains:
Clinical Evaluation:
- Medical History: The doctor will begin by discussing your symptoms, how the injury occurred, and any relevant medical history.
- Physical Examination: The doctor will carefully examine your foot, assessing for tenderness, swelling, bruising, and deformities. They will also evaluate your range of motion and stability in the midfoot area.
Imaging Studies:
- X-rays: X-rays are often the first imaging tool used to assess the alignment of the bones in the midfoot. They can help identify fractures, dislocations, or any abnormalities in bone alignment. X-rays are usually taken from different angles to get a comprehensive view of the midfoot.
- CT Scan: In more complex cases or when a fracture is suspected, a CT scan might be ordered. CT scans provide detailed cross-sectional images that can help visualize the bones and joints in the midfoot more clearly.
- MRI (Magnetic Resonance Imaging): MRIs can show soft tissues like ligaments, tendons, and cartilage in detail. This imaging method can help assess the extent of ligament damage and determine the severity of the injury.
Specialist Consultation:
- Orthopedic Specialist: Depending on the severity of the injury and the complexity of the case, you might be referred to an orthopedic specialist or foot and ankle specialist. These experts can provide further evaluation and offer treatment recommendations based on their expertise.
Diagnostic Considerations:
- Differential Diagnosis: It’s important to differentiate a midfoot sprain from other conditions that can cause similar symptoms, such as fractures, dislocations, or other ligament injuries. A proper diagnosis helps guide appropriate treatment.
Special Tests:
Physiotherapists often use various special tests to help diagnose midfoot sprains and assess the extent of the injury. These tests are designed to provoke specific symptoms and movements that can provide insights into the nature of the injury. Keep in mind that these tests are best performed by trained healthcare professionals. Here are some common special tests used in physiotherapy to diagnose midfoot sprains:
- Midfoot Compression Test (Squeeze Test):
This test involves gently compressing the midfoot from the sides. The physiotherapist applies pressure on both sides of the foot, near the midfoot area. Pain or discomfort during this compression can indicate ligamentous or joint capsule involvement. - Midfoot Dorsiflexion Test:
The physiotherapist holds the heel and gently lifts the forefoot into dorsiflexion (toes pointed upwards). Pain or discomfort in the midfoot during this movement can suggest ligamentous or joint involvement. - Navicular Drop Test:
In this test, the patient stands on one foot while the physiotherapist measures the height of the navicular bone (a prominent bone on the midfoot) when the foot is in a neutral position and during weight-bearing. A significant drop in the navicular height when weight-bearing can indicate midfoot instability. - Talar Tilt Test:
This test assesses the integrity of the ligaments on the medial and lateral sides of the ankle. The foot is held in a neutral position, and the physiotherapist applies an inversion (inward) and eversion (outward) force to the heel, assessing for any excessive movement or pain. - Anterior Drawer Test:
While the patient is seated with their foot hanging off the edge of the examination table, the physiotherapist holds the heel and applies an anterior (forward) force to the foot, assessing for any abnormal movement in the midfoot. - Plantarflexion and Dorsiflexion Range of Motion:
Assessing the available range of motion in plantarflexion (pointing the foot downwards) and dorsiflexion (lifting the toes upwards) can provide insights into potential midfoot ligament involvement and restrictions. - Single Leg Balance Test:
Evaluating the patient’s ability to balance on the affected foot can help assess stability and strength in the midfoot region.
Medical Treatment
1. Rest: Rest is crucial during the initial phase of healing. Avoid putting weight on the injured foot to prevent additional stress on the affected ligaments and tissues.
2. Immobilization Devices: Immobilization helps protect the injured area, promote healing, and prevent further damage. However, it’s important to follow the doctor’s guidance for proper immobilization techniques and durations.
- Brace or Splint: A brace or splint may be used to provide support and prevent movement of the midfoot. These devices can help stabilize the injured area while allowing some flexibility for healing.
- Walking Boot: A walking boot is a common choice for midfoot sprains. It offers better support than a brace and allows for gradual weight-bearing as healing progresses. Walking boots are adjustable and may have removable inserts to accommodate changes in swelling.
3. Casting: In some cases, a cast might be used to completely immobilize the foot and midfoot. This is more common for severe injuries or fractures.
4. Pain Management: Over-the-counter pain relievers and anti-inflammatory medications can help manage pain and reduce swelling. Non-prescription pain relievers like acetaminophen (Tylenol) or nonsteroidal anti-inflammatory drugs (NSAIDs) such as ibuprofen (Advil, Motrin) or naproxen (Aleve) can help manage pain and reduce inflammation.
5. Elevation: When not moving around, elevate the injured foot above the level of your heart to help reduce swelling. This can be particularly effective during the first few days after the injury.
6. Duration of Immobilization: The duration of immobilization depends on the severity of the sprain, the extent of the damage, and the healing progress.
Surgical Management: This intervention may be recommended for more severe midfoot sprains that involve significant ligament damage, fractures, or joint instability. Surgical management aims to repair damaged structures and restore stability to the midfoot. It options might include:
- Ligament Repair or Reconstruction: Surgical repair or reconstruction of damaged ligaments to restore stability to the midfoot.
- Fracture Fixation: Surgical placement of screws, pins, or plates to stabilize fractured bones.
- Joint Fusion: In cases of severe joint instability, fuse adjacent bones together to stabilize the joint and reduce pain.
- Tendon Repair: Surgical repair of damaged tendons to restore proper function.
Physical Therapy:
Here is how physical therapy can be specifically applied for the management of a midfoot sprain:
Pain Management:
- Manual Therapy: The therapist may use hands-on techniques to mobilize joints, reduce muscle tension, and alleviate pain.
- Modalities: Modalities like ultrasound, electrical stimulation, or cold therapy might be used to manage pain and inflammation.
Range of Motion Exercises:
Range of motion (ROM) exercises are important for maintaining flexibility and preventing stiffness in the midfoot after a sprain. Here are some ROM exercises that you can perform under the guidance of a qualified physiotherapist:
- Ankle Circles:
Sit comfortably on a chair or the floor and extend your legs in front of you.
Pointing your toes forward while lifting one foot off the ground, keep your knee straight.
While turning your ankle joint, begin rotating your foot in a clockwise direction.
Rotate your ankle clockwise ten to fifteen times in a steady, relaxed manner.
After finishing the clockwise circles, switch to the anticlockwise direction and build 10 to 15 circles there.
Place your foot back on the ground, then rotate the opposite foot’s ankles.
2. Toe Extension:
Place your feet flat on the ground and take a comfortable seat.
Keep your heels firmly grounded while extending all of your toes off the ground.
for 5 to 10 seconds while holding this posture.
Put your feet back on the earth.
Repeat this stretch between ten and fifteen times.
3. Toe Flexion:
For the toe flexion, either sit or stand with your feet flat on the floor.
Curl your toes gently downward, as if you were trying to make a fist.
To feel the bottom of your foot extend, hold your foot in this position for 5–10 seconds.
Relax and wring out your toes.
Repeat this stretch between ten and fifteen times.
4. Toe Tapping:
Place your feet flat on the ground and take a comfortable seat.
Lift your toes off the floor while keeping your heel firmly planted.
Start tapping your toes on the floor quickly.
Tap your toes continuously for 30 to 60 seconds.
Take a little interval and then tap your toes once more.
5. Towel Scrunches: This exercise helps strengthen and improve the flexibility of the foot muscles.
Place your feet flat on the ground and take a comfortable seat. The little towel should be spread out on the ground in front of your feet.
Utilizing your toes, fold the towel up towards you. Consider raising the towel by gripping it with your toes.
Holding the contorted position, forcefully compress the towel with your toes.
Release the pressure and use your feet to extend the towel straight out.
Repeat this maneuver as many times as you can, aiming for at least 10 to 15 scrunches each time.
6. Plantar Flexion and Dorsiflexion:
Plantar Flexion:
The act of pointing your toes away from your body is known as plantar flexion. Think about standing on your toes.
The gastrocnemius and soleus muscles in the calf are principally responsible for controlling this motion.
To do plantar flexion, push through the balls of your feet to lift your heels off the ground. The action employed in toe raises and calf raises is the same.
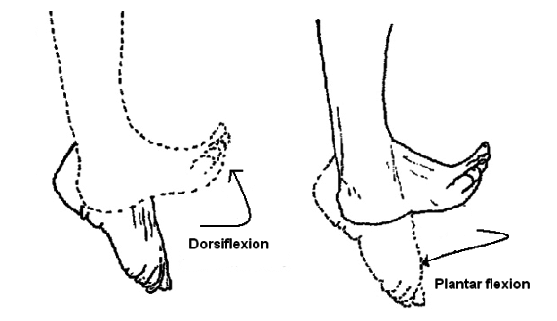
Dorsiflexion:
The action of drawing your toes towards your body or elevating the front of your foot off the ground is known as dorsiflexion.
The muscles at the front of the lower leg, notably the tibialis anterior muscle, are responsible for this action.
Lift your toes up towards your shin while maintaining your heels on the floor to accomplish dorsiflexion. When you walk and your foot is ready to hit the ground, you make this action.
7. Alphabet Writing: The simple and amusing foot exercise known as “alphabet toes,” also known as “toe writing” or “the alphabet,” can help improve the flexibility and dexterity of the toes. You will use your toes to “write” the letters of the alphabet in the air throughout this exercise. It’s a great method for strengthening the muscles in your toes, which will enhance foot mobility and functionality. This exercise encourages various movements and stretches in the midfoot. Following are the instructions for the alphabet toes exercise:
Sit comfortably on a chair or the floor and extend your legs in front of you.
While keeping your other foot firmly on the floor, lift one foot off the ground.
With your extensive toe acting as a pen, start “writing” the letters of the alphabet in the air.
Make each letter as large and distinct as you can with just your toes.
Once you’ve completed the alphabet with one foot, switch to the other and repeat the process.
Try to do the exercise softly and under control to ensure that the toe muscles are fully activated.
8. Calf Stretch:
To do a wall calf stretch, face the wall with your hands flat on it at shoulder height.
With one foot, take a step backward, making sure the heel is planted firmly on the floor.
Lean towards the wall while bending the front knee slightly and keeping the back leg straight.
The back leg’s calf needs to stick out.
For between 30 and 60 seconds, hold the stretch.
Repeat the stretch with the other leg.
9. Achilles Tendon Stretch: Stand facing a wall and place both hands at shoulder height on the wall. With one foot, take a step back, making sure the heel is planted firmly on the ground. Lean forward and bend your front knee to feel a stretch down the rear of your lower thigh.
Strengthening Exercises:
Strengthening exercises are important for recovering from a midfoot sprain as they help stabilize the injured area, prevent future injuries, and promote overall foot health. Here are some strengthening exercises that you can incorporate into your rehabilitation routine under the guidance of a healthcare professional or a qualified physiotherapist:
1. Toe Raises:

Place your feet flat on the ground and take a comfortable seat.
Lift your toes off the ground, but maintain your heels on the ground.
Hold the position for a few seconds before dropping your toes.
Repeat for a set of repetitions.
2. Marble Pick-Up:
Here’s how to perform the marble pick-up exercise:
While you are sitting on a chair, set a small bowl or container filled with marbles or other small balls on the floor in front of you.
To have a secure grip on the marbles while you are barefoot, take off your shoes and socks.
Place another dish or container next to the one holding the marbles and pick up each marble one at a time with your toes.
For five to ten minutes, or whatever long it takes you to feel comfortable, keep picking up and moving the marbles.
Stretching and relaxing your feet will help you rest after your workout.
This exercise helps strengthen the muscles in your toes and the arch of your foot.
3. Calf Raises:
Calf raises are a quick and efficient workout for calf muscles. Here’s how to perform calf raises:
Stand with your feet hip-width apart and a firm surface nearby for support. As you rise onto the balls of your feet, raise your heels as high as you can. Slowly lower your heels back down. Perform a set of repetitions.
4. Ankle Band Resistance Exercises:
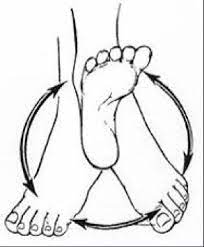
Use a resistance band looped around your forefoot and anchored to a sturdy object. Move your foot in different directions against the band’s resistance. Include movements like plantar flexion (pointing toes down), dorsiflexion (pulling toes toward you), inversion (rolling the sole inward), and eversion (rolling the sole outward).
5. Short Foot Exercise:
Place your feet flat on the ground and take a comfortable seat.
Focus on your right foot. Imagine gently trying to “shorten” the distance between your heel and the base of your big toe without curling your toes.
This action should create a subtle arch in your foot as the muscles on the underside engage.
Hold: Keep this engagement for a few seconds, usually around 5-10 seconds.
Release: Relax your foot muscles and allow your foot to return to its normal position.
6. Towel Curl Exercise:
Place your feet flat on the ground and take a comfortable seat.
The little towel should be spread out on the ground in front of your feet.
Utilizing only your toes, fold the towel up towards you. Consider trying to curl the towel with your toes.
Squeeze the muscles in your arch while keeping your hands curled up.
Release the pressure and use your feet to extend the towel straight out.
Every time you do this exercise, try to curl at least 10 to 15 times.
7. Heel Walking:
Heel walking is done by walking on your heels instead of your toes. Lift your toes off the ground and take small, controlled steps while keeping your balance and posture. Walk slowly on your heels while keeping your toes lifted. This exercise targets the muscles in your calves and can help improve foot strength.
8. Single-Leg Balance Exercises:
Stand on one foot while maintaining your balance. You can progress this exercise by closing your eyes or performing small movements like raising your arms.
- Stand on one leg while keeping the other leg lifted from the ground.
- Maintain proper posture and keep your core active.
- Hold the position for 20-30 seconds or as long as you can while maintaining balance.
- Switch to the other leg and repeat.
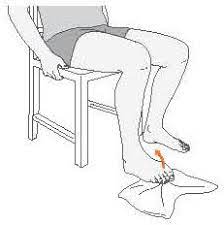
9. Ankle Plantarflexion and Dorsiflexion Resistance Exercise:
Attach one end of the Theraband to a stable surface and loop the other end around the top of your foot. Sit down and keep your knee straight. Start by pulling your toes towards you (dorsiflexion) against the resistance of the band, then slowly point your toes away from you (plantar flexion). This helps strengthen the muscles that control ankle movement and can indirectly support the midfoot.
10. Ankle Inversion and Eversion Resistance Exercise:
Ankle Eversion:
Place your feet flat on the ground and take a comfortable seat.
Wrap one end of the resistance band around the ball of your foot while holding the other end in your hand.
Slowly evert your foot (move it outward) while keeping your heel on the ground in opposition to the resistance of the band.
Before returning to the starting position, stay in the position for a little period of time.
10 to 15 times through each repetition for each foot.
Ankle Inversion:

As you sit on a chair or a flat surface, extend your legs in front of you.
Put one end of the resistance band around the ball of your foot.
Hold the opposite end of the band in your palm to tighten it up.
Pointing your toes straight ahead, maintain a relaxed gait.
Move your foot inside (inversion) slowly and gradually while fighting the resistance of the band.
Feel the muscles around your ankle contract as you maintain the inward stance.
Bring your foot back to the starting position slowly and steadily.
Move to the second foot after completing the exercise on one foot for the necessary number of repetitions (for instance, 10-15 reps).
This exercise targets the muscles that stabilize the ankle and midfoot.
11. Toe Spreading:
As you sit or stand comfortably, plant your feet firmly on the ground.
Allow your toes and feet to relax and take on their normal postures.
Spread your toes apart consciously to begin the toe-spreading action, as though you’re trying to leave as much space as you can between them.
Feel your toe muscles tense and expand as you maintain the spread position.
Release the spread and return your toes to their normal position.
Repetition of the toe-spreading motion is required.
This exercise can help improve the flexibility and strength of the muscles between your toes, potentially aiding in midfoot recovery.
Proprioception and Balance Training:
Balance training and proprioception are crucial components of rehabilitation for a midfoot sprain, as they help improve the coordination, stability, and overall function of the injured foot. Proprioception refers to your body’s ability to sense its position in space and the relative position of its parts, even without visual cues. Here are some proprioception and balance exercises that can be beneficial for midfoot sprain recovery:
- Single Leg Stance:
How to do the one-leg posture is as follows:
Start by standing on your injured foot while keeping the other foot slightly lifted off the ground and with your feet close together.
Choose One Leg: To begin, pick one leg. Bend the knee of the opposite leg and raise it a little bit off the ground.
On the supporting leg, maintain balance. Keep your core active and keep your back straight. For greater balance, you can put your hands on your hips or out to the sides.
retain the Pose: Try to retain the one-legged posture for as long as you can comfortably keep your balance—about 20 to 30 seconds.
Switch Legs: Set the raised leg back down before moving on to the other leg. the same steps again.
As you improve, you can close your eyes to make the exercise more challenging.
2. Balance Board or Wobble Board Exercises:
To test your balance, use a balance board or wobble board. Start by standing on the board with both feet and then progress to standing on the injured foot only. The instability of the board will engage the muscles around the midfoot, helping to improve strength and stability.
Basic Balance:
Stand on the balance board with both feet, finding your balance.
Keep your core engaged and a straight posture.
Hold the position for a certain amount of time (e.g., 30-60 seconds).
Progress to balancing on one leg for an added challenge.
Rocking Side to Side:
Balance on the board with both feet.
Allow the board to tilt by shifting your weight from side to side.
Control the movement and maintain your balance.
Front-Back Rocking:
Balance on the board with both feet.
Lean forward slightly, causing the board to tip forward, then return upright.
Lean backward, causing the board to tip backward, then return upright.
Repeat the front-back rocking motion while maintaining balance.
Rotational Movements:
Balance on the board with both feet.
Rotate your body to one side and then the other while maintaining balance.
You can extend your arms outward for better balance.
3. Heel-to-Toe Walk:
This exercise mimics the act of walking in a straight line while placing the heel of one foot directly in front of the toes of the other foot.
Focus on maintaining your balance and posture, taking about 20-30 steps forward and then turning around to return to the starting point. This exercise improves balance and coordination by challenging your ability to walk in a controlled manner with a narrow base of support. This challenges your balance and proprioception.
4. Calf Raises on an Unstable Surface:
Calf raises on a shaky surface including carrying out calf raises while balancing on a bumpy platform, such as a balance disc or a Bosu ball. This makes the workout more difficult by utilizing your stabilizing muscles and improving your balance.
Place your feet hip-width apart on the shaky surface to do this exercise. Then, elevate your heels by pressing through the balls of your feet.
Lift your heels up for a moment while using your calf muscles, then bring them back down.
Calf raises are better at strengthening your muscles and enhancing balance because the unstable surface makes it difficult for them to maintain equilibrium throughout the activity.
If you are new to calf raises, begin on a firm surface and gradually increase the height.
5. Squatting on an Unstable Surface:
This exercise enhances your proprioception and helps strengthen the muscles around your midfoot.
Squatting on an unstable surface is doing squats while standing on a shaky surface, such as a Bosu ball or a balancing disc.
This squat workout variant adds a factor of instability, training your core muscles and requiring more coordination and balance.
Step onto the shaky surface, making sure it’s center beneath your feet, to perform this exercise.
Squats are performed by bending the knees and lowering the hips while maintaining balance on uneven terrain. Focus on keeping appropriate form throughout the action by engaging your core.
To stand again, drive your heels to the floor. In addition to working your leg muscles, this exercise tests your stabilizing muscles, enhancing your total strength, balance, and functional stability.
Start with a solid surface if you’re new to squats or dealing with unstable surfaces, then graduate to the unstable surface as you gain comfort and confidence.
6. Toe Tapping:
This exercise challenges your foot’s control and proprioceptive awareness.
Place your feet flat on the ground and take a comfortable seat.
Lift your toes off the floor while keeping your heel firmly planted.
Start tapping your toes on the floor quickly.
Tap your toes continuously for 30 to 60 seconds.
Take a little interval and then tap your toes once more.

7. Lateral Hops:
Use a resistance band for support if needed. Hop laterally (side-to-side) on your injured foot while maintaining balance and control. This exercise can help with dynamic stability. Lateral hops involve jumping side to side explosively, landing softly on each foot. This plyometric exercise improves agility, power, and balance. Start with feet hip-width apart, jump laterally, and repeat for 10-15 reps per side for a few sets. Keep core engaged and focus on controlled movements.
8. Single-Leg eyes Closed Balance:
Perform any of the above exercises with your eyes closed. This takes away visual cues, forcing your body to rely solely on proprioception and muscle control.
Stand up straight, feet together, and arms at your sides.
Lift one leg off the ground while slightly bending the knee.
Find a focus point in your line of vision.
Lift your chosen foot slowly off the ground while keeping your gaze fixed on the object in the foreground.
For 20 to 30 seconds, or as long as your balance and form permit, hold the single-leg position.
Contract the muscles in the standing leg and your core to stabilize your body.
If you feel secure, try lifting your arms up over your head or extending them to the sides to further test your balance.
Put your foot back on the ground, then repeat the exercise with the opposite leg.
Gait Training:
- Analyzing Your Gait: The therapist will assess your walking pattern and provide guidance to ensure proper foot placement and mechanics.
- Gait training exercises that you can incorporate into your rehabilitation routine for a midfoot sprain. These exercises focus on improving your walking pattern and restoring normal biomechanics. As always, consult with your healthcare provider or physical therapist before starting any new exercises, especially when dealing with an injury like a midfoot sprain.
- Heel-to-Toe Rocker: A heel-to-toe rocker sole is often recommended for individuals with midfoot sprains or injuries like metatarsal fractures. This type of shoe design can help reduce the pressure and motion on the midfoot area, providing a smoother and more comfortable gait while promoting healing
Stand upright with your feet hip-width apart. Begin by rocking back and forth from your heels to your toes. Gradually progress to a forward walking motion, focusing on smoothly rolling from your heel to your midfoot and then pushing off from your toes. - Step-Ups:
Find a low step or platform. Step up with your uninjured foot first, then bring your injured foot up to meet it. Step back down with your injured foot first, followed by your uninjured foot. This exercise helps improve coordination and strength for ascending and descending stairs or curbs. - Mini Lunges:
To perform mini lunges: Stand with feet hip-width apart. Take a step forward with your uninjured foot. Bend both knees, lowering your body. Keep your front knee above your ankle. Back knee hovers above the ground. Push off your front foot to stand. Switch sides and repeat. Begin with a few repetitions on each leg. This exercise promotes proper stride length and balance. - Slow-Motion Walking:
Practice walking in slow motion, paying close attention to your gait mechanics. Concentrate on landing on your heel, rolling through the midfoot, and pushing off from your toes. This exercise helps you consciously refine your walking pattern. - Marching in Place:
Lift your knees high, similar to a marching motion, while standing in place. Focus on lifting your feet from the midfoot area rather than dragging them on the ground. This exercise enhances flexibility and strength in the midfoot region.

- Balancing on One Leg:
Stand on your uninjured foot and lift your injured foot slightly off the ground. Try to keep your balance for 30 seconds to a minute. This exercise improves stability and proprioception. - Tandem Walking:
Walk in a straight line with one foot in front of the other, as if you’re walking on a tightrope. This workout will put your balance and coordination to the test. - Backward Walking:
Walk backward for short distances while maintaining a heel-to-toe rolling motion. This exercise can help reinforce proper foot placement and mechanics.
Consistency and commitment to your physical therapy program are essential for achieving the best results. Working closely with your physical therapist, adhering to their guidance, and communicating any changes or concerns will help ensure a successful recovery from your midfoot sprain.
FAQs:
A healthcare professional, typically an orthopedic doctor or a sports medicine specialist, can diagnose a midfoot sprain through physical examination, imaging tests like X-rays or MRI scans, and by assessing your medical history.
Treatment often involves rest, ice, compression, and elevation (RICE), along with immobilization using a brace or cast. Physical therapy, pain management, and gradual return to weight-bearing activities are also common aspects of treatment.
You should consult your healthcare provider before starting any exercises. Once you receive clearance, gentle range of motion exercises and non-weight-bearing movements may begin early in the rehabilitation process.
Depending on the severity of the sprain, weight-bearing may restricted initially. Your healthcare provider will guide you on how much weight you can put on the injured foot and when you can start walking normally.
Depending on the extent of the sprain, recovery periods change. Mild sprains might take a few weeks, while more severe cases could take several months. Follow your healthcare provider’s guidance for a personalized timeline.
While there are exercises you can do at home, it’s recommend to work with a physical therapist. They can assess your condition, provide personalized exercises, monitor your progress, and adjust your regimen as needed.
Your body can perceive its location in space by using proprioception. It’s crucial for balance, stability, and coordination. After a midfoot sprain, proprioception exercises are important for retraining your foot and ankle to function properly.
While accidents can still occur, you can reduce the risk of future midfoot injuries by maintaining proper footwear, warming up before physical activities, strengthening foot and ankle muscles, and practicing proper form during exercises and activities.
If you experience severe pain, swelling, bruising, or difficulty walking after an injury to your midfoot, it’s best to seek medical attention promptly to ensure an accurate diagnosis and appropriate treatment.
It’s generally recommended to avoid high-impact activities and sports that put excessive stress on the injured foot during the initial stages of healing.
Signs of improvement may include decreased pain, improved range of motion, reduced swelling, and increased strength and stability in the injured foot.
Mild discomfort or stiffness can sometimes persist even after the initial healing period. Gradual improvement will observe over time. If you experience persistent pain or new symptoms, consult your doctor.
Depending on the severity of the sprain, your healthcare provider might recommend crutches or a brace to assist with weight-bearing and provide support. Follow their recommendations closely.
Gentle massage and myofascial release techniques can help promote blood circulation and alleviate muscle tension. However, avoid applying direct pressure to the injured area and consult your physical therapist before attempting any self-treatment.
Ibuprofen or paracetamol, two over-the-counter painkillers, can offer momentary relief. However, consult your healthcare provider before using any medications, especially if you have any medical conditions or are taking other medications.
Gradual progression is essential to avoid re-injury and promote proper healing. Slowly increasing the intensity, duration, and complexity of exercises allows your body to adapt and strengthen without overwhelming the healing tissues.
Yes, balance and proprioception exercises can be beneficial for injury prevention and overall stability. Including them in your regular exercise routine can help enhance your body’s awareness and coordination.
Return-to-activity timing varies based on the severity of the injury and your individual progress. Your healthcare provider or physical therapist will provide guidance on when it’s safe to resume specific activities.
Maintaining good foot and ankle strength, wearing appropriate footwear, warming up before physical activities, and practicing proper form during exercises can all help reduce the risk of re-injury.
Your body can perceive its location in space by using proprioception. It’s crucial for balance, stability, and coordination. After a midfoot sprain, proprioception exercises are important for retraining your foot and ankle to function properly.
.