

Range of motion exercises:
Table of Contents
What is the range of motion exercises?
The range of motion exercises refers to the activity aimed at improving the movement of the joint. The motion is influenced by many structures, namely the configuration of bone surfaces within the joint, joint capsule, ligaments, tendons, and muscles acting on the joint. The range of motion exercise is also called a “ROM” exercise. It is the capability of the joint to go through its complete spectrum of motion.
A range of motion of the joint can be a passive range of motion exercise, active-assisted range of motion exercise, or even an active range of motion exercise. The range of motion therapy is beneficial in healing as well as in recovery from soft tissue and joint lesions, maintaining existing joint as well as soft tissue mobility, minimizing the effects of contracture formation, helping neuro-muscular reeducation, and increasing synovial movement as well.
Regaining the range of motion in the joint is one of the first phases of injury rehabilitation, as well as the physiotherapy assessment, which will be performed prior to prescribing the range of motion exercises. An assessment looks at the range and the quality of the motion as well. Joints maintain a balanced range of movement by regular use as well as stretching of surrounding soft tissues. Just ten minutes of stretching three times per week can assist in improving the range of motion.
Quite often strengthening exercise programs are described alongside or shortly after a range of motion exercises as a decreased motion at the joint without improving the strength could cause a further injury. A continuous passive movement machine (CPM) is also used to maintain as well as increase ROM. The physical therapist can use this machine postoperative.
In pediatrics, ROM exercises are used when all or even some normal physical activities are not able to be fulfilled because of the physical condition of the children. Attention is given to a joint not being used through the provision of the active or passive ROM exercises.
Physiotherapy involves many kinds of range of motion exercises. Among these, one of the most useful and common are exercises that increase as well as facilitate a range of motion. A range of motion is the phase physiotherapists use to describe how much motion the patient makes with the joint or the part of the body. When the range of motion is affected, the patient finds that it is not possible to move the particular body part comfortably around the joint.
The range of motion may be affected by many different causes: sprained joints or even pulled muscles resulting from an accident or a sports injury, post-surgical lack of exercise, as well as the general lack of exercise may also result in the reduction in a range of motion. The range of motion exercises that target these injured areas may assist undo the damage as well as restoring free and unrestrained motion to the joints and muscles.
There are mainly three basic kinds of range of motion exercises for correcting and restoring the range of motion. These types of exercises are designed to address the kind of problem the patient has and to assist you to rebuild strength as well as the range of motion without doing further damage. Depending on the injury, the patient will do one or a mixture of these various types of exercise: passive, active-assisted, and active.
Brief introduction of the three types of the range of motion exercise
The first one is a passive range of motion: A movement applied to the joint only by another person or people or the passive
motion machine. When a passive range of motion is applied, the joint of a person receiving exercise is completely relaxed
whereas the outside force moves a body part, throughout the available range of movement.

The second one is an active-assisted range of motion: The Joint receives partial assistance from the outside force. This range of motion may result from the majority of the motion applied by a therapist or by the person or people helping a patient. It may be the half effort on the joint from each source, meaning a patient’s own effort as well as the external force.
The last one is an active range of motion: A motion of the joint provided entirely by a patient performing the exercise. In this type, there is no outside force aiding in the movement during performing an activity.
The range of motion exercises is mainly performed to preserve flexibility and mobility of the joints on which they are performed. These exercises decrease stiffness as well as will prevent or at least slow down the freezing of the joints as a disease progresses and the patient moves less often. The range of motion is a term that is used to describe the amount of movement the patient has at each joint. Every joint in a body has a “normal” range of movement. The joints maintain their normal range of movement by being moved. It is therefore very essential to move all the joints every single day. The stiff joints may cause pain as well as can make it hard for the patient to do normal daily activities. Each person with ALS needs the program of the exercise tailored to his or her individual needs and abilities as well. A physical therapist will see the patient until a patient or the caregiver are independent with the home exercise program that the patient can follow through with daily. This is essential to remember that as a disease progresses, the type of the range of motion exercises the patient will need to change.
Measuring the Range of Motion
The physiotherapist lines up the arms along the body, and after that, the patient can move the body in specific directions as well as to measure the amount of motion that occurs. Measuring range of motion is usually a painless procedure. There are few instances after surgery or even injury were measuring the range of motion can be painful, but the pain is usually short-lived and only occurs while the measurement.
In general, there are three types of range of motion exercises that are measured. They are a passive range of motion, an active-assisted range of motion, and an active range of motion.

Devices to measure the range of motion in the joints of the body include a goniometer and inclinometer. Both use the stationary arm, protractor, fulcrum, as well as movement arm to measure an angle from the axis of the joint). The goniometer is a metal or plastic device with two arms that are used in measuring the joint’s range of motion. A goniometer is placed along with A joint and measured by looking at the numbers to represent angular distance on the device. To measure any joint’s range of motion a physical therapist most commonly use a goniometer. If a patient is suffering from a decreased range of motion in any joint, a therapist may use the goniometer to assess what the range of motion is at the initial assessment, and then make sure the intervention is working by using a goniometer in subsequent sessions.
Types of goniometers
There are many types of goniometers is available, but of all the types, a universal goniometer is the most widely used.
Universal Goniometer
This type of goniometer comes in two forms, the first one is the short arm, as well as the second one, is the long arm. The short arm goniometer is commonly used for smaller joints such as the wrist, elbow, or even ankle, whereas the long arm goniometers are more accurate for the joints with the long levers such as the knee and hip joint.
Gravity Goniometer or Inclinometer
In it, the one arm has a weighted pointer that remains vertical under the influence of gravity.
Software or Smartphone-based goniometer
The smartphone as a digital goniometer has several benefits such as availability, ease of the measurement, application-based tracking of the measurements, and one-hand use. These types of goniometers use an accelerometer in phones to calculate any particular joint’s angles.
Arthrodial Goniometer
This is ideal for measuring cervical rotation, anteroposterior flexion, and lateral flexion of the cervical spine.
Twin axis electrogoniometer
The inter-rater and intra-rater reliability of an electrogoniometer is higher than the universal goniometer but the challenging to apply in a clinical evaluation of a patient, hence used more often for research purposes.
A tape measure may also be used to measure the range of motion in some specific parts of a body (lumbar range of motion).
Techniques for using a goniometer
It is essential that a single notation system is used to measure the joint’s range by the goniometer. A neutral zero method meaning 0 degrees to 180- degree system is the most widely used method to measure the joint’s range of motion. The same goniometer may always be used to reduce the chances of instrumental error.
Normal range of the joints
Shoulder
- Flexion: 0degrees to 180 degrees
- Extension: 180 degrees to 0degrees
- Abduction: 0 degrees to 180 degrees
- Adduction: 180 degrees to 0 degrees
- Internal rotation: 0 degrees to 90 degrees
- External rotation: 0degrees to 90 degrees
Elbow
- Flexion: 0 degrees to 150 degrees
- Extension: 150 degrees to 0 degrees
- Supination: 0 degrees to 90 degrees
- Pronation: 0 degrees to 90 degrees
Wrist
- Flexion: 0 degrees to 70 degrees
- Extension: 0 degrees to 80 degrees
- Radial deviation: 0 degrees to 30 degrees
- Ulnar deviation: 0 degrees to 20 degrees
Hip
- Flexion: 0 degrees to 120 degrees
- Extension: 120 degrees to 0 degrees
- Abduction: 0 degrees to 45 degrees
- Adduction: 45 degrees to 0 degrees
- Internal rotation: 0 degrees to 90 degrees
- External rotation: 0 degrees to 90 degrees
Knee
- Flexion: 0 degrees to 135 degrees
- Extension: 135 degrees to 0 degrees
Ankle
- Dorsiflexion: 0 degrees to 20 degrees
- Plantarflexion: 0 degrees to 50 degrees
- Inversion: 0 degrees to 20 degrees
- Eversion: 0 degrees to 15 degrees
Causes of the limited range of motion
- Limited range of motion refers to the joint that has a reduction in its ability to move. Movement can be limited due to a problem within the joint, swelling of tissue around the affected joint, stiffness of the muscles, or even pain.
- Some medical conditions associated with the limited range of motion in the joints include:
Ankylosing Spondylitis
Osteoarthritis
Rheumatoid Arthritis
Juvenile RA is the autoimmune form of arthritis that occurs in children under the age of 16 years
Cerebral Palsy
Legg-Calve-Perthes disease.
Sepsis of the hip and other joints is a bacterial infection of the joints
Congenital torticollis
Syphilis is a sexually transmitted infection - Other causes of a restricted range of motion include:
Inflammation of soft tissue surrounding the joint, or even joint swelling
Muscle stiffness
Pain
Joint dislocation
Fractures.
Benefits of the range of motion exercises
- There are various reasons for seeing the physiotherapists if motion is decreased at the joint. Range of motion therapy benefits
- Healing as well as in recovery from soft tissue and joint lesions
- Maintaining existing joint as well as soft tissue mobility
- Minimizing the effects of contracture formation
- Helping neuromuscular reeducation
- Increasing synovial movement.
- Enhance motion at the joint
- Improve the function of the joint and the whole limb
- Increase movement efficiency
- Improve independence
- Reduce joint pain
- Improve as well as maintain joint integrity.
Who would benefit from the range of motion exercises?
Many people would benefit from the range of motion exercises. A patient may suffer from decreased range of motion at the joint for many reasons. People with described conditions and injuries would get benefits from a physiotherapy assessment as well as a range of motion exercises:
Arthritic joints
Resolving ligament sprain- as tissues will heal as well as become tight
Resolving muscle strain – as tissues will heal as well as become tight
A foreign object within a joint
Post joint surgery
An acute injury where swelling is visible
Post joint replacement
Pre-surgery for example, prior to the joint surgery as post-surgery will reduce the range of motion, therefore the more motion which is available prior to surgery will improve the motion that will be available post-surgery.
What is the musculoskeletal range of motion?
The range of motion is the measurement of the motion around a specific joint or body part. It may involve both the distance the joint can move as well as the direction in which it can move. There are established ranges considered normal for various joints in a body. For the joint to have a full range of motion, it must have good flexibility. Flexibility is a range of motion around the joint. Each joint has its own level of flexibility, expressed in the degrees. Flexibility may refer to ligaments, tendons, muscles, bones, as well as joints. Limited flexibility can lead to pain, limitation, as well as compensation, all of which may result in improved dysfunction of a joint. If the joint has a full range of motion, it should be able to move in all planes as well as directions permitted to the joint. Joint motions include flexion, extension, abduction, adduction, lateral flexion, and rotation.
- Flexion: This is the motion that reduces the angle of a joint, bringing two bones closer together.
- Extension: This is the opposite of flexion, involving motion that improves the joint angle, or the distance between two bones or parts of a body.
- Abduction: Abduction involves the motion of a limb away from the midline of a body.
- Adduction: Adduction is the opposite of abduction, involving the motion of a limb toward the body’s midline.

Limited range of motion refers to the joint with reduced ability to move causing limited movement. The problem within a joint, swelling of tissue around a joint, muscle stiffness, or even pain may lead to a limited range of motion. The joint range of movement naturally declines as the patient age, but it can happen owing to several conditions. Conditions that may result in these symptoms include arthritis, joint dislocation, joint injury, immobilization, as well as surgery.
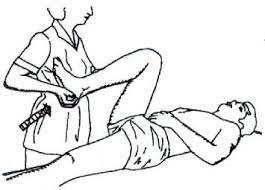
Passive range of motion exercise
A passive range of motion exercise is very helpful for the joints that have become inactive due to the injury or the paralysis attack. In a passive range of motion exercises, a patient does not do any type of motion themselves; instead, the physiotherapist or caretaker moves the limb or body part of a stiff joint, gently stretching muscles and reminding them how to move correctly. In most cases, therapeutic stretching exercises are also combined with passive range of motion exercises to promote faster recovery of the stiff or even flaccid joint. Here, a physical therapist stretches a soft tissue of the particular joint to relax the surrounding muscles and relieve tension. A passive range of motion exercises also helps in minimizing stiffness, rigidity, or flaccidity in the particular joint that has been immobilized.
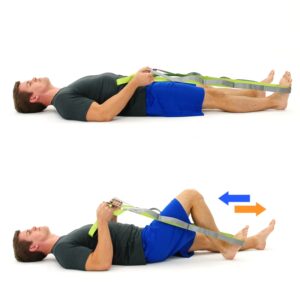
The most common as well as safest passive range of motion exercises are related to stretching the surrounding muscles with the aim to increase muscle flexibility. The most common path to perform this exercise is with the use of a tool, such as a stretching strap. This will help a patient to hold the stretch for a more sustained period of time, but having a physical therapist who assists with the stretch is a more beneficial pathway to practice passive range of motion exercises. With this type of exercise, the trained professional moves the limb or the body part into the stretch and holds it, with the intent to increase muscle flexibility.
This is superior for some reasons.
The first one is the physical therapist understands proper limits as well as knows how far to go.
The second one is the therapist knows how long to hold the stretch.
The last one is that physical therapists are also trained to know if it is targeting proper areas to achieve more benefits. With that in the mind.
In which conditions a therapist should apply the passive range of motion exercise
The passive range of motion exercises is typically used where there is a paralysis attack, when the patient is comatose, in the presence of the healing fracture, or if the pain is elicited during an active muscle contraction. One of the major aims of a passive range of motion exercise is to counteract the negative effects of immobilization. However, it is important to remember that the passive range of motion exercise cannot prevent muscle atrophy
Some benefits of a passive range of motion exercise
The passive range of motion exercise not only assists in promoting healthy joint functionality but also benefits a patient in reducing pain, improving healing, restoring and maintaining range of motion in the affected joints, and building muscle mass, allowing for healthy blood flow and assists in increasing oxygen levels as well.
Some guidelines for the passive range of motion exercise of affected joint
- The passive range of motion would be done in a supine or in a sitting position.
- Support weight of the joint at all times during performing the affected joint’s motion.
- Support above as well as below the affected joint a patient is moving.
- Keep a motion slow and smooth as well.
- Do not force the motion if the affected muscle or joint is stiff.
- A physical therapist should move only as much as the muscle or joint will allow.
- A passive range of motion should be pain-free, if the motions cause pain, stop and let the physical therapist know.
Exercises
Passive shoulder range of motion exercises
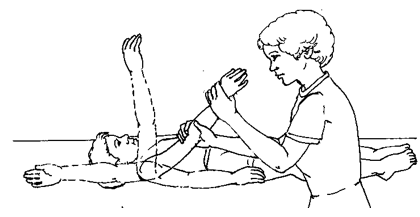
- Passive shoulder external rotation
To begin with, tell a patient to take a comfortable position, such as supine. Then, a physical therapist should move the arm out to the side at shoulder level, and with the elbow bent, an arm should be held, at the elbow and the wrist. After that, roll it outward. Gently hold the shoulder out. Do ten repetitions in one session. Do three sessions in one day. - Passive shoulder internal rotation
To embark with, tell the patient to take a comfortable position, such as supine. After that, a physiotherapist should move an arm inward to the side at the shoulder level, and the elbow bent to the 90degrees, with the arm should be held at the elbow as well as the wrist. Do ten repetitions per session. Do three sessions per day. - Passive shoulder flexion
To start with, tell a patient to take a comfortable position, such as supine. Next, a physical therapist should hold the arm at the elbow and the wrist. After that, move it straight forward and upward toward the ear side. Then, bring back to the starting position. Do ten repetitions in one session. Do three sessions in one day. - Passive shoulder extension
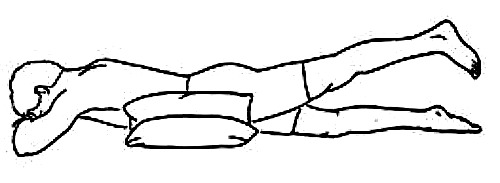
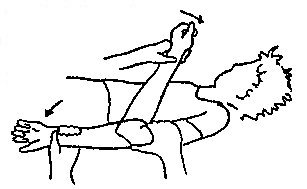
The therapist tells a patient to take a comfortable position, such as prone, to embark. However, the position of a palm should be facing up. Then, hold an arm at the elbow and the wrist. Next, move an arm straight out to the side. Do it ten times in one session. Do three sessions in a day. - Passive shoulder abduction and adduction
To begin with, ask a patient to take a comfortable position, like supine. Then, the therapist should hold the arm at the elbow and wrist. Next, the therapist moves it away from the body’s midline as well as the therapist tries to touch the ear. After that, bring back to the embarking position. Do ten repetitions per session. Do three sessions per day.
Passive elbow range of motion exercises
- Passive elbow flexion
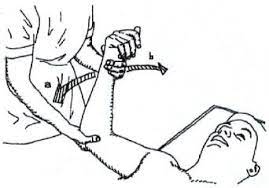
To begin with, a physical therapist should support a patient’s elbow or upper arm with one hand and hold the wrist or forearm with the other hand. Then, a physical therapist should slowly bend from the elbow and have the hand touch an elbow if possible. Do it ten times in one session. Do three sessions in a day.
- Passive elbow extension
To embark, the physical therapist should support the patient’s elbow or upper arm with one hand as well as hold the wrist or forearm with another hand and the hand must be bent. After that, the physical therapist should slowly straighten the elbow and have the hand touch the elbow if possible. Do it ten times per session. Do three sessions per day. - Passive elbow supination
To start with, the physical therapist tells the patient to take a supine or sitting position with the supported back. Then, a physical therapist should grasp the hand by shaking the hand. Next, a therapist moves the hand in supination which is in pronation, so the palm of the hand should face the roof. Do it ten times in one session. Do three sessions in a day. - Passive elbow pronation
To begin with, tell the clinician to take a comfortable position, namely a supine or sitting position with the supported back. After that, the physical therapist should grasp a hand like shaking a hand. Next, a therapist moves the hand in pronation which is in a supination position, so the palm of the hand should face the floor. Do it ten times in one session. Do three sessions in one day.
Passive wrist range of motion exercise
- Passive wrist extension
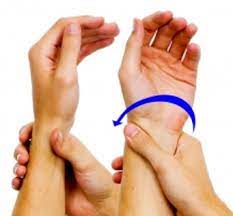
To begin with, take a comfortable position, such as sitting on a chair and injured hand hanging on the edge of the table with full pronation. After that, place a rolled towel under the affected hand. Then, a therapist takes his/her position opposite a patient. A physical therapist tells a patient that tries to move the wrist upward, but if a patient cannot move the wrist then a clinician moves the hand in the upward direction till the stretch should be felt by a patient. Perform this movement ten times in one session. Do three sessions in a day. - Passive wrist flexion
First of all, tell a patient to take a comfortable position, like sitting on a chair and the affected hand hanging on the edge of a table with full supination. Then, place a rolled towel under the injured hand. After that, a clinician takes his/her position opposite a patient. During the therapist performs the motion, he/she gives the command to a patient to try to move the wrist down and a clinician moves a wrist downward direction till the stretch should be felt by a patient. Do it ten times in one session. Do three sessions per day. - Passive wrist ulnar deviation
To begin with, tell a patient to take a comfortable position, such as sitting on a chair, and an injured hand should be in mid-pronation. Moreover, place a rolled towel under an injured hand. Then, a clinician takes his/her position opposite the patient. After that, a physical therapist gives a command to the patient that tries to move the wrist down while the physiotherapist performs the motion, and then a therapist moves the wrist in the downward direction till the stretch should be felt by the patient. Do this movement ten times per session. Do three sessions in a day. - Passive wrist radial deviation
First of all, ask a patient to take a comfortable position, like sitting on a chair and the injured hand should be in mid supination position. Furthermore, place a rolled towel under the affected hand. Next, a physical therapist takes his/her position opposite a patient. Then, a clinician gives a command to a patient that tries to move the wrist upward while a clinician performs the movement, and a physical therapist moves the wrist in the upward direction until the stretch should be felt by a patient. Do this action ten times in a session. Do three sessions per day. - Passive finger flexion
To begin with, place the hand with an affected finger flat on the table, with palm up. Then, a clinician places his/her free hand on the back of the fingers as well as moves the fingers inward like bending the fingers. Then, an injured finger will be free to move. Next, straighten the finger. Repeat it ten times per session. Do three sessions in a day. - Passive finger extension
To embark, place the hand with an injured finger flat on the table, with palm up. After that, a therapist places his/her one hand on the back of the fingers but the fingers should be in the flexion position. Then, move the fingers outward like straightening the fingers. After that, an affected finger will be free to move. Repeat it ten times a session. Do three sessions per day. - Passive thumb flexion
To start with, tell a patient to take a comfortable position, such as sitting on a chair and the hand should be in mid pronation. After that, the rolled towel is put under a hand. Next, use the one hand of a physical therapist to bend the thumb down so that the gentle stretch is felt. Repeat ten times in one session. Do three sessions per day. - Passive thumb extension
First of all, tell the patient to take a comfortable position, like sitting on the chair and the hand should be in mid pronation. Then, a rolled towel is placed under an injured hand. Next, use one hand of a physical therapist gently stretch the thumb out. Repeat ten times per session. Do three sessions in one day. - Passive thumb abduction
First of all, tell a patient to take a comfortable position such as sitting on a chair with a rolled towel under an injured hand, but the hand should be in mid pronation. Then, stretch the thumb out from the palm as if a patient is opening it up to hold a large jar, but remember that stretch at the big thumb knuckle, not a tip. Repeat ten times in one session. Do three sessions per day. - Passive thumb opposition
To begin with, tell a patient to take a comfortable position such as sitting on a chair. After that, touch the thumb to the tip of each finger. When a patient is able to do thumb opposition exercise easily, then touch further down on each finger till a patient is able to touch the base of each finger. Repeat ten times per session. Do three sessions in a day.
Passive hip range of motion exercise
- Passive hip as well as knee flexion
- To begin with, a patient should take a comfortable position, such as supine. After that, cradle a leg by placing the one hand under a bent knee, and then the other hand grasps the heel for stabilization. Next, lift the knee and bend it toward the chest side, with the kneecap pointed toward the ceiling. Do not allow a hip to twist during this motion. The foot should stay in a straight line with the hip, but not swing in or out. Next, the leg is lowered to the starting position. Do ten repetitons in one session. Do three sessions in a day.
- Passive hip abduction and adduction
To begin with, the patient can take a relaxed position, such as supine. Then, a physical therapist cradles the leg by placing a hand under the knee and holding it. After that, place another hand under the heel to stabilize a hip joint. Next, keeping a knee straight, move the leg along the surface of the bed, away from the other leg, to around 45 degrees. Then, bring the leg back towards the other leg. Do ten repetitions per session. Do three sessions per day. - Passive hip external rotation
To embark, a therapist tells a patient to take a relaxed position, such as supine with the back supported. Next, a physical therapist grasps the knee which is 90 degrees flexion position with the hip at 90 degrees flexion. Then, a physical therapist rotates the leg outside. Do it ten times per session. Do three sessions in a day. - Passive hip internal rotation
First of all, a therapist tells the patient to take a comfortable position, such as supine with a supported back. Then, the therapist grasps the knee which is at 90 degrees flexed with the hip is also at 90 degrees of flexion. After that, the physical therapist rotates the leg inside. Do it ten times per session. Do three sessions per day.
Passive knee range of motion exercise
- Passive knee flexion in supine
First of all, the clinician tells the patient to take a comfortable position, such as supine. After that, the physical therapist places one strong hand on the front of a thigh and grasps an ankle joint with the second hand. Then, the therapist bends the knee and the hip toward the face, when a therapist moves a leg, the patient should also try to help in bending the knee as well as the hip, which assists in the strengthing of the knee flexors. The therapist holds an injured leg at the endpoint for five seconds. Do it ten times in one session. Do three sessions per day.

- Passive knee extension in supine
First of all, a physical therapist should tell a patient to take a relaxed position, such as supine with knee bend. Then, a clinician places one hand on a thigh and grasps an ankle joint with another hand. After that, a therapist straightens the knee meaning away from the face, when a physiotherapist moves a leg, that time a patient should try to assist in straightening the knee, which helps in increasing the strength of the knee extensors. A clinician holds a leg at the endpoint for five seconds. Do it ten times per session. Do three sessions in a day.
Passive ankle range of motion exercise
- Passive dorsiflexion
To begin with, tell a patient to take a comfortable position, like lying on a bed with a knee straight and the foot should out of a bed. After that, a physical therapist cups a heel with one hand and places the other hand on the bottom of the foot. Then, a physical therapist gently pushes a foot up so that the toes point toward the head of a patient. Perform this exercise ten times in one session. Do three sessions in a day. - Passive plantarflexion
To embark, a physical therapist should give a command to a patient, to take a comfortable position, such as lying on a bed with knee straight and a foot should out of a bed. Then, a physical therapist cups a heel of an uninjured foot with the one hand and places the other hand on the bottom of the foot. After that, a clinician gently pushes a foot down so that the toes point away from a body. A physical therapist should make sure that do not hold this action at an endpoint. Perform it ten times per session. Do 3 sessions per day.

- Passive inversion
First of all, ask a patient to take a comfortable position, such as lying on a bed with the knee straight and the foot should out of a bed. Next, a therapist cups a heel with the one strong hand as well as places another hand on the bottom of the foot as well. After that, a therapist gently turns a foot inward, not allowing a leg to rotate. Do it ten times per session. Do three sessions per day. - Passive eversion
To begin with, a physical therapist should give a command to a patient to take a comfortable position, like lying on a bed with a knee straight and a foot should out of the bed. After that, a physical therapist cups a heel with one hand and places another hand on the bottom of the foot. Next, a physical therapist gently turns a foot outward but does not allow a leg to rotate. Do it ten times in one session. Do three sessions in a day. - Passive toe extension
To begin with, sit on a chair, and place the foot to be exercised across the opposite knee. After that, a patient places one hand on a heel as well as another hand on the toes, then moves the toes up towards the shin of the tibia as far as comfortable. Do it ten times in one session. Do three sessions in one day. - Passive toe flexion
To embark, a physical therapist tells a patient to take the sitting position on a chair and put a foot to be exercised across an opposite knee. Then, a patient put one hand on a bottom of a heel as well as another hand on the toes and moves the toes down towards the shin of a tibia as far as comfortable. Do it ten times in one session. Do three sessions in a day.
Active-assisted range of motion exercise
As the name suggests, these exercises mainly involve partial assistance from a therapist or from the patient himself/herself or with the use of a tool, such as a band or even a strap. A patient does most of the motions, but he/she gets little assistance to complete the affected joint’s movement correctly. Commonly in major cases, these restricted movements are the result of weakness or even pain caused because of falls, bruises, or even accidents, up to severe injuries. A physiotherapist mostly uses a strap or a band to secure the affected joint before helping in the movement. In the starting, the patient can suffer a great deal of pain and weakness when performing these types of exercises. However, with the time, the patient has a great scope for gradual and lasting improvement in the range of motion around the affected joint.
Some benefits of the active-assisted range of motion exercise for the affected joint
- Increase the movement of the affected joint.
- Improve the function of the affected joint and the whole limb.
- Increase the affected joint’s motion efficiency.
- Increase independence.
- Decrease pain.
- Increase and maintain affected-joint integrity.
How does the patient get started?
Learn an active-assisted range of motion exercises for the joint from the patient’s home health care provider. Practice exercises with the assistance of a patient’s home health care provider. The physical therapist can give the command to the patient on correct handholds and assist the needs of the patient. The physical therapist may also show the easiest path to perform all these exercises so the patient does not get hurt or tired. Find a comfortable position for the patient. Most of the patients prefer to use a bed for exercising with support. Do all range of motion exercises slowly, smoothly, as well as gently. Never force jerk or even over-stretch the muscles of the joint. This can hurt the muscle or even the joint instead of assisting. Move the joint only to the point of the resistance. This is the point where a patient may not bend the joint any further. Stop performing a range of motion exercises if a patient feels pain. Ask a therapist to tell the patient right away if he/she feels increased pain and soreness that does not stop after ceasing any exercise. The range of motion exercises may cause mild symptoms, but still again, should subside quickly. Try to perform all these exercises again by modifying a therapist’s helping level; this can reduce the soreness noted with the exercise.
Exercises
Active-assisted shoulder range of motion exercise
- Active-assisted shoulder flexion as well as extension
To start with, tell a patient to stand in front of a finger ladder. Then, place an injured hand on the finger ladder as well as move the fingers upward on the ladder meaning as long as possible improve the steps of a ladder and do shoulder flexion after that come back to the starting position. Do it ten times in one session. Do three sessions in one day. - Active-assisted shoulder abduction as well as adduction range of motion exercise
First of all, ask the patient to stand at a 90degrees angle from the finger ladder, but an injured side should be in front of a ladder. Then, place the affected hand on the finger ladder and move the fingers upward on a ladder meaning as far as possible increase the steps of a ladder and do shoulder abduction, after that come back to the embarking position. Do it ten times per session. Do three sessions per day.

- Active-assisted shoulder internal rotation with the use of the stick
Tell a patient to take a relaxed position, such as sitting with an unsupported back with an elbow 90 degrees of flexion. After that, a physical therapist should give a command to the patient that holds the two ends of a stick with the affected as well as unaffected hands, then with the use of a healthy hand move a shoulder inward, but an injured hand must be worked during performing the internal rotation action when the injured hand does not work then a healthy hand may work. Do ten repetitions in a session. Do three sessions in one day. - Active-assisted shoulder external rotation with the use of the stick
To embark, the therapist tells the patient to take a comfortable position, namely sitting with an unsupported back as well as elbow should be 90 degrees of flexion. Then, the clinician should give the command to a patient that holds the two ends of the stick in both hands, after that with the use of the uninjured hand move the shoulder outward, but an affected hand must be worked during performing an external rotation movement when an affected hand does not work than the good hand should work. Do ten repetitions in one session. Do three sessions per day.
Active-assisted elbow range of motion exercise
- Active-assisted elbow flexion
First of all, a physical therapist should give a command to a patient that takes a comfortable position, such as sitting on a chair with the back supported. Then, a physical therapist should support the patient’s elbow or upper arm with one hand as well as hold the wrist or forearm with another hand. Then, a physical therapist should tell a patient to move the forearm to the face side, meaning bend the elbow, but when a patient stops to do this movement, a physical therapist helps in completing the full range of elbow flexion. Do ten repetitions per session. Do three sessions per day. - Active-assisted elbow extension
To start with, a physical therapist should give a command to the patient to take a relaxed sitting position on a chair with the supported back, as well as the elbow should be bent. Then, a therapist should support a patient’s elbow or upper arm with one hand and hold the wrist or forearm with another strong hand. Next, the therapist should tell the patient to move the forearm from the face side to the ground side, meaning straighten an elbow, but when the patient stops doing it, a physical therapist assists to complete the full range of motion. Do ten repetitions in one session. Do three sessions in a day. - Active-assisted forearm supination
First of all, the clinician should give a command to the patient to take a relaxed position, such as sitting on a chair with
the supported back, and an elbow should be 90 degrees flexed with full pronation. After that, a therapist should support the patient’s elbow or upper arm with one strong hand as well as hold a wrist or forearm with another strong hand as well. Next, the clinician should tell the patient to rotate the forearm outward so a palm will be facing the roof, but when the patient stops doing this motion, a clinician assists to complete the full range motion. Do ten repetitions in one session. Do three sessions in a day.
- Active-assisted forearm pronation
First of all, a clinician should give the command to a patient to take a comfortable position, such as sitting on a chair with the supported back, and the elbow should be flexed to 90degrees with full supination. After that, a physical therapist should support the patient’s elbow or upper arm with one hand as well as hold the wrist or forearm with the other hand. After that, a clinician should tell a patient to rotate the forearm inward so the palm will be facing the ground, but when a patient stops doing this motion, a physical therapist helps to complete the full range of motion. Do ten repetitions in one session. Do three sessions in one day.
Active-assisted wrist range of motion exercise
- Active-assisted wrist flexion
First of all, tell a patient to take a comfortable position, like sitting on a chair and the injured hand relaxed on the edge of the table with full pronation. Furthermore, place the rolled towel under an affected hand. Next, a clinician takes his/her position opposite the patient. After that, a physical therapist gives commands to a patient that tries to move the wrist down, when a patient is unable to move his/her hand while that time the clinician provides the help to a patient to reach the full range. Do this motion ten times per session. Perform three sessions per day. - Active-assisted wrist extension
First of all, tell a patient to take a comfortable position, such as sitting on a chair, and an affected hand should be relaxed on the edge of the table with full pronation. After that, place a rolled towel under an affected hand. Next, a clinician takes his/her position opposite the patient. Then, a physical therapist gives the command to a patient that tries to move the wrist upward, when a patient is not able to reach the end range then a clinician provides help to reach the full range. Do this movement ten times per session. Do three sessions per day. - Active-assisted wrist ulnar deviation
Tell the patient to take a comfortable position, such as sitting on a chair, and an affected hand should be in mid supination. After that, place the rolled towel under an affected hand. Next, a clinician takes his/her position opposite a patient. In addition, a physical therapist gives a command to a patient that tries to move the wrist down, and when a patient stops while performing this movement, then a physiotherapist helps a patient to reach the end range. Do this motion ten times in one session. Do three sessions per day. - Active-assisted wrist radial deviation
First of all, tell a patient to take a comfortable position, like sitting on a chair, and an affected hand should be in mid supination. After that, place a rolled towel under an affected hand. Next, a physical therapist takes the position opposite a patient. Then, a clinician gives a command to a patient that tries to move the wrist up, and when a patient stops during perform this motion, then a physiotherapist assists a patient to reach the end range. Do it ten times in one session. Do three sessions per day.
Active-assisted hip range of motion exercise
- Active-assisted hip extension
Hand placement: A patient lies on the stomach to perform hip extension movement with straight hands beside a body, a clinician supports a patient’s thigh above the knee joint and the ankle. Then, a physical therapist should give a command to a patient that moves a leg upside, and a therapist should apply additional aids is only needed to help the patient lift the thigh off of the supporting surface and assist the leg back to the bed, in the event the patient fatigues and is unable to independently lower the leg slowly. Next, a physical therapist should watch for signs of muscle fatigue which includes quivering or shaking muscles around a hip and an increased feeling of weight in the affected limb; additional support may be needed. Do it ten times in a session. Do three sessions in one day. - Active-assisted hip abduction
Hand placement: A patient lays on an uninjured hip in a side-lying position, and an injured hip is on the top. For comfort, the small pillow can be placed between the two knees. Then, a physical therapist should apply for additional assistance in lifting an injured leg to a side with support above a knee joint and at the ankle, if needed. Remember, the motion is straight up and slightly back towards a physical therapist. After that, a physiotherapist makes sure that the top hip is rolled forward of the imaginary vertical line drawn straight through both hips, as well as does not let the patient roll backward at a hip when completing this exercise. - Active-assisted hip flexion
Hand placement: A patient lies on A back to perform the hip flexion with straight knees, after that a clinician supports a patient’s thigh above a knee joint as well as an ankle joint. Then, a physical therapist should give a command to a patient that moves a leg upside towards the ceiling, and a clinician should apply additional help is only needed to a patient to lift a thigh off the supporting surface as well as assist the leg back to a bed, in the event a patient fatigues and is unable to independently lower the leg slowly. Then, a therapist should watch for signs of muscle fatigue which includes quivering or shaking muscles around a hip and improved feeling of the weight in an affected limb; additional support may be needed. Do three sessions in one day. Do three sessions in a day.
- Active-assisted hip internal rotation
Hand placement: The patient lays on a back to perform a hip internal rotation with straight knees, after that the clinician supports a patient’s thigh above the knee joint and the ankle joint. Then, the therapist should give a command to the patient that moves a leg inward towards another leg side, and the physiotherapist should apply for extra help, which is only needed to help the patient to move the thigh inward as well as assist the leg back to the embarking position, in the event the patient fatigues and is unable to independently move the leg back slowly. Next, a clinician should watch for signs of muscle fatigue which includes quivering or they can see shaking muscles around the hip and an increased feeling of the weight in an injured limb; additional help can be needed. Do three sessions per day. Do three sessions per day. - Active-assisted hip external rotation
Hand placement: A patient lies on a back to perform a hip external rotation with straight knees, then a physical therapist supports a patient’s thigh above a knee joint as well as an ankle joint. Next, the physical therapist should give the command to a patient that moves the leg outward away from another leg, and a therapist should apply additional help is only needed to a patient to move a thigh outward as well as assist the leg back to the beginning position, in the event a patient fatigues as well as unable to independently move the leg back slowly. Then, the clinician should watch for signs of muscle fatigue which may include quivering or even shaking muscles around a hip and increased feeling of the weight in an affected limb; additional help may be needed. Do it ten times a day. Do three sessions in a day.
Active-assisted knee range of motion exercise
- Active-assisted knee flexion in supine
A physical therapist should tell a patient to take a relaxed position, like supine. Then, a therapist places one strong hand on a high and grasps an ankle joint with the other hand. After that, a therapist gives a command to a patient that bends the knee and a hip toward the face side. When a patient stops to complete the entire range, then a physical therapist assists to complete the knee flexion. Do it ten times in a session. Do three sessions in a day. - Active-assisted knee extension in supine
First of all, a physical therapist should tell a patient to take a relaxed position, such as supine. After that, the physical therapist places one hand on a thigh and grasps an ankle joint with another hand. Next, the clinician gives the command to a patient to straighten the knee and hip. When the patient stops to perform the entire range, then the therapist helps to complete a knee extension. Do it times in one session. Do three sessions per day.
Active-assisted ankle range of motion exercise
- Active-assisted dorsiflexion
First of all, tell a patient to take a comfortable position, such as lying on a bed with the knee straight as well as the foot should out of a bed. Next, a physical therapist cups a heel with one hand and places another hand on the bottom of the foot as well. After that, a physical therapist gives a command to a patient that moves the foot upward as far as a patient can, and when a patient is not able to move the foot between the motion, a clinician helps a patient to reach the entire range of the motion. Hence, the toes move towards the face. Do this exercise ten times per session. Do three sessions per day. - Active-assisted plantarflexion
Tell a patient to take a comfortable position, like lying on a bed with the knee straight and the foot should out of a bed. After that, a clinician cups a heel with one hand and places another hand on the bottom of the foot. Then, a physical therapist gives a command to the patient that moves the foot down as far as the patient can, and when the patient is not able to move the foot between the motion, a physical therapist helps the patient to reach the entire range of the motion. Next, the toes should be away from the face. Perform it ten times in one session. Do three sessions in a day. - Active-assisted inversion
To begin with, tell the patient to take a comfortable position, like lying on a bed with a knee straight and the foot should out of a bed. After that, a physical therapist cups the inner border with one hand and places another hand on the bottom of the foot. Next, a clinician gives a command to the patient that moves their foot inward as far as the patient can, and when the patient is not able to move the foot inward in between the movement, a clinician helps a patient to reach the entire range of the motion. Perform it is ten times in one session. Do three sessions in a day. - Active-assisted eversion
To embark, tell a patient to take a comfortable position, such as lying on a bed with the knee straight as well as the foot should out of a bed. Then, a therapist cups the inner border with one hand and places another hand on the bottom of the foot. Next, a clinician gives a command to a patient that moves the foot outward as far as a patient can, and when a patient is not able to move a foot outward in between the motion, a physical therapist aids a patient to reach the full range of the motion. Perform it ten times in a session. Do three sessions per day. - Active assisted toe flexion
To begin with, tell the patient to take a comfortable position, like lying on a bed with the knee straight as well as the foot should out of a bed as well. Next, a physical therapist cups the toes with one strong hand and places another hand on the bottom of the foot. Then, a clinician gives a command to a patient that moves the toes toward the ground as far as a patient can, and when a patient is not able to bend the toes in between the action, a physical therapist helps a patient to reach the entire range of the toe flexion. Do it ten times per session. Do three sessions in a day. - Active-assisted toe extension
First of all, ask a patient to take a comfortable position, such as lying on a bed with a knee straight and a foot should out of
a bed. Next, a physical therapist places one hand on the backside of the toes and places the other hand on the
bottom of the foot. After that, a physical therapist gives a command to the patient that moves the toes upward meaning toward the face side as far as a patient can, and when a patient is not able to extend the toes in between the movement, a therapist gives assistance to a patient to reach the full range of the toe extension. Perform it ten times per session. Do three sessions in one day.
Active range of motion exercise
What is an active range of motion exercises?

The active range of motion exercises assists in increasing joint function. A range of motion is how far the patient can move the joints in various directions. These exercises assist the patient in moving the joint through its full range of motion. Movement can help in keeping the joints flexible, decrease pain, and increase balance as well as strength.
What does a patient need to know about the active range of motion exercises?
Do the exercises the physical therapist teaches a patient about active range of motion exercise. Practice the exercises with the healthcare provider before the patient tries them by himself. Do this exercise every day, or as often as directed by the healthcare provider. Do the affected joint exercises in the same order every day. Go from flexion to extension to abduction to adduction to both side rotation to help a patient to remember the series of moves.
It may absolutely normal to feel some discomfort or pain during performing the motion at first. Regular exercise can help to decrease discomfort over time.
Exercises
Shoulder active range of motion exercise
- Shoulder flexion
To begin with, a physical therapist should tell a patient to take a relaxed position, such as sitting. Then, a patient should be commanded by a physical therapist to start with the arm by an injured side as well as slowly lifts the hand toward the ceiling with the elbow straight. Next, slowly bring an arm back down by the side with the straight elbow. Repeat it ten times in one session. Do three sessions in a day. - Shoulder extension
To start with, a physical therapist should tell the patient to take a relaxed position, like supine or sitting, with the hand that should be flexed. Next, the patient should be commanded by a therapist that starts with an arm by the affected side, and slowly bring a hand toward the floor with the elbow straight. Repeat it ten times per session. Do three sessions per day.

- Shoulder abduction
First of all, a physical therapist should tell the patient to take a relaxed position, like supine, side-lying, or sitting. Next, the patient should be commanded by a therapist that begins to do this exercise with an arm by an affected side, slowly lift a hand but move by a side toward the floor with the elbow straight. Then, slowly bring the arm back down by a side with the elbow straight. Repeat it ten times per session. Do three sessions per day. - Shoulder internal rotation
To begin with, a physical therapist instructs a patient to take a relaxed position, like supine or standing. Next, a patient should be instructed by a physical therapist to raise an arm to shoulder height at a 90- degrees angle to the body, after that rotate a hand inward in standing or upward in supine till the hand is even with the elbow. Then, slowly let a hand rotate to the starting position. Do it ten times in one session. Do three sessions in one day. - Shoulder external rotation
To start with, a physical therapist should give an instruction to a patient to take a comfortable position, like supine or standing. After that, the patient should be commanded by a therapist to raise the arm to shoulder height at a 90 degrees angle to a body, then rotate the hand outward, if a patient is in standing or downward if a patient is supine till a hand is even with an elbow. Then, slowly let a hand rotate to the starting position. Do it ten times per session. Do three sessions per day.
Active elbow range of motion exercise
- Active elbow flexion
To begin with, tell a patient to take a comfortable position, such as sitting or standing. Then, the therapist gives the command to a patient that bends an elbow meaning moving the forearm toward the face side. Do ten repetitions in one session. Do three sessions in a day. - Active elbow extension
To start with, tell the patient to take a relaxed position, such as sitting or standing. After that, a physical therapist should give the command to a patient that straightens an elbow meaning move the forearm away from the face. Do ten repetitions per session. Do three sessions per day. - Active forearm supination
To embark, the therapist tells a patient to take a comfortable position, like sitting or standing with the elbow around 90 degrees of flexion. Then, the clinician should give a command to a patient that moves the forearm outward so the palm will face the ceiling. Do it ten times in one session. Do three sessions per day. - Active forearm pronation
First of all, a physical therapist should tell a patient to take a relaxed position, such as sitting or standing with an elbow 90degrees flexed. After that, the clinician should give a command to the patient that moves the forearm inward so a palm will face the ground. Do it ten times in one session. Do three sessions in a day.
Active wrist range of motion exercise
- Active wrist flexion and extension
To begin with, tell the patient to place a forearm on the table on a rolled-up towel for padding with a hand hanging on the edge of a stable surface, such as a table with a wrist in full pronation. Then, a clinician should give a command to a patient to move a hand down until the patient feels the mild stretch. Next, return to the embarking position. Do ten times in a set. Do three sets per day. - Active wrist ulnar deviation
It is a responsibility of a physical therapist to give a command to the patient to take a comfortable position with the support of the forearm on the table on a rolled-up towel for padding or on the knee, along with the thumb upward in the position. Then, move the wrist down through its full range of motion. Do it ten times in a session. Do three sessions per day. - Active wrist radial deviation
First of all, a clinician gives a command to the patient to take a comfortable position with the forearm supported on a table
on a rolled-up towel for padding or on a knee, with a thumb upward. Next, move the wrist up through the full range of motion. Do it ten times per session. Do three sessions per day. - Active thumb flexion
The physical therapist gives a command to a patient to take a comfortable position with the forearm supported on a table on the rolled-up towel for padding or on the knee. Then, a thumb is positioned outward, as well as moving a thumb across the palm and back to the starting position. Do this action ten times per session. Do three sessions per day. - Active thumb extension
To embark, a physical therapist should give a command to the patient to take a comfortable position with the forearm supported on the table on the rolled-up towel for padding or on the knees. Then, the thumb is positioned outward direction. Next, move the thumb across the palm after that come back to the starting position and move slightly backward but not in abduction. Perform ten repetitions per session. Do three sessions in one day. - Active thumb abduction
Tell the patient to take a comfortable position, like sitting on a chair with the rolled towel under an injured hand, but the
hand should be in mid pronation. After that, tell the patient to stretch a thumb out from a palm as if a patient is opening it up to hold the large jar, but remember to stretch at the big thumb knuckle, not at the tip. Repeat ten times in a session. Do three sessions per day. - Active thumb opposition
To embark with, tell a patient to take a comfortable position such as sitting on a chair. Next, the therapist gives the command to touch the thumb to the tip of each finger. Then, when a patient is able to do this action effortlessly, touch further down on each finger until a patient is able to touch the base of each finger. Repeat ten times per session. Do three sessions in a day. - Active finger flexion
First of all, place the hand with an affected finger flat on a table, with palm up. Then, a physical therapist gives a command to a patient to bend the fingers inward. After that, straighten the fingers. Repeat this motion ten times per session. Do three sessions in a day. - Active finger extension
To start with, place the hand with an injured finger flat on a table, with a palm up. Next, a physical therapist will give a command to the patient to straighten the fingers. Next, relax the fingers. Repeat this movement ten times per session. Do three sessions per day.
Active hip range of motion exercise
- Active hip flexion with knee flexion
To begin with, the therapist tells a patient to take a supine position. Then, a physical therapist should give a command to a patient that bends the hip and knee towards the face side as far as possible without taking the assistance of a physical therapist or their own healthy hand. Do it ten times in a session. Do three sessions in a day. - Active hip flexion
To embark, a clinician should tell the patient to take a relaxed position, such as supine. After that, the therapist gives a command to the patient that raises a hip towards the ceiling side as far as possible without taking the assistance of the therapist or their own strong hand. Do it ten times per session. Do three sessions per day. - Active hip extension
To start with, a patient takes a relaxed position, such as the prone position. Then, a physical therapist should tell a patient to raise a leg as far as possible, but without any support from a therapist or a patient’s own strong hand. Do it ten times per session. Do three sessions in a day. - Active hip abduction and adduction
First of all, a therapist should give the command to the patient that takes a comfortable position, such as side-lying with the affected leg up. Then, a physical therapist tells a patient to move the leg up towards the roof as far as possible, but without any external support, and then come back to starting position. Next, do ten repetitions per session. Do three sessions per day. - Active hip internal rotation
First of all, the physiotherapist tells a patient to take a relaxed position, such as supine. Next, a clinician gives a command to a patient that rotates a leg inward towards the uninjured leg side as far as possible, without any extra support. Do it ten times in one session. Do three sessions in one day. - Active hip external rotation
To embark, the therapist tells the patient to take a relaxed position, like supine. After that, the physiotherapist gives a command to the patient that rotates the leg outward away from an uninjured leg as far as possible, and without any extra support. Do it ten times in one session. Do three sessions per day.
Active knee range of motion exercise
- Active knee flexion in supine
To embark, the clinician should tell the patient that takes a comfortable position, such as supine. After that, the therapist gives the command to the patient that bends a knee with the hip as far as possible but does not hold at an endpoint. Do it ten times in one session. Do three sessions per day. - Active knee extension in supine
First of all, a physical therapist should tell a patient to take a relaxed position, such as supine. Then, a clinician gives a command to a patient that straightens a knee as well as a hip but does not hold this position at an endpoint. Do it ten times in one session. Do three sessions in one day.
Active ankle range of motion exercise
- Toe extension
To do this exercise: To begin with, tell a patient to take a sit-up straight in a chair, with a foot flat on the ground. After that, place an unaffected foot on the normal thigh. After that, pull the toes upward toward an ankle. There should be a stretching feeling along a bottom of a foot as well as the heel cord. Massaging the arch of a foot during stretching will assist ease tension and pain. Repeat a toe extension exercise three times on each foot. Do ten repetitions in one session. Do three sessions in one day. - Toe flexion
To do this exercise: To begin with, tell the patient to take a sit-up straight on a chair, with a foot flat on the ground. Then, place a left foot on a right thigh. After that, they move the toes down toward the ground. Do ten repetitions per session. Do three sessions per day. - Active dorsiflexion
First of all, tell a patient to take a comfortable position, such as lying on a bed. Next, a therapist should give a command to a patient to bend a foot toward a face side meaning upward as far as a patient can. Repeat it ten times in one session. Do three sessions per day.

- Active plantarflexion
To embark with, tell a patient to take a comfortable position, such as supine on a bed. Next, a physical therapist should give a command to a patient to move a foot away from a body means down as far as a patient can. Repeat it ten times per session in a set. Do three sessions in one day. - Active ankle inversion
To embark, tell a patient to take a comfortable position, such as lying on a bed. After that, a therapist should give a command to the patient to move a foot inside as far as the patient can. Repeat it ten times in a session in one set. Do three sessions per day. - Active ankle eversion
First of all, the therapist tells a patient to take a comfortable position, such as lying on a bed. After that, a physical therapist should give a command to a patient to move the foot outside as far as the patient can, but at an endpoint, the hold should not be taken. Repeat it ten times in one session per set. Do three sessions per day.


26 Comments