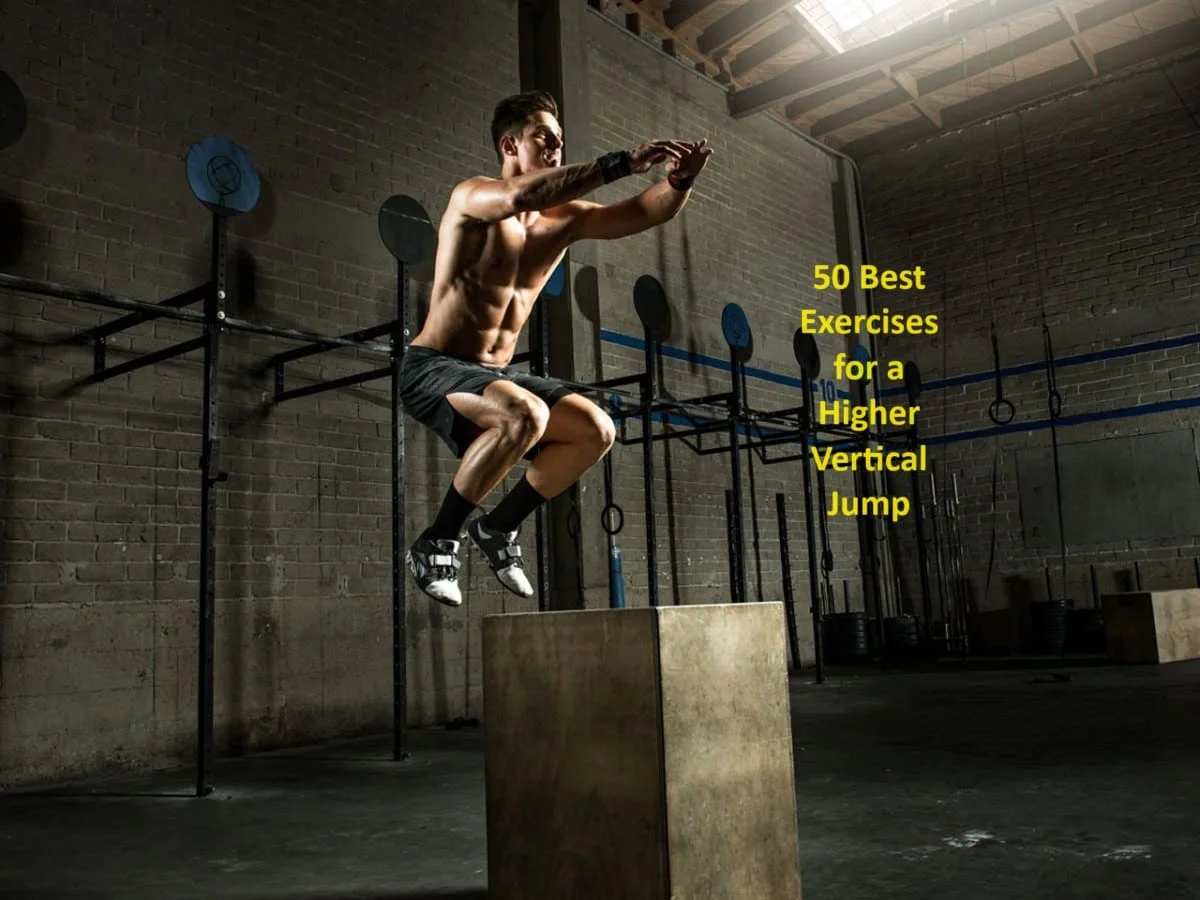
50 Best Exercises for a Higher Vertical Jump: A Comprehensive Guide
Your achievement in sports like volleyball, basketball, and track & field can be enhanced by learning to jump higher. Additionally, you’ll develop power, balance, and sharpness., all of which can improve both your functional and athletic motions.
The gold standard of lower-body strength and explosiveness is a high vertical leap; this skill is just as valuable in high-impact sports like basketball, football, and soccer as it is in the weight room. If you improve your hops, you may find that you can run quicker, lift more weight, and perhaps even dunk during your next pickup basketball game.
However, if you believe that your typical gym-rat training sessions can propel you to new heights, you are incorrect. You must train like an elite athlete if you want to leap like one, beginning with the workouts we’ll go through in this article.
You may perform a variety of activities to raise the height of your vertical jump. For instructions on how to do these exercises properly, advice on how to do higher jumping, and other strategies to stay fit, keep reading.
For numerous reasons, from bettering your general fitness to becoming more explosive in games, boosting your vertical is quite crucial.
Although learning to jump higher is a terrific aim, the technique may be both simple and hard at times.
A greater vertical can be beneficial for anyone preparing for the high jump, from basketball players who want to be able to touch the hoop to volleyball players who want to be better defenders.
You can improve your ability to jump using a variety of different methods and approaches, such as by performing different exercises and honing your jumping form.
There is something out there that will work for you whether you’re a professional sports player, a casual sports fan, or someone who just wants to add a few inches to their vertical.
Because of this, we’re going to look at a few pointers and techniques you may use right away to see a significant improvement in your vertical leap.
Table of Contents
Testing Your Vertical Jump:
Your ability to jump vertically is an excellent indicator of the strength and explosiveness of your lower body.
You need to have a suitable baseline measurement in order to gauge your development as your vertical leap improves.
Although most of us have been leaping since we were young children, completing a proper vertical jump requires some talent and practice.
There is something out there that will work for you whether you’re a professional sports player, a casual sports fan, or someone who just wants to add a few inches to their vertical.
Because of this, we’re going to look at a few pointers and techniques you may use right away to see a significant improvement in your vertical leap.
How to perform a vertical jump test is as follows:
Step 1: Stand with your feet directly behind your hips, your core and legs engaged, and your chest raised.
Widening your stance will actually lessen the force you can produce and drive into the ground for push-off, so resist the desire to do so.
Pulling your knees outward intentionally will cause you to experience tension in your hips while keeping your feet firmly planted on the ground.
With this, the hips are engaged rather than completely relaxed and set to fire.
In essence, you’re preparing your neuromuscular system so that muscle activation for your jump happens more quickly.
Keep in mind that you will have more power for your jump the faster you can generate force, and the higher you can jump the faster you can generate force.
Step 2: Quickly bend your hips and knees into a partial squat while maintaining an upright posture and a strong core. Sit back and throw your arms behind you to gain momentum.
Step 3: Leap as high as you can while propelling your arms forward and overhead.
Reach as high as you can with one arm alone since doing so will allow you to achieve a greater height than you would if you used both arms.
When you begin to descend again, straighten yourself back out and land gently while bending your knees to take the weight; watch that they don’t cave in. As a counterweight, allow your arms to swing backward.
Use a device known as a jump tester, which contains thin plastic sticks spaced at one-inch intervals along the top of a tall pole, while doing an official vertical leap test.
You can hop up along a wall using a pencil or erasable marker at home or at the gym. Be careful not to stretch the writing instrument higher than your fingers when you make marks on the wall.
By standing up and reaching as high as you can while recording the height of the tips of your fingers, you may calculate the difference between your standing vertical reach and the height you reach with your fingers when you leap.
How to Measure Your Vertical
When standing flat on the floor with your arm fully extended straight overhead, measure your reach before measuring your vertical.
The static vertical is then calculated by taking the reach measurement from a static jump and subtracting it from the standing reach.
An illustration would be if you had a standing reach of 80 inches and a jumping reach of 95 inches, giving you a total static vertical height of 15 inches.
You can get your average vertical or average jump height by repeating this motion three to five times, and then taking the average of the trials.
The same procedures can be used to determine your running vertical jump or maximum jump height by deducting it from your standing reach.
| Rating | Males (inches) | Females (inches) |
| Excellent | > 28 | > 24 |
| Very Good | 24 – 28 | 20 – 24 |
| Above Average | 20 – 24 | 16 – 20 |
| Average | 16 – 20 | 12 – 16 |
| Below Average | 12 – 16 | 8 – 12 |
| Poor | < 12 | < 8 |
Your vertical jump, for instance, would be 30 inches if your vertical reach was 95 inches and you marked 125 inches up on the wall with a pencil.
Although you are permitted to perform a few warm-up jumps, you are not permitted to run up or take any steps prior to the jump during a formal vertical jump test. Simply arrange your two feet together and hop into position.
Higher Jump Techniques:
By constantly engaging in exercises to raise your vertical leap, just like with any physical ability, you may teach yourself to jump higher.
Strengthening the jumping muscles—the glutes, hamstrings, quadriceps, calves, and core muscles—as well as developing explosive power and speed are the main goals of vertical jump training.
The good news is that you may apply the training you receive to increase your vertical jump to other exercise activities.
For instance, many of the same workouts that increase jump height will also enable you to run and accelerate more quickly on the sports field or court.
Although doing strength training exercises to increase muscle growth and strength is crucial, jumping higher requires more than just having stronger legs. Muscular strength is only one component of the optimal jumping higher formula.
Increasing your strength is the real secret to raising your vertical leap.
Strength times speed equals power (Power = Strength x Speed).
In other terms, power is the rate at which you can apply force.
Your muscles get more powerful as you can fire them more frequently and cause them to contract with more force.
When you jump, your muscle strength can be compared to your explosive speed.
You need to increase your explosiveness in order to toe off and drive force into the ground more quickly, which will increase your vertical jump.
In order to lift yourself off the ground and jump higher, this power is then transmitted from the earth back into your legs.
The force and power you exert on the ground will be returned to you in an equal amount and opposite direction according to the rules of physics.
Therefore, your vertical jump will be higher the more force you exert on the ground relative to your body weight.
Improving your jumping technique is crucial for maximizing your vertical leap and overall jumping performance. Proper technique can help you utilize your strength and power more efficiently. Here are some tips to help you refine your jumping technique.
Take off:
Begin with your feet shoulder-width apart in a low, athletic posture. To work your leg muscles, bend your knees and hips.
Maintain a straight back and an uplifted chest. Jump higher by simultaneously stretching your hips, knees, and ankles.
Arm Swing:
A big part of creating upward motion is using your arms. Swing your arms high as you take off to provide more lift.
As you descend, swing your arms back to build up momentum for the jump.
Leg Motion:
Concentrate on extending your hips, knees, and ankles in unison.
To maximize the tuck posture during the leap, particularly for sports like gymnastics or high jumping, bring your knees up to your chest.
Landing:
Be ready for a gentle landing. In order to absorb the shock and lessen the likelihood of damage, bend your knees and hips.
Roll softly to your heels after touching the ground with your feet.
Control and equilibrium:
Keep your body aligned during the jump to maintain balance. Never slouch or forward-lean.
Don’t over-rotate; instead, keep your movements under control.
Practice:
You must practice and engage in drills to improve your leaping technique. Spend some time perfecting your form using exercises tailored to your sport or hobby.
Analyzing the video:
Take a video of yourself jumping, then review it to see where you can become better. This may be quite helpful for identifying weaknesses in your approach.
Obtain Coaching:
Think about working with a jump-specific coach or trainer who can offer individualized direction and criticism.
Visualization:
Visualize yourself making the jump. Strengthening the proper motions in your thoughts can help you develop your technique.
Continuous Overload:
As your technique improves, gradually increase the height or distance of your leaps. This aids in preparing your body for the demands of greater leaps.
Warm-up and stretching:
Always warm up and stretch before jumping to increase flexibility and prevent injury. Your range of motion can be maintained by stretching.
Rest and Restoration:
Allow your muscles to rest and recover after challenging workouts. Performance can suffer and the risk of injury rises with overtraining.
Muscles Required for Jumping
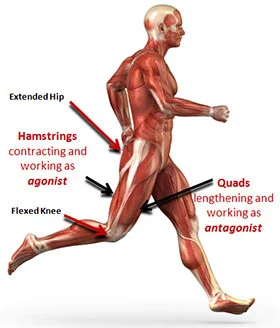
Triple extension, or the simultaneous and explosive extension of the hips, knees, and ankles, is what causes a leap. Triple extension is the key factor whether you’re watching an Olympic weightlifter complete a clean, a sprinter takes off down the track, or a basketball player goes up for a dunk. The muscles that enable it are listed below.
springing is a triple extension exercise for this reason, whether you’re doing a plyometric box jump as part of a HIIT workout, pressing a heavy barbell to do an Olympic clean, or springing up to hit a tennis serve.
Your body transitions from the lowered posture with your joints contracted into the explosive upward movement that lifts your body off the ground by the coordinated extension of your ankles, knees, and hips.
–Glutes, for hip extension (gluteus maximus, gluteus medius): Your butt’s three muscles are primarily in charge of extending your hips.
When you jump, the glutes also help to keep your hips and spine in place.
–Quadriceps (rectus femoris and the vastus lateralis, intermedius, and medialis), for extending the knee: The quads, which run down the front of the thigh.
When you land from jumping, this muscle group also flexes your hip.
–Hamstrings, which are used for knee flexion, hip extension, and absorbing landings (biceps femoris, semimembranosis, semitendonosis): These are a trio of muscles that run down the back of the leg.
To enable the hip extension, the hamstrings collaborate with the glutes. Additionally, they are in charge of knee flexion, which is essential for absorbing the shock of landing your leap.
–Calves (gastrocnemius, soleus), for plantarflexion and ankle extension: In a car, pressing the gas pedal causes these muscles to act together to plantarflex (stretch) the ankle.
–Core Muscles-Transverse abdominis, rectus abdominis, internal and external obliques, multifidi, and erector spinae, for the stability of the trunk:
Though we typically primarily associate jumping with the lower body, the core muscles must also be engaged in order to maintain the spine and transfer energy from your arms to your legs.
Trunk stability is aided by back muscles like the multifidus and erector spinae, as well as abdominal muscles like the transverse abdominis, rectus abdominis, and internal and external obliques.
You may greatly enhance your capacity to jump by working out each of these muscles, which are all important for getting off the ground.
Plyometrics and weight training are two exercise categories that boost general power and explosiveness.
Exercises:
Here are some drills and pointers to increase your vertical leap. Consistently perform these workouts for the best results. Try several ones to discover which ones get the greatest results.
How To Jump?
Step 1: Place your feet directly behind your hips while standing. You won’t be able to transfer as much force from your legs straight onto the ground if they are broader than that. Without shifting your feet, drive your knees outward until you feel tightness in your hips. Better leaping power will result from the hips being activated.
Step 2: To gain momentum, quickly lower your hips and knees while swinging your arms behind you. Imagine yourself in a half-squat or a little shallower; your hips must be positioned behind your knees. The hip motion you use during a deadlift or clean is the same as the hip action you use in a jump: bend them back while maintaining a long spine.
Step 3: Throw your arms forward and upward as you leap as high as you can. Reach up with one arm just when you leave your feet; this will allow you to reach a higher position than if you used both arms. Be cautious not to let your knees buckle inward as you land lightly with a modest knee bend. Like you did when you were getting ready to leap, drive them outward.
Strength Training:
Weight training involves adding weights to an exercise so that your body will experience more resistance while you make an explosive action.
In this way, by exerting a negative force that forces your muscles to work harder, you can exercise both strength and power.
Regardless of the exercise you perform, it is necessary to warm up before each session and handle the equipment with care because you are working with weights.
In case something goes wrong, you might also wish to ask someone to be your spotter during training sessions.
Always be cautious when exercising, but this is especially important when using heavy gym equipment like weights.
The following are a few examples of weight-training workouts that improve your jump:
Weight Step-Ups
In essence, these are straightforward step-ups that have resistance added to them to make the exercise more challenging.
Step 1: Place one foot on an elevated platform, then ascend onto it.
Step 2: Take your opposite leg and perform a high knee while still standing on the elevated area with one foot.
All of this is done while raising your knees high on the elevated platform and curling up while holding weights at your sides.
Step 3: Remove your pointer foot from the elevated platform and lower your high knee back to the ground while lowering your weights to your sides.
Repeat the technique using your other foot as the pointer in alternation.
Weighted step-ups are excellent for strengthening the quadriceps and work well as part of an aerobic routine.
Plyometrics
The majority of jump training activities are built on plyometric principles.
As a result of the high intensity of these exercises, your muscles are forced to exert their full force during brief intervals, which when performed properly enhances your overall force.
Plyometric workouts are so popular because they are so effective; each motion requires a significant amount of muscle recruitment.
The exercises cause a high rate of muscle tearing when performed repeatedly, and this, combined with adequate rest, results in the growth of muscular mass.
The majority of plyometric exercises include fast, maximally intense explosions of some kind.
Plyometric activities, of which jumping rope, jump squats, and clapping push-ups are a few examples, make up the majority of workouts that help us leap higher.
Plyometric exercises should be a part of your workouts if you wish to jump higher.
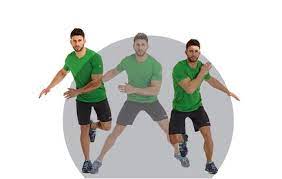
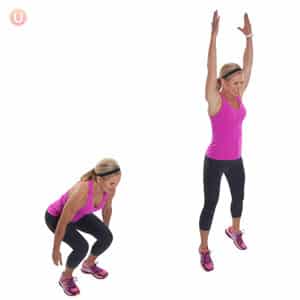
Jumping jacks:
By strengthening your lower body, plyometric exercises like jumping jacks will help you leap higher. They also cause your heartbeat to increase while pressuring your body out of its natural motion.
This practice is helpful for enhancing performance in tasks that call for sudden changes in direction. Stand straight with your foot and shoulder-width apart and your arms at your sides.
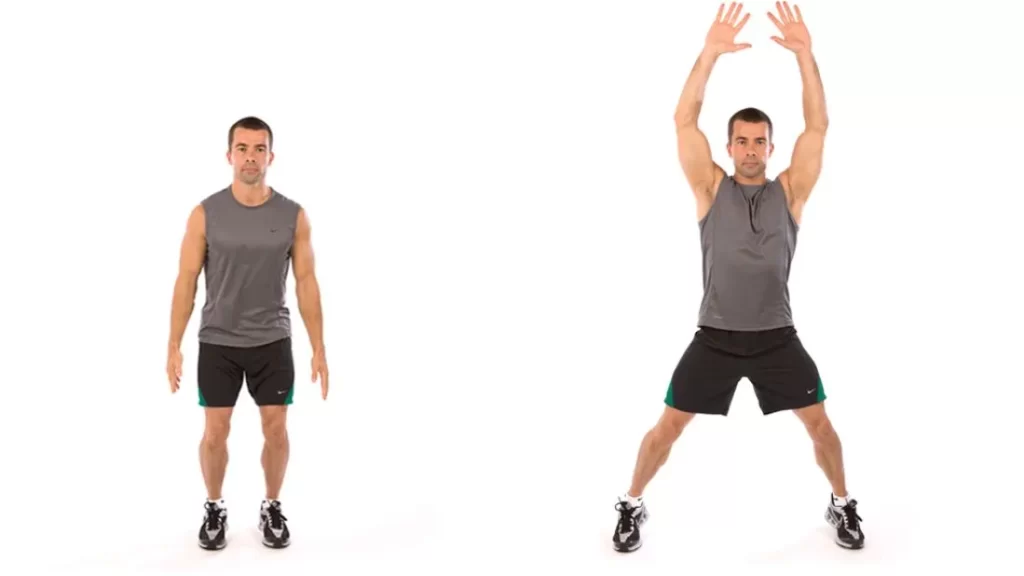
How to perform:
Step your right foot out to the side instead of jumping, raising both arms high and out to the sides at the same time.
In the starting position put your right foot back while bringing your arms back down to your sides.
Lift your left leg to the side and extend your arms up and out to repeat the exercise on the other side.
Continue to alternately raise and lower your arms while stepping to the sides with your feet.
Do 2-5 sets of 10-15 repetitions.
Although the pressure on the knees is reduced, the modified version still includes arm movement and stimulates the muscles of the shoulders, legs, and back. By reducing the potential stress on the knee joints, it allows the same movement pattern as jacks.
Single-leg deadlifts with jump:
This advanced exercise builds stability as you explosively jump on one leg at a time.
How to do it:
While standing behind you, extend your right leg.
Keep your feet off the floor if possible. Bend forward and align your body so that it is parallel to the floor. Drop your right arm to the ground. Raise your right leg behind you to the hip. Explosively jump straight up, lifting your left leg. At the same time, lift your right knee in front of you and extend your left arm above your head. Return to the starting position. Do 2-4 sets of 5-10 repetitions on each side.
Burpees
This exercise builds strength, endurance, and cardiovascular health. Burpees work your entire body and give you the power to jump explosively. If you want your burpees to be lighter or heavier, try different burpees.
Doing:
Stand with your feet shoulder-width apart, then lower your hips back and lower into a squat position.
Press your palms into the floor in front of your feet. Jump, walk, or back up with both feet on the high board.
Try to push.
Jump, walk, or step both feet toward your hands until you squat back down.
Jump explosively and extend your arms overhead.
Do 1 to 2 sets of 10 to 16 repetitions.
Forward linear jumps
This exercise targets your core, hips, and thighs. Linear forward jumping allows you to practice jumping forward and upward. To enhance this exercise, perform the next lunge as soon as you land instead of returning to the starting position.
Doing:
Stand with your feet directly under your hips and your arms at your sides.
Engage your core while pulling your shoulder blades back and forth. Lower your hips back and into a squat position.
Keep your elbows straight as you extend your arms back.
Jump forward by pushing your feet out and straightening them. Raise your arms above your head while doing so.
Pull your legs forward as you land. To reduce the impact, bend your knees and tilt your hips forward slightly, lowering yourself into a squat position. Keep your gaze on your landing spot.
After landing, stand up to return to the starting position.
Perform as much repetition as possible with the correct form.
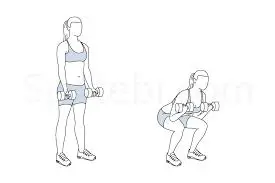
Squat:
The most fundamental kind of squat employs only your body weight as resistance, often known as an “air squat” or “bodyweight squat.” Weights, such as barbells or dumbbells, resistance bands, or yoga balls can all be used as squat variations.
When learning how to squat, it’s a good idea to work with a trainer who can correct your technique. The pressure in the squat should be distributed fairly evenly among your feet as you start. A foot tripod is another name for this.
Imagine your foot has a triangle-shaped sole with equal pressure applied to the heel, the front of the foot just behind the big toe, and the front of the foot behind the pinky toe.
Basic squat form:
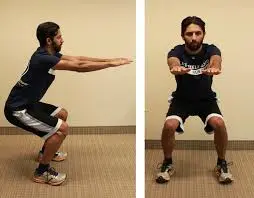
Start with your feet pointed slightly outward and a little wider than hip-width apart.
Pushing your hips back while keeping your chest out and the pressure even in your feet, engage your abs and shift your weight back into your heels.
Once your heels start to rise off the ground or your body starts to round or bend forward, lower yourself into a squat. Your form should decide your depth.
Keep your chest out and your core tight as you stand back up to your starting position by pressing through your heels. At the peak, squeeze your glutes.
Do 15 repetitions. up to three sets.
Squat jumps
Jump squats don’t require any special equipment. Because this is a plyometric exercise, you must use every muscle to the utmost potential in a short period of time.
The jump squat works your glutes, quads, hips, and hamstrings while raising your heart rate.
If you wish to practice this version, you need to have strong knees, hips, and ankles because it puts greater strain on your joints.
For this exercise, you’ll use the strength in your torso, hips, and legs to jump explosively. Once you have mastered squat jumps and are ready to take it to another level, you can perform weighted squat jumps with a barbell, trap bar, or dumbbells.
Doing:
Stand straight with your foot and hip spread apart and your arms at your sides.
Lower your shoulders and shoulder blades.
Tight your core and keep your hips straight. Keep your knees slightly bent.
Slowly lower your hips and return to a squat position until your heels are almost off the floor.
Lean forward slightly at the hips to keep your spine straight.
Pause for a moment at a low point.
Jump vigorously through your ankles, knees, and hips at the same time. While in the air, bring your knees close to your chest.
Land as softly as possible on the midfoot before shifting your weight toward your heels. To help absorb the impact, move your hips back and forth as you land.
Do 2 to 4 sets of 6 to 12 repetitions.
Rebounding
Rebounding is a type of aerobic exercise performed on a mini trampoline. It’s a great way to experience the feeling of jumping and flying while putting less stress on your joints.
There are a number of trampoline exercises you can try if you want to bounce back. You can expand a few minutes on every type or focus on one exercise for a longer time period. You can also try:
Jogging. Start with a simple jog to get used to the trampoline. You can keep your back straight or lean back slightly while lifting your knees. Start by raising your knees just a few inches. As you progress, raise your knees to your hips or chest.
Period. For 20 seconds, vigorously jump up and down or side to side or do jumping jacks. Then rest or dance slowly for 10 seconds. Do at least 7 intervals. Gradually increase the duration of the work phase to a minute or more.
Tuck-ups
Standing with your feet hip-width apart, raise your arms to your chest with your palms down, fully extended.
Squat with your knees slightly bent, then spring straight up off the balls of your feet.
Pull your knees up toward your chest as you jump. Try to touch your palms and knees together.
Knees slightly bent, feet hip-width apart, delicately touching the ground.
Calf raise:
Contrarily, calf raises can improve your overall health and lower body strength.
Follow these steps to execute calf lifts:

With your hands on your hips or a stable object for balance, stand tall with your feet hip-width apart.
Lift your heels off the floor while you stand on the balls of your feet. The balls of your feet should bear the majority of your weight rather than your toes.
Keep your spine neutral and your core tight throughout the motion.
Slowly bring your heels to the floor while feeling your calves stretch.
Repeat the motion many times.
By performing the exercise on a step or other elevated surface, you may extend your range of motion.
Exercises for strength training that concentrate on the major muscle groups can enhance overall body composition while also aiding in the growth of lean muscle.
Jumping lunges:
How strictly you can maintain your form, how smoothly you can make the transition, and how gently you can land all play a role in how well you can execute the jumping lunge exercise.
To do the leaping lunge exercise correctly, securely, and successfully, follow these instructions.
Make sure you have enough room to complete the maneuver before you begin. Consider relocating benches and other pieces of equipment as well.
Your core should be tight while you stand with your feet shoulder-width apart.
With your right leg, advance briskly. Do not move your arms away from your sides.
With this leg, shift your weight forward such that your heel contacts the ground first. When the forward leg is parallel to the floor, stoop down. This is the lowest place.
Jump up, swiftly changing your foot positions in midair so your left leg comes forward and your right leg travels back behind you. As you jump, raise your arms into the air to aid in your explosive movement.
Put the opposing leg forward and gently return to a basic lunge stance on the floor.
Repeat this movement pattern as many times as necessary, swapping legs after each leap. Beginners should aim for five to ten repetitions of each leg or 30 total seconds. Work your way up to 60 seconds of continuous leaping lunges as it gets easier.
Alternatives to jump lunges:
There are easier motions you may perform that imitate the jumping lunge if you don’t like it.
Step forward and backward:
Lunge forward and backward while still. Start by assuming a shoulder-width posture. The right foot should advance as the left knee and right knee are both 90 degrees bent. Repetition on the opposite side after returning to upright posture. After that, take a step back and do a reverse lunge on each leg.
Practice walking lunges:
Transfer the forward lunge motion to a walking lunge by switching the right and left legs in turn. Lunge forward 5 to 10 times with each leg.
Put TRX suspension straps to use.
Try executing leaping lunges while holding on to the straps if you have access to TRX suspension equipment. This will assist you in maintaining your balance and good posture as you practice the leaping phase of the workout.
Continuing with jumping lunges
When you’re prepared to increase the difficulty of leaping lunges, think about implementing one of these changes:
Superset a weighted leg exercise, such as squats or the leg press, with leaping lunges.
Jumping lunge while twisting your torso. Beginning in the leaping lunge stance, rotate your body to the right with your core as you come to rest. On the opposite side, repeat.
You should extend the duration of your set of leaping lunges.
Jump higher or faster to up the challenge and intensity.
Frog jumps
Frog jumps, sometimes referred to as frog hops or the hopping frog exercise, are a type of plyometric exercise that recruits muscles all over your body by using your own body weight as resistance. Standing in a wide stance with your feet pointed outward at a 45-degree angle, perform the frog leap exercise. As you lower yourself into a squat position, maintain a straight back. Embrace the earth and leap up quickly. For an additional cardio workout, you can bounce forward or in place.
Start with 2-3 sets of 12–20 repetitions for frog jumps. Your ability to maintain proper technique throughout each session will determine the sets and repetitions you choose.
- Take a 45-degree angle while standing with your feet wider than shoulder-width apart. Your shoulders should be exactly above your hips, and your head and neck should be in a neutral position. You should keep your chin tucked in during the entire motion.
- To establish a secure stance, evenly distribute your weight and grab the ground with your feet. With a slight bend in your elbows, your arms should hang loosely in front of your knees. With a deep inhale and exhale, pre-tension your shoulders and hips while also tightening your abs. This starting position should be used for all repetitions.
- Keep your spine neutral and start bending your knees and hips. Keep your shins in a relatively upright position. Lower yourself till your upper legs are parallel to the ground while keeping your chest high. Long and hanging in front of your body, your arms should be. Your legs and chest should be in line.
- Leap into the air by exploding through the earth to start your upward progress. Keep your arms outstretched in front of your body as you start to straighten your legs.
- Land on the balls of your feet after your jump. Allow your hips and knees to bend to absorb force while you spread your weight evenly across the whole sole of your foot. Keep your toes engaged and load your body weight into your midfoot and heel. Your knees should be in line with your toes, and your chest should be higher than your hips.
- Land carefully and softly. Maintain a tight core for the whole landing. Repeat the frog jump as needed to reach the appropriate amount of repetitions.
Jumping frogs improves cardiovascular health. Frog jumps, when performed correctly, can raise your heart rate and enhance your cardiac fitness.
Frog jumps help to build up the muscles that support your joints. The frog jump can strengthen the area around your ankles and engage your hip flexors at the same time.
It helps you develop the muscles in your lower body. The main muscles used in the frog leap exercise are your quadriceps, hamstrings, and glutes.
Alternating step jumps
Stand straight with your arms at your sides and your left foot on a bench bent 90 degrees at the hip, knee, and ankle.
Drive through your left foot while swinging your arms up and driving your body up with enough power to let your left foot leave the bench, keeping your chest up, shoulders back, and core braced.
Switch your feet in the air, landing on the bench with your right foot and your left foot on the floor. With each repetition, alternate legs.
Holmsen screamer lunges
Step backward into a reverse lunge while keeping your right leg straight and your left foot flat on the ground. Your left arm should be in the rear while your right arm is extended.
This is where everything begins.
Jump as high as you can while maintaining your left leg straight and driving your right knee up and forward with explosive force. Switch the position of your arms so that your left arm is now facing front.
Return to your starting posture by gently stepping onto your left leg.
Rep to each side equally.
Box jumps
Box jumps can be approached in one of two ways: either with an emphasis on power or with a focus on conditioning.
Another excellent plyometric exercise that will improve explosiveness and coordination is the box jump. Practice leaping up and down while maintaining perfect form and swinging your arms up and down while extending your hip as a warm-up for this exercise.
Box Jumping:

Start with a 12-inch or 6-inch box if you haven’t done any box jumps before.
This is a wise precaution to take to prevent harming yourself while working out, and it also helps you become used to the motion.
Aim for 3 to 4 sets of 5 repetitions, with several minutes of recovery in between sets, if you want to improve your explosiveness.
Choose a lower box if endurance is your main concern. Complete 3 sets of up to 20 repetitions, with just a minute of break in between.
Until you get the hang of things, pick a box that is on the shorter side as a beginner:
That’s a 14- or 16-inch box for people up to roughly 5 feet 4 inches tall.
That’s a 16- or 20-inch box for those who are 5 feet 9 inches or taller.
To execute:
Step 1: From the starting posture, spread your feet hip-to-shoulder-width apart and bring your arms back, getting ready to swing your arms upwards.
Drop your hips back and slightly bend your knees. keep your back straight and your spine tall during the entire workout.
The way you hold yourself in the starting posture will increase the force that pushes you up onto the box.
Step 2: Leap onto the box while pushing off the ground with your toes and swinging your arms overhead. Land on both of your feet.
Step 3. After you have touched down on the box, take a full step up and pause before moving on. From here, you can either step down to start the subsequent repetition or leap back down with a proper landing.
It’s important to remember not to land with your knees collapsing inward and to maintain a straight back to prevent your back from curving.
Make sure to hold your ground throughout the entire separation, both when you jump and when you land.
Progression:
Ankle weights or a weighted vest:
The physics of the box jump action can remain the same when the weight is secured to you, which is a natural evolution from a standard box leap.
Dumbbells in each hand: Develop this technique by leaping while holding a dumbbell in each hand.
Kettlebell: After dumbbells become simple, perform the box jump while holding a kettlebell in each hand at chest level.
Jumping rope:
Jumping rope is a great supplement to any pre-workout high jump stretches since it warms up the muscles and increases blood flow throughout the body.
To avoid injuries, it’s crucial to warm up properly; also, flexibility tends to enhance performance.
Jumping rope is a great exercise for balance and coordination in addition to stretching.
This exercise is a beneficial cardiovascular activity that can assist in the high jump. jumping rope can aid in improved fitness. jump rope correctly as follows:
Select the proper rope: Choose a jump rope that is appropriate for your height. Standing in the center of the rope, the handles should be at the level of your armpits.

The jump rope should be gripped in each hand while standing with your feet shoulder-width apart and your knees slightly bent. let’s start with fundamental etiquette. Maintain a comfortable wrist position with your elbows near your sides.
Start by leaping off the balls of your feet and flicking your wrists to rotate the rope. Start with little leaps, then gradually increase the pace and intensity as you get more comfortable.
To maintain appropriate posture, keep your shoulders relaxed, look forward, and activate your core. Land softly on the balls of your feet to decrease the force on your knees.
Create a rhythm: As you leap, create a steady beat and adhere to it. Start with shorter durations, like 1-2 minutes, and gradually increase your time as your endurance improves.
Add variations like single-leg jumps, double unders (where you twist the rope twice with each jump), or high knees (where you raise your knees up to your chest as you jump) once you have mastered basic leaping.
Look at your body: If you encounter any knee pain or discomfort during or after the workout, pay particular attention to it. If you experience any discomfort, it’s critical to modify the exercise or choose alternatives that are less taxing on your knees.
Carry out the following in 3 distinct planes and directions:
Backwards and forwards
To the side
Hip rotation
Buttock Kicks:
The following is a list of buttock kick techniques:
Stand straight with your feet apart. Tightening your core muscles will help you be more stable.
You may raise your right foot off the ground by bending your right knee and bringing your right heel toward your buttocks. As closely as you can, try to contact or come up to your glutes.
After moving your left foot in the same way, bring your right foot back to its starting position.
Make sure your heel is constantly pointed in the direction of your glutes as you continue to alternating buttock kicks.
Guidelines for buttock kicks:
Maintain good posture and an upright upper body during the whole workout.
Pay close attention to hamstring contraction as you press your heels into your glutes.
Start with a comfortable range of motion, gradually increase the intensity, and speed as your strength and comfort level increase.
Be deliberate in your movements and refrain from jerking or swinging.
Breathe properly when exercising, taking deep breaths in and out.
Work each leg for two to three sets of 10 to 15 repetitions, altering as needed according to your level of fitness.
Weighted jump squats
Standing tall and with your feet shoulder-width apart, hold a dumbbell in front of your chest.
Push your hips back and lower your body till your thighs are parallel to the floor while maintaining a firm core and a raised chest.
explosively jump straight up back up.
Avoid landing on flat feet by lightly bending your knees as you touch the ground, and then instantly lower yourself into your subsequent rep.
Dumbbell squats
Standing with your feet hip-width apart, hold two dumbbells at your sides at arm’s length.
Push your hips back, bend your knees, and lower your body until your thighs are parallel to the floor while maintaining a flat back and a tight core.
After pausing, push yourself back up to the starting position.
Dumbbell push presses
Holding a set of dumbbells by your shoulders with your palms facing in and your elbows tucked in close to your body, stand tall with your feet hip-to-shoulder width apart.
Push your hips back and bend your knees to lower yourself into a quarter-squat while maintaining a flat back and a tight core.
Press the weights squarely over your shoulders while standing up quickly with your legs. Maintain a tight grip on your biceps.
Repeat by lowering the weights back to their original position.
Romanian deadlifts
Holding a pair of dumbbells in front of your thighs with the palms facing you, stand with your feet shoulder-width apart and parallel.
As you gently bend at your hips and drive your butt back to the wall behind you, draw your shoulders back, release your knees, and engage your core.
Lower the weights while maintaining the natural arch of your lower back until your torso is almost parallel to the floor. Throughout the exercise, maintain a neutral head position and keep the weights close to your body.
Stop, clench your glutes at the peak, then press your hips forward to return to the beginning position when you can no longer descend any farther without arching your back (Your hamstrings ought to feel deeply stretched at this stage.)
Wall ball exercise
With your feet hip-width apart, stand about two feet away from a wall. Keep the wall ball at chest height in between your hands. Strike your sides with your elbows.
Maintain a neutral spine arch as you descend into a squat until your hip crease is at or below your knees. On the way down, keep the ball close to your chest.
Throw the ball at the wall over your head, aiming for a location about 8 feet from the ground, while keeping your chest up and pushing your body away from the floor.
After making contact with the wall, catch the ball before returning to your next squat.
Rerun the activity.
½ Kneel to single-leg hop
Enhances balance and coordination on one leg while building the muscles needed to jump and extend the legs. As you stretch up at first, keep your foot firmly planted on the ground. Once you’re more comfortable with the movement, add a jump.
The “1/2 kneel to single leg hop” exercise is a dynamic activity that can aid in the improvement of balance, stability, and lower body strength. Here’s how you do it:
- Begin by half-kneeling with one knee on the ground and the other bent at a 90-degree angle in front of you.
- Throughout the workout, engage your core and maintain proper posture.
- Push off the ground knee and convert into a single-leg hop.
- Land softly and with control and balance on the bent knee.
- Repeat the exercise on one leg for the appropriate amount of reps, then move to the other leg.
To lessen the impact on your joints, practice this exercise on a soft surface or on a mat. To avoid injury, begin with a modest number of reps and build gradually.
Drop squats with posterior arm throws
Improves landing reaction time. Throwing your arms behind you helps your hips to lower, and it also gets you ready to jump so that you may launch your hands into the air.
“Drop Squats with Posterior Arm Throws” is a dynamic exercise that combines squats with an explosive arm action. Here’s how you do it:
Begin by standing with your feet shoulder-width apart and your arms at your sides relaxed.
Begin with a traditional squat:
- Bend at the hips and knees and let go downward.
- Maintain a straight back and chest.
- Lower your thighs until they are parallel to the ground, or as low as you can comfortably go.
Swing your arms forward and upward as you explosively push back up from the squat position.
At the top of your jump, let go of your arms and throw them back in a controlled motion.
Return to the squat softly. - Return to the squat position softly to complete one repetition.
- This workout combines lower-body strength training with powerful arm movement. It can aid in the development of leg strength, power, and coordination. To avoid injury, practice the perfect technique and begin with a few reps, gradually increasing the intensity as your fitness level improves.
Broad jump to high jump
This is less about the length of your wide jump and more about your ability to land on your feet after jumping horizontally before blasting skyward.
The “Broad Jump to High Jump” exercise combines two different types of jumps to increase explosive power and athleticism. Here’s how you do it:
- Begin by standing with your feet shoulder-width apart and your arms at your sides relaxed.
- Execute a broad jump:
- To lower your body, bend at the hips and knees.
- Extend your hips, knees, and ankles as far as you can as you explode forward and forward.
- Land softly on your knees and keep your equilibrium.
3. Transition into a high leap immediately after landing the wide jump:
- Arms back, bending at the knees.
- Jump up quickly, swinging your arms forward and upward to gain height.
- Make an attempt to jump as high as you possibly can.
- Land softly and steadily.
This exercise combines the horizontal strength of the broad jump with the vertical power of the high jump, making it an excellent full-body workout for improving explosiveness and athleticism. Make sure you have enough room and start with a manageable distance and height, gradually increasing the challenge as your strength and coordination develop.
Lateral bound to jump:
For the majority of athletes, the ability to create and absorb force while moving side to side is essential. This practice comes in two forms:
jumping, assembling with both feet
jumping and landing on one leg
The “Lateral Bound to Jump” exercise combines lateral bounding with a vertical jump to increase lateral power, agility, and explosiveness. Here’s how you do it:
- Begin by standing with your feet shoulder-width apart and your arms at your sides relaxed.
- Begin with a lateral bound: – Bend your knees slightly.
Leap as far to one side as possible, landing softly on the opposite foot. Push off the landing foot immediately to return to the other side, switching sides.
3. Transition into a vertical jump after a few lateral bounds: – From your previous lateral bound, utilize the same foot to push off for a vertical jump. Swing your arms up and jump as high as you possibly can.
- Land softly and steadily.
This exercise improves lateral agility and vertical power, which is useful for sports requiring rapid lateral movements and vertical explosiveness. Begin with a manageable distance and elevation then progressively raise the difficulty as your fitness level improves. To avoid harm, proper form and a safe landing are required.
180º Jumps:
Designed to enhance the synchronization between jumping and landing. Effective arm driving will help with your rotation and overall height.
The “180° Jumps” plyometric exercise involves jumping and twisting your body 180 degrees in the air. Here’s how you do it:
- Begin by standing with your feet shoulder-width apart and your arms at your sides relaxed.
- Prepare to jump by bending your knees slightly.
- Launch yourself straight up into the air.
- When you’re in the air, turn your body 180 degrees.
- Land softly in the other way, with your knees slightly bent to absorb the shock.
After landing, keep your balance and control.
This exercise can aid in the development of lower-body strength, agility, and coordination. Check that you have enough space to do it safely, and start with a lesser rotation angle if necessary. You can progress to a full 180-degree rotation as your strength and stability increase. To avoid injuries, always emphasize a safe landing.
Back leg elevated single-leg jumps:
Poses a balancing, coordination, and strength challenge on one leg. When you feel comfortable with the movement, add the leap while keeping your foot firmly planted on the ground at first.
The lower body exercise “Back Leg Elevated Single Leg Jumps” tests your balance, strength, and coordination. Here’s how you do it:
- Locate a platform, bench, or other stable surface to elevate one foot behind you.
- Place your back on the bench and stand in front of it.
- Place one foot (the back leg) behind you on the bench.
- Maintain balance on the front leg.
- For balance, bend your front leg slightly and keep your chest high.
- Explosively spring off your front leg, fully extending it.
- Tuck your back knee toward your chest while in the air to increase your jump height.
- Land softly on the same front leg while maintaining your balance.
This exercise strengthens the supporting leg while also improving single-leg stability.
Tuck jumps:
Increases the hip-extension muscles’ and your quads’ explosive strength. The extra benefit of strengthening your core and using your hip flexors as you tuck your knees up to your chest.
Tuck jumps are a type of plyometric exercise that can help you increase your explosive power and leg strength. Here’s how to do them:
- Begin by standing with your feet shoulder-width apart and your arms at your sides relaxed.
- Begin with a standard jump, pushing off the ground with both legs.
- Bring your knees up to your chest as you jump, tucking them in as snugly as you can.
- Reach your arms forward and bring them in towards your knees at the same time.
- Aim for a tight tuck position in the air.
- To absorb the shock, land softly with your knees slightly bent.
Tuck leaps are a fantastic workout for developing lower-body strength and increasing your ability to create force fast. Make sure to do them on a shock-absorbing surface, and begin with a few repetitions before progressively increasing the intensity as your fitness level improves. To reduce joint tension, focus on good landing techniques.
Mountain climbers:
Trains your hips and core’s flexibility, strength, and coordination. also offers a satisfying cardio challenge!
A jump (burpee) should be incorporated into a solid mountain climber progression.
Mountain climbers are an excellent bodyweight workout for the core, shoulders, and legs. Here’s how to do them:
- Begin in a push-up stance, hands directly beneath shoulders, and body in a straight line from head to heels.
- Maintain your body’s stability by engaging your core muscles.
- Bring one knee up to your chest, then rapidly switch and pull the second knee in while stretching the first one back.
- Maintain this alternate action, as if “climbing” a mountain, by moving your knees in and out.
Mountain climbers are often performed for a set amount of time, such as 30 seconds to 1 minute, as part of a high-intensity interval training (HIIT) routine, but the period can be changed according on your fitness level..
High knee skips:
High knee skips are a difficult workout with many moving parts. High knee skip workouts are frequently utilized for sprint training because they target your hip flexors and enhance leg strength, coordination, and endurance. The skipping motions resemble rope jumping. High-knee skipping drills require more speed and motor control than high-knee marching activities.
Perform high knee skips by bending your knee and raising your upper leg until it is parallel to the floor. The stride necessitates a double-foot striking pattern, or right-right followed by left-left hops, similar to jumping rope. Additionally, you must time the double-foot strikes with the pumping of your arms. The skipping should start out slow, methodical, and with a straight trajectory. There should not be much superfluous movement, however, your arms and legs may move somewhat in that direction. You can perform half-high skips while lowering the angle to 45 degrees if you find the high knee position to be too challenging.
Single-leg leg press:
This workout focuses on and strengthens your quadriceps, which can increase your explosive power. Your glutes and hamstrings are also called upon for supplementary assistance.
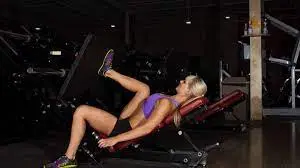
Step 1: Lie on the leg press platform with your feet straight front and hip-to-shoulder distance apart. Make sure your foot placement provides for proper hip and knee range of motion. On the footrest below, place one foot. Brace your abs by pulling in. Back and down, lock the shoulder blades. By holding the handles, you can stabilize your upper body.
Step 2: Lower the platform toward your body while keeping your knee in line with your middle toes and your weight evenly distributed over your foot. Utilize your full range of motion without sacrificing technique or bottoming out your thighs into your ribs.
Step 3 is to reverse the pattern and go back to the beginning.
Step 4: Continue. Keep your posture constant. Do not curve your spine, let your hips come off the pad, lock your knees, bounce at the bottom of the movement to build momentum, or collapse your knees inward. Keep your torso and hips from rotating.
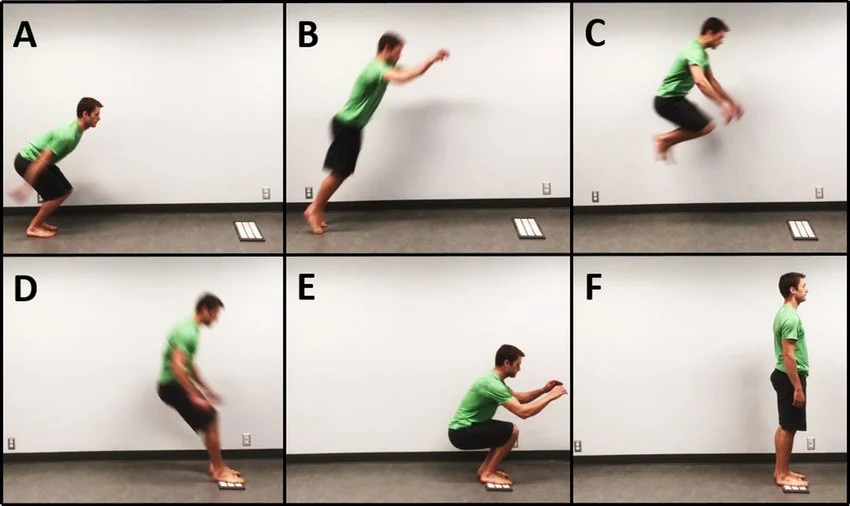
Depth Jump
The depth leap is distinguished from a regular box jump by the fact that the depth jump begins with a powerful eccentric (negative) muscular activity brought on by lowering down from an elevated platform. Due to the stress of the landing, the muscles are quickly stretched during the depth leap, which causes a dramatic shortening of the muscle fibers.
According to Benguche, “the depth jump makes use of the stretch-shortening cycle to enhance CNS activation and rate of firing.” The shock of quickly absorbing and then creating force teaches the body to react with higher amounts of reactive force, which strengthens the lower body’s elastic components.
Step 1: Stand on a plyo box that is 10 to 30 inches high (if you’re new to depth leaps, start with a smaller one). Your hands should be at your sides, and your feet should be hip-width apart.
Step 2. Exit the box by stepping forward with one foot and then backward with the other, lowering yourself to the ground. Your body should just fall to the ground; you aren’t hopping or jumping off the box.
Step 3: After firmly placing both feet on the ground (again, hip-width apart), jump as high as you can straight up into the air. It’s critical that you jump as quickly as possible after the least amount of time possible with your feet on the ground. Avoid squatting down before removing your feet. Simply let your hips and knees to naturally droop before extending them quickly to push yourself upward. As you do this, drive your arms straight up.
Step 4: Retract your steps onto the ground with gentle knees, take a moment to center yourself, then reappear on the box to complete the reps. The goal of this workout is explosive power, not fitness, so don’t rush between reps.
Technique Advice: Pay attention to how your body is positioned as you land on the ground and prepare to jump explosively. Your weight should be on the middle of your feet with your hips over your heels. Instead of jumping out in front of you, you should jump straight up (vertically).
When to Perform Depth Jumps: Perform depth jumps early in your workout, following a good warm-up, and before lower-body strength exercises like squats.
Benguche advises 2-4 sets of 2–5 repetitions for depth jumps, which is a fairly low total number of reps.
There is no need for an additional weight, he claims. To increase the difficulty and stimulation, the height of the box for the depth jump can be increased gradually.
Regression
Depth jumps can be performed on a conventional weight bench in the absence of a plyo box. Benches are a fantastic alternative for individuals new to the activity since they are more accessible to the ground than many boxes.
Progression
With two plyo boxes—one to step off of and another to leap onto—athletes frequently do depth jumps. A depth jump into a box jump is essentially what it is. When doing this variant, make sure there is adequate space (3-5 feet) between the boxes for you to securely land and leap. As your strength and power improve, progressively raise the height of the second box to move forward in the progression.
Ball-to-Medium Broad Jump
Jumping exercises that use resistance (rather than relying just on body weight) can assist in building strength and power. And a 10-pound med ball will do the trick; not much force is required.
Although the goal of this exercise is maximum distance rather than height, the advantages apply to your ability to leap vertically as well. The power element that results from loading the hips with the hinge-type motion makes the med-ball wide jump ideal for developing hip explosion, according to Khan.
Step 1: Hold a medicine ball (approximately 10 pounds) in both hands while standing a few feet away from a wall. The area of the floor in front of you should be large enough for you to leap. Your feet should be shoulder-width apart, the ball should be overhead, and your arms should be outstretched.
Step 2: To build elastic energy for the leap, lower your arms toward the ground and squat. (Technically, this is the exercise’s eccentric, or negative, phase.)
Step 3: Immediately leap out of the “hole,” pushing through your feet’s balls and extending your arms in front of you. Jump as far in front of you as you can after throwing the ball into the wall.
Step 4: Land on your heels with your knees bent and, if required, stoop to absorb the eccentric energy. (This final squat is only a secure landing; it is not essential to the workout.) If you can, try to catch the ball as it bounces back; if the wall is farther away, let the ball fall. Repeat the process for a certain number of reps.
Technique tip: You want to acquire some height, but not too much, when doing a broad (long) leap for maximum distance. Your trajectory should be less than 45 degrees.
When to Perform Medicine Ball Broad Leaps: Perform medicine ball broad leaps at the beginning of your workout, before performing challenging lower-body strength exercises. Before leaping exercises like hip bridges or lateral band walks, he works on glute activation with his athletes to help the glutes “wake up” and fire more forcefully.
Performing three sets of five repetitions with a 10-pound medicine ball.
Regression
Those who have never trained for explosive jumps should begin with no additional resistance. Simply perform the standing wide jump in this scenario without the med ball.
Progression
A heavy-duty elastic band fastened to the back of the waist with a belt and secured to a sturdy structure behind the athlete at floor level is a common addition by Khan to his players’ med-ball broad jump resistance. The band expands and provides more resistance as the athlete jumps and flies through the air.
Back squat:
The traditional barbell back squat is the best exercise for boosting lower-body strength because strength breeds power, and power improves vertically.
“The squatting pattern is one of the best ways to train the body for improved strength and power,” claims Benguche. The main squat-inducing muscles are the quads, hamstrings, and glutes, all of which are crucial for increasing vertical leap.
In the first step, position yourself in a squat rack and hold the bar with your hands as far as you find comfortable. Wedging yourself under the bar such that it rests on your traps or the back of your shoulders requires you to step below the rack and press your shoulder blades together and downward.
Step 2. Push the bar away from the rack and take a step back, keeping your toes pointed slightly outward and your feet shoulder-width apart. Try to screw both legs into the ground without allowing your feet to move, as if you were standing on grass and wanted to twist it up; you’ll feel your glutes contract and your foot arches raise as a result. Draw your ribs down so your torso forms a strong column by taking a deep breath into your belly and bracing your core.
Step 3: Maintain a forward gaze and your weight over your midfoot. As you lower your torso, bend your hips back and spread your knees apart. While maintaining proper head, spine, and pelvic alignment, descend as low as you can.
Step 4: Extend your hips and knees as you stand back up by pushing through your feet.
Keep your heels firmly planted on the floor when squatting. Throughout both the positive and negative halves of the lift, the bar should stay over your midfoot (not the balls of your feet). The weight has moved too far forward if your heels lift off the ground.
How to Use the Back Squat Timing: Perform back squats as either the first or second strength exercise in your program for the greatest strength improvements.
Sets/Reps: Benguche suggests 3-6 sets of 3-8 reps with moderate loading, or 70%-85% of your one-rep maximum (1RM), for developing overall strength in the lower body. He suggests smaller weights (55%–70% of 1RM) for 3-6 sets of 2–5 reps to increase quickness and power. Jump squats are squats carried out with minimal weights but executed with such force that your feet leave the ground when you stand up (see “Progressions” below).
Regression
For beginner-level athletes, scaling the back squat often means sticking to smaller loads (even just bodyweight at first) while mastering good technique. You may work on your technique by performing goblet squats with a kettlebell or dumbbell, but bear in mind that they are an anterior (front-loaded) version and won’t exactly replicate the mechanics of the back squat.
Progression
A variety of barbell squat variants have to be incorporated into your program as you acquire expertise. Your ability to leap higher will improve as you get more explosively strong, namely with jump squats.
In the jump squat, you don’t try for full depth as you would in a traditional back squat; instead, you just lower your body until your thighs are parallel to the floor. Come back up quickly, three to six inches is plenty, but make sure your feet are off the ground at the top. Reset after each rep, then gently land with a small knee bend.
Split Squat with Raised Feet (Bulgarian Split Squat)
This isn’t simply a simple exercise in mild support. The Bulgarian split squat, also known as the rear-foot raised split squat, is a valid exercise for building pure glute and quad strength, which will improve power and vertical leaping ability. Even if you leap two feet, concentrating on one leg at a time will stop your dominant side from making up for your weaker leg throughout the action.
Due to the need for a more upright torso than a typical squat, the exercise is also a fantastic choice for people with lower back problems. As a result, the lumbar spine is shielded from shearing forces that frequently result in damage while performing a traditional back squat.
Step 1: Stand lunge-length in front of a bench that is 18–24 inches high while holding a dumbbell in each hand. With one leg, extend back and place the top of the foot on the bench.
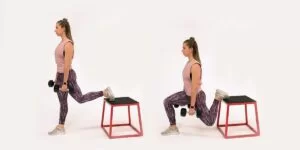
Step 2: After taking a deep breath, tightening your abdominal muscles, and lowering your body as far as you can, or until your back knee is just above the floor, extend the hip of the trailing leg. Don’t let your front heel lift off the ground; keep it firmly planted. After finishing your reps on one side, quickly go on to the other.
Technique Tip: It may take some trial and error to determine how far out in front of you to put your front foot. Your front knee should be over your heel or midfoot at the bottom of the action. Your foot is too far forward if your knee is behind your heel; if it is out over your toes, step out more. Starting in the bottom position and adjusting your stance from there is one method for determining the proper distance.
How to Perform a Rear-Foot Elevated Split Squat: One of the first two exercises in your workout’s strength section should be split squats. This exercise can also be done as a warm-up before doing explosive leaps if it is performed for a low volume and without the addition of resistance (see below for the isometric hold version).
Using a modest weight, perform 3–4 sets of 5-8 repetitions. You’ll need to go lighter than you would while doing a typical split squat or lunge since your balance will be compromised by the staggered stance and lifted rear foot.
A variety of training techniques, including a split squat at the bottom position for 30 seconds while holding an isometric position, followed by 5 repetitions.
One training technique involves performing five reps of an isometric hold for 30 seconds at the bottom split squat posture. This is usually done without the use of additional resistance, pumping the arms vigorously between each rep. “The time hold increases gluteal and quadriceps strength and endurance.,”
Regression
Balance-wise, the rear-foot raised split squat may be a challenging exercise. Use simply your bodyweight as resistance the first few times you attempt the technique. Perform a conventional split squat with your rear foot on the ground (not raised) if you find it difficult to maintain your balance.
Progression
Higher resistance holding might make the exercise more challenging and require greater core involvement. Examples of this include performing the exercise with a barbell across your shoulders (the most advanced variant) or carrying a kettlebell or dumbbell with both hands in the “goblet” position below your chin.
Kettlebell Swing Hike
The hiking swing is a modification of the standard kettlebell swing that teaches you how to swiftly produce force out of nowhere by getting you acclimated to bursting from a standstill.
Step 1: Lay a kettlebell on the ground, then step back from it with your feet shoulder-width apart. Kneel down and relax.
Step 2: Hinge your hips back until your hamstrings start to feel stretched. You should have a long, straight line connecting your head, spine, and pelvis.
Step 3: Take hold of the kettlebell and make an effort to split the handle in two. Your shoulder blades should push down and your lats should tighten as a result.
Step 4: Hike the kettlebell back between your legs until you can feel the inside of your thighs being touched by your forearms.
Step 5: Extend your hips explosively, as if you were rising up fast and tall, as soon as your forearms come into contact with your thighs. As you raise yourself, squeeze your glutes. Allow the power to bring the kettlebell to shoulder height in front of you.
Step 6: Keep the kettlebell under control as you lower it before setting it down again. A rep is one.
Technique tip: This is an explosive lift where the goal is to accelerate the movement of the kettlebell upward. To maintain the exercise’s safety, especially for the lower back, keep your core tight and your hips low as you stand up from the floor. Also, hoist the kettlebell with a rounded lower back rather than hyperextending it at the peak of each rep (i.e., don’t lean back)
How to Use the Kettlebell Hike Swing Timing: Perform hike swings first, before lower-body strengthening movements, in your workout.
4 sets of three to five repetitions each.
Regression
Work on the standard kettlebell swing instead, aiming for smooth reps (and greater reps, like 10 or more), if starting and stopping each rep seems uncomfortable. If this exercise is unfamiliar to you, check out our comprehensive guide to the kettlebell swing.
Progression
Squat clean exercises might be a useful progression if you’ve mastered the mechanics of an explosive hip hinge. Check out our squat clean guide.
Glute Ham Raise:
The hamstrings, which are essential for the hip extension phase of the triple extension in jumping, can be effectively isolated with these workouts.
Step 1: An adjustable footplate and various adjustable ankle pads are features of glute-ham benches. The ankle pads can be raised or lowered, and the foot plate can move in and out of alignment with the large cushion that rests on your hips. You’ll need to spend some time trying out different setups until you discover one that feels comfortable.
In the end, you want the footplate to be separated from the pad by a sufficient amount to allow your knees to hang below the pad when you get onto the bench.
Your shins should be slightly inclined upward when your feet touch the plate your torso is vertical (the top of the action), and the height of the ankle pads should be adjusted accordingly.
Your toes should touch the footplate when you slide your feet in between the ankle pads. These pads are about to hold your body weight, so make sure they are tightly fastened. Although you should aim to have your feet pointed straight down at a hip-width distance, you might need to turn your toes out a little bit to complete the exercise. Pushing your body up till it is upright requires using your hands on the large pad. Draw your ribs in, inhale deeply into your abdomen, and slightly tuck your pelvis so that it is parallel to your spine. Core-brace yourself.
Step 2: Slowly extend your knees while in this lofty kneeling position to lower your body. Bend your hips such that they dip a few inches below parallel when your torso is parallel to the floor. Use as much of your range of motion as you can without letting your hamstrings become too tight. Avoid bending to the point where your head is pointed at the ground because of this. Avoid letting your lower back arch at all costs. Remain stiff.
Step 3: Drive your feet’s balls into the footplate while extending your hips, letting your heels lift off the footplate. Kneel down and push through the large pad to raise your body back up. This movement should resemble how your leg moves when you’re jogging. (While the hamstrings are stretching the hips and bending the leg, you drive off the ball of your foot.)
If you’d prefer, you can shorten the range of motion by halting just before vertical. Given that the strain persists at both ends of the range of motion, this approach is effective for achieving pure muscle gain.
It’s a clue that you’re positioning yourself with your upper body too far in front of the pad if your calves start to cramp.
Due to the difficulty of the exercise, you may need to perform sets of 5-8 reps at first. However, after a few weeks, you should be able to perform the exercise for 8–12 reps, treating it similarly to other assistance exercises that are performed with moderate weight for moderate reps.
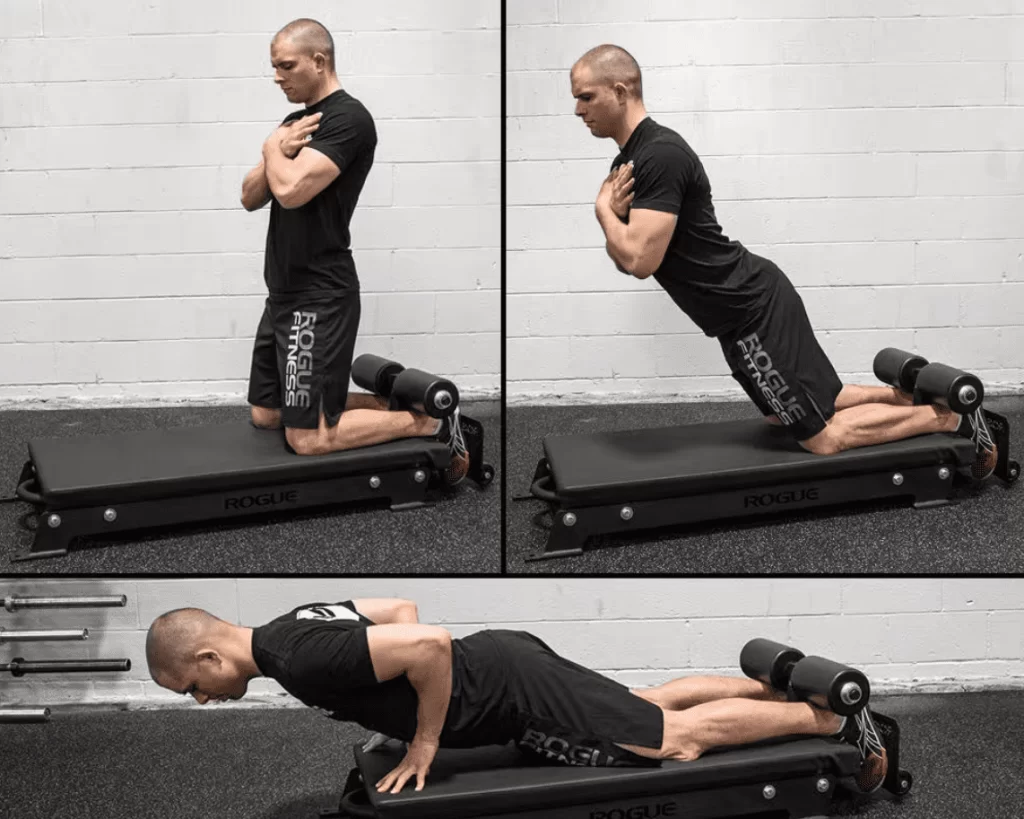
Nordic Hamstring Curls
Step 1: Place a loaded barbell on the ground and cover it with a mat or towel to protect your ankles. To protect your knees, lay down a pad or mat on the ground. Place your ankles under the bar while kneeling on the mat. (You can also use a bench that’s secured to the floor, or the spotter bar in a power rack, or have a buddy hold your ankles down).
Step 2: Recline your pelvis so that it is parallel to your spine. Inhale deeply into your abdomen, then tighten your abdominal muscles. In case you lose control while descending, have your hands ready at your sides to catch yourself. Maintain this hip position throughout the set by bending your hips back slightly so that your body leans forward a little.
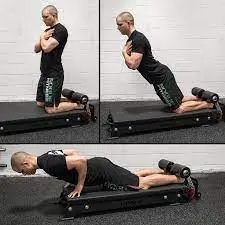
Step 3: Extend your knees and slowly drop your body to the ground while maintaining control. Allow your body to fall and break your fall with your hands when you feel you can no longer maintain tension in your hamstrings. Despite the limited range of motion, the exercise will still be beneficial because of the intense tension your hamstrings experience.
Step 4: Try to complete a glute-ham raise to go back to the beginning position by pushing off the ground.
At initially, you probably won’t be able to complete more than a few negative reps (only the lowering part of the action). Once you are able to complete an entire rep, gradually extend your range of motion. (That is, gradually try to rely less on your hands for support.)
You might also give the large inflatable ball that most people use for situps and other ab exercises, the physioball, a try, suggests Harski.
Harski advises, “Place the ball under your thighs and anchor your feet under a sturdy bench.” Make sure the bench is firmly planted; you might need to weigh its feet down. The exercise is performed in the same way as the Nordic curl and glute-ham raise.
Utilizing a Bosu ball, which has a dome on one side and a flat side, is an additional choice. Kneel on the edge of the inflated dome, driving primarily through the balls of your feet into a wall. Perform the Nordic curl exercise; if you are unable to complete the full range of motion, push yourself back up using your hands on the floor.
Banded Rolling Hamstring Curl
A standing hamstring curl version of this exercise. This muscle-strengthening exercise helps to enhance muscle tone and reduce fat around the knee.
If the patient has access to a weight bench designed specifically for this exercise, they can try this variation. Depending on how much weight is used, this could be harder than the standing hamstring curl.
On a weight bench, perform hamstring curls.
To do this exercise, the patient must lay face down on the exercise surface with their knees closely apart. Hold the handles to provide stability. Step forward and bear some weight. Just above the heels should be where the weight should be.
As you gradually bend both knees, use your legs to lift the weight. When your knees are at a 90-degree angle, slowly and steadily lift the weight.
Five seconds of holding the weight is followed by a progressive decrease.
Do as many repetitions as you can.
Use a lightweight when performing this exercise for the first time. Beginners should start with the lightest weight they can handle and gradually increase their weight as their strength develops.
Jump Squats With a Pause
The isometric hold increases the difficulty of this explosive strength move.
Starting off with no weight, increase the load gradually until it is no more than 25% of your 1RM squat load.
When you are in the lowest position, pause for three seconds before shooting as quickly as high as you can.
A quick and efficient approach to develop explosive leg drive across the whole range of motion and enable even balance over the foot is the squat vertical jump. The removal of a stretch-shortening reflex by the addition of a pause accelerates the influence on the pace of force generation.
Furthermore, having to stop the entire downward force rather than having the drop shortened by landing on a box enhances the foundation for elastic contribution to a subsequent concentric motion like a depth drop.
Squat all the way down and hold the position for two to three seconds. After the pause, drive up forcefully from the bottom for a straight-up jump that requires all of your energy.
Bend the knees and hips to absorb the landing while maintaining a solid stance.
By eliminating the arm swing and holding the hands freely at the chest, the demand for true leg and hip strength can be increased.
Purpose
A fundamental exercise for developing explosive hip and leg extension throughout the whole squat range of motion is the pause squat vertical jump. A greater pressure is placed on the rate of force development when the elasticity of a countermovement with the pause is eliminated.
Programming
Generally speaking, pause squat vertical jumps should be performed for 3–10 sets of 3-5 reps. They are typically performed at the conclusion of a training session in weightlifting. Challenging the body to activate more and higher-threshold motor units when partially tired, helps enhance explosiveness and prevents them from tiring the lifter out for the performance of more sport-specific speed-dependent lifts.
Variations
To concentrate entirely on leg and hip strength during this jump, perform it without swinging your arms; instead, hold your hands loosely at your chest.
Snatches exercise
One of the most recognizable Olympic lifts is the snatch. It is carried out as a single fluid lift but has four essential parts. Heavy objects appear to be much lighter thanks to the fluid mobility. Anyone can master the snatch lift with the right exercises, technique, and training.
Setting things up comes first. You should now take a standing position with your feet touching the bar. The next step is to stoop down and grab the bar with hands that are at least thirty inches apart. Squat down while holding the bar, keeping your eyes straight ahead.
You will now start the pull. Leg, back, and gluteal muscles should all be used to lift the bar. The bar should stay extremely close to your shins and knees as you lift it, but not so close that it makes contact. As you reach your toes, accelerate swiftly and triple-extend your knees, ankles, and hips.
Put your body in the squat posture by pulling your body beneath the bar. As you fully raise the bar above your head, you must rotate your wrists. You’ll start to stand after the bar is firmly in place. When you are fully upright, the bar is in control over your head, and your body is stationary, the snatch movement is complete.
A person can only raise so much weight with their arms. Once you cross that line, you must learn how to use your body. If not, you will reach a plateau in terms of how much weight you can lift. Consider performing high-hang snatches to assist in increasing your quickness when going beneath the bar. This entails commencing the snatch with the bar at mid-thigh height. Utilizing this launch stance accelerates your time under the bar and helps you become more explosive.
The snatch is actually a straightforward finesse lift, despite its apparent high difficulty. You can master the separate movements that run together by performing the proper foundational exercises.
The clean and jerk
The clean and jerk is about raw power, but the snatch is about elegance. The clean refers to the first phase of the lift. Pulling the heavy weights up and then clearing your shoulders are necessary for the clean. The movement then switches to a frontal squat, when the weights are controlled and raised overhead.
The configuration resembles the snatch a lot. You’ll put your feet up against the bar and stand. You should grab the bar at around shoulder level when stooping. In contrast, the snatch is frequently grasped along the entire length of the bar. As soon as you get the bar in your hands, crouch down and look forward.
The pull is the first motion. Maintain a flat back and begin to move with the body mechanics of a deadlift. This is a quick and powerful lift that necessitates a triple extension of the knees, ankles, and hips after the bar is past your knees. You should keep extending as the bar is raised until you are standing on your toes, almost as if you are jumping. Keep your arms straight and lift your shoulders up using your trapezius muscles while doing this.
You must draw yourself back under the bar once you have extended all the way. To maintain the bar close to you as you lower your torso, bend and lift your elbows as if you were executing an upright row.
Quickly lower yourself into a squat stance while raising the bar past your chest. At that point, you’ll swiftly switch your elbow position to the front and raise the bar above your deltoids.
The jerk is the last movement of the lift. Once you get the bar under control, you must stand up again. Make sure your hands are in the right place, then quickly stand up from the conventional front squat position. Jump with your legs slightly wider than your shoulders with one forward and one behind to provide a nice secure basis as the weight begins to ascend. The bar must be fully jerked overhead. As you control the weights overhead, put your feet back in their proper place.
Barbell Good Morning Exercise
The good morning workout strengthens the back, glutes, hamstrings, and abs. The strain on these muscles is increased while using a weighted barbell, although beginners should start with a minimal weight (or none at all). Your lower body and core strength training program should include the barbell good morning.
To practice the proper form, begin with a barbell that is not weighted. Then, start with modest weights and progressively increase the weight as you develop strength and improve your form.
Place your feet shoulder-width apart while keeping your knees slightly bent. Put a barbell on your shoulders that is the right weight so that the bar sits on your upper back’s trapezius muscles close to your shoulders.
Breathe deeply and brace your upper back and abdomen.
When you exhale, you’ll move your hips backward and your upper body forward. When your upper body is almost parallel to the floor, stop.
As you get back to where you were, take a breath.
You’ll be able to harness more force and jump higher as a result.
Per set, carry out 5-8 reps.
Box Squats
A plyometric box should be positioned about three feet behind the squat rack. This gives you enough room to squat comfortably without the bar slamming against the rack.
To practice appropriate form, start with either the bar or one extremely little weight. As opposed to a typical squat, this exercise requires less weight.
Next, position yourself under the bar so that it is on your upper back rather than your neck. The bar will appear to be resting on the natural shelf your shoulders have created. Place your feet farther apart than shoulder width. Step back until the box is directly behind your feet after unracking the weight.
Maintain a strong core and wide, slightly pointed toes on both feet. Sit back, unlock your hips, bend your knees, and controlably lower your body to the box. As you drop until you are sitting, keep your weight (center of mass) over your feet.
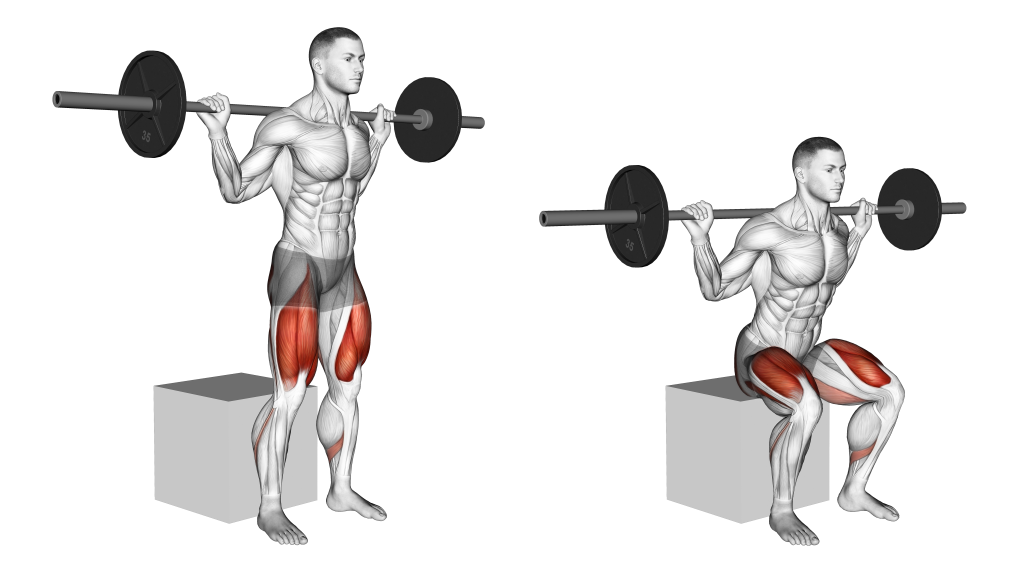
To keep your knees aligned with your feet as you stoop, imagine pulling them slightly apart. This is referred to by some lifters as “screwing your feet into the ground.” This prevents your knees from giving way when you lower and raise, which would place undue strain on them.
For 1-2 counts, you may sit on the box, but you must maintain a tall, active trunk to continue supporting the weight.
Then, as you force yourself forward by tightening your glutes and hamstrings to lift, gently bend forward at the hips. Get back to standing up straight.
3–4 sets of 6–12 reps should be completed.
This exercise is more of an explosive strength exercise than a pure strength exercise.
As a result, during the back squat, you should only utilize roughly 50% of your 1RM.
Instead of concentrating on the load you’re utilizing, you should concentrate on the explosive speed for each rep.
Use a wider stance and sit your hips back onto a box so that your thighs are parallel to the ground when doing the technique.
Once more, lower yourself gradually before driving with your hips and hamstrings to explode up.
Use chains or resistance bands on the ends of the barbells to increase the level of difficulty.
Variations of the box squat
A variation of the normal squat is the box squat. However, there are several adjustments you may make to it to further diversify this movement. Variety is the flavor of life, as the saying goes.
These variants that attack the muscle in various ways can always be used in place of one or two of your sets.
Noting that these variations are more difficult, bodyweight workouts are often used to execute them.
Single-legged box squat
The single-leg box squat is executed in the same manner as a standard box squat. This version is more challenging and is frequently performed without the use of weight. Hip stability is put under much greater strain. As you descend and lift, try to maintain a level hip position (2 Trusted Source).
As you raise and drop the leg, keep the knee in line with the foot. By carrying out the exercise in front of a mirror, you may verify this.
Face away from the box and place your feet shoulder-width apart in front of it. Put all of your weight on one leg, then lift the other foot off the ground just a little.
Your hips should be bent back as you slowly descend to the bench. As you lower, your raised leg will travel in front of you. While descending, maintain your pelvis level.
Take a two-count pause. Drive back to standing as you slightly hinge forward at the hips. Throughout the motion, maintain the front leg in the air.
To keep your center of mass forward if you’re having trouble regulating the movement, extend your hands out in front of you.
On each leg, complete 2-3 sets of 4–8 repetitions.
Box squat jumps
Compared to the box squat, the box squat leap is a more dynamic exercise. You are adding the ballistic nature at the top rather than simply driving up hard. Although it’s usually done without weight, you can also execute it while wearing a weighted vest. Just make sure it’s mild.
In this version, the jump is highlighted. Therefore, proper mechanics and shape are crucial.
Start and complete the exercise as you would a standard box squat. However, continue to push yourself higher and add a jump at the end when you sit and halt. After the jump, pause for 1-2 counts before starting a new repetition.
Complete 3 sets of 4–8 repetitions.
Medicine Ball Broad Jumps
We’re using a medicine ball in this exercise because it adds more resistance to the leaping motion.
Although this workout focuses on improving your forward leap rather than your vertical leap, the advantages apply to both.
Even while you can begin this workout without any weight, working your way up to a 10-pound medicine ball is a terrific method to include a strength element.
Even though the focus of this move is on your horizontal leap distance, it also works great for jumping higher.
Broad-jump medicine-ball:
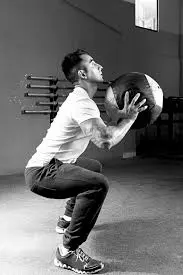
Hold the medicine ball while a few feet away from a wall.
Make sure there is enough room between so you can leap forward.
Step 1: Stand with the medicine ball overhead, arms outstretched, and feet shoulder-width apart.
Step 2: Bend your knees and descend into a squatting stance while you gather energy, bringing the medicine ball to your chest.
Step 3: Throw the medicine ball at the wall while jumping forward and pushing off the balls of your feet.
Step 4: To cushion the landing, land with your knees bent, then squat back down.
Step 5: If you are closer to the wall than it is, catch the medicine ball as it comes back at you. Otherwise, let it fall to the ground. Repeat the exercise by picking it back up.
Do not feel restricted to the exercise routine indicated here because the medicine ball lends itself to various uses in a range of different workouts.
These two weightlifting exercises are excellent choices for the weightlifting section of your jump training program since they both help you get better at jumping.
Jump out as far as you can while concentrating on the horizontal space. Maintain a trajectory of no more than 45 degrees.
Knees are bent to take the weight of your body on a smooth landing.
It’s crucial to practice vertical jump technique while organizing workouts to develop vertical jump height, therefore include some vertical jumps a few times a week as well.
Athletes are frequently pleasantly surprised by the improvements they can get with vertical jump training.
You’ll feel stronger and be able to jump higher thanks to these exercises, which will also help you sprint and squat more heavily.
Program for Training Vertical Jump
After discussing several plyometric and weight-training activities, it is clear to me that one of the biggest problems you may be experiencing when trying to improve your ability to jump higher is a lack of attention.
You may believe that it is difficult to put all of the available material into a sound training routine, but the truth is that figuring out the best course of action for increasing your vertical can be challenging and time-consuming.
To avoid the trouble of doing everything yourself, I advise looking into vertical leap programs if you’re serious about raising your jump height and are prepared to put in the time and effort necessary to achieve that goal.
Mental Exercise
You’ll likely need to complete mental training as your final phase of preparation before being able to jump higher. Although it may seem absurd, I firmly believe that how you approach the jump greatly affects the height you can achieve.
Visualization
One of the most effective mental exercises is visualization because it significantly improves performance.
When you see yourself jumping higher, you become more aware of the number of steps you take, your running form, and how you convert your racing momentum into the jump.
With the help of this effective tool, you may analyze your performance and perhaps discover areas of weakness during practice that you were previously unaware of.
Perseverance is a different type of mental training that is essential to your overall success. The only way to achieve true results is to be able to maintain a schedule of rigorous exercises and hard work, but after a while, it might be challenging to stay going.
No matter what type of exercise you choose, getting results depends on developing the mental muscle that encourages you to keep going.
Additional advice for improving athletic performance
A greater vertical leap is one aspect of the problem, however, it also translates to other health and fitness advantages. It’s crucial to approach training from a holistic standpoint if you want to increase your overall athletic performance.
BE CAREFUL WHAT AND WHEN YOU EAT.
Most people are aware that it is best to choose nutritious foods over junk food, but the timing of nutrients is also crucial. To aid with your body’s ability to repair and rebuild muscle tissue, try to eat 20 to 30 grams of protein within a couple of hours after working out.
PUT SLEEP FIRST
Everyone’s physical and mental health depends on getting enough sleep (between seven and nine hours for adults), but for athletes, it may literally be the difference between winning and losing.
Stretch and move about.
As if you needed another excuse to practice being mobile, there is some proof that stretching, especially dynamic stretching, may enhance vertical jump performance. So start swinging your legs now!
Tips to improve vertical jumps
Here are some tips that help you jump higher:
Do body warm-up before doing jumping exercises.
For each exercise, perfect your form before increasing your jump height.
Maintain a slight bend in your knees.
Land softly and gently. If the impact of landing puts pressure on your body, place bricks or foam cushions on the ground below you. Take advantage of the momentum of swinging your arms to help pull your body higher.
As you jump and land, keep your feet balanced.
When landing, always distribute your weight evenly on both sides of your body.
Increasing Jump Height
Let’s briefly review what we covered on increasing our vertical jump by inches.
Before reviewing the ideal form for jumping, which can be used for both a running jump and a standing jump, we first go over how to measure our vertical.
From there, we explore three distinct forms of training:
Plyometrics – When in doubt, employ these workouts to leap higher as they work on improving your speed and explosiveness, two extremely significant variables that greatly influence your outcomes.
Weight Training: Slightly less important than plyometrics, weight training aids in developing strength, which enhances overall stability and increases the amount of force you produce.
Visualization is one of several mental training activities that may be used to improve your level of awareness and confidence. It can be used on your off days.
Along with all of this, getting enough sleep, eating correctly, and performing a variety of jump-specific exercises all work well. With all of this knowledge, maybe you’ll be flying high in no time!
Other ways to stay in shape
In addition to jumping exercises, incorporate cardio and strength training into your fitness routine by including these types of exercises in your weekly routine.
Cardiovascular exercise enhances overall health and facilitates daily activities. Additionally, it reduces stress levels, enhances mental function, and improves circulation.
Building muscle strength will bring more power to your every movement. It can also help manage chronic health conditions, strengthen bones, and improve your overall quality of life. To improve your performance and move more easily, perform joint mobility exercises, either alone or as a warm-up.
These dynamic stretches improve strength and flexibility and positively impact the range of motion. It also helps increase jump height and speed while reducing pain.
How to Exercise Safely and Avoid Injuries
Consult your doctor before commencing an exercise program if you have a past or pre-existing health issue. To ensure the safety and effectiveness of an exercise program, proper exercise technique is required. However, depending on your specific circumstances, you may need to tweak each workout to achieve the best results.
Always choose a weight that permits you to maintain complete control of your body during the exercise. Pay great attention to your body when completing any workout and stop immediately if you experience pain or discomfort.
When to talk to your doctor:
Talk to a fitness professional or trainer if you’re new to exercise or want more advice on how to achieve your fitness goals. A personal trainer can be helpful if you have health problems or injuries that may affect your physical abilities. These may include hip, knee, and ankle problems.
Our experts will determine which exercises are best for you. Create a personalized routine based on your fitness level and goals.
It is important to learn how to perform jumping movements correctly and safely.
Although some jumping exercises are very effective, they can strain and damage your body. A personal trainer can help modify difficult exercises, give constructive feedback, and teach you appropriately.
A Note from Samarpan Physiotherapy Clinic
Your achievement in sports like volleyball, basketball, and track & field can be enhanced by learning to jump higher. Additionally, you’ll develop power, balance, and sharpness., all of which can improve both your functional and athletic motions.
These exercises can be helpful to improve athletic performance, increase leg strength, enhance agility and explosiveness, and better
FAQs
How can I quickly improve my vertical leap?
You can increase your vertical jump by combining strength training, plyometrics, and technique work, though there are no shortcuts to noticeable gains. For long-lasting results, consistency and dedication are essential.
Can I improve my jumping technique on my own?
You can certainly work on your technique independently, but working with a coach or trainer can provide valuable feedback and guidance.
How long does it take for my vertical jump to get better?
Each person’s rate of improvement is unique. Small improvements may become apparent within a few weeks, but major advancements may not occur for several months to a year or more.
Should I avoid any particular exercises to avoid getting hurt?
High-impact workouts like depth jumps should only be performed after developing a strong base of strength and conditioning. To lower the risk of injury, proper form is crucial.
Is it okay to jump a lot and with great intensity?
If you put an emphasis on proper form, give yourself enough time to recover, and pay attention to your body, jumping frequently can be safe. Injuries can result from overtraining, so finding the right balance is crucial.
Can stretching help me get a higher vertical jump?
Stretching can increase your overall range of motion and flexibility, which can help you jump with better form. Dynamic stretching and mobility drills, however, are frequently better for jumping than static stretching.
What part do recovery and rest play in jump training?
Rest is essential for muscle repair and development. To avoid overuse injuries and perform at your best, you must get enough sleep and take days off from rigorous training.
Should I seek medical advice before beginning a jump training regimen?
It’s a good idea to speak with a healthcare provider before beginning an intense jump training program to make sure it’s safe for you if you have any pre-existing medical conditions or concerns.
To improve my vertical jump, do I need access to a gym?
No, there are plenty of exercises you can do at home to increase your vertical leap. At home or outside, bodyweight exercises, plyometrics, and resistance bands can be beneficial.
How frequently should I work on improving my vertical jump?
While the recommended frequency of training can vary, it is typically 3–4 times per week. Make sure you give yourself enough time to recover and rest in between workouts.
Are there particular exercises for various sports?
Yes, depending on the sport, different training needs may apply. For instance, additional agility and dribbling drills may be beneficial for basketball players, while volleyball players may want to concentrate on lateral movements and blocking techniques.
What part does nutrition play in increasing the ability to jump?
In order to support muscle growth and recovery, proper nutrition is crucial. Aside from staying hydrated, make sure you’re eating enough protein, carbohydrates, and healthy fats.
Can I increase my vertical jump without using any equipment or weights?
Yes, without the use of weights or equipment, bodyweight exercises, and plyometrics can significantly increase your vertical jump. Squat jumps, tuck jumps, and burpees are a few examples of exercises.
Are there any particular recommendations for avoiding knee injuries while practicing my vertical jump?
Focus on proper landing technique, refrain from overloading with heavy weights too quickly, and strengthen the muscles that surround your knees, such as your quadriceps and hamstrings, to lower the risk of knee injuries.
Should I perform exercises on one leg only to increase my vertical jump?
Yes, exercises that involve just one leg, such as single-leg squats and lunges, can help correct imbalances and increase overall leg strength. Jump performance may benefit from these drills.
Can You Raise Your Jump Height?
Regular training can help you raise your vertical jump height. Your vertical jump, like other physical gains, can improve with adequate training and strengthening of the muscles involved in jumping.
References
- 10 Exercises and Tips to Help You Jump Higher | LADDER. (n.d.). https://ladder.sport/pages/how-to-jump-higher/
- The Snatch, Clean, And Jerk: Olympic Lifts Overview. (2018, August 21). Milo Fitness Factory. https://milofitnessfactory.com/snatch-clean-jerk-lifts/
- Cronkleton, E. (2020, May 28). 6 Exercises and Tips to Help You Jump Higher. Healthline. https://www.healthline.com/health/exercise-fitness/how-to-jump-higher
- Wuebben, J. (2023, March 22). How To Jump Higher: 5 Exercises To Improve Your Vertical. Onnit Academy. https://www.onnit.com/academy/how-to-jump-higher/
- Otey, D. (2020, July 29). How To Properly Do Glute-Ham Raises. Onnit Academy. https://www.onnit.com/academy/glute-ham-raises/#:~:text=Extend%20your%20hips%20and%20drive,leg%20works%20when%20it’s%20running.
- Pause Squat Vertical Jump Exercise Demo Video & Info. (n.d.). https://www.catalystathletics.com/exercise/623/Pause-Squat-Vertical-Jump/#:~:text=Squat%20to%20full%20depth%20and,bending%20the%20knees%20and%20hips.
- Mpt, T. E. P. (2022, June 24). How to Do Box Squats With Proper Form. Healthline. https://www.healthline.com/health/box-squats#variations
- G. (2022, July 30). How To Jump Higher And Increase Vertical Jump Overall. Ball Amazingly. https://ballamazingly.com/how-to-jump-higher-increase-vertical-jump/
- Frog Jump Exercise Guide: How to Do Frog Jumps Properly – 2023 – MasterClass. (2021, June 23). MasterClass. https://www.masterclass.com/articles/frog-jump-guide
- How to Jump Higher: Tips for Improving Your Vertical Jump – 2023 – MasterClass. (2022, February 4). MasterClass. https://www.masterclass.com/articles/how-to-jump-higher#1QTX3ryzXjjN6nA90SqdI7
- How to Do a Single Leg Press | NASM. (n.d.). NASM. https://www.nasm.org/exercise-library/single-leg-press
- High Knee Skips Workout. (2017, November 21). Healthy Living. https://healthyliving.azcentral.com/high-knee-skips-workout-19531.html