
Gluteus maximus muscle: Anatomy, Origin, Insertion, Function, Exercises
Table of Contents
Introduction
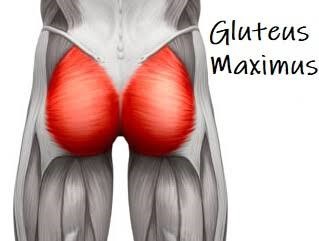
- The Gluteus Maximus Muscle is the largest and heaviest muscle in the body. It is the most superficial of all the gluteal muscles that are located at the back side of the hip joint. It is the largest muscle at the hip, representing 16% of the total cross-sectional area.
- Gluteus Maximus’s size allows it to bring about a large amount of force (the muscle evolved from an adductor of the hip, which is still seen in lower primates today). The development of the muscle’s function is associated with the erect posture & changes to the pelvis, now functioning to maintain the erect posture as a hip extensor.
- The gluteus maximus muscle covers all of the gluteal muscles except for the anterosuperior third of the gluteus medius.
- The ischial tuberosity can be felt deep in the lower side of the glute Maximus. When you flex your thigh, the lower border of the Glutes Maximus moves superiorly, exposing the ischial tuberosity subcutaneously (when you sit, you sit on the ischial tuberosity, ischial bursae, subcutaneous fat, and skin).
Origin of Gluteus maximus muscle:
- The outer slope of the dorsal segment of the iliac crest
- The gluteal surface of the ilium
- Dorsal surface of the lower part of the sacrum
- the coccyx side
- Sacrotuberous ligament
- Gluteal aponeurosis
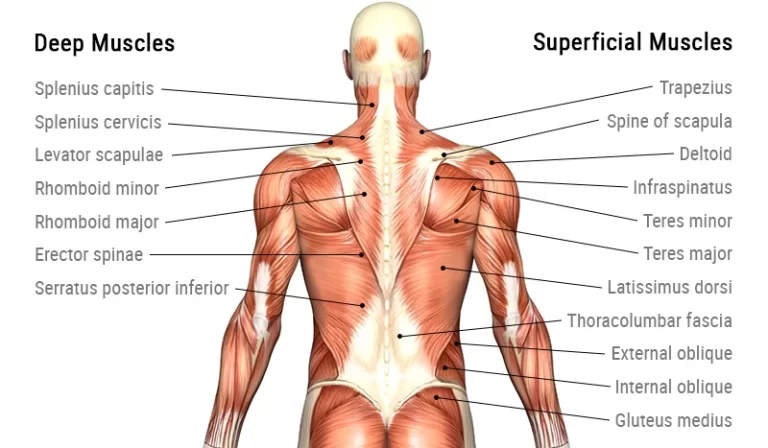
- attaches to the thoracolumbar fascia and its associated raphe. The gluteus maximus is linked to the ipsilateral multifidus and contralateral latissimus dorsi via this attachment, resulting in posterior oblique and deep longitudinal myofascial slings.
Insertion
- Gluteal tuberosity
- Iliotibial tract
Structure:
- The gluteus maximus muscle is the outermost muscle of the buttocks. It arises from connections to nearby structures on this site. It arises from the posterior gluteal line of the inner upper ilium, a bone of the pelvis, as well as from the lower part of the sacrum and the side of the coccyx, the tailbone; from the aponeurosis of the erector spinae (lumbodorsal fascia), the sacrotuberous ligament, and the fascia covering the gluteus medius (gluteal aponeurosis).
- The fibers are directed obliquely, inferiorly, and laterally.
- The gluteus maximus ends in 2 important sites:
- Those forming the upper and larger portions of the muscle, together with the superficial fibers of the lower portion, end in a thick tendinous lamina, which passes across the greater trochanter and inserts into the iliotibial band of the fascia lata;
- The deeper fibers of the lower portion are inserted into the gluteal tuberosity of the linea Aspera, between the vastus lateralis and adductor Magnus. If present, the third trochanter also serves as an attachment.
Bursae:
3 bursae are usually found in relation to the deep surface of this muscle:
- One of these is large in size and connects to the greater trochanter;
- A second (often missing) is situated on the tuberosity of the ischium;
- A third is found between the muscle’s tendon and the vastus lateralis.
Function
- The chief extensor of the thigh
- It is essential for maintaining an erect posture.
- Lateral rotation of the thigh
- Abduction of the thigh
Participation in Activities of Daily Living (ADLs), for example
- As the powerful extensor of the hip joint, the gluteus maximus is suited to powerful lower limb motion, e.g., stepping onto a step, climbing, or running, but is not used greatly during normal walking.
- The Gluteus maximus and the hamstrings work together to extend the trunk from a flexed position by pulling the pelvis backward, e.g., standing up from a bent forward position. Eccentric control is also provided when the body is bent forward.
- If the gluteus maximus muscle is paralyzed, climbing stairs and running will become very difficult. However, other muscles can extend the hip. The gluteus maximus can be trained to produce functional knee extension when the quadriceps femoris is weak or paralyzed.
- Research has indicated that contraction of the deep abdominal muscles may be assisted with the contraction of the gluteus maximus to assist with the control of anterior pelvic rotation. Gluteal muscle weakness has been proposed to be associated with a number of lower limb injuries.
Relations
- The gluteus maximus is the most superficial and the largest of all three gluteal muscles. It is surrounded by a thin fascia that separates the muscle from the adjacent subcutaneous tissue.
- The deep surface of the gluteus maximus muscle covers a number of structures; gluteus medius muscle, pelvic bones, the proximal attachments of the hamstring muscles, and several lateral rotators of the hip (piriformis, inferior gemellus, superior gemellus & obturator internus muscles).
- The deep surface of the muscle is also in relation to the 3 bursae:
- The trochanteric bursa is a separate muscle from the greater trochanter.
- The ischiofemoral bursa, when present, is located on the tuberosity of the ischium.
- The gluteofemoral bursa is found between the tendon of the gluteus maximus and that of the vastus lateralis muscle.
Nerve supply
- The gluteus maximus muscle is supplied by the inferior gluteal nerve (root L5, S1, and S2). Cutaneous supply is mainly provided by L2 and L3.
Blood supply
- The gluteus maximus muscle is vascularized by the muscular branches of the inferior gluteal and superior gluteal arteries, which are branches of the internal iliac artery.
Palpation:
- Locate the iliac crest, then move posteriorly along the crest to a small bony process known as the posterior superior iliac spine (PSIS). Place the palm of your hand with fingers pointing down and towards the midline of the body. The upper hand now covers the origin attachments and under the palm is the bulk of the gluteus maximus.
- Contraction of the muscle can confirm this. The Gluteus maximus muscle can be palpated whilst it acts during standing hip extension, a step-up, or whilst standing to raise the medial borders of the foot.
Clinical importance of gluteus maximus muscle
- Functional assessment can be useful in assessing injuries to the gluteus maximus & surrounding muscles.
- The 30second chair stand test measures a participant’s ability to stand up from a seated position as many times as possible in a 30-second period of time. Testing the number of times a person can stand up in a 30-second period helps assess strength, flexibility, pain, & endurance, which can help determine how far along a person is in rehabilitation, or how much work is still to be done.
- The piriformis test measures the flexibility of the gluteus maximus. This requires a trained professional & is based on the angle of external & internal rotation in relation to the normal range of motion without injury or impingement.
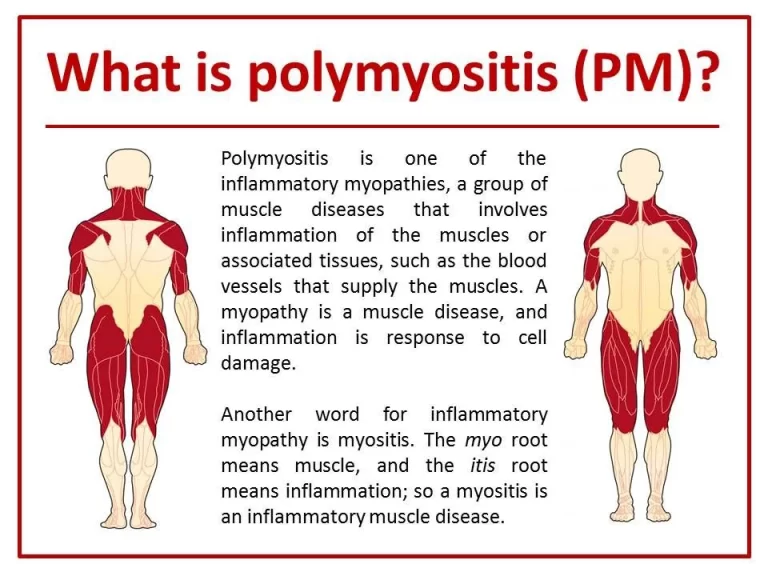
- The Gluteus maximus is one of the strongest muscles in the human body. It works with the semitendinosus & semimembranosus to extend the hip. When paralysis of the gluteus maximus occurs, the person feels difficulty standing up from the sitting posture without support. The gluteus maximus paralysis is more obvious in the case of muscular dystrophy. The Gower’s sign is positive on physical examination which is commonly observed due to the weakness of proximal hip muscles. In such a condition, the child feels difficulty standing up due to which he/she places their hands on legs for support & then on the thighs which help the child to climb on themselves.
Inhibition of Glutes Maximus
As mentioned in Vladimir Janda’s Glutes Maximus is one of the phasic muscles that tend to be inhibited in our body by many causes:
- Atherogenic inhibition from the hip joint.
- Tight iliopsoas sends a reciprocal inhibition to the Glutes Maximus as in Posterior lower crossed syndrome.
- Pain reflex inhibition either hip pain or lumbopelvic pain.
- Stretched weakness of Glutes Maximus.
- Sedentary lifestyle and not doing sports since all the work will be done by the hamstring as an Energy conservative mechanism of the body to save Gluteus Maximus for hard activities such as running, raising stairs, etc. So not doing sports won’t engage your Glutes Maximus and increase its inhibition and making the hamstring take over its action and become synergistic dominant.
All these causes will not only affect the timing of the Glutes Maximus but also will affect the amplitude of activation of the Glutes Maximus.
Stretching for Gluteus maximus muscle
- Gluteus stretch
- Lying Deep Gluteus Stretch
- Groin and long adductor muscle stretch
- Seated figure-four stretch
- Seated glute stretch
- Supine Hip Twist Stretch
- Wall Glute Stretch
- Supine Leg Extension Stretch
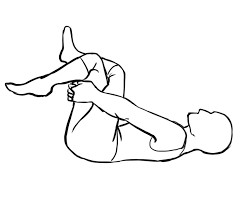
- Gluteus stretch:
- The starting position for the exercise is the supine position.
- The patient is Lying down on the back after that lift to the knee joint & cross to the right ankle joint over to the left knee joint.
- Then Grip the left thigh gently.
- Pull the hip joint in towards the chest.
- Hold this stretching position for 30 seconds.
- Then repeat this stretching one the other leg.
- Do this stretching 3 times in 1 session.
- Then do the 3 sessions per day.
2. Lying Deep Gluteus Stretch:

- The starting position for the exercise is the supine position.
- the patient is lying on the back with the legs being too bent.
- then Raise to the right ankle joint & rest the right ankle on the left knee joint.
- then Using both hands lace with the fingers behind the left thigh & gently pull it toward the patient,
- and keep the head & back onto the floor.
- Hold this stretching position for 20 to 30 seconds.
- then Repeat this exercise with the other leg.
- do this stretching 3 times in 1 session.
- then do the 3 sessions per day.

- Groin and long adductor muscle stretch
- The starting position for the exercise is the sitting position.
- The patient is Sitting down on the floor with the legs spread out too far as the patient so that is straight in front of the body.
- Place the hands onto the floor in front of the body onto the floor & angle the torso toward the floor.
- Lean to the forward, leaving the elbows on the floor.
- Hold to the position for 30 seconds.
- Stop this stretch if they feel any pain.
- Do this stretching 3 times in 1 session.
- Then do the 3 sessions per day.
- Seated figure-four stretch:
- This is also known as the Seated Pigeon Pose.
- The starting position of the exercise is the sitting position.

- The patient is sitting upright in a sturdy chair.
- Place the right ankle on the left thigh, just above the knee joint.
- Then Place the hands on the shins.
- After that Keep the spine straight & then lean slightly forward to deepen the stretch.
- Hold for the stretching position for 30 seconds & do the 3 times in 1 session.
- Then return to the starting position of the stretching.
- After that Repeat with the other leg.
- This stretching is also done in sitting on the floor & standing position.

5. Seated glute stretch:
- The starting position of the exercise is the sitting position.
- Sit on the floor & extend your legs in front of you.
- Keeping the back straight, lift the left leg.
- Place the left ankle joint on the right knee joint.
- Then Lean-to slightly forward &feel the patient deepen the stretch.
- Hold this stretching position for 30 seconds & do the 3 times in 1 session.
- Repeat this stretching on the other side.
- Do the 3 times in 1 session.

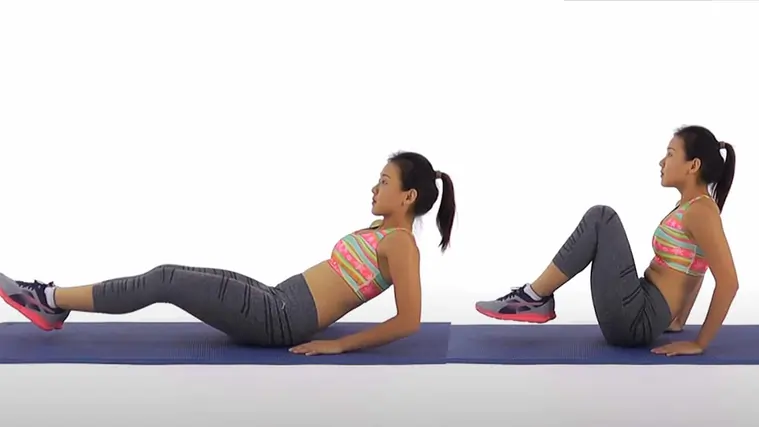
6. Z – Sit exercise
- Start by sitting comfortably on the ground.
- Bring the left knee to a 90-degree position in front of the body (as much as your body allows).
- Do the same with your right leg, toward the back of your body.
- You can sit upright in this pose or lean the torso forward toward your front leg.
- Hold the pose for 30 seconds, & then repeat on the other side.
- Supine Hip Twist Stretch

- This exercise stretches the outer hip, where the gluteus minimus muscle is located, without placing stress on your spine. Lie on the floor on the back with arms out to your sides & with your hands on the floor. Put the feet flat on the floor about hip-width apart. Cross left foot over right thigh near your knee. Exhale & turn your pelvis toward your right so that your outer right knee & your left foot move
- toward the floor. Do not lift your left shoulder off the ground or twist your upper back. Hold this stretch for 5 to 6 deep breaths. Perform 2 sets of stretches on each side of the body.
7. Wall Glute Stretch:

- This exercise stretches the entire hip region, which also takes the pressure off the sciatic nerves, which run through either side of the buttocks. Lie on the ground on your back, & put your feet on the wall about hip-width apart. Cross the left foot on your right thigh near the knee. Do not change the position of your pelvis as you cross your foot. Push your left knee toward the wall by using your hip. Hold this stretch for 5 to 6 deep breaths. Switch leg position, & repeat the stretch on the opposite hip.
8. Supine Leg Extension Stretch

- This exercise stretches the entire back of your hip & leg from your buttocks & into your calves. Lie on the ground on your back, & lift your left knee to your ribs. Grab the back of your knee, & point your knee so that it faces toward your right shoulder or the right side of your chin. Slowly extend your leg straight up, & flex your left foot toward your right shoulder. Hold the stretch for 5 to 6 deep breaths. Repeat the stretch on the opposite leg.
Strengthening exercise of gluteus maximus muscle
- Buttocks
- Knee to the opposite shoulder
- Side Leg Raises
- Prone Straight Leg Raises [ hip extension ]
- Glute bridge with band
- Seated hip abduction with resistance band
- Spiky ball roll on glutes
- Bridges
- Knee to Chest
- Downward-Facing Dog
- Pigeon Pose
- Clamshell exercise
- Leg bridge exercise

- Buttocks:
- The starting position for the exercise is supine.
- Patient Lay on to the back.
- Then bring the affected leg up to the right angle.
- Grasping the with the help of both hands behind the thigh.
- Then locking to the fingers of the head.
- Do the take unaffected leg & place to the ankle joint against to the knee joint.
- This exercise Repeat to the opposite sides.
- Do this exercise 3 times in 1 session.
- Then do the 3 sessions per day.

- Knee to the opposite shoulder:
- The starting position for the exercise is the supine position.
- The patient is lying on the back with both legs extended & feet flexed upward.
- Then Bend to the right leg & clasp both hands around the knee joint.
- After that Gently pull the leg across the body toward the left shoulder.
- Hold this exercise position for 30 seconds.
- Push the knee joint so that the leg is returned to the starting position.
- Do this exercise 3 times in 1 session.
- Then do this exercise 3 sessions per day.
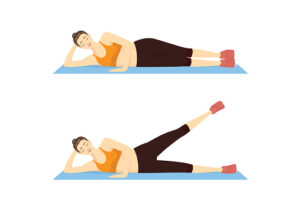
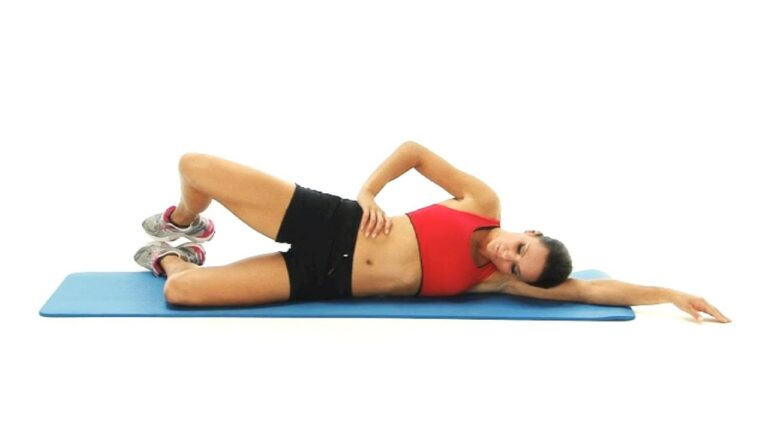
3. SIDE Leg Raises (hip abduction) exercise
- The starting position for the exercise is the side-lying position.
- The patient is lying on one side with the legs stacked.
- The patient is bent to the bottom leg for support.
- Then Straighten to the top of the leg and maybe upraise to 45 degrees.
- Hold this exercise position for 10 seconds & then relax.
- Then Repeat this exercise 10 times in the 1 session.
- Do this exercise in 3 sessions per day.
- Woman doing Side Leg Raise Exercise with lying in 2 Step on the blue mat. Illustration about Thighs Workout.
4. Prone Straight Leg Raises (hip extension) exercise :
- The starting position for the exercise is the prone position.
- The patient Lie to flat on their stomach.
- Must be Keep the legs straight.
- Then Tighten to the muscles in the bottom & then the hamstring muscle of the one leg.
- One leg is lifted toward the ceiling.
- Hold this exercise position for 10 seconds.
- Repeat this exercise 10-15 times in 1 session.
- Do this exercise in 3 sessions per day.
5. Glute bridge with the band:
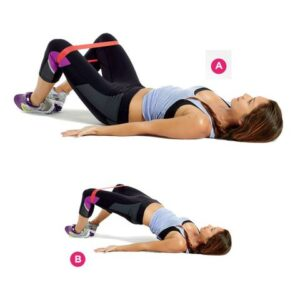
- The starting position for the exercise is the supine position.
- Place a small & tight resistance band around the calves.
- The patient is lying on their back & lifting their hips.
- Must be Keep tension in the band & tap the hip joint down to the floor before raising the hip back up again.
- This is important to keep the spine straight & do the movement from the hip joint.
- Repeat this exercise 10 times in 1 session.
- Do this exercise in 3 sessions per day.

6. Seated hip abduction with resistance band:
- Starting position is the sitting position.
- The patient is Sitting on the floor & placing the resistance band around the calves.
- Bend the knee joint & keep your feet on the floor.
- Then Place the hands slightly behind the patient.
- Must be Keep the back straight back & press the legs out to the sides as they externally rotate the hip joint.
- Then Gently & with the control, bring the legs back together.
- Repeat this exercise 10 times in 1 session.
- Do this exercise in 3 sessions per day.
7. Spiky ball roll on glutes
- The starting position for the exercise is the supine position.
- Use the spiky ball to roll out the tight muscles into the buttock.
- Then Roll the ball around to the fleshy part of the buttock for 30 seconds 1 time.
- Do this exercise 10 times in 1 session.

- Perform this exercise in 3 sessions per day.

8. Bridges :
- The starting position of the patient is in the supine position.
- The patient is lying on the back with the knees bent.
- Then patient feet are touching the floor.
- After that Raise the hips toward the ceiling.
- Must be kept back into the straight line with the knees joint & shoulders joint.
- Hold this exercise position for 10 seconds.
- Do this exercise 10 times in 1 session.
- Perform this exercise 3 sessions per day.
9. Knee to Chest :

- Starting position is supine.
- Lie onto the back.
- Starting with the left or right knee.
- Use the hands to gently pull by to the bent knee toward the chest.
- Hold for 10 seconds.
- Repeat this knee-to-chest exercise with to the opposite knee.
- Repeat this exercise 10 times per session & 3 sessions per day.
10 Downward-Facing Dog :
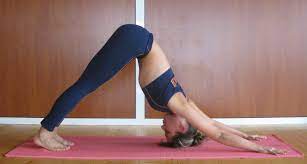
- Start this exercise with the hands & knees.
- Then press into the hands as far as to the lift of the hip joint toward the ceiling.
- Drop to the head down to the bring the ears into the line with the upper arms & chin all to the way into the toward the chest.
- Bend to the knee joint for the tilt of the pelvis slightly the forward.
- Then move to the body through to any variations of to the feel for to the appropriate.
- Hold this yoga pose for up to 1 minute.
- do this yoga pose 3 times a day.

11 Pigeon Pose:
- Starting with the all fours limb.
- Move the right knee joint toward to right wrist then place the shin on the floor.
- Then Move to the right ankle toward to left wrist.
- Slide the left leg back, point the toes & keep the hip joint facing forward.
- Then Extend the spine.
- Gently walk the hands forward.
- Hold this position for 5–10 breaths.
- Then return to the starting position.
- Switch the legs & repeat.
- Do this yoga the 3 times per day.
- Clamshell exercise
- Lie on your side, with legs stacked & knees bent at a 45-degree angle.
- Rest your head on your lower arm, & use your top arm to steady your frame. …
- Engage your abdomen by pulling your belly button in, as this will help to stabilize your spine & pelvis.
13. Leg bridge exercise:
- Tighten your abdominal & buttock muscles.
- Raise the hips up to create a straight line from your knees to shoulders.
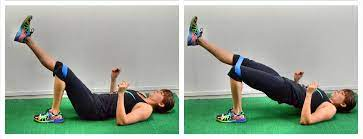
- Squeeze your core & try to pull your belly button back toward your spine.
- Slowly raise & extend one leg while keeping your pelvis raised & level.
- Hold.
- Return to the starting position with the knees bent.
- Perform the lift with the other leg.

14. Standing side bend exercise
- Using a wall for balance, stand with one side of the body to a wall.
- Cross the leg farthest from the wall in front of the other.
- Place one hand on the wall & the other on the hip. Then lean your upper body away from the wall, & push your hip toward the wall
- Hold for 20 to 30 seconds, then repeat on the other side
- Weighted deadlift

- Stand with your feet parallel & hip-width apart. If you feel comfortable, hold light dumbbells.
- Keep your spine long & your gaze forward. Your shoulders should be back & down.
- Squeeze the glutes as you fold from the hips, bending the knees so that your seat reaches back past the heels. Resist the urge to round the spine in order to “give in to the weight.”
- Allow your glutes & belly to control the descent & ascent.
Self-Myofascial Release:

- This is a self-massage technique that breaks apart muscle & tissue adhesion that causes sensitivity, pain & stiffness. Use a foam roller to massage your gluteal complex near your outer hip & the head of the femur. Put the foam roller on the floor, & sit on top of it with both feet flat on the floor. Cross your left foot over your right thigh, & put your left hand behind you near the roller. Your weight should shift toward your left hip.
12 Comments