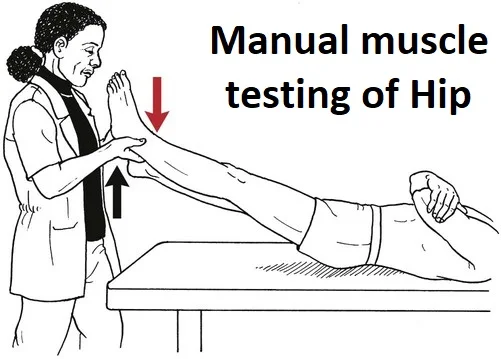
Manual muscle testing of Hip
Manual muscle testing of the hip involves assessing the strength and function of specific muscles around the hip joint. It is commonly used by healthcare professionals such as physical therapists, orthopedic specialists, or sports medicine practitioners to evaluate muscle imbalances, weakness, or injuries in the hip region.
Table of Contents
Hip flexion
Testing muscles

- Psoas Major
- Iliacus
- Rectus femoris
Patient’s position
To assess grades 3 to 5 Patient should be in the short sitting position with thighs supported
To assess grades 0-2 Patient should be in a side-lying position in that gravity minimally affects the position.
Therapist’s position
The therapist should be standing next to examine the side of the patient
Do the Palpation at the hip flexors muscles.
- Grade 5: The therapist applies maximum resistance in the opposite direction of hip flexion while the patient maintains the position.
- Grade 4: The therapist applies mild to moderate resistance in the opposite direction of hip flexion while the patient maintains the position.
- Grade 3: the patient does the hip flexion as a normal person.
- Grade 2: The therapist supports the leg and asks the patient to lift it the whole range.
- Grade 1: The therapist supports the leg and asks the patient to attempt to lift it. The patient lifts his leg only in a short range.
- Grade 0: No movement is observed.
How to test?
Give instructions for the test in the patient’s language so that he can easily understand the process.
The patient himself does the flexion of the hip.
To assess grades 4 to 5 give resistance on the distal femur in the opposite direction to flexion
For grade 5 which is normal muscle performance activity, the patient must have the strength to move through a whole range of motion which is called active resistance testing
Patients must maintain an endpoint range opposite to the maximum resistance force for the break test.
- Grade 0: No movement
- Grade 1: Trace movement, but no visible muscle contraction
- Grade 2: Movement with gravity eliminated
- Grade 3: Movement against gravity
- Grade 4: Movement against some resistance, but weak
- Grade 5: Normal strength
The therapist should repeat the same procedure on the other side to assess for any differences in muscle strength.
The therapist should document the grade of muscle strength for each side and any relevant findings or observations.
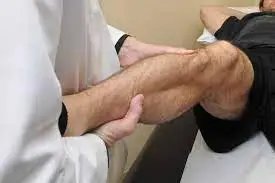
Hip extensions
Testing muscles

The main hip extensors are:
- Gluteus Maximus
- Semitendinosus
- Semimembranosus
- Biceps Femoris
Patient’s position
To assess grades 3 to 5
The patient should be in the Prone position. Arms may be overhead or in abduction to grasp the edges of the bed.
Hip Flexor Tightness altered The patient sets their body on the table while standing with their hips flexed. To stabilize the table, the arms can be used to hold it. To begin the test, the non-test leg’s knee must be flexed such that the test limb can rest on the ground.
To assess grades 0-2 Patient should be in a side-lying position in which gravity minimal affects the position.
Therapist’s position
For all grades of hip extension manual muscle testing, the therapist should stand at the side of the treatment table. However, for grades 3-5, the therapist should be positioned at the patient’s feet to stabilize the pelvis with one hand while applying resistance with the other hand in the opposite direction of hip flexion. For grades 2-5, the therapist should stand at the side of the leg being tested and support it with one hand while applying resistance with the other hand.
How to test?
To test hip extension manual muscle testing, the therapist should follow these steps:
The patient should lie on their stomach on a treatment table with their legs straight and feet hanging off the edge of the table.
The therapist should stand at the side of the treatment table.
- Test grade 0: Ask the patient to lift their leg off the table. If the patient is unable to lift their leg, they have a grade 0 hip extension.
- Test grade 1: Ask the patient to lift their leg off the table. we can see trace movement, but no visible muscle contraction.
- Test grade 2: Ask the patient to lift their leg off the .patient can do the movement with gravity eliminated.
- Test grade 3: patient can do the movement against gravity, but not against resistance
- Test grade 4: Apply mild to moderate resistance to the patient’s leg as they attempt to lift it off the table. If the patient can lift their leg against moderate resistance, they have a grade 4 hip extension.
- Test grade 5: Apply maximal resistance to the patient’s leg as they attempt to lift it off the table. If the patient can lift their leg against strong resistance, they have a grade 5 hip extension.
Repeat for the other leg: Repeat steps 3-8 for the other leg.
Document findings: Document the grade of hip extension for each leg in the patient’s medical record.
Hip Internal rotation
Testing muscles
- Gluteus Minimus (anterior fibres)
- Gluteus Medius (anterior fibres)
- Tensor fasciae lata

Patient’s position
The patient should be comfortable sitting.
Patients have to wear comfortable clothes in which he or they can do complete movement without any restrictions.
For assessing grades 3 to 5 Patient should be in a short sitting position on a plinth. examine side knee flexion to 90-degree°, basically, the foot should be suspended off the ground ex. sitting on the edge of a high bed.
To assess grades 0-2 Patient should be in the supine position.
Therapist’s position
The therapist should kneel alongside the patient in a sitting position and fix at the distal thigh on the middle side.
The therapist supposes to stand on the examined side if the patient is supine.
How to test?
The patient himself does the internal rotation of the hip.
Apply resistance against the patient’s movement by pushing their leg outward with your hand
To assess grades 4 to 5 apply resistance force with the lateral side of the ankle, in the opposite direction to internal rotation
Grade the muscle strength: Based on the amount of resistance the patient can overcome, grade the strength of the muscle being tested using a scale from 0 to 5.
- Grade 0: No contraction felt
- Grade 1: Flicker or trace of contraction
- Grade 2: Active movement with gravity eliminated
- Grade 3: Active movement against gravity
- Grade 4: Do the active movement against gravity and mild to moderate resistance
- Grade 5: Normal strength
Repeat on the other side: Repeat the same steps on the other side to compare the strength of both hips.
It is essential to perform this test accurately and consistently to obtain reliable results. It is also important to note that hip internal rotation manual muscle testing should be performed by a trained healthcare professional.
Hip External rotation
Testing muscles

- Gluteus Maximus
- Piriformis muscle
- Quadratus Femoris
- Obturator externus
- Obturator internus
- Gemellus Superior
- Gemellus Inferior
Patient’s position
The patient should be comfortable sitting.
Patients have to wear comfortable clothes in which he or they can do complete movement without any restrictions.
For examination grades 3 to 5 Patient should be in a short sitting position on a plinth with testing side knee flexion to 90-degree °, basically the foot should be suspended off the ground ex. just like sitting on the edge of a high bed
To assess grades 0-2 Patient should be in the prone position with the knee flexed to 90-degree.
Therapist’s position
The therapist is to kneel alongside the patient and fix at the distal thigh lateral side.
The therapist supposes to stand on examine side if the patient is in a prone position.
How to test?
Stand on the side of the hip being tested and place one hand on the opposite hip to stabilize it.
Test the muscle: Place your other hand on the ankle of the leg being tested and ask the patient to rotate their leg inward towards the midline of their body.
Assess resistance: Apply resistance against the patient’s movement by pushing their leg outward with your hand.
The patient himself does the external rotation of the hip
To assess grades 4 to 5 apply resistance force with the medial ankle in the available range in an opposite direction to the external rotation
Grade the muscle strength: Based on the amount of resistance the patient can overcome, grade the strength of the muscle being tested using a scale from 0 to 5.
- Grade 0: No contraction felt
- Grade 1: Flicker or trace of contraction
- Grade 2: Active movement with gravity eliminated
- Grade 3: Active movement against gravity
- Grade 4: Do the active movement against gravity and mild to moderate resistance
- Grade 5: Normal strength
Repeat on the other side: Repeat the same steps on the other side to compare the strength of both hips.
It is essential to perform this test accurately and consistently to obtain reliable results. It is also important to note that hip internal rotation manual muscle testing should be performed by a trained healthcare professional.
Hip abduction
Testing muscles
- Gluteus medius
- Gluteus minimus
Patient’s position

For assessing grades 0-2 Patient should be in the supine position.
For assessing grades 3 to 5 The patient should lie on their side with their bottom leg slightly bent and their top leg straight.
Therapist’s position
The therapist should stand behind where the patient is side-lying or on the examining side supine
Do the fixes at the pelvis on the side-lying
Do the Palpation of hip abductors muscles in the supine position.
How to test?
Stabilization: The therapist should stand behind the patient and stabilize the pelvis with one hand to prevent any pelvic rotation during the test.
Resistance: The therapist should place the other hand just above the ankle of the top leg and ask the patient to lift their leg up towards the ceiling while keeping it straight. The therapist should apply resistance to the leg as the patient lifts it.
Assessment: The therapist should assess the strength of the hip abductors by grading the resistance applied against the patient’s movement. The grading system is as follows:
- Grade 0: No contraction felt
- Grade 1: A flicker or trace of contraction felt, but no movement
- Grade 2: Movement with gravity eliminated (i.e., horizontal)
- Grade 3:Do the movement against gravity but not resistance
- Grade 4: Do the movement against gravity and mild to moderate resistance
- Grade 5: Normal strength against full resistance
Endurance: The therapist may also ask the patient to hold the position for a few seconds to assess endurance.
Repeat: The test should be repeated on both sides for comparison.
Note: It is important to ensure that the patient maintains proper form during the test, including keeping their leg straight and avoiding compensatory movements such as pelvic rotation or trunk rotation
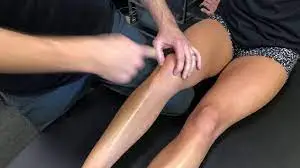
Hip adduction
Testing muscles

- Adductor Magnus
- Adductor Brevis
- Adductor Longus
- Pectineus
- Gracilis
Patient’s position
To assess grades 3 to 5 Patient should be on the side-lying with the top leg which is a non-examine side abducted to 25°. Examine the side is the lower leg in a side-lying position.
To assess grades 0-2 Patient should be supine. non-examine side is in 25° abduction.
Therapist’s position
The therapist should stand behind the patient on the side lying with fixing to the non examine side in abduction
The therapist stands on the examining side if assessing in a supine position.
Pelvis should be stable in a side-lying position.
Do the palpation of the hip adductors muscles in supine.
How to test?
The therapist should stand at the side of the patient and stabilize the pelvis with one hand to prevent any pelvic rotation during the test.
The therapist should place their other hand just above the ankle of the tested leg and ask the patient to push their leg down towards the table while keeping it straight. The therapist should apply resistance to the leg as the patient pushes down.
The patient himself does the adduction of the hip
For assessing grades 4 and 5 give resistance force on the medial femur in the opposite direction to adduction.
The therapist should assess the strength of the hip adductors by grading the resistance applied against the patient’s movement. The grading system is as follows:
- Grade 0: No contraction felt
- Grade 1: A flicker or trace of contraction felt, but no movement
- Grade 2: Movement with gravity eliminated (i.e., horizontal)
- Grade 3:Do the movement against gravity but not resistance
- Grade 4:Do the movement against gravity and mild to moderate resistance
- Grade 5: Normal strength against full resistance
The therapist may also ask the patient to hold the position for a few seconds to assess endurance.
The test should be repeated on both sides for comparison.
Note: It is important to ensure that the patient maintains proper form during the test, including keeping their leg straight and avoiding compensatory movements such as pelvic rotation or trunk rotation. Additionally, it is important to avoid excessive pressure on the inner thigh area during the test to prevent discomfort or injury.
Precaution
- Avoid testing if the patient has recently undergone hip surgery or has a hip injury that could be aggravated by the testing.
- Ensure that the patient is comfortable and adequately supported during the testing process.
- Use caution when applying resistance to avoid causing pain or injury to the patient.
- Avoid over-testing or repeating the test excessively, as this can lead to muscle fatigue or discomfort for the patient.
- If the patient experiences pain or discomfort during the testing process, stop immediately and seek medical attention if necessary.
- Always follow proper infection control procedures, including hand hygiene and the use of gloves, to prevent the spread of infection.