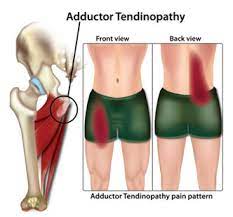
Adductor tendinopathy
Table of Contents
What is adductor tendinopathy?
- Adductor tendinopathy describes a number of conditions that develop in & around of Adductor tendon in response to chronic overuse. At a histopathological level, there are changes in the molecular structure of the tendon, typically collagen separation & collagen degeneration & at a macroscopic level typically see tendon thickening, a loss of mechanical properties & pain. The role of inflammation is still debated as research has demonstrated that there is generally an absence of inflammatory cells around the lesion. hence the terminology ‘tendonitis’ is outdated.
- The adductors consist of 5 muscles, which can be divided into the long & short adductors: the long adductors (Gracilis & Adductor Magnus) attach at the pelvis extending to the knee & the short adductors (Pectineus, Adductor Brevis & Longus) also attach at the pelvis & extend to the thigh bone. These adductor muscles help to stabilize the pelvis & pull the legs towards the midline (adduction).

Anatomy of Adductor muscles
Adductor Magnus muscle
Origin: The part of the muscle that is considered the adductor part has its proximal attachment to the inferior ramus of the pubis & the ramus of the ischium. The part of the muscle considered the hamstring portion has its proximal attachment to the ischial tuberosity. Every portion of the muscle has separate & distinct distal attachment points.
Insertion: Adductor part: posterior surface of the proximal femur, middle of linea aspera, medial supracondylar line, and Hamstring part: adductor tubercle of medial condyle of femur & supracondylar line.
Nerve supply: adductor part is supplied by the posterior division of the obturator nerve. (L2, L4). & hamstring part supplied by the tibial component of the sciatic nerve (L4).
Blood supply: The superior portion of the muscle is supplied by the medial femoral circumflex artery, & the inferior portion receives blood from the femoral, popliteal & genicular arteries.
Action: The adductor portion also contributes to the flexion of the thigh, especially the superior horizontal portion of the adductor part. The hamstring part adducts the thigh as well but also cooperates with the hamstring group of muscles & assists the extension of the thigh.
Gracilis muscle
Origin: The gracilis muscle originates from the inferior ischiopubic ramus, & body of the pubis.
Insertion: The gracilis muscle descends almost vertically down the leg & inserts on the medial tibia at the pes anserinus. The pes anserinus is further the attachment site of the Sartorius & the Semitendinosus.
Nerve supply: The gracilis muscles are supplied by the anterior branch of the obturator nerve (L2-L4). The anterior branch of the obturator nerve is supplied by the adductor longus, & sometimes the adductor brevis.
Blood supply: Gracilis muscle receives most of its vascular supply from the ‘artery to the adductors’, a branch of the deep femoral artery. The ‘artery to the adductors’ enters the gracilis via its lateral surface, approximately one-third away from its origin. The proximal part of the muscle also receives a small proportion of blood supply from the medial circumflex femoral artery and the distal third of the gracilis muscle is also to be supplied by a minor branch of the femoral artery.
Action: Gracilis acts on the hip & knee joints, resulting in several movements:
Strong leg flexion & the medial (internal) rotation around the knee joint when the knee is in a semi-flexed position.
Weak thigh flexion & the adduction around the hip joint, simply aid the other, more powerful thigh adductors.
Pectineus muscle
Origin: pectineal line & adjacent bone of the pelvis
Insertion: The oblique line extends from the base of the lesser trochanter to linea aspera on the posterior surface of the femur.
Nerve supply: The pectineus is predominately supplied by the femoral nerve (L2, L3). However, in some people pectineus may receive innervation from 2 separate nerves of the lumbar plexus.
Blood supply: The superficial portion of the muscle is supplied by the medial circumflex femoral artery, a branch of the femoral artery. The deep part of the muscle is vascularised by the anterior branch of the obturator artery, itself a branch of the internal iliac artery.
Function: Due to the course of its fibers, the pectineus both flexes & adducts the thigh at the hip joint when it contracts. When the lower limb is in the anatomical position, contraction of the muscle first causes flexion to happen at the hip joint. This flexion can go as far as the thigh at a 45-degree angle to the hip joint.
Adductor longus muscle
Origin: The strong tendon from the anterior aspect of the pubic body is inferior to the pubic crest.
Insertion: Expands into a fan shape, attaching widely to the linea aspera on the middle third of the femur.
This insertion point is between the insertion of the adductor Magnus & the origin of the vastus medialis muscle, & inferior to the adductor brevis insertion.
Nerve supply: Hip adductors & others & Anterior division of obturator nerve (L2, L3, & L4).
Blood supply: Deep femoral artery (Arteria profunda femoris)Deep femoral artery
and Arteria profunda femoris
Function: The main function of the adductor group of muscles is to adduct the thigh at the hip joint.
The adductor longus muscle also plays a role in external or lateral rotation& flexion of the thigh.
Along with the other hip adductors it helps to stabilize the pelvis in standing & aiding in balancing the body on the lower limb during walking.
Adductor Brevis muscle
Origin: Adductor brevis originates from the body of the pubis & inferior pubic rami.
Insertion: It attaches to the linea Aspera on the posterior part of the femur, proximal to the adductor Longus.
Nerve supply: The adductor brevis is supplied by the obturator nerve. The Obturator nerve is derived from the lumbar plexus (anterior branches of spinal nerves L2-L4).
Blood supply: The blood supply for the adductor Brevis muscle typically comes from the deep femoral artery (Profunda femoris) & from its branch called the artery for the adductors. It can also be supplied by partially from the medial circumflex femoral & obturator artery. Venous blood from this region is drained by the deep femoral vein, whose path follows that of its artery prior to emptying into the femoral vein.
How does adductor tendinopathy happen?
- The adductors muscles are active in many sports such as running, football, horse riding, gymnastics & swimming. The repetitive nature of the movements in some of these sports & the continuous change of direction in others heavily stresses the adductor tendon. which construct athletes more prevalent to adductor tendinopathy and also groin injuries. Other causes can be over-stretching of the adductor tendons or a sudden increase in training or the type of training, such as intensity.
- The development of adductor tendinopathy is multifactorial. One such factor is the significant leg length discrepancy which affects the gait pattern. Poor or altered movement patterns during physical activity may further overly stress the adductor tendons. Muscular length differences, strength imbalances, and muscular weakness in the lower limb or the abdominals can also be influential in developing adductor tendinopathy. Other factors such as; a lack of warming up, inactivity, fatigue, obesity, age-related weaknesses, degeneration, & genetics.
What are the symptoms of adductor tendinopathy?
- Adductor tendinopathies result in pain felt high up on the inside of the thigh close to the groin.
- In starting it may only be felt following exercise.
- For example, it may be 1st felt on rising the day following participation. Associated with the pain may be stiffness or tightness in the groin portion. Typically, these starting signs of adductor tendinopathy are ignored, as they disappear fastly with walking about or applying heat (i.e. a hot shower) over the groin part. However, as you continue to participate, the tendinopathy progresses & the pain in the groin becomes more intense & more frequent. Other key symptoms include:
- reduced range of movement
- swelling/inflammation
- stiffness
- weakness
Tendinopathy Phases
Your tendon’s inability to adapt to the load fastly enough causes the tendon to progress through four phases of tendon injury. While it is healthy for normal tissue adaptation during phase one, further progression can lead to tendon cell death & ensuing tendon rupture.
- Reactive Tendinopathy
- Normal tissue adaptation phase
- Prognosis: Excellent. Normal Recovery
2. Tendon Disrepair
- Injury rate > Repair rate
- Prognosis: Good. The tissue is attempting to heal.
- You must prevent deterioration & progression to permanent cell death (phase 3).
3. Degenerative Tendinopathy
- Cell death occurs
- Poor Prognosis – Tendon cells are giving up
4. Tendon Tear or Rupture
- Catastrophic tissue breakdown
- Loss of function.
- Prognosis: very poor.
- Surgery is often the only option.
- It is crucial to have tendinopathy professionally assessed to identify its injury phase. Identifying the tendinopathy phase is vital to direct the most effective treatment since specific modalities or exercises should only be applied or undertaken in distinct tendon healing phases.
Diagnostic Procedures adductor tendinopathy
- A physiotherapist can make an objective diagnosis following a thorough assessment or further investigations can be undertaken such as; Ultrasound, MRI, or CT scan.
Differential Diagnosis of adductor tendinopathy
- The causes of groin pain can be numerous due to musculotendinous, neurologic & internal structures in part with Osteitis Pubis being difficult to distinguish from Adductor tendinopathy. Another diagnosis’ can be; sports or inguinal hernia, iliopsoas bursitis, stress fracture, avulsion fracture, nerve compression, snapping hip syndrome, or chronic prostatitis.
What should I do if I’ve got adductor tendinopathy?
- Adductor tendinopathy usually does not get better on its own if the cause is not addressed and you constantly exercise. If you have or suspect you have adductor tendinopathy you might consult your nearest sports medicine professional. In the meantime, you can begin starting treatment. This might consist of icing following participation & regular gentle groin stretching. Icing should consist of crushed ice wrapped in a moist towel applied to the sore part for 15–20 minutes.
What should I not do if I’ve got adductor tendinopathy?
- If you have or suspect you have adductor tendinopathy, you should not ignore the problem. Your pain may get better as you exercise; however, the exercise you are doing may be interfering with the healing process & causing further damage. This can lead to injury getting worse such that your pain does not ‘warm up’ & you feel it throughout participation. If this happens, your recovery may be prolonged & it may take a number of months for you to return to full participation.
Could there be any long-term benefits from adductor tendinopathy?
- Adductor tendinopathy generally does not produce any long-term effects, as long as it is properly diagnosed & appropriately treated. Recovery generally takes place in a matter of weeks.
Medical treatment of adductor tendinopathy
- Pain relief is recommended in the first instance, although Non-steroidal anti-inflammatory drugs (NSAIDs) may be ineffective due to the noninflammatory nature of the injury. Steroid injections are not always indicated due to the potential risk for tendon rupture if injected directly into the tendon.
Physiotherapy treatment
Aim of treatment:
The aim of rehabilitation is to restore muscle & tendon properties, where strength training is beneficial to the tendon matrix structure, muscle properties & limb biomechanics. Exercises aim to address the neuromuscular & tendon changes (strength & capacity) in tendinopathy.
RICE protocol:
- Treatment includes rest from aggravating activities for an acute injury in the first 48 hours.
- Apply RICE protocol 3 times a day for 10-20 minutes to help reduce swelling & inflammation from any sudden trauma.
- When the swelling has decreased, blood flow stimulation therapy may begin to increase the healing process.
- Active treatment is then indicated to maximize rehabilitation.
- Recent evidence suggests that an eccentric-based exercise program is the most effective as well as heavy-slow eccentric & concentric exercises for improving both pain & function in the tendon, but Cook et al have proposed that a new,
3-stage model of tendinopathy where exercise treatment differs between stages. They suggest that the current treatment protocol of eccentric loading, used for stages 2 & 3, could be detrimental for stage 1 tendinopathy. Load provides a positive stimulus to both the tendon & muscle tissues, yet no single effective method exists for tendon rehabilitation, with variations in repetitions, sets, and the load applied depending on the stage of rehabilitation & the patient’s muscle-tendon response to the exercises.
Stage:1
- These stages that Cook et al propose are reactive tendinopathy, tendon disrepair (failed healing) & degenerative tendinopathy. In the early, reactive stages, the key is to modify the load to a tolerable level whereby the tendon can recover & heal. Cook advised however that tendons can have a latent response of around 24 hours. This means that what feels un-reactive immediately the following activity may flare up 24 hours later. At this stage, the use of NSAIDS is, but it is advised that their use may be of benefit.
- Stretching is also not indicated in the reactive stage as it can generate a compressive force on the affected tendon, aggravating the symptoms. An option is a massage to maintain muscle length. In this acute stage, the suggested treatment is isometric exercise over eccentric (resisting load but without motion) along with rest from the aggravating activity, where rest is relative for the individual. i.e. rest from the aggravating activities which may be speed, distance, or intensity & be wary of any pain that may appear 24 hours later. Symptoms and pain response will have to be the guide & cross-training is advised to maintain fitness & function. Reversal of changes within the tendon is possible at this stage.
Stage:2
- Tendinopathy in stage 2 can usually be characterized by an ongoing discomfort with localized thickening of the tendon from chronic overload and may be seen in patients of varying ages depending on; the length of time over which loading has taken place, frequency of loading & the intensity. Stage 2 can be difficult to distinguish clinically & some reversal may be possible, but load management for the long-term health of the tendon is advised to stimulate the load structure.
Stage:3
- With a stage 3 degenerative tendinopathy, the matrix and cell changes are progressed to a level that no reversal is possible, so treatment & management is aimed at the long term, consisting of eccentric loading, strengthening & stability exercises. A degenerative tendon is usually seen in the older athlete & occasionally in the younger depending on the extent of the chronic overloading. There may be areas of thickening & acute bouts of pain may indicate part of stage 1 tendinopathy within the tendon. With a degenerative tendon, there is also the risk of rupture. Treatment, therefore, needs to reflect the symptoms; as per stage 1 until the acute pain settles, then a long-term program of exercises as mentioned above.
There is no one way to treat the tendinopathy, so working with a physiotherapist to treat the symptoms is advised as is how to use rest along with a graded return to activity. Once any symptoms have resolved, a graded return to normal stretching activities can also start.
Hip adductor stretching exercise
- The adductors involve the inner leg muscles, called the groin. The adductor muscle stretch will include the group of muscles that has a significantly large muscle mass. The key action of these muscles is to pull the leg inward. There is more useful for them in sports such as soccer, where these muscles are used in kicking a soccer ball with the inside of the foot. Finally, they are utilized in flexion & extension of the thigh when against resistance or running.
- Adductor Lunge Stretch
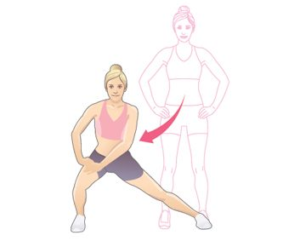
- Standing Lateral Lunge Adductor Stretch
- Butterfly Stretch
- Adductor AIS Release
- Supine Wall Stretch
- Standing Adductor Stretch
- Kneeling adductor stretch
- Half-kneeling adductor dips
- Frogger stretch
- Lateral squat
- Crossover stretch
- Seated Adductor Stretch
- Reclining angle bound pose
- Standing banded adduction
- Hip Opener and Groin Stretch
- Squatting Groin Stretch
- Frog Squat With Arm Raise
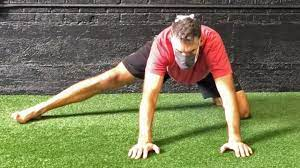
- Runner’s Lunge
- Adductor Lunge Stretch
How to perform stretch:
- Begin kneeling on the ground in a lunge position.
- Bend your torso forward to bring the outside of the shoulder towards the interior of the lead knee.
- Then, lunge forward so the hips slide forward.
- You can feel a stretch along the inside of the forwarding leg.
- Hold this adductor stretch for 5- 10 seconds then release.
- Perform 10-12 repetitions.
- Standing Lateral Lunge Adductor Stretch
How to perform stretch:
- Stand in a broad stance position.
- Now bend your & knee & move your hips to that side.
- maintain posterior pelvic tilt during the stretch
- You can feel stretch inside of the opposite thigh.
- Hold for 5-10 seconds & release.
- You can enhance holding time in progression.
- Do this adductor stretch 4-5 times.

- Butterfly Stretch
How to perform stretch:
- Sit down on the ground with your legs in front of you.
- Reach forward & grab your left foot.
- You can bend the knee to help the hand & foot join.
- Slowly pull your left foot up towards the groin bending until it is at a comfortable place & the sole is facing your right thigh.
- Bend your right knee to bring your right foot toward the groin so that it is sole touches the sole of your left foot.
- Hold both feet with your hands & place your elbows on the knees.
- While maintaining the back straight, allow your knees to fall towards the ground.
- You can give gentle pressure to the inner thigh by pressing gradually on the knees with the elbows.
- You might feel pulling & tension in your groin.
- Hold the butterfly stretch for 20-30 seconds.
- Release & repeat 2-3 times.
- Adductor AIS Release
How to perform stretch:
- Begin in a supine position with a resistance strap on around one foot.
- The opposite end of the strap is grasped in the hand.
- Then, actively slide the foot sideways.
- make sure to slide the foot, don’t raise it or the hip flexors can contract.
- At the end of the movement gradually pull the foot further outwards with the resistance strap.
- You can feel a stretch in the adductors.
- Hold the stretch for 5 to 10 seconds then slide to return.
- Perform 8-10 repetitions.
- Supine Wall Stretch
How to perform stretch:
- In the supine position in front of a wall with the leg up on the wall.
- move towards the wall as you can, and maintain the comfortable stretch in the hamstrings.
- Maintain the leg straight while they slowly split open until you feel a stretch inner side of the legs.
- Hold the stretch for 15-30 seconds.
- Relax & repeat 3 times.
- Standing Adductor Stretch
How to perform stretch:
- Start standing with the feet around 3 feet apart.
- Transfer the weight to one side & bend your knee.
- Keep the other knee straight to feel a stretch on the inside of the thigh.
- Hold the stretch for 15-30 seconds.
- Relax & repeat on the other side.
- Kneeling adductor stretch
How to perform stretch:
- Begin with your knees & hands on the ground.
- Straighten out a left leg to the side. Try to keep the leg on the floor.
- Move your butt back to the heel of your right bent knee.
- You can feel the stretch on the inner thigh of the left leg.
- Pause for 8-10 seconds, then release the stretch & back in.
- Repeat 8-10 times.
- Half-kneeling adductor dips
How to perform stretch:
- Half-kneeling adductor dips
- Start in a half-kneeling position with the right knee on the floor & the left leg bent with the foot on the floor.
- Move the left leg out to the side as much as you can.
- Your foot might be at a right angle to your knee.
- With your hands on your hips, dip the body toward the left leg.
- You can feel the stretch on the inner thigh—especially on the right side.
- Repeat 8-10 times.

- Frogger stretch
How to perform stretch:
- Start with your knees & forearms on the ground with your knees & feet wider.
- Try to keep the inner part of your feet on the floor.
- Sit the butt back to the heels, feeling the stretch on the inner thighs.
- Pause for 10-15 seconds, then release the stretch & back in.
- Repeat 8-10 times.
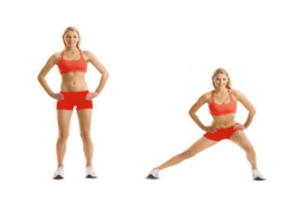
- Lateral squat

How to perform stretch:
- Stand tall & put the feet double shoulder-width apart.
- Transfer your weight to your left leg, bend your left knee, & push your hips back as if you are taking a sitting position.
- Drop as low as possible while keeping your right leg straight.
- Keep the chest up & your weight on the left leg.
- Breathe & hold for 15 to 20 seconds prior to returning to the beginning position.
- Repeat 2-3 times, then move to the other side.
- Crossover stretch
How to perform stretch:
- Start with the feet together, then step to the right with the right foot.
- Cross your both foot.
- Step to the right again with your right foot, & bring your left foot to join your right foot.
- Once both the feet are together and repeat on the opposite side.
- You can start gradually, but pick up the stride as you get used to the move.
- Do it 5-10 times.
- Seated Adductor Stretch
How to perform stretch:
- Straight the legs out to the side, and make a “V” shape.
- To prevent joint strain, do not overdo this pose.
- For many people, simply sitting like this is enough to give an inner thigh stretch.
- If you want to feel more stretch, keep your back straight, and lean towards the floor from your hip joints.
- Stay there for around 10-15 seconds. breathe normally.
- Reclining angle bound pose
This is the best stretch if you spend most of the day in a sitting position.
How to perform stretch:
- Take a supine position on the ground.
- Bend both knees & draw your soles inward so that their borders are touching each other.
- Move the knees down toward the floor so that you can feel the groin muscles stretching.
- Breathe & hold this position for 15- 30 seconds.
- Repeat 3-4 times. Try to draw the feet closer to the buttocks with every stretch.
- Squatting Groin Stretch
How to perform stretch:
- Take a standing position with the feet wide apart, toes pointing outwards.
- Slowly start squatting down until your knees are directly over the ankles & bend to 90 degrees.
- Put your hands on top of your inner thighs & gently push outward to open the hips.
- You will feel a stretch in the inner side of each leg.
- Hold for 20 – 30 seconds, relax & repeat 3 times.
- Hip Opener and Groin Stretch
How to perform stretch:
- Begin in a forward lunge position & drop your right knee to the floor.
- Place the left elbow on the inside of your left knee as pictured.
- Press the left elbow gently into your left knee & twist your torso to the right.
- Reach the right arm behind you until you feel a gentle stretch in the lower back & left groin.
- Hold the stretch for about 20-30 seconds, release & repeat on the right leg.
- Squatting Groin Stretch
How to perform stretch:
- Take a standing position with the feet wide apart, toes pointing outwards.
- Slowly start squatting down until your knees are directly over the ankles & bend to 90 degrees.
- Put your hands on top of your inner thighs & gently push outward to open the hips.
- You will feel the stretch in the inner side of each leg.
- Hold for 20 – 30 seconds, relax & repeat 3 times.
- Frog Squat With Arm Raise
How to perform stretch:
- Moving directly from the first stretch, place the right hand on the ground.
- Continue to gradually push your inner thigh outward, as you reach the left hand directly up to the roof, fingers pointed upward.
- With each breath, twist the upper body slightly further, reaching as high as you can.
- Your right heel might lift slightly.
- Then, switch the other sides.
- Runner’s Lunge
How to perform stretch:
- Get on all fours, facing the front of the mat.
- Plant the fingertips gently into the floor as you extend your right leg behind you, maintaining the knee rested or lifted slightly.
- Press the right heel toward the back of the room.
- Bring the left foot forward so it is in line with your left hand.
- Maintain your head upwards.
- Inhale & exhale, driving the hips further into the ground with each breath.
- Then, move to the other sides.
Hip Adductor Strengthening Exercises.
- Hip adductor exercises utilize multiple small muscles in the inner thigh that are responsible for bringing the thighs together, providing balance & support, and proper hip alignment. Most people should only consider doing hip adductor exercises whenever they walk past the hip adductor machine in the gym but we are here to change that Mentality.
- It is essential to strengthening the hip adductor muscles to increase mobility & flexibility, enhance stability & prevent leg injuries. Strong abductors are an integral part of sports performance, maintaining mobility, & injury prevention, as you age. This is the main muscle group that contributes to hip mobility & strength. In terms of strength training, the adductors are mostly overlooked because they can be difficult to train properly.
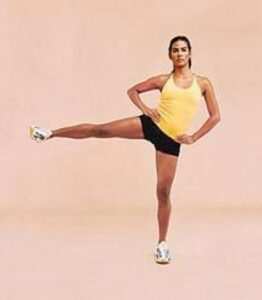
- Standing Leg Circles
- Side-Lying Hip Adduction
- Squat Side Kick
- Standing side Leg Raise
- Sumo Squat
- Cross Scissors
- Dumbbell Side LungeCossack Squat
- Copenhagen Side Plank
- Cable Hip Adductor
- Seated Hip Adduction
- Adductor machine
- Wide stance squat
- Standing banded adduction
- Seated banded adduction
- Standing Leg Circles
How to do it?
- This is the dynamic warm-up exercise, this exercise improves blood circulation to the hip muscle & upper leg.
- for standing leg circle exercise, stand with feet hip-width apart.
- Raise the left leg off the floor. while balancing on the right leg, make a small circle with your left leg.
- Complete 10 to 20 repetitions on the left side then change to the right leg.
- Note: If you have a balance problem then stand close to a prop where you can help to maintain your body by holding something.
2. Side-Lying Hip Adduction
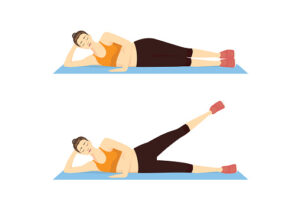
How to do it?
- This is the best exercise for the hip adductors that can be done on the ground while isolating a single leg at a time.
- All you need to do is to focus on contracting the hip adductor muscles to raise your leg off the floor.
- For this exercise, you have to lie down on your left side and take your arms in front of you with your elbows & forearm on the floor for support. raise the right leg over your lower leg placing your heels against the thigh of your bottom leg.
- maintain your leg extended, and raise it upward as much as possible.
- Slowly return to the starting position.
- Do 10-25 repetitions on the left side then move to the right leg.
- Note: You can add some provocation to your exercise by using a resistance band attached to an anchor or by strapping an ankle weight to the leg.
3. Squat Side Kick

How to do it?
- The squat side kick bodyweight exercise will utilize both the adductors & the abductors & is a great all-around lower limb exercise.
- This exercise combines 2 movements that enable both muscle strengthening & stretching which is important to decrease the risk of suffering from groin pain.
- For the Squat Side Kick exercise, you have to stand with a shoulder hip-width apart, and your hands are together in front of you.
- Flexed your knees until your thighs are parallel to the floor, then stand up & transfer your weight to your right leg while kicking out the left leg to the side.
- Back to squatting position then repeat it on another leg.
- Note: Your core muscles might be engaged throughout the movement with your back straight, chest up, & do not let your knees extend past your toes while squatting.
4. Standing side Leg Raise
How to do it?
- This is the best bodyweight exercise that can hit the hip adductors of one leg while hitting the hip abductors of the other leg as you will be using an isometric hold on your other leg to maintain it in the air.
- For this exercise, you have to stand with shoulders hip-width apart. now on the left leg away from the body.
- Then Lift the right leg as far as comfortable, & hold it there for 4-6 seconds.
- Raise your left leg to your right leg until they touch then lower back to the starting position. Complete 10-18 repetitions of 2-3 sets.
- Note: To make this exercise more challenging strap ankle weights to both legs.
5. Sumo Squat
How to do it?
- This variation of the squatting will hit the muscle groups in the lower limb plus the inner thighs.
- Maintain your back straight & your chest up throughout the exercise.
- Even though the sumo squat has a smaller range of motion compared with a regular squat, it is still an effective exercise that can be incorporated into normal workouts.
- For this exercise, you have to stand wider than the shoulder-width stance with your pointing outside.
- Take a squatting position, drop your hip down & back while your back is straight & chest up until your thighs are parallel to the ground.
- Push off through the ground and return to the starting position.
- Note: If you want to add some provocation to your exercise then hold a kettlebell in your hand.
6. Cross Scissors
How to do it?
- This is the best exercise to work hip adductor muscles & the core muscle simultaneously.
- Cross scissors are challenging as you require to stay in a crunched position throughout the movement.
- Maintain this position by crossing your legs in front of you need all your stabilizing muscles to be contracted.
- For this exercise, you have to Sit down & brace yourself by putting your hands on the floor back to you. move your leg off the ground in front of you at a 30-40-degree angle with one leg crossed over the other.
- Your core muscle might be engaged throughout the movement in a semi-“V” position change your legs out to the sides then bring them back closed while crossing the other leg over.
- Do this with an Alternate leg until you complete 10-20 repetitions on each side.
- Note: You can enhance the difficulty of cross scissors by sitting in a “V” position without bracing the upper limb with your arms.
7. Dumbbell Side Lunge
How to do it?
- The side lunge is an excellent exercise to improve your balance, stability, & lower limb strength.
- The side-to-side movement is both a strengthening & stretching exercise. Dumbbell Side Lunge exercise utilizes your hip abductors & hip adductor muscles.
- For this exercise, you have to stand with shoulder hip-width apart & hold the dumbbells at your chest level.
- Take a large step to your side & drop your hip down & back until your thighs are parallel to the floor while your foot is planted on the ground.
- Push through your flexed foot, & bring your back to the initial position.
- Repeat it for 10-15 repetitions then move to the next leg.
- Note: To make this exercise easy you can do bodyweight side lunges. your back might be in a neutral position & chest up while trying not to lean forward.
8. Cossack Squat
How to do it?
- Cossack Squat exercise moves the body through the frontal plane of motion, going side to side.
- Working lower limb at this angle can improve the flexibility of hips, knees, & ankles.
- You will increase your stability by mastering this exercise by getting a good stretch & strengthening the hip adductors.
- For this exercise, you have to stand with feet in a wide stance with toes pointing outside by dropping your hips downward & back.
- Squat down to that single side and shift your weight while your other leg is extended out with your heels on the floor, toes pointing up.
- Push through the ground with your flexed leg and bring your back to starting position.
- Repeat this exercise on the other leg by shifting the weight & lowering it down into a squat position on the other side.
- Note: Cossack Squat exercise requires a high degree of mobility so if you can not go all the way down then go as far as you can while trying to improve each workout. your back might be maintained in a neutral position throughout the exercise.
9. Copenhagen Side Plank
How to do it?
- Copenhagen Side Plank exercise is the most difficult variation of plank that not only hits the core muscles but also strengthens the hip adductors. Copenhagen Side Plank exercise will help to balance out the strength in the muscles on the outside of the hip.
- For this exercise, you have to lie down on the floor & perpendicular to the bench then brace yourself on your forearm & elbows.
- Lift with your flexed knee lift your top leg & place it on the bench.
- Hold this position.
- Complete 20-25 repetitions for 2 sets then do this on another side.
- Note: Increase the difficulty by doing this exercise with legs extended with only your ankle placed on the bench.
10. Cable Hip Adductor
How to do it?
- You may notice women at the gym doing this exercise while the men neglect it.
- It is time to move the stigma that cable hip adductions are not mainly, everyone might be doing this exercise to strengthen the adductors to reduce the risk of injury.
- Make sure you are warmed up with some dynamic stretches before performing this exercise then try to start with less weight & maximum repetitions until you are comfortable enough to increase the weight.
- Find an attachment that you can use to strap onto the ankle closest to the pulley.
- Set up the pulley around calve level. Stand to the side of the pulley. Brace yourself using your hand against the machine in a safe place where your fingers won’t get pinched. Your active leg might be up off the floor towards the pulley.
- Pull your leg away from the pulley towards the middle of your body.
- Slowly let leg return to its starting position Completed the desired number of repetitions
- Note: exercise can also be done with this same technique by attaching a resistance band to a fixed anchor point.
11. Seated Hip Adduction
- The seated hip adduction will isolate the hip adductor muscles when you are seated, only having to focus on bringing thighs together.
- Add Seated Hip Adduction exercise towards the end of your leg day after completing the bigger compound lifts such as squatting.
- Seat in the machine with back against the backrest
- Set the width of the knee pads to a manageable position that gives a stretch to the inner thighs but does not over-stretch the adductor muscles.
- Set up a lightweight for the 1st time set so that you do not overdo it.
- Squeeze thighs together while exhaling, until your knees meet in the center of the body.
- Slowly return to the initial position.
- Complete maximum repetitions.
12. Adductor machine
How to do it?
- Most people think of isolating the adductors, they may think of the classic adductor machine established in gyms across the world.
- Though this machine can do the best job of training the adductor, it is not the only movement that can yield good results.
- Considering that you can modify the amount of weight & width of the pads, this exercise is great for beginners. It is best to begin super light to get a feel for the exercise & avoid getting injured.
- For this exercise, you have to sit on the machine begin with sitting on the machine with the pads positioned between your legs as wide as is comfortable, & select your ability-wise resistance.
- In a controlled manner, contract thighs together just until the pads touch, & feeling the muscles contract.
- gradually reverse the movement, returning your thighs to the initial position. Repeat this exercise number of sets & repetitions.
- If just beginning, try 2–3 sets of 10 reps.
13. Wide stance squat
How to do it?
- Squatting is a king of leg exercises & this will stimulate the whole leg.
- There have different squat variations but here we discuss the wide stance squat also called sumo squat which will utilize inner thigh muscles.
- You can do this exercise with a variety of weighted equipment like a barbell, kettlebell, dumbbell, or sandbag — or with just only body weight.
- For the Wide stance squat exercise, you have to stand a little wider than the shoulder hip-width apart, and turn your toes outside.
- Shift your weight backward & slowly lower your hips until your thighs are parallel to the ground.
- Then return to the starting position by pushing through the ground, and your inner thigh muscles are contracted.
- Do 10-15 repetitions of 2-3 sets.
14. Standing banded adduction
How to do it?
- For this exercise, you need a resistance band, and wrap a resistance band on a solid anchor. you have to stand on either side of the body facing the anchor point & the resistance band.
- Allow the resistance band to pull the leg to the side by resisting the movement.
- To start this exercise you have to stand tall & bring a banded leg towards the midline of the body, you feel the good contraction in your inner thighs.
- Gradually release your leg back to the side with control movement.
- Switch the legs & do 10 to 20 repetitions for 3 to 4 sets on each leg.
15. Seated banded adduction
How to do it?
- For the Seated banded adduction exercise you need a resistance band, and wrap a resistance band on a solid anchor.
- You have to sit on the bench on either side of your body facing the anchor point & the resistance band.
- Put the internal foot through the resistance band, the band is positioned just below the knee joint. allow the resistance band to pull the leg towards the anchor point.
- Move your leg towards the center of the body by contracting the adductor muscle.
- Repeat this on each leg.
- Do 2-3 sets of 12-15 repetitions.
16. Lateral lunge
How to do it?
- For the Lateral lunge exercise, you have to stand with feet hip-width apart. step out of your left leg & start with sending your hip back as you flex your left knee.
- You can extend your arms forward for counterbalance if you like. during the descent, the knee should not move more than 2 inches beyond your toes, &your knee should be aligned between 2 & 3 toes.
- The toe turns outwards slightly. push-off through left to return to a starting position.
- Repeat on the right side leg to complete the 1st repetitions.
- Do 3 to4 sets of 8 to 10 repetitions on each leg.
When did you not do this exercise?
- If your health care provider advised to you take a rest.
- If you are already suffering from back & knee pain.
- If your lower limb bone recently fractured.
- If you feel pain during this exercise.
Health Benefits Of Hip Adductor Muscle Exercises.
The hip adductors are frequently overlooked when it comes to strengthening exercises but this is a mistake. By not strengthening these muscles you are leaving yourself suffering from groin injuries.
Below we explain some benefits of doing hip adductor exercises.
Better Balance: Better Balance exercise helps you to better balance as they keep our bodies upright when doing a sudden lateral motion. Some hip adductor exercises also encourage unilateral movement which catches the small muscles & helps to improve balance.
Enhanced Rotational Power: Strong hip adductors give our bodies produce more rotational power. The internal rotation of the hips required in some games like baseball or tennis requires rotational power & torque which is partly supported by these adductor muscles.
Boost Hip Extension: Hip extension plays the important role in some of the big compound lifts such as squatting & deadlifts. doing hip adductor exercises in your normal workout routine can improve your lifts, boost athletic performance and make daily living activities easier.
Reduce Risk of Injury: Groin pulls are a common injury sustained in sportsmen & even in daily life. The cause of groin strain happens due to tight or weak hip adductors. By strengthening & stretching the adductor muscles you can decrease the chances of experiencing this injury.
Athletes, in particular, depend on this muscle group to aid in explosive movements such as jumping, running, & quickly moving from side to side.
How to Prevent adductor tendinopathy?
- To prevent the development of adductor tendinopathy, an athlete might ideally engage in a strength & conditioning program to work on the factors mentioned, such as improving strength & coordination of the muscles, but allowing sufficient periods of recovery & adaptation in between training sessions, i.e. not too much training too soon.
- The athlete has to develop muscular strength & stability around the groin & pelvic areas by engaging in specific exercises relevant to the demands of their activity sport & with various levels of difficulty, such as training for speed & jumping. Another important aspect is muscular flexibility. Regular stretching is recommended. Products such as mobility & muscular supports may also help by alleviating high impacts.