Ankle mobilization Technique exercise
Table of Contents
What is mobilization for the Ankle joint?
- Ankle mobilization is a passive, skilled, manual therapy maneuver applied to Ankle joints and related to the soft tissue at various speeds and amplitudes taking physiological or arthrokinematic movement for therapeutic purposes
- minor amplitude potency applies at a fast velocity. A large amplitude force applies at a slow rate
- it is a manual technique that includes applying the target forces on a painful, stiff, or otherwise neglected joint in addition to improving its overall function. Which is not proper in all situations, joint mobilizations help improve the range of motion, reduce pain, and reduce stiffness.
- Joint mobilization is a hands-on treatment that is repeatedly executed by physical therapists and healthcare professionals who specialize in rehabilitation for movement disorders and chiropractors, health professionals treating disorders of the musculoskeletal system that involve bones, muscles, and soft tissue, ligaments
Introduction for ankle joint
- The ankle joint is a hinged variety of synovial joints that is hammered by the fabrication of the talus, tibia, and fibula bones. Together, the three borders form the ankle intersection.
- The articular facet of the lateral malleolus bony prominence on the lower fibula hammers the lateral border of the ankle joint
- The articular facet of the medial malleolus bony prominence on the lower tibia hammers the medial border of the joint
- The superior portion of the ankle joint hammers from the inferior articular surface of the tibia and the superior edge of the talus.
- The talus fabricates inferiorly with the calcaneus and anteriorly with the navicular
- The upper surface known as the trochlear surface is somewhat cylindrical and permits dorsiflexion and plantarflexion of the ankle
- The talus is broader anteriorly and more precise posteriorly
- It forms a wedge that fits between the medial and lateral malleoli generating dorsiflexion the most stable position for the ankle.
Ligaments of the ankle joint
- The main stabilizing ligaments are the deltoid ligament located medially, the anterior, and posterior talofibular, and the calcaneofibular ligament located laterally.
Medial Ligament
- The deltoid ligament is made up of four ligaments that form a triangle attaching the tibia to the navicular, the calcaneus, and the talus. It stabilizes the ankle joint during the eversion of the foot and inhibits subluxation of the ankle joint.
- The anterior tibiotalar and posterior tibiotalar ligaments attach the tibia to the talus.
- The tibionavicular ligament connects to the navicular anteriorly and the tibiocalcaneal ligament connects to the calcaneus inferiorly
Lateral Ligament
- Laterally the ankle has encouraged distinction into three separate ligaments, the anterior talofibular and posterior talofibular ligaments, and the calcaneofibular ligament. The lateral ligaments stabilize the ankle and provide a guide to direct ankle motion by connecting the lateral malleolus to the bones under the ankle joint. They are amenable to resistance in opposition to inversion and internal rotation stress.
- The anterior talofibular ligament attaches the talus to the fibula, the powerless of the three lateral ligaments, and thus the repeatedly injured.
- The posterior talofibular ligament attaches the talus to the fibula
- The calcaneofibular ligament attaches the fibula to the calcaneus inferiorly.
Anterior Talofibular Ligament (ATFL)
- Flat Weak Band that extends Anteriomedially.
- The most frequently damaged ligament of the ankle.
- Proximal attachment: Lateral Malleolus
- Distal attachment: Neck of Talus
- Function confines anterior displacement of the talus concerning the fibula and tibia.
- Resists Inversion in plantarflexion.
Posterior Talofibular Ligament (PTFL)
- Thick, a fairly strong band that travels horizontally and medially.
- the posterior talofibular ligament is below greater strain in full dorsiflexion of the ankle.
- barely injured because bony stability takes care of ligaments when the ankle is in dorsiflexion.
- Proximal attachment: Malleolar Fossa of the Fibula
- Distal attachment: Lateral Tubercle of the Talus
- Function pattern the back wall of the recipient socket for the talus’ trochlea.
- Resists posterior displacement of the talus.
Calcaneofibular Ligament (CFL)
- The round cord that passes posteroinferior
- Proximal attachment: Tip of Lateral Malleolus
- Distal attachment: Lateral Surface of Calcaneus
Function
- Aids Talofibular stability while performing Dorsiflexion.
- prevent inversion of the calcaneus concerning the fibula.
- Prevent Talar tilt into Inversion.
Anterior Tibiotalar ligament
- Proximal attachment: medial malleolus
- distal attachment: head of the talus
- Function: Reinforces Ankle Joint.
- Control Plantarflexion & Eversion
Posterior tibiotalar ligament
- distal attachment: talus tuberosity
- Function: control dorsiflexion
Tibionavicular ligament
- hammers most anterior part of the deltoid ligament
- distal attachment: dorsomedial aspect of navicular
- function: reinforces the ankle joint
Tibiocalcaneal ligament
- very thin ligament
- Distal attachment: sustentaculum tali
- Function: strengthens the ankle joint
Blood Supply of the ankle joint
- Derived from Malleolar Branches of:
- Peroneal Artery
- Anterior and posterior Tibial Artery
Nerve Supply of the ankle joint
- Common Peroneal Nerve, Tibial Nerve
Muscle and movement of the ankle joint
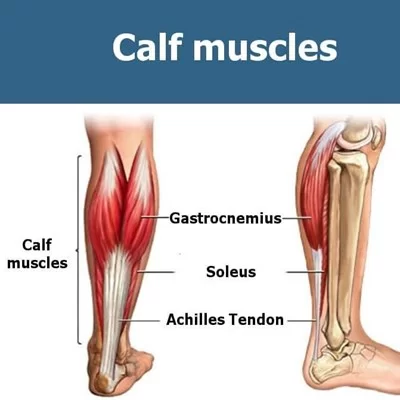
superficial muscle of the posterior compartment
- allow Plantarflexion when Knee is Extended, Flexion Knee raises the heel during walking
- Proximal attachment: lateral head of the gastrocnemius lateral aspect of the lateral femoral condyle
- the medial head of the gastrocnemius: the popliteal surface of the femur superior to the medial femoral condyle
- distal attachment: posterior surface of the calcaneus by the calcaneal tendon
- innervation: tibial nerve s1 s2
soleus
- allows plantar flexion to steadies leg on foot
- proximal attachment: posterior aspect of the head of the fibula, superior 1/4 posterior surface of the tibia
- below the soleal line and medial border of the tibia
- plantaris weekly assists gastrocnemius in planter flexion
- proximal attachment: inferior end lateral supracondylar line of the femur, oblique popliteal ligament
The deep muscle in the posterior compartment
tibialis posterior
- plantarflexion, and inversion, support the medial longitudinal arch
- Proximal attachment: interosseous membrane, posterior surface of the tibia inferior to soleal line, the posterior surface to the fibula
- Distal attachment: base of the metatarsal 2 to 4, cuboid, cuneiform, tuberosity of the navicular
- innervation: tibial nerve l4 and l5
flexor digitorum longus
- plantar flexion, flexion of lateral 4 digits, supports the longitudinal arch
- Proximal attachment: medial part posterior surface of tibia inferior to the soleal line, broad tendon to the fibula
- Distal attachment: base of the distal phalanx 2 to a
- amination: tibial nerve s2 and s3
flexor hallucis longus
- weak plantar flexion, flexion of the big toe at all joints, supports the medial longitudinal arch
- Proximal attachment: inferior 2/3 posterior surface of fibula, inferior part of the interosseous membrane
- Distal attachment: base of the distal phalanx of a big toe
- amination: tibial nerve s2 and s3
Muscle of the lateral compartment
peroneus longus
- weak plantar flexion, eversion, supports the transverse arch
- Proximal attachment: head of the fibula and superior 2/3 of the lateral surface of fibula
- Distal attachment: base of 1st metatarsal, medial cuneiform bone
- amination superficial fibular nerve l5 to s2
peroneus brevis
- weak plantar flexion, eversion
- Proximal attachment: inferior 2/3 of the lateral surface of the fibula
- Distal attachment: dorsal surface of tuberosity of base at 5th metatarsal
- amination: superficial fibular nerve l5 to s2
Muscle of the anterior compartment
tibialis anterior
- dorsiflexion, inversion, supports the medial longitudinal arch
- Proximal attachment: lateral condyle of tibia, interosseous membrane, superior 1/2 lateral surface of the tibia
- Distal attachment: the medial and inferior surface of medial cuneiform, the base of 1st metatarsal
- amination: deep fibular nerve l4 and l5
extensor digitorum longus
- dorsiflexion, extend lateral four digits
- Proximal attachment: lateral condyle of the tibia, interosseous membrane, superior 3/4 anterior surface
- Distal attachment: a middle and distal phalanx of lateral 4 digits
- amination: deep fibular nerve l5 and s1
extensor hallucis longus
- dorsiflexion extends big toe
- Proximal attachment: middle part anterior surface of the fibula, interosseous membrane
- Distal attachment: dorsal aspect of the base of the phalanx of a big toe
- amination: deep fibular nerve l5 and s1
peroneus tertious
- dorsiflexion aids eversion,
- Proximal attachment: Inferior 1/3 Anterior Surface Fibula, Interosseous Membrane
- distal attachment: dorsum of the base of the 5th metatarsal
- amination: deep fibular nerve l5 and s1
Conditions that required mobilization for ankle joint
- crush syndrome
- myositis ossification
- plantar fasciitis
- flat foot
- hallux valgus
- hallux rigidus
- metatarsalgia
- ankle sprain
Goals for ankle joint mobilization exercises
pain, muscle guarding, and spasm
- painful joint, reflex, muscle guarding, and muscle spasm can be examined with slight joint play techniques to stimulate neurophysiological and mechanical effect
Neurophysiological effect
- small amplitude oscillatory and distraction movement are used to encourage mechano receptors that may inhibit the transmission of nociceptive stimuli at the spinal cord or brain stem level
Mechanical effect
- minor amplitude distraction or gliding movement of the joint is used to cause synovial fluid movement, which is a vehicle for carrying nutrients to avascular portions of the articular cartilage
- rhythmic joint play techniques help to maintain nutrient exchange and inhibit the painful and degenerating effects of statis when the joint is swollen or painful, and can not go through a range of motion
- when adjusted to treat pain, muscle spasms and muscle guarding small amplitude techniques should not apply stretch on the reactive tissue
Reversible joint hypomobility
- reversible joint hypomobility can be managed with progressively vigorous joint play stretching procedure to elongate hypermobile capsular and ligamentous connective tissue
- uninterrupted or distracted stretch forces helped to distend the shortened tissue mechanically
Positional faults/subluxations
- A faulty or incorrect position of one bony companion in addition to its opposing surface may affect the outcome in limited motion or pain
- positional faults can transpire with traumatic injury, after periods of immobility, muscle imbalance
- the faulty position may be conserved by maladapted neuromuscular control across a joint
- during examined an active range of motion, faulty tracking of the joint surface results in pain or/and lessened motions
Progressive limitations
- diseases that progressively restrict movement can be examined with joint play techniques to maintain available motion or/and lessen the progressive mechanical reduction
- the patient’s response is necessary for the dosage of distraction or glide to treatment and the state of the disease
Functional immobility
- when the patient can’t functionally gesture a joint for a longer period
- the joint can be examined with nonstretch gliding or distraction procedure to maintain available joint play and inhibit the degenerating and reducing effect of immobility
Grades of mobilization of the ankle joint
Non-thrust oscillation techniques
- the oscillation or glide could also be performed using physiological movement
- grade 1:small amplitude rhythmic fluctuation is put at the start of the range, rapid oscillation like manual vibration
- grade 2:large amplitude rhythmic fluctuation is completed within range, not reach the limit, perform 2 or 3 seconds for 1 to 2 minutes
- grade3:large amplitude rhythmic fluctuation is initiated up to an available range of motion, stress into tissue resistance, perform 2 or 3 seconds for 1 to 2 minutes
- grade4:small amplitude rhythmic fluctuation is executed at the available range of motion, the strain in tissue resistance, rapid oscillation like manual vibration
- grade 1 and a pair are used to treat joint restriction of movement by pain or muscle guarding
- grade3 and 4 are necessary for stretch maneuver
Nonthrust sustained joint play techniques
- This system prescribes only joint play techniques that distribute (distract) or glides the joint surface
- grade 1(loosen): small amplitude distraction is applied when no stress is placed on the capsule, it equalizes cohesive force, muscle tension, and air pressure acting on joint
- grade2(tighten): limitless distraction or glide is applied to tighten the tissue surrounding the ankle
- grade3(stretch): a distraction or glide is applied with an amplitude large enough to make a stretch on the joint capsule surrounding the periarticular structure
- grade 1 distraction is given with all fluctuating movements
- apply intermediate distraction for 7 to 10 seconds with some seconds of rest in between several cycles
- grade 2 distraction is useful to determine the sensitivity of the joint, once the joint reaction is understood treatment dosage accelerates and decelerates
- gentle grade 2 distraction applied periodically won’t inhibit pain and/or maintain joint play when ROM is not allowed
- grade 3 distractions or glides are necessary to stretch joint structure, accelerate joint play motion
- for limited joints play motion apply a minimum of 6 seconds of stretch force followed by partial release (grade 1 or 2)
- reps:3 to 4-second intervals
Talocrural mobilization ( Upper ankle joint )
- resting position: 10-degree plantarflexion
treatment plane
- the treatment plane is in the mortise in the anterior and posterior direction concerning the leg
- stabilization: the tibia is strapped or held against the treatment table
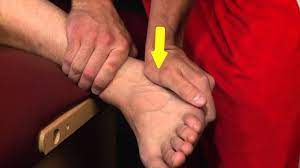
Talocrural distraction

- patient position: supine with lower extremity extended
- begin with the ankle in a relaxing position
- progress with the end of the available range plantarflexion or dorsiflexion
Therapist position and hand placement
- stand at the end edge of the treatment table
- wrap the fingers of both hands over the dorsum of the patient’s foot, just distal to the terminal
- place your thumbs on the plantar surface of the foot to hold the relaxing position
mobilizing force
- pull the foot along with the long axis of the leg in a distal direction by leaning backward
- this glide is used to decrease the pain and improve general mobility and movement
Talocrural dorsal glide

- patient position: supine with the leg supported on the treatment table and heel over the edge of the treatment table
Therapist position and hand placement
- stand to the side of the patient
- stabilize the leg with a belt to secure the leg to the treatment plane
- place the palmar aspect of the thenar eminence of the other hand over the talus just distal to the mortise
- wrap your fingers and thumb around the foot to maintain the ankle in a relaxing position
- grade 1 distraction force is applied caudal direction
mobilizing force
- glide the talus posteriorly with regard to the tibia by pushing in opposition to the talus
- talocrural dorsal glide is used to increase dorsiflexion
Talocrural ventral glide

- patient position: prone with the foot over the edge of the treatment table
Therapist position and hand placement
- stand at the end edge of the treatment table
- place your left hand across the dorsum of the foot to apply grade 1 distraction
- place the thenar eminence of your other hand just distal to the mortise on the posterior aspect of the talus and calcaneus
mobilizing force
- push against the calcaneus in an anterior direction which glides the talus anteriorly
alternate position
- the patient is in the supine
- stabilize a distal leg anterior to the intersection with your proximal hand
- the distal hand is shaped like a cup under the calcaneus
- when you pull against the calcaneus in an anterior direction the talus glide anteriorly
Subtalar joint ( talocalcaneal )
- the fabrication between the calcaneus and the talus is divided by the tarsal canal
- Resting position: in the middle between inversion and eversion
treatment plane
- the treatment plan is in the talus aided to the sole of the foot
- stabilization: dorsiflexion of the ankle stabilizes the talus, alternatively the talus is stabilized with one of your hand
Subtalar distraction ( Talocalcaneal distraction )

- patient position: supine with the leg supported on the treatment table and the heel over the edge
Therapist position and hand placement
- stand at the end edge of the treatment table
- externally rotate a patient’s hip so the talocrural joint can be stabilized in dorsiflexion with pressure from the thigh against the plantar surface of a patient’s forefoot
- the distal hand grasps surround the calcaneus from the posterior aspect of the foot
- the other hand fixes the talus and malleoli against the treatment table
mobilizing force
- snatch the calcaneus distally concerning the long axis of the leg
subtalar medial glide
- patient position: side-lying, prone with the leg supported on the treatment table
Therapist position and hand placement
- align your shoulder and arms parallel to the bottom of the foot
- stabilize a talus with your proximal hand
- place the base of the distal hand on the side of the calcaneus laterally to cause the medial glide
- wrap the fingers surround the plantar surface
mobilizing force
- apply grade 1 distraction force in the caudal direction and then push with the base of your hand against the side of the calcaneus parallel to the plantar surface of the heel
- subtalar medial glide is used to increase eversion
subtalar lateral glide

- patient position: side-lying, prone with the leg supported on the treatment table
Therapist position and hand placement
- align your shoulder and arms parallel to the bottom of the foot
- stabilize a talus with your proximal hand
- place the base of the distal hand on the side of the calcaneus medially to cause the lateral glide
- wrap the fingers surround the plantar surface
mobilizing force
- give thrust and apply grade 1 distraction force in the caudal direction and then push with the base of your hand against the side of the calcaneus parallel to the plantar surface of the heel
- subtalar lateral glide is used to increase inversion
alternate position
- patient position: supine with the leg supported on the treatment table and the heel over the edge
Therapist position and hand placement
- stand at the end edge of the treatment table
- medially or laterally rotate the patient’s hip so the talocrural joint can be stabilized in dorsiflexion with pressure from your thigh against the plantar surface of the patient’s forefoot
- the distal hand grasps surround the calcaneus from the posterior aspect of the foot
- the other hand fixes the talus and malleoli against the treatment table
mobilizing force
- moving the calcaneus medial or lateral direction with the base of the thumb
Intertarsal and tarsometatarsal mobilization
intertarsal and tarsometatarsal plantar glide

- patient position: supine with hip and knee flexed or sitting position, with the knee flexed over the edge of the treatment table and heel resting on your leg
stabilization and hand placement
- fixate the index finger to the more proximal bone on the plantar surface of the bone
- to glide the tarsal joints along the medial aspect of the foot
- position yourself on the lateral side of a foot
- place the proximal hand on the dorsum of the foot with the fingers pointing medially so the index finger can be wrapped surrounded and placed under the bone to be stabilized
- place your thenar eminence of the distal hand over the dorsal surface of the bone to be moved and wrap the fingers surround the plantar surface
- to glide the lateral tarsal joints position yourself on the medial side of the foot
- point your fingers laterally and positions your hands around the bones
mobilizing force
- give thrust to the distal bone in a plantar direction from the dorsum of the foot
- plantar glide is used to increase accessory motions necessary for supination
intertarsal and tarsometatarsal dorsal glide

- patient position: prone with a knee flexed
stabilization and hand placement
- fixate the more proximal bone
- To glide the lateral tarsal joint cuboid on calcaneus position yourself on the medial side of the patient leg
- wrap your fingers surround the lateral side of a foot
- To glide the medial bones navicular on the talus position yourself on the lateral side of the patient’s leg
- wrap your fingers around the medial aspect of a foot
- place your second metacarpophalangeal joint in opposition to the bone to be moved
mobilizing force
- give thrust from the plantar surface in a dorsal direction
Precaution for ankle joint mobilization exercises
Joint effusion
- the joint effusion due to trauma or disease
- rapid swelling of the joint generally designate
- bleeding in the joint and may occur with diseases aspiration of the blood to lessen the necrotizing effect on an articular cartilage
- slow swelling for more than 4 hours generally designates serious joint effusion or edema on the joint due to mild trauma irritation or disease
- do not stretch the inflamed or injured joint with mobilization because the joint capsule is already stretched by being expanded to accommodate the extra fluid
- the limitation of motion is in addition to extra fluid and muscle response to pain, not from shortened fibers
- gentle oscillating motion that does not stress the joint capsule may help to block the transmission of a pain stimulus so it is not perceived and may help to raise fluid flow while maintaining available cooperative play movement
- if a patient’s response to slight techniques is increased pain or joint irritability
- the techniques were exercised too strenuously or should not be done with the current state of pathology
Inflamation
- whenever inflamation is present, stretching raise pain, and muscle guarding result in greater tissue damage
- gentle distraction movements may temporarily decrease the pain response
hypermobility
- the joint of the patient with probable necrosis of ligaments or/and joint capsules should not be mobilized with stretching techniques
other precautions include
- Warm up necessary for any sports activity
- gently stretch or do slow jogging for two to three minutes to warm up the muscles. Don’t force a stretch with the“dancing movement”
- Condition your muscles for the sport
- The amount of time spent on the activity should be elevated gradually over weeks to construct both muscle strength and mobility. Cross-training by taking part in different activities can help construct the muscles.
- select athletic shoes specifically for your foot type
- People whose feet are in pronation or who have low arches should select shoes that provide support in both the front of the shoe and under the longitudinal arch. The heel and back of the shoe should be very stable. Those with stiffer feet or high longitudinal arches should select shoes with more cushion and a softer platform. Use sport-specific shoes. Cross-training shoes are a global good choice; however, it is best to use shoes designed for the sport.
- Replace sports shoes when the march on foot wears out
- People who run regularly should change shoes every six months, more frequently if a voracious runner.
- avoid running or stepping on an uneven surface
- Try to be careful on terrain surfaces or hills with loose grass. Holes and roots are problems if you are pathway running. If you have problems with the lower legs, a dirt road is softer than a sideway, which is softer than concrete. Try to find a good surface if possible. whenever you’re racing, be assured to train on the surface you’ll before run on.
- Be careful running too many hills
- Running uphill is a great workout, but make sure you gradually construct this up to avoid injuries. Be careful when running downwards from the hill too fast, which can often lead to more injuries than running upside to hills
FAQS
- When do we use joint mobilization for the ankle?
The main goal of joint mobilization of the ankle is to recover the normal joint play movement that might have been concession by damage or injury. Normal movement of an affected joint will be regained faster if it is concession early in the treatment program. Also, mobilization is beneficial in cases when a range of motion is the not presence
- Why the early mobilization important after an injury?
In patients with acute limb injuries, early mobilization decelerates pain and swelling and improves functional outcomes correlated with cast immobilization
- How long do you do joint mobilization for the ankle joint?
Typical treatment of a knee joint may add a series of three to six mobilizations carried on up to 30 seconds, with one to three oscillations or /and glide per second
- How does joint mobilization reduce pain?
grade 2:large amplitude rhythmic oscillation is start within the range of motion, not reaching the limit of movement, apply a glide for 2 or 3 seconds for 1 to 2 minutes
that passes center way into a joint range of motion, attending any part of the range and yet not reaching the end range. This technique can be given to treat joint stiffness by accelerating a range of motion and the joint pain - can mobilization of the ankle be good before surgery ??
Early mobilization decelerates the risk of postoperative complications, accelerates the rehabilitation of functional capacity, positively impacts several patient-reported outcomes, and decreases hospital length of stay, thereby fewer care costs.