Ankle Stability Exercises
Table of Contents
What is ankle stability exercise?
- Doing ankle stability exercises daily can improve muscle strength of muscles around the ankle. Strengthening your ankle muscles will also help you to walk properly and prevent your muscles placed around the knee and hip from weakening. The ankle joint is a weight-bearing joint that is made of various bones, tendons, and ligaments. Together, these structures bear the weight of the body while allowing a person to move. Ankle stability exercises can help people with pain, injury, or mobility problems.
- Ankle stability exercise is prescribed when you have any ankle-related injury such as an ankle sprain, fracture around the ankle, or any ankle-related condition. This exercise makes your ankle more strong enough to do all your daily activities more easily.
- Ankle exercise helps you to get better mobility. This exercise helps sportspersons to get better performance. Strong also ankle prevents you from foot and leg injuries.
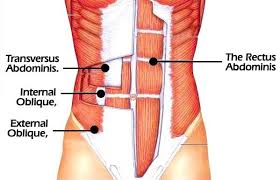
Which muscles are situated around the ankle joint?
- Calf muscles – The gastrocnemius, and Soleus muscles
- Posterior tibialis,
- Flexor hallucis longus
- Peroneal longis and Brevis
What are the Health Benefits of ankle exercises?
The followings potential benefits of ankle exercises include :
- Preventing injuries: Strengthening the muscles around the ankle helps decrease pressure on the ankle joint, which can help prevent injuries.
- Improving bone density: Ankle stability exercises assist to increase bone density. An improved bone density reduces the risk of degenerative bone diseases, such as osteoarthritis.
- Improving balance: Strong ankle muscles should improve balance. Good balance is essential for many sports and exercises. It will also reduce the risk of falls.
- Improve range of motion of ankle joint.
- It improves flexibility and mobility.
There are some Ankle Stability exercises:
- Single-leg Balance
- Single-Leg Balance with Movement
- Toe-Heel Walking
- Single-leg Step Downs
- Walking Lunges
- Single-leg Roman Deadlifts
- Partial Weight-Bearing Seated Calf Raises
- Partial Weight-Bearing Standing Weight Shift
- Full Weight-Bearing Standing Calf Raises
- Full Weight-Bearing Lateral Stepping
- Full Weight-Bearing Lateral Jump
- Single Leg Stance on a Towel
- Balance with eyes closed
- Pillow balance
- Pillow balance with eyes closed
- Non-weight-bearing Ankle motion
- Isometrics exercises
Single-leg Balance:
- Stand up with legs directly underneath the body or as they feel best naturally.
- Transfer your weight from both feet to one foot. (If you feel unstable, use a chair to support against until you build strength).
- Pause for some seconds at least, adding time as you improve.
- Change the leg and repeat.
- Do each set.
- As you want to make it more challenging, you can lift your non-weight-bearing leg off the ground more and more, or stand on unsteady surfaces, like a BOSU ball for an added challenge.
- You can also increase the time limit you hold the position.
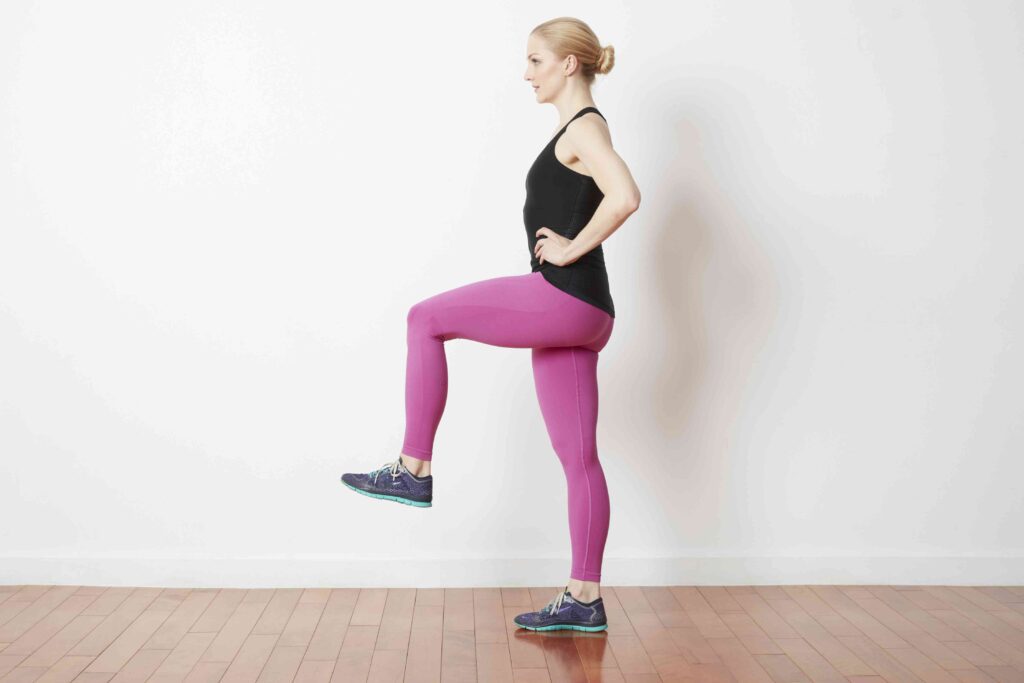
Single-Leg Balance with Movement:
- Stand up with your legs directly underneath the body as they feel the most natural.
- Shift your body weight from both feet to just one foot.
- Raise the leg without putting any weight on it off the ground.
- Instead of keeping your raised leg unmoving, like the single-leg balance mentioned above, move your leg.
- Swing it back side of the body and then in front, bend your knee and lift it towards your waist and then back down. Or, move your leg out towards the side of the body and then back in. Perhaps, perform all three in sequence.
- If you are not stable because of the motion, use a chair for some support, just like you did in the original single-leg balance. Ultimately, you will be able to perform this pose without any help.
Toe-Heel Walking:
- Stand straight.
- Transfer your body weight to the heel of the feet.
- Ensure the front part of your foot is elevated off the ground.
- Balance on the heels, then walk.
- Keep this up for some seconds at least between breaks. The goal is for 8-10 sets of 15 to 20 seconds with 20 seconds rest between them.
- Now shift your full body weight to your toes (or as close as you can get).
- Start walking on your toes.
- Keep this up for some seconds at least between breaks.
- Try to perform this session twice or thrice a day and aim to increase the duration as you gain strength back in your ankles.
Single-leg Step Downs:
- Stand straight on a stable, elevated surface, such as a step, or bench.
- Hold one foot off the edge.
- Flex the knee of your supporting leg.
- Bring the foot back up to its elevated pose(starting position)
- Drive your weight through the heels.
- Repeat 10-15 times on each side of the body.
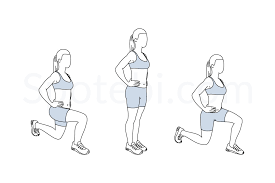
Walking Lunges:
- Stand up.
- Put one step forward and bend this leg until your knee is at a 90-degree angle.
- Let your knee which is at back to dip down to the floor.
- Hold this pose for a few seconds.
- Use the leg at the back to step in.
- Repeat on the opposite leg.
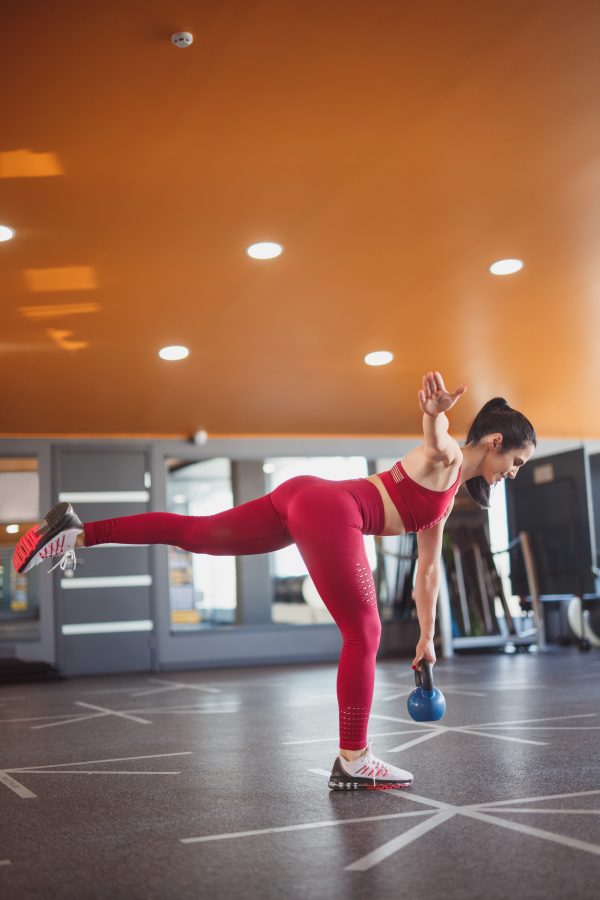
Single-leg Roman Deadlifts:
- Stand straight with a resistance (ideally a kettlebell) in one hand.
- Gently flex at the waist, maintaining control of your body.
- Lower the weight down towards the floor (using one hand) while you raise your leg (on the same side of your body) off the floor.
- Slowly back to a standing position.
- Do it 8-10 times on each side of your body.
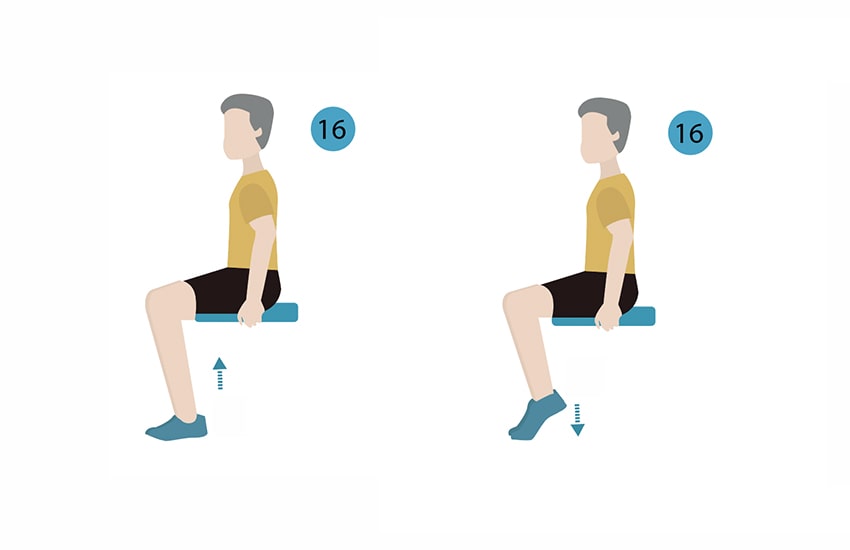
Partial Weight-Bearing Seated Calf Raises:
- Sit in a chair with the injured foot placed on the ground.
- Raise your heel as much as possible while keeping your toes in touch with the ground.
- Place your heel back on the ground.
Partial Weight-Bearing Standing Weight Shift:
- Stand straight while holding onto a stable object.
- Transfer some amount of your weight onto the injured foot.
- Pause the position for 15 seconds.
- Then, relax and put your partial body weight back onto your uninjured foot.
Full Weight-Bearing Standing Calf Raises:
- Stand upright on the injured foot while lifting the uninjured foot off the ground.
- Lift yourself, standing only on the ball of the injured foot and raising your heel off the floor.
- Hold the pose for 15 seconds.
- Relax and transfer your body weight back onto your uninjured foot.
Full Weight-Bearing Lateral Stepping:
- Set a rolled towel or short object on the ground to the side of your injured foot.
- Step on the towel with the injured foot and stand on that foot.
- Then set the uninjured foot over the object and stand on both feet.
- Step back on the towel with the uninjured foot and stand on that foot.
- Then put the injured foot back on the towel and stand on both feet.
Full Weight-Bearing Lateral Jump:
- Set a rolled towel or short object on the ground to the side of your injured foot.
- Jump just above the towel and land on the injured foot.
- Then jump back above the towel and land on the uninjured foot.
Single Leg Stance on a Towel:
- Fold a towel into a small rectangle and put it on the floor.
- Stand on the injured foot on the towel and the uninjured leg on the floor.
- Lift the uninjured leg off the floor. Stand on the towel with the injured leg.
- Pause for 15 seconds. As your balance increases, rise that time up to 45 seconds.
- Return your uninjured foot to the ground.
- You can make it more challenging by standing on more unstable surfaces like a wobble board. Your physiotherapist may also have you use a BAPS board (Biomechanical Ankle Platform System) during working on balance exercises.
Balance with eyes closed:
- Now perform the basic balance exercise with the eyes closed.
- This is much harder because you don’t have visual points of reference to help your balance.
- Ensure to have something for support.
- Again, try to do it up to 20-30 seconds and 1 minute, if you can.
Pillow balance:
- Do the same basic balance exercise during standing on a pillow.
- This is much more difficult. Even if the ankle is not sprained, your foot will wobble around a lot and you’ll constantly require to correct your balance.
- See if you can do up to 20-30 seconds to 1 minute. Stop immediately if you start to experience pain in your ankle.
Pillow balance with eyes closed:
- This is a very challenging exercise.
- See how long you can hold the balance during standing on a pillow with your eyes closed.
- Assure to have something available for support.
- Perform up to 20-30 seconds to 1 minute if you can.
Non-weight-bearing Ankle motion:
- The first exercises you will probably perform will be the lightest, to build strength slowly. For these, you will sit on a bed or the floor with your feet out in front of you.
- Dorsiflexion – Starting with your toes pointed upward(towards the ceiling), bend your ankle upward toward your knee as far as you can without causing pain. Pause it for 10-15 seconds, then slowly release it to the resting position.
- Plantar flexion – The same thing in reverse. From the initial pose, turn your foot downward, away from the rest of the body like a ballerina toe-point. Stretch as far as you can, hold it, and slowly release it.
- Inversion – With the toes pointing straight, turn your injured ankle in towards your uninjured foot. Pause for 15 seconds and release.
- Eversion – From the starting position, point your toes outward until either the ankle hurts or it won’t move any further. Count and release.
- Drawing the alphabet – With your ankle danging loose (like from a stool on the side of a bed), slowly make the alphabet with your foot, pretending that your big toe is your pen. This gains the ankle moving in many different combinations of range and direction.
Isometrics exercises:
- Eversion – Set the outside of your injured foot against the stationary(stable) object and contract the muscles as if to turn the toes outward, but utilize the object to prevent that. Pause for some time and release
- Inversion – Set the inside of your foot against the stationary(stable)object and do the same thing, as if attempting to move the object with your toes but not succeeding. Hold and release.
- In both these exercises, the solid object is to make sure that while your muscles contract, your ankle does not move.
Precaution:
- Proper exercise technique is necessary to ensure the safety and effectiveness of an exercise, but you may need to modify the exercise to get the best results based on your needs. You have to select a weight that allows you smooth and control movement.
- If you want to progress and build body strength, then incorporate proper warm-ups, rest, and nutrition into your exercise program. You have to take rest for 24 to 48 hours before starting the same muscle group exercise.
- your muscles need some rest to get recovery after a workout.
When did you not do Ankle exercises?
- If you feel any pain or discomfort during the exercise, then stop immediately.
- If you have a past or present health condition that is poor, then consult your doctor before starting this exercise program.
- If you have a recent foot injury.
- If your ligament is injured
FAQ:
When should I start ankle stability exercises?
Start ankle stability exercises 2 to 3 days after your injury.
How often should I perform ankle stability exercises?
Perform 8 to 12 repetitions of these exercises once or twice daily for 2 to 4 weeks, depending on the severity of your injury.
Why are ankle stability exercises important?
These exercises help improve ankle joint mobility and reduce the risk of injury.
What should I do if my ankle hurts during exercise?
Stop that exercise immediately and take rest for some time. If pain continues then consult the doctor.