Hip Range of motion exercise
Table of Contents
What is a Hip range of motion exercise?
Hip Range of motion exercise is a type of exercise in which hip joint to go through its complete spectrum of movement, it may be actively, passively or by supported by therapist.
- The hip joint range of motion is the capability of the hip joint to go through its complete spectrum of movement. The range of the motion of the hip joint is divided into three parts, passive range of motion, active-assisted range of motion, and active range of motion exercises. This is refer to the activity aimed at increasing the motion of the hip joint. This motion is influenced by several structures, namely, the configuration of bone surfaces within the hip joint, joint capsule, ligaments, tendons, and muscles acting on the hip joint.
Brief introduction of three types of range of motion exercises of the hip joint
- The first one is the passive range of motion exercise: The motion is applied to the hip joint only by an individual or people or even by a passive motion machine. When a passive range of movement is applied, the hip joint of the person receiving exercise is completely relaxed during the outside force moves the body part, such as the hip, throughout the available range of movement.
- The second one is the active-assisted range of motion exercise: The hip Joint receives partial help or assistance from the outside force. This range of movement can result from the majority of the motion applied by a therapist or by the person or people assisting the patient. It also may be a half effort of the hip joint from each source.
- The last one is the active range of motion exercise: The motion of the hip joint performed entirely by a patient himself/herself. Mainly in this, there is no outside force that may be added during performing the hip motion.
What is a Goniometer?
- The goniometer is a metal or plastic device with two arms that are used to measure the joint’s range of motion. A goniometer is placed along A hip joint as well as measured by looking at the numbers to represent angular distance on the device.
- Goniometer placement for measuring flexion and abduction hip range of motion
- Axis location: Femoral greater trochanter
- Stationary arm: Parallel to the trunk
- Movement arm: Parallel with the longitudinal axis of the femur in line with the lateral femoral condyle
Movements in the hip
- Abduction: Sideways motion of the leg away from the body
- Adduction: Inward motion of the leg toward the midline of the body
- Extension: Moving the thigh backward, toward the buttocks
- Flexion: Moving the thigh forward, toward the chest
- External rotation: Putting the leg into a butterfly position
- Internal rotation: Curling the leg into the fetal position
What is the normal hip range of motion?
- The hip range of motion is measured in degrees of motion. Normal motion of the hips allows for three degrees of movement, which means the leg should be able to move freely in 6 different directions within three planes.
- Abduction: 0 degrees to 45 degrees
- Adduction: 45 degrees to 0 degrees
- Extension:0 degrees to 60 degrees
- Flexion: 0 degrees to 120 degrees
- External rotation: 0 degrees to 45 degrees
- Internal rotation: 0 degrees to 45 degrees
Passive range of motion exercise of the hip joint
- This is useful for the hip joint that has become inactive due to injury or any type of paralysis attack. In the passive range of motion exercises of the hip joint, a patient does not perform any movement themselves; instead, a therapist moves the upper limb or body part of the stiff hip joint, gently stretching muscles and reminding them how to move correctly. In the majority of the cases, therapeutic stretching exercises are combined with passive range of motion exercises to increase faster recovery of the stiff hip joint. Here, the physiotherapist stretches the soft tissue of the hip to relax the surrounding muscles and relieve tension. Passive range of motion exercises for the hip also helps to minimize stiffness and rigidity in the hip joint that has been immobilized.
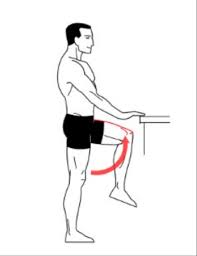
- Some of the most common and safest passive range of motion exercises for the hip are related to stretching the surrounding muscles with the goal to increase muscle flexibility. One way to do passive range of movement exercise is with a specialized tool namely the stretching strap. These exercises aid a patient hold a stretch for a more sustained period of time, but having a therapist who assists with the stretch is the more effective way to practice passive range of motion exercises(PROM) for the hip joint. With this type of exercise, a trained professional moves the upper arm into the stretch and holds it, with the intent to increase muscle flexibility.
- This is superior for a few reasons.
First of all, a physiotherapist understands proper limits and knows how far to go.
Secondly, a clinician knows how long to hold the stretch.
Lastly, the therapist is also trained to know if it is targeting the exact area to achieve more benefits. With that in the mind
In which condition a physiotherapist should apply the passive range of motion exercise in the hip joint
- The passive range of motion(PROM) exercises for the hip joint are typically used where there is a paralysis attack, when the patient is comatose, in a presence of the healing fracture, or if the pain is elicited during the active muscle contraction. One of the main goals of passive range of motion exercise(PROME) is to counteract the contradictory effects of immobilization, but it is essential to remember that the passive range of motion (PROM) exercise cannot prevent muscle atrophy.
Some benefits of the passive range of motion exercise of the hip
- Passive range of motion exercises does not only assist in promoting healthy joint functionality but also benefit a patient in decreasing pain, promoting healing, restoring, maintaining range of motion in certainly affected hip joints, building muscle mass, allowing for better blood flow as well as aids in improving oxygen levels.
Some guidelines for passive range of motion exercise for the hip joint
- Passive range of motion may be done in lying or in sitting positions.
- Support the weight of the arm at all times while performing the movement.
- Support above as well as below the hip joint the patient is moving.
- Keep the motion slow and smooth.
- Do not force the motion if the hip muscle or hip joint is stiff.
- A therapist should move only as much as the hip muscle or hip joint will allow.
- The passive range of motion should be pain-free, if the hip motions cause pain, stop and let a therapist know.
Exercises
Passive hip and knee flexion
First of all, the patient should take a relaxed position, such as supine. Next, cradle the leg by placing the one hand under the bent knee and, the other hand grasp the heel for the stabilization. Lift the knee as well as bend it toward the chest, with the kneecap pointed toward the roof. Do not allow the hip to twist while this motion. The foot should stay in a straight line with the hip as well as not swing in or out. Then, the leg is lowered to the embarking position. Do it ten times per session. Do three sessions per day.
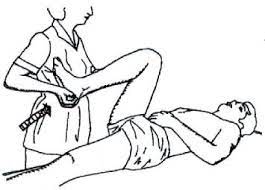
Passive hip rotation
First of all, the therapist should tell the patient to take a comfortable position, like supine. Next, place one hand on the thigh as well as another hand just below the knee. Then, bend the knee halfway to the chest so that there is a 90-degree angle at the hip as well as the knee. After that, pull the foot toward the patient and then push it away. However, remember that do not go beyond the point of the resistance or pain. Lower leg to embarking position.
OR another way to do this exercise
Support the leg under the knee as well as the heel. Then, bend the knee halfway to the chest so that there is a 90-degree angle of the hip and knee as well. Next, push the foot away from the body, and pull the foot toward the patient side.
Passive hip abduction
To start with, a patient can take a comfortable position, such as supine. After that, the therapist cradles the leg by placing the hand under the knee as well as holding it. Next, place the other strong hand under the heel to stabilize the hip joint. Then, keeping the knee straight, move the leg along the surface of a bed, away from the other leg, to around 45 degrees. Next, bring the leg back to the other leg.
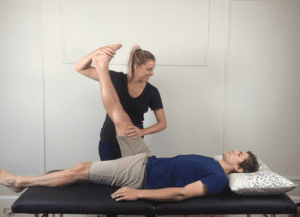
Passive hip external rotation
First of all, tell the patient to take a comfortable position, such as supine with the back supported. Then, the therapist grasp the knee which is 90 degrees flexed with the hip at 90 degrees flexion. After that, the clinician rotates the leg outside and holds five to six seconds. Do ten repetitions per session. Do three sessions per day.
Passive hip internal rotation
To embark with, the physiotherapist tells a patient to take a relaxed position, such as supine with a supported back. Next, a clinician grasps the knee which is in 90 degrees of flexion position with the hip at 90 degrees of flexion. Then, a therapist rotates the leg inside and holds five to six seconds. Do ten repetitions in one session. Do three sessions in one day.
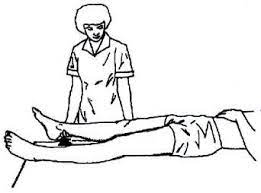
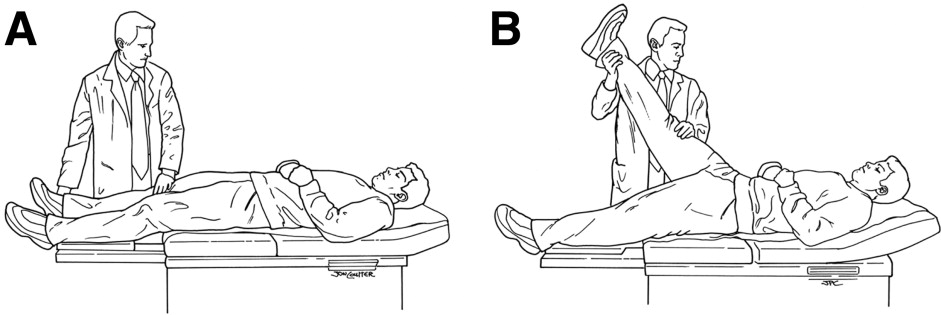
Passive hip flexion
First of all, the therapist should tell the patient to take a comfortable position, such as supine. After that, the therapist holds the backside of the thigh with one hand and the ankle with the other hand. Then, the clinician raises the leg as far as possible with a straight knee. Do it ten times per session. Do three sessions per day.
Passive hip extension
To begin with, a clinician should tell a patient to take a relaxed position, such as supine. Then, a physiotherapist holds the backside of the thigh with one hand as well as the ankle with the other hand. Next, a therapist places the raised leg back with a straight knee on the bed. Do it ten times in one session. Do three sessions in one day.
Active-assisted range of motion exercises
- As the name suggests, these exercises mainly involve partial assistance from a physiotherapist or from the patient himself/herself. A patient does most of the movement, but he/she gets little assistance to complete the hip motion correctly. Mostly in major cases, this restricted hip movement is the result of weakness or even pain caused because of falls, bruises, or even accidents, up to serious injuries. A clinician mostly uses the strap or even the band to secure the hip joint before helping in the movement. In the beginning, the patient can suffer a great deal of pain and weakness when performing these hip joint exercises, but with time, the patient has a great scope for gradual and lasting improvement in the range of movement around the hip joint.
Some benefits of the hip active-assisted range of motion exercise
- Increase motion of the hip joint.
- Improve the function of the hip joint and the whole upper limb.
- Improve hip joint movement efficiency.
- Increase independence.
- Decrease pain.
- Increase and maintain hip joint integrity.
How does the patient get started?
- Learn an active-assisted range of motion exercises for the hip joints from the patient’s home-health physical therapist. Practice the exercises
with the help of the patient’s home-health physical therapist. The therapist can instruct the patient on correct handholds as well as assistance needs of a patient. A physiotherapist can also show the easiest way to do all the exercises so the patient does not get hurt or tired. - Find a comfortable as well as relaxed position for the patient. Most patients prefer to use the bed for exercising.
Do all hip range of motion exercises slowly, smoothly, as well as gently. Never force, jerk, or even over-stretch the muscle. This
can hurt the muscle or the joint instead of helping.
Move a hip joint only to the point of resistance. This is the point where the patient cannot bend the joint any further.
Stop hip range of motion exercises if a person feels pain. Ask a therapist to tell the patient right away if he/she feels
increased pain and soreness that does not stop after ceasing any exercise. Hip range of motion exercises may cause mild symptoms, but again, should subside quickly. Try to do this exercise again by modifying the therapist’s assistance level; this should decrease the soreness noted with the exercise.
Exercises
Active-assisted hip extension
Hand placement: The patient lies on the stomach to perform hip extension with straight hands beside the body, the therapist supports the patient’s thigh above the knee joint as well as the ankle. After that, the therapist should give the command to the patient that moves the leg upside, and the clinician should apply additional aid is only needed to help a patient lift the thigh off of the supporting surface (bed) as well as help the leg back to a bed, in the event a patient fatigues and is unable to independently lower a leg slowly. Then, the therapist should watch for signs of muscle fatigue which includes quivering or even shaking muscles around the hip as well as an increased feeling of weight in the affected limb; additional support can be needed. Do ten repetitions per session. Do three sessions per day.
Active-assisted hip abduction

Hand placement: The patient lays on the unaffected hip in a side-lying position, the affected hip is on the top. For comfort, a small pillow may be placed between the two knees. After that, the therapist should apply for additional help in lifting the affected leg to the side with support above the knee joint as well as at the ankle, if needed. Remember that, the movement is straight up as well as slightly back towards the therapist. Next, the clinician makes sure that the top hip is rolled forward of an imaginary vertical line drawn straight through both hips, and does not let a patient roll backward at the hip when completing this exercise.
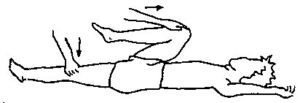
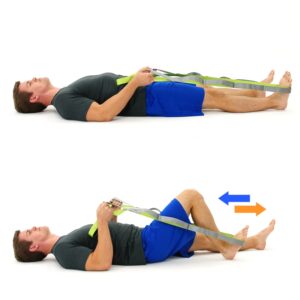
Active-assisted hip and knee flexion with the use of a strap
First of all, the therapist should tell the patient that take a comfortable position, such as supine. After that, the strap roll around the foot, and the two ends should be grasped by the two hands of the patient, next move the leg towards the body side, and when the patient cannot move the leg actively, pull the strap towards the body side. Do it ten times per session. Do three sessions per day.
Active-assisted hip flexion
Hand placement: The patient lies on the back to perform the hip flexion with straight knees, then the therapist supports the patient’s thigh above the knee joint and ankle joint. After that, the clinician should give the command to the patient that moves the leg upside towards the roof, and the physical therapist should apply additional assistance is only needed to help the patient to lift the thigh off the supporting surface and help the leg back to the bed, in the event the patient fatigues and is unable to independently lower a leg slowly. Next, the physical therapist should watch for signs of muscle fatigue which includes quivering or even shaking muscles around the hip and increased feeling of weight in the injured limb; additional support can be needed. Do three sessions per day. Do three sessions per day.
Active-assisted hip internal rotation
Hand placement: A patient lays on the back to perform the hip internal rotation with straight knees, then a physiotherapist supports the patient’s thigh above the knee joint as well as the ankle joint. Next, the physical therapist should give the command to a patient that moves the leg inward towards the other leg side, and a therapist should apply for external help, which is only needed to assist a patient to move the thigh inward and help the leg back to the starting position, in the event a patient fatigues and is unable to independently move a leg back slowly. After that, the physiotherapist should watch for signs of muscle fatigue which includes quivering or shaking muscles around the hip as well as an increased feeling of weight in the affected limb; additional help can be needed. Do three sessions in one day. Do three sessions in one day.
Active-assisted hip external rotation
Hand placement: The patient lies on the back to perform the hip external rotation with straight knees, after that the therapist supports the patient’s thigh above the knee joint and ankle joint. Then, a physiotherapist should give a command to the patient that moves a leg outward away from the other leg, and the physical therapist should apply additional assistance is only needed to help the patient to move the thigh outward and assist the leg back to the embarking position, in the event the patient fatigues and is unable to independently move the leg back slowly. Next, a physiotherapist should watch for signs of muscle fatigue which includes quivering or shaking muscles around the hip and increased feeling of weight in the injured limb; additional assistance can be needed. Do three sessions per day. Do three sessions per day.
Active-assisted hip flexion with knee flexion
Hand placement: A patient lies on the back to perform the hip flexion with knee flexion, after that the physiotherapist supports the patient’s thigh above the knee joint as well as the ankle joint. Then, a therapist should give the command to a patient that moves the leg upward towards the face side with knee bend and a therapist should apply additional assistance is only needed to assist a patient to lift the thigh off the supporting surface as well as help the leg back to a bed, in the event the patient fatigues as well as are unable to independently lower the affected leg slowly. Then, a physiotherapist should watch for signs of muscle fatigue that include quivering or shaking muscles around the hip as well as an increased feeling of weight in the affected limb; additional support may be needed. Do three sessions in one day. Do three sessions in one day.
Active range of motion exercise
What is an active range of motion exercises?
- Active range of motion exercises assists in increasing joint function. Range of motion is how far you can move the joints in various directions. These exercises assist the patient move each joint through its full range of motion. Motion can help keep the joints flexible, decrease pain, and increase balance as well as strength.
What does the patient need to know about active range of motion exercises?
- Do the exercises the healthcare provider teaches you. Practice the exercises with the healthcare provider before the patient tries them by himself. Hip exercise every day, or as often as directed by the healthcare provider. Do hip joint exercises in the same order every day. Go from flexion to extension to abduction to adduction to internal rotation to external rotation to help you remember the series of moves. Move slowly, gently, as well as smoothly. Avoid fast or even jerky movements. Stop if the patient feels pain. It is absolutely normal to feel some discomfort at first. Regular exercise can help decrease discomfort over time.
Exercises
Active hip flexion with knee flexion
First of all, tell the patient to take a supine position. After that, the therapist should give the command to the patient that bends the hip as well as knee towards the face side as far as possible without the help of the therapist or their own healthy hand. Do ten repetitions per session. Do three sessions per day.
Active hip flexion
To begin with, the therapist should tell a patient to take a comfortable position, such as supine. Next, a clinician gives the command to a patient that raises the hip towards the roof side as far as possible without taking the help of a physical therapist or their own strong hand. Do ten repetitions in one session. Do three sessions in one day.
Active hip extension
First of all, the patient takes a comfortable position, such as a prone position. After that, the therapist should tell the patient to raise the leg as far as possible, but without any support from the therapist or the patient’s own healthy hand. Do ten repetitions per session. Do three sessions per day.
Active hip abduction and adduction
To embark with, the therapist should give the command to the patient that takes a comfortable position, such as side-lying with the affected leg up. After that, the therapist kindly tells the patient to move the leg up towards the ceiling as far as possible, but without any external support, and then come back to starting position. Next, do ten repetitions per session. Do three sessions per day.
Active hip internal rotation
First of all, the therapist tells the patient to take a comfortable position, such as supine. After that, the therapist gives the command to the patient that rotates the leg inward towards the unaffected leg side as far as possible, without any external support. Do ten repetitions per session. Do three sessions per day.
Active hip external rotation
To begin with, a physical therapist tells a patient to take a comfortable position, like supine. Next, a physical therapist gives the command to a patient that rotates the leg outward away from the unaffected leg as far as possible, and without any external support. Do ten repetitions in one session. Do three sessions in one day.
Frankenstein walk
This exercise works on the hips, quads, as well as hamstrings. It also improves the range of motion. Maintain good posture first, avoid bending at the waist, as well as improve your speed as the patient progress. Instructions: First of all, stand with the arms extended in front of the patient, and palms facing down. As the patient moves forward, swing the right leg up to extend it straight out, creating a 90-degree angle with the body. Lower the right leg to the ground, then swing the left leg up in the same way. Continue for ten seconds, changing direction if the space is limited. Once the patient feels comfortable, do the exercise by reaching the arm out to touch the opposite foot, and extending the other arm behind the patient.
Hip circles

This motion increases flexibility as well as stability. For more support, use the stable object support. Instructions: Stand on the right leg with the left leg lifted. After that, move the left leg in circles. Then, do twenty circles in each direction. Next, do the right leg. To make this exercise more difficult, improve the size of the circles and do three sessions in one day.
Sidestep exercise
Keep the hips as well as toes facing straight ahead. Improve the intensity by lowering the band so it is above the ankles and lowering the squat position. Instructions: First of all, stand in the half-squat position. Engage the hip muscles as the patient slowly take small steps to the side. After that, take ten to fifteen steps in one direction. Do the opposite side too, it there is affected found. Do it three times per session.
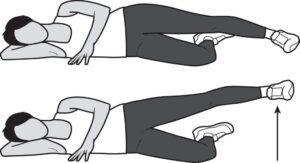
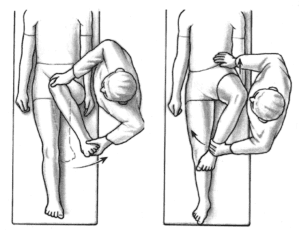
Clamshell exercise
This exercise builds strength in the hips, thighs, as well as glutes. It stabilizes the pelvic muscles as well as can relieve tightness in the lower back, which assists prevent overuse and injury as well. Once the patient is mastered the basic pose, check out for a few variations. Instructions: To begin with, lie on the side with bent knees. After that, rotate the top leg up as high as the patient can, then pause for the moment.
Next, lower to the embarking position. Do ten to fifteen repetitons per session. Do three sessions per day.
Lateral step-up
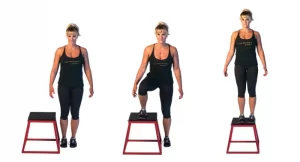
This exercise works the glutes, quads, and hamstrings whereas stabilizing as well as strengthening the core. Up the intensity by enhancing the weight. Instructions: To embarking with, stand with the bench or box to the right side. After that, bend the knee, as well as place the right foot on the bench.
After that, stand up straight, tapping the left foot on the bench. Next, slowly lower the left foot back down to the ground. Do ten repetitions per session. Do three sessions per day.
Hip marching
This exercise builds strength as well as flexibility in the hips and thighs. Instructions: To begin with, sit toward the front edge of the chair. Next, the therapist should tell the patient to raise the left leg as high as possible, keeping the knee bent. After that, slowly and with control, lower the foot. Then do the right side too. This is one repetition. Do two to three sets of five to ten repetitions.
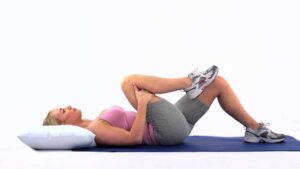
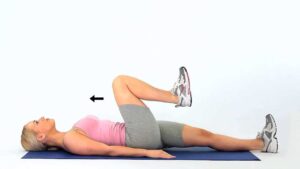
Floor hip flexion
This exercise stretches the hip flexors, thighs, as well as glutes.
Instructions: Lie on the back and pull the right leg into the chest to embark with. After that, press the back of the left knee into the ground, feeling a stretch in the hip. This movement improves hip flexion. Do ten repetitions per session. Do three sessions per day.
Butterfly pose
This exercise stretches the hips while improving blood circulation and improving internal and external rotation as well. Rest your sitting bones on the edge of the cushion or folded blanket to support the pelvic tilt motion. If the patient feels tight, place blocks or cushions under the thighs for support. Instructions: Sit with the knees bent as well as the soles of the feet together. Then, interlace the fingers under the feet. Use the elbows to gently press the knees down to the ground. Then, feel an opening in the hips as the patient releases tension.
After five seconds, extend the arms in front of you and come into the forward fold.
Side leg raises
This exercise strengthens the glutes as well as thighs. Instructions: Tell the patient to lie on the right side with the legs stacked. After that, raise the left leg as high as the patient can. Then, pause here, and return to the embarking position. Do ten repetitons per session. Do three sessions per day.
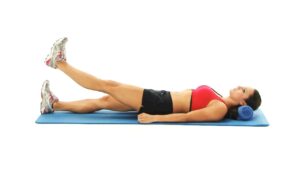
Leg lifts
Raise the leg so that the foot is 6 to 12 inches (15 to 31 centimeters) off from the bed. Hold this position of leg lifts in the air for five seconds. Return the leg to a bed.
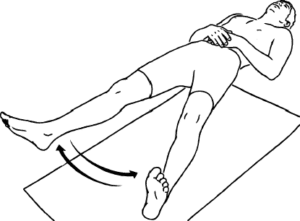
Side to side leg movement
Flex the foot so the toes point up toward the roof. After that, move the leg out to the side as long as possible. Then, bring the leg back to the middle.
In and out leg rotation
Put the leg flat on a bed. Roll the affected leg toward the middle so the big toe touches a bed. Then roll the leg out as well as try to make the smallest toe touch the bed.