
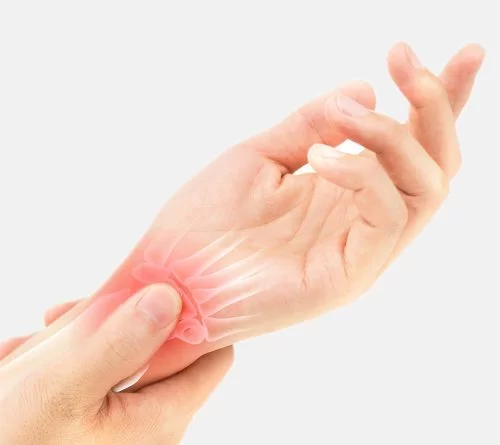
Wrist Sprain
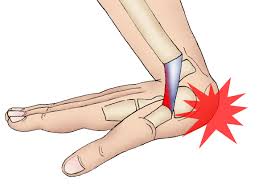
A wrist sprain occurs when you fall on your wrist, which leads to it being bent or twisted forcefully, In this ligaments that support the wrist stretch beyond their stretch limits and it may tear. Wrist sprains are common injuries and mostly heal within a few days with conservative treatment.
The wrist is a complicated joint that connects the forearm to the hand.
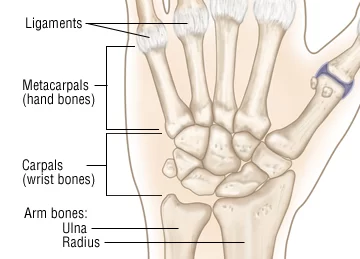
- Two long bones in the forearm, the radius, and ulna, form a curved joint surface that forms almost a cup, where carpal bones in the hand fit.
- There are two rows of carpal bones.
- The scaphoid, lunate, and triquetrum bones form the proximal row (closest to the forearm) and fit into that curved joint surface foot the radius, and the ulna.
- The bones that make up the distal carpal row (further from the forearm) are the trapezium, trapezoid, capitate, and hamate.
- A ligament is a dense band of tissue that attaches to bones on each side of a joint to help maintain stability as the joint moves.
- There are many ligaments in the wrist, including those that span the radiocarpal joint, the main joint of the wrist.
Other ligaments stabilize the joints between each of the carpal bones.
- Radial wrist sprains (on the thumb side of the wrist) affect the ligaments that connect the scaphoid and lunate bones.
- Ulnar wrist sprains (on the little finger side of the wrist) affect the ligaments of a triangular fibrocartilagenous complex that connects the ulna to the carpal bones.
- A sprain describes an injury to a ligament, with it being stretched, partially, or completely torn.
- A wrist sprain is an injury to the ligaments of the wrist region, including the ligaments connecting the carpal bones and the ligaments connecting the proximal row of carpal bones with the radius and the ulna.
- By injury, we mean that the ligaments are partially or completely torn.
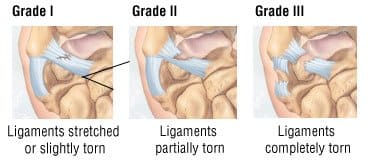
There are three grades:
- Grade 1: A mild overstretching of the ligaments, without joint instability.
- Grade 2: A partial rupture of the ligaments, with no or mild joint instability.
- Grade 3: A complete rupture of a ligament with severe joint instability.
Table of Contents
Clinically Relevant Anatomy :
- Representation of the various ligaments susceptible to sprain at the wrist joint.
- There are two types of wrist sprains, namely radial and ulnar wrist sprains.
- The radial wrist sprain is the most common, with mostly an injury of the ligaments connecting the lunate with the scaphoid, including the scapholunate ligament and the radioscapholunate ligament.
- In the case of an ulnar wrist sprain, it can be torn of the ligaments of the triangular fibrocartilagenous complex or the lung-triquetrum complex.
- Sprains of the wrist are fairly rare in everyday life and in the workplace. Under certain weather conditions, such as during ice storms or after a snowfall, a wrist sprain is commonly caused by a fall in which a person lands on an outstretched arm.
- For athletes, sprains and other injuries to the wrist or hand account for 3% to 9% of all sports injuries.
- They are especially common among young males who play football, basketball, or baseball.
- In addition, at least 36 Olympic events have been linked to an unusually high rate of wrist sprains, including roller hockey baseball, boxing, basketball, volleyball, weightlifting, ice hockey, wrestling, and judo.
- Among skiers, wrist sprains commonly occur when the skier falls while still gripping a ski pole or still having the pole strapped to the hand.
- Falls are also a frequent cause of wrist sprains and fractures among snowboarders and inline skaters.
- In platform divers, wrist sprains can occur when the wrist absorbs an unusually forceful impact as the athlete hits the water.
- Wrist sprains also occur in racquet sports, wrestling, and pole vaulting because the wrist is subjected to extreme twisting movements during these sports.
Wrist Sprain Causes
A wrist sprain is an injury that occurs when the ligaments in the wrist are stretched or torn. It is usually caused by a sudden twisting or bending motion of the wrist beyond its normal range of motion. The most common causes of wrist sprains are:
- Falls: Falling on an outstretched hand is a common cause of wrist sprains. This can happen during sports activities, accidents, or simply tripping and landing on the wrist.
- Sports injuries: Participating in sports that involve repetitive or forceful movements of the wrist, such as basketball, tennis, or gymnastics, can increase the risk of wrist sprains.
- Accidents and trauma: Car accidents, workplace accidents, or any situation where the wrist experiences direct impact or trauma can lead to a sprain.
- Repetitive strain: Overusing the wrist through repetitive motions, such as typing on a keyboard for long periods or performing activities that require constant wrist movement, can strain the ligaments and lead to sprains.
- Improper lifting technique: Lifting heavy objects using improper form or lifting objects that are too heavy for the wrist to handle can cause sprains.
- Weak or imbalanced muscles: Weak muscles or muscle imbalances around the wrist joint can make the ligaments more vulnerable to injury, increasing the risk of sprains.
It’s important to note that these causes are not exhaustive, and there can be other factors specific to an individual’s circumstances that contribute to a wrist sprain. If you suspect a wrist sprain, it’s advisable to seek medical attention for proper diagnosis and treatment.
Possible complications :
- If the injury doesn’t heal properly, it has a higher chance of happening again.
- The injury can also become long-term (chronic).
- This can cause ongoing pain, weakness, or instability of the wrist. Over time, arthritis may develop in the wrist.
- This can worsen pain and cause stiffness and limited movement of the wrist and hand.:
Wrist sprain symptoms
- In more severe sprains, swelling can change the shape of your wrist, and you may have some bruising (a black-and-blue skin discoloration).
- Also, you’ll probably feel significant pain when you try to move your wrist, or when your health care professional moves your wrist while examining it.
Diagnosis
- After reviewing your symptoms, your doctor will ask you to describe how you injured your wrist. Include as many details as you can.
- Did you fall or twist the wrist? What position was your wrist in when you injured it? If you are an athlete, your doctor may want an eyewitness account of your injury from a trainer or coach.
- Your doctor also will review your medical history, especially any history of previous wrist, hand or forearm injuries.
- If the results of your history and physical suggest you have a severe wrist sprain or a fractured bone, your doctor may order wrist X-rays.
- If these appear normal, but your symptoms are severe and persistent, your doctor may order additional tests such as magnetic resonance imaging (MRI) or a computed tomography (CT) scan.
- In some people, especially in competitive athletes with moderate or severe wrist injuries, the doctor may do a type of minor operation called arthroscopy to inspect the wrist ligaments directly for signs of damage.
Examination :
- We will start the examination with the anamnesis.
- During this questionnaire, we want to learn more about the origin of the injury and we can already ask if there are (according to the patient) any functional disorders.
- Let the patient describe the symptoms, the most frequent complaint is ‘pain’, let the patient define this pain.
- It will also be important to ask about the expectations of the therapy. And you can gather information about previous injuries and any possible factors that can hamper the healing process.
- After the anamnesis, you should do an inspection of the injured wrist, by comparing it to the other wrist.
- A sprained wrist can be swollen, red, tender, and warm to the touch.
Palpation:
- When you have finished the inspection, you can palpate the wrist with all her structures.
- Most of the structures in the wrist are very well palpable, but swelling can hinder palpation and the palpation can be painful for the patient.
ROM Examination :
- After palpation, you should test each articulation in search of pain, abnormal motion, or crepitus.
- The physiological movement of the wrist can be examined by simple tests of the palmar flexion, dorsiflexion, radial deviation, and ulnar deviation.
- You should also test the functional movement by letting the patient do things like catching, pinching, holding, and managing simple objects.
- When there is severe swelling, you can expect that even the smallest mobilizations will be very painful for the patient.
Strength Examination :
- Next, you can do a resistance examination, to examine whether the muscle strength is still normal.
- You should do this for flexion, extension, and ulnar and radial deviation.
- Beware this can be very painful or even impossible for patients with a severe wrist sprain when the passive mobilizations are already painful and not fully practicable.
- The results of your tests and thus the functional disorders will depend on the severity of the injury.
Special test:
You can also run some more specific provocative wrist tests:
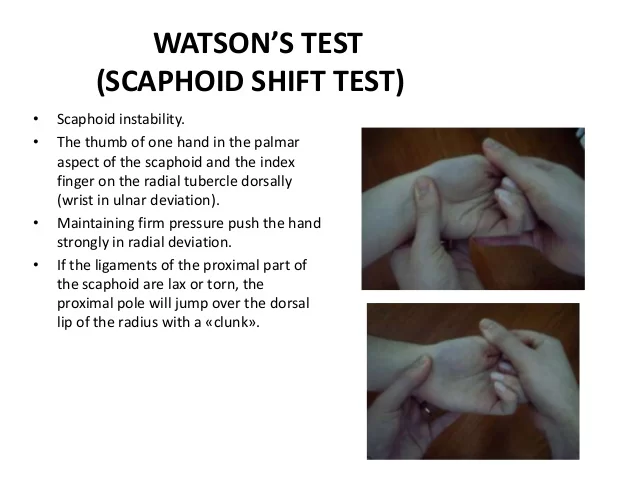
- Scaphoid Watson shift test
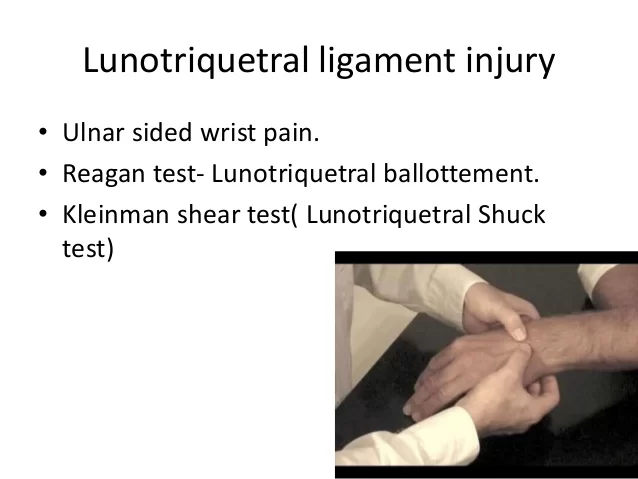
- Lunotriquetral-ballotement-test
- finger extensions against resistance
- Midcarpal test
- Distal radioulnar joint test
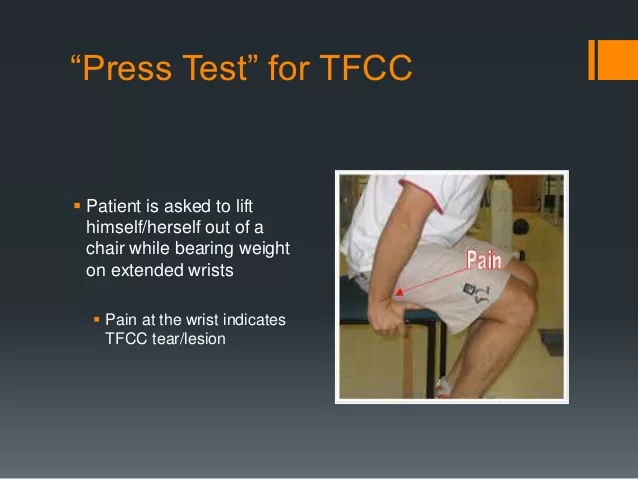
- Triangular fibrocartilage complex [TFCC] stress test
- Triangular fibrocartilage complex stress test with compression
- Gripping rotatory impaction test
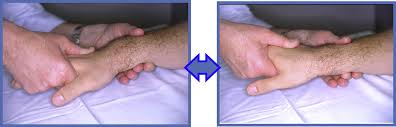
These tests will give you more information about which ligaments are (partially) ruptured and the instability of the wrist.
Expected Duration :
- In milder wrist sprains, symptoms usually improve within two to three days.
- More severe sprains can take a number of weeks or even months to heal completely.
Prevention :
- To prevent sports-related wrist sprains, wear protective equipment that supports the wrist.
- In particular, snowboarders and inline skaters should protect their wrists by using wrist guards or snug-fitting plastic wrist splints.
- Platform divers may wear protective tape, wrist splints, or wraps that limit the extension of the wrist.
- To prevent wrist sprains related to skiing, choose ski poles that have a low-profile grip with finger grooves. Also, grip ski poles without using straps and drop poles during the fall.
How to heal wrist sprain fast?
Following treatment, the procedure helps you to recover fast from a wrist sprain.
Treatment of wrist sprain :
For milder wrist sprains, initial treatment follows the RICE rule:
At first, you should follow the R.I.C.E. method:
- Rest: -Stop the activity and use of the injured wrist for 48 hours or until the pain and the swelling have subsided.
- Ice Application: -Apply a cold pack (wrapped in a towel) or a bag of crushed ice to the sprained wrist, for about 15 minutes, several a day for several days.
-Don’t ice it for more than 20 minutes at a time!
-Cryotherapy will create superficial vasoconstriction so that the local blood flow and haemorrhage decrease.
-There is some discussion about the effectiveness of cryotherapy, most studies approve of the fact that cryotherapy has a pain-decreasing effect.
-There are also indications that cryotherapy would influence inflammation, but more and bigger studies are required to prove evidence. - Compression: Wrap the wrist with an elastic compression bandage and limit swelling.
-The bandage should push the edema fluid away from the injured tissue.
-Start wrapping at the base of the fingers and stop just below the elbow, so that you wrap in the direction of the heart. -The wrap should be snug, but be careful not cutting off circulation. - Elevation: -Try to keep the wrist above heart level as often as possible, for two days.
-This will help drain fluid and reduce swelling around the wrist.
- Your doctor also may suggest a non-steroidal anti-inflammatory drug (NSAIDs), such as ibuprofen (Advil, Motrin, and others), to relieve pain and ease swelling.
- For moderate wrist sprains, especially in professional or competitive athletes, the wrist may be immobilized in a splint or light cast for seven to 10 days.
- If you have a significant wrist injury, you will need physical therapy as soon as symptoms allow.
- Athletes usually can return to competition once symptoms subside, although it may be advisable to protect the injured wrist with a support splint.
- When a severe wrist sprain causes significant instability in the wrist, surgery may be required.
When To Call a Doctor?
- Call your doctor immediately whenever you have symptoms of a severely sprained wrist, especially if your wrist is deformed or severely swollen, or if pain prevents you from moving your wrist normally in any direction.
- For milder sprains, call your doctor if your wrist symptoms do not improve within two to three days after your injury.
Prognosis
- Since most wrist sprains heal with time, the long-term outlook is usually excellent.
- This is especially true for people who do not routinely play sports that twist or bend the wrist.
- Among athletes with severe sprains, arthroscopic repair is usually successful.
The goals of physical therapy are to speed up the healing process, ensure an optimal recovery and reduce the chance of another wrist sprain in the future.
Rehabilitation will vary depending on the individual and the injury, but will usually consist of some of the following:
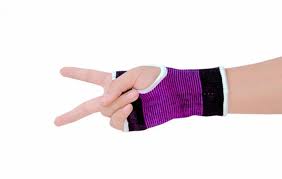
WRIST TAPING AND/OR BRACING FOR WRIST SPRAIN :
- Keeping the wrist from moving (immobilization) is often needed for more severe wrist sprains, and may be recommended for 1-2 weeks to let the ligaments heal;
- The Aircast A2 Wrist Brace and Quick Fit Wrist are for this purpose and may be prescribed.
- For a 2nd degree sprain or moderate injury, the Elastic Wrist Splint or DonJoy ComfortForm Wrist Support is ideal.
- For a 1st-degree wrist sprain or mild injury, the Universal Wrist O Prene or Boomerang Wrist will provide mild compression and support.
PASSIVE MODALITIES :
Ice, heat pack, and soft-tissue massage may be performed by the Physiotherapist to relieve symptoms.
Wrist sprain stretches exercise :
Once symptoms have subsided, active exercises are added; stretching exercises will help to increase flexibility that may have been lost.
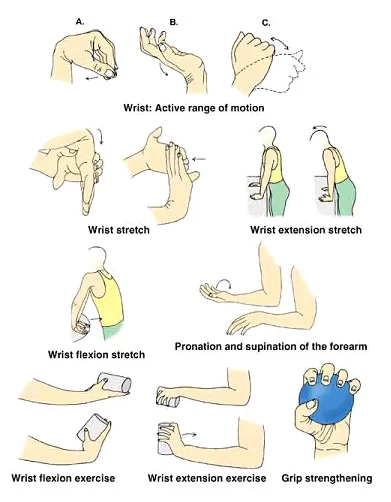
STRENGTHENING EXERCISES :
Resistance bands and therapeutic rubber balls are helpful to build strength back up in the wrist and surrounding areas.
PATIENT EDUCATION :
Physiotherapists will work with patients to help them modify dangerous activities and gradually return to sports or activities based on their progress.
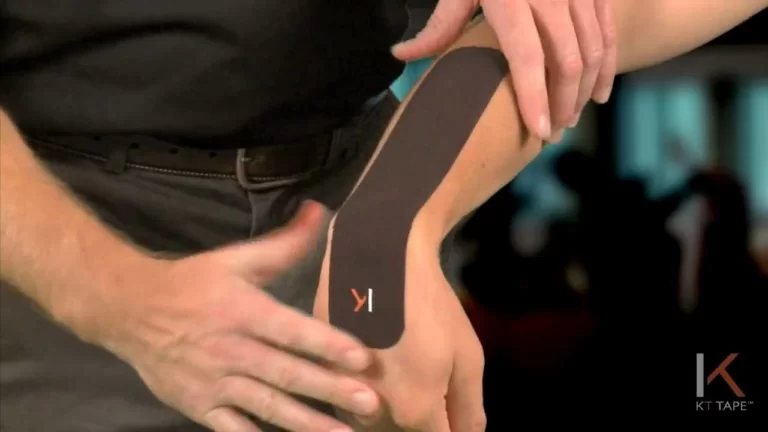
Wrist sprain kt tape :
SURGERY :
- In case of a severe wrist sprain it can be recommended to immobilize the wrist.
- In some rare cases, surgery may be needed to repair a ligament that was torn completely.
- In the second phase, the patient should do gradual retraining exercises, including active mobilizations, to increase flexibility and range of motion, and exercises for the strengthening of the injured wrist.
- We have to start these exercises early in the rehabilitation, to prevent stiffness and weakness from developing and to ensure the wrist is functioning correctly.
- You can start exercising as soon as pain allows.
- It is very important that the patient is guided by the treating physiotherapist during the exercises.
- We prefer active mobilizations above the passive ones, but in some cases, we can do passive mobilizations to treat hypomobility, by adding traction.
- First, you can perform radiocarpal and midcarpal traction, to see whether this movement provokes pain.
- This handling can be used to treat hypomobility in different directions.
- To stimulate flexion you should do the dorsal sliding technique.
- During this technique, the convex carpal bones will move in a dorsal direction over the concave surface of the distal radius.
- To stimulate extension you have to do the volar sliding technique.
- This will cause the sliding of the convex carpal bones in the volar direction over the concave surface of the radius.
- The ulnar sliding technique will stimulate radial deviation.
- The radial sliding technique will stimulate ulnar deviation.
- After these passive mobilizations, you can go to the active mobilizations.
- There are many exercises you can give to your patients, here are some examples.
- Turning the wrists: hook your fingers into each other and turn the wrist in different directions.
- Place your forearms on a table and perform extension (arm in pronation on a table) and flexion (arm in supination on a table).
- Do the same for ulnar and radial deviation, you can do this one in pro- and in supination.
- You can combine mobilizations with some stretching exercises for the extensors and flexors.
- Before you start to stretch, you should perform an isometric contraction and hold this for 5 seconds.
- After mobilizations, you can start exercises to improve muscle strength.
- These exercises will be very similar to the mobilizations, except for the fact that you should use some tools.
- By tools, we mean weights, Theraband, pull machines,s and many others.
- The goal of these tools is to put resistance to the movement.
- You should start with a low resistance/weight and many repetitions to train the muscle endurance first, then gradually increase resistance/weight but decrease repetitions to train muscle strength, do this depending on the possibilities of the patient.
- It can also be useful to do some proprioceptive exercises, especially for practicing sports, like gymnastics, where the athletes frequently us their hands as weight carriers.
- These exercises are often performed in push-up position.
- You will gradually change the surface under the hands starting with flat ground, followed by, a normal pillow, Airex pad, Sissel pillow, and wobble board.
- It is difficult to give information about the repetitions and the durations of the exercises because this is strongly related to the patient and his advancement.
- When returning to sports activities, the therapist can prepare the patient by tapping the wrist or adjusting a brace.
What to Expect
- Symptoms such as pain, swelling, bruising, and loss of strength or stability are common with mild (grade 1) to moderate (grade 2) wrist sprains.
- With mild injuries, stiffness is normal once the ligament begins to heal. This can improve with light stretching.
- Severe (grade 3) wrist sprains may need to be looked at by a hand surgeon. X-rays or an MRI of the wrist may need to be done. More severe injuries may require surgery.
- Chronic sprains should be treated with splinting, pain medicine, and anti-inflammatory medicine. Chronic sprains may need steroid injections and possibly surgery.
ERGONOMICS
- Talk with your provider before using these medicines if you have heart disease, high blood pressure, kidney disease, or have had stomach ulcers or internal bleeding in the past.
- DO NOT take more than the amount recommended on the bottle or by your provider.
- DO NOT give aspirin to children.
- Activity
- To build strength once your wrist starts to feel better, try the ball drill.
- With your palm up, place a rubber ball in your hand and grab it with your fingers.
- Keep your hand and wrist still while you gently squeeze the ball.
- Squeeze for about 30 seconds, then release.
- Repeat this 20 times, twice a day.
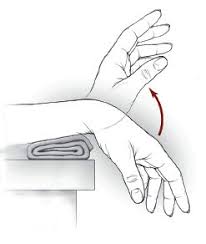
- To increase flexibility and movement:
- Warm up your wrist by using a heating pad or warm washcloth for about 10 minutes.
- Once your wrist is warm, hold your hand out flat and grab your fingers with the uninjured hand. Gently bring the fingers back to bend the wrist. Stop just before it begins to feel uncomfortable. Hold the stretch for 30 seconds.
- Take a minute to let your wrist relax. Repeat the stretch 5 times.
- Bend your wrist in the opposite direction, stretching downward and holding for 30 seconds. Relax your wrist for a minute, and repeat this stretch 5 times, as well.
- If you feel increased discomfort in your wrist after these exercises, ice the wrist for 20 minutes.
- Do the exercises twice a day.
Follow-up :
- Follow up with your provider 1 to 2 weeks after your injury. Based on the severity of your injury, your provider may want to see you more than once.
- For chronic wrist sprains, talk to your provider about what activity may be causing you to re-injure your wrist and what you can do to prevent further injury.


5 Comments