
Wrist pain: Physiotherapy treatment and exercise
Table of Contents
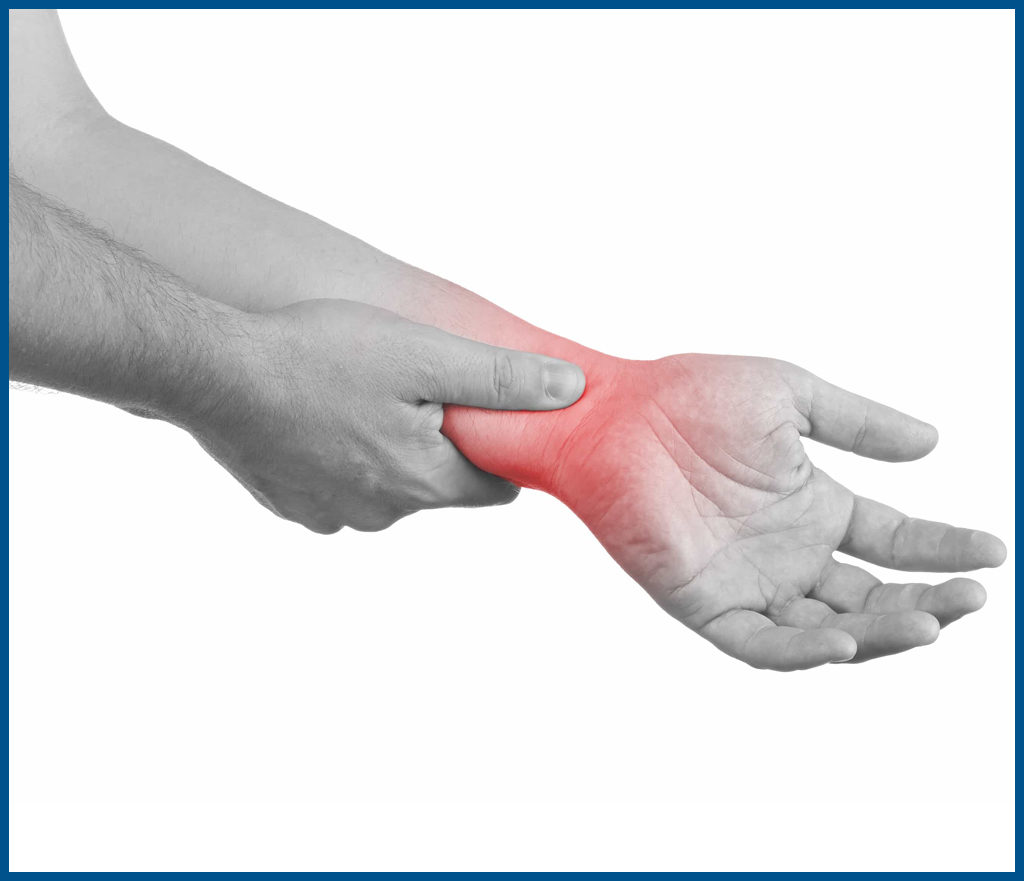
What is wrist pain?
- Wrist pain is any type of pain or discomfort in the wrist joint.
- It is often occurred by sprain or fracture from sudden injuries to the wrist or surrounding areas. However, wrist pain can also result from long-term problems, namely repetitive stress, arthritis, and carpal tunnel syndrome.
What is a wrist joint?
- The wrist joint is also known as the radiocarpal joint, which is a synovial type of joint in the upper limb, marking the area of transition between the forearm and the hand.
- The wrist joint is made up of eight small bones which support a tube that contains tendons and nerves inside it.
- This tube is covered by a ligament, which helps hold everything in place. It is one of the most common joint pains that people get as the repetitive motion of your wrist can be more damaging than people realize.

What are the considerable causes of wrist pain?
Damage to any of the parts of the wrist can cause pain and affect a person’s ability to use the wrist and hand.
- Osteoarthritis = Osteoarthritis involves inflammation of the wrist joint and causes the cartilage between the bones within joints to wear away.
- Rheumatoid arthritis = Rheumatoid arthritis is an autoimmune disease, the body’s immune system breaks down healthy tissues, and the breakdown of tissue can lead to painful warmth and swelling in affected areas.
- De Quervain’s disease = In this tendinitis condition, swelling of the tendons and tendon sheaths around the base of the thumb may lead to pain in the thumb, wrist joint, and hand.
- Repetitive strain injury = According to the name, repetitive strain injury occurs from repetitive activities, namely typing and knitting. Overworking the joint can cause it to swell, and put pressure on the surrounding nerves.
- Triangular fibrocartilage complex injury = The triangular fibrocartilage complex is a structure in the wrist joint located towards a person’s pinky finger. It acts as a cushion and support to the small bones. The cartilage can wear away over time or tear because of an impact injury. Owing to the location of the triangular fibrocartilage complex, a person will typically experience trusted Source pain down the small finger side of the wrist should it minimally damage.
- Wrist tendonitis = Wrist tendonitis typically happens due to small tears to the tendons of the wrist. The tears in the tendon may result in localized inflammation, irritation, and pain.
This condition usually occurs because of sudden, sharp injuries to the tendons or wear an account of repetitive movements. - Wrist bursitis = Bursae are small fluid-filled sacs that help by providing cushions to joints. Inflammation of bursae is considered bursitis.
These can occur in many areas of the body, including the wrist also. - Ganglion cyst = This condition may cause wrist pain, due to fluid-filled soft tissue cysts that most commonly develop on the wrist at the base of the back of the hand. Ganglion cysts may compress nerves in the wrist, causing localized pain, but people often experience little to no pain from these cysts.
- Wrist sprain = Overstretching of ligaments in the wrist joint can cause ligaments sprain. The damage of the muscles will typically cause pain and swelling to the affected area.
- Sudden impacts = Wrist injuries often occur when a person falls forward onto the floor and has to outstretch of hand. It can cause sprains, strains, and even fractures.
- Carpal tunnel syndrome = Carpal tunnel syndrome develops when there is increased pressure on the median nerve at the level of the wrist joint, and it passes through the carpal tunnel, a passageway in the palm side of your wrist.
- Kienbock’s disease = This disease mostly affects young adults and involves the progressive collapse of one of the small bones in the wrist joint. Kienbock’s disease occurs when the blood supply to the small bones is compromised.
What are the various signs and symptoms of a wrist injury?
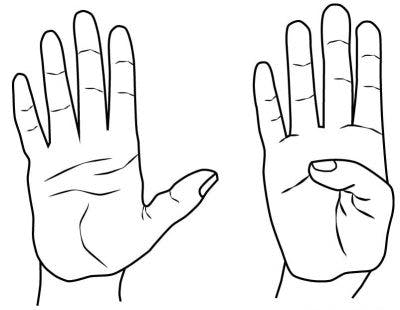
- Swollen fingers
- Difficulty in making a fist or gripping any objects.
- Numbness or even tingling sensation in the hands and fingers.
- Pain, numbness, and tingling that gets especially worse at night.
- Sudden or sharp pain in the hand and fingers.
- Swelling and redness around the wrist joint.
- The warmth felt in a wrist joint
How to Diagnosis of Wrist pain?
During the physical examination doctor may:-
- Check wrist for tenderness, swelling, or even deformity.
- The doctor may ask the patient to move the wrist to check for a decrease in range of motion.
- Assess the patient’s grip strength and forearm strength.
- In some cases, the doctor may suggest one or more imaging tests, namely arthroscopy or nerve tests.
Imaging test
- X-rays = This is the most commonly used test in wrist pain. Using a small amount of radiation, X-rays can reveal bone fractures/signs of osteoarthritis.
- CT scan = This CT scan can provide more-detailed views of the bones in the wrist joint and may spot any type of fractures that don’t show up on X-rays.
- MRI = This test uses radio waves and a strong magnetic field to produce detailed images of the bones and soft tissues in our body.
For a wrist MRI, the patient’s upper limb may insert into a smaller device instead of a whole-body MRI machine. - Ultrasound = This imaging center is a simple technique, a non-invasive test that can help visualize tendons, ligaments, and cysts.
- Arthroscopy = If imaging test results are inconclusive, the doctor may perform an arthroscopy for a clear diagnosis, a procedure in which a pencil-sized instrument called an arthroscope is inserted into a person’s wrist through a small incision in the patient’s skin. The instrument contains a light and a small camera, which projects images onto a television monitor in front of the doctor. Arthroscopy is considered the gold standard for evaluating especially long-term wrist pain. In some cases, doctors may repair wrist problems through the arthroscope.
- Nerve tests = Doctor might order an electromyogram (EMG) if carpal tunnel syndrome is suspected. It measures the tiny electrical discharges produced in the muscles. A needle-thin electrode is inserted into the muscle, and electrical activity is recorded when the muscle is at rest when it’s contracted. Nerve conduction studies are also performed as part of an EMG to assess if the electrical impulses are slowed in the region of the carpal tunnel.
Some special tests for wrist pain
Tests for diagnosis of carpal tunnel syndrome (CTS)
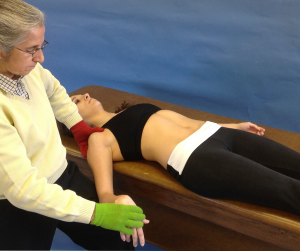
- Carpal Compression Test or Median Compression Test or Durkan’s test :
The patient is in a sitting position. The patient forearm is supinated and the examiner applies direct pressure over the carpal tunnel(median nerve) between the thenar and hypothenar eminence for 30 seconds.
If the test is positive then numbness, pain, or paresthesia is felt by the patient in the distribution of the median nerve.

- Phalen’s Test:
The patient places his/her flexed elbows on a table, allowing his/her wrists to fall into maximum flexion.
The patient is asked to push the dorsal surface of his/her hands together and hold this position for the next 30-60 seconds.
This position will increase the pressure in the carpal tunnel, in effect compressing the median nerve(at the level of the wrist)between the transverse carpal ligament & the anterior border of the distal end of the radius.
Phalen test is considered positive when the patient’s symptoms are reproduced, the test gives the same symptoms as that experienced with carpal tunnel syndrome, such as paresthesia (burning, tingling, numbness) in the distribution of the median nerve(at the wrist level). If the patient feels no pain or any other symptom, even if the motion is maintained for three minutes or longer then the test is negative.
Test for diagnosis of De Quervain’s disease
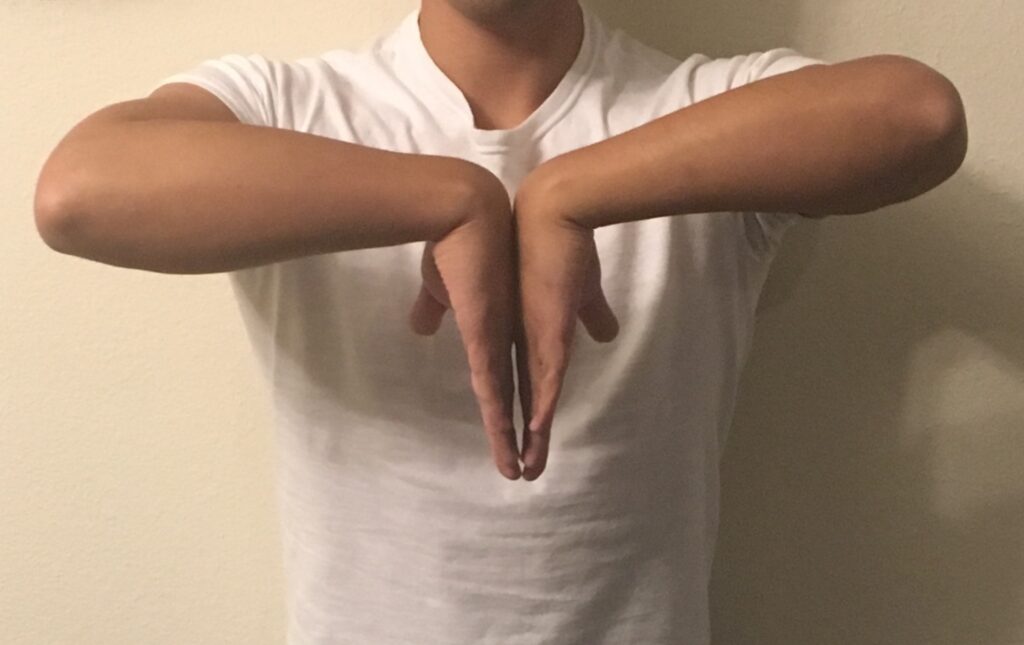
Finkelstein’s test:
- To embark with, the patient must sit comfortably and relaxed on the examination table. Then, examine the patient’s hand in the air,
- while the other hand of the patient rests just beside the body. The therapist after that asks the patient to make a fist around a thumb and to perform a ulnar deviation.
- If the patient does not feel any pain radiating up the inside of his/ her arm from the thumb then the test is negative.
- Ask the patient if he/she feels pain radiating up the inside of his or her arm from the thumb. If the patient reports pain then, Finkelstein’s test is positive, which indicates De Quervain’s syndrome.
- Upper Limb Tension Test for diagnosis of median nerve compression:
- Movements performed = Shoulder depression,Shoulder Abduction 90,External rotation,Elbow extension,Forearm supination,wrist and finger extension.
- The test is positive, if Symptoms are reproduced or as compared to the normal side, the difference in elbow extension greater than 10 degrees on the affected side/contralateral cervical side bending increases symptoms/ipsilateral side bending decreases symptoms.

- Upper Limb Tension Test for diagnosis of radial nerve compression:
- Movements performed = shoulder girdle depression, shoulder abduction 70, internal rotation, elbow extension, wrist, finger, and thumb flexion.
- If Symptoms are reproduced, then the test is positive.
- Upper Limb Tension Test for diagnosis of ulnar nerve compression
- Movements performed = shoulder girdle depression, Shoulder abduction 110, shoulder external rotation, forearm pronation, wrist and finger extension, elbow flexion.
- The test is positive if Symptoms are reproduced.
Treatment of wrist pain:
Medical treatment:
Simple painkillers (like paracetamol) or non-steroidal anti-inflammatory drugs( NSAIDs) like ibuprofen are available over the counter
and can be very effective but do not use them for more than 2 weeks without any medical advice.
If the patient is currently taking any form of medication it is advisable to consult their general practitioner or pharmacist before taking
additional pain relief.
Physiotherapy treatment in wrist pain:
Electrotherapy:
Ultrasound: Waves of ultrasound may reduce pain, swelling.
wax therapy: Reduce pain.
TENS(Transcutaneous electrical nerve stimulation): For reduction of pain
Exercise for wrist pain:
Stretching exercise:-
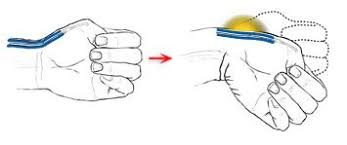
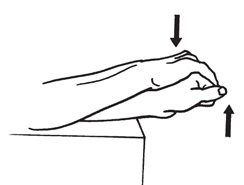
- Raised fist stretch:
- Embark with patient’s arm up beside head, with patient’s hand open.
- Make a fist, keeping a thumb outside of it.
- Slide fingers toward the wrist until a stretch is felt.

- wrist flexors stretching:
- Tell the patient to stretch his/her arm out in front of his/ her.
- Slowly, point the fingers towards the floor until you feel a mild to moderate stretch. Then, use another hand to gently pull the raised hand toward the body. Hold this position for thirty seconds. Repeat this exercise 3 times.
- Point the fingers up until you feel a stretch. Use the other hand to gently pull the opposite hand toward the body. Hold this position for thirty seconds. Repeat this exercise three times.

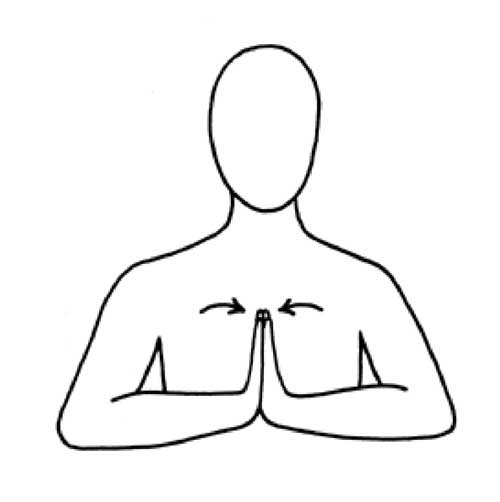
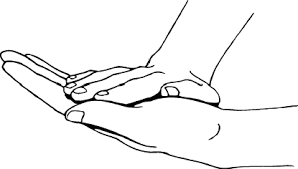
- Prayer position:
- Sit with the palms together and put elbows on the table in a prayer position
- Lower the sides of the hands toward the stable surface which is present in front of the patient until you feel a stretch. Keep the palms together. Hold this position for thirty seconds.
- Repeat this three times per day.
- Finger stretch:
- Bring the last and ring fingers together. Separate the second and third fingers from the ring finger. Repeat the stretch 10 times. Hold it for 5-7 seconds.

- Wrist extensors stretching:
- Tell the patient to place your hands out in front of you, do pronation then bend your hand towards the floor so that your fingers are
- facing your knees. With the help of another hand pull it towards the downside. Do three repetitions and hold for thirty seconds.
- Thumb stretch:
- Hold your hand out in front of you, as if you are saying stop. Embark with your thumb positioned outward. Move the thumb across your palm then back to the starting position. Hold it for the next 30 seconds and repeat this exercise 3 times.
- Wrist Extensors Stretching:
- Sit with arm out straight in front of you, then do supination with wrist flexion. With the help of the other hand pull the hand as far as the patient feels stretched. Hold the stretch for 30 seconds, and repeat it three times.
Range of motion exercise:–
- Wrist Circles:
- Tell the patient to bring your hands up with your elbows close to your body, as making a fist. Rotate your wrists in a circular movement, Then ask the patient to keep your palms facing the floor side to maximize the range of motion. Do ten circles in each direction.

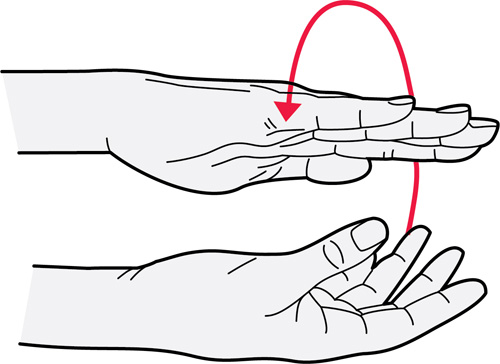
- Hand lift:
- Tell the patient to place your forearm on a flat surface, like a table, with the affected hand hanging over the edge, especially palm facing to the floor side. Put a rolled-up towel under the affected wrist that provides the patient comfortable position. With the keeping patient’s fingers relaxed, move hand upward until he/she feels a gentle stretch, then return to the starting position.
- Wrist turn:
- Tell the patient to bend elbow 90 degrees with palm facing down. Rotate his/her forearm, so that palm faces up and then down. The patient can stand or sit to do this.
- Hand wave:
- Tell a patient to support his/her forearm on a table on a rolled-up towel for padding / put his or her forearm on your knee, thumb facing upward. Do movement of the wrist flexion and extension through its full range of motion, as if you are waving.
- Supination/Pronation:
- Tell the patient to sit with his/her arm by his/her side and elbow bent to 90 degrees. Then rotate the forearm so that patient’s palm will face up, and then down. Repeat this movement 10 times.
- Wrist Extension over the edge of Table:
- Tell the patient to sit with his/her forearm resting on a table, with palm facing down, and hand hanging over the edge of the table. With another free hand, bend the wrist up as long as possible. Repeat this exercise ten times without any type of hold.

- Wrist Flexion over the edge of Table :
- Tell the patient to sit with his/her forearm resting on a stable surface-like table, with palm facing down, and hand dangling over the edge of the table. With the other free hand, try to bend the wrist down as long as possible. Repeat this exercise ten times with three sessions per day.
- Thumb Opposition:
- Tell the patient to move their thumb and touch the tip of the index, middle, ring, and little finger, aiming to stretch across to the base of the little finger. Repeat this exercise ten times with three sessions per day.
Resisted isometric:–
- Isometric wrist extension:
- Hold one hand, then place the position of palm down on a table or other stabilize surface. Put another hand on top of it. Tell the patient for raising the lower hand, but do not allow it for any type of movement.
- Isometric wrist flexion:
- Hold one hand, then place the position of palm down on a table or other stabilize surface, with your palm facing upside, but do not allow it for any type of movement.
- Isometric ulnar deviation:
- Hold one hand, then place the position of palm down on a table or other stabilize surface. Put another hand on the medial side of it. Tell the patient to move his/her inside, but do not allow it for any type of movement.
- Isometric radial deviation:
- Hold one hand, then place the position of palm down on a table or other stabilize surface. Put another hand on the medial side of it. Tell the patient to move his/her outside, but do not allow it for any type of movement.
Strengthening exercises:-
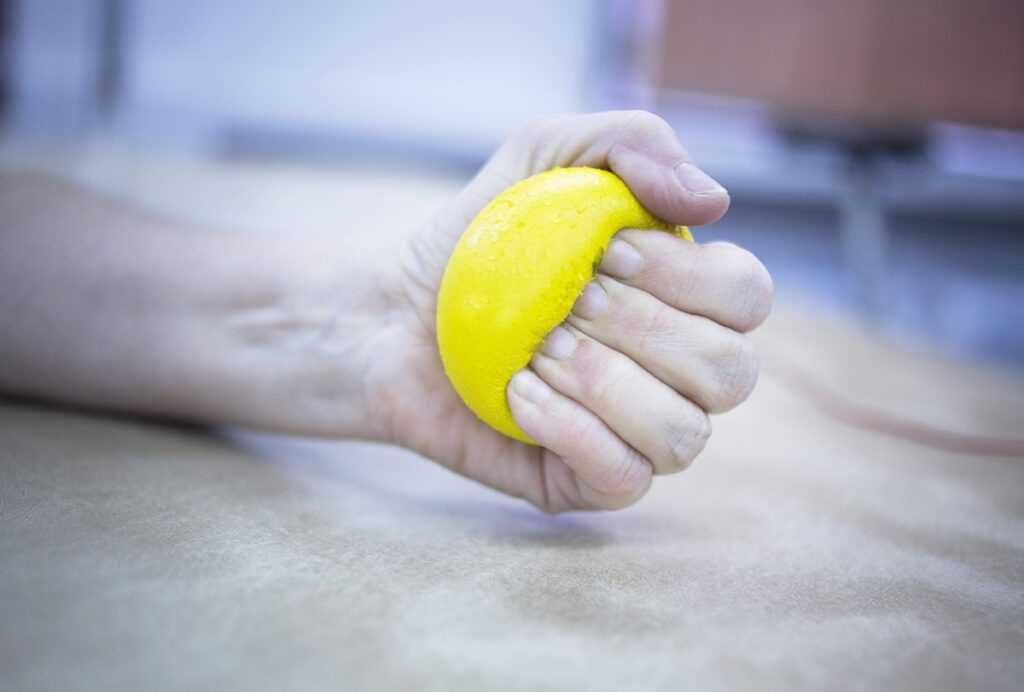
- Ball squeeze strengthening:
- Patients can do ball squeeze strengthening exercises with any kind of ball, around the size of a tennis ball, or patients can do exercise with the use of putty, which comes in soft, medium, and hard firm strengths. The patient can also use a rolled-up towel or pool noodle for squeezing. Firstly, sit comfortably and take the ball or putty according to preference in the hand, wrapping fingers and thumb around the ball or putty. Tell the patient to squeeze as hard as he/she can. Hold the squeeze for ten seconds. Then, relax the grip slowly. In starting phase around five to six days repeat this exercise 5 to 7 times. Then increase repetition slowly.
- Grip strengthening:
- Various types of hand grip strengtheners are present. Grippers come in a variety of tensions which creates different types of load on muscles and increase muscles strength. The patient can initiate with one that is only a little close. When that becomes easy, enhance the gripper tension. Firstly, sit comfortably with the arm bent at 90 degrees, palm facing inward, try to hold the gripper in one hand. Then, squeeze slowly, and after that release without any type of hold. Repeat 10 times. Only the patient’s hand should be moving, not the arm or forearm. Change hands and repeat this exercise. When the patient can comfortably do 2 to 4 sets per session, try a gripper with more tension.
- Finger strengthening:
- Embark with the palm of the hand put on a tissue or towel on a table or other stabilizing surface, but fingers apart. Pull fingers together by pressing the hand down into the table and bunching up the towel between the fingers. Repeat this exercise ten times. Patient can also, do this exercise without using a towel or tissue, and simply by pressing down on the table and squeezing the fingers together.
- Wrist flexion with dumbbell:
- Tell the patient to put the forearm on the table as a resting position. After that, turn your hand over, so your palm is facing the roof. Hold the dumbbell and tell the patient to keep his/her forearm against the table. Then, flex your wrist up so that your palm moves towards the roof. Once the patient’s wrist is in a full flexion position, hold this position for 2-3 seconds. Then, tell the patient to lower the hand back slowly to the starting position. Repeat the wrist flexion exercise 10 times per session.

- Wrist extension with dumbbell:
- To start this wrist extensors strengthening exercise, tell the patient to sit on a chair with his/her forearm resting on a stable surface-like table. With hang wrist and hand over the edge of the table. Then, hold a 2- or 3-pound dumbbell in his/her hand. With palm facing down, then slowly lift hand up, so the back of his/her hand moves towards the roof, but forearm should remain stable on the table. Without any hold at the end position, do this exercise 10 times per session. After 3-4 days add hold when the wrist is fully extended, hold this position for five seconds, then slowly lower hand down. Repeat this movement for 10 repetitions.

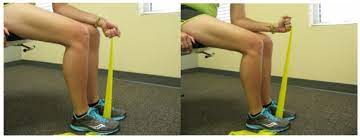
- Wrist flexors strengthening with theraband:
- Tell the patient to take a stable position like sitting on a chair with forearm resting on a table, with palm facing up, and hand resting over the edge of the table. Hold on to one end of the resistance band, while the other end is under the patient’s foot or the therapist can hold one end of the resistance band on his/her hand. Now pull up against the resistance of the elastic of theraband. Repeat this exercise 10 times per session. After 3-4 days, try hold when the wrist is fully flexed, hold this position for 5 seconds, after that slowly lower hand down. Repeat this movement for 10 repetitions.

- Wrist extensors strengthening with theraband:
- Ask the patient to sit with forearm resting on a stable surface(table), with palm facing down, and hand resting over the edge of the table. Hold onto one end of the theraband, whereas the other end of the band is under a patient’s foot, or fix another end with the stable thing, such as a table or pillar or chair. Give the command to the patient that pulls up slowly against the resistance as far as comfortable (extend your wrist.) Slowly return to the starting position. Repeat this exercise 10 times. After five days, try hold when the wrist is fully extended, hold this position for ten seconds, then slowly lower your hand down. Do this movement for 10 repetitions.
- Ulnar deviators strengthening with theraband:
- Tell the patient to take a stable position like sitting on a chair with forearm resting on a stable surface such as a table, with palm facing up, and hand resting over the edge of the table. Hold onto one end of the theraband, whilst the other end is under the foot of the patient or a therapist can hold one end of the resistance band on his/her hand or even wrap one end with a chair, pillar, or table. Now turn the hand inward against the resistance of the elastic of theraband. Repeat it 10 times per session. After five days, try hold when the wrist is in fully ulnar deviation, hold this position for ten seconds, then slowly take the starting position. Repeat this movement 10 times.
- Radial deviators strengthening with theraband:
- Tell a patient to take a stable position such as sitting on a chair with forearm resting on a table, with palm facing up, and hand resting over the edge of the table. Hold onto one end of the resistance band, while the other end is under the foot of the patient or the therapist can hold one end of the theraband on his/her hand or even wrap one end with the stable thing, namely the chair, pillar, or table. Now turn the hand outward against the resistance of the elastic of theraband. Repeat it ten times per session. After four days, try hold when the wrist is in fully radial deviation, hold this position for five seconds, then slowly take the starting position. Repeat this movement 10 times.
- Rubber band strengthening for hand muscles:
- This exercise is so simple but unique. It works the smaller hand muscles. It is also one type of exercise in which patients can do it with sitting at a desk or anywhere else. Take an ordinary rubber band that we use in our daily life, and stretch it around the tops of the fingers and thumb. Slowly open your hand to stretch against the rubber band, then slowly close the hand. Repeat this exercise 10 times, after 5 days hold when fingers are fully open for 10 seconds, and repeat this exercise 10 times per session.
- Wrist walking
- Tell the patient to stand near a wall, with arms straight, but palms against the wall, and fingers pointed up. Keeping palms against the wall, walk wrists down the wall as far as the patient can then turn hands around so that the patient fingers are pointed down. With palms against the wall, walk wrists back up as far as the patient can.


6 Comments