Wrist pain on the ulnar side: Cause, Symptoms, Treatment, Exercise
Table of Contents
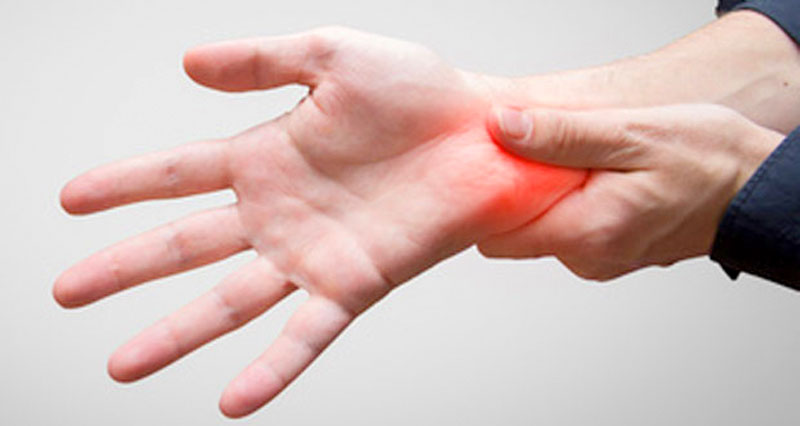
What is the ulnar wrist pain?
The wrist joint plays a crucial role in almost everything people do with the hand. It comprises lifting objects, operating mobile phones, preparing food, and many other activities. When people feel pain on the side of the wrist, just opposite the thumb, it may be ulnar wrist pain. The ulnar side of the wrist is the side of the little finger. People may often feel pain there.
The ulnar pain is named after the ulna, the arm bone which ends at the wrist on the side of the pinky finger. The word “wrist” is used to elaborate on the joint where the hand is attached to the forearm. Ulnar wrist pain means pain on the pinky side of the wrist is very common. It may result from injury to bones, cartilage, ligaments, or even tendons. The ulnar wrist pain can worsen with the motion. When an individual grips something or twists the wrist, a person may experience severe pain. However, the time duration and severity of the pain may vary depending on its causes.
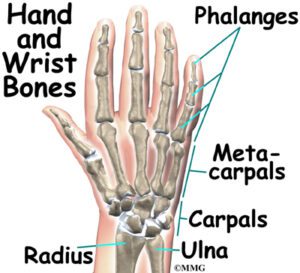
The wrist joint is a complex joint that bridges the hand to the forearm. It is mainly a collection of multiple bones as well as joints. The wrist, as well as the hand, are composed of a total of 27 bones: 8 bones of the wrist, 5 metacarpals, and 14 bones of the phalanges. The hand and the wrist form a group of complex, delicately balanced joints which are reviewed as the most active part of the upper extremity.
There are mainly three joints in the wrist:
Radiocarpal joint: In this joint, the radius(one of the forearm bones) is joined with the first row of wrist bones, scaphoid, lunate, and triquetrum.
Ulnocarpal joint: This joint is where the ulna(one of the forearm bones) joins with the lunate as well as triquetrum wrist bones. This joint is mostly injured when the patient sprains their wrist. Some people are born with or even develop an ulna that is longer than the radius, which may cause stress as well as pain in the joint, which is known as ulnocarpal abutment (impaction) syndrome.
Distal radioulnar joint: This joint is where the two forearm bones connect (distal ulna and radius). Pain with an ulnar side of the wrist joint can sometimes be a challenging issue to treat.
The most common causes of wrist pain on the pinky side
- Wrist Fracture
- Regardless of how severe, moderate or mild the wrist pain is present, there is a chance patient has a wrist fracture, which is another name for a broken wrist. Although the patient can move the wrist, it may be considered that bone can be broken. Delaying treatment of a broken wrist may be harmful as well as painful, so visit a hand surgeon as soon as you are feeling pain. The medial side of the severe wrist pain can be occurred by ulna, pisiform or fifth metacarpal bone fracture.
- Arthritis
- There are various types of arthritis, which affect the hands and the wrists. Arthritis in general can cause pain as well as stiffness. If the patient is experiencing wrist pain, he/she may be suffering from a type of arthritis such as rheumatoid arthritis or osteoarthritis, or arthritis because of crystal deposits in the joint from gout or pseudo-gout.
- Ulnar Impaction Syndrome
- Those who suffer from ulnar impaction syndrome condition have an ulna bone that is longer than the radius bone, which can cause it to “bump into” the smaller wrist bones. It is one type of degenerative condition.
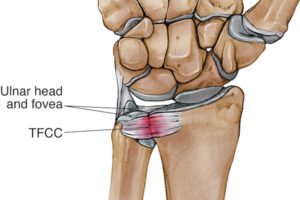
- The triangular fibrocartilage complex (TFCC) Tear
- The TFCC full form is the triangular fibrocartilage complex is an essential structure that helps to connect the forearm with the small bones in the ulnar side of the wrist joint. It may tear from natural wear or an injury or accident and maybe cause wrist pain. The TFCC is a hunk of cartilage and some associated ligaments which occupy a lot of space in the ulnar fovea area. It is a neat soft tissue structure in that it forms a sort of hammock which supports up to twenty percent of the load across the wrist. This structure might be damaged with some actions that induce a forceful end of range twisting of the wrist joint to palm up or palm down positions as may be experienced in many racquet sports activities, or through forceful loading through the ulnar side of the wrist joint as can be experienced in many sports. This injury type can be tricky due to some tears will heal on their own and some will not the quality of healing depends on how well supplied with blood vessels the damaged tissue is, and with damage more toward the ulna side healing better as well as damage closer to the centerline means the radial side of the wrist healing poorly.
- The distal radioulnar joint (DRUJ) is the joint between the two forearm bones(the radius and ulna) at the wrist. The junction between the radius bone on the thumb side and the ulna bone on the pinky side. This joint forms portion of the border of the “gap” which is filled in by the structures of the triangular fibrocartilage complex. This relationship means, the distal radioulnar joint disruption goes hand in hand with the triangular fibrocartilage complex tearing, in which ligaments important to stabilizing the distal radioulnar joint are considered part of the group of anatomic structures making up the triangular fibrocartilage complex.
- Nerve Injury
- Nerves that pass through the wrist joint can be damaged by too much pressure at some point, by stretching, or by something as minimal as a cut, causing pain, and numbness or weakness in the wrist or the hand.
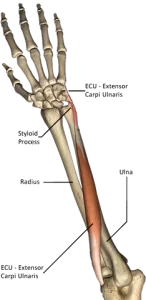
- Extensor carpi ulnaris (ECU) tendon strain
- The extensor carpi ulnaris is a forearm muscle that acts to extend the wrist at the wrist joint, which can be one of the muscles which help the patient to flick a backhand. As with many other tendons, low-level injury(mild injury) often results from repetitive strain, as happens when taking up a new activity or increasing the number of repetitions in a new activity. Occasionally this condition happens through traumatic events – a heavy serve to reach scooping action with a racquet or stick that can tear the soft structure. Putting it simply, if the patient is pumping up the jam in the sport, the patient is at the risk (especially if the patient is playing racquet sports). These injuries vary in intensity. Some extensor carpi ulnaris injuries are low-grade tendon irritation means less serious and others involve frank tearing away of the tendon sheath means more serious from the ulna bone.
- Overuse
- If the patient overuse the wrist despite having damaged tendons, the patient is more likely to get ulnar wrist pain.
- Growths
- Various types of growths such as ganglion cysts may cause ulnar wrist pain.
- Ulnar Artery Thrombosis
- When the patient has a blood clot in the ulnar artery, it leads to a painful wrist, causing ulnar wrist pain.
- Infection
- Infections may also cause ulnar wrist pain if the patient has a prior penetrating injury or even any underlying situation that leads to infections, which results in ulnar wrist pain.
- Kienbock’s disease
- In this condition loss of blood supply happens which leads to the death of the lunate bone on the ulnar side of the wrist.
Signs and symptoms of the ulnar side of wrist pain
Ulnar wrist pain, while at rest or even with movement, is a common sign of many different injuries, accidents, and medical conditions.
The most common signs and symptoms of ulnar wrist pain include:
- Pain occurs on the pinky-finger side of the wrist.
- Popping or clicking noise in the wrist is associated with the sharp pain with the movement.
- Loss of strength in the hand when gripping strongly is associated with pain.
- Loss of motion at the wrist especially with the rotation of the forearm and with the lateral motion of the wrist towards the pinky side (ulnar deviation).
- Swelling around the wrist joint along with the redness.
How to Diagnose pain on the wrist pinky side?
If the patient has severe pain, swelling, and redness, they should take the advice of a doctor for proper diagnosis. After physical examination, most doctors suggest going for some imaging test. Imaging tests will also be ordered.
Imaging tests may include:
- X-rays: Mainly used to show the relationship between the bones in the arm and the wrist to identify fractures, arthritis, deformities, signs of infection, or even tumors.
- Computed tomography (CT): This type of imaging test reveals subtle fractures, fracture healing, abnormal alignment of the bones, assess ligaments for tears or wear, and checks artery blood flow for blockages.
- Magnetic resonance imaging (MRI): This imaging test is used to check for abnormal growths as well as soft-tissue injuries, namely tendons, ligaments, blood vessels, and nerves.
- Ultrasound: Ultrasound is used for identifying foreign bodies in the wrist area, tendon ruptures, tendonitis condition, compressed nerves, checking blood flow, and assessing abnormal growths.
- Wrist arthrography: In this imaging test, with the use, of a radiopaque fluid is injected into the joint to get a clear view of the joint structures before performing many of the above imaging studies.
Special test
- Upper limb tension test for ulnar nerve impingement test
First of all, each test is done on the normal mean asymptomatic side. Traditionally for the upper extremity, the order of joint positioning starts from the shoulder followed by the elbow, forearm, wrist, fingers, and. Each joint positioning component is added till the pain is provoked or symptoms are reproduced. To further sensitive the upper limb test, side flexion of the cervical spine must be added. If pain is started in the very initial position, then there is no requirement to add further sensitizers. - If pain or sensations of tingling and numbness are experienced at any stage while performing movement into the test position or during the addition of sensitization maneuvers, particularly reproduction of neck, shoulder, or even arm symptoms, the test is positive; this confirms a degree of mechanical interference affecting neural structures of the body.
Movements performed: Shoulder girdle depression, shoulder abduction 110, shoulder external rotation, elbow flexion, forearm pronation, wrist, and finger extension.
If the pain radiates to the 4th and 5th digits, the test is positive
If the patient does not feel the radiation or pain in their hand, the test is negative.

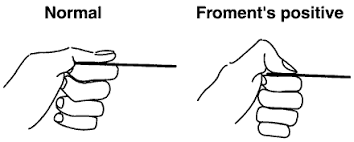
- Froment’s sign test
- It is a physical examination of the hand to test for ulnar nerve palsy which results in decreased functionality as well as muscle weakness of the pinch grip in fingers. It tests the strength of the adductor pollicies muscle of the thumb, which is innervated by the ulnar nerve and is weakened in ulnar nerve palsy. Froment’s sign is seen after damage to the ulnar nerve, which innervates the adductor policies muscle and interossei muscles, which provide adduction of the thumb in the hand and extension of the interphalangeal joint in the hand. The flexor pollicis longus muscle(innervated by the median nerve), will substitute for the adductor pollicis muscle (innervated by the ulnar nerve) and cause the thumb to go into hyperflexion movement. Ulnar nerve palsy may be a result of dysfunction at the cervical spine, elbow (cubital tunnel syndrome), or the wrist (Guyon’s canal syndrome).
- Technique
- The therapist gives the command to the patient to make a strong pinch between the thumb and index finger of the hand and grip a flat object, namely a piece of paper, and cotton clothes between the thumb and index finger. The therapist then attempts to pull the object out of the patient’s hands. There is the weakness of the adductor policies innervated by the ulnar nerve which would keep the interphalangeal joint relatively straight; instead, the flexor pollicis longus muscle which is innervated by the median nerve is substituted for the abductor pollicis and will cause the interphalangeal joint to go into a hyperflexed position.
- Janne’s sign test
- Jeanne’s sign is seen in response to pinch forces. Regardless of isolated thumb interphalangeal flexion, the interphalangeal flexion is accompanied by metacarpophalangeal joint hyperextension. Some people have normal metacarpophalangeal joint volar plate laxity, allowing hyperextension of this joint. Therefore, if it is seen, the therapist must determine whether it is related to a normally lax volar plate or to the absence of part or all (innervation is variable) of the flexor policies brevis or both. The most crucial observation is the comparison to the contralateral unaffected thumb. If both thumbs are fully innervated it is likely (but not absolute) that the pinch pattern will be the same.
- The murphy’s sign test
- It is used to test for a lunate bone dislocation. To perform murphy’s sign test, the patient should sit on a chair, then the therapist gives the command to the patient to make a fist. Whereas the patient is making a fist, the examiner or even medical professional should examine the hand. Especially, the therapist should evaluate the knuckle formed by the third metacarpal, a fancy word for the knuckle of the middle finger. If this knuckle is level with the second as well as fourth knuckles, which are the knuckles on either side of the middle finger, it is a sign, that the lunate bone is dislocated.
- Modified baker’s test
- The technique of performing this test is that the therapist asks the patient to flex the proximal interphalangeal (PIP) joint of the little finger alone while the other fingers of the hand were held extended by the therapist. Then the last and second last fingers were released to flex together to observe the improvement in the proximal interphalangeal (PIP) joint flexion. If the person is unable to flex the proximal interphalangeal (PIP) joint of a pinky finger while other fingers are restrained in extension but able to flex the proximal interphalangeal (PIP) joint of the 5th digit while the 4th digit is released, after that it shows absent of 5th tendon of Flexor digitorum superficial muscle.
- Flexor Digitorum Superficialis Test
- The position of the patient is that the hand is relaxed on the table with supination of the forearm. Then, assesses the flexor digitorum superficialis tendon’s function. To isolate the involved tendon, hold the extension of the index finger of the patient, except for the one being tested. After that have the patient flex the involved finger at the proximal interphalangeal joint. If the patient can actively flex the proximal interphalangeal (PIP)joint, the tendon is intact. If not, then the tendon may be cut or ruptured.
- Flexor Digitorum Profundus Test
- Tell the patient to take a relaxed position of the hand on a stable surface, such as a table, with forearm supination. Assesses flexor digitorum profundus(FDP) tendon function. Isolate the tendon of the flexor digitorum profundus by holding the patient’s fingers in extension position, except for the involved finger. The therapist should further isolate the distal interphalangeal joint by maintaining the metacarpal phalangeal as well as proximal interphalangeal joints of the affected finger in full extension. Then have the patient flex the finger in question at the distal interphalangeal joint. If the patient can actively flex the distal interphalangeal joint, the tendon is intact. If not, then the tendon may be cut or ruptured.
- Proximal interphalangeal and distal interphalangeal collateral ligament tests
- First of all, tell the patient to take a relaxed position with a hand supported on the table along with the forearm pronated. To assesses, the ulnar collateral ligaments of the finger joints grasp the medial as well as the lateral surface of the proximal phalanx(PF) with the thumb as well as the index finger. Use the thumb and index finger of the patient’s other hand to grip the medial as well as the lateral surface of the intermediate phalanx. Whereas, stabilizing the proximal phalanx with one hand, maintain the joint at 15 to 20 degrees of flexion. Use the other hand to radially distract the intermediate phalanx which stresses the ulnar collateral ligament of the proximal interphalangeal joint of the hand. Whereas, applying the stress, visualize as well as a feel for the abnormal opening of the joint as compared to the unaffected joint of the other hand. Basically, there should be a slight opening with a firm endpoint. The absence of the firm endpoint accompanied by associated sensations of pain or even instability indicates a sprain of the ulnar collateral ligament in the hand.
- Metacarpophalangeal collateral Ligament Test
- First of all, tell the patient to take a relaxed position by putting a hand on a stable surface like a table and the forearm is in supination. To enhance examination as well as visualization, ask the patient to slightly do flexion the unaffected fingers further into flexion than the affected finger. To assesses the ulnar collateral ligaments of the metacarpophalangeal joints. For stabilization, the physiotherapist should grasp the distal surface of the metacarpals. Use the thumb as well as the index finger of the other hand to grip the medial as well as the lateral surface of the proximal phalanx and to maintain the joint in thirty degrees of flexion. Use the thumb as well as index finger to radially distract the proximal phalanx which gives stress on the ulnar collateral ligament of the metacarpophalangeal joint. During applying the stress, visualize as well as a feel for the abnormal opening of the joint as compared to the unaffected joint of the other hand. Basically, there should be a slight opening with a firm endpoint. The absence of the firm endpoint accompanied by associated sensations of pain or even instability indicate an ulnar collateral ligament sprain.
- Gamekeeper’s thumb Test
- To assesses the ulnar collateral ligament stability at the thumb’s metacarpophalangeal joint, tell the patient to take a neutral position along with the hand relaxed on a stable surface like a table. Grasp the medial as well as the lateral surface of the first metacarpal with the thumb as well as the index finger. Use the thumb as well as the index finger of the other hand to grip the medial as well as the lateral surface of the proximal phalanx, maintaining the joint in the extension position. Apply ulnar stresses to the joint by abducting the proximal phalanx. During applying the stress, visualize as well as a feel for the abnormal opening of the joint as compared to the opposite thumb. Basically, there should be a slight opening with the firm endpoint. The absence of the firm endpoint accompanied by associated sensations of pain or even instability indicate a sprain of the ulnar collateral ligament in the hand.
- Allen Test
- Give commands to the patient to make a tight fist and open the fist fully three or four times. This test determines whether or not the radial, as well as ulnar arteries, are supplying the hand to their full capacities. During the patient is holding the last fist, the examiner places compression on the radial or ulnar artery. If upon release, blood fails to return to the palm as well as fingers, an obstruction to the arterial blood flow is possible.
Deformities
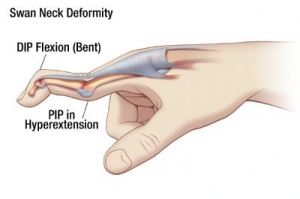
- Swan neck deformity
- It is a deformity of the finger identified by the hyperextension of the proximal interphalangeal joint (PIP) as well as flexion of the distal interphalangeal joint (DIP). Reciprocal flexion of the metacarpal phalangeal joint may also be present. A swan neck deformity is caused by an imbalance in the extensor mechanism of the digit of the hand, and the deformity starts when there is a loss of extension at the distal phalanx or tightening of the extensor mechanism at the proximal phalanx, both intrinsic as well as extrinsic, at the proximal interphalangeal joint.
- Boutonnière deformity
- It most often results from rheumatoid arthritis still it can also result from injury namely, deep cuts, joint dislocations, fractures, or osteoarthritis. In this condition, the middle finger joint of the hand is bent inward meaning toward the palm side, and the outermost finger joint is bent outward meaning away from the palm.
- Trigger finger
- It is most common among people with rheumatoid arthritis (RA)or diabetes. Repetitive use of both hands (as can occur from using heavy gardening shears) makes trigger fingers more likely to happen. In trigger finger condition, a finger becomes locked in a bent position. The finger locks when one of the tendons which flex the finger becomes inflamed as well as swollen, often with a noticeable round, raised area (nodule) in the palm. The inflammation, as well as swelling, can cause pain in the palm and in the base of the finger as well, especially when the finger is flexed as well as extended.
- Hitchhiker’s thumb
- It is developed when the thumb flexes at the metacarpophalangeal joint means connecting the thumb to the palm of the hand as well as hyperextends at the interphalangeal joint means the one just below the thumbnail. This condition is sometimes also called the Z-shaped deformity.
- Claw hand
- It is a condition in which the fingers are noticeably curved or bent. This claw hand condition can affect one or more fingers, on one or both hands. This condition gets its name from the curvature of the fingers, which makes the hands resemble a bear’s claw. Claw hand may be a congenital defect means a defect present at birth or it may be due to certain disorders or injuries. Depending on the severity of this condition, the patient may have difficulty using the hands to pick up as well as grasp items. Damage to the nerves can occur either in the arm or hand from injuries or diseases. Ulnar nerve palsy and ulnar nerve entrapment are the conditions in which nerve damage leads to the claw hand. Abnormal wear of the cartilage or even bone in the spine can cause compression on the nerves, which can also lead to claw hands.

Treatment Wrist pain on the ulnar side:
Medical treatment
- Treatment for pinky side wrist pain depends on the cause. Standardize treatments to relieve pain include:
- Take anti-inflammatory medication, namely naproxen or ibuprofen or newer non-steroidal anti-inflammatory drugs (NSAIDs), or steroid injections to reduce pain.
Physiotherapy treatment for Wrist pain on the ulnar side
Electrotherapy
- US(ultrasound): This modality helps to reduce pain and swelling, and this is only used on the pain site to get the more specialized effect.
- Wax bath therapy: This modality is used to relieve pain, redness, and swelling. It provides heat to the affected area.
- TENS(Transcutaneous electrical nerve stimulation): This modality is mainly used to reduce superficial pain.
Exercise for pain in wrist pinky side
Stretching exercise
- Stretching wrists as well as hands
- Wrist exercises may increase flexibility as well as help to lower the risk of injury. Stretching exercises are recommended as a preventive measure or to reduce slight pain. However, it should not be used by individuals with inflammation or serious joint damage unless recommended by a healthcare professional or specialist.
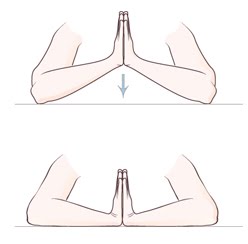
- Praying position stretching
- While standing, place the palms together in a praying position. Have the elbows touch each other. The hands should be in front of the face. The patient’s arms should be touching each other from the tips of the fingers to the elbows. With the palms pressed together, slowly spread the elbows apart. Do this exercise while lowering the patient’s hands to waist height. Tell the patient to stop when the hands are in front of the belly button or the patient feels the stretch. Hold the stretch for 30 seconds, and repeat this 3 times per session. Do three sessions per day.
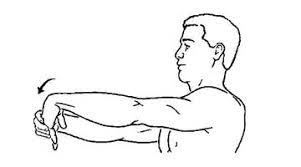
- Wrist extensors stretching
- First of all, give the command to the patient to extend one arm in front of himself/herself at shoulder height. Keep the palm down, facing the floor. Release the wrist so that the fingers point downward. With the free hand, gently grasp the fingers and pull them back toward the body. Hold for 30 seconds. Do three repetitions per session, and three sessions per day.
- Reverse prayer position stretch
- To begin with, by pressing the back of the hands and fingers together with the fingers pointing downward as well as the elbows pointing outward. Increase the intensity of the stretch by keeping the elbows in place as well as raising the hands. The patient should feel mild discomfort but not pain. Hold this stretch position for 30 seconds, and do three repetitions per session. Do three sessions per day.
- Extended arm
- To stretch in the opposite direction: extend the arm with the palm and face up toward the roof. With the hand, gently press the fingers down toward the ground. Gently pull the fingers back toward the body. Hold this position for the next 30 seconds, and do three repetitions per session. Do three sessions per day. Repeat both stretches with the other arm also.
- Clenched fists
- The physiotherapist should tell the patient to take a sitting position with the open hands on the thighs with palms up. Close the hands slowly into fists. Do not clench too tightly it. With the forearms touching the legs, raise the fists off of the legs and back toward the body, bending at the wrist. Hold for 30 seconds. Lower the fists as well as slowly open the fingers wide. Repeat three times per session. Do three sessions per day.
- Gently pull the fingers back to stretch the wrist.
- To perform this wrist stretching exercise, place the palm over the fingers of the other hand. Gently pull the fingers back toward the wrist, away from the palm. Count slowly to thirty, and then release it. Then stretch the other wrist joint in the same way. Do three sessions per day. Hold the hands outward as well as gently bend the wrist down.
- Hand stretching
- Tell the patient to hold one arm out straight in front of herself/herself. With palm down as well as fingers extended. Bend the wrist at a 90-degree angle, pointing the fingers to the ground. Use the other hand to gently pull the hand back toward the patient’s face. The patient feels the stretch in the forearm and releases. Count 30 seconds, and repeat three times per session. Then stretch the other wrist in the same way, and do three sessions per day.
- Flex as well as extend the hand over the side of a table for the wrist stretch.
- Grab a rolled-up towel or even washcloth to support the wrist while stretching. Put the towel at the edge of the table as well as rest the wrist on it, with the hand over the edge, palm facing downward facing the ceiling. Raise the hand (extending the muscle) until the patient feels the stretch in the wrist, and hold for about 30 seconds. Then lower the hand (flexing the muscle) for a good stretch. Repeat this exercise three times, and do three sessions per day. Then switch to the other wrist.
- Raised fist stretch
- To do this type of stretching exercise, start with the arm up beside the head, with the hand open. Then, make the fist, keeping the thumb outside of it. Slide the fingers toward the wrist until the patient feels the stretch.

- Wrist rotators stretching
- To do this type of stretching exercise, first of all, tell the patient to stretch the arm out in front of himself/herself. Slowly, point the fingers down until the patient feels the stretch. Use the other hand of the patient to gently pull the raised hand toward the body. Hold this position for 30 seconds. Do three sessions per day. Point the fingers toward the roof until the patient feels the stretch. Tell the patient to use the other hand to gently pull the raised hand toward the body. Hold this position for thirty seconds. Repeat this 3 times per session.
- Finger stretch
- To do the finger stretching exercise, tell the patient to bring the second last as well as last fingers together. Separate the middle as well as index fingers from the second last finger. Hold for a minimum of 10 seconds, and do 10 times per session. Repeat three sessions per day.
- Fist-opener
- To do this type of stretching exercise; tell the patient to make the fist first and hold this position in front of the patient. Stretch the fingers until the hand is flat as well as open, with the fingers together. Repeat this movement 10 times.
- Thumb pull
- First of all, to do this type of stretching exercise tell the patient to grab the thumb with the other hand. Then, gently pull the thumb backward, away from the hand. Hold the stretch for 30 seconds with three repetitions. Repeat it on the other thumb too. Do three sessions per day.
- Alternate finger stretching exercise
- First of all, to do this stretching exercise tell the patient to bring the middle as well as ring fingers together. Then, separate the pinky as well as index fingers from them. Repeat the stretch 10 times. Do around 5 times per day.
- One arm wrist stretch
- Tell the patient to reach the affected arm out in front of himself/herself with palm facing away from the patient and fingers pointing down. Keep the shoulder down as well as relaxed. Then, grab the tip of all four fingers with the unaffected hand and draw them toward the chest. Hold for 30 seconds and then release. After that flip the hand so that the palm is facing the patient with fingers still pointing down. Now, hold all four fingers with the unaffected hand and point the fingertips toward the body to stretch the top of the wrist. Hold this position for 30 seconds. Repeat 3 times per session. Do around three sessions per day.
- Pronated extensors stretching
- Perform this stretching on both sides, begin with the elbow straight as well as the palm facing downward. With the other hand, pull the wrist downward, stretching the top side of the forearm. The patient should feel mild discomfort but not pain. Hold this stretching for 30 seconds. Do three repetitions per session with three sessions per day.
- Thumb adductor stretching
- First of all, with the arm extended in front of the patient’s face. Keep the elbow straight, the palm facing in front of the patient, and the fingers pointed upward. On the other hand, gently pull the thumb downward as well as backward. Do not pull the thumb too hard. The patient should feel a light stretch at the base of the thumb. Hold the stretch for 30 seconds with three repetitions. Do three sessions of three repetitions per day.

- Thumb extensor stretching
- To begin with, by bending the thumb into the palm of the hand as well as gripping it with the other fingers. Bend the wrist towards the pinky side of the hand. The patient should feel the stretch on the thumb side of the forearm. Hold this stretch on both hands for 30 seconds, do three repetitions per session. Do three sessions per day.
- Fingertip Touches
- This exercise seems so simple, but it is stretching the tendons in the fingers. Holding the hands upright with the fingers spread comfortably apart, touch the thumbs to the pinky fingers, move on to the ring finger, and repeat until the patient touched all four fingers. Repeat a few times and then take a rest.
Passive Mobilisation
- If the range of motion of the wrist or even any metacarpal phalangeal joint is reduced then passive mobilization would be the best exercise to increase ROM.
- In the starting, traction of the radiocarpal, as well as the midcarpal joints, can be used to determine whether this provokes pain.
- To promote wrist flexion movement, a dorsal sliding technique can be used.
- Dorsal glide at radiocarpal joint
- Procedure
- The physiotherapist should stabilize the proximal hand of the patient’s elbow which is also 90 degrees from the wrist flexion position. The distal hand grasps the radiocarpal joint just distal to the radial as well as ulnar styloid processes.
- Indication
- The mobilization involves moving the row of carpal bones of the hand dorsally to promote wrist flexion.
- To promote wrist extension, the volar sliding technique can be used.
- To promote the wrist extension movement, a dorsal sliding technique can be used.
- Palmar glide at radiocarpal joint
- Procedure
- The therapist should stabilize the proximal hand of the patient with the elbow at 90 degrees from the wrist extension position. The distal hand grasps the radiocarpal joint is just distal to the radial and ulnar styloid processes.
- Indication
- The mobilization involves moving the row of carpal bones volar to promote wrist extension.
- To promote the radial deviation movement the ulnar sliding technique can be used.
- Procedure
- The wrist of the affected limb is kept in a mid-range position. The force is applied by the hand of the physiotherapist around the distal row of carpals.
- Indication
- Ulnar glide is for increasing radial deviation of the wrist joint.
- To promote the ulnar deviation movement, the radial sliding technique can be used.
- Procedure
- The wrist of the affected upper limb is kept in a mid-range position. The force is applied by the hand of the physiotherapist around the distal row of carpals.
- Indication
- Radial glide is to increase ulnar deviation of the wrist joint.
Distraction
- Wrist joint distraction
- To embark with the hand relaxed in front of the body and the palm facing towards the chest. With one hand, grip the other hand above the wrist joint as well as gently pull outward. The patient may feel as well as see some separation at the wrist joint. Hold this position for 5-10 seconds.
- Joint distraction: fingers and thumbs
- To embark with, the hand relaxed in front of the body as well as the palm facing towards the chest. With the other hand, grip the tip of the index finger and gently pull the finger outward. The patient may feel as well as see some separation at the knuckle joints. Repeat this procedure for all fingers too. Hold for 5 to 10 seconds.
Range of motion exercise for Wrist pain on the ulnar side
- Wrist extension range of motion exercise
- Tell the patient to place the forearm on a table on a rolled-up towel for padding with the hand hanging off the edge of the table, palm
- down. Then, Move the hand upward till the patient feels a gentle stretch. Then, return to the starting position without any type of hold at the endpoint.
- Wrist flexion range of motion exercise
- Tell the patient to place the forearm on a table on a rolled-up towel for padding with the hand in a neutral position. Tell the patient to move the hand upward until the patient feel a gentle stretch. Then, return to the starting position, but without any type of hold at the endpoint. Do ten repetitions per session, and three sessions per day.
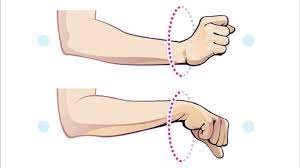
- Wrist supination range of motion exercise
- Tell the patient to take a standing or sitting position with the arm at the side with the elbow bent to 90 degrees with the hand in a neutral position. Moving the thumb outside means that the palm faces up. Do this movement ten times per session and do three sessions per day.
- Wrist pronation range of motion exercise
- Tell the patient to take a sitting position with the arm at the side with the elbow bent to 90 degrees with the hand in a neutral position. Moving the thumb inside means that the palm faces down. Do this exercise ten times per session and do three sessions in one day.
- Wrist ulnar range of motion exercise
- Tell the patient to take a sitting position with the forearm supported on a table on a rolled-up towel for padding or on the knee, thumb upward. Move the wrist down through its full range of motion. Do ten repetitions per session with three sessions per day.
- Wrist radial deviation range of motion exercise
- Tell the patient to take a sitting position with forearm supported on the table on a rolled-up towel for padding or on the knee, thumb upward. Move the wrist up through its full range of motion. Do 10 repetitions per session and 3 sessions per day.
- Thumb flexion range of motion exercise
- To begin with, tell the patient to take a sitting position and the thumb positioned outward. Move the thumb across the palm from the starting position without any type of hold at the endpoint. Do ten times per session and three sessions per day.
- Thumb extension range of motion exercise
- To embark with, tell the patient to take a sitting position with the thumb positioned outward. Give the command to the patient that moves the thumb across the palm and back to the starting position. Do ten times per session with three sessions per day.
- Hand or finger tendon glide
- Embark with the fingers extended straight out. Then, tell the patient to make a hook fist and return to a straight hand. Make a full fist and return to a straight hand back. Make a straight fist and return to a straight hand.
- Wrist Circles exercise
- With the elbows touching the sides, extend the forearms in front of the body. With the palms facing the ground, tell the patient to pretend that they are loosely gripping the handlebars on a bicycle. Move the wrists up as well as down a few times, then side to side a few times. Finally, rotate the wrists in several circles toward the outside of the body, followed by several circles toward the inside of the body.
- Hand open-and-close exercise
- With the elbows touching the sides, extend the forearms in front of the body. Make a fist and hold for a few seconds. Then, open the hand, spread the fingers wide, and hold for a few seconds. Repeat the stretch ten times. If the patient has hand or wrist pain that worsens over time, is severe, interferes with the daily activities, or does not go away, the patient should see the healthcare provider. Hand or wrist pain can sometimes be a sign of a more serious problem, namely a fracture, tendonitis, arthritis, or carpal tunnel syndrome.
- Finger exercise
- Tell the patient to make a fist and ensure the thumb is straight in position, not tucked under the fingers. Slide fingertips up a palm, tips of fingers moving towards the base of fingers until a stretch is felt by the patient. Repeat ten times per session and do three sessions per day. Wrist rotates exercise. Tell the patient to make a fist with the elbow held close to the side of the body, then slowly rotate the palm upwards and downwards until a stretch is felt in each hand. Do not hold at the endpoint. Repeat ten times per session, and do three sessions per day.
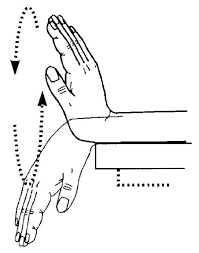
- Wave the hand to improve the range of motion
- Use the rolled-up towel or washcloth to support the wrist on the edge of a stable surface, such as a table. Hold the hand out straight, palm facing toward the side with the thumb toward the roof. Bend gently at the wrist up as well as down, kind of like the waving movement of hands. The thumb will move straight up toward the roof, and then the pinky finger will move straight down toward the ground. Hold ten seconds as the patient is moving up and down, and repeat the stretch ten times on each side. The patient can also do this exercise with the palm facing down. Bending the wrist toward the pinky finger is called ulnar flexion or ulnar deviation, and bending the wrist toward the thumb side, is called radial deviation.
- Forehead touch
- This exercise is so simple. First of all, tell the patient to stand straight with the arms at the sides and raise one hand, so the palm is resting on the forehead. Hold this position for ten seconds then slowly bring the hand down again. Repeat the exercise ten times per session. Do three sessions per day.
- Hand curl
- This exercise is another exercise that stretches the ulnar nerve. First of all, tell the patient to stand or sit upright with the arm held straight in front of the body with the elbow straight in position. Curl the wrist as well as fingers towards the body, and then extend the hand away from the body to feel a stretch in the wrist joint. Finally, bend the elbow as well as raise the hand upward. Repeat this exercise ten times per session. Do three sessions per day.
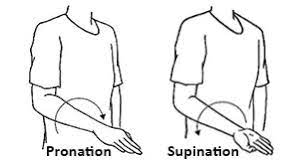
- Rotate the forearm to increase the wrist range of motion.
- In this exercise supination and pronation movements mainly occurs. First of all, tell the patient to bend the elbow at a 90-degree angle, with the palm facing down. Then rotate the forearm so the palm faces up means in supination movement and hold this position for up to 10 seconds. Then rotate the palm back down toward the ground means in pronation motion and hold for 10 seconds. Repeat this movement 10 times, and then switch to stretching the other wrist. Be sure to keep the elbow still as the patient rotate the forearm.
Building hand and wrist muscles (strengthing exercise)
Simple exercises to strengthen the wrist and hand muscles.
- Desk press
- Tell the patient to take a sitting position, and place the palms face up under a desk or table. Press upwards against the bottom of the desk at the office. Hold this position for 10 seconds per repetition. This exercise strengthens the muscles that run from the wrists to the inner elbows. Do ten repetitions per session with three sessions per day.

- Tennis ball squeeze exercise
- Tell the patient to take a relaxed position and squeeze a tennis ball or stress ball firmly for 10 seconds. When the patient does this exercise, then it should not be painful. However, it should allow the patient to strengthen the wrists.
- Push exercise
- Give the command to the patient that makes a fist as well as points the thumb up, as if the patient is giving a thumbs-up sign. Create resistance with the thumb and hand muscles to keep the thumb from moving. Gently pull back on the thumb with the freehand.
- Hold this position for ten seconds and repeat it ten times per session with three sessions per day.
- Pull exercise
- Tell the patient to make the fist and point the thumb up. Create resistance with the thumb as well as hand muscles to try and keep the thumb pointing up toward the roof. Use the free hand to gently push the thumb forward. Hold this position for ten seconds and repeat it ten times per session along with three sessions per day.
- Sponge-squeeze
- Tell the patient to squeeze a sponge or even a stress ball, by making a fist. Hold this position for 10 seconds per repetition and then relax. Repeat this exercise 10 times in one session with three sessions per day.

- Fist to jazz hand exercise
- This is another gentle exercise in which the patient should focus on hand flexibility as well as strength. Rest one arm on the table, like the patient is about to arm-wrestle someone. Then, make a fist. Slowly open the fist as well as stretch the fingers out as wide as the patient can comfortably go (do a jazz hand). Repeat 10 times per session, then switch arms.
- Wrist curl
- The patient can do this exercise with a resistance band, a dumbbell, or even just bodily resistance. If the patient is using a light resistance band, hold one end of the band down with the bottom of the foot and grab the other end with the working hand. For dumbbells, stick with 1–5 pounds, depending on the patient’s level. Sit and hold the arm at 90 degrees, with palm facing up. The arm can rest on the leg, a bench, or a table. Curl the wrist up, like it is doing a baby biceps curl. Return wrist to the embarking position.
- Repeat 10 times in one session, then switch sides. Be sure to move only the wrist. This is not a biceps curl, it is a wrist curl, so keep the arm and shoulder still while the wrist does all the work.
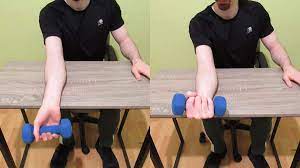
- Wrist flexors strengthening with dumbbell
- First of all, tell the patient to take a relaxed position with a hanging hand on the edge of the table. Then, hold the 500gm dumbbell in the affected hand. Give the command to the patient to move the hand upward and then relax, which helps the hand to strengthen the wrist flexors. Do ten repetitions in one set along with one set per session. Do three sessions per day. After around five days, increase the weight as well as increase the repetition.
- Grab an exercise band to increase resistance to strengthen your wrists
- First of all, to perform the wrist extension exercise, sit as well as place the forearm on the leg with the wrist out beyond the knee. Hold the resistance band with the palm facing down, and put the other end of the band under the foot, keeping the band taut. Gently bend the wrist upward as the patient counts slowly to two. Then lower the wrist slowly as you count to five. Repeat ten times, and switch sides. Then, flip the arm over as well as slowly flex the wrist upward, holding the resistance band.
- Wrist extensors strengthening with dumbbell
- To embark with, tell the patient to take a relaxed position with a hanging hand on the edge of the table, the hand must be in pronation. Then, hold the 500gms dumbbell in the affected hand. Give the command to the patient to move the hand upward and then relax, which helps the hand in strengthening the wrist extensors. Do ten repetitions in one set along with one set per session. Do three sessions per day. After around five days, increase the weight as well as increase the repetitions.
- Wrist ulnar deviators strengthening
- To embark with, tell the patient to take a relaxed position with hand in a mid-supination position on the edge of the table. Then, hold the 500 gms dumbbell in the affected hand. Give the command to the patient to move the hand down and then relax, which helps the hand in strengthening the wrist ulnar deviators. Do ten repetitions in one set along with one set per session. Do three sessions per day. After around five days, increase the weight as well as increase the repetitions.

- Wrist radial deviators strengthening
- To start with, tell the patient to take a relaxed position with the hand in a mid-pronation position on the edge of a stable surface-like table. After that, hold the 500 gms dumbbell in the affected hand. Give a command to the patient to move the hand upward and then relax, which helps to strengthen the wrist radial deviators. Do 10 repetitions in 1 set along with one set in one session. Do 3 sessions per day. After around five days, increase the weight and increase the repetitions.
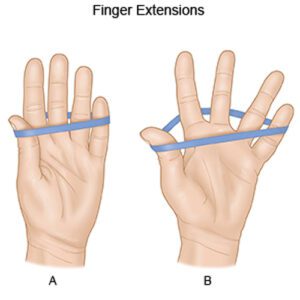
- Finger exercise with theraband
- First of all, tell the patient to wrap the theraband around the fingers which should wrap tight around the fingers, and then give the command to the patient to open the fingers as far as the patient can. Do ten repetitions per set in one session. Tell the patient to do three sessions per day.
Home remedies
- There are some practical home remedies as well as lifestyle tips that may help an individual to reduce ulnar side wrist pain.
- Some useful tips and home remedies include:
- Wearing a wrist brace for additional support, mainly when using the hand or wrist.
- Using ergonomic or even padded tools to decrease pressure on the wrist
- Avoiding repetitive activities as well as taking regular breaks while at work.
- Keeping hands as well as wrists warm.
- Give maximum rest to the affected hand
- If the patient has swelling then elevation should be effective
- Ice pack must be used in starting phase of recovery and after exercise