32 Best Workout in Gym
Creating the best workout plan for complete body muscle gain involves a combination of various exercises, progressive overload, adequate rest, and proper nutrition. A well-rounded workout plan typically includes both compound and isolation exercises targeting major muscle groups.
Table of Contents
How to start a gym workout for beginners?
The best gym practice for beginners is:
- Always warm up – The greatest dynamic stretches to do before every workout.
- Keep your workouts simple.
- Maintain consistency.
- Begin with a lighter weight than you expect – use your body weight or a weight that allows you to easily complete three sets of 8-12 reps without sacrificing form.
- Always include rest days in your weekly schedule – keep reading for expert tips on rest days.
- Always cool down after a workout – we’ve put together a list of the finest cool-down stretches.
- If the weight isn’t enough, you can always add more, but starting too heavy risks damage, especially in the early days as your body adjusts to a new habit.
What makes a good gym workout for a beginner?
As a beginner, you should concentrate on perfecting your form and technique while lifting.
- Recovery is also critical. So, depending on your goals, two strength training days and two cardio conditioning days would be great, with a day off after each strength day. We want to test the body and give it time to adjust to the demands of your workout.
- As a beginner, once you’ve established experience with free weights or resistance machines, you could benefit from splitting your strength days as follows:
1. Upper and lower body workouts are combined to make a training split.
2. Alternatively, push and pull exercises.
How to achieve your goals with gym workouts?
Whether your aim is weight loss, strength improvement, or something else, there are a few crucial things to remember when working out in the gym:
- Include rest days regularly to avoid overtraining.
- Consume a well-balanced diet that includes foods from all dietary categories.
- Keep hydrated.
- Remember to warm up and cool down; doing so will keep you safe.
- If you require assistance, consult a professional or a PT at your club.
Gym Workout:
Pushups
Pushups strengthen the arms, chest, and shoulders by engaging several muscle groups.
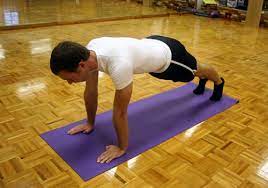
How to do it:
- Start in a plank pose, with your arms straight and your body lifted so it is parallel to the ground. To support the body, keep the feet together and the toes flexed.
- On the floor, with the fingers pointing straight forward or slightly inward, the hands should be placed shoulder-width apart.
- Maintaining a straight spine, progressively bend the elbows outward and descend the body to the floor.
- Maintain proper hip and lower back alignment.
- Lower yourself as far as you can, aiming to put your chest or chin on the floor.
- Press the body back up into the starting posture using the arm muscles.
- Maintain abdominal muscular engagement throughout to support the back.
Bodyweight squats
It can strengthen the lower limb and core by working the stomach, buttocks, hips, thighs, calves, and shins.
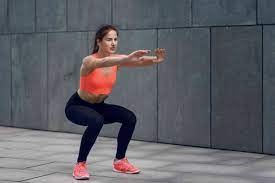
How to do it:
- Ensure that your toes are pointed outward while you stand with your feet slightly wider than hip-width apart.
- Maintain straight shoulders while keeping the hands down by the sides with the palms facing in.
- To support the back, contract the abdominal muscles.
- Maintain a flat back by shifting the hips back and bending the knees as if taking a seat.
- Continue lowering yourself to the ground until your thighs are parallel to the floor.
- To return to the beginning position, straighten up by pressing through the feet.
- Inhale while you kneel, then exhale as you stand back up.
Lunges
Lunges engage the thighs, buttocks, hips, and abdominal muscles.
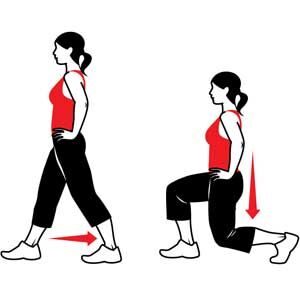
How to do it:
- Stand tall with your feet together.
- Bend the knee and place the foot flat on the ground as you step one leg forward into a long stride.
- Bend the supporting leg’s knee towards the floor.
- To return to standing, use the muscles of the forward leg.
- Repeat with the other leg.
Planks
Planks help to increase core strength by strengthening the back and abdominal muscles.
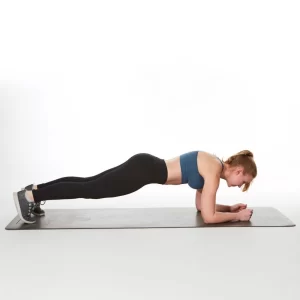
How to do it:
- Begin with the elbows on the floor and lower the arms, maintaining the elbows in line with the shoulders.
- Lift the body in a straight line horizontal to the floor.
- To support the body, keep the feet together and the toes flexed.
- Hold the position for 20-30 seconds.
- Lower slowly to the floor and rest for 1 minute before repeating 3-5 times.
- When folks are comfortable with this exercise, they can progress to a high plank. The same body alignment is used in this motion, but the participant keeps their arms straight with their hands flat on the floor, immediately underneath the shoulders.
Dumbbell rows
Dumbbell rows can help to strengthen the back while also increasing muscle growth. Muscle strength increases the body’s ability to burn calories. When relaxing, rely on a reliable source. This exercise will require two dumbbells.
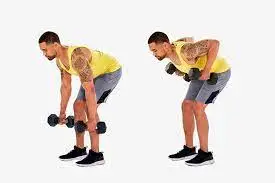
How to do it:
- Stand with your knees slightly bent and your hips tilted forward, maintaining your back straight.
- Hold the dumbbells in front of you with your arms straight and the insides of your wrists facing each other.
- Return one hand to the beginning position after pulling it towards the rib cage.
- Repeat with the other arm.
- Continue alternating sides for 8-10 reps per set.
Deadlift
Target muscles include the entire body, hamstrings, quadriceps, gluteals, lower back, and trapezius.
Barbell is required as equipment.
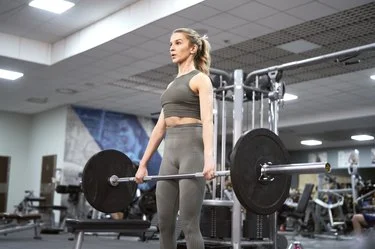
How to do it:
- To begin, choose a light barbell. Position your feet shoulder-width apart (or a little wider) with your toes under the bar. The feet might point straight front or slightly outward. Heels should be kept flat on the ground. When you raise it, the bar will come close to and possibly graze your shins. Maintain a neutral spine position.
- Brace the abdominal muscles to keep them stable.
- Squat down and bend your knees. Parallel to the squat, but not the same, form is required for the descent to the bar. Your back should be erect or slightly arched, not rounded at the shoulders or spine.
- Using an overhand or mixed grip, grab the bar just outside the line of the knees.
- Lift the bar by pushing up from the knees with your legs. Exertion causes you to expel your breath. Take care not to raise the hips first, causing the trunk to move forward and the back to around. As the legs push up, the arms remain extended and grab the bar with tension. Consider the legs and shoulders going upward in sync with the hips, which are the balancing points.
- As you reach full height, the bar should almost graze your shins and rest about thigh level. Pull your shoulders back as far as you can without leaning backward.
- Lower the bar to the floor in a reverse motion, keeping your back straight.
- Repeat for the appropriate number of times.
Plate Press out
A plate is required as equipment.
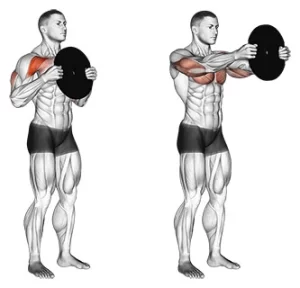
How to do it:
- With the smooth side facing out, hold two small plates between your palms in front of your chest.
- Focusing on your chest, squeeze the plates together and extend your arms out in front of you all the way.
- Return the weights to your chest after stretching your lats.
- Once you have completed all of your reps, press the weights down at a 45-degree angle from your chest for the second set.
- The next set requires you to press them up at a 45-degree angle.
Bench Press
The chest, triceps, and shoulders are the primary targets.
Weight bench and barbell (or dumbbells) are required.
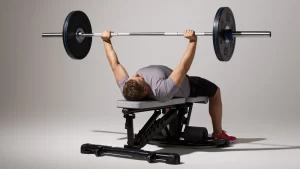
How to do it:
- If an exclusive bench press rack is not available, you can use a regular flat bench instead. Dumbbells or a barbell are other options for performing bench presses. Whatever you choose, make sure it’s the right weight for you.
- Lie down on the bench below the rack that supports the bar. Your buttocks, shoulders, and head are flat on the bench, and your spine is neutral. Your feet are level on the floor and somewhat close together.
- Pull your shoulder blades forward behind you when pressing to prevent pressing with rounded shoulders.
- Use an overhand grip, while keeping your thumbs on the outside of your clenched fist. Your arms are slightly broader than shoulder-width apart, and your upper arms are at a 45-degree angle to the body.
- Maintaining a locked-elbow position, remove the barbell off the rack. (Do not transfer the bar directly from the rack to the chest position in an arc.)
- Take a breath as you lower the bar to your chest, right below the nipple line.
- Maintaining a locked-elbow position, remove the barbell off the rack. Pay attention to the ceiling rather than the bar.
- Lower the bar till it is just over your sternum. The next bench press is going to start here.
- Once you’ve completed your reps, place the bar on the rack with your elbows locked out. Lower the bar to the barbell rest by gradually moving the bar backward until you feel the rack uprights.
- Avoid hitting the rack rests directly. If you miss, you risk losing control, which is dangerous.
Leg curl
The hamstrings, calf muscles, glutes, quadriceps, and shins are the muscles targeted.
Leg curl machines are required.
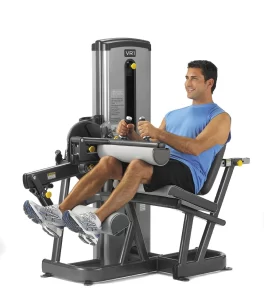
How to do it:
- Stretch your legs out fully while lying face down on the lying leg curls machine. The roller pad should be placed a few inches above your heels, right above your calves. Take hold of the support handles on either side of the device.
- Exhale and flex your knees, bringing your ankles as near as possible to your buttocks. Keep a strong grasp on the bench with your hips.
- Hold for a few seconds.
- Inhale as you slowly and deliberately return your feet to the beginning position.
Barbell Shoulder Press
Shoulders, upper back, mid-back, and core are all targets.
Barbells and weight plates are required.
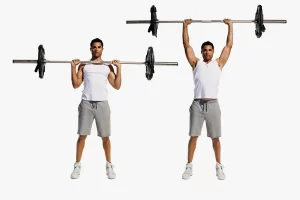
How to do it:
- Position the barbell in front of your shoulders on a power rack. You should be able to remove the bar from the rack without standing on tiptoes or bending too far down.
- Stand shoulder-width apart with your feet shoulder-width apart and your hips and knees fully stretched, but not locked. Hold the barbell in a front-rack posture (on your front shoulders), elbows pointing forward, and hands shoulder-width apart. This is where you’ll begin.
- As you exhale, tighten your core, squeeze your shoulder blades together, and press the barbell above.
- Continue pressing until your arms are completely locked out. This motion should feel like you’re pushing your head through the “window” created by your arms.
- While inhaling, use your back muscles and return the barbell to the front-rack position with control.
- Repeat these actions to finish the exercise, or place the bar back in the power rack for more sets.
Kettlebell Swing
The glutes, hamstrings, hips, core, shoulders, and back are the muscles targeted.
Kettlebell is required.
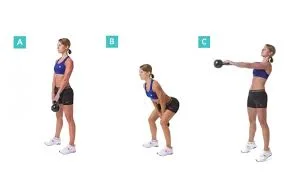
How to do it:
- Put the kettlebell just in front of your feet, which should be significantly outwardly tilted and more apart than hip distance. Bend your knees slightly and keep your shoulders rolled back, your abs engaged, and your belly button drawn towards your spine.
- As you stretch your hands for the kettlebell handle, press your hips back and forward. Don’t squat and keep your back straight. If your knees begin to bend excessively, you will lose your hip hinge. If this happens, reset and work on pressing your hips back.
- Inhale as you firmly grab the kettlebell handle with both hands. Roll your shoulders back slightly to help regulate the swing’s velocity while avoiding a forward curvature in the spine. Your core is still active.
- Exhale and squeeze your glutes and hamstrings as hard as you can to raise to an upright position in one forceful movement. Make sure your hips do not extend above your shoulders during this section of the workout, and allow the kettlebell to swing forward as high as it will naturally go, which is normally around shoulder height.
- Push your hips back and, as you exhale, allow the kettlebell to naturally fall backward towards the floor. Allow your weight to swing between your legs while keeping your neck and spine neutral.
- Continue the kettlebell swings, keeping your chest straight and using your hips and glutes to push the movement. Exit the action slowly by dropping the kettlebell or bringing your momentum to a halt. Every time you swing the kettlebell, lessen the force you utilize until you can do it easily and securely.
Seated Cable Row
Back and forearms are the primary targets.
The cable machine is required as equipment.
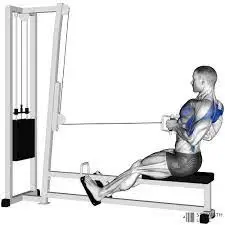
How to do it:
- Place your hands on the cable attachment while sitting on the bench with your legs bent. It usually has a triangle handle, however, it could also be a bar.
- Position yourself with your knees slightly bent, so that you must reach out with your arms to grab the handle without folding your lower back over. Prepare to row by bracing the abdominals.
- Pull the grip and your weight back towards your lower abdomen, avoiding leveraging the row’s momentum by dragging your torso back with your arms.
- By maintaining your back straight and pulling your shoulder blades together while you row, you can target the middle to upper back.
- Return the handle under strain to full stretch, remembering to keep your back straight even if your hips are flexed. If essential, carry out the practice again.
Face Pulls
Deltoids are the targets.
A cable pulley machine is required.
How to do it:
- Install a cable pulley machine so that the pulley system is slightly above your head. For this exercise, use the rope attachment with two handholds.
- Reach up and take hold of the handles with both hands, palms facing in. Step back until your arms are fully extended, then engage your core and slightly lean back, producing a 20-degree angle with your body.
- Return the handle under strain to full stretch, remembering to keep your back straight even if your hips are flexed. Rep the exercise a total of four times.
- You shouldn’t allow your shoulders to slump or roll forward. Once you have lifted a small amount of weight from the stack by pulling the rope just slightly towards you, tighten your shoulders by rolling them back. This is where you’ll begin.
- Pull the attachment’s handles straight up to your brow. Maintain a palms-in position while your elbows flare outward towards the sides, engaging the back delts.
- Reverse the motion and slowly extend your arms without letting your shoulders or chest drift forward. Throughout the activity, you should maintain good posture.
- Begin with two sets of 20 repetitions. Go lighter than you believe you need to and concentrate on steady, controlled motions.
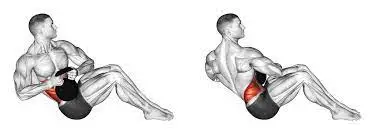
Reverse Crunch
Abdominals are the primary targets.
An exercise mat is required.
How to do it:
- Lay face up on the mat, arms by your sides. They can be closer to your body or comfortably extended for balance.
- Bend your knees and brace your abs as you slowly raise your legs until your knees are squarely above your hips and your lower legs are parallel to the floor (bent 90 degrees). This is your starting point. Brace your abdominal muscles and maintain a neutral spine position with a tiny natural curvature in the lower back (lumbar) region, but your back is firmly against the floor.
- As you exhale, contract your core to curve your hips and knees towards your chest, lifting only your hips off the mat. Maintain the same angle of your knees throughout this ascending phase.
- Keep your head upright, and keep your neck and shoulders relaxed and on the mat. When you can’t curl without your back coming off the mat, hold.
- Put your hips back on the mat and bend your knees over your hips to a 90-degree angle as you gently return to the starting position.
- Perform 10 repetitions for three sets of 10 repetitions, increasing the number of repetitions as you gain strength.
Dumbbell lunge
Gluteus maximus, quadriceps, and hamstrings are the muscles targeted.
Dumbells are required.
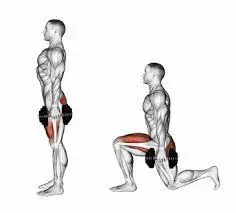
How to do it:
- Stand with a dumbbell in each hand.
- In a lunge, advance one step while lifting your left leg. Wait for a beat.
- Return to the beginning posture by pushing off your left leg and repeat. Perform 10 reps per leg.
Russian twist with kettlebell
Core and abs are the goals.
Kettlebell is required.
How to do it:
- Place your ankles together on the floor. The bottom of the kettlebells must be grasped by both hands.
- Twist your arms to one side, allowing your body to follow but your back to remain straight, while securely clasping the kettlebell.
- Twist the kettlebell as much as you can until it is almost touching the floor. Twist back through the center and over to the other side, engaging your core. Perform 10 repetitions.
Renegade Row
Traps, lats, rhomboids, delts, abs, obliques, biceps, triceps, and forearms were all worked out.
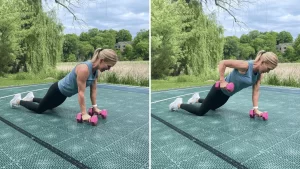
Build a strong back, energize your abs, and improve anti-rotational core strength all at once. While it’s easy to concentrate on the ‘row’ component of the movement, the key to getting the most out of this motion is to focus on your plank placement.
How to do it:
- Put your hands on the grips of two dumbbells and perform a press-up.
- Row the right dumbbell up to your abs while keeping your core tight, then return to the starting position.
Flat Dumbbell Fly
Delts, pecs, rhomboids, serratus anterior, rotator cuffs, and biceps were exercised.
Believe it or not, this motion is more effective than the bench press in stimulating the chest muscular fibers that stimulate growth – and it doesn’t require nearly as heavy weights. Just be careful not to lock your arms out during the extension, or the load will shift away from your pecs and onto your elbow joints.
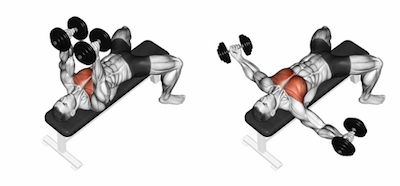
How to do it:
- Lie down on a flat bench with two dumbbells at your shoulders, palms facing in.
- Lift the dumbbells until your arms are nearly fully stretched. This is where you’ll begin.
- From this position, arc the weights down to your sides with a small bend in your arms until you experience a stretch across your chest.
- By reversing the movement, squeeze your pecs to restore the weights to the starting position.
Treadmill
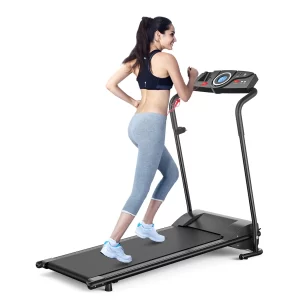
How to do it:
- Get acquainted with the treadmill you’ll be using. Make sure you understand how to change the speed and incline. If you’re utilizing a treadmill at your gym, a member of the staff can help you.
- Before walking onto the treadmill, stretch. To loosen up your joints and muscles, do five to ten active stretches. Dynamic stretches are performed while moving. You can, for example, walk around with your knees as high as possible. Then, swing your legs forward and backward, gradually increasing the height of the leg lift as your muscles loosen. Swing your arms forward and back and practice slow, controlled arm circles to warm up your arms.
- Step onto the treadmill, but do not stand directly on the belt. Grab the handrails and set your feet on the belt’s sides. If the machine has a safety kill switch, attach it to your clothing and press the “Start” button.
- Start your training with a five-minute warm-up. The intensity of this warm-up is determined by what you intend to do in your workout. If you want to undertake a speed walking workout, walk slowly. If you want to undertake a steady state running workout, walk quickly or softly jog. Finish your warm-up by gradually increasing your speed to your preferred pace and performing your workout.
- Proper form is required when walking or running. Maintain a straight back, broad shoulders, and forward-looking eyes. Leave your hands off the railings once you’ve removed them. Pump your arms and legs together smoothly.
Indoor Bike
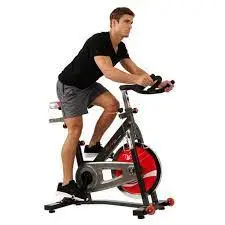
How to do it:
- Adjust the height of your seat or saddle. Place yourself next to the bike, facing the front. The seat should rest directly on your hip bone. Another technique to check the height is to stand next to the bike and lift one leg. Bend your knee and maintain a 90-degree angle with your leg. The saddle should be parallel to your bent leg.
- Change the direction of your saddle. This is the distance between you and the handlebars. Sit on the bike to choose the best location for your saddle.
- Most people can get away with a neutral, middle position, but the most accurate way to adjust is to make sure your knee is in line with your toes as you pedal.
- From your knee to your toes, you should be able to draw a straight line. Just make sure your knee doesn’t cross your toes.
- Adjust the height of your handlebars. The important thing to remember is that your spine should never flex or arch while utilizing the handlebars. Place them at a height that permits you to maintain a neutral spine even if you’re bending forward during a hill climb.
- You don’t want to slip or slide when working out.
- Use a strap or a clip to fasten your shoes.
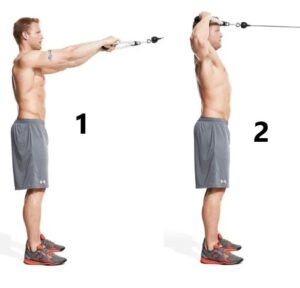
Cable Cross-Over
Pecs, anterior deltoids, and triceps were worked.
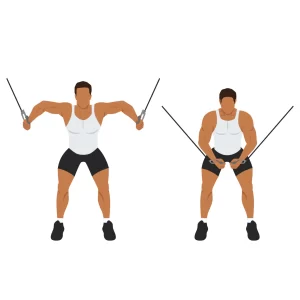
How to do it:
- An appropriate height for the pulleys on a cable pulley machine is just above shoulder level.
- Take hold of the handles and position yourself in the center of the machine.
- Walk out until the cable is taut with your arms spread.
- Starting with your arms slightly bent up and out to the side, pivot from your shoulders to bring the wires down and across your chest until your hands cross over.
Mountain Climbers With a Medicine Ball
Mountain climbers are a full-body exercise that is made more difficult by the addition of a medicine ball.
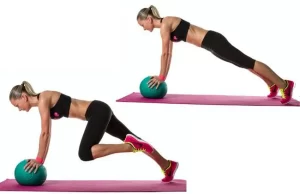
How to do it:
- Position yourself in a plank position with the medicine ball beneath your hands.
- Drive your right knee up towards your chest while keeping your back and neck straight. Extend it, then drive your left knee up towards your chest. Maintain core engagement throughout.
- Continue for 30 seconds, going as fast as you can without compromising form. Take a 30-second break. Repeat two more times.
L-Sit pull-up
Lats, Abdominals, Biceps, Chest, Forearms, Glutes, Groyne, Hamstrings, Hip Flexors, Lower Back, Middle Back, Obliques, Quads, and Shoulders are the muscle groups involved.
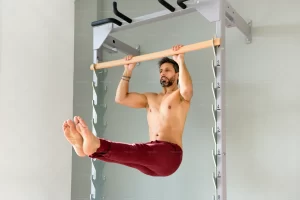
How to do it:
- Hang down with your hands palms down around a pull-up bar.
- Raise your legs parallel to the ground and make an L shape with your body.
- Raise yourself with your arms while keeping your legs parallel to the ground. Reverse the process by slowly lowering your arms.
Pec Deck
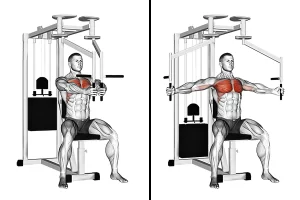
How to do it:
- Arrange the Pec Deck so that the vertical bars are near the machine.
- Make sure the handles are at or near your chest level. As you turn away from the machine, extend your hands, first one, then the other.
- Pull the grips together and avoid the urge to tense up as you return.
Wide-Grip Dips
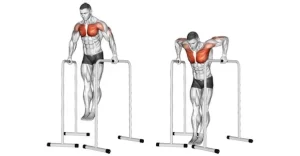
How to do it:
- Using two parallel bars that are a few inches wider than shoulder-width apart, support your body while maintaining a straight line of sight with your arms.
- Descend until your torso is nearly parallel to your hands, then push back up to your starting position with your elbows locked out.
- As you drop, keep your torso somewhat horizontal, emphasizing your chest muscles over your triceps.
Barbell Squat
The hamstrings, glutes, and lower back muscles are all engaged.
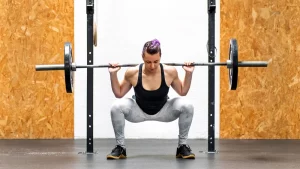
How to do it:
- Set up a barbell in the squat rack at the optimum height for your height. The barbell should be just below your shoulders. Make sure you have adequate space to back up a few steps after unracking the barbell.
- Step underneath the barbell and lay your hands on both sides of it while facing the barbell. The barbell should rest on your upper back muscles.
- Unrack the barbell and take a few steps back until you’re only a few inches away from the barbell rack.
- Maintain a tall posture, with your feet slightly wider than hip-width apart and your knees slightly bent. Your shoulders should be directly above your hips, with your head and neck in a neutral position. Maintain your chin tucked throughout the action as if you were holding an egg beneath your chin.
- Distribute your weight evenly over your feet, from toe to heel. Grab the floor with your feet to form a stable foot stance.
- By turning your shoulders outward, you may activate your lats and upper back.
- Engage your abdominal muscles while tensing your shoulders and hips. Both your pelvis and your ribs should be somewhat tucked.
- Flex your hips, knees, and ankles to start the downward motion while maintaining balance.
- Your legs should be parallel to the floor or just barely below it after you’re finished lowering them. As you lower, keep your weight equally distributed on your feet.
- At the bottom, pause for a second.
- To start the upward movement, drive your feet into the ground and stand up. Maintain the engagement as you press into the midfoot and heel.
- As you begin to stand, maintain your chest high, clench your glutes, straighten your knees, and move your hips forward.
- Squeeze your glutes and quadriceps as you finish the exercise, keeping your spine neutral.
- After each repetition, your shoulders should be directly over your hips.
- Think of your pelvis as a vessel filled with water that you are attempting to keep from spilling out the front, back, or sides.
Barbell Glute Bridge
The muscles gluteus maximus, gluteus minimus, and gluteus medius are exercised.

How to do it:
- Make a mat to cushion your body.
- Lie down on your back.
- Roll a barbell across your legs and place it where your hips bend. Consider utilizing a wraparound barbell pad to cushion the weight against your body.
- Bend your knees 90 degrees so that they are pointing up at the ceiling.
- Maintain a flat foot on the floor.
- Wrap your fingers around the barbell.
- While holding the barbell, use your heels to push your hips upward. Your shoulders and head will be parallel to the floor. Your knees should still be pointing up, and your body should be in a straight line from your shoulders to your hips. While in this position, you may notice your abdominal muscles tightening.
- Hold this elevated stance for a few seconds before slowly lowering yourself to the floor.
- Depending on your strength, endurance, and the weight of the barbell, bring your body slowly into and out of this position for up to 10 repetitions.
- During your workout, repeat the exercise for 2 to 3 sets with the same amount of reps. Between sets, you should take at least a few seconds to relax.
Standing Machine Twist
It helps you avoid back issues by strengthening your abdominal and oblique muscles.
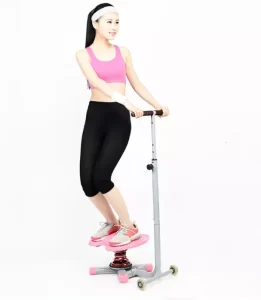
How to do it:
- Hold the machine handles while standing on a twisting machine with your feet hip-width apart.
- Maintain a normal posture by keeping your back straight.
- Exhale and, tensing your abs, slowly shift your pelvis to the right, as far as you can.
- Hold the stretch for several seconds before inhaling and returning to your starting posture.
- Extend the stretch on the opposite side, this time to the left, as far as you can without moving your head or upper torso.
Cable Side Bend
The cable side bend is a core strengthening exercise that focuses on the obliques specifically. This exercise also strengthens the lower back and hips.
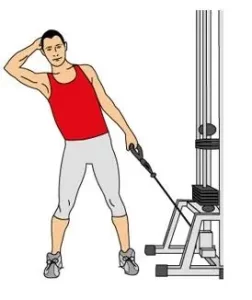
How to do it:
- Attached a D-handle to a low pulley and stood side by side with the weight stack.
- Right-handedly grasp the D-handle while maintaining a right-facing pulley while standing.
- In the direction of the pulley, laterally flex (bend sideways) your body.
- Straighten your arm and get it close to your torso.
- Your torso should be bent away from the pulley as you raise the D-handle.
- Bend your torso towards the pulley to slowly drop the D-handle back to the starting position.
- Replicate as many times as necessary to reach the target number of times.
- Turn around and do the cable side bend again on your left side.
Abs Wheel Rollout
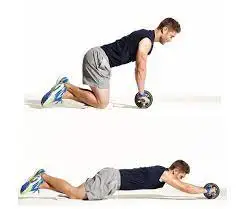
How to do it:
- Kneel on the floor and grab the ab wheel roller with your hands in the start position; your arms should be straight and your torso upright.
- Your knees and toes should be the only parts of your body that touch the floor while you let the abs wheel progress as far as it can.
- Your body and upper legs should be parallel to the floor and just a few inches above it at the finish position.
- Once your torso is upright again, pull the abs wheel in the opposite direction, back towards your knees.
- Rep as many times as you can.
Rowing machine
The rowing machine is a wonderful alternative for a complete body aerobic workout.
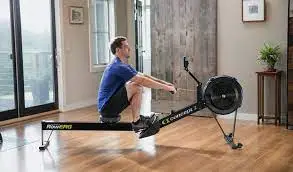
How to do it:
- Arms at your sides, back straight ahead, and knees and ankles bent so that your shins are practically vertical, sit upright on the rowing machine. This involvement will help to safeguard your lower back. Then, lean forward slightly while keeping your back straight.
- Begin by pressing with your legs while bracing and contracting your core. Lean back to around 45 degrees when your legs are straight. The final action involves pulling the handle towards your body, a few inches over your belly button. Keep the following body movement sequence in mind: legs, core, hips and shoulders, arms.
- Although you won’t be here long, this is the resting stance opposite the catch position. Legs are long, shoulders and back are bending away from the legs, hands (and handle) are brought in towards the body, and elbows are tucked in towards the torso.
- To return to the catch position, repeat the driving actions in reverse order. Extend the arms, swing the hips forward, and bend the knees to bring the torso over the legs.
Leg Press
Quadriceps, hamstrings, glutes, and even calves are targeted.
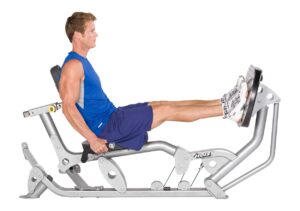
How to do it:
- Select the necessary weight and adjust the seat so that the knees are slightly bent over right angles.
- Set your feet shoulder-width apart.
- Try to push through your heels while maintaining your knees aligned over your toes.
- Extend the legs until they are virtually straight, but avoid locking the knees.
- Replacing the weight in its starting position slowly is important.
- A rep for the required amount of representatives.
Summary
In conclusion, incorporating regular gym workouts into one’s lifestyle can bring about a multitude of benefits that positively impact both physical and mental well-being. Engaging in a consistent exercise routine at the gym helps to improve cardiovascular health, increase muscular strength and endurance, and enhance flexibility. Not only does it promote weight management and body composition improvements, but it also boosts metabolism and energy levels, leading to a greater sense of vitality and overall fitness.
Additionally, gym workouts offer an opportunity to socialize and interact with like-minded individuals, fostering a supportive and motivating environment. Furthermore, the release of endorphins during exercise contributes to reduced stress and anxiety, leading to enhanced mood and mental clarity.
Nevertheless, it is essential to tailor the workout program to individual preferences and fitness levels, ensuring safety and effectiveness. Overall, by making gym workouts a part of one’s routine, individuals can pave the way toward a healthier, happier, and more fulfilling life.
FAQs
Before a workout, aim for a small meal or snack with a good balance of carbs and protein about 1-2 hours before exercising. Afterward, focus on a meal rich in protein and carbohydrates to aid in recovery and muscle repair.
To minimize the risk of injury, always warm up properly, use correct form during exercises, avoid lifting too heavy weights beyond your capacity, and listen to your body. Don’t hesitate to ask for help from gym staff or personal trainers if you’re unsure about an exercise.
The frequency of gym workouts depends on your fitness goals and experience level. Generally, beginners can start with 3-4 sessions per week, while more experienced individuals can aim for 4-6 sessions. It’s essential to include rest days to allow your muscles to recover and prevent overtraining.
It depends on your primary fitness goals. If you want to focus on building strength and muscle, do your strength training first. If cardiovascular fitness is your priority, start with cardio. Alternatively, you can do a mix of both, just ensure you warm up adequately before each.
Yes, warming up is vital. It helps increase blood flow to your muscles, enhances flexibility, and prepares your body for the workout ahead. Spend 5-10 minutes doing light aerobic exercises or dynamic stretches.
Set clear, achievable goals, track your progress, and find a workout buddy or join group classes to stay motivated. Also, reward yourself for reaching milestones, and remember that consistency is key to seeing results.
Results vary depending on various factors like effort, consistency, diet, and genetics. Expect noticeable changes after a few weeks of regular training.