28 Best Exercise For Posterior Tibial Tendon Dysfunction
Table of Contents
What is posterior tibial tendon dysfunction?
Posterior tibial tendon dysfunction (PTTD) is described as a painful condition that involves the foot and ankle portion of the body. This can affect your ability to walk or perform certain lower-body movements. Posterior Tibial Tendon can be treated with non-surgical or surgical methods.
Posterior tibial tendon dysfunction (PTTD) is a problem that causes foot and ankle pain. It is also known as posterior tibial tendinitis or posterior tibial tendon insufficiency.
The posterior tibial tendon connects the calf muscle to the bones on the inside of the lower leg. The main purpose of the tendon is to support the arch of the foot on the inside of the foot. If the tendon is damaged or torn, it may no longer support the arch. This can be a painful injury that negatively affects foot and ankle activities, including walking and running. posterior tibial tendon dysfunction is the most common reason of acquired talipes equinovarus in adults.
Tendon degeneration begins long before clinical disease appears. Early detection of posterior tibial tendon dysfunction can prevent operative correction; in case of progression, surgical reconstruction with osteotomy and arthrodesis becomes necessary. risk factors for the disease include hypertension, obesity, diabetes, previous trauma, or exposure to steroids.
stages of posterior tibial tendon dysfunction
There are four stages of tibial tendon dysfunction:
- Stage I: The tendon is damaged but otherwise intact.
- Stage II: The tendon has ruptured (torn) or is not working properly. The leg is deformed.
- Stage III: The leg is significantly deformed. There are degenerative changes in the connective tissue (cartilage) at the back of the leg.
- Stage IV: there are degenerative changes in the ankle joint.
Clinically Relevant Anatomy
The tibialis posterior originates from the posterolateral tibia, the posteromedial fibula, and the interosseous membrane. Anatomy of the tibial posterior tendon.
It runs through the deep dorsum of the foot and its tendon runs behind the medial ankle. This area has the weakest blood supply to the tendon and is the most common site of rupture.
Near the point of attachment, the tendon divides into main, plantar, and recurrent parts, with the main component inserted into the navicular tubercle, the second, third, and fourth metatarsals, second and third phalanges of the plantar, and the sacrum. The Achilles tendon is connected to the calcaneal tubercle. They are responsible for the planterflexion movement.
The hind tibia functions as the primary dynamic stabilizer in the medial long arch and as the primary investor in the midfoot.
Its contraction also raises the medial longitudinal arch, resulting in a rigid structure in the rear and midfoot. This allows the gastrocnemius to work more efficiently during the gait cycle. If damaged, pes planus foot can occur and can put more stress on the surrounding ligaments and soft tissues.
Differential Diagnosis
Although posterior tibial tendon dysfunction is the most common cause of acquired clubfoot deformity in adults, many other conditions are associated with it. The diagnoses listed below can be very similar to posterior tibial tendon dysfunction and should be considered in the assessment:
Tarsal coalition
Inflammatory arthritis
Charcot arthropathy
Neuromuscular disease
Traumatic disruption of midfoot ligaments
How is posterior tibial tendon dysfunction diagnosed?
Your healthcare provider will look for swelling of the tibial tendon at the ankle and the back of the foot. They move your foot from side to side and control the range of motion of your ankle. Swelling, tenderness, and pain or weakness when moving the foot or ankle are early signs of posterior tibial tendon dysfunction.
Your provider will examine the back of your foot to look for changes in its structure or shape. Your heel can point outward and your inner arch can rest on the ground. The forefoot can also move away from the body to balance heel and arch changes. On the back of your foot, your provider will also look for signs of “too many toes.” In a normal foot, only the fifth toe (pinky) and portion. Those with posterior tibial tendon dysfunction may have more toes visible.
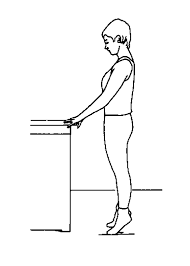
The one-limb heel-raise test can also determine the health of the posterior tibial tendon. In this test, you stand next to a wall or a chair to support your balance. Then you lift the whole leg off the ground and try to lift the sick leg up onto the toes. If the tendon is healthy, you should be able to comfortably perform 8-10 heel lifts. In the early stages of posterior tibial tendon dysfunction, it may not be possible to do any heel lifts.
What tests can diagnose posterior tibial tendon dysfunction?
Imaging tests can help your doctor confirm a diagnosis, including:
X-rays: Anterior, posterior, and lateral views of X-rays of both legs provide detailed images of the bones. X-rays can help detect arthritis or a fallen arch. They also help detect joint degeneration in the later stages of posterior tibial tendon dysfunction.
Magnetic resonance imaging (MRI): MRI can determine the health of tendons and surrounding muscles. Early on, MRI can be used to plan non-surgical treatment. In later stages, MRI can be used to plan surgical treatment.
Computed tomography (CT scan): A CT scan creates a 3D image of your soft tissues and bones. It provides more detailed images than X-rays. A CT scan can help identify arthritis or confirm posterior tibial tendon dysfunction.
Ultrasound: Ultrasound can be used to examine the size of the tendon, detect tendon degeneration, or spot fluid in the tissue surrounding the tendon, which may be present in the early stages of posterior tibial tendon dysfunction.
Causes of Posterior Tibial Tendon
A serious injury from a fall can cause a tear or inflammation of the posterior tibial tendon. The tendon can also tear from extensive use. This usually applies to athletes who participate in vigorous sports or activities such as tennis, soccer, basketball, or long-distance running. If the tendon is torn or inflamed, the arch will slowly collapse. Obesity
Hypertension
Diabetes
Use of steroids
Previous surgery in this area
Diseases that cause inflammation, such as Reiter’s syndrome
Too much force is applied to the leg (for example, you are running on an incline)
Tissue injuries in the foot or ankle
Current joint diseases
recurrent posterior tibial tendinitis
abnormal talus anatomy
degenerative changes associated with osteoarthritis,
progressive degeneration of the soft tissues that support the medial side of the foot
In addition, the tendon weakens as we age or may break completely. Therefore, Posterior Tibial Tendon is more common in women and people over 40 years of age. Younger people rarely report this condition, but it can still occur as a result of an injury.
Posterior Tibial Tendon Dysfunction Symptoms
Some common symptoms of hamstring tendon dysfunction include:
Swelling on the inside or outside of the ankle and foot
Arch collapse
Damage to the bone of the leg
Inability to stand on tiptoes
Difficulty walking on uneven surfaces
Difficulty going up and down stairs
One foot wears shoes differently than the other
Pain when standing on the toes
Pain and swelling on the inside of the foot and ankle (worse during any activity, such as standing or walking)
Turning the ankle inwards
Pain in the outer ankle (caused by the collapse of the foot, which puts more pressure on the outer bone of the ankle)
The foot and toes begin to rotate outward
Physical Therapy for Posterior tibial tendon dysfunction
Posterior tibial tendon dysfunction (PTT) causes pain on the inside of the foot or ankle. Pain creates a hurdle while running. Working with a physical therapist can help relieve your pain so you can return to your normal activities.
The goals of therapy for Posterior tibial tendon dysfunction disease are:
Helps the foot and ankle move without pain
Improves foot and ankle range of motion
Strengthens the foot and ankle
Correcting the position of the feet with exercises or special foot pads called orthotics
Helps to return to a normal level of functioning
Your physical therapist may use different techniques to help you. For example, they can use:
Manual techniques
Therapeutic methods
Kinesiology taping
Exercises
Exercise for posterior tibial tendon dysfunction
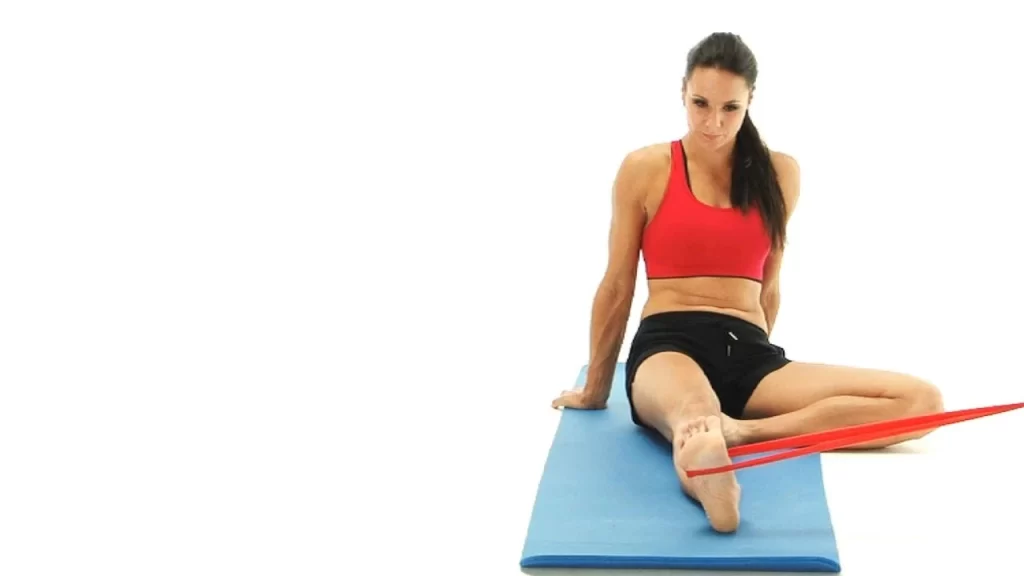
Seated calf stretch

For the calf stretch, you will need a resistance band for this stretch, but if you don’t have one, try using a kitchen towel. Sit on the floor with one leg straight out in front of you and the other bent, then use the straight leg to circle the bottom of the leg against the resistance. Hold one end of the band in each hand and pull the band toward you to bend your leg and stretch your calf.
Hold the end of the movement for about 15-30 seconds. you can also increase the holding time during the progression period. then change the side and repeat the same procedure for the other leg. The calf muscles are important for controlling foot movement (dorsiflexion, plantarflexion) during walking and running.
Calf strength determines your gait and ability to run short (sprinters) or long (marathon) distances and also determines what speed you can run. You should also strengthen the calf muscles, as they are directly connected to the Achilles tendon.
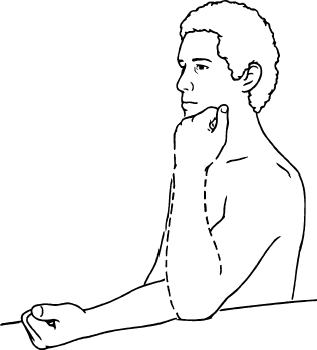
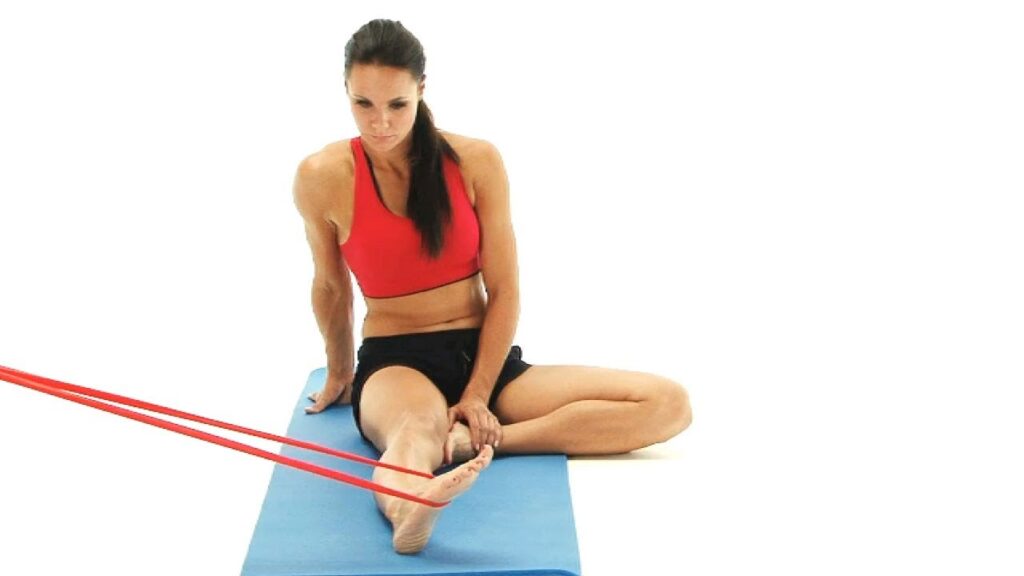
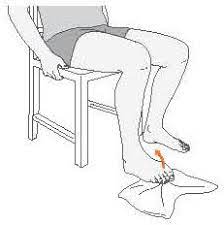
Hamstring muscle strech
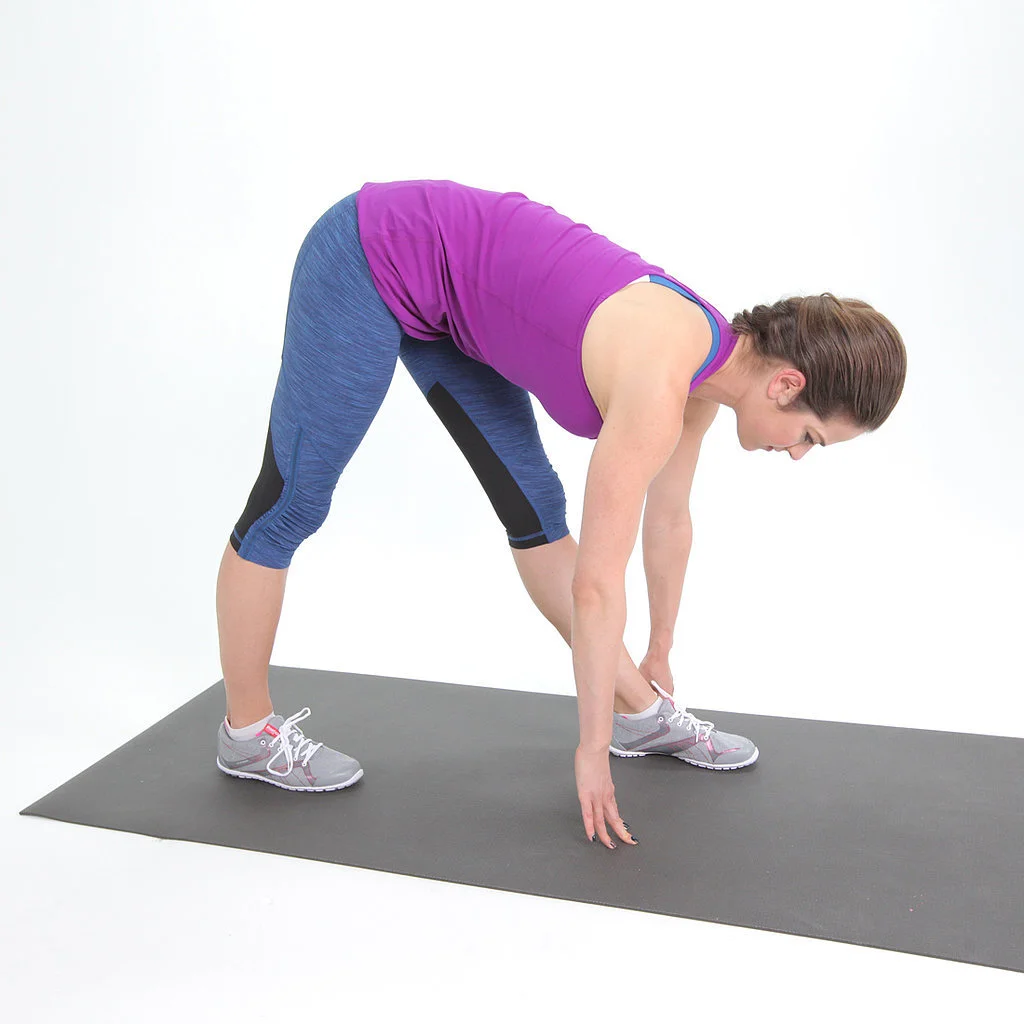
This exercise is suitable for beginners who have difficulty touching their toes have hamstring stiffness or suffer from posterior tibial tendon dysfunction. The benefits of hamstring stretches are that they help relieve back pain, improve posture, and prevent pain and injury. The hamstrings are a group of muscles that are connected to the pelvis and knee.
They allow you to extend your knees and tilt your hips. But when they are stretched, they can cause pain in the lower back, knees, and feet. Place a strap or belt around the lower leg. If you can’t reach your toes, you can pull your legs to your head with a strap. You can also grab the top of the foot instead of the toes.
Bend the opposite leg to help stabilize and align your body as you stretch. Hold the final range of motion for about 15-30 minutes, which is necessary for proper stretching. Slowly lower your legs. Repeat with the other leg. Do this exercise two or three times on each leg.
Big toe stretch
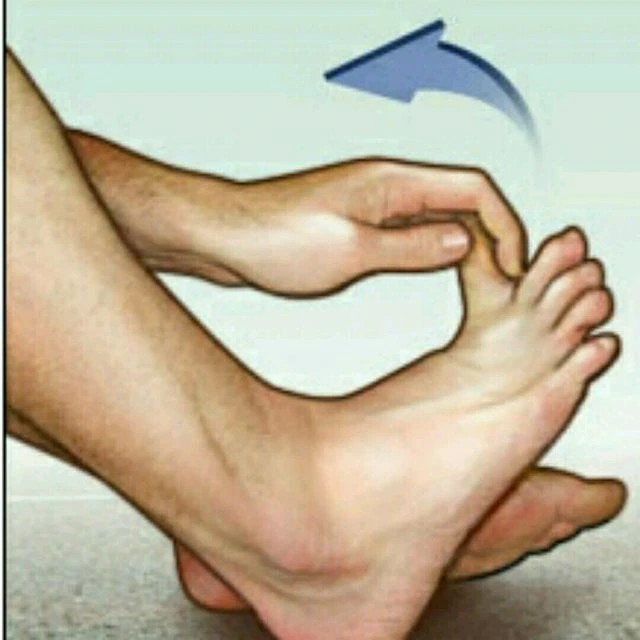
This stretch is good if your toes are pinched by tight or pointed shoes. Sit with your feet on the floor. Lift your right leg up and place your ankle on your left thigh. Use your hands to move your toes up, down, and to either side, holding each position for five seconds. Repeat ten times per session and do three to six sets per day.
grip is essential for proper stretching. Switch legs and repeat with the big toe of the left foot. The benefit of this stretch is that toe stretches improve flexibility and mobility. Others also increase the strength. Some are suitable for certain conditions, such as joints and plantar fasciitis. Toe stretching exercises with toe-strengthening exercises, exercises can also help prevent overuse or repetitive strain injuries(pain). this stretch also reduces the pain and provides flexibility to the muscles.
Planter fascia stretch
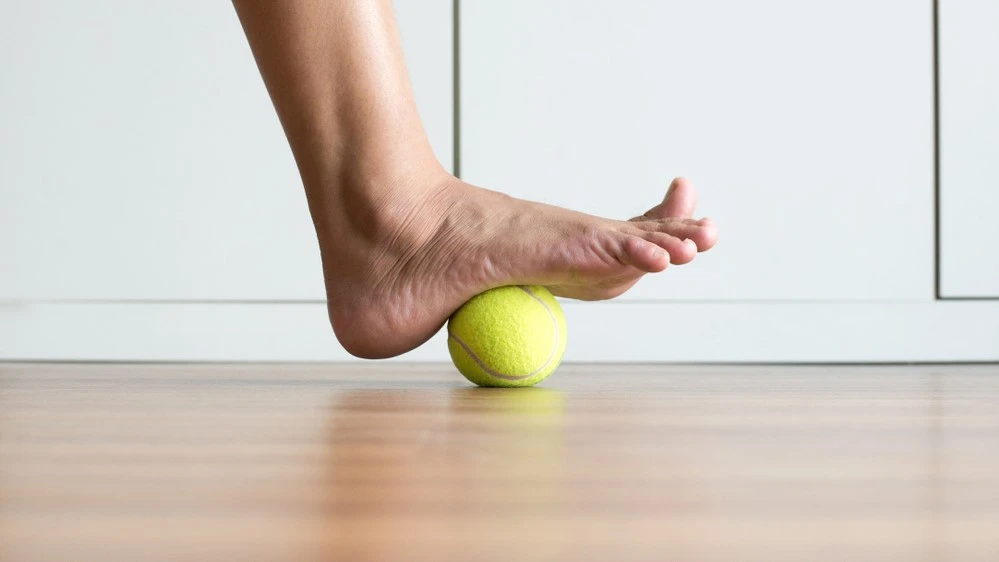
For the planter fascia stretch exercise, you will need a tennis ball or another small ball of the same size. If you don’t have a ball on hand, you can use a water bottle or other cylindrical object instead. Sit on a chair and place the ball under the affected leg.
Roll the ball back and forth under the arch of the foot to stretch the plantar fascia. Continue rolling for three to five minutes. You can do this stretch three times per session and do three to five sets per day.
Relaxing the plantar fascia muscle can prevent pain and inflammation, strengthen the supporting muscles (thereby helping to decrease stress on the ligament), and reduce inflammation.
Anterior tibialis stretch
The advantage of tibialis anterior stretching is less risk of injury to calves, ankles, and feet, less chance of tibialis anterior tendinitis, and better clearance when walking to avoid tripping. The tibial anterior group starts from a standing position. You must use your hand on a wall or other support to balance. Bend both knees slightly.
The right leg remains straight on the floor. The extended leg or the left leg is placed behind this stable/right leg so that the toe of the left leg touches the floor. Keeping your toe firmly on the floor, pull your left leg forward so that you feel a stretch from the top of your left leg through your calves. When you feel the stretch, hold it for 10-30 seconds. repeat the same procedure other side.
Variation of Anterior tibialis stretch
Kneeling Shin Stretch
Seated Shin Stretch
Lying Shin Stretch
Standing Stretch
Planter flexion of the ankle
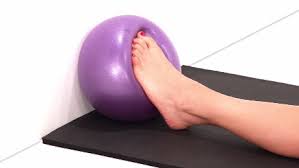
Sit on any surface with your thighs parallel to the floor (such as a ball, chair, or platform). Bend your knees 90 degrees and keep your feet on the floor. (Remember: When the knees are at 90 degrees, the gastrocnemius becomes relaxed at the top of the knee, immobilizing it. When the gastrocnemius is not engaged, the plantar is forced to take the lead in lifting the heel off the floor and lowering the heel to the floor.)
Sit straight on the pelvic floor (“sit” bones for good support, pull the navel with the lower abdominal wall to the spine. Lift the heels off the floor, pressing the feet into the floor). Hold the upper edge of the movement and then slowly descend. Increase the weight by placing a weight on each thigh above the knee and lifting one leg at a time, or “hanging” your heels off the end of the platform to increase ankle range of motion.
Dorsi flexion of the ankle
This exercise can be done with arm resistance it is called passive dorsiflexion movement of the ankle. If the client has knee or lower back problems, place a pillow under the knees to take extra pressure off the knees and lower back:
Sit on a high platform with your knees at a 90-degree angle so your shins can hang and not touch the ground. Pull in the lower abdominal wall to keep the body stable. Point your toes to the floor. Hold the top of one leg and lift the front of it towards the calf. Do not steer with the toe extended. (Procedures should not be performed on the toes of the ankle joint.)
Continue to hold the leg and raise it in a swinging motion to a mid-raised position (big toe lead). Then bring the leg back down to the center and lift it as far as possible to the side and up. Do ten repetitions on each leg, increasing only when you have achieved perfect form.
Ankle circles
The ankle circle is an exercise that trains the mobility of the ankle joint. Begin by lifting your right leg about two inches off the floor.
Move the big toe in a circular motion as if making an imaginary circle with it. Breathe normally as you perform this step. After making a circle with the right leg, repeat with the left leg. Learning the correct anklet shape is easy with the step-by-step anklet ring instructions, anklet ring instructions, and anklet ring technique video tutorial on this page. the ankle circuit is an exercise for those with very little fitness and training experience.
Variations
Do ankle curls while sitting on a bench.
This exercise can be done in a supine position in bed or a standing position.
Foot doming exercise
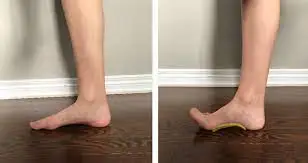
The foot doming is a simple but effective basic exercise for rehabilitation and injury prevention programs that improves leg muscle activation. When done correctly, vaulting activates the adductor hallucis and abductor hallucis and activates the latter more effectively than other inner leg exercises. When performed three minutes a day for four weeks, this exercise can reduce navicular prolapse (arch collapse) by 14.2% and improve postural balance by 3.9% to 6.5%.
The training procedure is shown in the picture. Techniques that improve leg dominance training include barefoot dominance during weight-bearing balance exercises and incorporating barefoot walking and running into the training program. intrinsic foot muscles and foot mechanics have received even greater attention as important factors in both rehabilitation and injury prevention. Targeted training of these structures has been missing from the training and recovery programs of both runners and athletes.
Glute Bridge
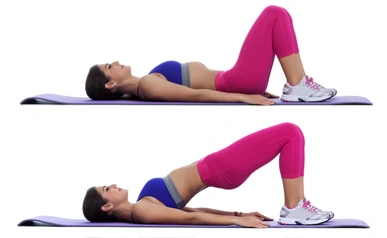
For the bridge Begin by supine position on a mat or plinth. Bend your knees and place your feet firmly on the mat, making sure they are hip-width apart and your back is in a neutral position. Let your shoulders rest on the sides of the plinth. This is your starting point. Press your heels into the mat and lift your hips off the floor, squeezing your glutes until your body forms one straight line from chin to knee, resting on your shoulders.
It is important to keep your body in a straight line, and not to push your hips as high as possible, which often leads to back arching, pain, or injury. Breathe in. Then you should take the starting position from the bridge position. If you have trouble doing the glutes bridge, wrapping a resistance band over your knees can help. Repeat the same procedure about five to ten times. Glute bridges are a great way to strengthen the largest muscles in the body, such as the glutes and legs (not to mention the core and back) while helping to improve hip mobility, posture, and core stability.
Marble pickup exercise
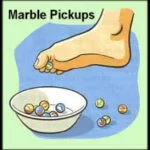
Marble pick-up Exercise Keeping your feet strong and flexible can help reduce foot and ankle pain, reduce muscle pain, improve overall foot health, and keep you active. Exercises that improve mobility of joints (range of motion) and help elevate the legs can decrease the risk of injury.
Slow and gradual stretches will increase your flexibility. This exercise strengthens the muscles of the soles and toes. start with the sitting position (your back straight in a chair) with your feet on the floor. Place 20 marbles (or a small object) and a small bowl on the floor in front of you. Pick up one marble at a time with the help of the muscles and keep it in the bowl or mug. Take all twenty marbles in one leg.
Repeat with the other leg. You have to do this exercise for around five to ten minutes.
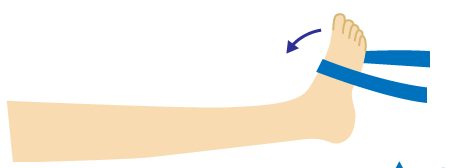
Eversion with Resistance Band
For the Eversion with resistance band exercise you can use the sitting position on a chair or the supine position on the plinth, this exercise is also done actively or passively.
Wrap the resistance band around both legs and hold both ends of the tape. Try to move your leg up and out toward the starting target against band resistance. Hold the end range of eversion movement for five to ten seconds and then adjust slowly ankle back to the starting position.
Make sure that only your ankle is moving, not the whole leg.
Do eight to ten repetitions per session and if possible repeat four to five times a day.
Inversion with Resistance Band
For the inversion with resistance band exercise you can use the sitting position on a chair or supine position on the plinth, this exercise is also done actively or passively.
Place the curl resistance band over the affected leg holding the band in place with one hand to the side.
Start End Try to move the affected leg down and in against band resistance.
Hold the end range of inversion for around five to ten seconds and then adjust slowly
the ankle back to the starting position. Make sure only your ankle is moving, not the whole leg.
Do eight to ten repetitions per session and if possible repeat four to five times a day.
Sole to sole
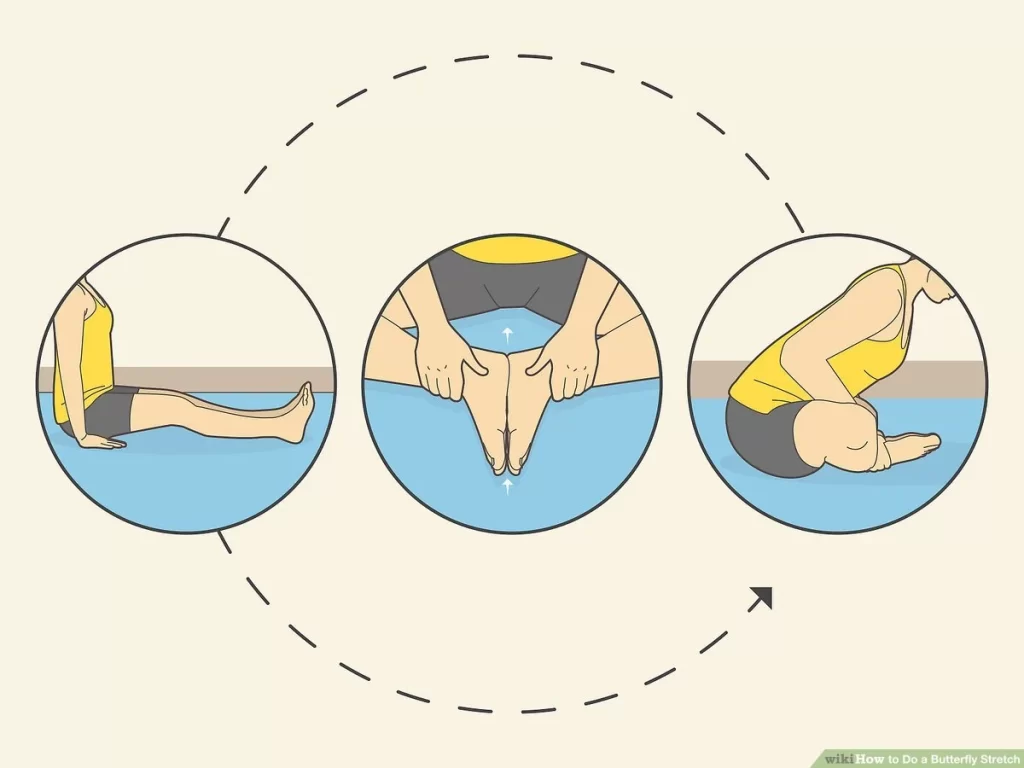
Sole to Sole exercise. An isometric exercise for the Tibialis Posterior muscle.A great exercise to start strengthening the tendon with minimal chance of irritation.
Start with the butterfly position and keep your feet together(touch with each other). If you feel comfortable you can use a sitting position on the chair.
Press the balls of your feet together as you pull your toes slightly toward the ceiling. You can check the tendon by feeling it activate under your finger or thumb. It may take some practice at first. The sole-to-sole exercise provides the strength to your feet’ muscles. increase the finger’s strength and also provide mobility.
You can do this exercise three to five times per session and do three sets per day.
Tibialis posterior strengthening
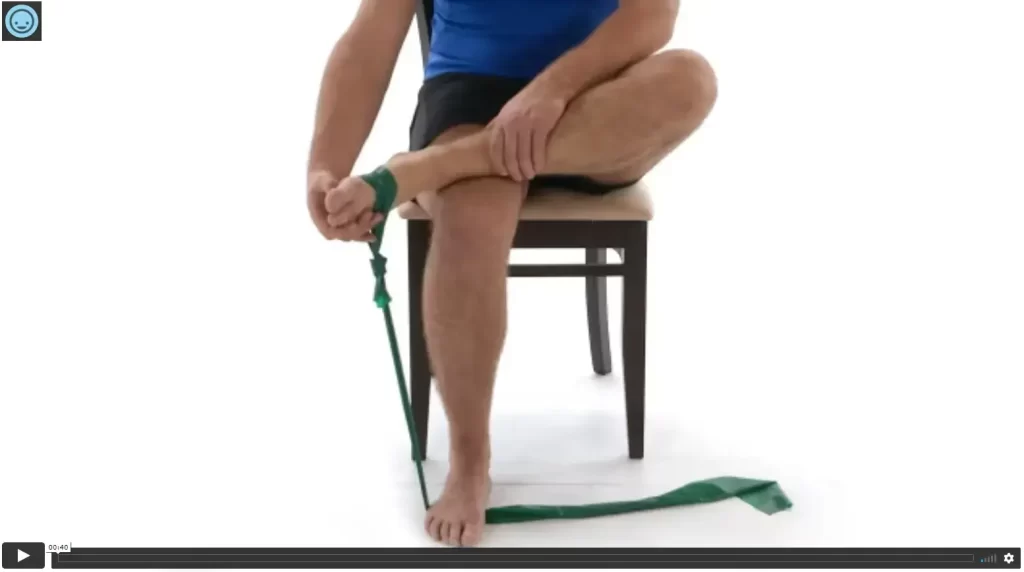
The Tibialis posterior is an important stabilizer of the leg during standing and walking. The posterior tibial tendon provides dynamic support to the plantar aspect of the foot and arch when the muscle or tendon is deficient.
These exercises especially strengthen the posterior tibial muscle. It is important to give the tendon enough time to heal before doing strength exercises. Using an elastic resistance band as resistance, move the ankle from an inverted position to an inverted position. This exercise strengthens the leg muscles and also increases ankle mobility, you can start the exercise as you progress.
you need to do five to eight repetitions per session and also three sets per day.
Strengthening of the posterior tibial muscle can be done in several positions. Reinforcement also improves arch control. This can be started after the person’s muscle strength has been manually assessed.
Stabilize Your Knees with Step-Downs
This movement is more therapeutic than building muscle and can help stabilize the knee. And since the hips, patella, and quad work together to help the patella bend properly, it’s important to strengthen and work all of these muscles to keep it strong and flexible. Start standing with one foot on a step, one foot off the ground.
Slowly lower the uninjured leg
on the step side. Touch the heel lightly to the floor. Return to the original position. Repeat until the number of repetitions is completed. Switch the legs. five sets, 20 repetitions (ten on one side). If it’s too intense, start with multiple sets and reps that work best for you.
Single leg balance
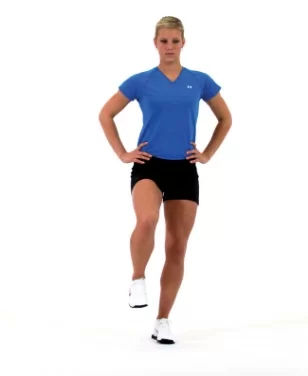
Before you begin single-leg balance training, your physical therapist may want to obtain a baseline measurement of your balance to monitor your progress. Balance exercises, such as the Functional Range exercise or the One Leg Test, can give you an idea of how well your body’s balance systems are working.
Stand tall with your feet together. be careful during the exercise
Keep a chair or object(kitchen table) in front of you, for support if you feel unstable. Lift one leg off the ground. avoid feet touching the ground(this can give you extra stability). Look at the clock, how many seconds you can stand on one leg, and record this number. If you can stand on one leg for around 15 -30 seconds you can gradually increase the duration of hold, the same procedure(standing) on a soft surface, such as a pillow. Go slow and make sure you have support and you should be able to fill it safely.
Step up
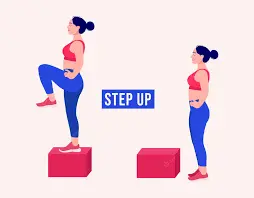
Step-up combines jumping and stepping up, like climbing stairs. You raise yourself to a standing position on the bench by pushing through the leg of the cable. You then slowly step back to the starting position with the non-lead leg. Make sure your lead leg is glued to the step. Depending on the mobility and strength of your hips, place your foot on the box with the knee bent at a 90-degree angle or the hip bent slightly below the knee.
Make sure it is on a flat surface. Do with body weight, holding the dumbbells to your chest and standing about a foot away from the box. Place the entire lead leg on the box with the toes pointing forward. Push through the wire leg to stand. As you stand up, think about extending your glutes forward. With the knee extended, place one foot on a box, balance on one leg, or press the non-working leg onto a high knee.
Step down slowly with the non-lead foot, reset, and repeat. The body mainly engages the legs and core without touching the upper body unless you use a weight.
Variation of setup exercise
Sprinter Step up
Lateral Step up
Crossover Step up
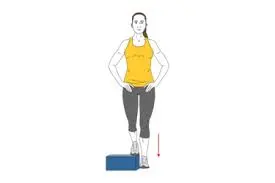
Heel raise
Heel raises, also known as heel raises or eccentric calf raises, are a simple bodyweight exercise. Doing this regularly will strengthen your calves. It can also lead to more beautiful and toned calves. The best place to lift your heel is on a flat non-slip surface. Use a wall, table, work surface, or the back of a chair for support.
Because the heel exercise is so simple, it’s easy to rush it. But to enjoy all its benefits, it is important to maintain a slow and controlled movement.
Place your feet on the floor. The legs should be under the shoulders. Place one or both hands on a support to steady yourself. Slowly lift both heels so that you are standing on your toes. Stay in the raised position for at least one second. Slowly lower your heels to the floor in a controlled motion.
Repeat 8 to 15 times per session and do three sets per day.
Variations to Heel Raises
Double heel raise with weights
Single-leg heel raise exercise
Weighted single-leg heel raise
Tibialis Posterior Release
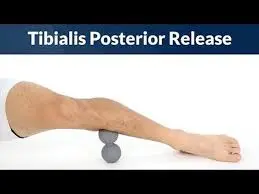
Self-massage of the muscles and tendons in the back of the calf can be very helpful in improving healing and reducing pain. This is because massage and pressure encourage blood flow to the injured area and help it heal. For a general massage, you can use a foam roller or massage stick on the calf muscles. Below we look at a specific release technique called trigger point release for an injured muscle.
Take a peanut ball or other hard ball (like a lacrosse ball).
Sit on the floor and lean sideways on the leg you want to treat.
Extend the foot to be massaged with the inside of the foot to the floor.
Bend the opposite leg for stability.
Place the ball on the inside of the leg, just behind the shin (do not place the ball directly against the bone).
Start high near the knee and hold each painful point for 15-30 seconds or until the pain and tension begin to subside.
Gradually move the ball down to the ankle, stopping at other painful spots and holding.
While holding, you can also move your ankle up and down to relax.
Continue as long as necessary until your symptoms improve.
Towel scrunch
The strength of the small intrinsic muscles of the foot may play a role in providing arch support that is lost in PTTD. this exercise developed the normal foot arch and provided strength to the foot muscles. this exercise is a little bit difficult for this condition so avoid painful movement of the foot.
Take a towel or napkin and sit on a chair.
Place a towel on the ground under the foot you are working on, making sure most of the towel is in front of the toes. Lift your toes and extend them forward to the edge of the towel, keeping your heels on the ground. Place your toes back on the towel and twist them back to bring the edge of the towel closer to you. Repeat 10-15 reps at a time, adjusting the towel as needed
Concentrate on keeping the bow high throughout the exercise. Do two to three sets per day with 10-15 repetitions.
This is another great way to build strength in your feet and toes to provide arch support. You can also try making alphabets from your toes which encourages toe movement. If these exercises are difficult to perform with sufficient arch control, you can also simply sit with your feet on the ground and practice raising your arch to the ceiling.
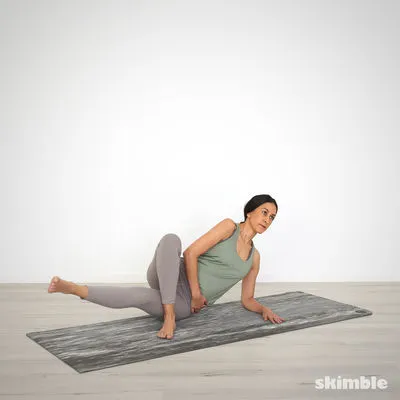
Prone leg raise
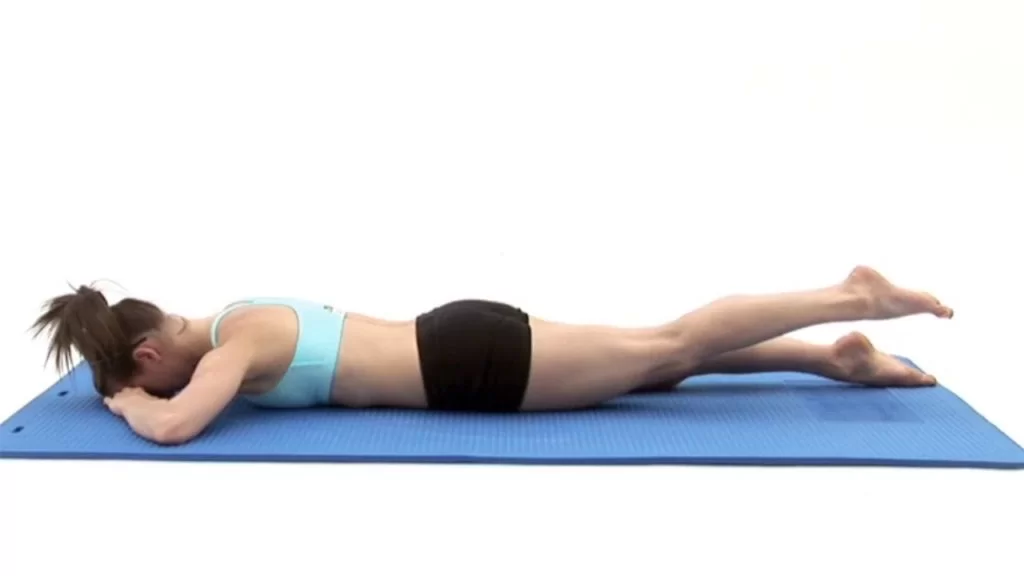
The benefit of a prone leg raise is that you can able to stand and walk with more confidence and elegance. You can stand with the crowd until your team hits the winning goal. You can probably take longer walks on the beach or through the park and just enjoy the scenery without the distraction of pain or fear of injury.
Begin by placing your hands and knees on the floor with your arms and thighs perpendicular to the floor and extending straight through your shoulders and hips. Keep your hips, back, neck, and head in line with the floor.
Now squeeze your lower abdominal muscles, lift one knee, and slowly extend the other leg back, toes pointed, until the leg is almost parallel to the floor. Then slowly return the leg to the starting position so that the knee touches the floor. Keep your head, neck, back, and pelvis parallel to the floor in the original line during the exercise. Gradually increase the number of leg extensions on each side until you can do eight to ten repetitions (per leg) per set. Don’t do so many reps that you tire and break your form.
Side leg raise
Lateral leg raises are a core and leg exercise where you lie on your side on the floor and abduct (push) your legs away from the midline. It can also be done while standing. This exercise is great for building strength and endurance in the core, hamstrings, and hip abductors. Lateral leg raises are good for developing strength in the outer thighs and hip abductors while targeting the abdominals and obliques. Secondary muscles are the hip, gluteal, and quadriceps muscles that are targeted. Strengthening these muscles with this exercise can also help prevent knee, hip, and lower back injuries.
For the same benefit, you can do it lying on your side or on your feet, using only your body weight. Lie on your side on the floor. Rest your head on your right hand and place your left hand in front of your stomach or at your side for extra support. Your legs should be placed on top of one another and your body should be in a straight line. Bring your nuclear power. This is your starting point. Exhale as you raise your leg vertically until it reaches 45 degrees or more.
Count for two seconds as you do this. Keep your legs straight and your heart closed. Pause the moment at the end rage position. Make sure your hips are straight and pointed forward. As you return to the starting position, inhale and count for three to five seconds as you do so. Repeat this movement for four sets of eight to 20 repetitions. Practice both sides in one set.
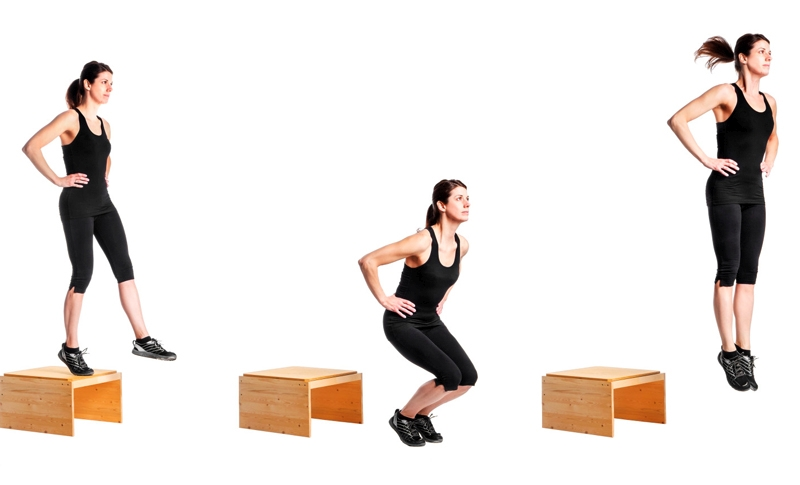
Squat
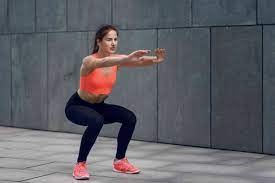
Place a chair or low box behind you It is not necessary you can also take support from the wall and start standing facing away from the chair. Breathe in and tense your core, thinking you can pull your navel toward your spine. Look straight ahead, and bend both your hips and knees, making sure your knees are in line with your toes. Continue to lean back, push your hips back, and bend your knees until you can easily sit on the chair behind you, keeping your shoulders back and your chest proud to prevent slouching during the movement.
Exhale as you push through your heels while extending your hips and knees to return to the starting position. You should feel a stretch in your glutes, quads, and hamstrings. Squats are known as an incredible compound workout because they work for several large muscle groups at once. So not only do they strengthen your glutes and quads, but they also work almost every muscle in your lower body, including your hamstrings and calves, as well as your core and back to stabilize the movement, especially when you are loaded with a barbell.
For the starting phase, you can do three to five repetitions with the help of your physiotherapist and gradually increase the repetition of the exercise.
Balance board exercises

If you’re new to balance board training, consider performing these exercises near a wall or a stable surface like a table that you can rest your hands on. You can create an entire workout on the balance board. To get you started, here are five exercises that target the most important muscles in your body. This series of balances starts from a basic position, moves from front to back, and ends with a lateral movement. It targets your glutes, quads, hamstrings, calves, and core to improve stability, coordination, and spatial awareness. Start standing on a balance board with your feet wide apart. The legs must be on the outer edges of the board. Maintain an upright position and maintain a neutral back. Choose a focal point in front of you to focus on. This can help balance. Shift your weight so that the edges of the table do not touch the floor.
Balance in this position for 15-30 seconds.
Front to back
Slowly tilt the plate forward until it touches the floor.
Slowly tilt the plate back until it touches the floor behind you.
Your arms should be in the anterior aspect of you or at your sides. Shake slowly back and forth for 30 seconds.
Side to side
Stand in the original balance position.
Tilt the board slowly to the right and then to the left.
you can do this movement for around five to ten seconds.
Mini squat
Balanceboard mini-squats target your glutes and quadriceps. thigh, calf, and core muscles.
Start in a balanced position, but move your feet a few inches to the sides (a little wider than hip-width apart).
Place your hands in front or at your sides for balance. Alternatively, you can hold onto a wall or stable surface for balance.
Slowly bend your knees into a squat position. Just go as long as you can while keeping your balance. Push through the heel and stand up. Do 10-15 repetitions.
Wobble board exercises
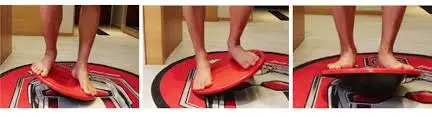
While sitting, place the pendulum under your feet and slowly rotate it several times in each direction. This is good for improving the range of motion and control of the ankle.
Balance on the paddle board as long as you can without the edges touching the floor. Aim for more than two minutes without touching the floor. Spin the wobble board around, but don’t let the edge of the board touch the floor. Aim for two to three minutes.
Balance on the board with both feet and do small knee bends to test your balance. Gradually bend your knees deeper into a squat. Balance on both feet again, and extend both arms in front of you.
Slowly roll your upper body from side to side. Balance on both feet, throw the ball against the wall, and catch it on the way back. Do all the above exercises with your eyes closed! This makes them significantly more difficult!
Stand with one leg on the wobbleboard.
Rock the board back and forth for one minute and then side to side for one minute.
Again, stand on the wobbleboard with only one leg. Turn the plate in a circular motion in one direction for one minute, then repeat in the other direction.
Try balancing on a wobbly board with just one leg! How far can you go? Balance on one leg and try to do your balance with small knee bends. Still, point your hands in front of you with one leg and rotate your upper body from side to side. Balance on one leg, throw the ball against the wall, and catch it on the way back.
You can also do this with a partner. Once you master all these exercises, your proprioception and balance will be fine! If not, keep working on it and you will soon see improvements.
Heel-toe walking
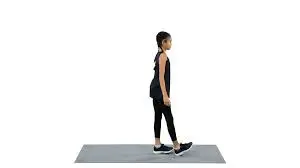
There are many great exercises to improve balance. Heel walking is one of them. Heel walking, sometimes called tandem walking, is easy to practice in any environment where there is room for four to eight consecutive steps back and forth. To be safe, start by walking along the kitchen counter or wall with one hand touching the surface.
Clear space around you to avoid tripping hazards. Begin in a good standing position, lengthening through the spine. Raise your arms to your sides. As you progress, you can cross your arms over your chest. This hand position adds a balance challenge to the heel exercise. Another good option is to hold a weighted ball (close to your body) while you practice heel walking.
Keep your eyes on the horizon. Use your peripheral vision to observe the floor and the surrounding space. This ability helps you walk without looking down.\
(Note: If this is too difficult, try the semi-tandem position. Instead of placing the heel of the front foot directly in front of the toes of the back foot, you can move them slightly.)
When you are four to eight steps forward, depending on your condition, step back and return to the starting position. Practice walking back and forth on your heels several times a day to keep your feet on the ground and walk with confidence.
Plyometric
Plyometrics are exercises that use your body’s ability to jump and land with explosive force. They allow you to run fast, change direction, and absorb the forces on your body when running and jumping. Your physical therapist may include plyometric exercise as part of rehabilitation for posterior tibial tendinitis.
If you are an athlete trying to get back to playing without pain, this type of training is important. Your physical therapist will likely wait until later in your rehabilitation to begin plyometric training. You must have very good strength, balance, and proprioception to handle the forces on your body. Examples of plyometric exercises include:
Drop jump
One leg jump
Jump or skip in different planes and directions of motion
Be careful when doing plyometric training. To avoid injuries, the body must always be in the correct position during exercise. Your physical therapist can watch you do the exercises and make sure you’re doing them correctly.
Getting Started with Exercises
What you need:
A few basic tools can make the recovery process and PTTD training program simple and effective. If you don’t have them, don’t worry. you can arrange these objects for the exercise or make them at your home.
Resistance bands
This affordable all-in-one tool is one option you should definitely consider a priority in your training program. This allows you to add resistance to your foot and ankle movements. Each color of the resistance band offers a different level of tension that you can gradually progress to.
Massage tools
There are different ways to massage the lower leg and relieve local pain and stiffness. Consider using a peanut or lacrosse ball to work on the calf knots (trigger points). You can work on larger muscles like calves with a foam roller or muscle roller.
Soft surfaces
Once you’ve mastered standing exercises, you may want to try moving to softer surfaces that challenge your balance and foot and ankle stability. Options include grass, carpet, or foam padding.
Supportive shoes or orthopedic inserts
When you exercise, you probably go barefoot to strengthen your feet enough. However, to maximize results and minimize the deformity of flat feet, keep your feet supported throughout the rest of the day.
Order for training
You’ll be sitting on the floor for many of the exercises below, so leave room to stretch!
Timer or clock
Make sure you hold every stretch for a minimum of 30 seconds. You should be able to complete the entire exercise program in less than 20 minutes so you can get on with your day and still feel your best.
Tips for Effective Results
To maximize the results of your training program, it is important to remember the following tips:
For best results, stretch each muscle group for at least 30 seconds
Do not bounce while stretching as this can cause injury. hold the end range of movement until you feel the stretch (tension) and then release.
Start your exercise program slowly. If you experience foot or ankle pain during any exercise, change your range of motion or overall difficulty.
Pay special attention to your arch form and check with strengthening exercises to promote optimal biomechanics and reduce the risk of injury. Don’t let it flatten or wobble too much
When you’re not exercising, wear supportive shoes or foot orthotics to minimize unnecessary stress on your feet and ankles, which can worsen your PTTD or cause plantar fasciitis.
If you’re not sure where to start or your symptoms aren’t improving with this exercise program, consider physical therapy to improve results and get personalized advice from an expert.
Keep your overall health in mind during your recovery and make sure you eat a balanced diet, stay hydrated, lose weight (if necessary), and manage your stress levels properly.
The Posterior Tibial Tendon During Gait
The functions of the intact tendon include plantar flexion of the ankle, inversion of the foot, and elevation of the medial longitudinal arch of the foot (it appears to be the primary stabilizer of this arch). This height of the medial longitudinal arch creates a complete mid-bone gap so that the midfoot and hindfoot are rigid.
This allows the gastrocnemius muscle to work more efficiently when walking. Other joint capsules and ligaments weaken in the posterior tibial tendon. The subtalar joint rotates, the foot abducts (the talonavicular joint) and the heel is in pronation. A flat arch develops, which can lead to adult flat feet. The gastrocnemius cannot function without the posterior tibial tendon, resulting in balance and walking.
Differences in muscle activation:
Participants with Posterior Tibial Tendon have significantly greater posterior tibial EMG amplitude during the second half of the stance phase. They walk with a pronated foot and have increased posterior tibial activity compared to participants without Posterior Tibial Tendon.
Orthotics:
Optimizing foot load management with foot orthoses and appropriate footwear is the most important aspect of therapy. Depending on the progression of the pathology, it can be gradually treated with over-the-counter non-individual foot orthoses, then individual foot orthoses, and finally semi-rigid ankle-foot orthoses. In the case of stage I disease, non-surgical treatment should be tried for at least Three to four months.
A short walking brace or removable brace boot immobilization is recommended for patients with acute tenosynovitis. If symptoms improve after immobilization, the patient can be fitted with a custom orthosis or ankle-foot orthosis (AFO). The orthosis should be a full-length, semi-rigid, full-contact insert with a medial attachment. The main function of the orthosis is to support the arch and correct the elastic component of the deformity.
Stage I: Acute: 4-8 weeks of immobilization, RICE; Chronic: flat shoes and corrective orthosis, ie. spring-foot orthosis, tape
Stage II: acute 4-8 weeks of immobilization, RICE; Chronic: strap fixation, corrective orthosis, and flat shoes
Stage III: Straps, regular shoes or semi-rigid shoes, and adaptive orthosis
Stage IV: Laces, regular shoes or semi-rigid shoes, and adaptive orthosis
What Kind of Physical Therapist Do I Need?
All physical therapists are trained through training and experience to assess, manage, and treat a variety of symptoms and conditions. You may consider seeing a physical therapist who is:
Experience in foot and ankle care.
Board Certified Clinical Orthopedic or Sports Physical Therapy Specialist or Orthopedic or Sports Residency or Fellowship. This physical therapist has deep and extra knowledge, experience, and skills that may provide to your condition.
A practice that focuses on orthopedic injuries.
Get a recommendation from family, friends, or other healthcare providers. Before an appointment, ask about the physical therapist’s experience in treating posterior tibial tendon dysfunction.
Be prepared to explain your symptoms in as much detail as possible. Notice what causes or aggravates your symptoms.
Posterior Tibial Tendonitis Treatment
Your doctor will decide the best treatment based on the severity of your symptoms. If a doctor detects PTTD tendon damage early, he or she can treat the condition non-surgically. This usually includes:
Immobilization
Your foot will be placed in a cast or walking boot for about two months to reduce inflammation and promote healing. In brackets. A custom-made ankle brace can support the ankle and foot in the early stages of PTTD. This reduces stress on the tendon and can help avoid surgery in some cases.
Medicines.
Your doctor may prescribe non-steroidal anti-inflammatory drugs, such as aspirin and ibuprofen, to control pain and inflammation. Sometimes steroids (cortisone) may also be prescribed. Make sure your doctor is aware of your medical history and other medications that may interact with these medications.
Physiotherapy.
Treatment and proper rest will help strengthen the muscles and tendons surrounding the affected muscle and portion.
Orthopedics.
These are medical devices prescribed by a doctor. They are usually the inner parts of the shoe that support the arches and tendons. In some cases, your doctor may prescribe a custom cast or orthotic brace for your leg.
If non-surgical treatment does not reduce your pain after six months, you may need to explore surgical methods of treating the condition. The specialist determines the best treatment according to the location of the pain and the extent of tendon damage.
Some surgical options may include:
Tenosynovectomy.
This treatment involves cleaning out the tendon by removing the inflamed tissue around it. Surgeons use this option in mild cases of PTTD.
Osteotomy.
This surgery realigns your heel bone. Sometimes this may mean removing part of the bone. Tent transfer. This surgery removes healthy fibers from one tendon to replace the damaged posterior tibial tendon.
arthrodesis.
It is the process of fusing two or more bones together to prevent movement of the affected joint.
All surgery can prevent this condition.
Chiropractic for Posterior Tibial Tendon Dysfunction
The use of chiropractic in the treatment of posterior tibial tendon dysfunction has been very successful. A chiropractor usually recommends rest and ice along with chiropractic care to help realign the ankle, foot, and lower leg to prevent a weakened tendon. Often the ankle loses mobility when the arch collapses and the bones of the foot and ankle move.
By using chiropractic techniques to realign the ankle and thus restore the forward gliding of the joint, they can relieve posterior tibial tendon dysfunction pain and help improve the condition. They may also recommend an air brace to stabilize the ankle if the patient does a lot of walking, and advise on lifestyle changes such as weight loss and a healthy diet. Often, patients who have tried to work with doctors to correct their flat feet, but have been unsuccessful, will eventually find relief and healing from their posterior tibial tendon dysfunction.
Helpful Tips for Posterior Tibial Tendon Dysfunction
The tips below will help you get back to your normal activities. The best part is that most people’s symptoms are decreasing. Tendons can heal slowly, so recovery can take several months.
If you have any of the contributing factors above that can be changed, it is important that you make the necessary changes in your lifestyle to aid your recovery. How you manage the load through the tendon is key to the healing process. You need to reduce the load by increasing the strength of the tendon and then gradually build up the muscles/tendons to get back to where you were before the symptoms started.
footwear
Switching to comfortable running-style shoes/shoes or walking shoes with a small heel will provide the best support for the hamstrings. Avoid wearing hard, flat, or unsupported shoes. Very flat shoes can make your symptoms worse, especially if you also have tight calves. It is important to note that shoes with flexible soles generally provide less support to the foot and can increase stress on the soft tissues of the foot and ankle. If your shoes have shoelaces, make sure they are tied properly.
Schedules / Prognosis
Symptoms should improve within 6 to 12 weeks of following this advice. Not everyone recovers quickly, and some may need six to nine months of targeted rehabilitation to return to full pain-free. It is worth noting that it is normal to experience pain or aggravation during recovery.
Prevention for posterior tibial tendon dysfunction
How can I reduce my risk?
You can decrease the chances of risk of PTTD by:
Wearing sturdy shoes. You should choose a shoe that offers additional arch support. Avoid shoes that can increase the risk of injury, including high heels, flats, and flip-flops.
Extending the bottom edge. Standing calf raises are a great way to stretch the tendons and surrounding muscles. A foam roller can also relax the calf muscles.
Doing strengthening exercises. Resistance exercises, single-limb heels, and walking short distances on your toes can strengthen your feet and ankles and help prevent injuries.
Don’t push through the pain. Stop what you are doing at the first sign of discomfort.
Posterior tibial tendonitis recovery time
In our experience, posterior tibial tendon recovery times depend on the following factors:
How long was the tendon painful before you started proper treatment?
What sport or activity do you want to return to – high impact sports such as running and jumping take longer to return to.
Other factors, such as menopause and aging, can also increase recovery time.
It is not an exact recovery duration but, you can expect the following recovery times:
8-12 weeks, if the tendon pain started only in the last two weeks and you can rest it and apply the right treatments immediately,
4-9 months if you suffered pain for more than a month before starting appropriate treatment,
more than 12 months if you have had pain for several months.
A note from Samarpan Physiotherapy Clinic
Posterior tibial tendon dysfunction exercises are designed to strengthen, stretch, and prevent damage to the posterior tibial tendon. A home exercise program is one of the best ways to jumpstart your recovery. The most important factor is just beginning. If you have questions or concerns about your symptoms, especially if they become severe, be sure to contact a trusted doctor, such as an orthopedic doctor or physical therapist, for further medical advice as soon as possible. You can also visit our Sampan physiotherapy clinic for treatment.
FAQ
What are the symptoms of a weak posterior tibial tendon?
there are acute symptoms such as swelling, tenderness, and pain or weakness while the movement or at rest of PTTD. Your provider will examine the back of your foot to look for changes in its structure or shape. Your heel can point outward and your inner arch can rest on the ground.
What causes posterior tibial tendon dysfunction?
Posterior tibial tendon dysfunction is usually a slowly developing condition that mainly affects middle-aged obese women. Risk factors include obesity, hypertension, diabetes, steroid use, and seronegative joint disease.
How long does the posterior tibial tendon dysfunction take duration for the heal?
Posterior tibial tendon dysfunction usually takes six to eight weeks to heal, and early activity in the healing tendon can cause delays in recovery. Non-compliance can double recovery time and be extremely frustrating for patients. You can be considered as a progressive condition because the symptoms are day by day increase.
How to fix posterior tibial tendon dysfunction?
Conservative treatment with immobilization in a walking boot or cast for up to three to four weeks to allow the posterior tibial tendon to heal, followed by eccentric strengthening with physical therapy, may be warranted.
Can you reverse the hamstring tendon dysfunction?
Treatment of posterior tibial tendon dysfunction
Posterior tibial tendon dysfunction is a progressive condition. This means that it will day by day become worse. Therefore, early diagnosis and treatment are important. If detected early enough, conservative treatment (without surgery) should be sufficient.
Should we stretch the posterior tibial tendon?
Stretching the calf and calf muscles and tibialis posterior muscles at the posterior aspect of the leg. Make sure you stretch your calf muscles with your knee straight and your knee bent. This ensures that all the muscles in the back of the leg are fully stretched. Do stretching exercises two or three times a day.
References
- Professional, C. C. M. (n.d.). Posterior Tibial Tendon Dysfunction (PTTD). Cleveland Clinic. https://my.clevelandclinic.org/health/diseases/22057-posterior-tibial-tendon-dysfunction
- Posterior Tibial Tendon Dysfunction. (n.d.). Physiopedia. https://www.physio-pedia.com/Posterior_Tibial_Tendon_Dysfunction
- SR, V. (2022, November 1). What Is Posterior Tibial Tendon Dysfunction? WebMD. https://www.webmd.com/a-to-z-guides/what-is-posterior-tibial-tendon-dysfunction
- Knapp, P. W. (2023, May 23). Posterior Tibial Tendon Dysfunction. StatPearls – NCBI Bookshelf. https://www.ncbi.nlm.nih.gov/books/NBK542160/#:~:text=Posterior%20tibial%20tendon%20dysfunction%20(PTTD,of%20adult%20acquired%20flatfoot%20deformity.
- Barraclough, A. (2022, December 7). 5 best calf stretches to strengthen and injury-proof your lower leg. Runner’s World. https://www.runnersworld.com/uk/training/a42108882/calf-stretches/
- Cpt, A. A. (2023, August 8). How to Stretch Tight Hamstrings. Verywell Health. https://www.verywellhealth.com/great-hamstring-stretches-296849
- Zibutis, C. (2023, August 8). Benefits of the Heel Raise Exercise and How to Do It. Joggo. https://joggo.run/blog/benefits-of-the-heel-raise-exercise-and-how-to-do-it/
- Clinic, M. P. (2022, April 4). Tibialis anterior stretch: Health benefits, Types, and How to do. Mobile Physiotherapy Clinic. https://mobilephysiotherapyclinic.in/tibialis-anterior-stretch/
- Ms, S. H. (n.d.). Ankle Flexion and Extension. IDEA Health & Fitness Association. https://www.ideafit.com/personal-training/ankle-flexion/
- Pt, L. I. (2021, July 5). How to Do a Single Leg Stance. Verywell Fit. https://www.verywellfit.com/single-leg-stance-exercise-for-better-balance-2696233
- Lindberg, S. (2021, February 24). Not Just for Rehab: Using Balance Boards to Enhance Exercise. Healthline. https://www.healthline.com/health/fitness/balance-board-exercises#exercises
- Wilson, M. A. (2021, October 25). Heel Toe Walk for Balance – Sit and Be Fit. Sit And Be Fit. https://www.sitandbefit.org/heel-toe-walk-balance/
- Staff, P. (2018, March 30). How To Do Prone Leg Lifts Correctly. Pritikin Health Resort. https://www.pritikin.com/how-to-do-prone-leg-lifts-correctly/
- S. (2023, April 11). How To Squat Your Essential Guide To Proper Squat Form. SWEAT. https://www.sweat.com/blogs/fitness/squats