

Latissimus Dorsi Muscle
Table of Contents
What is Latissimus dorsi Muscle?
- The latissimus dorsi muscle (‘the lats muscle’ or ‘the lats’) is the broadest muscle in the human body. It is relatively thin & covers almost all back muscles at the posterior trunk, rather than the trapezius muscle.
- Together with the levator scapulae, trapezius & rhomboid muscles, the latissimus dorsi relates to the superficial layer of the extrinsic back muscles.
- Functionally, the latissimus dorsi muscle belongs to the muscles of the scapular movement. This muscle is liable to pull the inferior angle of the scapula in different directions, generating movements on the shoulder joint; internal rotation, adduction & extension of the arm. Moreover, it is an assisting respiratory muscle, as well as one of the main stabilization of the spine during its varying movements.
Relations of Latissimus Dorsi Muscle
- The latissimus dorsi muscle is situated superficially in the lower 2/3 of the trunk, covering the serratus posterior muscles. The teres major muscle locates superficial or to latissimus dorsi. The adjoining fibers of these 2 muscles are united but divided by a bursa towards their humeral attachments. As they span the interval between the scapula & proximal humerus, the latissimus dorsi & teres major form the posterior axillary fold. The fold is emphasized when the arm is adducted against resistance. During this motion, it is possible to detect the whole inferolateral border of latissimus dorsi up to its attachment to the iliac crest.
- The lower part of the lateral margin of the latissimus dorsi consists of the medial margin of the lumbar triangle (of Petit). The triangle is laterally completed by the external abdominal oblique muscle, & inferiorly by the iliac crest. The internal abdominal oblique muscle made up the floor of this space.
- The latissimus dorsi muscle consists of another important anatomical landmark which is the auscultation triangle. The borders of this space are the trapezius (superiorly), medial border of the scapula (medially), & latissimus dorsi (inferiorly). When a person bends their arms across the chest & bends the trunk forwards, the lower pulmonary lobes become subcutaneous within the auscultation triangle, & thus ready for the auscultation of the respiratory sounds with a stethoscope.
Origin of Latissimus dorsi Muscle
- The latissimus dorsi muscle lies over the lumbar & lower thoracic regions of the back. Depending on the origin, one can differentiate 4 parts of this muscle:
- Vertebral part: originating from the spinous processes of the 7th to 12th thoracic vertebrae & the thoracolumbar fascia
- Costal part: having origins from the nine to twelve ribs
- Iliac part: starting from the iliac crest
- Scapular part: begin from the inferior angle of the scapula (inconstant)
- All the fibers diverge towards the proximal humerus. During their course, the upper vertebral & scapular fibers take a nearly horizontal course, the lower vertebral & iliac oblique, & the costal nearly vertical.
Insertion of Latissimus dorsi Muscle
- At the level of the teres major muscle, the fibers mold spirally surround it, with the lower part of the latissimus dorsi insert proximally at the humerus & at the upper part more distally. All fibers combined & have an attachment to the floor of the intertubercular sulcus of the humerus between the pectoralis major & teres major muscle.
- The easiest way to memorize the relation of the latissimus dorsi, pectoralis major & teres major muscles as they insert in the intertubercular sulcus is to use the following mnemonic: ‘Lady between two majors’:
- Lady: Latissimus dorsi
- Majors: Teres major, pectoralis major.
Nerve supply
- The nerve supply to the latissimus muscle is carried by the thoracodorsal nerve (C6 to C8), a branch of the brachial plexus.
Blood supply
- The thoracodorsal artery (continuity of the subscapular artery), supplies the vascular supply to the latissimus dorsi muscle. It enters the muscle on its coastal surface, medial to the lateral border & a few cms from the subscapular artery.
- As the thoracodorsal artery, emerging arteries of the ninth to eleventh posterior intercostal arteries, & first to third lumbar arteries supply the latissimus dorsi muscle.
Action
- Shoulder joint: internal rotation, adduction, extension.
- Assists in respiration.
Functions of Latissimus dorsi Muscle
- Synonyms: Extension of the shoulder joint, Extension articulation is glenohumeral
- Due to the multidirectional attachment of its fibers, the latissimus dorsi muscle has 3 actions on the shoulder joint:
- It effectively does an extension of the flexed arm
- It adducts & internally rotates the arm
- If the humerus is stabled opposite the scapula, it pulls the pectoral girdle back side as a whole.
- These motions determine the complex functional activity of the latissimus dorsi muscle; it is a climbing muscle, a rowing muscle, & a swimming muscle.
- Latissmus dorsi is a climbing muscle. With the arms fixed above the head, it can uprise the trunk upwards, together with the help of a pectoralis major muscle. It is an essential muscle in rowing, swimming (especially during the downstroke) & chopping. The muscle also participates in violent expiration, as it joins to the ribs. During cough and sneeze, the muscle can be palpated pressing forcibly inward, as it acts to compress the thorax & abdomen.
- The muscle helps in holding the scapula against the thorax during upper extremities movements. The alignment of the muscle to the inferior angle of the scapula allowed this movement.
- In activities like walking with crutches, where the humerus is the fixed point when standing, latissimus dorsi has the liability to pull the trunk forwards relative to the arms. With this motion, there is also a raising of the pelvis. In people with paralysis of the lower half of the body, the fact that latissimus dorsi attaches to the pelvis & the fact that it is still innervated enables the person to generate movement of the pelvis & trunk. Because of this, people wearing calipers & using crutches will be able to achieve a modified gait by fixing the arms & hitching the hips by one by one contraction of each side of latissimus dorsi muscle.
There are several noteworthy assisting functions of the latissimus dorsi:
- If the arms are fixed above the head, it will work in synergy with the pectoralis major muscle to raise the trunk upwards
- It fixes the scapula against the thoracic cage during humeral motions on the shoulder joint
- In people who use crutches & therefore have their humerus as the fixed point while standing, the latissimus dorsi assist in pulling the trunk forwards with its humeral alignment being fixed.
- This motion also causes the raising of the pelvis. The people with paraplegia, this motion enables the movements of the pelvis & trunk.
- It supports forced expiration by pressing the rib cage (accessory muscle of expiration). For this reason, the muscle is sometimes strained during coughing attacks (“coughing muscle”).
The power, size, and strength of this muscle can be done with training in a variety of different exercises.
- Some of these include:
- Vertical pulling motions such as pull-downs & pull-ups (including chin-ups)
- Horizontal pulling movements such as a bent-over row, T-bar row & various rowing exercises
- Shoulder extension movements with straight arms such as straight-arm lat pulldowns & Pull-overs
- Deadlift
Clinical significance of Latissimus dorsi Muscle
Tightening in latissimus dorsi Muscle
- Tightness in the latissimus dorsi has been seen as a contributor to chronic shoulder pain & chronic back pain. Because the latissimus dorsi joins the spine to the humerus, tightness in this muscle can consider as either sub-optimal glenohumeral joint (shoulder) function which tends to chronic pain, or tendinitis in the tendinous fasciae connecting the latissimus dorsi to the thoracic & lumbar spine.
- The latissimus dorsi is an impactful source of muscle for breast reconstruction surgery after mastectomy (e.g. Mannu flap) or to recorrect pectoral hypoplastic defects like in Poland’s syndrome. An absent or hypoplastic latissimus dorsi can be one of the defining symptoms of Poland’s syndrome.
Cardiac support
- For heart patients with low cardiac output & who are not suitable for cardiac transplantation, a procedure termed cardiomyoplasty may assist the failing heart. This surgery involves wrapping the latissimus dorsi muscles surrounding the heart & electrostimulating them in synchrony with ventricular systole.
Injury to latissimus dorsi muscle
- Injuries to the latissimus dorsi are a rare occurrence. They occur disproportionately in baseball pitchers. Diagnosis can be achieved by visualization of the muscle & movement testing. MRI of the shoulder girdle is used to confirm the diagnosis. Muscle belly injuries are treated with rehabilitation while tendon avulsion injuries will be treated surgically, or with rehab also. Either of the treatment, patients tend to return to play without losing any function.
Paralysis of latissimus dorsi muscle
- Damages of the brachial plexus might paralyze the thoracodorsal nerve & thus affect the latissimus dorsi. In contrast, a single lesion of the nerve (e.g. by trauma) occurs very occasionally. Clinical signs are the missing muscular relief at the back & the posterior axillary fold. In everyday life, the paralysis of the muscle might cause a slight weakness in the shoulder, however, usually, the defect is well compensated by the remaining shoulder musculature.
Stretching exercise of Latissimus dorsi Muscle
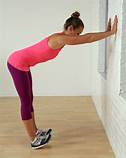
Wall Lat Stretch
- Stand while seeing the wall & then place the hands on the wall at the waist & level at shoulder width.
- Step behind while folding the hips until the torso & arms are in a straight line. The back should remain flat.
- Stabilize the arching of the lower back by using abdominal muscles. Alternatively, flex the elbows downward while the forearms rest vertically on the wall. You can also do the stretch with a table in place of the wall.
- And the torso is angled toward the bar at the lower position. Use both arms to do the bar stretch & hold all bar stretches for 30 secs.
Stretch with Foam Roller
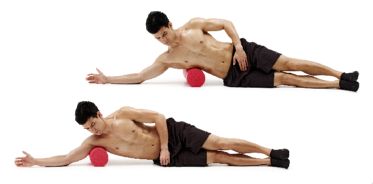
- Place a foam roller below the lat as shown in the figure aside.
- Move the entire body forward & backward using the legs in a way that the roller massages the upper part of the back. Keep the upper part of the body relaxed & the breath normal.
- You can do the exercise for 15 to 90 secs if you are comfortable & do not feel any pain. You can do this exercise while placing the hands at the back of the head & arms across the chest.
Extended Child’s Pose on Fingertips:
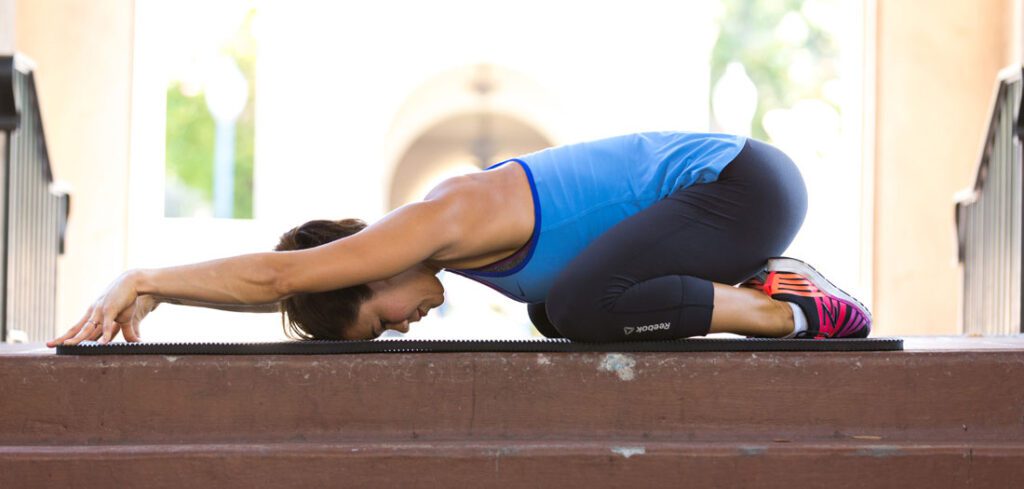
- The patient is Kneeling on the floor.
- Try to Touch the big toes together & the patient is sitting on the heels.
- Next, separate the knee joint about as wide as the hip joint.
- Then Bend the forward from the hip joint & walk the hands out as far in front of them as possible.
- With the arms extended palms are facing down then come up onto the fingertips as if the ball underneath the palms & melts the chest toward the floor.
Side-Lying Parallel Arm Chest Stretch:
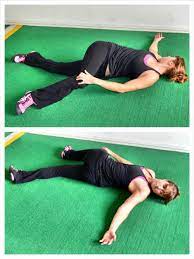
- The patient is lying prone on the stomach then bring both arms out to the sides then palms facing down & to create the letter, T.
- Then Start to roll onto the right side by pushing with the left hand.
- Lift the left leg, bend the knee joint & place the left foot behind you on the floor for stability.
- Then Rest the right temple on the floor.
- Must be Keep the left hand on the floor for balance.
- For the feel of the extra stretch, lift the left hand toward the ceiling.
- Then Repeat this stretching on the other side.
- You can do this position several times during the stretching routine.

Cat-Cow:
- Come onto all 4 in a tabletop position (hands & knees on the floor).
- Press into the hands & feet as you breathe in to look up, allowing the belly to fill with air.
- Breath out, tucking the chin towards your chest & arching the spine toward the ceiling.
- This pattern of motion continues, moving with each breath.
- Do this for 1 to 2 minutes.
Sphinx stretch:

- Lie on the stomach with the elbows underneath the shoulders & the hands extended in front, palms facing down.
- Set the feet slightly apart. It is ok for the big toes to touch.
- Gently engage the lower back, buttocks, & thighs as you lift the head & chest.
- Stay strong in the lower back & abdominals, breathing deeply.
- Press the pelvis into the floor.
- Gaze straight ahead or gently close the eyes.
- Hold this pose for 30 secs-1 min.
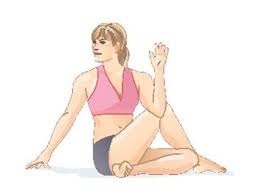
Seated spinal twist:
- Sitting on the floor with both legs extended out in front.
- Bend the left knee & place the foot to the outside of the right thigh.
- Place the right arm on the outside of the left thigh.
- Place the left hand behind you for support.
- Starting at the base of the spine, twist to the left side.
- Hold this pose for up to 1 minute.
- Repeat on the other side.
Strengthening exercise for Latissimus dorsi Muscle
One Arm Row on One Leg
- Doing a row on a single leg adds a balance challenge, and for that reason, you will generally use a lower weight.
- To start, transfer the weight to the left leg & tip from the hips, taking the trunk line to the ground as you lift the right leg and raise it up. keep the body in a proper alignment from head to heel.
- You can control onto a wall for balance if you need to.
- From this position, pull the elbow high into a row & slowly lower down.
- If you feel fatigued, take the leg to relax & rest lightly on the toes, keeping most of the dumbbell in the front of the leg.
- Repeat for 10 to 15 repetitions on both sides.
Lat Pulls With Bands rest
- This exercise mesmerized the lat pull machine at the gym.
- If you want to make this exercise tougher, you can use a door holder for the band and put it in a doorway above you or you can hold the band overhead & squeeze the back muscles to pull the elbows downwards towards the rib cage.
- To make this exercise harder, hold the band with the hands closer together.
- You can also do this exercise with 1 arm at a time for a more targeted movement.
- Repeat for 12 to 16 reps.
Rowing Barbell
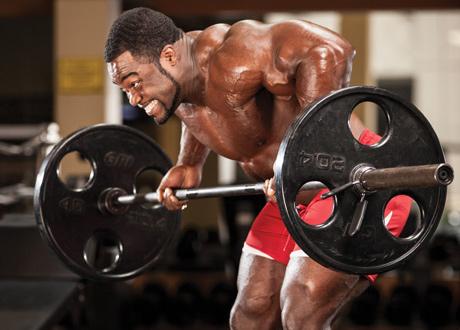
- While dumbbells allow you to work both sides separately, a barbell allows you to lift a healthier weight than you would with different weights.
- For this exercise, you have to grab the barbell with the palms facing the body & tip from the hips until the trunk is at near a 45-50 degree angle.
- You do not want to lower the trunk too far because that can strain the back, especially if the weight is heavy.
- The knees should be flexed to protect the back, take the barbell straight out & then squeeze the back to pull the barbell in towards the umbilicus.
- Repeat for 10 to 20 reps. You can also perform this movement with the palms outwards, as in a biceps curl.
Dumbbell Pullovers
- Pullovers are the best exercise because they work with multiple muscle groups at the same time, the latissimus, the chest, & the triceps. If you do them on the physioball, you also contract the lower limb & core.to start this exercise you have to come in a bridge position & grab a weight straight up overhead.
- If you are new to this move, begin with a lightweight.
- Keeping the arms extended, elbows slightly flexed, lower the dumbbells beside you to about head level or as far as you feel comfortable.
- Squeeze the back & slowly pull the weight back to the initial position, repeating for 12 to 14 reps.
Renegade Row
- To begin this exercise you have to come into a plank position on the hands & toes or knees. grab 2 dumbbells with the palms seeing each other.
- If this bothers the hands, try just 1 at a time.
- Holding the plank position for alternate rowing each weight up & down for 10 to 16 repetitions.
- If this is too challenging then perform this exercise on the knees, keeping the knees directly beneath the hips & the hands under the shoulders.
Pull-Ups

- If you are a beginner at pull-up exercises, there are ways to modify to movement & slowly build the strength to lift the entire body.
- Start by putting a chair or step stool beneath the pull-up bar. put the hands wider than the shoulders, prop one foot (or both feet if needed) on the chair & use that leverage to pull the body up.
- Lower & repeat for 10 or more res.
- Over time, you can try using less from the lower limb & more from the upper limb.
- Try this modification, Use a table or a chair to pull own self up into position & then slowly lower your own self down without the chair.
- These are known as negatives, which are a nice way to build upper limb strength.
Dumbbell Rows
- For this exercise, hinge from the hips, the back should be flat & the abdominals engaged.
- The weights (which should be on the heavy side) hang downwards & you squeeze the back to pull the elbows raise up to trunk level.
- You do not want to yank the dumbbells up, but by using those back muscles to regulate the movement. The elbows should stop just above trunk level.
- Because you are bending over with dumbbells hanging down, the lower back has worked too hard to keep the body neutral.
- Flexed the knees if you feel a strain in the lower back & keep the abdominals braced.
One Arm Row
- For the single-arm row, you can often go even more weight because now you are supporting the lower back with 1 hand on the other leg, unlike the double-arm rows.
- For this exercise, grab the latissimus as you engage the elbow up to the trunk level. At the top, contract the shoulder blades together to get more muscles involved. Down the dumbbells & repeat for 12-16 repetitions on each side.
Seated Rows With Resistance Bands
- Resistance bands can change the whole rowing exercise. The resistance band creates resistance throughout the exercise, so the muscle fibers will fire just a little differently.
- You can perform this exercise standing or sitting. Wrap a resistance band around a steady object in front of you & hold the handles in both hands. Move backward far enough that you have an opposing tension on the band.
- The shoulder should be down, contract the back to row the elbows in, stopping at trunk level. Release & repeat for 12 to 16 reps.
Bent-Over Row With Bands
- For this exercise, loop the band beneath both ankles & hold onto the band closer to the feet.
- This will let you create more tension in the band than holding the handles.
- Keep the back flat & parallel to the ground, pull the elbow up, and stop at trunk level
- Repeat for 10 to 12 repetitions. This exercise is also good with tempo changes.
Power Plank With Rows
- This advanced move hits 2 muscles with one stone. The plank activates the abdominals, lower back,& lower limb.
- Adding a row means you work with the core even more since you are balancing the body on a single hand, & you are also working the lattisimus dorsi.
- To begin this exercise, get into a plank position on the hands &toes with the feet wide. if you want to do more challenging it, perform this exercise on the knees.
- Hold onto a kettlebell or a dumbbell & pull the elbow up into a row.
- Lower & repeat for 14 to 18 repetitions while holding the plank the whole time. Take a rest & then switch sides.
Alternating Dumbbell Rows
- One way to change traditional dumbbell rows is to alternate them from left o right.
- This action activates more core & allows you to concentrate on a single arm at a time.
- To start, tip from the hips & keep the back flat. Slowly flexed the right elbow, pulling it up to trunk level.
- Lower & now lift the right elbow into a row.
- Alternate, taking the time with each repetition for 10 to15 reps.
Straight Arm Pulls
- The targets the back muscles, but it utilizes the triceps as well.
- Balance the own self on the ball means the lower back & legs utilize to stabilize the body.
- To perform this exercise, anchor a band around a steady object in front of you & then position own self with the ball under the trunk. you are far good away from the anchor point to have tension on the band.
- Begin with the arms extended out in front of you &, keep the arms straight, pull them down & back behind you, and contract the back.
- Repeat for 10 to 20 reps.
Barbell Pullovers
- Doing this exercise with a barbell raises the intensity of this exercise quite a bit.
- Unlike dumbbell pullovers, you will want to keep the elbows flex the entire time so you do not go too far & end up dropping the barbell.
- Begin this exercise on the bench & hold the barbell with hands close together just over the rib cage.
- Keeping the elbows flexed, lift the barbell & take the arms back behind the head.
- Contract the back to pull the barbell back to the initial position & repeat for 10 to12 reps.
Compound Row
- This exercise works the lats, but it also works on the lower back, glutes,& hamstrings. You may choose a weight full band for this exercise to get the most out of the benefits.
- Firstly Wrap a band around a steady object in front of you & step beside it until you felt tension on the band.
- Tip from the hips, knees slightly flex, & abdominals in, keeping the arms extended.
- Stand up &, at the same time, pull the elbows to trunk level in a rowing movement.
- Release & repeat for 10 to 20 reps.
Lateral raises exercise:
- First, hold a pair of light dumbbells for this exercise.
- You are standing with the feet slightly wider than the hip joint width apart.
- Try to raise the weights to the sides till are at shoulder level.
- Must be remembered to engage the core muscles & slowly lower the weights down to the sides.
- Repeat this exercise for 2 sets, in every set consisting of 12 to 15 reps & 3 to 4 times per week.
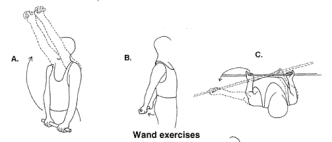
Wand exercise:
- This exercise is helpful to you for increasing ROM exercise.
- The patient is holding the wand with the help of both hands.
- Then perform the shoulder & elbow joint movement.
- Shoulder flexion, abduction, adduction, external & internal rotation & elbow flexion, and extension movement perform with the wand.
- Every exercise does the 2–3 times per day.
Shoulder Flexion isometric exercise:
- To perform the isometric shoulder flexion exercise you are standing to face a wall.
- Try to flex your elbow joint on the side of the shoulder then make a fist.
- You Place the folded napkin in between your fist & the wall & slowly press your hand into the wall.
- Hold this pressing for 7 to 10 seconds then slowly release the pressing.
- You do not need to try to push the wall over.
- Just you are gently pressing the wall to activate your shoulder flexor muscles.
- Do the 12 to 15 repetitions.
Shoulder abduction isometric exercise:
- This exercise mostly targets your rotator cuff muscles.
- To perform shoulder abduction you stand six inches away from the wall.
- Then turn your body perpendicular to the wall & close to the wall at the side which is affected by the shoulder joint side.
- Make a fist on that side & press the towel into it.
- You are also using a folded towel for extra support.
- You are only gently pressed into the wall & try to lift your arm outside.
- Hold this pressure for 10 seconds & slowly release pressure from the wall.
- Do the 10 to 15 repetitions.
Shoulder joint external rotation isometric exercise:
- This exercise helps to strengthen the latissimus dorsi muscle, and rotator cuff muscles, mostly teres minor & infraspinatus.
- To perform shoulder external rotation you are stand to perpendicular to a wall about 6 inches from the wall.
- The affected shoulder joint is close to the wall.
- First flexed the elbow joint up to 90 degrees then make a fist.
- Try to press the towel from the back of your hand into the wall as you rotate the arm in an outward direction.
- Then gently press the towel into the wall.
- Hold this pressing for 5 to 10 secs & slowly release the pressure from the wall.
- Complete 10 to 15 reps.
Shoulder joint internal rotation isometric exercise:
- To perform shoulder internal rotation you are standing facing a door frame & and outside the wall corner.
- The affected shoulder joint is near the door corner.
- Then flex the elbow joint up to 90 degrees & make a fist.
- Try to gently press the towel into the corner wall & door jamb like as you rotate the arm inward towards the belly.
- Hold this pressing for 5 to 10 secs & slowly release.
- Do the 10 to 15 reps.
Shoulder Extension isometric exercise:
- To perform shoulder extension you are standing to 6 inches away from the wall & your back is facing the wall.
- Your elbow joint is straight so your hand stays just near your buttocks & makes a fist.
- Try to gently press the towel into the wall behind you.
- Hold this pressing for 5 to 10 seconds & slowly release.
- Complete the 10 to 20 repetitions.
Scapular Retraction/Protraction movement:
- You are lying on your stomach means in a prone position on a table & bed with your injured arm hanging over the side.
- Must keep your elbow joint straight & lift the weight slowly.
- Try to squeeze your shoulder blade toward the opposite side as you can possible.
- Then return slowly to the starting position & repeat this exercise.
- Do this exercise 2–3 times per day.
Bent-Over Horizontal Adduction Exercise:
- You are lying on your stomach means in a prone position on a table & bed with your injured arm hanging over the side.
- Must keep your arm straight & slowly raise it to eye level.
- Then slowly lower it back to the starting position & repeat this exercise.
- Do this exercise 2–3 times per day.
Dumbell Pullover Exercise:
- Lie across the bench with only the upper back & neck being supported by the bench.
- Hold the dumbbell with both hands, forming a triangle with the hands or by gripping the inner plate.
- Hold the dumbbell directly above the chest with elbows bent slightly.
- Engage the core & slowly lower the dumbbell past the face & over the head as far as you can.
- Pull the dumbbell back over the face to starting position.
- Complete the 5 to 10 repetitions.
- Repeat 3 sets at a time.
Cable Straight Arm Pull Down Exercise:
- Attach a wide grip handle or different accessory above the head to the cable machine
- Hold the handle with an overhand grip using both hands at shoulder width
- Bend forward slightly at the hips & with the elbows slightly flexed pull down on the handle by depressing the shoulder blades while extending the shoulders
- Pull downwards until the handle reaches the thighs
- Slowly return initial position
- Complete the 5 to 10 repetitions.
- Repeat 3 sets at a time.
Inverted Row Exercise:
- Set up bar slightly higher than the arm’s length above the surface
- Sit under the bar with both legs stretched out in front of you
- Reach up holding the bar with both hands using an overhand grip wider than shoulder-width apart
- Straighten the body so the arms are straight & heels are on the floor
- Pull up by retracting the shoulder blades until the chest hits the bar
- Slowly lower to initial position
- Complete the 5 to 10 repetitions.
- Repeat 3 sets at a time.
Underhand Yates Row Exercise:
- Hold a barbell with both hands using an underhand grip at shoulder width
- Bend & the knees & hinge forward at the hips at 45 degrees
- The arms should be almost fully extended with the bar over the thighs
- Pull the bar up to the waist
- Now stop at the top then slowly return to the initial position
- Complete the 5 to 10 repetitions.
- Repeat 3 sets at a time.
Underhand Grip Lat Pull Down Exercise:
- Sit on a bench seeing the cable machine
- Reach up & hold the bar with both hands using an underhand grip, shoulder-width apart
- Pull down on the bar by bringing the shoulder blades down & back until the bar reaches the chest
- Slowly return to the initial position
- Complete the 5 to 10 repetitions.
- Repeat 3 sets at a time.
Lat Pull Downs Exercise:
- Sit on a bench seeing the cable machine
- Reach up & hold the bar with both hands using an overhand grip, hands are a little wider than shoulder-width apart
- Pull downwards on the bar by bringing the shoulder blades down & back until the bar reaches the chest
- Slowly return to the initial position
- Complete the 5 to 10 repetitions.
- Repeat 3 sets at a time.
Pull-Ups Exercise:
- Grasp the bar, hands shoulder-width apart by using an overhand grip
- Begin with arms completely extended the pull the chest up toward the bar as high as you can
- Hold thoroughly at the top then back to the starting position
- Complete the 5 to 10 repetitions.
- Repeat 3 sets at a time.
Chin-ups Exercise:
- Hold the bar, hands shoulder-width apart palms with an underhand grip
- Begin with arms completely straight & pull the chest up to the bar as high as you can
- Hold briefly at the top then return to the initial position
- Complete the 5 to 10 repetitions.
- Repeat 3 sets at a time.
Single-Arm Dumbell Row Exercise:
- Hold a dumbbell with a neutral grip with the right hand then place the right knee & right hand under the shoulder on a bench.
- Grab the dumbbell with the left arm straight directly beneath the left shoulder
- Pull the dumbbell upwards, bending at the elbow & keeping the arm close to the body until the dumbbell is next to the hip
- Slowly lower to initial position
- Complete the 5 to 10 repetitions.
- Repeat 3 sets at a time.
Seated Cable Rows Exercise:
- Sit on a bench with the knees bent then reach forward & grab the triangle handle
- Pull the handle back towards the navel keeping the back straight & squeezing the shoulder blades together
- Slowly return to the initial position
- Complete the 5 to 10 repetitions.
- Repeat 3 sets at a time.
High Cable Reverse Crossover Fly Exercise:
- Begin with both handles at head height on the cable machine
- Stand seeing in the center of the two-pulley machine
- Reach up & across the body with both hands grabbing the handles with an overhand grip (or grab the cables)
- Pull the elbows down, out & back as far as possible until the arms are in line with the back
- Slowly return to the initial position
- Complete the 5 to 10 repetitions.
- Repeat 3 sets at a time.
Cable Supine Reverse Fly Exercise:
- Begin with a bench in the center of 2 pulleys
- Reach up across the body grabbing both handles(cable) with an overhand grip
- Lie down on the bench with the arms crossed above the chest with the elbows slightly bent
- Pull the arms down to the sides until the elbow is level with the shoulders, keeping the arms perpendicular to the torso
- Slowly return to the initial position
- Complete the 5 to 10 repetitions.
- Repeat 3 sets at a time.
Dumbell Reverse Fly Exercise:
- Grab the dumbbells with both hands with a normal grip
- Then hinge at the hips until the body is almost parallel to the floor
- Starting with the arms hanging down from the shoulders pull the dumbbells up & back until the elbows are level with the shoulders
- Slowly lower to the initial position
- Complete the 5 to 10 repetitions.
- Repeat 3 sets at a time.
Band Pull-Aparts Exercise:
- Stand up straight, with feet shoulder-width apart
- Grasp the band close to the ends with an overhand grip
- Raise arms outwards in front of you at shoulder height
- Stretch the band apart by squeezing the shoulder blades together
- Slowly lower to the initial position
- Complete the 5 to 10 repetitions.
- Repeat 3 sets at a time.
Face Pulls Exercise:
- Set the cable at head height
- Grab the handles and rope with an overhand grip
- Keeping the elbows below the shoulders pull back until the hands are parallel to the face
- Slowly return to the initial position
- Complete the 5 to 10 repetitions.
- Repeat 3 sets at a time.
Breathing Exercises
Diaphragmatic Breathing Exercise :
In supine position
- Lying on your back on a surface or in bed, together with your knees flex and your head supported to the bottom. you’ll use a pillow behind your knees to support the legs.
- Place one hand on his higher chest and therefore the alternative slightly below your skeletal structure. as you’re feeling your diaphragm move as you breathe.
- Breathe in slowly exploiting your nose so your abdomen moves away and it’ll permit your hand to rise. The hand on your chest ought to persist as still as connected
- Tight the abdominal muscles and allow them to fall within as you expire exploitation of your lips. The hand on your belly ought to move down to its original position
- In a sitting position in a chair, with your knees flex and your shoulders, head, and neck neutral position. you can perform for 7 to 10 minutes, several 5 to 6 times a day. Diaphragmatic exercise also call a relation exercise
In sitting position
- Sitting in a chair straight position and lengthen the distance between your umbilicus and sternum.
- your shoulders and neck should be relaxed.
- the pelvis is in the neutral position.
- your hand’s position should be at the side of your lower ribs.
- Breath in slow using your nose. As you inspirited feel your ribs should be outwards and upwards. During inspiration expansion of the trunk in three areas forward, sides, and back. expiration using your nose. As you expire your lower ribs move inward direction.
Segmental Breathing Exercise :
Lateral costal expansion
- it is also called lateral basal expansion. it was usually done unilaterally or bilaterally. it can also do in a sitting or lying position
- place your hand lateral aspect of the rib cage
- and ask the patient to breathe out and the rib cage should be downward and inward
- as the patient expired therapist should apply pressure on the rib cage with the palms of your hand
- before inspiration, you need to downward and inward stretch to the chest to facilitate the external intercostal contraction
- apply normal force on the lower rib cage to get stimulate and patient to get inspirited deeply and the chest will expand
- when the patient expiration therapist will squeeze the rib cage downward and the inward
- the patient may perform manually and ask to apply force with his hand or with the towel.
Posterior basal expansion
- This form of deep breathing exercise accents post-surgical maneuvers who have bedridden and cannot sit up for a prolonged-time period. because of that time secretion move to the posterior segment of the lower side of the rib.
- sit and lean onward on a pillow, slightly bend your hips
- place the physiotherapist’s hand over a posterior segment of the rib
- place your hand lateral aspect of the rib cage
- ask the patient to breathe out and the rib cage should be downward and inward
- as the patient expired therapist should apply pressure on the rib cage with the palms of their hand
- before inspiration, you need to downward and inward stretch to the chest to facilitate the external intercostal contraction
- apply normal force on the lower rib cage to get stimulate and patient to get inspirited deeply and the chest will expand
- when the patient expired therapist will squeeze the rib cage downward and an inward
- the patient may perform indirectly ask to apply force with his hand or with a towel
Right middle lobe expansion(lingual expansion)
- the patient is in a sitting position therapist’s hand should be right or left side at the below axilla level
- ask the patient to breathe out and the rib cage should be downward and inward
- as the patient expired therapist should apply pressure on the rib cage with the palms of their hand
- before inspiration, you need to downward and inward stretch to the chest to facilitate the external intercostal contraction
- apply normal force on the lower rib cage to get stimulate and patient to get inspirited deeply and the chest will expand
- when the patient expiration therapist will squeeze the rib cage downward and the inward
- the patient may perform manually and ask to apply force with his hand or with a towel
Apical expansion
- Patient in a sitting position on a chair or bed therapist’s hand should be below the clavicle
- As the patient breathes out apply pressure with the palm or fingertip just below the clavicle
Pursed lip breathing exercise
- Sitting with using your back straight or lying down. Relax each shoulder and neck the maximum amount as potential.
- inspiration using your nose for two to three seconds, the air is getting into your abdomen. fill your abdomen with air instead of your lungs.
- Purse your lips like you’re processing on hot food then expire slowly, taking double as long to exhale as you took to respire.
- you can repeat For several times. you’ll rise the inspiration and expiration counts from a pair of seconds to four seconds, and so on pursed lip breath effective
5 Comments