Olecranon Fracture
Table of Contents
Definition
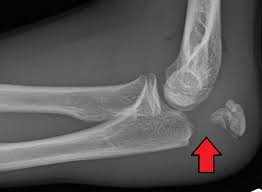
An Olecranon fracture is a type of fracture that occurs at the pointy bone at the tip of the elbow, known as the olecranon process. This bone is part of the ulna, one of the two forearm bones, and plays a crucial role in the stability and movement of the elbow joint.
Olecranon fractures can result from various causes, such as falls onto the elbow, direct blows, or sudden, forceful extensions of the arm. These fractures can range in severity from simple fractures to more complex, comminuted fractures.
Typically, these fractures involve injury to the joint and are often accompanied by joint effusions and hematomas. Extra-articular fractures, on the other hand, involve avulsion fractures and are more commonly observed in older individuals.
The management and treatment of olecranon fractures depend on the type and extent of the injury, with options including conservative measures, casting, or surgical intervention. Prompt diagnosis and appropriate treatment are essential to ensure proper healing and restore the function of the elbow joint.
Clinical relevant anatomy
The elbow joints are created up of the following joints:
- Ulna-humeral joint:
- Function: Stability; elbow flexion/extension
- Radio-humeral joint
- Function: Lateral stability; forearm pronation/supination
- Proximal radio-ulnar joint
- Function: Forearm pronation/supination
- Olecranon function:
Insertion point for the triceps, thus plays an essential role in the extensor mechanism of the elbow.
Major articulation for the elbow joint.
Epidemiology/Causes
- Mechanism of injury
- Direct:
- Fall on the forearm
- The elbow on an extended hand is hyperextended, forcing the olecranon into the distal humerus.
- Penetrating injuries affecting the articular surface (e.g. panga wounds)
- Indirect: Through triceps contraction
- The compaction of the triceps avulses the olecranon and tears the distal triceps expansion
- Sportsmen (e,g. wrestlers and gymnasts) that cause a lot of isometric arm power (e.g. wrestlers and gymnasts) are at risk
Signs and symptoms
Patients with a damaged olecranon are incapable of extending their arms.
Classification
The Mayo classification system of olecranon fractures is based on the displacement of the olecranon, comminution, and elbow stability. There are three types of fractures, each with 2 subtypes.
Type I: Non-comminuted and minimally comminuted fractures
Type II: Displaced fracture with entire ulnar collateral ligaments
Displaced vs non-displaced
Stable fracture
Type III: Fracture with trouble between the forearm and the humerus
Displaced vs non-displaced
Unstable as a consequence of the disruption of the medial collateral ligament
Diagnostic procedures
Physical examination
- Subjective interview:
- Mechanism of injury: Immediate blow to the elbow
- Complaints:
- Pain over elbow
- Inability to extend the elbow
Observation:
- Deformity:
- Obvious around elbow
- Forearm appears shorter
- Distortion of bony landmarks of elbow
- Swelling
- Bruising
Palpation:
- Tenderness over the tip of the olecranon and proximal ulna
- Palpable gap at fracture site
- Range of motion: Limited elbow extension
- Neuromuscular examination of the hand to find out concomitant
Special investigations
X-rays: AP and lateral views
Medical Treatment of Olecranon Fracture
Prognostic factors for elbow function and the development of arthrosis after operative treatment of olecranon fractures include elbow instability and fracture morphology. The aim of management is to restore the extensor mechanism of the elbow and reconstruct the articular surface.
Type I: two weeks of immobilization and symptomatic treatment
Risk of displacement as an outcome of triceps pull
Type II + III: Require surgical fixation.
Surgical intervention
Tension band wiring fixation:
Presentation: Non-comminuted transverse fractures affecting less than half the articular olecranon surface
Complications:
- Loss of fixation
- Non-union
- Skin breakdown
- Infection
- Olecranon bursitis
- Radial head subluxation
- Prominent hardware
Plate fixation (more stable):
Indication: Comminuted fractures
Good results with regard to union and the prevalence of hardware complications
Intramedullary screw fixation:
Indication: For simple, non-comminuted transverse fractures, intramedullary screw fixation is recommended.Decrease pain, improved function, and range of motion when compared to tension band wiring
Olecranon exision and/or the triceps advancement-technique:
Indication: The articular surface is too comminuted or osteoporotic for fixation (elderly/low-demand patients).
To reduce the risk of instability, the following criteria also apply –
- Intact:
- Medial collateral ligament
- Interosseous membrane
- Distal radioulnar joint
- Method: The triceps tendon is attached again to the proximal edge of the articular surface.
Complications
Olecranon fractures and their surgical treatment can result in several complications which may arise.
- Permanent extension loss
- Heterotopic ossification
- Non-union
- Malunion
Physiotherapy Treatment
Precise post-operative care is very crucial for maximum healing. The functional aim of the physiotherapist is to restore and
normalize activities of daily living. Rehabilitation and bone healing will take almost 12 weeks:
Week 1
Inflammation phase:
- A splint or cast is applied for fixation, in 60° elbow flexion to decrease tension on the skin
- Assess capillary refill, sensation, active and passive range of motion of the fingers excessive swelling
- start active range of motion of the shoulder, hand, and digits (splint to be kept on)
- Oedema management
After 3 to 4 days:
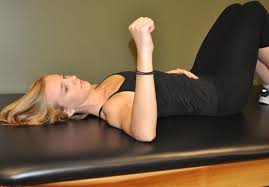
Isometric exercises of the wrist
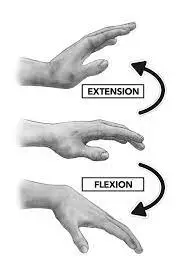
Isometric Wrist Extension
- Try to make a fist with the injured hand with the palm down.
- Take the wrist in a slightly upward direction and resist with the other hand.
- Hold for10 seconds reps times3/day
- Progress to sets reps times/day
Wrist Flexion
- Try to make a fist with the involved hand with the palm up.
- take the wrist in a slightly upward direction and resist with the opposite hand.
- Hold for 10 seconds reps times/day
- Progress to sets reps times/day
Radial Deviation
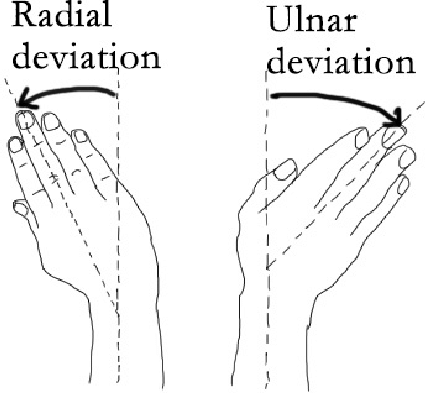
- Try to make a fist with the injured hand with the thumb upward and facing the ceiling.
- Take the wrist in a slightly upward direction and resist with the opposite hand.
- Hold for 10 seconds reps times/day
- Progress to sets reps times/day
Finger Extension
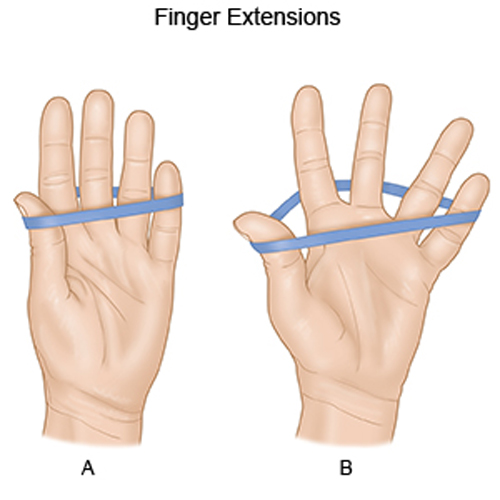
- Try to make a fist with the injured hand, palm down.
- Take the fingers from bent into a straightened position, resisting with the opposite hand.
- Hold for 10 seconds. reps times3/day
- Progress to sets reps times/day
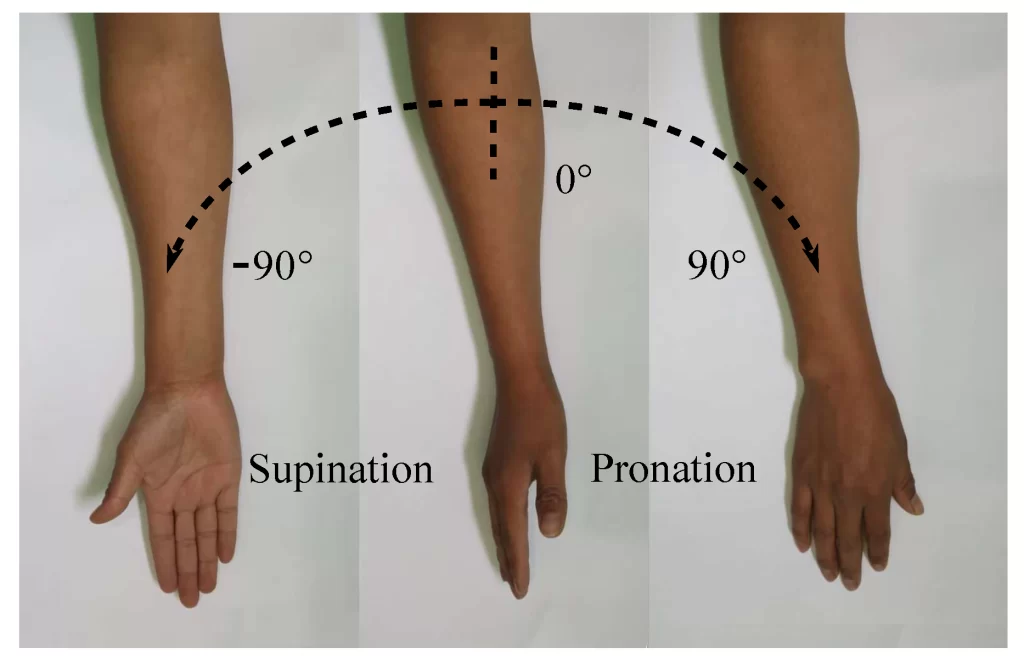
Pronation
- Try to make a fist with an injured hand with a thumb upward.
- Rotate the forearm a little toward a palm-down position.
- Resist with the other hand.
- Hold for 10 seconds reps times/day
- Progress to sets reps times/day
Supination
- Try to make a fist with the involved hand with the thumb upward.
- Rotate the forearm a little toward a palm-up position.
- Resist with the other hand.
- Hold for 10 seconds.
- Begin sets reps times/day
- Progress to sets reps times/day
Wrist Extension Stretch
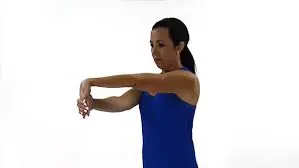
- Have elbow straight.
- Grab the palmar surface of the hand and bend the wrist back toward the face for a mild stretch.
- Hold for 10-20 seconds and relax.
- Begin sets reps times/day
- Progress to sets reps times/day
Wrist Flexion Stretch
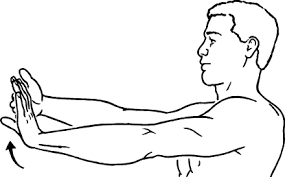
- Put elbow straight.
- Grab the hand and bend up until a mild stretch is felt.
- Hold for 10-20 seconds and relax.
- Begin sets reps times/day
- Progress to sets reps times/day
Gripping
- Put tennis or racquetball in the palm of the hand.
- Squeeze and hold for seconds.
- Begin sets reps times/day
- Progress to sets reps times/day
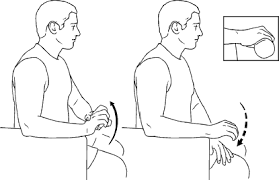
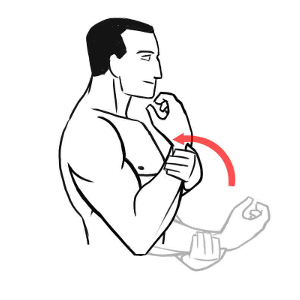
Gentle active elbow flexion (without splint)
Elbow flexion tends to the ability to flex the elbow. To improve the elbow flexion ROM:
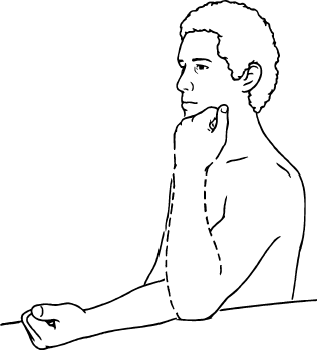
- Begin with standing with the arm at the side.
- Actively flex the elbow up as far as possible, then grasp the forearm or wrist with the other hand and slowly – add overpressure.
- Hold the bent position of the elbow for 5 to 10 seconds, and then release the stretch by straightening the elbow.
- Repeat the exercise 5 times.
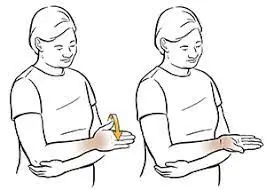
Active range of motion of the wrist
Wrist extension and flexion
- Rest the forearm on a table.
- Put the hand over the ledge with the palm facing down.
- Slowly move the hand upward until a person feels a gentle stretch.
- Lower the hand again to the starting position.
Palm turning exercise
- Start with sitting, lay the hand flat on the leg with the palm facing down.
- Slowly turn the hand over, so that the palm is facing up.
Opening and closing fist
- Begin with the fist closed (not too tightly).
- Gently open your hand and stretch your fingers outwards.s.
- Close the fist again.
- Teach patient functional adaptions, e.g. to use the opposite extremity for self-care activities
Week 2
Reparative time: None to minimal stability in the elbow.
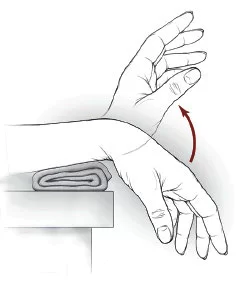
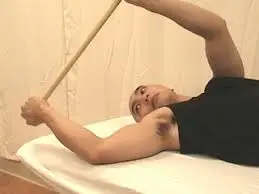
Passive Extension
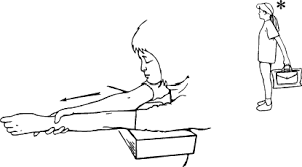
- Put a towel roll under the elbow and a weight on the wrist with the palm facing up.
- Let gravity straighten the elbow.
- If you do not have a cuff weight, place two tiny cans into both ends of a tube sock, securing the open end and looping over the wrist.
- Hold in this position for 60 seconds.
- Release tension and repeat 5 times.
Splint or cast removed in most cases
Gentle isometric exercises of the biceps
Isometrics bicep exercise
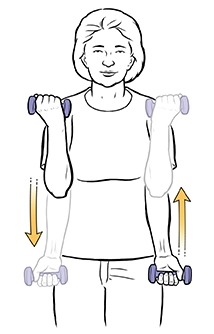
Static curl with a dumbbell
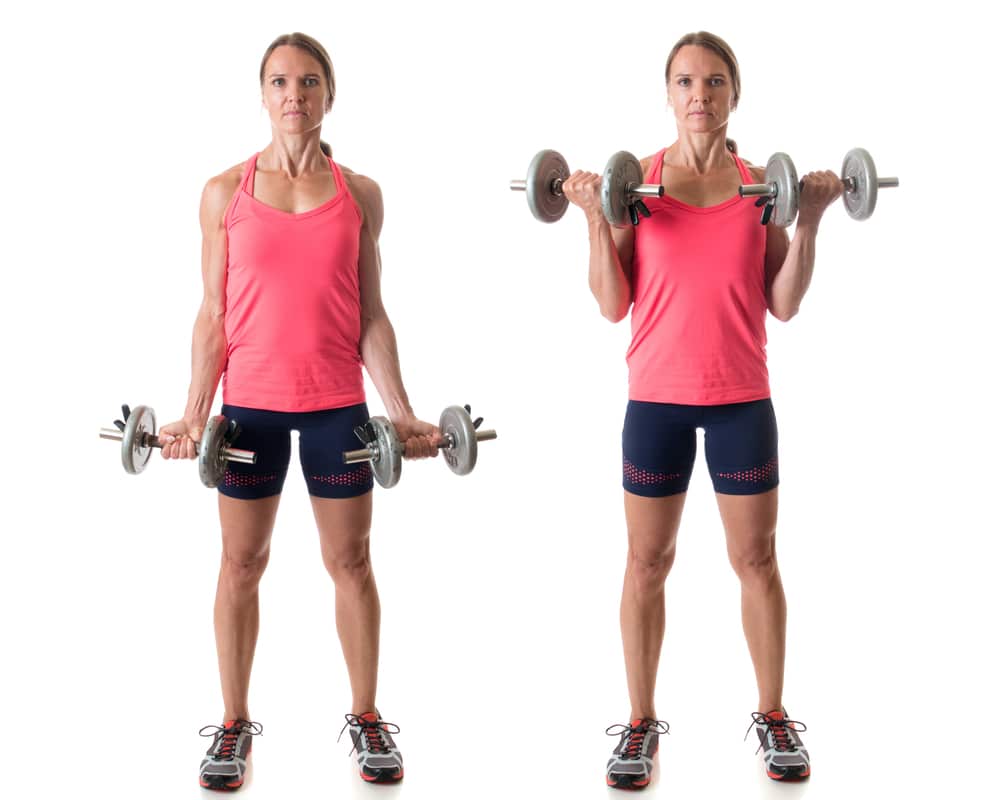
- Start with the arms at the sides and a dumbbell in each hand.
- Hold a dumbbell with one hand and lift it up to the height of your elbow while keeping your arm at a 90-degree angle.
- Maintain this position for as long as a person can, or for about 10 seconds.
- Repeat with the other arm after lowering the dumbbell.
Double arm static bicep curl with dumbbell
- To improve the problem of this exercise, lift the dumbbells with both arms at the same time.
- If a person has only one dumbbell, he can perform this isometric bicep exercise while sitting down.
To do the seated position with one arm, do the following
- Begin with a seated position
- Lean the torso forward and place the right elbow inside the right knee.
- Pick up the dumbbell, keeping the right elbow inside the right knee for stability.
- Maintain the right arm bent at 90 degrees.
- Maintain this position for at least 10 seconds or for as long as a person may hold.
- Repeat the previous steps with the opposite arm.
As with various weighted exercises, these dumbbell variations are effective in tracking progress. Over time a person will either be
able to maintain a heavier weight or improve the time in which you hold the weight.
Lying dumbbell hold
This motion works the bicep but in a position where it is most elongated. It’s useful for building the strength of the biceps when it is totally locked out, otherwise known as “straight arm strength”.
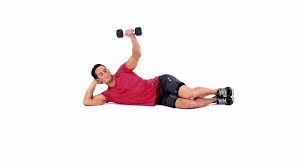
- Begin this motion with a dumbbell in each hand.
- Lie down on a bench and extend the arms at either side of the torso keeping the hands level with the waist and palms facing upward. Maintain for as long as possible or 15 seconds.
Towel hold
There are two methods in which a person may use a towel to perform isometric bicep isometric exercises.
- The first method begins with you standing on one end of the towel.
- Grasp the contrasting end of the towel with the same side hand as the foot that is standing on the towel.
- Get the other foot behind a person so that you’re in a split stance
- Bend the arm to a 90-degree angle and hold this position for 15-20 seconds ensuring the biceps are involved during the hold. If not, hold the towel in a position that is closer to the ground.
- maintain the 90-degree position for at least 10 seconds or for as long as a person can hold.
- Repeat the process with the opposite hand.
- The second method begins with you taking the towel and passing it under the knee.
- Bring both ends of the towel with both hands and raise them such that the leg comes up as high as possible.
- Flex both arms at 90 degrees.
- If a person struggles to balance, perform this exercise against a wall.
- Please maintain this state of affairs for as long as possible.
Isotonic exercises to the digits
Squeezes
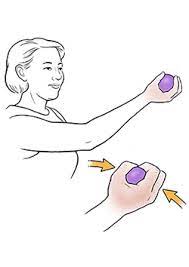
- Squeezing activities combine both isotonic and isometric aspects to strengthen hands.
- Utilize a dedicated hand-squeezing tool, or simply grab a tennis ball, a rubber ball, or a similar squeezable object that also offers resistance.
- Squeeze the object with all 5 fingers as hard as a person may, then hold the position for 5 seconds before returning to the starting position.
- Complete 5 repetitions with each hand, at least three times daily.
Resistance Band
- A resistance band is a handy tool thanks to its length and versatility.
- It may also help a person strengthen their hands. Secure a band to the floor, or step on one end, then grasp the other end with the 4 fingers.
- Position the arm so the forearm is parallel to the floor, the palm faces away from the person and the wrist is bent downward.
- Use the free hand to grasp the opposite forearm, just below the wrist.
- The hand holding the band then curls upward, gently and returns to the starting position to complete one repetition.
- Do 3 sets of 10 reps with each hand, or work up to that level.
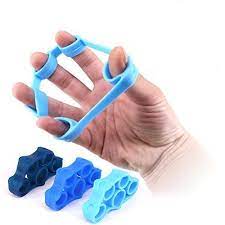
Rubber Band

- One or more sturdy rubber bands may essentially act as small resistance bands to help strengthen the grip.
- Place the rubber band on the outside of the fingertips so it covers the area where each fingernail meets the skin.
- Extend all 5 fingers as far as possible, then back them to the starting position.
- An individual may use more than one rubber band if the training is too easy.
- Perform 3 sets of 10 repetitions with each hand, or work up to that level.
Week 4-6
Fracture now partially stable:
Active and active-assistive range of movement to the shoulder, elbow, and wrist
Active and active assisted shoulder range of movement exercises
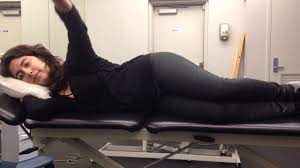
Shoulder abduction while lying on your side.

- Lie on one side and gently lift the arm up towards the ceiling.
- To start the shoulder active ROM exercises, begin with active shoulder abduction.
- Lie on one side.
- The shoulder that you are plying should be on top.
- Keep the elbow straight and the thumb pointing towards the ceiling.
- Once the arm is straight and resting on the hip, gently lift the arm up into the air and towards the ceiling.
- Make sure to keep the arm in line with the body, and be sure the thumb remains pointing at the ceiling.
- Move the shoulder fully through a pain-free ROM, and then gently lower the arm back down to the starting position.
- Do 8 to 12 repetitions of this exercise, and then progress to the next exercise.
Make sure to stop if a person feels worsening pain in the shoulder or arm.
- Lie on one side with the elbow straight and the arm out in front of you, parallel to the floor.
- The following shoulder active ROM exercise is called horizontal abduction. begin this exercise by lying on the side with the shoulder to be exercised on the top.
- Put the elbow straight and flex the shoulder so that the arm is out in front of you and parallel to the floor. gently lift the arm up so that the hand is pointing towards the ceiling.
- Maintain this position for 1 to 2 seconds, and then gently lower to the starting position.
- Move through a pain-free ROM.
- This exercise should be completed for 8 to 12 repetitions.
- If a person experiences any pain with this exercise, stop immediately and consult your healthcare provider or physical therapist.
After this exercise is complete, a person may move to the next exercise: active shoulder external rotation.
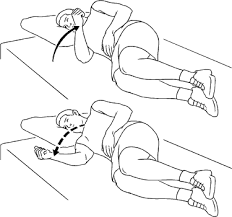
Sidelying Shoulder External Rotation Exercise
- Lie on one side with the elbow bent and tucked into the side.
- Active shoulder external rotation is an excellent exercise to increase the use of the rotator cuff muscles.
- It may help increase rotator cuff strength or improve neuromuscular control of this muscle group.
- Make sure to talk to the physician and physical therapist to ensure that this exercise is appropriate for you.
- To begin this exercise, lie on the side with the shoulder to be exercised on top.
- Keep the elbow bent to 90 degrees and tucked into the side.
- The elbow should remain at the side the entire time.
- The hand should be relaxing comfortably in front of the navel.
Active Shoulder External Rotation
- Gently rotate the shoulder so the hand moves up towards the ceiling.
- While keeping the elbow tucked by the side, slowly rotate the shoulder and bring the back of the hand up towards the ceiling.
- To perform the active external rotation, slowly raise the hand up towards the ceiling.
- The elbow should remain bent and tucked into the side.
- The motion should be coming from the shoulder as it rotates.
- When the shoulder rotates out all the way, maintain the end position for 2 seconds, and then gently back to the starting position.
- A person should perform 5 to 10 pain-free repetitions of this exercise.
Sidelying Shoulder Internal Rotation Exercise
- Lie on one side with the bottom elbow bent 90 degrees.
- To begin active shoulder internal rotation, a person must lie on your side, but this time the shoulder to be exercised should be on the bottom.
- A person can have to move the arm forward an inch or two so that a person is not lying directly on the arm or elbow.
- Keep the elbow bent to 90 degrees, and keep the palm facing up.
Shoulder Internal Rotation Exercise
- Gently rotate the shoulder so the hand raises up. Keep the elbow bent.
- While keeping the elbow bent to 90 degrees, gently rotate the shoulder so that the hand moves up towards the navel.
- The ROM should be pain-free. Once the hand is up at the navel, maintain this position for two seconds, and then gently lower back to the starting position.
- Repeat this exercise for 8 to 12 repetitions. Make sure that no pain is caused by this exercise.
Active and active assisted elbow range of motion activities

Elbow Flexion
Elbow flexion tends to the ability to bend the elbow. To increase the elbow flexion ROM:
- Stand with the arm at the side.
- Actively flex the elbow up as far as possible, then grasp the forearm or wrist with the other hand and gently add overpressure.
- maintain the bent position of the elbow for five to 5 seconds, and then release the stretch by straightening the elbow.
- Repeat the exercise 15 times.
Elbow Extension
To increase the ability to fully straighten the elbow, a person must work on elbow extension ROM exercises. To do this:
- Start with sitting in a chair with the elbow resting on a table. A person may want to rest the upper arm on a pillow or folded towel for comfort.
- Straighten the elbow out all the way, and then utilize pressure to the forearm or wrist to count overpressure to the stretch.
- Straighten the elbow out as far as an individual can with overpressure, and maintain the stretch for five to 10 seconds.
- Loose up the stretch and allow the elbow to bend a bit.
- Repeat the exercise for 10 repetitions.
- An individual can also add a bit of stretch to the elbow extension by holding onto a 2- to 3-pound weight.
Forearm Supination
The ability to turn the wrist over so the hand faces up is called supination, and this motion happens at both the elbow and at the wrist joint. To increase the ability to supinate the hand, perform the forearm supination ROM exercise.
To perform the exercise:
- Stand or sit with the arm at the side and the elbow bent about 90 degrees.
- Keep the elbow at the side and turn the wrist and hand over so the palm faces up.
- To count overpressure to the stretch, use the contrasting hand and reach underneath the forearm of the supinated arm.
- Hold the wrist and slowly add overpressure by turning the hand further into supination.
- When a stretch is felt, maintain the position for 5 to 10 seconds.
- Repeat elbow supination ROM for 10 repetitions.
Forearm and Elbow Pronation
Forearm pronation manages the ability to turn the hand over so the palm faces the floor. This motion is extremely crucial in performing tasks such as pouring a cup of coffee or playing the piano.
To perform the forearm pronation ROM stretch:
- Start with a Stand or sit with the elbow bent 90 degrees and folded in at the side.
- Rotate the hand and wrist over as far as possible, then reach the different hand over the top of the forearm.
- Keep the wrist, and turn the arm further into a pronated position.
- Maintain the position with overpressure for five to 5 seconds, and then release the stretch.
- Repeat the pronation ROM stretch 10 times.
Avoid passive range of movement at the elbow
Isometric exercises to the elbow
Isometric Strengthening
- Do 10 repetitions 4 times a day
- Extension (straightening)
- Individually these should be repeated 10 times and tried 4 times a day
- Place the hand of the affected side on top of the wrist of the unaffected side
- Attempt to straighten the affected elbow but resist any actual movement with the other
- hand. Hold this position
- Relax the arm and repeat
A person may then improve load in different joint positions.
Flexion (bending)
- Place the hand of the unaffected side on top of the wrist of the injured side (affected
- side).
- Attempt to bend the elbow but resist any actual movement with the hand.
- Hold this position
- Relax your arm and repeat
- Aim for about 30% of maximum resistance
- A person may then improve load in different joint positions.
Pronation:
- maintain the involved wrist in the unaffected hand.
- Try to roll the affected forearm over so that the palm faces the floor but resist this with the hand for 30% of max strength.
- Relax and repeat
Supination:
- Posture as above, but this time try to roll the palm up to face the ceiling but resist with the hand holding the wrist.
- Relax and repeat
- Aim for 30 % of max strength
Activities of daily living: Uses the active extremity for stability and light self-care.
Week 8-12:
- Progressively weight-bearing through affected limb
- Resistive exercises to elbow flexors and extensors
- Active and active-assistive range of movement to the elbow and wrist in all planes (until satisfactory range is achieved)
- There can be some limitations in elbow extension:
- Gentle passive stretching may be necessary
- A dynamic splint can be utilized for passive elbow stretch.
FAQ
What is a fracture of the olecranon?
An olecranon fracture is a break in the “pointy bone” of the elbow, which is really the end of the ulna and protrudes as you bend your arm. This sort of fracture is typical and typically presents alone (with no additional injuries), but it can also be a component of a more serious elbow injury.
How long does it take for an olecranon fracture to recover?
After an olecranon fracture, people may be able to return to their regular activities in about 4 months, while a full recovery may take longer. People might not have their complete range of motion back even after the fracture has healed. This often keeps getting better over time.
What kind of olecranon fracture occurs most frequently?
80–85% of olecranon fractures have the most typical fracture pattern, Type II. 5-12% of instances involve type I injuries, whereas 6% involve type III injuries.
How long is an olecranon procedure?
The operation can be carried out as an outpatient procedure and normally lasts an hour. On the back of the elbow, the surgical incision is located in the middle.
When do olecranon fractures start to happen?
The most frequent mechanism of injury for these fractures, which often affect children between the ages of 5 and 10, is trauma to an extended hand or flexed elbow. They are frequently accompanied by other fractures of the radial head or the distal section of the humerus.
References
- Olecranon fracture. (n.d.). Physiopedia. https://physio-pedia.com/Olecranon_Fracture
- Pt, B. S. (2022). 4 elbow range of motion exercises. Verywell Health. https://www.verywellhealth.com/elbow-range-of-motion-exercises-2696025
- Isotonic exercises for hands. (2017, November 21). Healthy Living. https://healthyliving.azcentral.com/isotonic-exercises-hands-13958.html