
Normal Gait Pattern And Gait Training
Table of Contents
What is a Gait Training?
- Bipedal walking is an important characteristic of humans. This page presents information about the different phases of the gait cycle, important functions of the foot while walking, and gait analysis which is a key skill for physiotherapists.
- Gait speed determines the contribution of each body segment. Normal walking speed primarily involves the lower extremities, with the arms and trunk providing stability and balance.
- The faster the speed, the more the body depends on the upper extremities and trunk for propulsion as well as balance and stability. The legs continue to do the most work as the joints produce greater ranges of motion through greater muscle responses.
- In the bipedal system, the three major joints of the lower body and pelvis work with each other as muscles and momentum move the body forward. The degree to which the body’s centre of gravity moves during forward translation defines efficiency. The body’s centre moves both side to side and up and down during gait.
- The gait cycle is a repetitive pattern involving steps and strides. A step is one single step, a stride is a whole gait cycle. The step time is the time between heel strike of one leg and heel strike of the contra-lateral leg. Step width can be described as the mediolateral space between the two feet.
- There are some differences between the gait and run cycle – the gait cycle is one third longer in time, the ground reaction force is smaller in the gait cycle and the velocity is much higher. In running, there is also just one stance phase while in stepping there are two. Shock absorption is also much larger in comparison to walking. This explains why runners have more overload injuries.
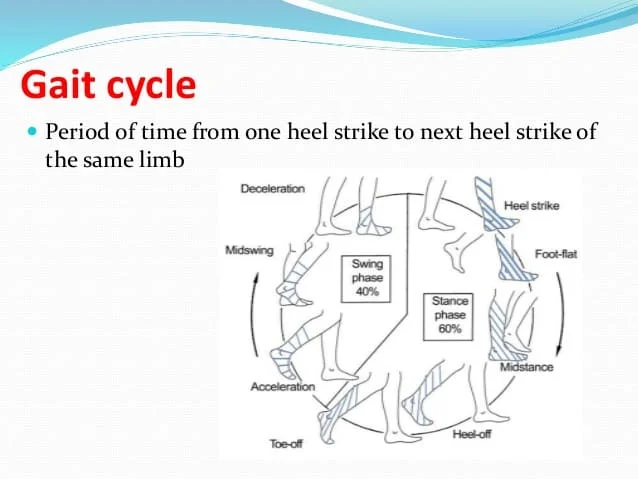
THE GAIT CYCLE:
The sequences for walking that occur may be summarized as follows :
(1) Registration and activation of the gait command within the central nervous system.
( 2) Transmission of the gait systems to the peripheral nervous system.
(3) Contraction of muscles.
(4) Generation of several forces.
(5) Regulation of joint forces and moments across synovial joints and skeletal segments.
(6) Generation of ground reaction forces.
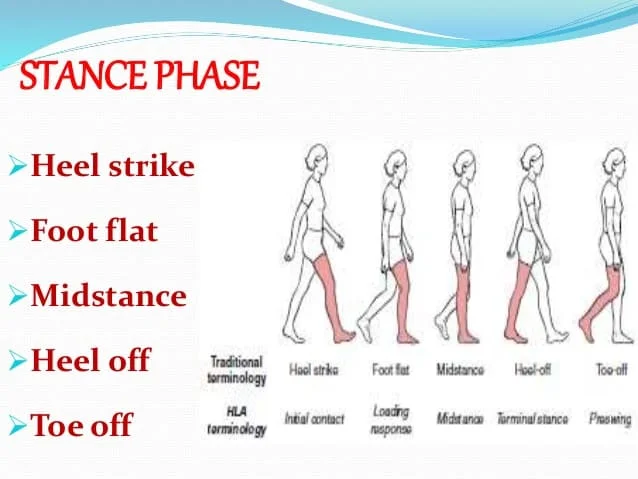
Classification of the gait cycle involves two main phases :
(1) stance phase
(2) swing phase.
- Phases of the Gait Cycle :
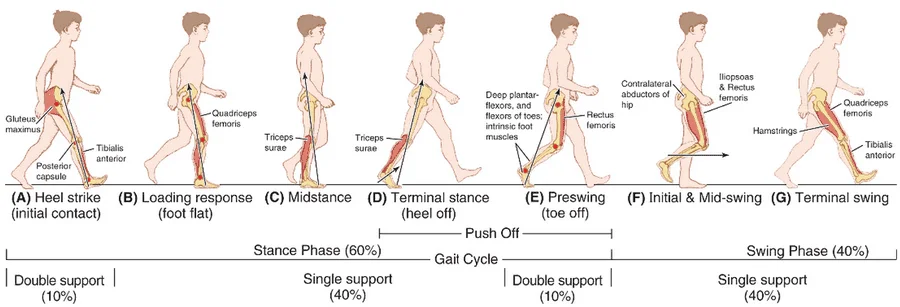
Stance Phase– 60%
Swing Phase– 40%
The stance phase occupies 60% of the gait cycle while the swing phase occupies only 40% of it.
Gait involves a combination of open- and close-chain activities.
CRITICAL GAIT PARAMETERS AVERAGE WALKING SPEED:
- average walking speed = 2-3 mph (60-80m/min) average cadence
- average cadence = 80-110 steps/min average step length
- average step length = 60 cmn Stance/swing
- stance/swing = 60/40
- Single/double limb support = 80/20
- Running has no double limb support
A more detailed classification of gait recognizes six phases:-
1) Heel Strike
2) Foot Flat
3) Mid-Stance
4) Heel-Off
5) Toe-Off
6) Mid-Swing
1) HEEL STRIKE:
- Also known as initial contact, is a short period which begins the moment the foot touches the ground and is the first phase of double support.- 30° flexion of the hip and full extension in the knee is observed. The ankle moves from a neutral position into knee flexion (5°) begins and increases, just as the plantar flexion of the heel increased.
- plantar flexion is allowed by eccentric contraction of the tibialis anterior, extension of the knee is caused by a contraction of the quadriceps muscle, flexion is caused by a contraction of the hamstrings, and the flexion of the hip is caused by the contraction of the rectus femoris.
2) FOOT FLAT:
- In foot flat, or loading response phase, the body absorbs the impact of the foot by rolling in pronation. The hip moves slowly into extension, caused by a contraction of the adductor magnus and gluteus maximus muscles.
- The knee flexes to 15° to 20° of flexion. Ankle plantar flexion increases to 10-15°
3) MID-STANCE:
- In mid-stance, the hip moves from 10° of flexion to extension by contraction of the gluteus medius muscle. The knee reaches maximal flexion and then begins to extend
- The ankle becomes supinated and dorsiflexed which is caused by some contraction of the triceps surae muscles
- During this phase, the body is supported by one single leg. At this moment the body begins to move from force absorption at impact to force
- propulsion forward
4) HEEL-OFF:
- Heel off begins when the heel leaves the floor. In this phase, the body weight is divided over the metatarsal heads. Here can we see 10-13° of hip hyperextension,
- which then goes into flexion. The knee becomes flexed (0-5°) and the ankle supinates and plantar flexes
5) TOE-OFF:
- In the toe-off/pre-swing phase, the hip becomes less extended. The knee is flexed 35-40° and plantar flexion of the ankle increases to 20°.In toe-off, like the name
- says, the toes leave the ground
6) EARLY-SWING:
- In the early swing phase the hip extends to 10° and then flexes due to contraction of the iliopsoas muscle 20° with lateral rotation. The knee flexes to 40-60°,
- and the ankle goes from 20° of plantar flexion to dorsiflexion, to end in a neutral position.
7) MID-SWING:
- In the midswing phase the hip flexes to 30° (by contraction of the adductors) and the ankle becomes dorsiflexed due to a contraction of the
- tibialis anterior muscle.The knee flexes 60° but then extends approximately 30° due to contraction of the sartorius muscle. This extension is caused by
- the quadriceps muscles.
8) LATE-SWING:
- The late swing/declaration phase begins with hip flexion of 25-30°, a locked extension of the knee, and a neutral position of the ankle.
METHODS OF ANALYZING GAIT
Kinematicsis: the method of observing or measuring the position of joints and segments through each phase of gait(visual gait analysis)
Kinetics: is the method of measuring the Ground Reaction Force at each joint and then calculating the muscle activity or soft tissue resistance present to stabilize the joint
Initial Contact:
• Double Support
• Hip = Flexed 30*
• Knee = Extended
• Ankle = Neutral
• Goal = Begin Stance
Loading Response:
•Double Support
•Hip = Flexed
•Knee = Flexing 5-10*
•Ankle = Plantarflexing to 20*
•Goals = Weight Acceptance, Shock Absorption, Advance body over Heel Rocker
Mid Stance:
• Single Support
• Hip = Extending
• Knee = Extending but not to 0*
• Ankle = Dorsiflexing
• Goal = Advance body over stationary foot, ankle rocker
Terminal Stance:
• Single Support
• Hip = Extending 15-30*
• Knee = Extend, then Flex
• Goal = Advance body over forefoot rocker
Pre Swing:
•Double Support
•Hip = Flexing
•Knee = Flexing 30-40*
•Ankle = Plantarflexing 20-30*
•Goal = Prepare for Swing, transfer load to other limbs
Initial Swing:
• SingleSupport
• Hip = Flexing
•Knee = Flexing up to 65*
•Ankle =Dorsiflexing to 0*
•Goal = Clear foot and advance limb
Mid Swing:
•Single Support
•Hip = Flexing to 30*
•Knee = Extending
•Ankle =Dorsiflexing to 0*
•Goal = Advance limb and clear foot
Terminal Swing:
• Single Support
•Hip = Flexed 30*
•Knee = Extending
•Ankle = Neutral
•Goal = Advance limb
Initial Contact:
•Double Support
•Hip = Flexed 30*
•Knee = Extended
•Ankle = Neutral
•Goal = Begin Stance
AMBULATION AIDS FOR GAIT TRAINING:
Function:
Ambulation aides are designed to increase the base of support for standing and walking activities. Torque and other joint stresses can be minimized with the effective use of an ambulation aid. Selection of the most appropriate device is dependent on stability and mobility needs. Overall, ambulation aids can –
- decrease pain
- allow for compensation when there are decreases in:-
co-ordination
endurance
balance
strength

The term “assistive device” can be substituted for ambulation aid, however, it is less specific and needs to be supported by language and instruction specific to its use in gait training
Factors Influencing Selection of Ambulation Aid:-
- patient status (medical history, WB, cognition)
- prognosis for rehabilitation/mobility
- home/work environment
- community activities/demands
- patient/client/family goals
WALKING AIDS USED FOR GAIT TRAINING:
- Walking aids are assistive devices for the rehabilitation of walking/gait abnormalities.
- Walking aids are useful to assist people who have difficulty in walking or people who cannot walk independently.
-These include:-
1- Crutches,
2- Sticks,
3- Frames
- Crutches:
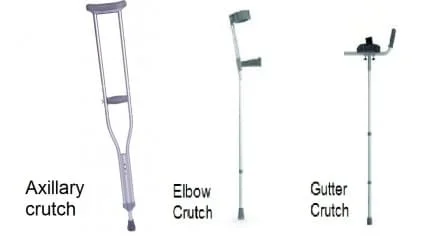
- These are used to reduce weight bearing on one or both legs and also give support where balance is impaired and strength is inadequate.
- Types of Crutches:
A. Axillary crutches:

-They are made of wood with an axillary pad, a hand piece and a rubber ferrule.
-The position of the hand piece and the total length are usually adjustable.
-The axillary pad should rest beneath the apex of axilla and hand grip in slight flexion when weight is not being
-When weight is being taken through axillary pad, the elbow will go into extension and weight is transmitted down. arm to hand piece.
Measurement of length:
- It is done with the patient in lying position.
a.With shoes off- It is measured from the apex of the axilla to the lower margin of the medial malleolus.
- This is an easy measurement and is reasonably reliable.
b.With shoes on – It is measured 5cm down from the apex of the axilla to a point 20cm lateral to the heel of the shoe - This tends to be less accurate than the first method.
- The measurement from the axillary pad to the hand grip should be taken with the elbow slightly flexed from a point
- 5cm below the apex of the axilla to the ulnar styloidstyloid.
- Once the patient is standing with the support of the crutches, the physiotherapist must guide to use the correct way to
- use the crutches that they do not allow the axillary paress into the axilla.
Disadvantages of axillary crutches:
1- Axillary crutches are less stable than walker.
2- Improper use of axillary crutches can cause injury to the neurovascular structures in the axillary region. Axillary crutches require good standing balance by the patient.
3- Geriatric patient may fell insecure or may not have the necessary upper- body strength to use axillary crutches.
- To properly fit a patient with axillary crutches, both the length of the crutches and the height of the hand piece must be properly
- adjusted.
- The length of the axillary crutch should be adjusted so the therapist can fit two or three fingers between the top of the axillary crutch and the patient’s axilla.
- When standing, the tips of the crutches should be approximately 6 inches from the toes of the patient’s shoes at a 45-degree angle.
- The handpiece of the axillary crutch should be adjusted so the patient has 15 to 25 degrees of elbow flexion
B. Elbow crutches:
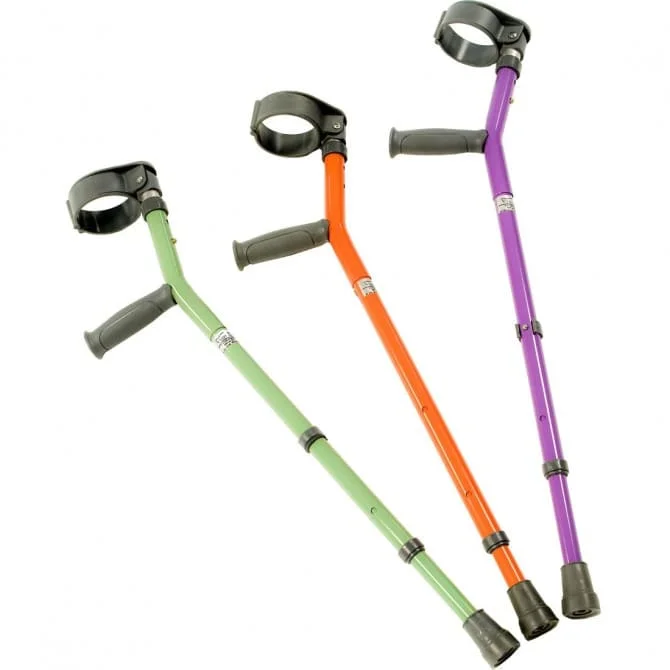
- They are made of metal and have a metal or plastic forearm band.
- They are usually adjustable in length by means of a press clip or metal button and have a rubber ferrule.
- These crutches are suitable for patients with good balance and strong arms.
- Weight is transmitted exactly the same way as for axillary crutches.
Measurement of length:
- The measurement is usually taken with the patient in the lying position with the shoes on.
- The elbow is slightly flexed (approximately 15º) and the measurement is taken from the ulnar styloid to a point 20cm lateral to the heel of the shoe.
- Once the patient is standing with the support, the length must be checked.
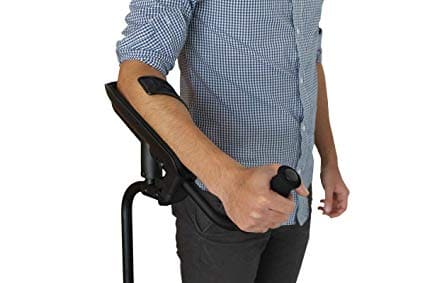
C. Forearm crutches:
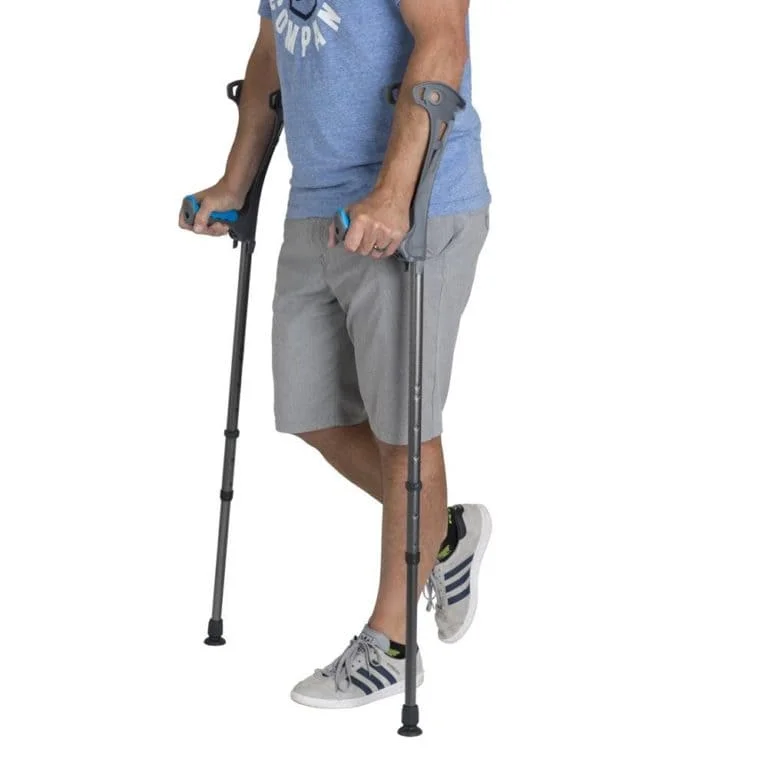
- They are made of metal with a padded forearm support and strap, an adjustable hand piece, and a rubber ferrule.
- These are used for patients with rheumatoid disease to provide support.
- They cannot take weight through hands, wrists, and elbows because of deformity or pain.
• Forearm crutches (Loftstrand or Canadian crutches) are used when the patient need crutches permanently, or for long periods of time.
• People who use Loftstand crutches must have the stability and coordination to use them.
• Using forearm crutches requires no more energy, increased oxygen consumption or heart rate than axillary crutches.
• This type of crutch has the advantage of being easily stored and transferred.
• There is no risk of injury to the neurovascular structures in the axillary region when using this type of crutch.
Measurement of length:-
a.If the patient is able to stand, it is better to assess the required length in this position from elbow to the floor.
b.Measurement can be carried out with the patient lying with shoes on, and is taken from the point of the flexed elbow to 20cm lateral to the heel.
- A patient with Rheumatoid Disease may allow the hips and knees to flex in the weight-bearing position because of muscle weakness and/or pain but with gutter
- crutches for support he may be able to obtain more extension.
- This must be taken into account in any adjustment.
Proper Positioning:
- When standing up straight, the top of your crutches should be about 1-2 inches below your armpits.
- The handgrips of the crutches should be even with the top of your hip line.
- Your elbows should be slightly bent when you hold the handgrips.
- To avoid damage to the nerves and blood vessels in your armpit, your weight should rest on your hands, not on the underarm supports.
Disadvantages of forearm crutches:
1- Forearm crutches are less stable than a walker.
2- They require good standing balance and upper-body strength.
3- Geriatric patients sometimes feel insecure with these crutches. They may not have the necessary upper-body strength to use forearm crutches.
- To fit the patient with forearm crutches, have the patient stand with arms hanging loosely by the side. Place the crutch parallel to the lateral aspect of the tibia and femur.
- Adjust the height of the handpiece so that it is level with the ulnar styloid process.
- This will insure the elbow is flexed between 15 and 25 degrees.
- The top of the forearm cuff should be adjusted so that it is located 1 to 1.5 inches distal to the olecranon process of the elbow while
- the patient is grasping the handpiece of the crutch with the wrist in neutral flexion extension.
D.GUTTER CRUTCHES:
- Gutter Crutches also called adjustable arthritic cruches or forearm support crutches.
- These are additional type of crutches, which is composed of paddded forearm support made up of metal, an strap and adjustable hand piece
- with rubber ferrule.
- These crutches are used for patients who are on partial weight bearing like Rheumatoid disease.
Preparation for crutch walking:-

a. Arms:- shoulder extensors, adductors, and elbow extensors must be assessed and strengthened before the patient starts walking.
-The hand grip must also be tested to see that the patient has sufficient power and mobility to grasp hand piece.
b. Legs:- the strength and mobility of both legs should be assessed and strengthened if necessary.
– Main attention to the hip abductors and extensor, the knee extensors, and the plantar flexors of the ankle should be given.
c. Balance:- sitting and standing balance must be tested.
Demonstration:- The physiotherapist should demonstrate appropriate crutch walking to the patient.
Crutch walking:- During first time, when the patient is to stand and walk, the physiotherapist should have an assistant to support the patient.
i. Non-weight bearing:- Patient should always stand with a triangular base i.e. crutches either in front or behind the weight-bearing leg.
ii. Partial weight bearing:- The crutches and the affected leg are taken forward and put down together.
Weight is then taken through the crutches and the affected leg, while the unaffected leg is brought through.
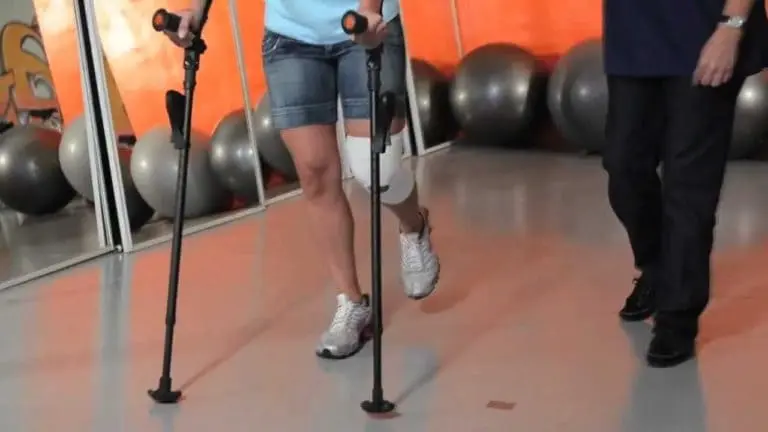
Walking- Gait Training:
- Lean forward slightly and put your crutches about one foot in front of you.
- Begin your step as if you were going to use the injured foot or leg but, instead, shift your weight to the crutches.
- Bring your body forward slowly between the crutches. Finish the step normally with your good leg. When your good leg is on the ground, move your crutches ahead in preparation for your next step.
- Always look forward, not down at your feet.
Sitting:
- To sit, back up to a sturdy chair.
- Put your injured foot in front of you and hold both crutches in one hand.
- Use the other hand to feel behind you for the seat of your chair.
- Slowly lower yourself into the chair.
- When you are seated, lean your crutches in a nearby spot.
- Be sure to lean them upside down—crutches tend to fall over when they are leaned on their tips.
- To stand up, inch yourself to the front of the chair.
- Hold both crutches in the hand on your injured side.
- Push yourself up and stand on your good leg.
Stairs climbing:
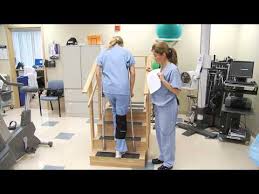
- To walk up and down stairs with crutches, you need to be both strong and flexible.
- Facing the stairway, hold the handrail with one hand and tuck both crutches under your armpit on the other side.
- When you are going up, lead with your good foot, keeping your injured foot raised behind you.
- When you are going down, hold your injured foot up in front, and hop down each step on your good foot.
- Take it one step at a time. You may want someone to help you, at least at first.
- If you encounter a stairway with no handrails, use the crutches under both arms and hop up or down each step on your good leg, using more strength.
- If you feel unsteady, it may be easier to sit on each step and move up or down on your bottom.
- Start by sitting on the lowest step with your injured leg out in front.
- Hold both crutches flat against the stairs in your opposite hand.
- Scoot your bottom up to the next step, using your free hand and good leg for support.
- Face the same direction when you go down the steps in this manner.
There are several different walking patterns that an individual using crutches may use, including:-
- 2 point: this gait pattern is less stable as only two points are in contact with floor and good balance is needed to walk with 2 points crutch gait.
- 3 point:- this gait pattern is used when one side lower extremity (LE) is unable to bear weight It invloves three points contact with floor (two crutch point and one unaffected LE).
- 4 point:- this gait pattern is used when there’s lack of coordination, poor balance and muscle weakness in both LE, as it provides slow and stable gait pattern with three points support.
USE OF CRUTCHES FOR GAIT TRAINING:
Standing with Your Crutches:
- The tripod stance is what provides your body with the most support and keeps weight off of your injured leg when standing still.
- Keep your good foot firmly on the ground and place the crutches in front of your body at a 45 degree angle to the good foot.
- Be careful not to move the crutches too far away or too close to your body since this will not provide the support you need.
Walking with Crutches:
- There are three main walks or “gaits” when using crutches.
- They are the “Four-Point Gait,” the “Partial Weight-Bearing Three-Point Gait” and the “Three Point “Swing Through Gait.”
- Your medical provider will tell you which one of these is best for your particular injury.
- Four-Point Gait:

- This is most commonly used to provide assistance with walking when both legs are in a weakened condition.
- To use this gait, put the right crutch out and step with the left foot. Then put the left crutch out and step with your right foot.
- The pattern is right crutch-left foot and left crutch-right foot.
2. Partial Weight-Bearing Three-Point Gait:
- This is used when your injured foot can bear some weight, but you still need the assistance of crutches.
- To do this, put both crutches in front at a 45-degree angle, just like the tripod stance.
- Step with your bad foot up to the crutches and then step with your good foot past the crutches.
3. Three-Point Swing-Through Gait:
- This is used to keep all pressure off your injured foot.
- Starting from the tripod stance, swing both feet through, placing your good foot in front of the crutch.
- Make sure you “swing through” so that you’re giving your body the proper support when stopping.
Stair climbing with crutches
Without railing:
- When you go UP
- Step up with the strong leg-weight should be on the hand grips. The weak/operated leg follows.
- Put no weight on the weak/operated leg.
- The crutches are brought up last. If you are casted, be sure your toes clear the steps before proceeding to the next step.
- When you go Down
To reverse the process, be sure that your toes are close to the edge of the stairs.
- Place both crutches on the stair below.
- Step down with the weak/operated leg (or just lower yourself if no weight allowed)
- Push down on the hand grips and step down with the stronger leg.
- Place the crutches down again and proceed
With railing:
- When you go UP
- Place both crutches on the side opposite the railing.
- Holding onto the railing and crutches, step up with the stronger leg.
- Then bring up the weak/operated leg and crutches to the same step.
- Continue to go up, always with the stronger leg first.
- When you go Down
- Place both crutches opposite the railing.
- Bring the crutches down first.
- Step down with the weak.
- Put the weight on the railing and crutches.
- Next step down with a strong leg
USE OF STICKS FOR GAIT TRAINING:
- Sticks may be made up of either wood or metal with curved or straight hand piece.
- Metal pores are adjustable while wooden ones are non-adjust-able.
Measurement of length
- The measurement can usually be taken with the patient in standing position.
- The elbow is slightly flexed and the measurement is taken from the ulnar styloid to the floor approximately 15cm from the heel.
Uses
- Sticks allow more weight to be taken through the leg than crutches.
- One stick may be used on the unaffected side, so that the stick and affected leg are placed forward together, taking some of the weight through the stick.
Types
Tripod or quadripod
- Metal sticks with three or four prolonged bases and gives more stable support than stick.
FRAMES
- They are light weight with four feet which can be adjustable in height.
- Patient lifts the frame forward then leans on it and takes steps.
- The patient should take even steps, keeping the frame forward.
- Rotator frames which can be pushed or reciprocal frame where each side moves independently are useful for ataxic patients.
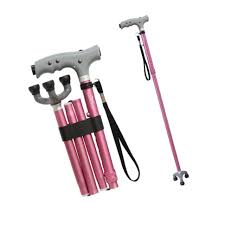
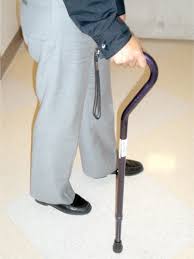
CANES
- A cane can be helpful if you have minor problems with balance or stability, some weakness in your leg or trunk, an injury, or pain.
- If you are elderly, using a single-point cane may help you to walk more comfortably and safely and, in some cases, may make it easier for you to continue living independently.
- Canes are used to compensate for impaired balance or to increase stability while ambulating.
- There are several styles of canes but the standard is known as the J cane.
- A cane is functional on stairs and in confined areas.
- It is also easily stored and transported.
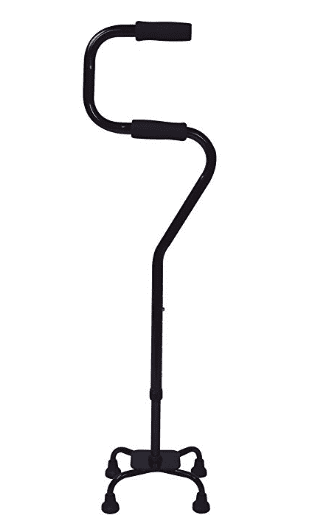
1. Single canes:
These are canes with only one leg. They include:
Standard canes:
- This can also be called a straight cane and it is generally made of wood or aluminum.
- They are lightweight and inexpensive.
- The length of the wooden standard canes must be custom-fitted to the specific patient while the aluminum standard cane has pins for length adjustment so there is no need for custom fitting.
- These standard canes are useful for patients who need just an additional point of contact with the floor for balance with little or no weight bearing needed, therefore, increasing the base of support.
- This cane can be used for patients with. mild sensory or coordination problems found in visual, auditory, vestibular, peripheral proprioceptive, or central cerebellar disease.
Offset canes:
- These canes are usually made from aluminum and the lengths are also adjustable with no need for custom fittings.
- These canes allow for the patient’s weight to be displaced over the shaft of the cane.
- This cane provides more stability and can be used for occasional weight bearing.
- The type of patients in need of this cane are those with painful gait disorders like that of mild to moderate antalgic gait gotten from hip or knee osteoarthritis.
2. Multiple-legged canes
These are canes with multiple legs. They include
Quadripod (quad) cane:
- This is a four-legged cane usually made of aluminium.
- This cane permits more weight bearing, increases base of support and provides more stability for the patient.
- It can also stand by itself freeing the patient to use his or her hands.
- The only disadvantage is that all four legs of the cane must be in contact with the floor during gait to provide stability which hinders fast gait.
- It is also not suitable for stair climbing.
- It can be prescribed for hemiplegic patients or patients with moderate to severe antalgic gait from osteoarthritis.
Hemi walker:
- This is also known as a walk cane.
- It is made of aluminum and has a vertical component with a handle and two legs, and another component with two additional legs angled away from the patient.
- This cane provides more broad-based support than the other canes.
- It is used by patients requiring continuous weight bearing through one upper extremity like stroke patients with hemiparesis who have moderate to severe lower extremity disability.
Proper Positioning:
- When standing up straight, the top of your cane should reach to the crease in your wrist.
- Your elbow should be slightly bent when you hold your cane.
- Hold the cane in the hand opposite the side that needs support.
- For example, if your right leg is injured, hold the cane in your left hand.
From Sitting to Standing
- Position the cane on the unaffected side of the patient.
- Advise the patient to move to the edge of the seat, hold the cane handle, and bear weight on the unaffected leg and cane to come up to the standing position.
- Make sure the height of the cane is appropriate ensure elbow flexion is 20° to 30° and that the cane is 2” in front of the affected leg and 6” to the side of the affected leg.
Walking
- To start, set your cane about one small stride ahead of you and step off on your injured leg. Finish the step with your good leg.
Three Point Gait:
- Instruct the patient to balance the body weight on the strong or unaffected limb while moving the cane forward approximately 12-18 inches. Make sure the cane is close to the patient’s body
- The patient then moves the weak or affected foot forward.
- The patient transfers the weight from the unaffected foot to the affected foot and cane, and then brings the unaffected foot forward to join the affected foot.
- Repeat the steps 1 to 3 while shadowing the patient closely and alertly.
Two Point Gait
- Instruct the patient to balance body weight on the strong or unaffected foot.
- Instruct the patient to move the cane and the weak or affected foot forward in unison, keeping the cane close to the body to prevent leaning to the side.
- Instruct the patient to transfer their body weight forward to the cane and move the unaffected leg forward.
- Repeat steps 1 to 3 while shadowing the patient closely and alertly.
Standing to Sitting
- Instruct the patient to approach the chair (or bed), and turn in small circles toward the stronger side till the back is facing the chair or bed.
- Assist the patient to back up to the chair until the chair can be felt against the back of the patient’s legs.
- Instruct the patient to reach for one arm rest at a time.
- The patient lowers to the chair in a controlled manner.
Stairs
- To climb stairs, place your cane in the hand opposite your injured leg.
- With your free hand, grasp the handrail.
- Step up on your good leg first, then step up on the injured leg.
- To come down stairs, put your cane on the step first, then your injured leg and then, finally, your good leg, which carries your body weight.
- Canes can be used for stair climbing if proper instructions are followed (Up with the good leg, down with the affected one).
Disadvantages of a cane
- It provides limited support due to its small base of support.
- To fit a patient with a cane, have the patient stand and place the can parallel to the lateral aspect of the tibia and femur.
- Adjust the hand piece of the cane so it is level with the ulnar styloid process.
- This will provide 15 to 25 degrees of elbow flexion when the patient grasps the handle of the cane.
Measuring the cane:
- There are different ways of adjusting the cane to fit the specific patient.
- Elbow flexion could be used as a guide. Ideally, there should be 20 to 30 degrees of elbow flexion in the elbow while holding the cane approximately 15 cm (6“) from the lateral border of the toes.
- This degree of flexion allows efficient elbow movement while walking with the cane, allows the arm to shorten and lengthen during different phases of the gait cycle, and provides a shock absorption mechanism.
- The degree of elbow flexion can be measured using a goniometer.
- Another way of fitting the cane to the patient is to make certain that the top of the cane is at the same level of the greater trochanter or wrist crease when the patient is standing upright with the arms hanging loosely by the side as shown below.
- That means the cane length should be the same as the distance from the ground to the greater trochanter or elbow crease when the patient’s arm is in the anatomical position.
- The patient should be wearing appropriate, comfortable shoes during measurement.
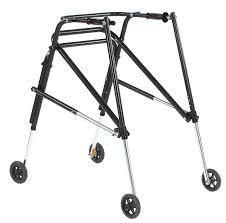
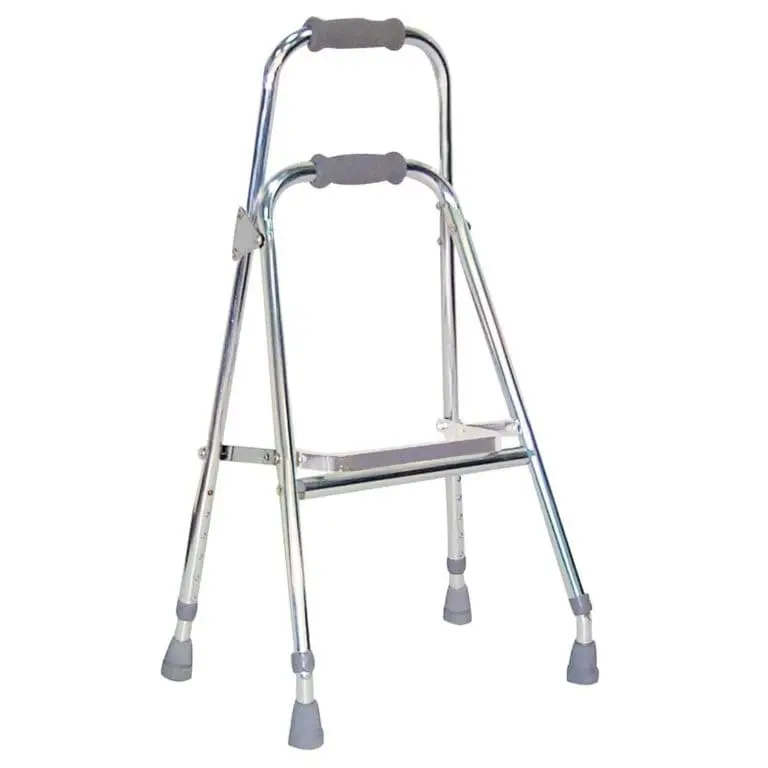
WALKERS:

- If you have had total knee or total hip replacement surgery, or you have another significant problem, you may need more help with balance and walking than you can get with crutches or a cane.
- A pickup walker with four legs will give you the most stability.
- A walker lets you keep all or some of your weight off of your lower body as you take steps.
- With a walker, you use your arms to support some of your body weight.
- As your strength and endurance get better, you may gradually be able to carry more weight in your legs.
- Walkers provide maximum stability and support and allow the patient to be mobile.
- Walkers are designed in many styles, but all have four legs.
- Some may have two or four wheels.
- Wheels allow the patient to gently push the device forward as opposed to picking the walker up to move it forward.
- Another variation in the design of the walker is the ability to fold the walker when it is not being used. This feature allows for easier transportation in a car and for storage
Getting Up from a Chair with a Walker
- Slide forward in your chair and then slide your,leg forward.
- With one arm on the chair and one arm on the walker, push up to a standing position.
Sitting Down from a Chair with a Walker:-
- Get close enough to the chair that you can feel it against the back of your legs.
- Slide your leg slightly forward. Reach back with one arm for the armrest/edge of the chair and slowly sit down.
Positioning
- When standing up straight, the top of your walker should reach to the crease in your wrist. Your elbows should be slightly bent when you hold the handgrips of the walker.
- Keep your back straight. Don’t hunch over the walker.
- Check to be sure the rubber tips on your walker’s legs are in good shape.
- If they become uneven or worn, you can purchase new tips at a drug store or medical supply store.
- To properly fit a patient with a walker, adjust the height of the walker so that the patient has between 15 and 25 degrees of elbow flexion when grasping the handles of the walker.
- Adjust your walker so that it fits the arms comfortably.
- Make sure to adjust correctly because it can reduce stress on an individual’s shoulders and back.
- Elbows should bend comfortably an angle of ~15 degree.
- When standing inside the walker with your arms at your side, the top of the walker grip should align with the crease inside the wrist.
Disadvantages of using walkers:
- Walkers are cumbersome and difficult to store and transport.
- Walkers are very difficult to use on stairs.
- Walkers reduce the speed of ambulation.
- The patient is unable to use a normal gait pattern by using walker.
Use of walker
- Walkers Many individuals utilize walkers for added stability and balance.
- A walker increases an individual’s base of support.
- The most common types of walkers that you will see are a standard walker, a front wheeled walker, and a rollator.
Types of walker
Standard Walker
- This walker has four nonskid, rubber tipped legs for increased stability.
Front Wheeled Walker
- This walker has wheels on the two front legs.
- This can increase the fluidity of walking, but the individual must be able to control the movement of the walker.
Rollator
- This a walker with four wheels and front breaks. –
- This walker is ideal for individuals who do not rely on leaning on the walker for balance and are able to demonstrate a more reciprocal gait pattern, but need some increased stability.
- Patients who utilize a rollator must demonstrate the cognitive ability to safely utilize the breaks on the rollator.
The knee walker
- This similar to a foot-propelled scooter, but it has a platform for resting your knee.
- This is great for athletes and individuals who have long distances to go and have the ability to coordinate and control the walker.
PARALLEL BAR IN GAIT TRAINING:
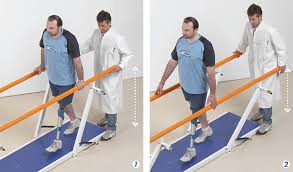
- Parallel bars are used when maximal patient support and stability are required. The gait pattern can be practiced in parallel bars and the fit of the assistive device can be checked.
- The parallel bars limit mobility. So once the patient becomes proficient with the appropriate gait pattern, the patient must progress to another assistive gait device to be mobile.
- Care must be taken so that the patient does not become dependent on the parallel bars
- The parallel bar height needs to be adjusted to provide 15 to 20 degrees of elbow flexion when the patient is standing erect and is grasping the bars about 6 inches anterior to the hips. The bars need to be approximately 2 inches wider than the patient’s hips when the patient is centered between the bars.
MEASUREMENT AND FIT
General Guidelines
- Parallel bars should be 2″ wider than greater trochanters.
- Ambulation aid grip/handle should line up with greater trochanter or ulnar styloid process (wrist crease) when the patient is in static standing.
- A range of 20 to 30 degrees of elbow flexion is optimal.
- Measure from the greater trochanter to the patient’s heel to determine grip/handle height if the patient needs to remain supine.
- Forearm crutch cuff should be 1-1.5 inches distal to elbow crease.
- Allow approximately 2 inches from the axilla to the axillary rest during standing/gait activities to minimize risk for neurovascular compression.
Common Errors
- measurements are not adjusted for postural imbalances in upright positions.
- Measurements do not account for footwear.
- Measurements are not confirmed in standing.
- Optimal resting standing position is not maintained during measurements.
- Crutches/cane – positioned too far or too close (ant/posterior/lateral) to lower extremities.
- Walker – feet are too far anterior/posterior of rear legs.
Effects of Poor Fit
- Decreased stability
- Increased energy expenditure
- Decreased function
- Decreased safety
Benefits of contralateral positioning
- Reduces forces of abductors at contralateral hip and ground reaction force from floor through cane which counteracts contralateral pelvic tilt during swing so then result is decreased joint compression forces at the hip.
Use of assistive gait devices in rehabilitation
Reasons for using an assistive gait device are :
- Poor balance,
- Inability to bear weight on a lower extremity due to fracture or other injury,
- Paralysis involving one or both lower extremities, or
- Amputation of a lower extremity
Advantages to early ambulation following an injury :
- Aiding circulation,
- Preventing calcium loss in bones, and
- Aiding the pulmonary and renal systems.
General Principles :
- It is important for the patient to be carefully evaluated in order to select the appropriate assistive device to meet the patient’s needs.
- The therapist must be aware of the patient’s total medical condition, and weight-bearing status of the involved extremity when considering which type of assistive device to use with the patient.
- The therapist will need to determine the range of motion of the extremities and the strength of the primary muscles required for ambulation.
- The primary muscles required for ambulation with axillary crutches, using a three-point crutch gait pattern, are the scapula stabilizers, shoulder depressors, shoulder extensors, elbow extensors, and finger flexors.
- The patient must press downward on the assistive gait device in order to move the body forward. The scapular, shoulder, and elbow musculature support the body’s weight while the non-affected lower extremity is moved forward. The flexors fold the handpiece of the assistive gait device.
- The primary lower-extremity muscles in the weight-bearing lower extremity are the hip extensors, hip abductors, knee extensors, knee flexors, and ankle dorsiflexors. While the patient is standing on the unaffected lower extremity, the muscles of the hip and knee provide stability. The ankle dorsiflexors position the foot so that it can clear the floor when the limb is swinging forward.
Basic gait patterns
The selection of the proper gait pattern is dependent upon the patient’s
- balance,
- strength,
- coordination,
- functional needs, and
- weight-bearing status
1. Four-point gait pattern:-
- A four-point gait pattern is used when the patient requires maximum assistance with balance. It requires the use of bilateral assistive gait devices (canes or crutches).
- The pattern begins with the forward movement of one of the assistive gait devices, and then the contralateral lower extremity, the other assistive gait device, and finally the opposite lower extremity (e.g., right cane, then left foot; left cane, then right foot).
- This is a slow gait pattern, but a stable one.
2. Two-point gait pattern:
- The two-point gait pattern requires the use of bilateral assistive gait devices.
- This pattern is faster than the four-point gait.
- The two-point gait pattern closely approximates a normal gait pattern and should be encouraged.
- This pattern does require the patient to coordinate moving an assistive gait device and the contralateral lower extremity at the same time.
- This pattern is less stable than the four-point pattern.
3. Modified four-point and two-point Gait patterns:
- The modified four-point and two-point gait patterns require only one assistive gait device.
- The assistive device is used with the opposite upper extremity to the involved lower extremity, if possible.
- This widens the base of support, increases stride lengths, cadence, and walking velocities than when using the cane on the same side as the involved lower extremity.
4. Three-point gait pattern:-
- The three-point pattern requires two crutches or a walker, but it cannot be performed with two canes.
- This pattern is used when the patient is only able to bear full weight on one lower extremity.
- When using axillary crutches and a three-point gait pattern, between 44.4 and 49 percent of the patient’s body weight is transmitted through the upper extremities.
- So the strength of the upper extremities and uninvolved lower extremity must be assessed prior to attempting ambulation.
- The energy cost (oxygen consumption) for this type of gait is about twice as high as normal walking.
5. Modified three-point gait pattern:-
- The modified three-point gait pattern requires two crutches or a walker.
- This pattern is used when the patient can bear full weight with one lower extremity but is only allowed to touch the involved lower extremity to the floor.
- This is known as touchdown weight bearing (TDWB).
- The term “partial weight bearing” (PWB) refers to when the involved lower extremity is allowed only part of the patient’s weight to be transferred through it.
- In this pattern, the walker or crutches are advanced first, and then the involved lower extremity is advanced forward.
- The patient presses down on the assistive gait device and advances the uninvolved lower extremity using either a “swing to” or “swing through” pattern.
Patient Training
- The objective is to strengthen the pelvic and abdominal muscles and to increase awareness of pelvic rotation.
- Strengthening Abdominals:
- It is important to strengthen the abdominals as this muscle group is the foundation for attaining pelvic retroversion.
- Increasing awareness of Pelvic Retroversion: This movement helps create momentum and facilitates locking of the Stance Control Knee Joint at the end of swing phase; this exercise is performed by contracting the abdominal muscles and is first performed with the knees bent.
- Strengthening and Awareness of Pelvic Rotation:- This exercise is performed against resistance with the patient in the lateral position. The awareness and utilization of these exercises increase momentum and can compensate for hip flexor weakness. Attempts should also be made to strengthen innervated hip flexor musculature.
Initial Standing and Weight Bearing in SCKAFO:
- The objective is to allow the patient to gain confidence by weight bearing with the SCKAFO knee joint in the locked position. This phase of therapy should be conducted with the patient within the parallel bars.
- Initial Standing:-
- The patient is asked to stand with feet evenly spaced with weight evenly distributed over both legs.
- Attention should be paid to the alignment of the pelvis in the sagittal plane.
- During this exercise, the patient is asked to contract their abdominal muscles.
- This exercise is repeated with the sound side advanced
- Weight Transfer:-
- Beginning with the feet evenly spaced the patient is encouraged to transfer weight to achieve full weight bearing on the side.
- This should be done gradually against resistance until the patient gains confidence and full control of weight distribution.
11 Comments