37 Best Exercises for Labral Tears of the Hip
Labral tears of the hip are a common source of hip pain and can significantly impact an individual’s mobility and quality of life.
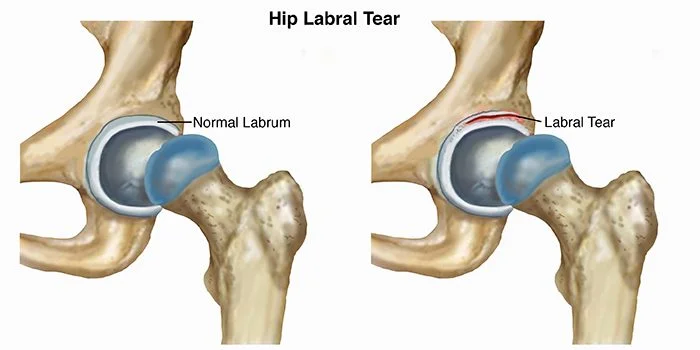
A ring of cartilage called the hip labrum surrounds the hip joint and offers support and protection.
When this labral tissue is damaged or torn, it can lead to discomfort, limited range of motion, and other hip-related issues. While the management of labral tears often requires medical evaluation and possibly surgery, targeted exercises can play a crucial role in pain relief and rehabilitation.
For those who suffer a hip labral tear, physical therapy or exercises for a labral tear of the hip are often recommended to begin the recovery process.
In this guide, we will explore some of the best exercises that can help manage hip labral tears and improve hip function.
Table of Contents
What is a Labrum?
The hip socket is encircled by the Acetabular Labrum, sometimes referred to as the “Hip Labrum,” which is a fibrous ring of cartilage. Its main function is to stabilize the entire lower body by holding the thighbone in place. When the labrum is working properly, it controls the joint’s fluid and acts as a rubber seal, facilitating mobility.
The complicated hip joint enables the leg to move in a variety of planes and orientations. As a result, a variety of reasons, the most frequent of which is a hip labral tear, can cause dysfunction or discomfort. If ignored, a torn labrum can cause crippling hip instability and be very painful.
What is a Hip Labral Tear?
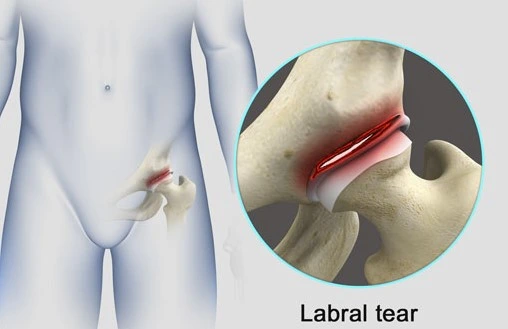
The hip is like a ball and socket. The socket is called the acetabulum and the ball is the head of the femur located at the top of the femur (leg). A labral tear is damage to the labrum, the delicate tissue that covers the acetabulum.
The labrum helps the femoral head move smoothly in its socket. This allows the pelvis to move without problems or pain. It also acts as a seal to keep the ball and socket together but not touching.
An injury to the labrum, a ring of cartilage that covers the hip joint, is referred to as a hip labral tear. A hip labral tear is commonly caused by repeated activities such as long-distance running and other sports that entail twisting and turning. Symptoms range in severity.
Symptoms of a Labral Tear
Hip labral tear symptoms are simple to identify. It is typical for discomfort to start deep in the groin and spread to the hips, hamstrings, abdominals, or lower back. Patients frequently experience pain even when performing routine, stress-free tasks like walking, twisting, or sitting in a car or at a computer.
These signs include:
Pain: Hip Pain is a common symptom. It is typically felt in the groin or hip area and maybe a deep, aching pain.
Limited Range of Motion: Labral tears can lead to a reduced range of motion in the hip joint, making activities like bending, twisting, or rotating the hip uncomfortable. hip pain during end-range movements
Hip-catching, pinching, or grating sensation: Many individuals with labral tears report a clicking, popping, or catching sensation in the hip when they move it.
Internal rotation of the knee when in flexion, adduction, and pain across the chest
Knee bent and outstretched with pain from simultaneous flexion, abduction, and external rotation
Having discomfort when elevating a straight leg against resistance. Instability: Some people may experience a feeling of hip instability or a sense that the hip is “giving way.” Muscle weakness: surrounding the hip.
What causes a Labral Tear?
Numerous factors, such as rapid or irregular movement, recurrent stress, or direct damage to the joint, can result in a hip labral tear.
Overuse is a frequent contributor to hip labral tears. Other times, untreated structural abnormalities of the bone might cause harm and worsen over time.
Hip labral tears can be caused by numerous things, including:
Structural Conditions: Conditions that cause the hip to move abnormally can also cause hip labral tears. In femoroacetabular impingement (FAI), the head of the femur does not fit properly into the socket. This imperfect fit can lead to long-term groin pain and limited range of motion. This is the foremost common cause of labral tears. FAI can affect people of all ages. Without treatment, it can lead to osteoarthritis in some patients.
Injury: Trauma to the hip joint can cause a hip labral tear. This can happen to people who play certain sports that involve repetitive and forceful movements, such as hockey, soccer, football, and golf.
Repetitive Movements: Athletes or individuals involved in activities that require repetitive hip movements are at higher risk.
Degenerative diseases: Osteoarthritis is a chronic (long-term) wear and tear of interarticular cartilage. As the cartilage wears down slowly over time, it becomes more prone to tearing. Older age and excess weight can increase a person’s risk of developing osteoarthritis. People with osteoarthritis usually have pain and stiffness in more than one joint (such as the hip and knee joints).
Classification
Labral tears are categorized in several ways
Etiology
Location:
Anterior sprain: In most cases, the discomfort is more persistent and is located on the anterior hip (anterosuperior quadrant) or at the groin.
Posterior: They are seen in the lateral area or deep in the posterior buttocks.
Superior/lateral encounters are uncommon.
Different Kinds of Hip Labral Tears
Acetabular Labral Tear: This kind of tear affects the labrum that lines the hip joint’s socket (acetabulum).
Femoral Labral Tear: where the labrum connects to the femoral head (the ball-shaped top of the thigh bone), might happen less often.
Morphology:
Radial flap is the most prevalent, with rupture of the labrum’s free border.
Fraying of the free margin by radial fibrillation, linked with degenerative joint degeneration
Longitudinal peripheral is the least common.
A separated labrum can cause instability or abnormal mobility.
How do you treat/repair a Hip Labral Tear?
Labral rips in the hip seldom heal completely on their own; instead, surgery is frequently required for full structural repair. However, most people are OK with recovering to the point where it is no longer painful. Typically, people can alleviate their symptoms by:
- Conservative Treatment: Mild to moderate labral tears may respond well to conservative treatment, including rest, physical therapy, anti-inflammatory medications, and activity modification.
- Injections: Corticosteroid or platelet-rich plasma (PRP) injections may be used to reduce pain and inflammation.
- Surgical Intervention: Severe or symptomatic tears may require surgical repair. Hip arthroscopy is a common minimally invasive surgical procedure used to repair or remove damaged portions of the labrum.
Benefits of Physical Therapy
There are two main causes of a hip labral tear: severe trauma or overuse of the hip joint. The stability and functionality of the hip can be greatly impacted by a rupture of the cartilage labral ring, regardless of the source. Therefore, working with a movement specialist and a musculoskeletal specialist such as a physiotherapist can be very effective:
Identify imbalances or poor movement habits that are contributing to your symptoms.
Create a program that will give you the best possible results for your recovery and return to normal daily activities.
Guides you through your recovery if it is determined that arthroscopic hip surgery is necessary.
Physical Therapy for a Hip Labral Tear
When you work with a physical therapist (PT), you can expect personalized recommendations and progress over time. The process consists of four stages: diagnosis, identification of the cause, pain, and treatment.
Diagnosing a Hip Labral Tear
First, the PT will assess your history, symptoms, and movement mechanics, as well as whether you have groin, buttock, or hip pain. They will then proceed with specific tests to assess what hip pathology is causing your symptoms. A handful of tests involving the passive range of motion of the hip and femur are most commonly used to assess pain. This can include a hip extension (McCarthy test), figure four position (FABER test), and other various combined movements involving hip rotation and flexion (hip abduction test, Fitzgerald test, etc.).
A PT can provide an accurate diagnosis, but if you are unsure or suspect a more serious underlying cause, you will be referred to an orthopedic surgeon for further diagnostic imaging tests.
Managing the Pain
The hip pain for you depends on your symptoms and preferences. Your doctor may discuss NSAIDs or cortisone injections for short-term relief. However, a PT can recommend less invasive pain treatments that do not involve the risks or side effects of medications. They are a great short-term solution to get you on track and tolerating your regimen. These pain relief options may include:
Electrical stimulation (TENS) – reduces pain sensitivity. Your PT can show you the best electrode placement for your pain symptoms.
Ultrasound – Deep sound waves into the superficial tissues of the hip joint can promote healing if deemed necessary by the PT.
Self-massage – Using your hands or massage tools can help relieve muscle tension that can cause pain. Your PT may recommend certain techniques. Low-impact movements – such as swimming, walking, and stationary cycling – promote circulation. Mild pelvic strains (indicated only if pelvic mobility is limited or stiffness is present). Temperature-based methods – including ice packs or a heating pad.
Treatment of Hip Labral Tear
Initially, your treatment will focus primarily on pain relief and gentle strengthening of the hips to restore balance. Over time, as you become more tolerant, you will move through more functional hip movements to optimize biomechanics with daily activities. Ultimately, the goal is for you to have a home exercise program that you are comfortable continuing on your own once you return to your normal routine.
Massage techniques
Physical therapy’s earliest phases frequently include manual treatment. Some techniques may include lower extremity soft tissue massage, deep tissue massage, joint mobilization, muscle energy techniques, trigger point massage, myofascial release, and more. These techniques aim to reduce pain, restore hip mobility and joint mobility, and reduce stiffness in the surrounding muscles and connective tissue.
Exercises
Your exercise program will primarily consist of exercises that strengthen your hips and core. If the pain is worse at first, you start with basic pain-free movements such as isometrics with resistance bands and exercises that focus on one large muscle group at a time. As your symptoms decrease and your coordination improves, you can progress to more dynamic hip movements and hip movements that prepare you for your normal daily activities, such as lunges, one-leg balances, and squats. Common target areas are the abdominals, glutes, hamstrings, quads, hip flexors, and deep hip rotators.
Correcting Movements
The final phase of PT focuses on optimizing your movement patterns. Proper form and biomechanics in daily activities such as sitting, walking, sleeping, and more dynamic movements (exercise or sports) are essential for hip recovery. This allows for proper healing and reduces the likelihood of future hip problems.
Exercises for Hip labral tear:
The labrum is a ring of cartilage that provides stability to the ball and socket joint of the hip for everyday activities. Unfortunately, due to overuse, trauma, or muscle imbalances, these types of injuries are most common in athletes, but they can happen to anyone. If you have a sprained hip, exercises that promote circulation and healing are critical to your recovery, whether or not surgery is needed. Keep reading to learn about the best exercises for hip labral tears.
Stretching exercise
Hamstring muscle strech:
The hamstrings are a set of three muscles located on the back of the thigh. Never push yourself to stretch or stretch while you are in pain. While performing intense exercises, breathe properly. Try to incorporate pull-ups into your program at least twice a week. Lie on your back with your legs completely stretched on the floor.
For this stretch, you should also be at the corner of a wall or door. Lift your right leg up and set the heel on the wall, keeping the knee slightly bent. Slowly extend your right leg until you feel a hamstring stretch.
Hold for 10 seconds, then work for 30. Rep with the opposite leg. Then repeat this stretch a few more times on each leg.
As flexibility increases, try moving near the wall for a more stretch. There are several exercises and stretches you can do to keep your thighs open. Warm up the muscles before stretching. Try walking or some other activity to warm up your muscles.
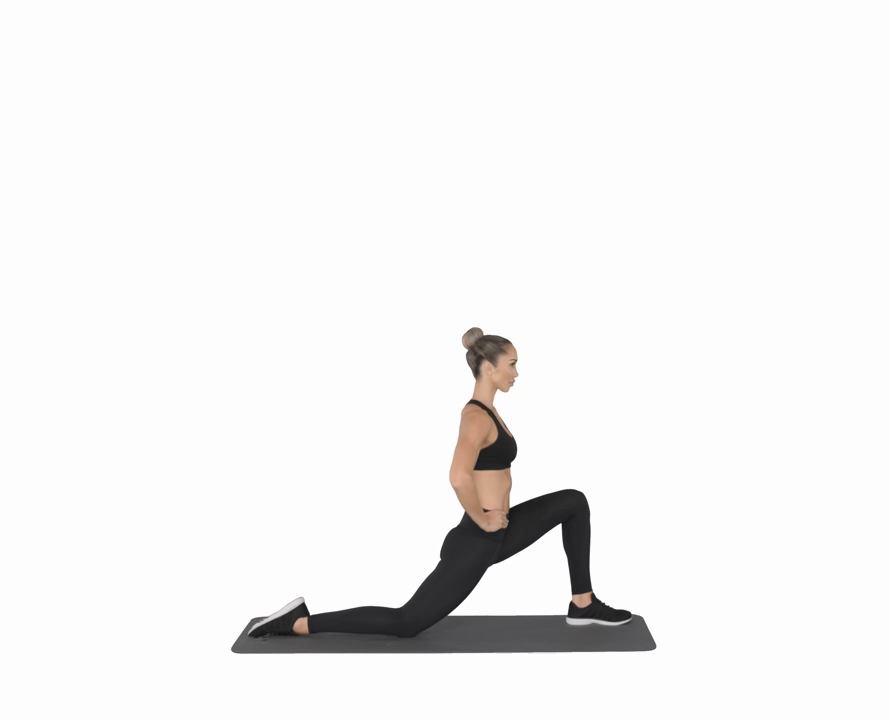
Kneeling Hip Flexor Stretch:
Helps open the front of the hip and create more length in hip flexors and quads for hip extension and arabesque.
Be careful if you have knee pain. Remember to use a pillow, towel, or rolled yoga mat under your knee when stretching.
The stretch should be felt especially in the front of the thigh and hip. If you have knee pain, stop.
Piriformis stretch:
Stretching the piriformis muscle can enhance mobility, lessen lower back, buttocks, and leg discomfort, and reduce muscular tension. A flat, pear-shaped muscle deep within the hips and buttocks is known as the piriformis. This powerful muscle travels up the upper thigh from the lower back via the glutes.
It is crucial to everyday living and leisure activities because it stabilizes the hip joint and externally rotates the thigh. Start the pear-shaped stretch by sitting in a chair with both feet flat on the ground. Place your right ankle on your left knee after lifting it. Next, sit tall and straight while bending your right leg such that your toes point towards your calf.
Lean your chest forward towards your legs while maintaining a straight back. Lean forward just enough to experience stress but not pain. wait Repeat with the opposite leg after releasing the stretch.
There are following ways to stretch the piriformis muscle.
piriformis stretch while seated on the ground
different forms of the piriformis stretch
a lying piriformis stretch
Pigeon pose
Quadriceps Stretch
Place your feet hip-width apart.
Bring your heel towards your buttocks by bending your afflicted knee.
Hold your ankle gently or use a strap or cloth to help move your heel closer.
Hold the stretch for 20-30 seconds before repeating on the opposite side.
Calf Stretch While Standing:
Stand with your back to a wall and your hands against it for support.
Place your afflicted leg behind you, straight.
Bend your front knee while maintaining a straight back leg and your heel on the ground.
Hold the stretch in your calf for 20-30 seconds.
Rep on the opposite side.
Shin box
The purpose of this exercise is to stretch the internal rotators of the hip and then activate the same muscles. Start in a seated shin position (90-degree hip to knee front; 90-degree hip to knee back) and see if you can get the same amount of weight on both sit bones.
When you reach this, begin to shift your weight slightly forward, maintaining a neutral spine, and lift your feet off the mat. Maintain contact with the mat with the back knee. As you can see my mobility and control are quite limited and I have been working on it. A progression of this exercise would be to use less hand support and lift the lower leg higher.
Seated hip external/internal rotation stretch / 90-90 Hip switch
Here’s how to do the 90/90 stretch:
Sit on the floor and bend one leg in front of your body, hip out. Position it so that your shins and knees rest on the ground. Your leg should form a 90-degree angle and your ankle should be neutral so that your leg is straight.
Place one leg beside you with the hip turned inward and the shin and ankle on the ground. Bend the knee so that the leg forms a 90-degree angle.
The back knee should be in line with the hip and the ankle should be neutral. Try to maintain a straight back and resist the inclination to lean to one side. Think of sitting straight on both hips and ease your lifted hips straight to the ground. Hold this stretch for up to 60 seconds and take a deep breath to relax into the position. Do 2-3 repetitions on each side. By doing this set just 2 times a week, hip mobility will improve in just 1-2 months.
Hip Flexor Stretch
A conventional hip flexor stretch can improve any approach to hip mobility. This stretch can improve muscular strength as well as joint flexibility. As a result, it may be significantly more useful than a simple flexibility stretch on its own.
Do the following:
Start by kneeling on one leg with the other leg bent at a 90-degree angle.
Keep hip and shoulder alignment with the kneeling leg. The other knee should be parallel to the ankle and heel of the front foot.
Place your hands on your front knee and apply slight pressure. As a result, your core muscles are worked.
Tuck your hips and tailbone below your body.
To brace your spine, squeeze your glutes and abdomen firmly throughout the workout.
Lean forward gently till you feel it in your hips. Keep it there for around 1-2 minutes.
Then, as your knee tries to push forward, squash your rear foot into the ground. Hold this for about 30 seconds.
Maintain the beginning posture for 30 seconds more while relaxing.
After moving your legs, repeat the complete action on the opposite side of your body.
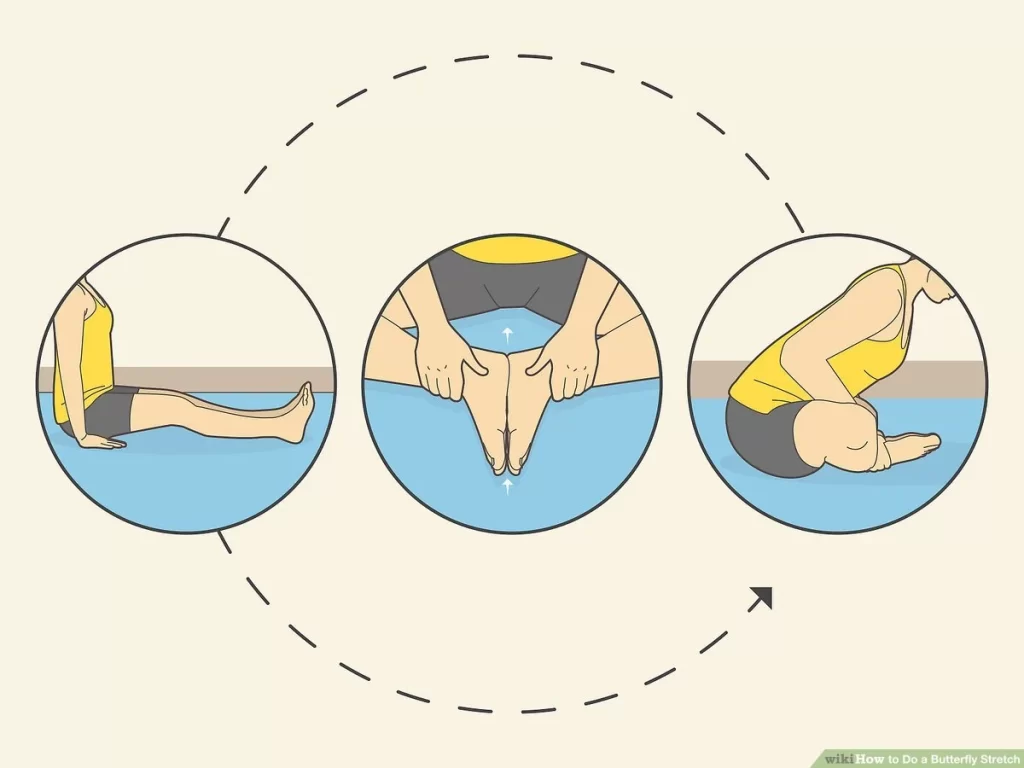
Butterfly exercise
One of the most popular hip mobility exercises is the butterfly stretch. It can be relatively soothing and a quick, low-impact approach to moving your muscles and joints. Your reverse should be straight as you sit on the ground with your core muscles contracted.
Your bases should be compressed against one another as you flex your legs. Holding your bases forcefully in place with both hands, slightly bending your hips forward while pressing down with your hands on your bases. Release the Hold after 30 seconds also repeat it, if asked.
Traveling Butterfly
The traveling butterfly stretch is nearly to same as a standard butterfly stretch. still, this exercise’s current replication is a little more demanding and dynamic. It’s a great option for anyone who desires the relaxing advantages of the butterfly while engaging your muscles in a slightly more energetic way.
To start the traveling butterfly, sit on the ground with your reverse straight and your hips square, just like you would for the traditional butterfly. Unbend out both your legs in front of you. Press down, lifting your hips off the bottom and moving towards your heels while keeping your hands on the bottom behind your hips. Your arms will support your body as you perform this stir, which will put you in the butterfly posture. Hold the position for a bit of time. After that, start over from the morning and reprise.
Movement Exercises/ Mobility exercises:
Correct movement is important to keep the hip joint as healthy as possible. Correct movements promote muscle balance, and hip mobility and improve circulation in injured areas.
While stretching can be a great remedy for general hip pain, it should only be used if your hip has limited flexibility or range of motion. Otherwise, stretching has shown little relief for this injury. Instead, compound movements that provide a range of motion and strength to the hips are ideal.
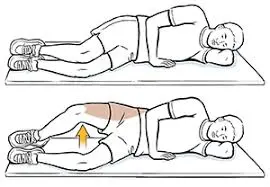
Supine Straight Leg Raise
Your hip flexor muscles may be strengthened using the Straight Leg Raise (SLR) exercise, which can also increase the range of motion in your hip.
The Straight Leg Raise (SLR) exercise is demonstrated here:
Straight Leg Raise While Supine:
Lay on your back on a mat or the ground or any flat surface.
Keep your legs straight and close together while supporting yourself with your arms at your sides or, if necessary, under your buttocks.
By gently pushing your lower back against the floor, you may activate your core muscles.
Lift the injured leg slowly off the floor, maintaining it straight. Make sure you are in complete control of the motion and do not jerk your leg.
Lift your leg as high as you can without feeling any pain or discomfort, aiming for a 45-degree angle.
After a brief period of time in the lifted posture, carefully bring your leg back down to the floor.
For each leg, do 2-3 sets of 10-15 repetitions.
Throughout the exercise, remember to take frequent breaths and concentrate on lifting your leg using your hip flexors.
If at first, you find this exercise too difficult, you can begin with a lower range of motion and gradually increase it.
Prone leg raise
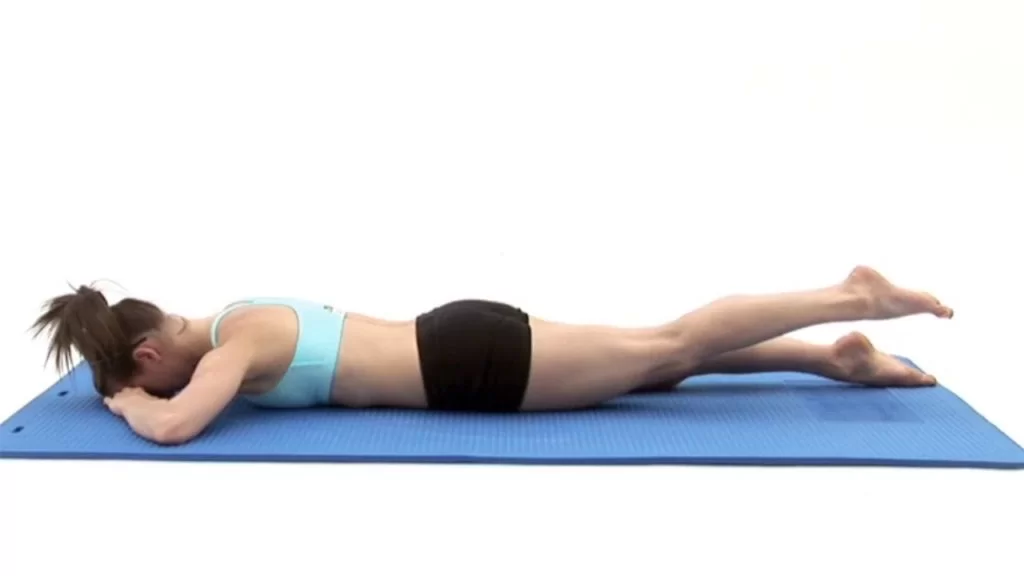
In the prone position, hip extension exercises might be helpful for enhancing stability and developing the hip muscles. In a prone posture, you can train your hips by following these steps:
On a comfy surface or workout mat, begin by resting on your stomach (prone position).
For support and stability, place your arms at your sides, palms facing down.
Place your legs parallel to your torso and straight.
To engage your core muscles, pull your belly button towards your spine.
Start the exercise by slowly raising one leg off the ground while concentrating on engaging the glutes and hamstrings at the back of your hip to lift the leg.
Keep your knee straight and try to keep your lower back from arching too much as you elevate the leg.
Maintain control and good form as you raise your leg to a comfortable height. Both your glutes and hamstrings ought to tighten up.
Holding the raised posture for a brief moment (1-2 seconds) can help you activate your hip muscles even more.
Return your leg to the starting position slowly and deliberately.
With the opposite leg, repeat the exercise.
Side-lying leg raises(hip abduction)
To increase mobility and stability, this exercise concentrates on strengthening the core, gluteus, and hip abductors. For further support, flex the knee at the bottom. To make the muscles from this workout stronger, you can wrap a resistance band or theraband around your ankles.
beginning on your side Your left hip lies squarely above your right hip while you are lying on your right side.
Maintain a straight posture while using your left hand to support you on the floor. Put your right hand or a cushion under your head for support.
Raise your left leg gradually.
For two to five seconds, keep holding this stretch all around you. Return to the starting position of these workouts gradually.
The side leg raise has the advantage of being a leg lift exercise that when performed correctly, targets several muscle groups, including the gluteus, hamstrings, lower back, and hip flexors.
If you perform this easy exercise on a daily basis, it will help keep your hip, lower back, and abdominal muscles strong.
three sessions every day, three sets per side, and 15-20 repetitions per session.
Supine Hip Extension:
Exercises that extend the hip can be helpful for those who have hip labral tears because they strengthen the muscles around the hip joint and increase stability. Under the direction of a trainer, you might want to try the following hip extension exercise:
Hip Extension in the Supine:
On a flat surface, such as a mat or the floor, lie on your stomach.
Keep your arms by your sides and your legs straight and parallel.
Brace your abdomen lightly to activate your core muscles.
Start by raising the afflicted leg off the ground while concentrating on engaging the gluteal muscles in your buttocks to carry out the exercise.
Lift your leg as high as you can without hurting or feeling uncomfortable. Make sure you have control over the action and stay away from jerky movements.
After a brief period of time in the lifted posture, carefully bring your leg back down to the floor.
For each leg, do 2-3 sets of 10-15 repetitions.
Keep your breathing even as you perform the exercise, and pay close attention to using your glutes to extend your hips.
If at first, you find this exercise too difficult, you can begin with a lower range of motion and gradually increase it.
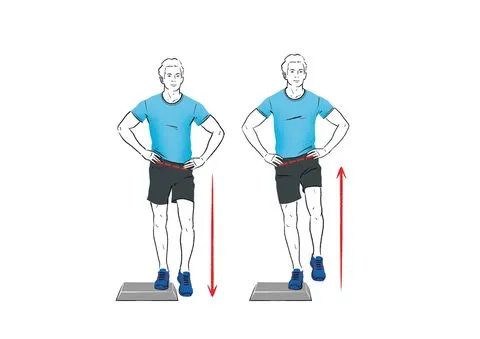
Standing Hip Circles:
Exercises that involve a hip circle can assist in strengthening the muscles surrounding the hip joint and enhance hip mobility. These exercises can be helpful for a variety of things, such as recovery, warm-up, and overall fitness. Try this easy hip circle exercise:
Hip circles while standing:
Stand up straight with feet and shoulders apart.
If you need to balance yourself, put your hands on your hips or grasp onto a sturdy object like a chair or countertop.
Slowly begin the action by pulling your hips forward and to the right while moving them in a circular manner.
Keep rotating your hips in a circular pattern by first moving them to the right, then back, then left, and then forward once again.
Make a few clockwise circles with your hips, then change direction and make a few anticlockwise ones.
Perform 2-3 sets of 10-15 hip circles in each direction.
Throughout the exercise, maintain a largely motionless upper body and concentrate on the movement originating from your hips.
Avoid jerky motions by performing the exercise in a steady and fluid way.
This exercise can aid in enhancing hip mobility and may be especially beneficial before engaging in other activities or as a component of a larger hip mobility regimen.
Hip hikes
The ability to walk, run, or rise up from a chair, among other functional movements, depends on the strength of the gluteal muscles. Additionally, these muscles enable you to ascend and descend stairs. If you have weak hips, you should visit a doctor or physical therapist for advice on the best hip-strengthening exercises.
Simple hip workouts may be beneficial, while more complex hip strengthening may be required to resume regular activity.
Keep the supporting leg straight while standing on one leg with your abdominal muscles locked.
Next, let the foot still dangling on the rung descend to the ground gradually. Allowing the pelvis to gradually sink will help.
It’s crucial to keep the supporting leg on the step as straight as possible. Many individuals like to lower by bending their knees, but you may also lower by letting your hips fall gradually.
Remember to manage the movement with a calm and steady drop; your foot shouldn’t contact the ground. Once your hips have dropped as far as they can go, maintain the position for a few seconds while keeping your abs firm. then carry on with the final workout step.
Seated Leg Adduction:
Take a seat on a sturdy chair or bench with your back straight and your feet flat on the ground.
In between your knees, place a cushion or a small exercise ball.
For stability, keep your upper body still and your core active.
Put pressure on the exercise ball or cushion in between your knees as you squeeze them together.
Squeeze for a brief period of time before gently releasing.
Repeat the squeezing and releasing action for the desired amount of time.
Tips:
Keep your back straight during the workout and avoid leaning forward or backward.
Focus on using your inner thigh muscles to squeeze the ball or cushion.
With this seated leg adduction exercise, the inner thigh muscles may be exercised effectively without putting too much stress on the knees or other joints. For people who might have mobility limitations or prefer seated activities, it is especially suitable. Use it along with other inner thigh exercises to give your legs a comprehensive workout.
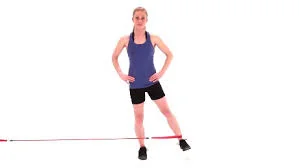
Standing hip abduction:
Here’s how to perform a standing hip abduction:
Take a tall posture with your feet together and your arms by your sides.
Make use of your core muscles for stability.
Put all of your weight on one leg while slightly bending the knee of the other leg.
The non-weight-bearing leg should be raised as far to the side as possible while remaining straight.
Hold the position for a short period of time, focusing on contracting your inner thigh muscles.
Return the leg to its starting position slowly.
Perform the required number of repetitions of the action on the first leg before moving to the second.
During the workout, keep your back straight and avoid bending or tilting your upper body.
Keep your hips square and pointing front.
You can perform the exercise next to a wall so that you can lightly touch it with your fingertips, or for better balance, place your hands on a chair or a wall.
Perform 2-3 sets of 10–15 repetitions on each leg, or you may do them for a predetermined length of time (for instance, 30 seconds on each leg). If you want to make the workout harder, wrap tension bands or ankle weights around your feet.
Supine hip abduction:
It is performed while lying on your back and is a great option for those who may find it difficult to stand for extended periods of time or have limited mobility. Instructions for supine hip abduction are as follows:
Legs straightened, lie on a mat or other comfortable surface on the floor.
Place your arms at your sides with the palms down for support.
By tightening your abdominal muscles, you can stabilize your pelvis and lower back.
While keeping one leg straight, lift the second leg off the floor and stretch it out to the side as far as you can.
Hold the position for a short period of time, focusing on contracting your inner thigh muscles.
Return the leg to its starting position slowly.
Perform the required number of repetitions of the motion on the first leg before moving to the second.
Tips:
Avoid jerking or swinging and be careful in your movements.
During the exercise, try to keep your spine neutral and avoid arching or rounding your lower back.
If required, you can ease the discomfort of the exercise by bending the knee of the leg that is being lifted.
Perform 2-3 sets of 10–15 repetitions on each leg, or you may do them for a predetermined length of time (for instance, 30 seconds on each leg). To make the workout more challenging, you might place a resistance band slightly above your knees or add ankle weights.
Standing hip flexion:
Here are the exact steps to complete the standing hip flexion exercise:
Start by standing up straight, making sure your shoulders are relaxed, and placing your feet hip-width apart.
To maintain balance and support during the activity, if required, you can utilize a firm surface like a wall or a chair.
Keep one foot flat on the ground while shifting your weight to the other. Your supporting leg will be the one you are now using to stand.
Bend the knee of the non-supporting leg while you balance on the supporting leg.
Flex your hip joint to start the motion. You should comfortably raise the non-supporting leg’s knee as high as you can. Your hips should do most of the moving.
Keep your torso essentially upright while raising your knee. Aim to keep your waist from sagging too forward or backward.
Controlled knee flexion is required. In order to efficiently activate your hip flexor muscles, avoid jerky or quick motions.
After you have elevated your knee as high as you are comfortable with, slowly drop it down to the beginning position.
Carry out the same action with the other leg. As high as you can comfortably raise your knee without straining, do so.
Carry out the exercise on each leg for a certain number of repetitions. Typically, 10 to 15 repetitions per leg are performed.
Depending on your fitness level and objectives, you can perform two to three sets of this exercise.
During the exercise, contract your abdominal muscles to assist in stabilizing your body.
Coordinate the motion with your breath by inhaling as you elevate your knee and exhaling as you drop it back down.
You may strengthen your hip flexor muscles and increase hip mobility and stability by performing the standing hip flexion exercise. To get the most out of the workout, concentrate on keeping good form and control throughout.
Seated Hip Flexion and Extension:
Seated hip flexion and extension exercises are great for improving hip mobility and strengthening the hip flexor and extensor muscles. These exercises can be particularly helpful for individuals recovering from hip injuries or surgeries or those looking to enhance their hip function. Here’s how to perform seated hip flexion and extension exercises:
Seated Hip Flexion:
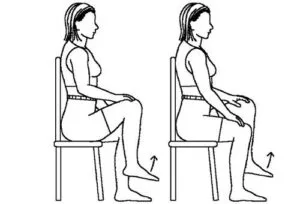
With your feet flat on the ground and your back straight, take a seat on a firm chair or bench.
For stability, place your hands on the sides of the chair or your hips.
Start by raising the leg that is having trouble off the floor, bringing the knee up to your chest, and flexing the hip joint.
Maintain a straight spine and use your core muscles while performing the action.
Lift your leg as high as you can without hurting or feeling uncomfortable.
After briefly maintaining the lifted posture, bring your leg back down to the floor.
For each leg, do 2-3 sets of 10-15 repetitions.
Seated Hip Extension:
With your feet level on the floor and your back straight, sit in the same chair or bench.
For support, put your hands on the sides of the chair or your hips.
Start out by straightening out the afflicted leg behind you while keeping it near to the ground.
To execute the action, pay close attention to using your gluteal (buttock) muscles.
As high as you can raise your leg without hurting yourself, do so.
After briefly keeping your leg elevated, bring it back down to the floor.
Each leg should get 2-3 sets of 10-15 repetitions.
When engaging in these drills:
Maintain a straight back and proper posture.
Make deliberate, fluid motions.
Hip flexors for flexion and glutes for extension are the primary muscles that you should concentrate on using.
Exercises should be performed with no discomfort.
Avoid holding your breath and take frequent breaths.
Hip External/Internal Rotation:
Hip external and internal rotation exercises can help improve the range of motion in your hip joint and strengthen the muscles responsible for these movements. These exercises can be beneficial for individuals recovering from hip injuries, experiencing hip tightness, or looking to enhance hip flexibility. Here’s how to perform hip external and internal rotation exercises:
Hip External Rotation:
With your feet flat on the ground and your back straight, take a seat on a firm chair or bench.
So that your ankle is resting on your opposing thigh, cross your afflicted leg over your opposite knee.
Your injured knee can be moved away from your body by gently pressing it outward with your palm. This rotational movement is external.
Till your hip and groin region stretch, gently push the area. Make sure to carry out the action in a range that is both pain-free and pleasant.
For 20–30 seconds, keep your body extended out while breathing steadily.
Place your leg back in the beginning position after releasing the pressure.
Stretch each leg twice or three times.
Hip Internal Rotation:
Your feet should be flat on the floor when you sit on a chair or bench with your back straight.
Similar to the beginning posture for external rotation, cross the afflicted leg over the opposing knee.
This time, gently massage your afflicted knee inward with your palm until it is positioned next to your opposing knee. Internal rotation is occurring here.
Till you get a stretch in your hip and buttock region, gently push the area. Go as far as you can.
Hold the stretched posture for 20 to 30 seconds while keeping your breathing steady.
Put an end to the pressure and bring your leg back to its initial position.
Stretch each leg in two to three sets.
These hip rotation exercises should be done as follows:
Make calm, delicate motions.
Pay attention to the targeted muscles and the hip stretch.
Stretches should be done within a range of motion that is pain-free.
Avoid holding your breath and take frequent breaths.
The Clamshell exercise:
Clamshell exercises are frequently advised for people with hip labral tears because they strengthen the gluteus medius and other hip muscles while putting less stress on the hip joint. How to conduct clamshell exercises is as follows:
For hip labral injuries, try these clamshell exercises:
Lie on your side on a mat.
Create a “L” shape with your legs by bending them at the hips and knees to a 90-degree angle.
As you perform the exercise, keep your feet close together.
To add stability, place your upper hand on your hip.
Lift your upper knee as slowly as you can while keeping your pelvis still. This looks like the clamshell opening.
Pay careful attention to contracting your hip-side muscles, particularly your gluteus medius.
Hold the elevated posture for a short while to feel your hip muscles contract.
Maintaining the 90-degree angle at the hips and knees, slowly lower your top knee back down to the beginning position.
Complete the specified number of repetitions, which is often between 10 and 15 every set.
Perform 2-3 rounds of the clamshell exercise on each side.
Breathe in as you are ready to elevate your knee, exhale as you do so hold it there, and then breathe back in as you drop it to the beginning position.
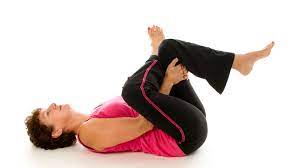
The purpose of this exercise is to help strengthen the external rotators of your abs and hips, the muscles you should use to rotate your legs, and help you balance on one leg in a rotated position. You want to keep your abs tight while doing this exercise and make sure you can get your hands under your waist while lying on the mat.
As you progress, make sure you don’t sink into the mat and/or move your hips up to lift your leg – keep your torso tall and tall and keep space in your hips as you lift your leg.
Hip-Controlled Articular Rotations
The purpose of this exercise is to teach you how to control and increase the range of motion of an asymptomatic hip without compensation. You want to make sure you don’t cause symptoms when you move your hip – no clicking, squeezing, or lifting your leg. You can see I’m holding on to the couch so I can concentrate on getting my leg up as high as possible. The progression of this exercise would be without hands, lifting the leg higher, and finally adding a kettlebell to the arm of the moving leg.
Childs pose rock backs
They can be an excellent way to restore hip flexion in the hip without causing severe pain in the front of the pelvis. Start on your hands and knees and gently press your back toward your heel. If you start to feel pain or tension in your pelvic area, don’t push anymore.
Dynamic Pigeon Pose
This is another great way to improve hip mobility, especially hip external rotation and flexion. This stretch can be increased by how much you push your upper body forward. This is easiest to do while sitting on the floor, but you can use alternative methods if necessary.
Leg Swings
These are beneficial, simple, and relaxing mobility exercises. Leg swings constantly work well as a wind-down stretch after a drill or training session. They’re simple to carry out, and you may do them while multitasking in other ways or watching TV. To begin, stand tall with your hips square. Hold on to a president, counter, rail, or other stable object with your left hand to keep your balance.
Lift your left leg as exactly resemblant to the ground as you can while precisely crossing it over your right leg. rather than remonstrating aggressively, this should be a flowing, delicate stir. Hold your leg up for a moment, sluggishly lower it, and repeat this. Perform a minimum of ten reiterations. also switch sides and reprise.
Foam Rolling Exercises
Pain ranging from dull and achy to acute in nature is frequently the main sign of a hip acetabular labrum rupture. In certain cases, back discomfort and groin pain are also included. Try these foam rolling exercises to ease discomfort in your bigger muscle groups as a starting point.
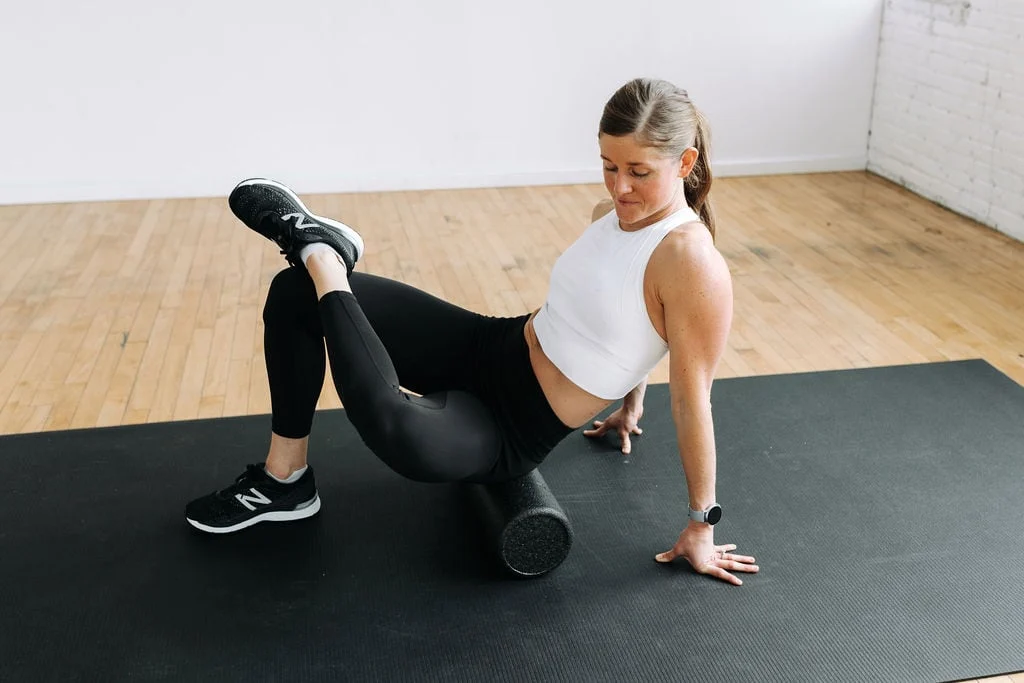
Glute Roll
A labral rupture in the hip can leave the glutes tight. You’ll need to get used to the pressure of the foam roller at first, but you can always relieve the strain on your painful muscles by using more of your free limbs to support you. Remember that you ought to be able to maintain your calm. Avoid applying pressure directly to bones or joints and only apply pressure to the muscles themselves.
Set your foam roller down on the floor.
When you’re ready, sit on the foam roller with your legs crossed in front of you.
As you construct a figure four with your legs, support yourself by placing your hands behind you on the floor.
The right glutes, in particular the gluteus medius, should be massaged. To put the right hip in external rotation, bring the outside of the right ankle to rest on the outside of the left knee. If this motion makes your symptoms worse, do not force it.
Roll back and forth on the glutes using your left leg and arms as a compass.
Roll for one to five minutes back and forth, at a comfortable pace.
If necessary, repeat with the opposite leg.
You may also use a tennis ball, lacrosse ball, or even just your hand if you don’t have a foam roller.
Groin Roll
Another common problem area is the groin and hip muscles that run along the inner thigh. Be gentle with the area to prevent aggravation and adjust pressure or position as needed.
With the foam roller on the floor, lie on your side with the sick side up.
Your leg is bent at about 90 degrees at the hip and knee.
Bring the foam roller close to your body so that it is parallel to your body and place your inner thigh on the foam roller.
Roll the foam roller back and forth under your thigh with your upper arm.
If you find a sore spot on the inner thigh, stop and slowly bend and extend the knee until the muscle relaxes.
Repeat 10 times for each painful point for a few minutes.
Quad Roll
Finally, the quads and hip flexors are also usually tight due to hip pain. Make sure you stay out of your knees and hips as you roll up and down.
Keep the foam roller on the floor
Lie on your stomach with the front of your thigh on the roller
Use your hands to guide the roll up and down your thighs
Slowly roll back and forth, pausing to hold the painful points while rhythmically bending the knee as needed
Additionally, you can roll the back of your legs (hamstrings) or even your hips (iliotibial band).
Self-Massage of the Hip
Outside of the foam roller, you can use other massage tools to relieve pain. It can range from a massage roller or vibrating tool to your hands.
Take a massage roller
Place the tool against the painful muscle of the upper thigh
Apply enough pressure to get relief without straining the muscles
Roll back and forth slowly
Point to the desired areas on the side, front, back, or front of the thigh
Continue for 1-5 minutes.
Strengthening Exercises
Strengthening the hips and core is the most important part of a hip replacement home exercise program. It restores hip function and balance so you can return to your daily activities and sports as quickly as possible. Always focus on maintaining good form and keeping your core activated with each exercise below.
The timing for starting strengthening exercises after a hip labral tear can vary based on individual factors, including the severity of the tear, the type of treatment received (conservative or surgical), and your healthcare provider’s recommendations.
Standing abduction with theraband:
Performing this exercise:
Required Hardware
A doorknob or other sturdy anchor point, such as a fixed object, to which a resistance band or Theraband may be secured at ankle height.
Instructions:
Abduction of the hip
Set up: Attach one Theraband end to a fixed place that is ankle height.
facing the anchor point while standing with your feet together.
Position: The opposite end of the Theraband should be wrapped around the ankle of your outer leg, which is the one that is furthest away from the anchor point.
Your inner leg, which is the one that is closest to the anchor point, should be the limb performing the exercise.
Exercise: Keep your inside leg straight or slightly bent at the knee and slowly abduct it away from your body’s midline.
Keep your actions under control and concentrate on activating your inner thigh muscles during the entire workout.
At the conclusion of the exercise, stop a moment after your leg has fully abducted.
Return: Slowly bring your leg back to the starting position while managing your resistance to the pull of the Theraband.
Avoid letting the band abruptly yank your leg back; instead, maintain control of the movement the entire time.
Repetitions:
Start by aiming for 10 to 15 repetitions on each leg.
You can perform two to three sets of this exercise during your workout.
Tips: To stay stable during the workout, maintain a straight upper body and tighten your abdominal muscles.
Avoid swinging your leg or relying on momentum when making the action. By focusing just on the muscles being exercised, you can avoid exerting too much effort in other regions of your body.
Change the resistance of the Theraband as necessary. If the band is too slack or too tight, your muscles cannot be properly challenged.
3-Way Hip Motion
This great and effective hip stabilization exercise hits almost every major muscle group around the hip. Tune in and notice if one of the three directions is harder or more stressful than the others – make sure you’re more diligent with your form.
If necessary, stand close to a wall, chair, or counterweight
Take the loop tape and place it around both legs to about mid-calf
Stand tall with good posture and tight abs as you put your weight on one leg
Bring your free leg straight behind you as you extend your hips and squeeze your butt, being careful not to lean forward and keep your ankle bent.
Return the leg to the starting position
Next, bring your leg out straight, keeping your knees and toes straight in front, and avoid leaning your torso to the side.
Return the leg to the starting position
Finally, bring your leg straight out in front of you into hip flexion before returning to the starting position
Repeat these 3 moves 10 times
Repeat 2-3 series with both legs
As you progress through this exercise and want to make it more difficult, you can do the moves without balance assistance or even stand on a foam pad. Additionally, you can add more functional moves to your bar, such as side-to-side walking or exaggerated forward walking (known as monster walks).
Psoas March
Keeping the hip joint strong is an important part of hip recovery, especially since most of the hip muscles have multiple roles in stabilizing the hip in addition to the pelvis and lower back. This exercise addresses core and hip strength at the same time, minimizing hip aggravation.
Begin by supine with legs bent, and feet on the floor.
Wrap the curl resistance band around your feet so the band goes under the arches
Make sure your back is flat and stable against the floor by tightening your abdominal muscles
Lift both feet off the ground so your hips and knees both bend about 90 degrees to start.
Now begin to extend one leg forward as you press your foot into the resistance band
Go as far as you comfortably can and stay in shape
Push each leg forward in turn
Repeat 10 times with each leg, 2-3 sets total
If this movement is too difficult to control or pain occurs, raise your legs higher towards the ceiling or start without the bar
To make the exercise more difficult, bring your feet closer to the ground.
Bear Sit
Regular application of the bear stretch helps strengthen the adductor muscles in your hips and inner shanks. launch by performing the unresistant stretch. Put your bases out in front of you as you sit on the mat. Keep a straight line from knee to heel while extending your bases and knees outward.
Pull your knees piecemeal while grabbing hold of each ankle with your outstretched hand. Flatten your lower aft gradationally and maintain the position for about a minute. Gently inhale and exhale while holding.
To begin the active stretch, let go of your ankles and extend your arms straight in front of you. As you depress your shoulder blades, make fists with your hands. Hold this position for 10 to 15 seconds while breathing deeply and using your core muscles. Spend about a minute in the unresistant position with your hands over your ankles. Several further times, repeat the active stretch.
Banded Squat
Since the squat is a movement we all do every day to get up and down from chairs and other low surfaces, squatting with proper hip strength and coordination is important. This move also engages the hip abductors and rotators for a great compound movement. Do not force a movement that causes hip tension or pain.
Take the curling tape and wrap it around the legs above the knees
Stand with your feet hip-width apart and your knees directly over your toes (not tucked in).
Do a mini-quad by bending your hips and knees
Keep your butt back as if you were sitting in a chair, with your back straight and your weight centered on your feet (not your toes).
Holding this squat position, activate the outside of your pelvis by pressing it against the band to gently rotate your pelvis outward (knees apart)
Repeat this small hip movement 10 times, for a total of 2-3 sets
You can increase the depth of the squat and the number of repetitions as allowed.
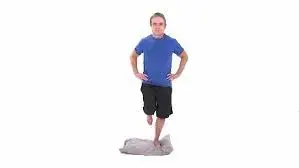
Single Leg Stance
Balancing on one leg is a great way to strengthen your hips. It is also a very functional movement because one-legged balance is necessary for basic daily movements such as walking and running.
Stand close to a chair, wall, or counterweight as needed
Choose your difficulty based on the surface you’re standing on – either the ground or a softer surface like a foam balance or even a balance board.
Raise your body weight on one leg for balance
Try to hold for 30 seconds for 2-3 sets on each leg
You can increase your balance challenge by reducing arm support, standing on a more difficult platform, or even increasing your overhead or arm support.
Single-Leg Deadlift
Your hips will get stronger from this workout, and your coordination will get better. This workout may be changed by beginning without weights.
The hamstrings, glutes, lower back, and core are among the muscles that the single-leg deadlift targets during strength training. Additionally, it enhances stability and balance.
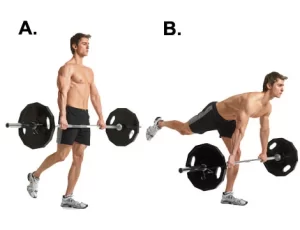
Step your feet together, then stand tall.
You can hold a weight in one hand in front of your thigh if you have one (such as a dumbbell or kettlebell).
Shift your weight to one foot while bending that knee slightly.
Lean forward at the hips while extending your other leg straight behind you.
To maintain a neutral spine when you bend at the hips, keep your back straight and your chest up. As if you were closing a door with your behind, picture pulling your hips back.
Extend your non-weight-bearing leg behind you as you keep lowering your chest toward the ground.
Your body should be positioned such that your extended leg and head are in a straight line.
Ideally, you should be parallel to the ground with your outstretched leg, but the depth may vary based on your flexibility.
To raise your torso back to the beginning position, contract your glutes and hamstrings.
Concentrate on driving the motion with the muscles of your standing leg.
Maintain a firm core for stability.
Bring your non-weight-bearing leg back down to the ground next to your standing leg once you’ve stood up again.
Before moving to the second leg, do the exercise on the first leg for the necessary number of repetitions. This usually entails 8–12 repetitions for each leg, however, the precise number may change according to your fitness level and objectives. As part of your training, perform 2-4 sets of single-leg deadlifts on each leg.
For the exercise to be as safe and effective as possible, keep your spine neutral, avoid locking your knee while standing, and utilize the perfect form at all times.
Resistance Band Squat Walk:
It is done while wearing a resistance band to enhance the amount of resistance and difficulty. The Resistance Band Squat Walk is performed as follows:
Wrap the resistance band around your legs just above your knees. The band should be tight but not uncomfortable.
Stand with your feet wide apart. Keep your chest high, your core tight, and your shoulders back.
By bending your knees and pressing your hips back, you can lower your body into a squat. Keep your heels firmly planted on the ground, your knees aligned with your toes.
Maintain tension on the resistance band and step to the side with your right leg in a squat position. To feel the resistance and maintain your form, take a wide enough step. Then step your left foot to your right foot, this time keeping tension on the band. Keep your body in a squat position during the exercise. Continue walking sideways for the specified distance or number of repetitions, alternating the position of the right and left feet.
Tip:
By pushing the resistance band modestly as you move, you can maintain constant tension on the band. Step to the side and the squat focuses on contracting the glutes and inner thighs. Avoid bending your knees inward by keeping them in line with your toes. Keep your shoulders back and chest straight throughout the exercise. To maintain perfect form and maximize the benefits, exercise slowly and avoid rushing. The Resistance Band Squat Walk is a useful exercise for the lower body muscles.
Side Step-ups:
Side actions are performed as follows:
It is best to start standing next to a sturdy platform or seat with your feet apart. The platform should be slightly higher than the height of the knee. Place your right foot firmly on the platform to ensure it is fully supported. Hold the pose straight by contracting your core muscles. Push your right leg through and lift your body onto the platform using your glutes and quads. The left leg of the body should be raised from the ground and slightly bent. Return your body to the starting position by bending your right knee and hip and lowering your left leg. Additions must be repeated on the same side as many times as necessary. Then turn to the other side, step on the platform with your left foot, and repeat the procedure.
Tips for side actions:
To avoid collapsing or collapsing, remember to keep your knees in line with your toes when you stand up. As you use your glutes and quads to rise to the platform, keep your core stable. You can use your arms for balance by swinging them naturally or keeping them relaxed. At the peak of activity, squeeze your glutes. Keep your balance by standing completely straight on the platform. Choose a platform height that allows you to perform the exercise effortlessly and in the best possible form. As you get more comfortable and stronger, move up, starting at a lower level. You can add resistance by wearing a weighted vest or holding dumbbells.
Hip bridge with resistance band:
The lumbar bridge with a resistance band can be done as follows:
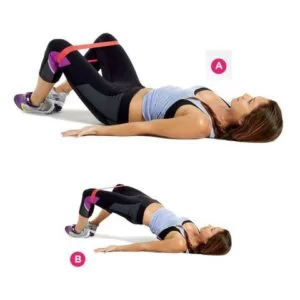
A resistance band (loop or microband) is required as an accessory.
Lie on your back on a soft surface. Wrap the resistance band around your thighs just above your knees. Place your feet apart on the floor, knees bent. Palms down for stability, and place your hands by your sides. Move the navel toward the spine to activate the core muscles. Create a straight line from your shoulders to your knees by pressing your heels into the ground and contracting your glutes as you lift your hips off the ground. Pushing your knees out against the resistance band activates your inner thigh muscles as you lift your hips. Hold the bridge position for a while contracting your glutes and inner thighs. In a controlled manner, bring your hips back to where they were at the start.
Tip:
During the exercise, keep your knees parallel to your legs and do not let them sink. Avoid arching or rounding your lower back during the exercise by keeping your spine neutral. Get the most out of the exercise by contracting your glutes and inner thighs at the top of the movement.
Foot elevated Single leg glute bridge
This is the first of our eight strengthening exercises and one of the gentlest yet most effective glute and hip straighteners. Begin by lying on your back with your feet on a 6- or 8-inch box. Press the heel of the box down and try to lift your back off the floor. Make sure you squeeze the butt as hard as possible.
Straight Leg Bridge
You will need a foam roller or a power step to start this exercise. Although the bridge is traditionally done with the knees bent and feet on the floor, with straight legs it helps strengthen the glutes and hamstrings while providing excellent hip extension.
Take a foam roller or sturdy step.
Lie on your back and place your lower legs (near the bottom of your legs) on the foam roller.
Keeping your legs completely straight, tighten your abs and back as you lift your hips toward the ceiling.
Lift as high as possible without arching your lower back
Hold for 1-5 seconds for 10-15 repetitions
Repeat 2-3 sets.
Hip flexor raise/ psoas hold
This motion strengthens the psoas, a deep hip flexor muscle that can enhance stride length and minimize injury. This is a win-win situation!
Bend your right knee and raise your upper leg to the sky from a standing position.
For around 30 seconds, balance on your left foot while maintaining your right knee and leg at hip level.
Slowly lower your right leg, then repeat with your left leg.
Remember to maintain your trunk upright during the exercise. Lift your leg less high if your head bobs forward or your trunk rounds.
Fire hydrants
Because the fire hydrant is a bodyweight exercise, you don’t need any special equipment. You just need a mat.
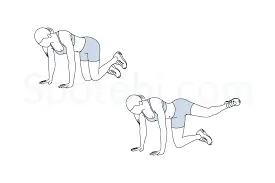
Start on your hands and knees. Place your shoulders over your hands and your hips over your knees. Tighten your core and look down. At a 45-degree angle, lift your left leg away from your torso. Keep your knee at a 90-degree angle. For one rep, lower your legs to the beginning position. Do 3 sets of 10 repetitions. Repeat with the other leg.
Tips
Keep your core and hips stable. Move your hip only. Otherwise, your hips and glutes will not activate properly.
Lifting the leg, point the leg towards the opposite wall. This helps the pelvis rotate properly.
Benefits:
The fire hydrant is an excellent exercise to strengthen the gluteus maximus muscle. Some variations also work to tone and strengthen your abs.
As the largest muscle in the pelvis and pelvic region, the glutes control the three main movements of the pelvis. They include:
Hip extension. A hip extension moves your thighs back and away from your hips. This will allow you to walk and ascend.
External rotation of the hip. This happens when your foot turns outward. To exit the automobile, you employ hip external rotation.
Cock abduction A hip abduction lifts your leg off the center of your body, allowing you to step to the side.
The fire hydrant includes all three moves, making it a great glute workout. This can help your glutes look toned and shaped. Strong glutes also improve your posture, reduce the risk of injury, and reduce back and knee pain.
Modifications:
A fire hydrant with a resistance band:
Fire hydrants can be made with a resistance band loop around each leg. Your glutes and hips are made to work against resistance by the band.
Do this by wrapping a resistance band over your knees. Operate fire hydrants normally.
A fire hydrant with pulses
fire hydrants make it more difficult to increase pulses. When you lift your leg, press 3-5 times. Lower your legs to complete 1 rep.
The quantity of pulses can be increased as you gain strength.
Standing fire hydrant
Like regular fire hydrants, standing fire hydrants strengthen the glutes, hips, and core. They involve a similar hip motion.
This exercise does not stress the wrists, making it ideal for people with wrist pain or discomfort.
You can put your hands on the back of the chair for balance.
Stand with your feet wide apart. Bend your left leg 90 degrees. Bend your body forward and squeeze your core. Raise your legs 45 degrees without moving the rest of your body. For one rep, lower your legs to the beginning position. Do 3 sets of 10 repetitions. Repeat with the other leg. Place the loop of the resistance band slightly above the knees to increase the range of motion.
Side plank clam shells
This is a very effective and efficient hip-strengthening exercise that engages both the hips and the core at the same time. It is not important which side you begin on because you will complete this exercise on both sides.
How to Do a Clamshell Plank
Lie on your left side, legs slightly bent, elbow under your shoulder.
Lift your hips as high as you can while keeping your abs engaged by pressing into your lower forearm.
Raise your upper knee to open your thighs like butterfly wings, then lower the knee carefully to complete one rep. The motion is comparable to that of a clam.
On both sides, Do three sets of 10 repetitions.
Wall sit with Clam Shell
Be wary of the intensity of these hip-strengthening exercises, which will be performed in completely weight-bearing positions.
Wrap a tiny band around your thighs, just above your knees. Place your back against a wall. Your feet should be hip-width apart and flat on the floor, toes forward, and heels about a foot away from the wall.
Bend your knees and slide your back down the wall while keeping your body erect. Lower your thighs till they are slightly above but not parallel to the floor. Maintaining a knee angle greater than 90 degrees will allow you to compress your pelvic floor. Your knees should be parallel to one other, with the band generating stress to try to draw them together.
Tense your inner core muscles and contract your pelvic floor. Continue to contract your pelvic floor throughout the set.
Keeping your feet level, steadily move your knees apart, working against the band’s tension.
Return your knees to the starting position slowly.
Perform 5 to 10 reps of separating your knees and returning to the beginning position.
After you’ve completed all of your reps, slide up the wall to stand back up.
Side Stepping with band
If done correctly, this is another intense hip strength. You’ll need some breathing room for this one.
Place the band slightly above each ankle and wrap it around both legs, keeping it flat and not bunched.
Your feet should be shoulder-width apart. The band should be tight without being strained.
To stimulate the gluteus medius, bend your knees slightly and get into a half-squat position.
Maintain a straight line between your feet and your shoulders, and face forward with your body weight equally distributed over both feet.
Maintaining your half-squat stance, shift your weight over one leg and take a lateral stride with the other. Sideways, move this leg in and out eight to ten times. Throughout the action, keep your hips level. Maintaining a low, forward-facing posture is beneficial throughout this workout. Your back should be straight.
Shift your weight slowly and swap legs. Repeat 10 more side steps.
Resistance band exercises:
Tie the other end of a resistance band to something substantial and wrap it around one’s ankle. Keeping the leg straight, move the legs forward, backward, and to the sides by moving the legs at the hip joint.
Can hang on to a chair to keep one’s balance
Some examples of robust items are a bed frame, the legs of an elliptical machine, a table leg, and so on.
Repeat each exercise 10-15 times each leg (forwards, backwards, and sides) 1-2 times per day. Progression: after the number of repetitions has been increased to 20 and it still feels easy, the resistance of the band may be increased.
Hip Adduction – Ballerina Squeezes:
Instructions:
Take a seat on a cushioned surface, either an exercise mat or a carpeted floor.
Place the exercise ball between your knees while keeping your feet flat on the floor or mat and hip distance apart.
To engage your core muscles, pull your belly button towards your spine.
Use your leg muscles to gently squeeze the ball between your inner thighs. Keep your upper body calm while you complete the exercise.
Keep the pressure in place for three to five seconds while breathing normally.
As the strain is gradually released, your inner thigh muscles should feel at peace.
The number of first-squeeze repetitions should be between 10 and 15. As you get more accustomed to the workout, you may progressively increase the amount of repetitions.
Advice: Be mindful to keep your back straight and avoid arching it when exercising. This facilitates using the relevant muscles in the right way.
Focus on using the muscles in your inner thighs rather than your knees or hips.
Avoid squeezing the ball too tightly since this might be painful for you and strain your muscles.
During the workout, breathe normally rather than holding your breath.
Variations:
Double Squeeze: Maintain the double squeeze while raising your feet just a tiny bit off the ground. Squeeze the ball with both legs. The task becomes a little bit more challenging as a result.
Sitting in a chair with your feet flat on the ground, squeeze the ball between your knees. Squeeze the ball while sitting and tighten your abs to maintain balance.
Include the ball squeeze exercise in your lower body workout regimen to help tone and strengthen your inner thighs. It’s vital to start at a comfortable level of intensity and progressively raise it as you become more acclimated to the activity, just as with any new workout.
Hip flexion with prolonged sitting – Toe alphabet:
Sit on the mat with legs straight in front of you and hands relax on the floor at your sides.
Keep your knee straight and lift one leg from the floor.
Write any letters in the air with your feet.
Monster Walk (Side Steps):
How to do this exercise:
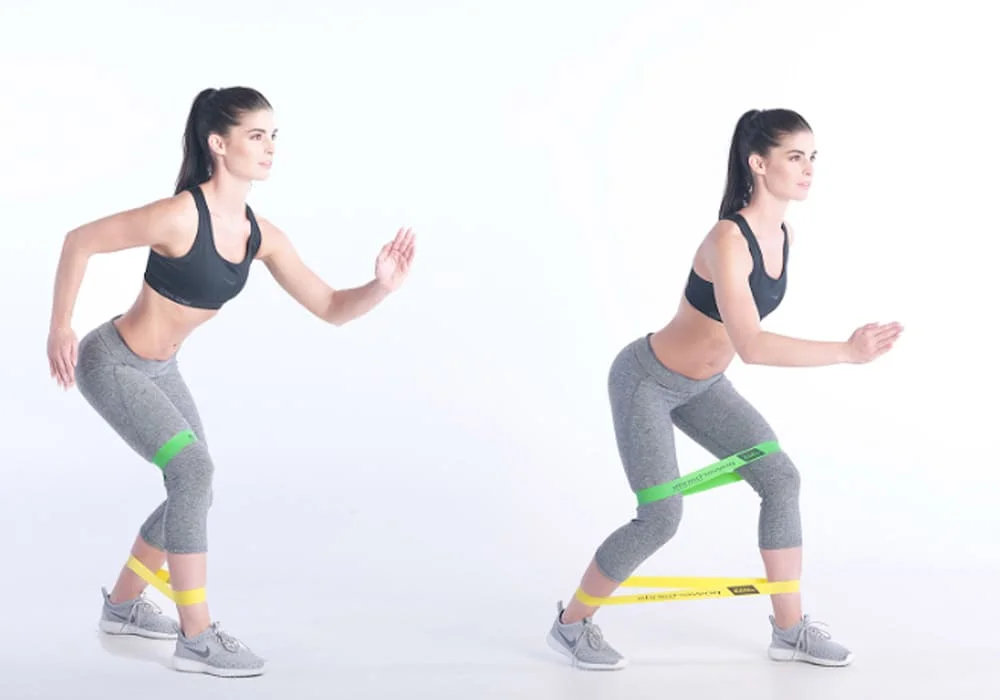
Standing with your feet hip-width apart, knees slightly bent, and toes pointing forward, place a resistance band immediately above your ankles.
Take a step to the left, keeping your upper body upright and your knees slightly bent. Step out just far enough to encounter resistance without stretching yourself so much that your knees buckle.
Continue walking to the left for another 10 to 15 steps. Stop, then take the same number of steps to the right to return to your starting place. There is just one set.
Step 10 to 15 times to each side, beginning with the first set.
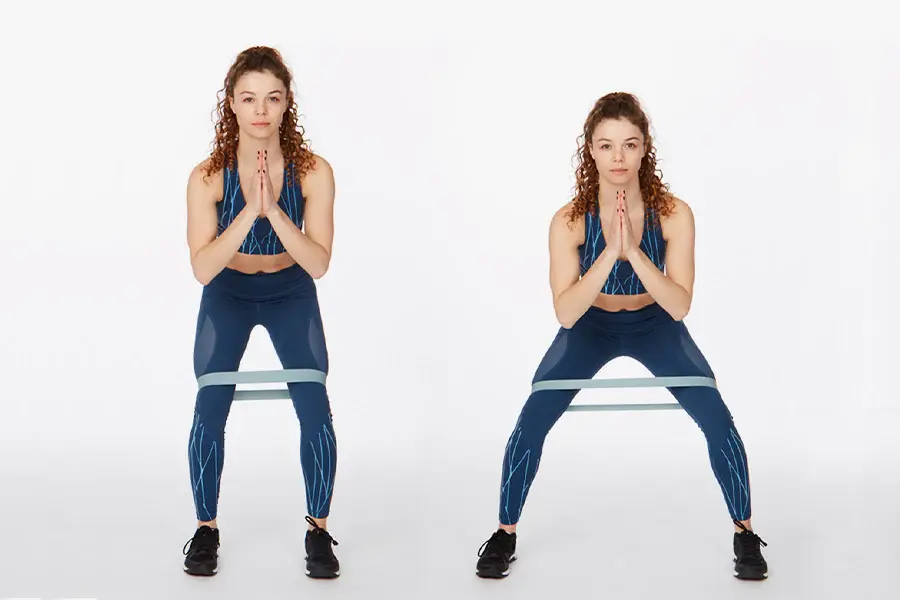
Standing small range squat:
To start, maintain a straight posture and space your heels shoulder-width apart.
Squat as low as is comfortable while allowing your hips to rest and pushing your buttocks back.
then Return to your starting position gradually.
Repeat the standing small-range squat exercise ten times for each set.
once or twice a day, perform three sets.
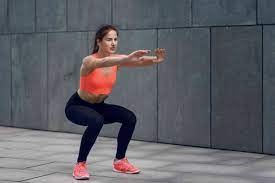
Squats:
Squats target several lower-body muscles. It may be done purely using body weight.
How to put these into action:
Stand with your feet apart.
Maintain a raised chest and engage your abdominal muscles throughout your workout.
Lower your body as though resuming a chair seat by bending at the hips and knees. Maintain your weight on your heels and keep your knees parallel to your toes.
Continue to fall until your thighs are parallel to the floor, or as far as you can without jeopardizing your form.
Pause briefly at the bottom of the squat before pushing through your heels to return to the starting position, fully extending your hips and knees.
The movement should be repeated multiple times.
Tips for performing squats:
Begin with bodyweight squats to work on your technique. Gradually raise your weight as you become more comfortable and powerful.
By keeping your back straight, you may avoid rounding or arching it.
To maintain proper alignment, keep your knees in line with your toes.
Avoid bouncing or using momentum during the whole motion.
Inhale and exhale during it.
Increase the amount of sets and reps progressively as your strength improves.
Squat walks:
Squat using a resistance band tied across the thighs or ankles.
Take a step to the side and then squat when completing the squat.
Take a step forward and squat in the opposite way (essentially, squatting side to side).
2-3 sets of 5-7 repetitions per side
Dead Bug:
Why does it work: This workout targets pelvic stabilization by strengthening your core with the purpose of avoiding tilting your pelvis.
How to do it :
Begin by laying back on a mat on the floor.
Straighten your arms and reach the ceiling.
Form a 90-degree angle with your knees and hips, with your thighs perpendicular to the floor.
Lift your feet off the ground and align your shins with the floor.
Pull your navel towards your spine to flatten your lower back into the mat and engage your core.
Begin by extending your right leg and lowering your left arm towards the floor behind your head, being careful not to contact the ground.
Return to the starting position with your right leg and left arm.
Change sides by extending your left leg and lowering your right arm while keeping your core engaged.
Continue alternating sides until the appropriate number of repetitions is reached.
Exhale as you stretch your arm and leg and inhale as you return to your starting position.
Avoid any quick or jerky moves by keeping your movements calm and methodical.
If you’re new to this exercise, start with a lesser range of motion and progressively increase it as your core strength develops.
Maintain core stability throughout the exercise and prevent your lower back arching allowing your lower back to arch off the floor.
Lunges:
A typical lunge is performed by stepping forward with one leg at a 90-degree angle while maintaining your upper body straight. After completing 10 reps on each leg, you can switch legs. You may progressively increase the repetitions, or you can add resistance by holding a pair of dumbbells.
These are an excellent workout for strengthening your legs in general, as well as the muscles surrounding your knees. Lunges can be performed in a variety of ways, including:
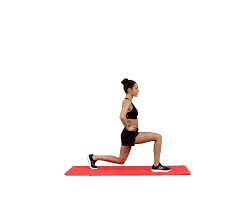
Start by putting your hands on your hips and feet wide at the hips apart.
Step forward with one foot while keeping your upper body straight and your core firm.
Bend both knees till your back knee is almost or just touches the ground. Make a 90-degree angle with your front and back legs.
Make sure your front knee is squarely above your ankle and does not extend past your toes. Your rear knee should only be slightly elevated from the ground.
Apply pressure through your front heel to return to the starting position. Contract your quadriceps and glutes, as well as your front thigh and buttock muscles, to perform the movement.
The lunge should be repeated on the same leg an adequate number of times.
Lunges should be performed on the opposite leg after swapping legs.
Advice on how to perform lunges:
Maintain a straight upper body during the lunge and avoid excessive forward or backward tilting.
Contract your core muscles to keep steady during the workout.
Start with bodyweight lunges and gradually add weights (such as dumbbells) to increase the intensity.
Keep your front knee in line with your toes and prevent allowing it to fall inward.
Move slowly and thoughtfully throughout the workout, avoiding any sudden movements.
Inhale as you lower your body and exhale as you raise it.
Begin with 2-3 sets of 10-15 repetitions for each leg, and then adjust as needed based on your comfort and fitness level.
Side Lunge
This move stretches the inner thighs and groin while building leg and core strength. This is a great compound movement to get you on the right track with your hip recovery.
Start standing with your feet hip-width apart and your abs tight
Lift your left leg out to the side, keeping your knee straight while keeping your foot on the ground
As you reach with your left foot, bend your right knee as if you were squatting
Continue to bring the left leg to the side, pushing the rear back and bending the right leg
Hold for 5-10 seconds and repeat 5 times for 2-3 sets
Repeat with the right leg.
Cossack Squats:
It is a lower-body exercise that targets the quadriceps, hamstrings, glutes, and adductor muscles. It is also known as side-by-side squats. Cossack squats are done in the following manner:
Start by standing with your toes pointed outward and your feet wider than shoulder-width apart. Maintain your hands on your hips or in front of your chest for balance, or stretch them out in front of you.
Start by shifting your weight to one leg and bending that knee while keeping the other leg parallel and stretching out to the side. While lowering your body, try to keep your feet on the ground.
Squat down on the bent leg, maintaining your knee straight, toes pointed, and chest up. The leg that is stretching should be straight and parallel to your torso.
When you’ve achieved the desired depth, take a second to rest before returning to the starting position by pushing through the heel of the bent leg. Simultaneously, extend the opposing leg to the opposite side and repeat the exercise.
Alternate between sides, squatting on one leg while keeping the other leg extended, then returning to the starting position.
Balance exercise:
Balancing on one leg:
Try to lift one foot off the floor while standing on both feet without falling over or losing balance (swaying from side to side, falling forward and/or backward).
Depending on how steady they are, they can use a chair, table/counter, and/or a wall for support. Progression: From utilizing both hands to using only one. One hand to one finger, one finger to nothing. From nothing to closed eyelids.
Hold your equilibrium for 30 seconds to 1 minute before moving on.
Do the exercise on both legs.
3 times per leg, 2-3 times per day
Single-leg balance on an unstable surface:
Standing on one leg increases core stability, strength, and balance.
Be careful and start by standing on a cushion or yoga mat and raising your arms straight out to the side
As you gain confidence and improve coordination, try balancing on a stability disc or BOSU ball
Hold for 3 sets of 30 seconds and repeat on both legs
Support yourself with a chair or cane if necessary.
Single-Leg Balance:
Keep your pelvis neutral and your hips level while you balance yourself on one leg.
Hold for 20 to 30 seconds, or for whatever long it takes you to stay balanced.
By incorporating minor weight shifts, closing your eyes, or standing on an unsteady surface, you may gradually lengthen the exercise’s duration and complexity.
Tandem Stance:
Create a straight line by placing one foot, heel to toe, in front of the other.
Maintaining balance while keeping your arms at your sides is your key concern.
Hold for 20–30 seconds before moving to the front foot on the other side.
Weight Shifts:
Place your feet hip-width apart as you stand.
Transfer your weight from one foot to the other while maintaining level hips.
To test your balance, gradually increase the weight shifts’ range of motion and speed.
Leg raises to the side:
Place your feet hip-width apart as you stand.
Keep your hips level as you slowly elevate one leg to the side.
Repeat on the opposite side, lowering the leg.
On each side, perform 10 to 15 repetitions.
Cardio Exercises for a Hip Labral Tear
There are a variety of aerobic activities that can help treat hip discomfort caused by a labral tear or similar hip injury. Swimming, walking (outdoors or on a treadmill), rowing, and riding on a stationary cycle are some of these workouts.
Swimming
When you have a hip injury, swimming is an excellent form of exercise. Swimming laps in a pool allow you to develop your muscles without the pressure and stress on your hips and other joints that many non-aquatic activities cause. You may also change up your routine by choosing other strokes such as breaststroke, backstroke, and others to keep things interesting.
Walking
Walking is another fantastic aerobic exercise option for anyone suffering from hip discomfort caused by a labral tear. It allows you to engage a variety of muscles across the body while having a mild effect on the joints. Of course, it will raise your heart rate. When walking with an injured hip, however, it is advisable to walk on a level surface. To prevent unpleasant surprises, plan your stroll in an area you are comfortable with.
Treadmill
A treadmill is an excellent way to walk in a controlled setting on a flat surface. Not only will you be able to train your numerous muscles and develop your cardiovascular system, but in the odd event that something does happen, you will be in a safe area – such as your house or a gym – rather than a mile or two down the street wondering how you will get back home.
Rowing
When suffering from hip discomfort, another wonderful cardiovascular training option is rowing a boat or utilizing a rowing machine. Rowing puts a lot of strain on your joints and, when done correctly, may engage a lot of muscles in your hip, such as your glutes and back.
A stationary bike
A stationary cycle is another alternative for getting good cardio exercise. In a safe and regulated atmosphere, the cycle may work on your quadriceps muscles. There is no need to be concerned about traffic, bad weather, or challenging terrain. Instead, you may exercise at any tempo and resistance level you prefer. There are no surprises. There were no unexpected complications.
However, when attempting to treat an injury such as a labral tear in the hip, always see a medical practitioner before beginning a new workout plan.
Gait Training:
Normal Walking: Maintain a normal, pain-free walking style. Your doctor or physical therapist may examine your gait and provide specific recommendations to help you avoid limping or compensatory motions.
Hip Abduction Gait: This exercise can assist in improving hip stability and prevent excessive hip adduction (inward movement).
- Wrap your ankles with a resistance band.
- To develop the hip abductor muscles, walk forward while retaining tension on the band.
Treatment of hip labral tears with physical therapy:
- Physical therapy is the usual conservative method of choice for the treatment of hip labral tears. For these types of injuries, a physical therapist will usually rely on the set of exercises listed in this post.
- They may also use other techniques in hip pain situations where the problem may not be just a labral tear in the hip. For example, they may use passive physical therapy methods such as electrical muscle stimulation, ice, heat, and traction.
- But the treatment for many, if not most, hip problems is exercise. Whether it’s a sprained hip or just an uneven hip, most conservative rehabilitation comes through sensible stretching and exercise.
- A physical therapist can not only treat your condition but also help you prevent future injuries by training you in proper form and using proper warm-up stretches, etc.
Movements to Avoid with Hip Pain
When you’re recovering from a torn hip, there are a few specific movements that can make your symptoms worse or even cause a bigger tear. Try to avoid these movements as much as possible during the healing process to avoid unnecessary setbacks. As you improve, talk to your doctor about agreeing to a higher level of activity.
There are some guidelines to consider when doing exercises to repair a hip labral tear. Certain exercises and movements must be avoided so that they do not burden or damage the hip further.
Keeping this in mind, avoid the following.
Strenuous sports such as football, wrestling, and basketball
Hiking
Running
Lifting heavy weights
Additionally, you should avoid exercises that use rotational movements, such as exercises that rotate the pelvis inward. Also, avoid straining the hip flexors at the front of the hip. This includes those exercises where the knee is raised to the chest.
Finally, the last thing to remember is not to wait for treatment. More frequent waiting leads to deterioration, especially in both acute and chronic sports injuries, both of which are common causes of hip injuries.
Any movement that increases hip pain (outside of general discomfort) or other abnormalities
A movement that requires a combination of internal rotation and flexion – because it causes the front of the hip to adduct (presses on the arachnoid bone)
Deep bending action; like the death toll
The end result is hip extension
Jumping, running, or other vigorous activity
Sprain or cut during sports activities
Heavy leg lift
Tips for Performing Exercises
Now that you have a good idea of where to start with your exercise program, here are some tips to optimize it to minimize downtime and feel your best.
Combine your exercise program with other activities that promote healing and pain relief – such as massage, heat, and electrical stimulation.
Carefully rotate your posture and pelvic position during daily activities and sleep to avoid unnecessary aggravation.
If you are unsure about your exercise program, physical therapy is always a great option – a physical therapist can guide you through an individualized treatment to maximize your recovery process.
Always use your symptoms to gauge when to change or advance your exercise program, daily activities, and sports.
Prevention:
Preventing a hip labral tear involves maintaining good hip health, reducing the risk of injury, and making lifestyle adjustments to protect the hip joint. Here are some prevention strategies:
Maintain a Healthy Weight: Excess body weight can put additional stress on the hip joint. Maintaining a healthy weight through a balanced diet and regular exercise can help reduce the risk of hip issues.
Stay Active and Exercise: Regular exercise that includes hip-strengthening and flexibility-enhancing activities can help support hip joint health. Include exercises that target the muscles around the hip, such as hip abductors, adductors, and external rotators.
Use Proper Form: Whether you’re engaging in sports or performing daily activities, use proper body mechanics and form. Avoid overstraining the hip joint and muscles with awkward movements or excessive force.
Avoid Overuse: Be mindful of overuse injuries, especially if you participate in sports or activities that involve repetitive hip movements. Take breaks, vary your activities, and allow your body time to recover.
Stretch and Maintain Flexibility: Include regular stretching in your routine to maintain hip flexibility. Focus on stretches for the hip flexors, quadriceps, hamstrings, and hip rotators.
Maintain Good Posture: Proper posture reduces unnecessary stress on the hip joint. Whether sitting or standing, maintain good alignment to support your hips.
Appropriate Footwear: Wear proper footwear for your activities. Shoes with good arch support and cushioning can help distribute pressure evenly across the hip joint.
Listen to Your Body: Pay attention to any signs of discomfort, pain, or stiffness in the hip. If you experience persistent hip pain or discomfort, consult a healthcare provider early for assessment and guidance.
Cross-Training: If you’re an athlete or engage in strenuous activities, consider cross-training to reduce the risk of overuse injuries. Alternating between different sports or exercises can help prevent repetitive strain on the hips.
Properly Adjust Equipment: Ensure that sports equipment, such as bicycles or exercise machines, is properly adjusted to your body to reduce the risk of poor mechanics leading to hip issues.
Consult a Professional: If you have structural abnormalities in your hip, such as femoroacetabular impingement (FAI), consider consulting a healthcare provider or orthopedic specialist for guidance on managing and preventing hip problems.
Best Sleeping Positions for Hip Pain
There is no best sleeping position for hip pain. It varies from person to person, depending on the cause of the pain. Keep changing your position until you find something that relieves your pain. If you sleep on your back, place a wedge pillow under your knees to reduce pressure on your lower back. Side sleepers should use a pillow between their knees and turn to the opposite side to see if that relieves the pain. The pillows keep the spine in the correct position, which reduces hip, back, and knee pain.
How Should a Hip Labral Tear Patient Sit?
There are a few tweaks you may make if your typical sitting position is exacerbating hip labral tear discomfort.
However, the overall objective is to avoid putting your knees too close to your body (pushing your hips into excessive flexion). While seated, try to maintain your knees lower than your hips.
Avoid using low chairs and choose ones that are taller.
Your seat’s base should be tilted such that the front faces the ground.
Place a wedge-shaped cushion under your butt.
Your seat should be slightly reclined.
If none of these modifications work, depending on the activity, you might feel more comfortable standing, kneeling, or reclining on your back.
Can a labral tear heal completely?
The good news is that many of our patients with labral tears become asymptomatic with conservative treatment. The first thing to do is see a physical therapist or orthopedic specialist who will evaluate you and determine if you may have a labral tear.
There are several other diagnoses that can mimic a labral tear, and you’ll want to have a professional evaluate your spine, hip, knee, and ankle mechanics to determine where the symptoms are coming from.
If the symptoms are indeed due to a possible labral tear, conservative treatment may include physical therapy, which may include soft tissue mobilization, joint mobilization, short-term adaptive activities, and targeted exercise, stretching, and mobility first performed by your therapist. and then by your therapist.
Understanding what to expect and what exercises will help you stay on track with your recovery will help you get the best results. In addition, proper treatment of a labrum tear from the beginning reduces the risk of future problems such as joint damage and hip arthritis. Always discuss your hip concerns with a sports doctor or physical therapist. If your symptoms do not improve, suddenly worsen or limit your daily activities, contact a trusted doctor immediately for more information.
What Makes a Hip Labral Tear Worse?
Several factors can aggravate or worsen a torn labrum depending on where the rip is and how serious it is:
sitting cross-legged
stooping down
stair climbing and descending
Running
Cycling
high-impact endeavor
Kneeling with your knees against your chest
carrying out any motion that causes your hips to tilt inward or outward
How Long Does a Hip Labrum Tear Recovery Take?
Before you can completely resume your prior activity levels after a labral tear that does not require surgery, you might need to go through two to four months of physical therapy.
If hip labral repair surgery using an arthroscopic approach is necessary, this time frame is greatly prolonged. The recovery period often lasts between five and six months, however, each surgeon has their unique regimen.
According to a review, hip labral tear therapy is commonly separated into four phases after surgery.
Phase 1 lasts for around three weeks and is largely concerned with reducing your discomfort, safeguarding the area that had surgery, and halting the deterioration of your muscles.
In Phase 2, you gradually regain your strength and range of motion while getting any residual gait irregularities fixed.
Phase 3 can continue to focus on strength for up to four more weeks while also focusing on your balance and general endurance.
After around 12 weeks, running and other impact exercises are reintroduced in Phase 4.
FAQs
What is a hip labral tear?
The hip is like a ball and socket. The socket is called the acetabulum and the ball is the head of the femur located at the top of the femur (leg). A labral tear is damage to the labrum, the delicate tissue that covers the acetabulum.
The labrum helps the femoral head move smoothly in its socket. This allows the pelvis to move without problems or pain. It also acts as a seal to keep the ball and socket together but not touching.
What causes hip labral tears most frequently?
Numerous factors, such as rapid or irregular movement, recurrent stress, or direct damage to the joint, can result in a hip labral tear.
Overuse is a frequent contributor to hip labral tears. Other times, untreated structural abnormalities of the bone might cause harm and worsen over time.
Overuse, severe injuries, or anomalies in the form or position of the hip bones are the usual causes of labral tears.
recurring actions.
Long-distance running, as well as the abrupt twisting or pivoting motions frequent in sports like softball or golf, can cause joint wear and strain that ultimately results in a hip labral rupture.
Is it okay to work out if you have a hip labral tear?
With a hip labral tear, exercise should be done carefully and under the direction of a medical professional or physical therapist. While certain workouts may help recovery, others could worsen the problem.
What workouts should I stay away from if I have a hip labral tear?
Exercises involving significant resistance, high-impact motions, or extensive hip flexion should typically be avoided. Running, squatting deeply, and hard lifting may make the tear worse.
Can physical activity aid in the healing of a hip labral tear?
Yes, particular workouts may be a crucial component of the healing process. Exercises designed to increase hip strength, mobility, and stability help speed up healing and lessen discomfort.
What workouts can you perform without risking hip labral tears?
It is frequently advised to perform gentle hip mobility exercises, hip strengthening exercises (such as clamshells or bridges), and hip mobility exercises. But your condition should be taken into account, and a healthcare professional should recommend the precise workouts.
When I have a hip labral tear, should I stretch?
Stretching has many advantages, but it must be done cautiously and with supervision. To relieve muscular tension around the hip joint without exacerbating the tear, concentrate on mild stretching.
How frequently should someone with a hip labral tear work out?
Your healthcare professional or physical therapist should decide on the frequency and intensity of exercise. You could first begin with low-intensity workouts and progressively step up your intensity as you go.
How Should a Hip Labral Tear Patient Sit?
However, the overall objective is to avoid putting your knees too close to your body (pushing your hips into excessive flexion). While seated, try to maintain your knees lower than your hips.
Avoid using low chairs and choose ones that are taller.
Your seat’s base should be tilted such that the front faces the ground.
Place a wedge-shaped cushion under your butt.
Your seat should be slightly reclined.
What indications of a hip labral tear should I be on the lookout for when exercising?
If your hip pain, stiffness, or a clicking or catching feeling worsens, stop exercising. Tell your healthcare practitioner if you have any negative effects.
After a hip labral rupture, can I resume my prior level of physical activity?
With the right therapy and direction from your healthcare team, it could be feasible for you to resume your prior activity level, depending on the degree of the tear and your particular recovery.
Can exercise alone treat a hip labral tear, or is surgery required?
A hip labral rupture may not necessarily call for surgery. Exercise and physical therapy are examples of conservative therapies that can be used to address many situations. When conservative approaches are ineffective, surgery is frequently recommended.
What part does physical therapy play in the healing of hip labral tears?
Recovery from a hip labral rupture requires physical therapy. In order to help your healing process, a physical therapist may evaluate your condition, provide a personalized training program, and offer advice on safe mobility and posture.
Can yoga or Pilates aid in the healing of hip labral tears?
Hip flexibility and strength can be improved with yoga and pilates. To prevent aggravating the illness, it’s important to find programs and instructors who have expertise working with people who have hip injuries.
Should I massage my hip with heat or ice before or after working out?
Depending on your particular situation, using heat or ice may help you manage pain and inflammation. To find out if ice or heat is better for you and when to use it, speak with your doctor or physical therapist.
Is swimming a healthy kind of exercise for recovering from a hip labral tear?
Hip labral tear rehabilitation can be greatly aided by swimming and water-based workouts. While providing resistance for strengthening, the water’s buoyancy lessens the impact on the joint.
Is cycling safe to perform when recovering from a hip labral tear?
For those with hip labral injuries, low-impact workouts like cycling are frequently a secure choice. To reduce stress on the hip joint, it’s crucial to guarantee optimal bike setup and form.
References:
- Bennett, A. (2023, March 2). Hip Labral Tear Physical Therapy Exercises: 11 Exercises to Improve Your Hip Pain [in 2023] — Movement is Medicine Physical Therapy and Sports Performance Physical therapy in Norfolk. Movement Is Medicine Physical Therapy and Sports Performance. https://www.movementismedicinept.com/blog-physical-therapy-near-me/https/wwwmovementismedicineptcom/hiplabraltearphysicaltherapyexercises
- Exercises for a Hip Labral Tear. (n.d.). Vive Health. https://www.vivehealth.com/blogs/resources/hip-labral-tear-exercises
- Wells, B. (2023, March 16). Easy Exercises for Hip Labral Tears Pain Relief. Better Health Chiropractic. https://betterhealthalaska.com/physical-therapy-anchorage/hip-labral-tear-exercises/
- Labral Tear. (n.d.). Physiopedia. https://www.physio-pedia.com/Labral_Tear
- Sapienza, K. (2021, November 30). Hip Labral Tear – 8 Proven Exercises To Alleviate Hip Pain – Integrative Spine & Sports. Integrative Spine & Sports. https://integrativespineandsports.com/hip-labral-tear/
- 13 Ideas for Opening Hips. (n.d.). 13 Ideas for Opening Hips. https://www.healthline.com/health/opening-hips
- Carter, K. (2022, September 15). The Best Exercises to Prevent and Treat a Hip Labral Tear. Runner’s World. https://www.runnersworld.com/health-injuries/a29425202/hip-labral-tear/
- Hip flexion in long sitting – Alphabet with toes (exercise video). (n.d.). Hip Flexion in Long Sitting – Alphabet With Toes (Exercise Video). https://us.physitrack.com/home-exercise-video/hip-flexion-in-long-sitting—alphabet-with-toes#:~:text=Sit%20on%20the%20floor%20with,the%20air%20with%20your%20toes.
- SportsMed, Y. (2022, October 7). Best Exercises For Hip Labral Tear | Physiotherapists in Toronto | Yorkville Sports Medicine Clinic. Physiotherapists in Toronto | Yorkville Sports Medicine Clinic. https://www.yorkvillesportsmed.com/blog/best-exercise-for-labral-tear
- Prajapati, D. (2023, September 28). 28 Best Exercise For Posterior Tibial Tendon Dysfunction. Samarpan Physiotherapy Clinic. https://samarpanphysioclinic.com/exercise-for-posterior-tibial-tendon-dysfunction/#Hamstring_muscle_strech
- Prajapati, D. (2023, May 24). 8 Best Exercises for Hip Bursitis – Samarpan Physio. Samarpan Physiotherapy Clinic. https://samarpanphysioclinic.com/8-best-exercises-for-hip-bursitis/#Glute_Bridges
- Pridgett, T. (2018, December 31). How to Do a Plank With a Clamshell | POPSUGAR Fitness. POPSUGAR Fitness. https://www.popsugar.com/fitness/how-do-plank-clamshell-45630716
- Luhar, F. (2023, June 9). 11 Best Exercise to Improve Hip Mobility – Samarpan Physio. Samarpan Physiotherapy Clinic. https://samarpanphysioclinic.com/11-best-exercise-to-improve-hip-mobility/#4_Hip_Flexor_Stretch
- S. (2023, August 1). What to Do for a Hip Labral Tear. IMPACT Physical Therapy. https://www.impactphysicaltherapy.com/physical-therapy-for-hip-labral-tear/#:~:text=Hip%20Labral%20Tear%20Exercises,-Physical%20therapy%20for&text=Side%20Stepping%20with%20Resistance%3A%20Otherwise,%2C%20for%2015%2D20%20reps.
- Prajapati, D. (2023, April 11). 7 Best Exercises for Piriformis Syndrome – Stretch & Strength. Samarpan Physiotherapy Clinic. https://samarpanphysioclinic.com/best-exercises-for-piriformis-syndrome/#Knee-to-shoulder_piriformis_stretch
- Exercise for Hip Labral Tears. What to do and what NOT to do. (2021, August 22). Exercise for Hip Labral Tears. What to Do and What NOT to Do. https://www.maksreznik.com/blog/hip-labral-tear-exercises
- Patel, D. (2023, July 25). 40 Best Exercise for Inner Thighs – For Toned and Strong Thigh. Samarpan Physiotherapy Clinic. https://samarpanphysioclinic.com/40-best-exercise-for-inner-thighs/#Ball_Squeeze
- The Best Exercises to Prevent and Treat a Hip Labral Tear. (2022, September 15). Runner’s World. https://www.runnersworld.com/health-injuries/a29425202/hip-labral-tear/