13 Best Exercise For Deep Infrapatellar Bursitis
Deep infrapatellar bursitis is a condition characterized by inflammation of the bursa located beneath the patellar tendon, just below the kneecap.
Exercise can play a crucial role in managing the symptoms of this condition, but it’s essential to choose the right exercises that minimize stress on the affected area while promoting strength, flexibility, and pain relief. In this introduction, we will explore some of the best exercises for deep infrapatellar bursitis, with a focus on improving knee function and reducing discomfort.
Table of Contents
Introduction
Bursae are small fluid-filled pockets or sacs located between bones, muscles, and tendons. They provide cushioning and lubrication, allowing the soft tissues to slide smoothly over each other or over the bone without friction. There are several different types of bursae around the knee. The deep infrapatellar bursa is located below the patella and sits around the patellar tendon, the large tendon that connects the quadriceps to the leg.
Superficial Infrapatellar Bursa – sits in the anterior aspect of the patellar tendon, between the tendon and the overlying skin
Deep Infrapatellar Bursa – Located below the patellar tendon, between the tendon and the tibia (shin). The superficial and deep bursa within the patella are treated as a single unit for all purposes.
The Infrapatellar Bursa protects the patellar tendon during flexion and extension of the knee, allowing it to slide smoothly and freely over the tibia during this movement. Irritation, pressure, or friction of the bursa causes it to produce extra fluid as a defense mechanism to prevent damage that causes bursitis. The bursa gradually swells and can thicken and harden if left untreated. In extreme situations, calcification can occur in the bursa.
Causes of Deep patellofemoral bursitis
Excessive wear and tear from repetitive stress or excessive activity: Without exercise or activity, the muscles can weaken and your knee no longer has the muscle support it needs to move properly. This can put too much stress on your knees and hips, or your weight can be unevenly distributed between your knee joints. Uneven weight distribution puts extra stress on some areas compared to others, resulting in abnormal wear in stressed areas.
Acute trauma: A direct blow to the top of the tibial knee during athletics can cause injury to the infrapatellar bursa or a fall on the knee. In such cases, blood can leak into the bursa, causing irritation, inflammation, swelling, and pain.
Infection (septal bursitis) – The closer the bursa is to the surface of the skin, the more likely it is to become infected with certain bacteria that are usually found on the surface of the skin. This infection is known as septic bursitis, and the common bacteria that causes this infection is known as Staphylococcus Epidermis (or Staphylococcus aureus).
Repetitive kneeling or crawling: When kneeling, excess pressure travels through the knee, compressing it. This causes the bursa to become thick and swell.
Knee conditions: Infrapatellar bursitis often develops secondary to other knee problems, most commonly jumper’s knee (patellar tendinitis) and Osgood Schlatter’s disease.
Symptoms of Deep Infrapatellar bursitis
Symptoms of Deep infrapatellar bursitis usually develop gradually over a period of weeks or months and include:
Swelling around the knee: Swelling around the front of the knee is common with infrapatellar bursitis. There may be a pliable pocket of fluid in the front of the lower leg, just below the kneecap, that is tender to the touch.
Knee pain: Deep infrapatellar bursitis pain is usually felt in the front of the knee, just below the patella, which causes pain below the knee. the pain extends to the anterior aspect of the leg. deep Infrapatellar bursitis pain is usually worse when bending the knee and climbing stairs. The knee is very painful because it compresses the bursa
Redness and warmth: There may be redness at the front of the knee, especially with septic infrapatellar bursitis, and the skin may feel warm to the touch.
Difficulty sleeping: Bursitis often affects sleep, often accompanied by awakenings due to waves of pain caused by bending the knee or falling while sleeping.
Knee stiffness and weakness: Knee pain can cause less use of the knee, which over time can lead to joint stiffness and weakness.
Fever as a symptom of deep infrapatellar bursitis: People who suffer from septic infrapatellar bursitis also suffer from fever and an increased white blood cell count due to organisms in the knee joint.
Exercise for Deep patellofemoral bursitis
Calf muscle stretch
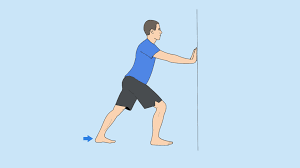
Calf stretching can really help reduce knee pain and improve flexibility. The sole consists of two muscles at the back of the leg. The larger muscle, the gastrocnemius, begins just above the knee, and the soleus begins below the knee. Face the door frame. Wedge the foot of the affected leg so that the ball of the foot is flat against the frame and the heel is on the floor. To prevent slipping, shift your entire body weight onto your wedged foot. Keep the affected knee straight.
Move your hips toward the jam. You will feel a stretch in your muscles (posterior aspect of your leg). Increase the stretch by slightly arching your lower back and bending forward. Make sure the buttocks are in line with the legs; don’t let your buttocks show. Press the ball of your foot hard against the door frame and hold for about five to ten seconds. Release the pressure and lean forward. Turn between times as you push the ball of your foot against the frame, release, and lean forward. Continue for 90 seconds. Pause and slowly come out of the position. If necessary, repeat the stretch on the other leg.
Towel hamstring stretch
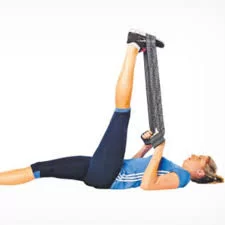
For the towel hamstring stretch you need a towel and follow these steps:
Lie on your back, wrap a towel around the back of one thigh, and support your thigh by holding both ends of the towel. If you don’t have a towel, you can use a resistance band to hold your foot.
Keep one foot on the floor. Slowly extend your knee until you feel a stretch in the back of your thigh, trying to make your lower leg parallel to the ceiling. Extension of the hip and extension of the knee only until the stretch is comfortable. Hold the stretch position for around 15-20 seconds and gradually increase the hold duration to around 30 seconds. Try this stretch on each leg, one at a time, 4-5 times for one full set.
Aim to do two sets a day. There are many techniques available to stretch the hamstrings at the back of the thigh, and it is important to choose an approach that is comfortable and does not aggravate the sciatic nerve. Standing hamstring stretches can provide a deeper stretch, so they should be done with care and proper posture, especially for beginners. Once mastered, these stretches can be done anywhere and do not require a chair or other aids. Stretching the heel joint while standing may also be more appropriate than lying down, sitting, and/or standing may be difficult during injury or pregnancy.
Quadriceps muscle stretch
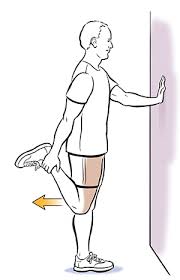
The quadriceps (quadriceps) is a large muscle group located on the front of the thigh. The purpose of these muscles is to straighten the hips and extension of the knees. Tight quads can cause knee and back pain and even injuries.
Quad stretching after a lower body workout is the key to healthy, flexible, and stress-free quads. Make sure you do warm-up exercises for the muscles before you start stretching. Hold the stretch around 15- 30 seconds on each side and deepen the stretch gradually and carefully. Avoid excessive stretching of muscles.
Place the end loop of a resistance band or belt around your ankle behind you. Lie on your stomach on the bed or floor in the most comfortable position for you. Raise your legs and place a resistance band or belt on your shoulders. Gently pull on the resistance band or belt until you feel a stretch in your quads. Make sure your leg is coming straight up, not pointing in or out. Hold the set time and repeat on the other leg.
Heel slide
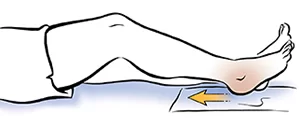
Heel slides are simple leg exercises that involve extending the leg away from the body, bending the knee, and sliding the heel towards the butt. You can do the heel slide using a bed, floor, or wall. Heel slides are often recommended after knee surgery the regain the mobility of the knee joint. The main goal of the heel slide exercise is to increase the range of motion or mobility of the knee joint.
They also help strengthen and stretch the tissues surrounding the knee and leg muscles. This is an important part of the recovery process and helps prevent further injury. There are several heel exercises you can try. You can try or add one or more variations according to your needs. Each variation targets slightly different muscles.
You can experiment with toe placement. Point your toes or pull your toes back toward your shins. Or turn your toes both ways. Lie on your back with your legs extended and feet slightly apart. Slide the affected leg as close to your buttocks as possible. Hold this position for 5 seconds. Press the heel back to the starting position. Heel slides are often used to rehabilitate the body after surgery or injury. They are an easy way to keep your body active, especially if you are not fully mobile. Heels increase the range of motion of the knee, which helps improve mobility, flexibility, and flexibility.
Variations of heel slide
Abduction and adduction heel slides
Seated heel slides
Chair heel slides
Wall heel slides
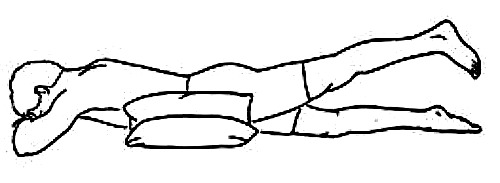
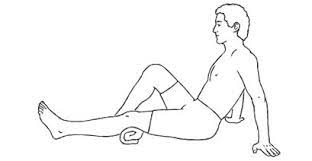
Straight leg raise
To perform straight legs, you do not need any special equipment except for a room where you can freely lie on your back. The workout takes about five minutes from start to finish and is usually done three to four times a day along with other additional exercises.
It is often better to do straight legs on a plinth or mat compared to on a soft surface. Soft surfaces can harm the position of your hips, causing them to twist or sink instead of staying neutral. To start the straight leg: Start with a supine Lying position on the plinth or mat with your hips straight and your feet comfortably flat on the floor.
Do flexion of the knee of the uninjured knee to a 90-degree angle and place the foot on the surface of the plinth. Stabilize the rectus femoris muscles by contracting or squeezing the quadriceps (muscle group in the anterior aspect of the thigh). Inhaling slowly, lift your straight leg six inches off the ground. Hold for three seconds. do expiration slowly, and back to the starting position with proper balance. Relax and repeat ten more times.
If done correctly, you will feel the tension in your hips, thighs, and abs throughout the movement. If you want to make straight legs more difficult, add a small dumbbell weight to your leg. Start by placing the weight on your thighs and lower it to your ankles as you get stronger. This helps reduce torque around the hip and knee and protects them from injury. A physical therapist can help determine the right weight for you.
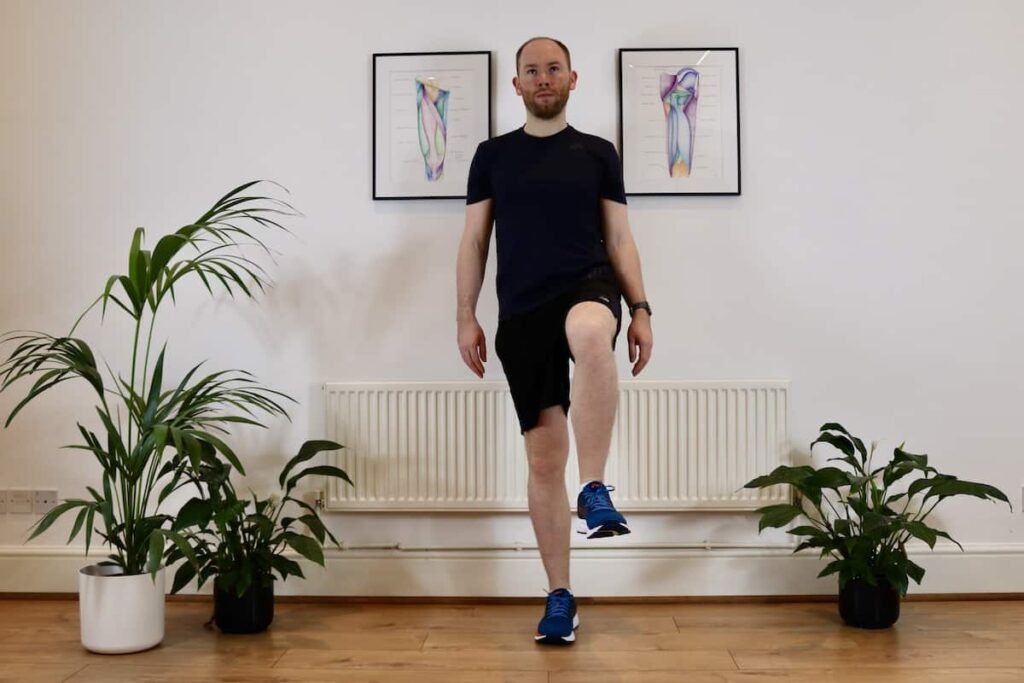
Side leg raise

Side leg raises involve abduction of the hip joint or doing the hip away from the normal position. This is a great and easy way to build strength in the outer thighs and hip abductors, including the gluteus medius and minimus. You can do it lying down or standing up using only your body weight. This makes it easy to sneak almost anywhere with a few reps. Standing leg lifts are an extremely versatile exercise because they can be done almost anywhere, even while standing and waiting. You can choose a chair or other support for better stability. Start with your hands in front of you or rest on your hips.
Stand tall, toes forward. As you lift your right leg off the floor with your leg bent, inhale and shift your weight to your left leg. As you exhale, bring your leg back down to the left. Repeat five to ten times and then switch to the other side and gradually increase the repetition according to your strength. Try to keep your legs straight. This will help you get the most out of your workout and prevent back strain. Make sure your hips and knees are in the same alignment and your knees are not locked. They should be soft and relaxed during exercise. Keep your body and back straight during the exercise.
Variations for side leg raises
add ankle weights
Use resistance bands or tubes
Use both weights and resistance bands
side plank with the side leg raises
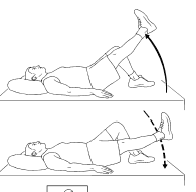
Prone leg raise
Lying legs is an exercise that targets the hamstrings, mainly the gluteus. This exercise is usually done with the prone lying position on the plinth or the mat. A person does hip lifts by contracting the hip muscles and raising the legs parallel to the body in the air. For this exercise, you should take a prone position with both hip extensions and knees in flexion and both hands at your side or down on your forehead for support. Gently tighten your core muscles while holding your abdominal muscles, you should breathe normally. Abs should be engaged and knees should be straight.
Then gradually hyperextension of the hip joint as much as you can. The knees should be in an extension position, the thighs should rise from the surface of the plinth. Hold the leg straight up in the air for a few seconds and then slowly lower the leg back to the floor. Make sure you avoid trick movement of the hip when you do hyperextension of the hip. Do this exercise for 10-20 repetitions and then repeat this exercise on the other leg. Make sure there is at least a 48-72 hour break between the other session of the prone leg raise (it allows the muscles to recover).
You can also wear resistance, such as a Thera band wrap, over the ankle in front of you, this adds resistance and adds challenge to the abdominal leg raise. You do this exercise once or twice a day, and it is a good idea to visit your nearest physiotherapist to check the frequency of the exercises according to the condition of your legs or back.
Single leg stance
The benefits of this exercise can improve your balance and athletic performance, and help you avoid falls that can cause serious injury. Stand tall with your feet together. Be safe during the test; Keep a stable object nearby, such as a chair or kitchen table, to hold on to if you feel unsteady. Lift one leg off the ground.
Try to hold the lifted leg which provides stability to your muscles. Look at the clock, how many seconds you can stand on one leg, and note that number.
If you can stand on one leg for at least 60 seconds, try the one-legged stance, standing on a soft surface, such as a pillow. Once you have this baseline test, practice the one-leg balance exercise. As in the test, stand behind a chair or next to something stable. For support, you can hold the chair. Lift one leg off the ground, slowly. you should manage balance by standing on one leg for five to ten seconds. and then back to the starting position and repeat five to ten times. Try to increase the duration of the hold of exercise. Do it on the opposite leg.
Seated knee extension
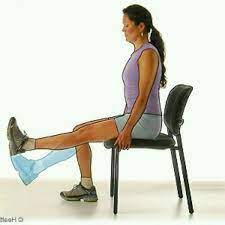
The seated knee extension is exactly what it sounds like – a single-joint isolation exercise performed to strengthen, stretch, or train the muscles involved in knee extension. Seated knee extensions require a seat (preferably without arms) and enough room to fully extend one leg forward. Used as resistance training, a diagnostic tool, and a rehabilitative prescription, the seated knee extension is the definition of versatile movement. Seated knee extensions require a seat (preferably without arms) and enough room to fully extend one leg forward.
To perform seated knee extensions, you need to sit in a chair with your hips and back firmly in place, both feet flat on the floor, and your toes pointed forward. Then grab both sides of the seat for support and extend one leg until your lower leg is approximately parallel to the floor or until you reach the limit of motion.
Remember that the only moving joint is the knee and the hips should not contribute dynamically to this action. Hold this position for several seconds squeezing your quadriceps before placing your foot back on the ground. The seated knee extension will stretch the knee joint as you add weight to this exercise, so it will strengthen the hip muscles.
Wall squat

The wall squat, also known as the wall sit, is a bodyweight exercise that targets your core and lower body muscles. When practicing wall squats, start from a standing position with your feet shoulder-width apart and your back against a wall. Lower into a sitting position with your knees bent at a 90-degree angle. Keep your lower back firmly against the wall and hold the position for a certain amount of time.
If the exercise turns out to be too strenuous, you can relieve the tension in the lower back by practicing an exercise called the ball squat. This variation follows the same steps, but an exercise ball or stability ball is placed between the lower back and the wall. If you want to increase the intensity of your exercise, consider doing single-leg wall squats or dumbbell wall squats. Begin wall squats by doing two to three sets of 30-60 seconds.
Choose a duration that allows you to maintain good technique throughout the set. Stand with your back against a strong wall and walk your feet forward. The feet should be shoulder-width apart. drag your back on the wall until your thighs are parallel to the surface. The knees should be above the ankles. Distribute your weight should be equal and keep your feet on the surface to develop a stable position of your body. Your upper body and head should lean against the wall. The chin should remain tucked in throughout the movement as if you were holding an egg under your chin.
Keep your shoulder abducted or you can get help from your physiotherapist (by holding the patient’s hand). Stand up, stretch, and repeat as many sets as you want. Do three to five repetitions of the wall squat and increase the repetitions of the wall squat.
Hip adductor stretch
These hip joints are a group of muscles on the inner thigh. This stretch is also used during warm-ups to prepare the muscles for other exercises. It is important to try to relax during strenuous exercises. Don’t hold your breath. Instead, focus on slow, deep breathing as you try to stretch a little more. This stretch can be done in two different ways – lying on your back or sitting on the floor.
We recommend lying on your back.
Remember to keep your toes toward the ceiling and your knee straight. Slowly move your leg to the side until you feel a pleasant stretch in your groin. Try to hold for 30 seconds. Slowly return to the starting position. We recommend sitting on the floor. Another measure is We recommend sitting on the floor or firm surface. Bring your legs together and sit with your back straight.
Place your hands on your knees. Slowly press your knees to the floor until you feel a pleasant stretch in your groin. You can hold the stretch for around 10-20 seconds which provides pain relief. Slowly return to the starting position.
Resiatance band walking
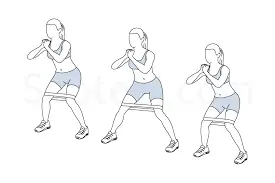
The resistance band walking exercise is a specific benefit for any athlete who plays this sport such as running, jumping, pivoting, and twisting. A weak gluteus medius—one of the muscles situated posterior aspect of the hip—can reason of problems the knee joint pain. Performing the resistance band walking exercise provides the protection of the knee by training correct movement patterns at the knee joint so it doesn’t cave in or out.
The tape should be taut but not tight. Bend your knees slightly and do a half squat to activate the gluteus medius. Keep your feet in line with your shoulders and face forward so that your body weight is evenly distributed on both feet. Maintain a half squat, shift your weight over one leg, and step to the side with the other leg.
Move that leg in and out to the side eight to ten times. Keep your hips horizontal throughout the movement. With this exercise, it helps to maintain a low, forward-facing position. Your back should be straight, not round. Shift your weight slowly and switch legs. Take another eight to ten side steps.
Static quadriceps exercise(SQE)
Static quadriceps exercise (SQE) is also known as isometric quad exercise. This is a good exercise to treat knee bursitis, which causes knee pain. A static quadriceps exercise is an exercise in which the muscle contracts steadily without noticeable movement. joint This exercise contracts and strengthens the quadriceps.
The quadriceps muscle is the main muscle for jumping, cycling, and running as sports activities. In everyday life, this muscle helps you get up from a chair, walk, climb stairs, and squat. Start with the uninjured leg. Sit on the floor or bed.
Pull your toes up toward your shins and press your knee into the bed or floor to stretch your quads. This should get your heels off the bed a bit. (You can also place a small towel under the training knee). You can feel the contraction in your muscles while in between this exercise. Hold for five to ten seconds. Repeat ten times. Repeat on the affected leg. Do this exercise three to five times a day or as directed. If you feel pain during the exercise, you can stop the exercise abruptly. If your doctor has told you to rest, you can also stop exercising. If exercise increases pain.
Step up exercise
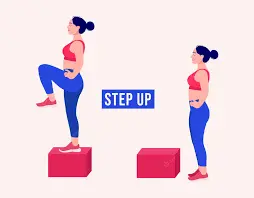
The effectiveness of lifting comes from the fact that it is a unilateral exercise, that is, the exercises are performed on one limb at a time. Not only does this help equalize muscle and strength imbalances between the legs, but the instability it creates also increases muscle mass throughout the body. Mainly quads and gluteus, but also hamstrings, calves, and core. Stand tall with a dumbbell at your sides and place your right leg on the bench so that your hips, knees, and ankles are all bent 90 degrees.
Keeping your chest up and shoulders back, push your torso up with your right leg until it’s straight (keep your left leg up). Pause and then lower your body back to the starting position with control. Do equal repetitions with both legs. Remove the dumbbells and perform movements using only your own body weight, or replace the bench with a box or aerobic step. A normal weight makes your exercise easy.
VMO
Vastus medialis exercises are a great way to improve knee stability and function, reduce knee pain, and reduce the risk of cartilage damage. Most people with chronic knee pain have a weak response in the medial muscle. This changes the way the knee moves, and how force is transmitted through the knee, and puts too much stress on the inner knee.
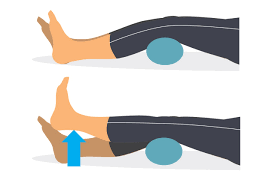
The vastus medialis muscle is the largest of the four quadriceps muscles in the front of the thigh. Lie on your back with a wrapped towel under your knees and place the ball between your knees.
Gently squeeze your glutes and ball, then lift one heel off the floor until your knee is straight. Squeeze the ball and hold for 3 seconds, then slowly lower your leg. Repeat ten times, gradually increasing the number of repetitions as you get stronger, aiming for 25. Vastus medialis and vastus medialis oblique are part of the same muscle, so there is no need to do different exercises for each part. But you want to make sure the VMO is properly activated.
Prone trerminal extension
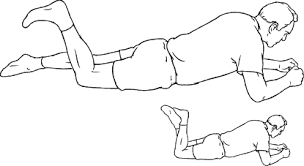
This exercise is the starting point for many post-operative knee rehabilitation programs. It can also be used when there are inflammatory problems in the knee, which prevents full strength at that time. It is also a way to isolate and focus the vastus medialis oblique muscle, which is important for patellar stability. Lie face down and place a towel or foam roller under your lower leg.
Lift your knee off the floor by squeezing your quadriceps.
Squeeze the knee as much as possible and hold it for about four to five seconds or for the agreed time.
Release the contraction slowly and continue the set.
Push the quads all the way out.
Repeat until you have completed the set. If done correctly, you will feel a “burner” or fatigue in the leg muscles while performing the exercise. The hanging exercise can be done several times a day to improve the memory of knee extension. It’s a simple but effective way to stretch your knees and improve overall function while walking, sitting, standing, and climbing stairs.
How Can a Physical Therapist Help?
Your physical therapist designed an exercise program. Your program includes exercises and treatments that you can do at home. Physical therapy can help you return to your normal lifestyle and activities. The time required for recovery from knee bursitis varies, but results can be achieved more quickly if you follow a proper anti-swelling, stretching, and strengthening program.
In the first 24 to 48 hours after diagnosis, your physical therapist may recommend you:
Apply light pressure to the area by wrapping the knee with a bandage in a certain manner. Rest the area, avoiding activities that cause pressure or pain in the knee. Use ice packs at a certain frequency and for a certain period of time. Ask your doctor about additional services, such as medications or diagnostic tests. The goals of physiotherapy are:
Reduce pain.
Improve your mobility, strength, flexibility, and endurance. Helps you get back to the things you want to do. After the initial treatment described above, the physiotherapist will work with you to:
Reduces pain and swelling.
If repetitive activities have led to knee bursitis, your physical therapist will teach you how to avoid or modify them so recovery can begin. They may use different treatments in the clinic (such as machines that use heat, light, or sound) to control and reduce your pain and swelling.
Improve movement.
Your physical therapist will choose specific activities and treatments to help restore the normal range of motion. They can start with “passive” movements that they do to gently move the knee joint. You promote active exercises and stretches for yourself.
Improves flexibility.
Stretching exercise can provide flexibility to the tightened muscle which is situated around the knee joint. They start by helping you tighten them and teach you how to tighten them yourself.
Improve strength.
If your physical therapist finds weak or damaged leg muscles, he or she will teach you the right exercises to restore strength and flexibility.
Improve endurance.
Regaining the strength of the hip and knee muscles is necessary after injury. Your physical therapist will be focused on the strength of your muscles with the help of strengthening exercises.
Improve balance.
Regaining your knowledge of balance which is necessary after any injury. Your physical therapist will teach you exercises which is useful to improve your balance skills.
Restore agility.
Speed and accuracy of foot movement are important in sports. Your physical therapist can help you regain these skills as you prepare to return to sports.
Learn a home program.
Your physical therapist will teach you strengthening and stretching exercises that you can do at home. These exercises are tailored to your needs. If you do them as directed by your physical therapist, you can speed up your recovery.
Back to activities.
A physical therapist will discuss your activity goals with you. They use them to set recovery goals for work, sports, and home life. Your treatment program will help you achieve your goals in the safest, fastest, and most effective way. Your physical therapist will also teach you exercises, work retraining activities, and sport-specific techniques and exercises to help you reach your goals. Fast recovery time. Your physical therapist is trained and experienced in choosing the best treatments and exercises to help you: Get well safely. Go back to your normal lifestyle. Achieve your goals faster than you are likely to achieve on your own.
How Is Deep Infrapatellar Bursitis Treated?
There are several options for treating deep infrapatellar bursitis:
Rest: Avoid activities and exercises that stress the knee. The stock market needs time to recover. If you don’t rest, the deep infrapatellar bursa becomes irritated and inflamed and takes longer to heal
Keep the pressure off: Keep as much pressure off the knee as possible – try to avoid kneeling or crawling. If you must kneel, wear knee pads or kneel on a pillow. And it can really help to make some simple adjustments when going up and down stairs, especially if it hurts
Cryotherapy: Regular application of ice to the front of the knee can help reduce pain and inflammation from infrapatellar bursitis, but it’s important to follow the recommended guidelines – visit Ice the Knee for more information.
Treatment of deep infrapatellar tendinitis: fluid can be removed from the inflamed bursa – this is called aspiration.
Medications: Your doctor may recommend that you take non-steroidal anti-inflammatory drugs (NSAIDs) to reduce the pain and swelling associated with bursitis.
Aspiration: Your doctor may use a needle and syringe to remove excess fluid from the deep infrapatellar bursa. They may simultaneously inject corticosteroids into the bursa to reduce pain and swelling
Physical Therapy: Strengthening exercises and stretches are an important part of deep infrapatellar bursitis rehabilitation to restore full strength, mobility, and function to the knee.
Surgery: If symptoms persist despite treatment, your doctor may recommend surgery to completely remove the bursa, but this is usually only done as a last resort. One of the main goals of infrapatellar bursitis is to reduce fluid in the bursa that can leak into the knee. There are many different options for treating knee swelling that can help.
Avoid activity while Deep patellofemoral knee bursitis
Avoid high impacts.
If you are prone to knee bursitis, it is best to avoid vigorous activity. This includes things like running, jumping, and sports. If you do this activity, take frequent breaks and stretch well before and after. Low-impact activity is a better option for people with knee bursitis. These include walking, swimming, and cycling. Try to find an activity you enjoy so you’re more likely to stick with it.
Deep patellofemoral Knee Bursitis Prevention Tips
To prevent knee bursitis or keep it from coming back, try:
Wear sturdy shoes that fit well and provide good cushioning.
When looking for a new pair of shoes for knee bursitis, make sure you get sturdy, well-fitting shoes. Good padding is also important to reduce the impact on the joints. Several types of footwear can be useful in treating knee bursitis. Running shoes or cross trainers are usually a good choice as they offer good support and cushioning.
Stretching before and after exercise.
stretching exercise provides prevention of bursitis. Remember to warm up with light stretching before starting the exercise. It helps to relax the muscles and joints of the legs. After your workout, don’t forget to cool down a bit by stretching. This helps reduce the risk of inflammation and pain around the knee joint. Static stretches are a good choice for warming up and cooling down.
Avoid high impacts.
If you are prone to knee bursitis, it is best to avoid vigorous activity. This includes things like running, jumping, and sports. If you do this activity, take frequent breaks and stretch well before and after. Low-impact activity is a better option for people with knee bursitis. These include walking, swimming, and cycling. Try to find an activity you enjoy so you’re more likely to stick with it.
Use a knee pad or other support.
It’s a good idea to use some kind of support if you’re doing an activity that could potentially cause knee bursitis. This can be anything from knees to braces or a wrap. This will provide support to your knees and decrease the risk of developing bursitis. You can try several different forms of support. Knee pads are a good choice for activities such as cycling or skateboarding. If you play sports, a brace or wrap can help stabilize the joint and prevent further injury. Be sure to talk to your doctor about which support is best for you.
Give yourself time to rest and recover.
If you start to feel pain and swelling around your knee, it’s important to take some time off from your normal activities. the rest provides muscle relaxation. You may need to ice the area for 20 minutes several times a day. You can also take over-the-counter pain relievers such as ibuprofen or acetaminophen to reduce inflammation and pain. If the pain is severe or lasts more than a week, it is worth seeing a doctor. They may prescribe stronger medications or offer other treatment options.
A note from Samarpan Physiotherapy Clinic
If you have deep patellofemoral bursitis condition which becomes the reason for pain and also makes it hard to move, you can visit our Samrpan clinic If you are not able for that you can read the whole article which provides you with knowledge about the condition provides solutions for this condition. That means you can easily get the care you need through our article, when and where it works for you.
Through our program, you will have access to therapeutic exercises and stretches appropriate for your condition. In addition, you will have a personal care team to guide, support, and customize our program for you. This article and its contents are for educational and informational purposes only and do not constitute medical advice or professional services related to you or your medical condition.
Risk factors for deep patellofemoral bursitis condition:
The following factors are considered risk factors for the development of deep infrapatellar bursitis:
Repetitive kneeling: Kneeling puts pressure on the knee and prepatellar bursa. People who kneel frequently, especially for work, are more likely to develop deep patellofemoral bursitis.
Rheumatoid arthritis and/or gout: If you have rheumatoid arthritis and/or gout, you are more likely to develop deep patellofemoral bursitis.
Playing contact sports: Certain sports such as football, wrestling, rugby, and basketball can cause strong knees that can lead to prepatellar bursitis.
Immunosuppressive condition: Conditions that weaken your immune system, such as diabetes, increase your risk of getting an infection that can cause deep patellofemoral bursitis.
FAQ
How to get rid of deep infrapatellar bursitis?
Initial treatment for deep infrapatellar bursitis includes avoiding activities that cause pain or stress to the infrapatellar bursa and associated tendons (jumping, running, and kneeling). Using ice to reduce inflammation and pain. In severe cases, fluid drainage into the deep infrapatellar bursa.
Is exercise good for knee bursitis?
Start the gradual stretching and then strengthening exercises to treat knee bursitis. If you have knee bursitis, heels, straight leg raises and quads are good exercises.
What is the fastest way to treat deep infrapatellar bursitis?
Apply an ice pack to the knee for 20 minutes several times a day until the pain subsides and the knee no longer feels warm to the touch. Use the package. Using compression or a knee sleeve can help reduce swelling. Lift your knee.
What exercises should be avoided with deep infrapatellar bursitis?
Ischiogluteal bursitis
That means all transplant exercises like the rower, recumbent bike, and some bench presses. Deep squats, bent-over rows, Romanian deadlifts, and sometimes bridge exercises should be avoided due to deep flexion.
Does sitting make bursitis worse?
The main symptom of hip bursitis is pain. Other symptoms of hip bursitis may include swelling of the hip. Bursitis pain usually gets worse when sitting or lying down. The pain may also increase when you do repetitive activities, such as climbing stairs.