Exercises for wrist pain: Mobilization, Stretching and Strengthening Exercise
Exercises for wrist pain is one of the most important part of treatment for permanent resolution of wrist pain. After wrist pain, muscles around wrist become stiff and weak. So Physiotherapist recommended few exercise that helps to make your wrist more powerful and strong enough to perform all your activity easily without any extra efforts.
If you are sportsmen or performing high intensity wrist movement in day to day activity then proper rehabilitation exercise program after relieving wrist is crucial for permanent solution. In this article we update best exercise you can do at home, however you must consult Physiotherapist before starting exercise is advisable.
Table of Contents
What is wrist pain?
- This condition is very common with various causes. The wrist joint plays a major role in basic motions, starting from texting to writing. However, when the pain occurs, it can interfere with day-to-day life activities and even affect a person’s quality of life. The hand, as well as the wrist, forms a group of complex, very delicately balanced joints which are considered the most active part of the upper extremity. Optimal overall function is important to so many activities of daily life.
- Wrist pain is mainly caused by sprains or even fractures from sudden injuries. Still, wrist pain may also result from long-term problems, namely repetitive stress, arthritis, and carpal tunnel syndrome.
Electrotherapy treatment to reduce wrist pain
Ultrasound: Ultrasound is mainly used to reduce pain and swelling
TENS(Transcutaneous electrical nerve stimulation): TENS modality is mainly used for the reduction of pain and inflammation.
Deep therapy: Use to decrease the pain
Exercises to reduce wrist pain
- Different exercises help the patients to reduce pain, improve range of motion, decrease inflammation, and redness and strengthen the muscles.
Stretching exercises
- some benefits of stretching exercise
- Stretching exercise may improve the performance in physical tasks, decrease the risk of injuries, help the joints move through their full range of motion, enhance muscle blood flow, enable the muscles to work most effectively, and improve the ability to do daily tasks.
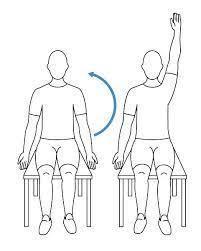
- Praying position stretching
- Tell the patient to take a standing position, and place the palms together in a praying position. Have the elbows touch each other. The patient hands should be in front of the face. The patient’s arms should be touching each other from the tips of the fingers to the elbows. With the palms pressed together, slowly spread the elbows apart. Do this exercise while lowering the hands of the patient to waist height. Give the command to the patient to Stop when the hands are in front of the belly button or the patient feels the stretch. Hold the stretch for 30 seconds, then repeat three times per session and do three sessions per day.
- Wrist extensors stretching
- Give the commands to the patient to extend the affected arm in front of the patient at shoulder height, and keep the palm down, facing the ground. Relax the wrist so that the fingers point downward. With the free hand, gently grasp the fingers and pull them back toward the body. Hold for 30 seconds per repetition. Do three times per set in one session. Three sessions per day.
- Clenched fists
- Tell the patient to take a sitting position, and place the open hands on the thighs with palms up. Close the hands slowly into fists, but do not clench the fingers too tightly. With the forearms touching the legs, raise the fists off of the patient’s legs as well as back toward the patient’s body, bending at the wrist. Hold for 30 seconds. Lower the fists as well as slowly open the fingers wide. Repeat three times per session. Do three sessions per day.
- Hooked stretching exercise
- First of all, to do this stretching exercise, hook one elbow under the other as well as pull both arms towards the center of the torso. The patient should feel a stretch in the shoulders and wrap one arm around the other arm so that the palms are touching each other. Hold the position for 30 seconds, with three repetitions, as well as do three sessions per day.

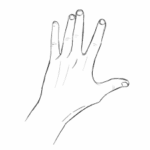
- Finger stretching exercise
- First of all, to do this stretching exercise, bring the pinky as well as ring fingers together. Separate the middle as well as index fingers from the ring finger. Hold for 30 seconds in one repetition, do three repetitions per session. Repeat three sessions per day.

- Fist-opener
- To begin with, make a fist as well as hold it for 30 seconds in front of the therapist. Stretch the fingers until the hand is flat as well as open, with the fingers together. Repeat the movements five times per session. Do three sessions per day.
- Thumb pull
- To do this stretching exercise, grab the thumb with the other hand. Slowly, pull the thumb backward, mild away from the hand. Hold this stretching position for 30 seconds in one repetition. Do three repetitions in one session. Do three sessions per day. Repeat this exercise on the other thumb too.
- Alternate finger stretch
- To do this stretching exercise, bring the middle as well as ring fingers together. Separate the pinky finger as well as index fingers from them. Repeat the stretching three times per session. Do three sessions per day.
Alternate finger stretch
- Wrist extensor stretching with extended arm
- To embark by extending both of the arms in front of the patient’s face. Make two fists, like the patient is punching the air. Move the fists downward, while keeping the arms straight. Hold for 30 seconds as well as do three repetitions per set in one session. Repeat three sessions in one day.
- Wrist flexors stretching exercise
- To embark with, tell the patient to put the arms in front of the patient himself/herself as well as make a fist with the hands. Open both of the hands, as if the patient was pushing on the wall in front of himself/herself. Take the right hand as well as pull the fingers back on the patient’s left hand as well as hold for 30 seconds. Repeat on the other hand too. Repeat 3 times in one session. Do three sessions per day.
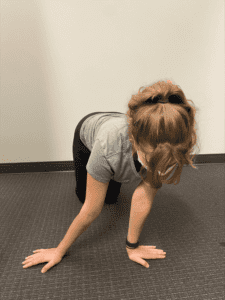
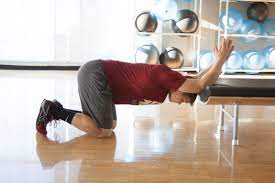
- Side to side stretching
- To embark with, tell the patient to take a tabletop position with the knees as well as hands-on the floor. Move the fingers outwards, they should be facing away from each other hands. Move from side to side, and hold for 30 seconds. Do it three times per session. Do three sessions per day.
- Wrist circle stretching exercise
- To begin with, tell the patient to take the sitting position with the hands-on table. Let the wrists hang off the edge. Make the circle with the wrist going clockwise. Then make a circle going anticlockwise. Hold at the end for 30 seconds. Repeat three times per session. Do three sessions per day.
- Seated clenched fists
- To embark with, tell the patient to take a sitting down position as well as put the hands on the thighs. The palms should be facing up. Gently, make the fist with both hands. Then, bend the wrist slightly so that it is facing toward the patient. The patient should make sure to keep the arms on the thighs. Hold for 30 seconds. Gradually open the fists. Do three times per set in one session. Do three sessions per day.
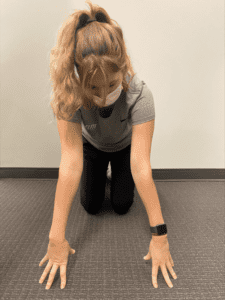
- Palm pulses stretching exercise
- To embark with, tell the patient to take a tabletop position with the knees as well as hands-on the floor. Spread the fingers wide. Leave the palms off the floor while keeping the fingers on the floor. Move or pulse the palms down to up 10 times.
- Thumb as well as upper wrist stretching exercise
- Give the command to the patient to put the right arm out as well as make a fist around the thumb. Bend the fist down toward the floor. The patient will feel the stretch in the top of the wrist as well as the thumb. Hold for 30 seconds as well as repeat on the other hand. Do three repetitions per session. Do three sessions per day.
- Figure eight
- Tell the patient to interlace the hands with the elbows at the sides. Make the figure eights with your hands and hold for 30 seconds. Do three repetitions per session. Do three sessions per day.

- Palm to ceiling wrist stretching exercise
- First of all, give the command to the patient that extends one arm in front of the patient’s face and palm facing toward the roof. Bend the wrist so that the fingertips point toward the ground. Using the other hand, gradually, pull the fingers toward the body until the patient feels the stretch in the underside of the wrist. After holding for thirty seconds, repeat using the other hand. Repeat this exercise three times per session. Do three sessions per day on each side.
- Finger tendon glide stretch
- To embark with, the fingers extended straight out in front of the patient. Make a hook fist first, and return to the straight hand. Make a full fist, after that return to a straight hand. Make the straight fist, and return to a straight hand. Repeat this exercise ten times per set in one session. Do three sessions per day.
- Thumb stretching exercise
- First of all, tell the patient to hold the hand out in front of the patient’s face, as if the patient is saying stop. Embark with the thumb positioned outward. Move the thumb across the palm and after that back to the starting position.
- Wrist extensors stretching with the use of a table
- Tell the patient to stand at the table with the palms down, fingers flat, and elbows straight as well. Lean the bodyweight forward. Hold this position for 30 seconds. Repeat 3 times in one session. Do three sessions per day.
- Basic wrist stretching exercise
- The basic wrist stretching exercise is an excellent way to alleviate stiff joints in the wrist, especially after long days of typing and writing. To begin with, hold the right hand out in front of the patient’s face with the palm facing upwards. Grip all four fingers with the opposing hand. Gradually, pull the fingers down towards the ground. Hold the stretch for thirty seconds, after that release the hand back to the embarking position. Repeat with the other hand, holding for thirty seconds. Repeat the exercise three times per session. Do three sessions per day.
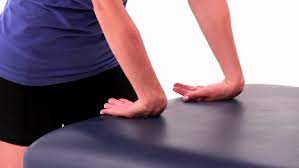
- Wrist stretching exercise using a table
- First of all, tell the patient to place both the palms face down on the edge of a table. Fingers point away from the patient’s body. Keep the elbows straight, and gradually lean the body-weight slightly forward. After that reverse it! Place both of the palms face down on the edge of a table with fingers pointing toward the body. Keep the elbows straight, as well as gently lean the body-weight back away from the table.
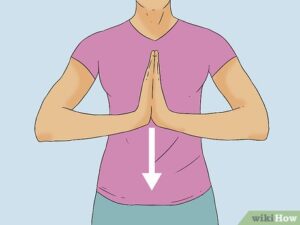
- Reverse prayer stretching exercise
- Place the backs of the hands together in front of the patient’s body as well as press the elbows toward the floor without letting the backs of the hands come apart until the stretch is felt in the forearms.
- Loosen-up stretching exercise
- This exercise is a simple stretching exercise to loosen up the fingers as well as hands before the patient begins exercising. It is also a good break to relax the wrists as well as hands if the patient is doing repetitive hand motions. Sit comfortably and then bend the arm at the elbow at a right angle. Make the fist first, and then gradually open it spreading as well as stretching the fingers apart. Repeat three times per session. Do three sessions per day. In every repetition hold for 30 seconds.
- Prayer stretch with a steeple
- Tell the patient to stand with the elbows bent as well as palms together. Spread the fingers as well as thumbs as wide apart as the patient can. After that move the palms apart as well as together again, keeping the fingers as well as thumbs touching. Repeat three times per session with three sessions per day.
- Backward facing wrist stretch exercise
- Place the hands out in front of the patient, rotating the wrists around so that the patient’s fingers are facing the knees. Embark with the fingers closer to the patient’s knees. Keeping the palms flat on the floor, shift the body back toward the heels, then forward toward the hands. Do three repetitions and hold for thirty seconds in every repetition.
- Forward-facing wrist stretching exercise
- To begin with, the hands are flat on the ground in front of the patient with fingers facing forward. Make sure that the elbow pits are facing forward as well as pulse forward for three repetitions, holding for thirty seconds in each repetition in one session. Do three sessions per day.
- Palm heel up side to side stretching exercise
- Make sure the hands are flat on the floor with fingers spread out. After that, lift the heel of the hands up off the floor. Then push the hands into the floor while focusing on the knuckles, and go side to side. If this position is tough, bring the hands closer to the body. Do this for about 15 seconds going side to side along with around ten repetitions per session. Do three sessions per day.
Massage Therapy
- Massage therapy is an age-old technique that uses both stretching as well as pressure in a rhythmic flow. Massage therapy helps in reducing tension in specific muscles that have built up due to injury or even stress. Massage therapy helps the person to get the blood flowing which speeds up the recovery process at any level.
- Some benefits of massage therapy
- Reducing stress as well as increasing relaxation.
- Decreasing pain as well as muscle soreness and tension as well.
- Improving circulation, energy as well as alertness.
- Lowering heart rate and blood pressure as well.
- Improving the immune function of the body.
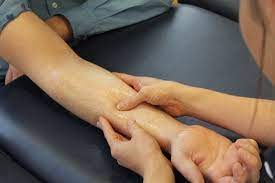
- Effleurage (Stroking) technique
The hands are passed rhythmically as well as continuously over the patient affected part, in one direction and straight only, with the aim of increasing blood flow in that direction, stretching tissues, relaxing the patient as well as aiding the dispersal of waste products. This technique involves a stroking motion of the hands sliding over the skin of the wrist and is always the first as well as last technique applied in a massage session. Effleurage can be used with varying tempo as well as pressure according to the stage of the situation and whatever the desired effect of the massage is.
- Petrissage (Kneading) technique
- The affected skin is lifted up, pressed down as well as squeezed, pinched, and roll as well. Alternate squeezing as well as relaxation of the tissues stimulates the local circulation and may have a pain-relief effect with some muscular disorders. The basic motion is to compress, pick up, and after that release the soft tissues. It is generally used when a deeper effect than effleurage is wanted, and it is techniques include:
- Squeezing
- First of all, tell the patient to take a relaxed position, supine or sitting. Then, the therapist applies the squeezing technique, the circular hand stroke is used for the whole wrist for this technique using a circular motion. The therapist will bring the tissue between the patient’s two hands lifting it up as well as away from the body.
- Picking up
- To embark with, give the command to the patient that takes a relaxed position, and then pick up technique applying equal pressure on the sides of the tissue as well as lifting it away from the body. The hands of the therapist are parallel to the limb being treated to avoid hyperextension of the outer wrist.
- Shaking
- The vibration or shaking massage technique is a fine, gentle, trembling motion performed with hands or fingers. Shaking can be used to stimulate soft tissues in the body. Vibration motions can help stimulate nerves, relieve muscular tension as well as decrease stress. This technique is mainly performed by hands, the therapist should put one hand on the other hand and place it on the affected side while stroking give vibrations.
- Rolling
- The skin rolling technique is performed using the thumb as well as fingers to pull the skin away from the tissue. It is then rolled forwards in constant movement to help separate it from being stuck in muscle. Skin rolling can be used around areas of scar tissues to help break them down.
- Wringing
- The wringing technique consists of lifting as well as squeezing the muscle forwards and backward motion. Wringing is used to treat tight muscles, for relaxation as well as part of a post-event massage. The benefits of wringing are relief of tight muscles, reduced DOMS as well as improved recovery.
- Myofascial Release
- The myofascial release technique is manual for stretching the fascia aiming to relieve fascia restrictions. Fascia is situated between the skin and the underlying structure of muscle as well as bone and connects the muscles, organs, and other skeletal structures in the body. Fascia can become restricted through injuries, stress, trauma, or even poor posture. Three strokes have been provided to the tight muscle. The physiotherapist should place one hand on the other and then apply stroking on the affected part to release tightness.
- Trigger Point Therapy
- Trigger point therapy mainly involves the applying of pressure to tender the muscle tissue in order to reduce pain as well as dysfunction in other parts of the body. Trigger points are active centers of muscular hyperactivity, that often cross over with acupuncture points in the body.
- Deep Transverse Frictions
- Deep transverse frictions are transverse connective tissue therapy applied directly by the therapist’s fingers. Oscillating pressure is provided across the direction of the tissue fibers. Mainly used on the tendon or even ligament injuries to aid break down thickened, pain-producing scar tissue.
- Compression Massage
- In this useful technique, rhythmic compression into muscles is used to create deep hyperemia as well as softening effect in the tissues. This technique is often used for sports massage as a warm-up for deeper, more specific massage work.
- Cross-Fibre Massage
- Cross-fiber friction massage techniques are applied in a general manner to create a stretching as well as broadening effect in large muscle groups of the wrist or even on site-specific muscle as well as connective tissue, deep transverse friction is applied to decrease adhesions and to aid in creating strong, flexible repair while the healing process.
- Palm Massage
- Target the muscles in the hand to reduce sore wrists. Open the affected hand. Place the thumb of the unaffected hand into the base of the affected thumb and wrap the fingers around the back of the affected hand. Gently move the thumb in circles as the patient feel that release tension in the large thumb pad.

- Tennis ball roll massage
Hold onto the tennis ball between both hands with the palms open. Vigorously roll the ball between the hands to decrease muscle tension as well as wrist pain. If the patient cannot find a ball, use a smooth rock, a frozen water bottle, or the patient’s car’s gear shift to rub out tense hand muscles.
Mobilization
Some benefits of mobilization at the wrist joint
- Reducing the levels of pain as well as discomfort from the injury.
- Improving the range of motion of the joints.
- Increasing the movement quality of the joints.
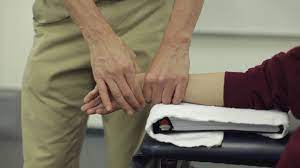
- Distal radioulnar joint mobilization
- Procedure
- To perform this mobilization technique at the distal radioulnar joint, first of all, the therapist gives the command to the patient to take a sitting position with the wrist in a neutral position on the towel, and then the physiotherapist stabilizes the patient’s hand as well as a radiocarpal region by placing the index finger in the web of the patient’s thumb and the thenar eminences and middle, ring, and pinky fingers grasping the distal radius as well as proximal carpals. The physiotherapist grasps the distal ulna between the thumb as well as the pads of the fingers. Then applied anteroposterior glide and medial and lateral rotary joint play movements of the distal ulna.
- Indication
- These motions can be used to increase joint play as well as promote greater pronation and supination motions at the distal radioulnar joint.
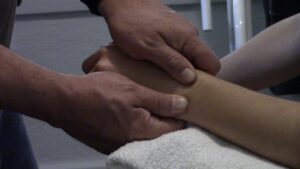
- Dorsal-palmar glide at radiocarpal Joint
- Procedure
- First of all, tell the patient to take a relaxed position like sitting on the chair, and then the therapist’s proximal hand stabilizes the patient’s elbow which is in 90 degrees of flexion. The distal hand grasps the radiocarpal joint just distal to the radial as well as ulnar styloid processes. The physiotherapist takes up a long-axis extension to the barrier.
- Radio carpal joint (ulnar and radial glide)
- Procedure
- To begin with, the physiotherapist should give the command to the patient to take a relaxed position like sitting on a chair. The wrist is kept in a mid-range position(neutral). The force is applied by the strong hand of the physiotherapist around the distal row of carpals.
- Indication
- This mobilization technique involves moving the row of carpal bones whether dorsally to promote wrist extension movement or palmar to promote wrist flexion movement. This technique may also be performed on a hypermobile wrist following prolonged immobilization because of casting.
- Indication
- Ulnar glide is to increase radial deviation and radial glide is to increase ulnar deviation of the wrist joint.
- Mid-carpal as well as radiocarpal distraction
- Procedure
- These two techniques are performed in a similar way using slight differences in hand positions. For mid-carpal distraction, to begin with, tell the patient to take a relaxed position like supine or sitting, and the stabilizing the hand is placed over the styloid processes of the radius and ulna, and the mobilizing hand is placed over the distal carpal row. For radiocarpal distraction, the mobilizing hand is over the proximal carpal row.
- Indication
- These techniques are used to improve generalized wrist mobility as well as open the joint spaces, allowing for greater motion into the wrist extension because it is the closed-packed position of the wrist.
- Mid-carpal dorsal-palmar glide
- Procedure
- First of all, tell the patient to take a sitting position. Then, the stabilizing hand grasps the patient’s wrist just proximal to the styloid processes of the ulna and radius to stabilize the distal radioulnar joint.
- The mobilizing hand is put over the distal carpal row.
- Indication
- This mobilization technique involves gliding the row of carpal bones at the wrist joint either dorsally to promote wrist flexion or palmar to promote wrist extension.
- Mid-carpal dorsal-palmar glide
- Procedure
- First of all, tell the patient to take a sitting position. Then, the stabilizing hand grasps the patient’s wrist just proximal to the styloid processes of the ulna and radius to stabilize the distal radioulnar joint. The mobilizing hand is put over the distal carpal row.
- Indication
- This mobilization technique involves gliding the row of carpal bones at the wrist joint either dorsally to promote wrist flexion or palmar to promote wrist extension.
- Distal radioulnar joint mobilization
- Procedure
- To perform this mobilizations technique at the distal radioulnar joint the physiotherapist stabilizes the patient’s hand as well as a radiocarpal region by placing the 2nd metacarpal finger in the webspace of the patient’s thumb as well as the thenar eminences and third metacarpal, fourth metacarpal and fifth metacarpal fingers grasping the distal radius as well as proximal carpals. The therapist grasps the distal ulna between the thumb as well as the pads of the fingers. Then provides anteroposterior glide as well as medial and lateral rotary joint play movements of the distal ulna bone.
- Indication
- These movements can be used to improve joint-play as well as promote greater pronation and supination movement at the distal radioulnar joint.
- Thumb metacarpal-carpal radial and ulnar glides
- Procedure
- First of all, the physiotherapist should give the command to the patient to take a relaxed position like sitting on the chair with the affected hand placed on the edge of the table. After that, the patient’s hand is placed with the ulnar side down, and the joint is in the resting position, and stabilizing the hand grasps the distal forearm with the grip around the trapezium while mobilizing the hand grasps the first metacarpal with mobilizing the hand, glide metacarpal toward the radius to improve extension, or toward ulna to improve flexion while applying gentle traction
- Indication
- Ulnar glide for increasing flexion. Radial glide for an increasing extension.
- Metacarpo phalangeal/interphalangeal(MCP/IP) distraction
- Prcocedure
- To embark with, the therapist should give the command to the patient to take a relaxed position, sitting on the chair in a place affected hand on the edge of the table. Then, the physiotherapist must support the forearm of the patient first, after that grip the proximal bone of the joint being mobilized with one hand as well as the distal bone between the first finger and second finger of the mobilizing hand. With the joint slightly flexed in position, distraction is imparted using the mobilizing hand.
- Indication
- This technique is used to promote general joint play as well as to promote metacarpal phalangeal joint flexion and interphalangeal joint extension.
- Metacarpal phalangeal/interphalangeal(MCP/IP)dorsal and palmar glide
- Procedure
- First of all, the physiotherapist should give the command to take a relaxed position which can be sitting on a table or chair, and place an affected hand on the edge of the table. After that, the therapist must support the forearm of the patient first and then grip the proximal bone of the joint being mobilized with 1 hand as well as the distal bone between the thumb as well as the index finger of the mobilizing hand.
- Indication
- This mobilization technique is imparted by moving the base of the distal bone either palmar or dorsal, promoting flexion or extension motions, respectively.
Range of motion exercises
Some benefits of the range of motion exercise
- Enhance movement at the wrist joint.
- improve the function of the wrist joint and the whole limb.
- Improve motions efficiency.
- Increase independence of the fine moments.
- Reduce pain in the wrist
- Improve as well as maintain joint integrity.
- Wrist circles to increase range of motion
- First of all, the physiotherapist should give the command to the patient to take a relaxed position like sitting on a chair. Then, bring the hands up with the elbows close to the body, making fists. Rotate the wrists in a circular motion. After that, try to keep the palms facing down to maximize the range of motion. Do 15 to 20 circles in each direction in one session. Do it in opposite direction too (anticlockwise). Do three sessions per day.
- Wrists Shakes
- To begin with, tell the patient to take a namaste position of the hand. After that, simply shake the wrists out for 5 to 7 minutes in one set per session. Do three sessions per day.
- Shake It Out
- Shaking out the wrist as well as hands after staying in the same position for a while is a great mode to reintroduce blood flow and relieve the stiffness of the joints. To embark with, the hands out in front of the patient and palms facing the ground. Slowly shake the hands by letting the wrist go limp and continue for thirty seconds. Repeat up to three times per set. One set per session is enough. Do three sessions per day.
- Fist to Fan
- To embark with, the hands in front of the patient and palms facing downwards. Make the fist with both hands. Open the fist halfway so that the finger is bent at the knuckles. Hold for ten seconds. Open the hands fully so all five fingers are straight as well as spread wide apart. Hold for ten seconds in one repetition. Do five times per session along with three sessions per day. Re-make the fist, and repeat the routine again.
- Thumb Touches
- This exercise helps to increase coordination in the thumb as well as forefingers, and helps to reintroduce blood flow back to the affected area: Hold the hands outwards with the palms facing the roof. With the affected hand, slowly bring the thumb to touch the tip of every finger. Repeat on the other hand too. Then, return to the embarking position. Repeat five times with both hands in one session. Do two sessions per day.
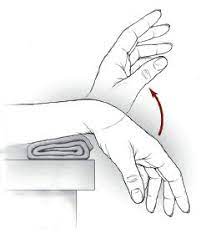
- Wrist supination range of motion exercise
- Tell the patient to take a relaxed position means to stand or sit with the arm at the side with the elbow bent to 90 degrees, with the hand in the mid-range over the edge of the table. Tell the patient to move their hand upward facing the ceiling without holding it at the endpoint. Do ten times in one set in one session. Do three sessions per day.
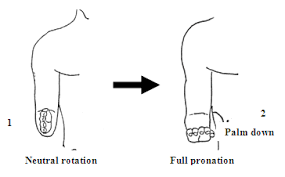
- Wrist pronation range of motion exercise
- The therapist should give the command to the patient to take a relaxed position means to stand or sit with the arm at the side with the elbow flexed to 90 degrees, with the hand in the mid pronation position over the edge of the table. Tell the patient to move their hand downward facing the floor without holding it at the endpoint. Do ten times per set in one session. Do three sessions in one day.
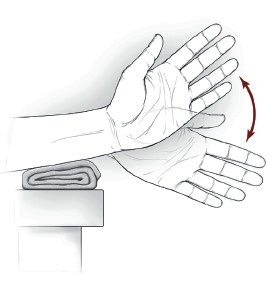
- Wrist extension range of motion exercise
- First of all, place the forearm on the table on the rolled-up towel for padding with the hand hanging off the edge of the stable surface, like a table with palm down. The therapist should give the command to move the hand upward till the patient feel a gentle stretch. Then, return to the starting position. Do ten times per set in one session. Do three sessions per day.
- Wrist flexion range of motion exercise
- To begin with, tell the patient to place a forearm on a table on the rolled-up towel for padding with the hand hanging off to the edge of the stable surface, like a table with a wrist, is in full pronation. Then, the physiotherapist should give the command to move the hand downward till the patient feel a mild stretch. Then, return to the embarking position. Do ten times in one set, per session. Do three sessions in one day.
- Wrist flexion range of motion exercise in supination
- To begin with, tell the patient to place the forearm on a table on the rolled-up towel for padding with the hand hanging off the edge on a stable surface, like the table with palm down. The therapist should give the command to move the hand upward till the patient feel a mild stretch. Then, return to the embarking position. Do ten times per set in one session. Do three sessions per day.
- Wrist extension range of motion exercise in supination
- To embark with, give the command to the patient to place the forearm on the edge of the table on a rolled-up towel for padding with the hand, which is in full supination position. Then, the physiotherapist should give the command to move the hand down until the patient feels a gentle stretch. After that, return to the starting position. Do ten repetitions in one set per session. Do three sessions in one day.
- Wrist ulnar deviation range of motion exercise
- First of all, it is the responsibility of the physiotherapist to give the command to the patient to take a relaxed position with the support of the forearm on the table on a rolled-up towel for padding or on the knee, along with the thumb upward in position. Move the wrist down through the full range of motion. Do ten times per set, in one session. Do three sessions per day.
- Wrist radial deviation range of motion exercise
- To begin with, the therapist gives the command to the patient to take a relaxed position with the forearm supported on the table on a rolled-up towel for padding or on the knee, with the thumb upward in position. Then, move the wrist up through the full range of motion. Do this exercise ten times per session, and three sessions per day.
- Thumb flexion range of motion exercise
- To start with, the physiotherapist gives the command to a patient to take the relaxed position with the forearm supported on a table on the rolled-up towel for padding or on the knee. The thumb is positioned outward. Move the thumb across the palm and back to the embarking position. Do it ten times per session. Do three sessions per day.
- Thumb extension range of motion exercise
- To embark with, the physiotherapist should give the command to the patient to take a relaxed position with a forearm supported on the table on the rolled-up towel for padding or on the knees. The thumb is positioned outward direction. After moving the thumb across the palm then come back to the starting position and move slightly backward but not in abduction. Do ten repetitions in one set per session. Do three sessions in one day.
- Hand/finger tendon glide range of motion exercise
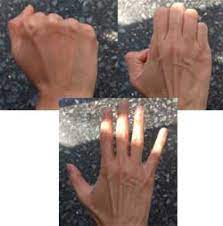
- To embark with, the fingers extended straight out. Then, make a hook fist and return to a straight hand. After that, make a full fist and return to a straight hand. Make a straight fist, and return to a straight hand.
Strengthening exercise
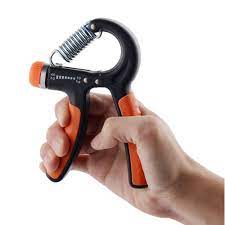
- Grip strengthening
- Grippers come in many types of tensions. The patient can start with the one that is only a little difficult to move. When the low weight becomes easy, increase the gripper tension. Grippers range starts from light to ones requiring 365 pounds of pressure to close(move). Tell the patient to sit comfortably with the arm bent at 90 degrees, with palm facing in, holding the gripper in one hand. Then, squeeze slowly, and release it without holding it at the endpoint. Repeat 10 to 15 times per session, and do three sessions per day. Only the hand should be moving, not the whole arm. Switch the hand and repeat. When the patient can comfortably do three to four sets, try the gripper with more tension.
- Rubber band strengthener
- Rubber band strengthening exercise is simple, still, it works the smaller hand muscles. It is also one the patient can do sitting at a desk or anywhere else. Tell the patient to take an ordinary rubber band which is available at home, and stretch it around the tops of the fingers as well as the thumb. Then, slowly open the hand to stretch against the rubber band, and after that slowly close the hand. Keep the movement controlled. Repeat 10 times per session. Do three sessions per day.
- Fist to jazz hand
- First of all, tell the patient to rest one arm on the table, like the patient is about to arm-wrestle someone. Then, make a fist. After that, slowly open the fist as well as stretch the fingers out as wide as the patient can comfortably go (do a jazz hand). Repeat 10 times per set in one session. Do three sessions per day.
- Finger spread-apart with theraband
- First of all, wrap a theraband around each of the fingers. Then, push against the resistance from the band, and after that spread fingers as far apart as possible. Hold for ten seconds, then release it. Continuously do 10 times, then switch the theraband to the other hand and repeat. Do it ten times per session. Do three sessions.

- Dumbbell windshield wipers
- To begin with, place the forearm on a stable and flat surface like a table or chair. Then, hold one end of a lightweight dumbbell (around two to five pounds) in your hand. Rotating the wrist from right to left, lift as well as lower the dumbbell in a windshield wiper movement. Do continuously for 10 repetitions per set in one session. Do three sessions per day.
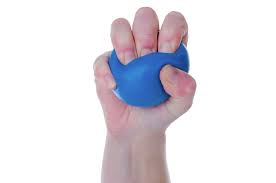
- Ball Squeeze
- To embark with, telling the patient to grasp a ball in one hand means an affected hand that has the ability to be squeezed, such as the stress ball, tennis ball, or even racquetball. Squeeze the ball with all your fingers for ten seconds and then relax. Repeat ten times per session. Do three sessions per day. After 5 to 6 days increase repetitions from 10 to 20, according to the patient’s ability.
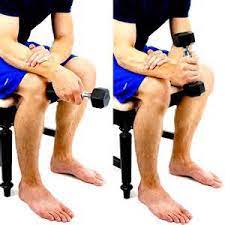
- Wrist extensors strengthening with the dumbbell in pronation
- To embark on this wrist strengthening exercise, tell the patient to sit in a chair with the forearm resting on a table. Then, hang the wrist and hand over the edge of the table. Hold a 2 or 3-pound dumbbell in the affected hand. After that, with the palm facing down, slowly lift the hand, so the back of the hand moves towards the roof. The patient’s forearm should remain on the table. Then, the therapist should give the command to move the hand in an upward direction as far as he/she can and then come back to the normal position. Do it ten times per session. Do three sessions per day. After 5 to 6 days, the therapist must apply hold at the endpoint for ten seconds per repetition.
- Dumbbell wrist flexors strengthening in pronation
- First of all, tell the patient to sit on a chair with the forearm resting on a table. After that, hang the wrist as well as hand over the edge of the table. Hold a 2 or 3-pound dumbbell in an affected hand. Then, with the palm facing down, slowly flex the wrist down so that the palm moves down the floor. Without holding at the endpoint tell the patient to do 10 repetitions in one session and then release. Do three sessions per day. After 5 to 6 days, the therapist must give the command to the patient to hold for ten seconds in one repetition, for strengthening the muscles.
- Wrist extensors strengthening with a dumbbell in supination
- To start this wrist strengthening exercise in full supination, tell the patient to take a sitting position in a chair with the forearm resting on a table. After that, hang the wrist as well as hand over the edge of the table. Hold a 2 or 3-pound dumbbell in the injured hand. Then, with the palm facing up, slowly move the hand down, so the back of the hand moves towards the ground. The patient’s forearm must remain on the table. After that, the therapist should give the command to move their hand in a downward direction as far as he/she can and then come back to the neutral position. Do it ten times in one session. Do three sessions in one day. After 5 days, the therapist must give the command to the patient to hold at the endpoint for ten seconds per repetition. Do two sessions per day.
- Wristflexors strengthening with the dumbbell in supination
- To start this wrist strengthening exercise, first of all, tell the patient to sit on a chair with the forearm resting on the table. After that, hang the wrist as well as hand over the edge of a table. Hold a 2 or 3-pound dumbbell in the injured hand. Then, with the palm facing up, slowly lift the hand, so the back of the hand moves towards the ground. The patient’s forearm must remain on the table. Then, the physiotherapist should give the command to move their hand in an upward direction as far as he/she can and then come back to the neutral position. Do ten times in one set per session. Do three sessions per day. After 5 days, the physiotherapist must give the command to the patient to hold at the endpoint for ten seconds per repetition.
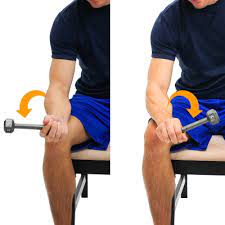
- Wrist supination with dumbbell
- To perform this exercise, tell the patient to take a sitting position on a chair with the forearm resting on a table. Make sure that the wrist, as well as hand, are over the edge of the table. Then, hold the end of a small 1- to 3-pound dumbbell in the hand, like the patient would hold a hammer. After that slowly allow the hand and wrist to rotate over so the palm is facing up towards the roof, then slowly rotate the hand back up, so the dumbbell is straight up again. Do ten repetitions in one set per session, but without hold at the endpoint. Do three sessions per day. After 5 to 6 days of this exercise, tell the patient to take hold at the endpoint for ten seconds in one repetition.
- Wrist pronation with dumbbell
- To strengthen the wrist pronators, tell the patient to sit on a chair with the forearm supported on a table and the wrist and hand over the edge. Hold the dumbbell with the weight pointing up towards the ceiling. After that, slowly rotate the hand, so the wrist and palm are facing down towards the ground, then slowly turn the hand back to the embarking position with the weight pointing up towards the roof. Do it ten times per set in one session. Do three sessions per day.
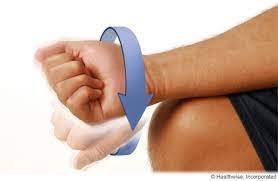
- Rotation
- Sit with the arms bent to 90 degrees as well as forearms out in front of the patient with palms facing down. Hold the light resistance band or dumbbells, or even go weight-free and pretend the patient is holding something. Then, slowly rotate the hands so the palms are facing up. After that, slowly rotate the palms back to the embarking position. Repeat 10 times per set in one session. Do around two sessions per day.
- Wrist curl
- First of all, tell the patient to take a sitting position and hold the arm at 90 degrees, with the palm facing up. The arm can rest on the leg, a bench, or even a table. Curl the wrist up. Return wrist to the embarking position. Repeat 10 times per session.
- Pronated wrist curl
- First of all, to do this exercise, then the patient should sit and hold the arm at 90 degrees, with the palm facing down. After that curl the wrist up. Return wrist to the embarking position. Repeat 10 times per set in one session. Do three sessions per day.
- Squeeze
- While standing or sitting position, hold the ball (or squeezable thing of choice) with the palm facing up. After that, squeeze the squeezy thing as hard as the patient can for ten seconds. Slowly release the grip. Repeat 10 times in starting then upgrade the repetition with the time.
- Wrist ulnar deviators strengthening with dumbbell
- To embark on this wrist strengthening exercise, tell the patient to sit in a chair with the forearm resting on the table. After that, give the command to the patient to put a hand in mid-range of supination and pronation over the edge of a table. Hold a 2 or 3-pound dumbbell in the affected hand. Then, with the palm facing the side, slowly move the hand down. The patient’s forearm must remain on a table. Then, the therapist should give the command to move the hand in a downward direction as far as he/she can and then come back to the neutral position. Do ten times in one set per session. Do three sessions per day. After 5 days, the physiotherapist must give the command to the patient to hold at the endpoint for ten seconds per repetition.
- Wrist radial deviators strengthening with dumbbell
- To start these wrist strengthening exercises, first of all, tell the patient to sit on a chair with the forearm resting on a table. Then, give the command to the patient to place hand in mid-range of pronation as well as supination over the edge of a table. Hold a 2 or 3-pound dumbbell in the injured hand. After that, with the palm facing the side, slowly move the hand up. The patient’s forearm should remain on a table. After that, the physiotherapist should give the command to move the hand in an upward direction as far as the patient can and then come back to the neutral position. Do ten times per set in one session. Do three sessions in one day. After 5 to 6 days, the therapist must give the command to the patient to hold at the endpoint for five seconds per repetition.
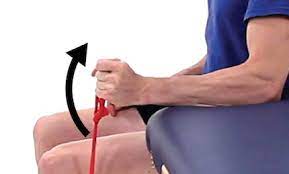
- Wrist extensors strengthen with the use of the theraband with pronated hand
- First of all, tell the patient to take a relaxed position, which means sitting on the stable surface(chair) with the hand hanging on the rolled pillow at the edge of the table, the palm should be facing the floor. Then, wrap the one end of the band on the patient’s hand, while the second end on the physiotherapist’s strong hand. Give the command to the patient to move their hand in the upward direction against the theraband. After that, do ten times per set in one session. Around three sessions would be done by the patient per day. After 5 to 6 days hold the position at the endpoint for nearly five to ten seconds per repetition. Slowly come back to the neutral position. When a patient is adapted to the light-weighted theraband, upgrade the color of the theraband for strengthening.

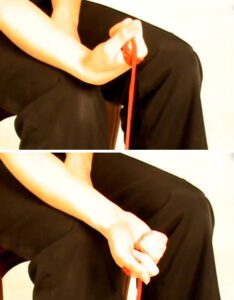
- Wrist flexors strengthen with the use of the theraband with a pronated hand
- To begin with, give the command to the patient to take a relaxed position, like sitting on a stable surface(chair or table) with the hand hanging on the rolled towel at the edge of the table, and the palm should be facing the ground. After that, wrap the one end of the theraband in the patient’s hand, and the second end in the therapist’s strong hand. Tell the patient to move their hand in the downward direction against the band. Then, do this strengthening exercise ten times per set in one session. Nearly three sessions would be done by the patient in one day. After 5 days hold the position at the endpoint for around five to ten seconds in one repetition. Slowly come back to the starting position. When the patient is adapted to the light-weighted band, upgrade the color of the band for strengthening.
- Wrist ulnar deviators strengthening with theraband
- First of all, telling the patient to take a relaxed position means sitting on the chair with the hand in mid-pronation position at the edge of the table and the hand should be put over the rolled towel. Then, wrap the one end of the theraband in the patient’s hand, and the second end in the therapist’s hand. Ask the patient to move their hand in the downward direction agaist the band. Do ten times per set in one session. Around three sessions should be done by the patient in one day. After 5 to 6 days hold at the end position for ten seconds per repetition. Slowly return to the normal position. When a patient is adapted to the light-weighted band, then upgrade the color of the band for strengthening.
- Wrist radial deviators strengthening with the theraband
- To begin with, tell the patient to take a relaxed position, like sitting on the chair with the hand in mid-supination position at the edge of the table and the hand should be placed over the rolled towel. After that, wrap the one end of the theraband in the patient’s hand, and the second end in the therapist’s hand. Ask the patient to move their hand in the upward direction agaist the band. Do ten times in one set per session. Around two sessions would be done by the patient in one day. After 5 days hold the position at the endpoint for ten seconds per repetition. Slowly come back to the normal position. When a patient is adapted to the light-weighted band, upgrade the color of the band for strengthening.
- Wrist extensors strengthen with the use of the theraband with supinated hand
- To begin with, ask the patient to take a relaxed position, like sitting on a stable surface(chair or table) with the hand hanging on the rolled towel at the edge of the table, the palm should be facing the roof. Then, wrap the one end of the band on the patient’s hand, and a second end on the therapist’s strong hand. Tell the patient to move their hand in the downward direction against the band. Then, do it ten times in one set per session. Nearly three sessions would be done by the patient in one day. After 5 days of holding the position at the endpoint for around ten seconds per repetition. Slowly return to the normal position. When the patient is adapted to the light-weighted band, upgrade the color of the theraband for strengthening.
- Wrist flexors strengthening with the use of the theraband with supinated hand
- First of all, give the command to the patient to take a relaxed position, like sitting on a stable surface(chair) with the hand hanging on the rolled towel at the edge of a table, but the palm should be facing the roof. Then, wrap the one end of the theraband on the patient’s hand, and the second end on the physiotherapist’s strong hand. Ask the patient to move their hand in the upward direction against the theraband. Then, do ten times per set in one session. Around three sessions should be done by the patient per day. After 5 to 6 days hold the position at the endpoint for around five to ten seconds in one repetition. Slowly come back to the neutral position. When the patient is adapted to the light-weighted theraband, upgrade the color of the band for strengthening.
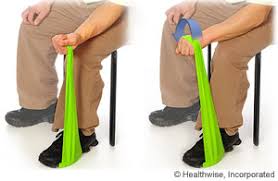
- Supinators strengthen with the use of the theraband
- First of all, give the command to the patient to take the relaxed position, like sitting on a stable surface(chair) with the hand neutral on the rolled towel at the edge of the table. Then, wrap the one end of the theraband in the patient’s hand, while the second end in the physiotherapist’s strong hand. Give the command to the patient to rotate their hand against the band, the palm will face the roof. After that, do this strengthening exercise ten times in one set per session. Around three sessions should be done by the patient in a day. After 5 to 6 days hold the position at the endpoint for nearly five to ten seconds in 1 repetition. Slowly return to the starting position. When the patient is adapted to the light-weighted theraband, upgrade the color of the theraband for strengthening.
- Pronators strengthen with the use of the theraband
- First of all, tell the patient to take a relaxed position, like sitting on a stable surface(chair) with the hand in the neutral position and should be on the rolled towel at the edge of the table. Then, wrap the one end of the band in the patient’s hand, while the second end in the physiotherapist’s strong hand. Give the command to the patient to rotate their hand against the band, so the hand should be facing the ground. After that, do this strengthening exercise ten times in one set per session. Around three sessions should be done by the patient in a day. After 5 to 6 days hold the position at the endpoint for around ten seconds in a repetition. Slowly return to the embarking position. When the patient is adapted to the light-weighted theraband, upgrade the color of the theraband for strengthening.
Home remedies to reduce wrist pain
Rest: Try to give proper rest and avoid the use of the injured wrist movement.
Ice: Applying ice packs to the injured wrist and hand, without them touching the skin directly.
Compression: Wrapping the wrist (injured area) with an elastic bandage to provide support, reduce blood flow, as well as limit swelling.
Elevation: Keeping the injured area raised above the level of the heart to decrease swelling.