
Posterior Cruciate Ligament
Table of Contents
What is the Posterior Cruciate Ligament?
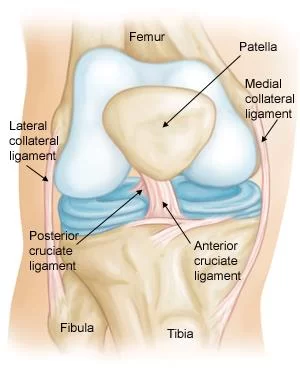
The posterior cruciate ligament (PCL) is one of the four major ligaments of the knee joint, along with the anterior cruciate ligament (ACL), medial collateral ligament (MCL), and lateral collateral ligament (LCL). It is a strong ligament situated within the knee that connects the femur to the tibia, helping to stabilize the knee joint. Here is an overview of the anatomy of the posterior cruciate ligament:
- Location: The PCL is located within the knee joint, crossing from the posterior intercondylar area of the tibia to the medial condyle of the femur.
- Structure: It is one of the two cruciate ligaments in the knee, the other being the anterior cruciate ligament (ACL). The posterior cruciate ligament (PCL) is stronger and broader as compared to the ACL. It is situated inside the knee joint and prevents the tibia from moving too far backward in relation to the femur.
- Function: The primary function of the PCL is to prevent the tibia from displacing posteriorly in relation to the femur. It helps to stabilize the knee joint and works in conjunction with the ACL to provide overall stability to the knee.
- Attachments: The PCL has two points of attachment. The femoral attachment site is located on the medial side of the femur’s lateral condyle, and the tibial attachment site is on the posterior intercondylar area of the tibia.
- Blood supply: The blood supply to the PCL is limited compared to some other ligaments, which can impact its healing capacity in case of injuries.
Posterior Cruciate Ligament Injury
- Injuries to the posterior cruciate ligament are not as common as other knee ligament injuries. In fact, they are often subtle and more difficult to evaluate than other ligament injuries in the knee.
- Many times a posterior cruciate ligament injury occurs along with injuries to other structures in the knee such as cartilage, other ligaments, and bone.
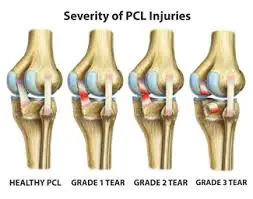
exercises Injured ligaments are considered “sprains” and are graded on a severity scale.
Grade 1 Sprains
- The ligament is mildly damaged in a Grade 1 Sprain. It has been slightly stretched but is still able to help keep the knee joint stable.
Grade 2 Sprains
- A Grade 2 Sprain stretches the ligament to the point where it becomes loose. This is often referred to as a partial tear of the ligament.
- Grade 3 Sprains
- . This type of sprain is most commonly referred to as a complete tear of the ligament. The ligament has been split into two pieces, and the knee joint is unstable.
- Complete tear of the posterior cruciate ligament
A complete tear of the posterior cruciate ligament, back view. - Posterior cruciate ligament tears tend to be partial tears with the potential to heal on their own. People who have injured just their posterior cruciate ligaments are usually able to return to sports without knee stability problems.
Cause
An injury to the posterior cruciate ligament can happen in many ways. It typically requires a powerful force.
A direct blow to the front of the knee (such as a bent knee hitting a dashboard in a car crash, or a fall onto a bent knee in sports)
Pulling or stretching the ligament (such as in a twisting or hyperextension injury)
Simple misstep
Symptoms
- The typical symptoms of a posterior cruciate ligament injury are:
- Pain with swelling that occurs steadily and quickly after the injury
Swelling that makes the knee stiff and may cause a limp
Difficulty walking - The knee feels unstable, like it may “give out”
To Top
Doctor Examination
During your first visit, your doctor will talk to you about your symptoms and medical history. - During the physical examination, your doctor will check all the structures of your injured knee, and compare them to your non-injured knee. Your injured knee may appear to sag backward when bent. It might slide backward too far, particularly when it is bent beyond a 90° angle. Other tests which may help your doctor confirm your diagnosis include X-rays and magnetic resonance imaging (MRI). It is possible, however, for these pictures to appear normal, especially if the injury occurred more than 3 months before the tests.
- X-rays. Although they will not show any injury to your posterior cruciate ligament, X-rays can show whether the ligament tore off a piece of bone when it was injured. This is called an avulsion fracture.
- MRI. This study creates better images of soft tissues like the posterior cruciate ligament.
Treatment of Posterior Cruciate Ligament Injury
- Treatment
Nonsurgical Treatment
If you have injured just your posterior cruciate ligament, your injury may heal quite well without surgery Your doctor may recommend simple, nonsurgical options. - Use of RICE Principle: When you are first injured, the RICE method – rest, ice, gentle compression, and elevation — can help speed your recovery.
- Immobilization. Your doctor may recommend a brace to prevent your knee from moving. To further protect your knee, you may be given crutches to keep you from putting weight on your leg.
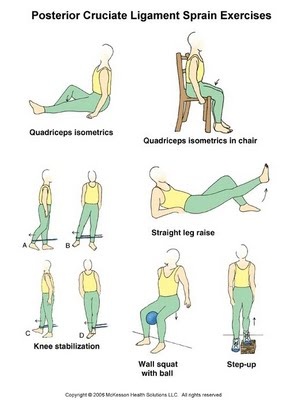
- Physical therapy. As the swelling goes down, a careful rehabilitation program is started. Specific exercises will restore function to your knee and strengthen the leg muscles that support it. Strengthening the muscles in the front of your thigh (quadriceps) has been shown to be a key factor in a successful recovery.
Start exercising your injured leg when some of the swelling has gone down and you are able to put about half of your weight on that leg. - Quad sets: Sit on the floor with your injured leg straight and your other leg bent. Press the back of the knee of your injured leg against the floor by tightening the muscles on the top of your thigh. Hold this position for 10 seconds. Relax. Do 2 sets of 15.
- Seated quad sets: Sit in a straight-back chair with your injured knee bent at a 90-degree angle. Try to tighten the top of your thigh muscles without moving your leg. Hold for 10 seconds. Do 2 sets of 15.
Knee stabilization: Wrap a piece of elastic tubing around the ankle of your uninjured leg. Tie a knot in the other end of the tubing and close it in a door at about ankle height.
Stand facing the door on the leg without tubing (your injured leg) and bend your knee slightly, keeping your thigh muscles tight. Stay in this position while you move the leg with the tubing (the uninjured leg) straight back behind you. Do 2 sets of 15. - Turn 90 degrees so the leg without tubing is closest to the door. Move the leg with tubing away from your body. Do 2 sets of 15.
Turn 90 degrees again so your back is to the door. Move the leg with tubing straight out in front of you. Do 2 sets of 15.
Turn your body 90 degrees again so the leg with tubing is closest to the door. Move the leg with tubing across your body. Do 2 sets of 15.
Hold onto a chair if you need help balancing. This exercise can be made more challenging by standing on a firm pillow or foam mat while you move the leg with tubing. - Straight leg raises: Lie on your back with your legs straight out in front of you. Bend the knee on your uninjured side and place the foot flat on the floor. Tighten the thigh muscle on your injured side and lift your leg about 8 inches off the floor. Keep your leg straight and your thigh muscle tight. Slowly lower your leg back down to the floor. Do 2 sets of 15.
Wall squat with a ball: Stand with your back, shoulders, and head against a wall. Look straight ahead. Keep your shoulders relaxed and your feet 3 feet (90 centimeters) from the wall and shoulder’s width apart. Place a soccer or basketball-sized ball behind your back. Keeping your back against the wall, slowly squat down to a 45-degree angle. Your thighs will not yet be parallel to the floor. Hold this position for 10 seconds and then slowly slide back up the wall. Repeat 10 times. Build up to 2 sets of 15.
Step-up: Stand with the foot of your injured leg on a support 3 to 5 inches (8 to 13 centimeters) high –like a small step or block of wood. Keep your other foot flat on the floor. Shift your weight onto the injured leg on the support. Straighten your injured leg as the other leg comes off the floor. Return to the starting position by bending your injured leg and slowly lowering your uninjured leg back to the floor. Do 2 sets of 15.
If you have access to a wobble board, do the following exercises: - Wobble board exercises
Stand on a wobble board with your feet shoulder-width apart. - Rock the board forwards and backward 30 times, then side to side 30 times. Hold on to a chair if you need support.
Rotate the wobble board around so that the edge of the board is in contact with the floor at all times. Do this 30 times in a clockwise and then a counterclockwise direction.
Balance on the wobble board for as long as you can without letting the edges touch the floor. Try to do this for 2 minutes without touching the floor.
Rotate the wobble board in clockwise and counterclockwise circles, but do not let the edge of the board touch the floor.
When you have mastered the wobble exercises standing on both legs, try repeating them while standing on just your injured leg. After you are able to do these exercises on one leg, try to do them with your eyes closed. Make sure you have something nearby to support you in case you lose your balance.
When might surgery be required?
- Surgery for a ruptured posterior cruciate ligament is often required when other structures in the knee are also damaged for example the anterior cruciate ligament or lateral ligaments.
Also, if there is rotational laxity, or the athlete’s lower leg twists more than normal in relation to the upper leg.
Surgical Treatment
- Your doctor may recommend surgery if you have combined injuries. For example, if you have dislocated your knee and torn multiple ligaments including the posterior cruciate ligament, surgery is almost always necessary.
- Rebuilding the ligament. Because sewing the ligament ends back together does not usually heal, a torn posterior cruciate ligament must be rebuilt. Your doctor will replace your torn ligament with a tissue graft. This graft is taken from another part of your body, or from another human donor (cadaver). It can take several months for the graft to heal into your bone.
- Procedure. Surgery to rebuild a posterior cruciate ligament is done with an arthroscope using small incisions. Arthroscopic surgery is less invasive. The benefits of less invasive techniques include less pain from surgery, less time spent in the hospital, and quicker recovery times.
- Surgical procedures to repair posterior cruciate ligaments continue to improve. More advanced techniques help patients resume a wider range of activities after rehabilitation.
Rehabilitation
- Whether your treatment involves surgery or not, rehabilitation plays a vital role in getting you back to your daily activities. A physical therapy program will help you regain knee strength and motion. If you had surgery, physical therapy will begin 1 to 4 weeks after your procedure.
- How long it takes you to recover from a posterior cruciate ligament injury will depend on the severity of your injury. Combined injuries often have a slow recovery, but most patients do well over time.
- If your injury requires surgery, it may be several weeks before you return to a desk job – perhaps months if your job requires a lot of activity. Full recovery typically requires 6 to 12 months.
- Although it is a slow process, your commitment to therapy is the most important factor in returning to all the activities you enjoy.
Rehabilitation of a posterior cruciate ligament injury can be split into 4 phases:
PHASE 1: Immediately following injury
Aims – To control swelling, maintain the ability to straighten and bend the leg, and begin strengthening exercises for the leg muscles when possible.
Duration – 2 weeks.
- Rest from aggravating activities.
Use crutches if necessary.
Complete rest for the first 48 hours, after that, let pain be the guide to the speed of progression of rehabilitation.
Apply cold therapy and compression as soon as possible following injury and for 15 minutes every 2 hours for the next 24 to 48 hours.
The frequency of application can be gradually reduced over the next few days to no less than 3 times a day and always after mobility or strengthening exercises.
Stretching exercises for the lower leg and upper body. Calf stretches, hamstring stretches, ankle mobility, and pain-free knee mobility exercises. If it hurts, do not do it.
Strengthening exercises (pain-free) – static quads, static hamstring holds, calf raises (both legs).
After week 1, the athlete may be able to maintain aerobic fitness with stationary cycling. By the end of week 2, the athlete should aim to be walking normally without aids. - PHASE 2 After Week 2
Aims – To completely eliminate swelling, regain full mobility, and build on strengthening exercises. By the end of this phase, the athlete may be able to do ‘proper’ cycling or light swimming.
Duration – 2 weeks.
- Apply cold therapy and compression 3 times a day until swelling is eliminated.
Once this is achieved, apply cold after every training session.
Mobility exercises – continue to work on these if full mobility has not been achieved.
Otherwise, progress onto more usual stretching exercises as long as they do not cause pain in the knee.
Strengthening exercises – continue with phase 1 exercises and also begin to include standing static quads (instead of sitting), half squats (both legs), hip raises, hip exercises against resistance, step-ups and single-leg calf raises.
PHASE 3: After week 4
Aims – To regain full strength and begin to return to sports-specific training.
Duration – 2 weeks.
- Apply cold therapy and compression following training sessions for 15 to 20 minutes to help prevent swelling from returning.
Stretching exercises for calf muscles, hamstrings, quadriceps, adductors, and abductors.
Progress strength exercises from phase 2 by increasing resistance and moving from double leg exercises to single-leg exercises. Plyometric exercises (hopping and bounding may be possible during this stage).
Begin a gradual return to running. Once the athlete can run for 20 to 30 minutes without any problems then speedwork can be gradually introduced. Start at 50% of maximum speed and increase each session to 90% of maximum speed.
Include backward and sideways running drills as well as quick changes of direction.
Phase 4: After week 6
Aims – To return to sports-specific training and competition. - Duration 2 weeks.
- Cold therapy and compression should not be required during this stage. If there is still swelling on the knee it may be necessary to go back a stage or two.
Full sports-specific flexibility training should be done through regular stretching before and after training sessions, on a daily basis.
Sports massage techniques to the surrounding muscles will help recovery after training and keep muscles in better condition.
Sprinting speed should now be near to normal and the athlete able to change direction at speed and perform other sports-specific tasks without pain or unease. Normal sports-specific training should now be resumed.
When the athlete is confident they should be returned to sport in a limited capacity for example a footballer may play only 20 minutes of a game. This will gradually introduce them to the demands of competition both physically and psychologically

4 Comments