
Posterior Cruciate Ligament Injury (PCL Injury)
Table of Contents
What is Posterior Cruciate Ligament Injury? (PCL Injury)
Posterior Cruciate Ligament Injury (PCL injury) happens far less often than does injury to the knee’s more vulnerable counterpart, the anterior cruciate ligament (ACL). The posterior cruciate ligament and ACL connect your thighbone (femur) to your shinbone (tibia). If either ligament is torn, it might cause pain, swelling, and a feeling of instability.
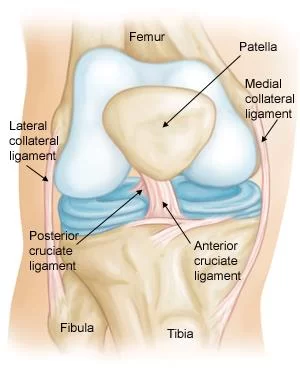
Ligaments are strong bands of tissue that attach one bone to another. The cruciate (KROO-she-ate) ligaments connect the thighbone (femur) to the shinbone (tibia). The anterior and posterior cruciate ligaments form an “X” in the center of the knee.
Although a posterior cruciate ligament injury generally causes less pain, disability, and knee instability than does an ACL tear, it can still sideline you for several weeks or months.
ANATOMY OF KNEE
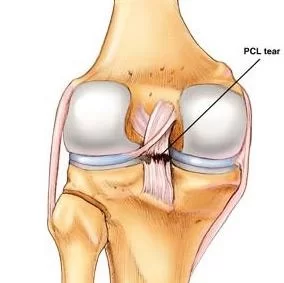
Posterior Cruciate ligament (PCL) is found inside your knee joint. It originates at the internal surface of the medial femoral condyle and inserts on the center of the posterior aspect of the tibial plateau, 1 cm below the articular surface of the tibia. They cross each other to form an “X” with the anterior cruciate ligament in front and the posterior cruciate ligament in back. The cruciate ligaments control the back-and-forth motion of your knee.
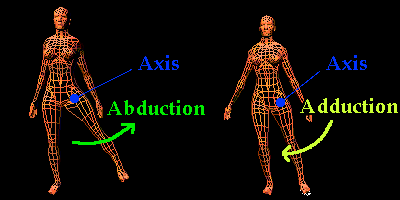
The PCL is one of the two cruciate ligaments of the knee. It acts as the major stabilizing ligament of the knee. and prevents the tibia from excessive posterior displacement in relation to the femur. It also functions to prevent hyper-extension and limits internal rotation, adduction, and abduction at the knee joint. The PCL is twice as thick as the ACL which results in fewer injuries than the ACL due to its stronger nature. As a result, PCL injuries are less common than ACL injuries.
The PCL consists of two inseparable bundles: the wide anterolateral (AL) bundle and the smaller posteromedial (PM) bundle. The AL bundle is most tight in mid-flexion and internal rotation of the knee, while the PM bundle is most tight in extension and deep flexion of the knee. The orientation of the fibers varies between bundles. The AL bundle is more horizontally orientated in extension and becomes more vertical as the knee is flexed beyond 30°. The PM bundle is vertically orientated in knee extension and becomes more horizontal through a similar range of motion.
Posterior cruciate ligament mechanism of injury:
In this medial view of the flexed knee, the lateral femoral condyle has been removed to reveal the structure of the PCL. Because the anterolateral bundle is stretched and the posteromedial bundle relaxed during flexion, excessive flexion in the form of hyperflexion causes tensile stress, shown in red, on the anterolateral bundle of the PCL that leads to PCL injury.
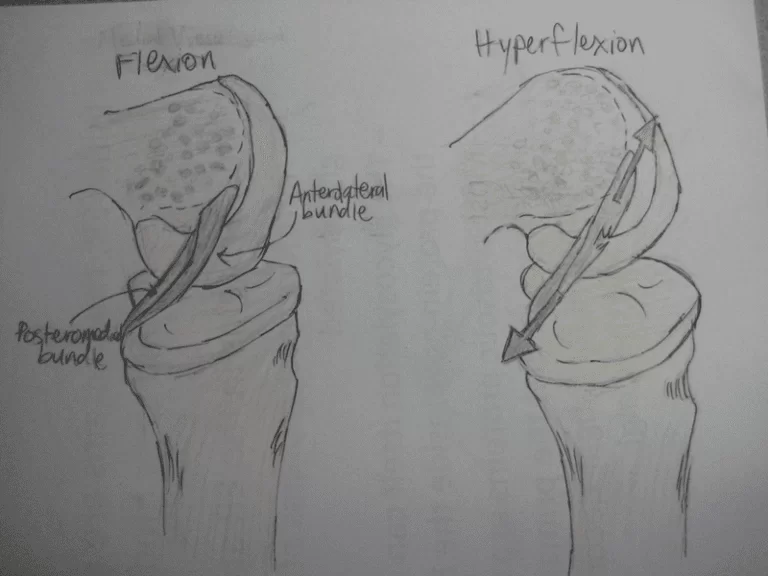
In this position, the PCL functions to prevent movement of the tibia in the posterior direction and to prevent the tilting or shifting of the patella. However, the respective laxity of the two sections makes the PCL susceptible to injury during hyperflexion, hyperextension, and in a mechanism known as a dashboard injury. Because ligaments are viscoelastic they can handle higher amounts of stress only when the load is increased slowly.
When hyperflexion and hyperextension occur suddenly in combination with this viscoelastic behavior, the PCL deforms or tears. In the third and most common mechanism, the dashboard injury mechanism, the knee experiences impact in a posterior direction during knee flexion toward the space above the tibia. These mechanisms occur in excessive external tibial rotation and during falls that induce a combination of extension and adduction of the tibia, which is referred to as varus-extension stress, or that occurs while the knee is flexed.
Posterior cruciate ligament injury symptoms:
The following typical symptoms of a posterior cruciate ligament injury are:
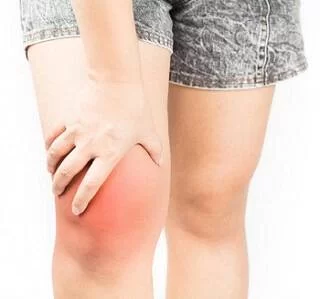
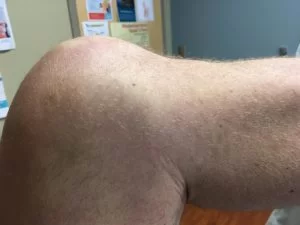
- Knee Pain with swelling that occurs steadily and quickly after the injury
- Swelling that makes the knee stiff and may cause a limp
- Difficulty walking
- The knee feels unstable, like it may “give out”
GRADES
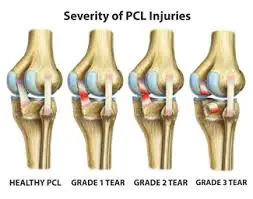
- Grade I: the PCL has a slight tear.
- Grade II: the PCL ligament is minimally torn and becomes loose.
- Grade III, the PCL is torn completely and the knee can now be categorized as unstable.
- Grade IV: the ligament is damaged along with another ligament housed in the knee
CAUSES OF PCL INJURIES
PCL injuries are often due to a blow to the knee while it’s bent suddenly.
Common causes include:
- Striking the knee against the dashboard during an auto accident
- Falling on the knee while it’s bent
Sports are a common cause of PCL injury. These injuries are especially common in:
- Football
- Soccer
- Baseball
- Skiing
DIAGNOSIS
During the physical exam, your doctor might press on your knee to feel for injury, looseness or fluid in the joint from bleeding. He or she may move your knee, leg or foot in different directions and ask you to stand and walk. Your doctor will compare your injured leg with the healthy one to look for any sagging or abnormal movement in the knee or shinbone.
In some cases, your doctor may suggest one or more of the following imaging tests:
X-ray: While an X-ray can’t detect ligament damage, it can reveal bone fractures. People with posterior cruciate ligament injuries sometimes have breaks in which a small chunk of bone, attached to the ligament, pulls away from the main bone (avulsion fracture).
MRI scan: This painless procedure uses radio waves and a strong magnetic field to create computer images of the soft tissues of your body. An MRI scan can clearly show a posterior cruciate ligament tear and determine if other knee ligaments or cartilage also are injured.
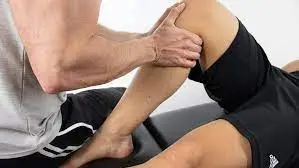
POSTERIOR DRAWER TEST
The patient is supine and the knee to be tested is flexed to approximately 90 degrees. The examiner then sits on the toes of the tested extremity to help stabilize it. The examiner grasps the proximal lower leg, approximately at the tibial plateau or joint line, and attempts to translate the lower leg posteriorly. The test is considered positive if there is a lack of end feel or excessive posterior translation
Posterior sag sign:
the patient is asked to flex both knees and hips at 90 º while lying in the supine position. The examiner holds both heels and legs. Posterior tibial translation is an indication of an injured or insufficient PCL.
MEDICAL TREATMENT:
- NSAIDs pain relievers, such as ibuprofen (Advil, Motrin IB, others) or naproxen sodium (Aleve), can help relieve pain and reduce swelling.
- Immobilize the knee in a range of motion brace locked in extension for 2-3 weeks
- Assisted weight-bearing (partial to full) for 2 weeks
SURGERY :
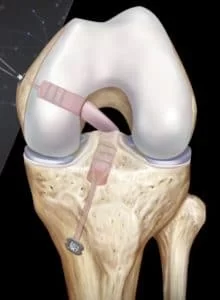
Rebuilding the ligament: Because sewing the ligament ends back together does not usually heal, a torn posterior cruciate ligament must be rebuilt. Your doctor will replace your torn ligament with a tissue graft. This graft is taken from another part of your body, or from another human donor (cadaver). It can take several months for the graft to heal into your bone.
Procedure: Surgery to rebuild a posterior cruciate ligament is done with an arthroscope using small incisions. Arthroscopic surgery is less invasive. The benefits of less invasive techniques include less pain from surgery, less time spent in the hospital, and quicker recovery times.
PHYSIOTHERAPY TREATMENT
Pain relieving modalities with the use of the RICE Principle.
- Rest
- Ice: 10-20 minutes every 2-4 hours
- Elevation
- Compression
- Hydrotherapy
- Transcutaneous electrical nerve stimulation (TENS) unit treatment is effective in pain management.
Exercise in Posterior cruciate ligament injury
1. Static Quad sets of Exercise
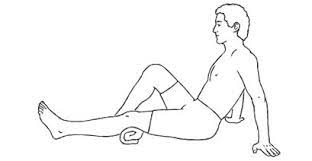
Sit on the floor with your injured leg straight and your other leg bent. Press the back of the knee of your injured leg against the floor by tightening the muscles on the top of your thigh. Hold this position 10 seconds. Relax. Do 2 sets of 15.
2. Seated quadriceps strengthening exercise
Sit in a straight-back chair with your injured knee bent at a 90-degree angle. Try to tighten the top of your thigh muscles without moving your leg. Hold for 10 seconds. Do 2 sets of 15.
3. Straight leg raise (SLR)
Lie on your back with your legs straight out in front of you. Bend the knee on your uninjured side and place the foot flat on the floor. Tighten the thigh muscle on your injured side and lift your leg about 8 inches off the floor. Keep your leg straight and your thigh muscle tight. Slowly lower your leg back down to the floor. Do 2 sets of 15.
4. Wall squat with a ball
Stand with your back, shoulders, and head against a wall. Look straight ahead. Keep your shoulders relaxed and your feet 3 feet (90 centimeters) from the wall and shoulder’s width apart. Place a soccer or basketball-sized ball behind your back. Keeping your back against the wall, slowly squat down to a 45-degree angle. Your thighs will not yet be parallel to the floor. Hold this position for 10 seconds and then slowly slide back up the wall. Repeat 10 times. Build up to 2 sets of 15.
5. SIDE LEG RAISES
Lie on one side with your legs stacked. Bend the bottom leg for support. Straighten the top leg and raise it to 45 degrees. Hold for 5 seconds, lower and relax briefly, then repeat 10-15 times. Switch sides and start over. Want to try a bit of a different spin on the move? Point the toe of your upper leg slightly toward the floor as you raise it.
6. AHKF
Lie on the floor (orbed if the floor is difficult) with your knee straight, and slowly bend the affected knee as far as possible (moving your ankle as close to your bottom as possible). When you feel a stretch in the thigh muscle hold the position for 10 seconds then return to the straightened position and hold again for 10 seconds. Repeat 10 times.
POST-OPERATIVE REHABILITATION EXERCISE
1.Exercises (0° to 90°)
– Passive knee flexion
– Active knee extension: Isometric quadriceps
SLR
– Patella mobilizations in all directions to prevent arthrofibrosis
2. Knee range of motion to 0° to 120°
– Full extension range of motion
– Exercises: Open chain knee extension exercises (0°-70°)
Closed chain weight bearing exercises (range 0°-45°) :- Mini-squats (0°-45°) – progress from double to single
Bilateral and unilateral leg press
Stationary cycling once knee flexion >100°
SLR uses maximum resistance of 10% of the body weight
3. Bilateral to unilateral closed chain exercises (0°-45°)
- Wall squatting, single-leg squats, and lunges
- Other exercises: Balance and proprioceptive drills
Forward and lateral step-ups
Stair climbing
Treadmill walking
4. Continue knee and hip strengthening exercises, including :
Open chain quadriceps exercises (90°-0°)
Open chain hamstring exercises (0°-45°)
Closed chain squatting and lunging (0°-75°).
DO’S & DON’TS
~Get plenty of rest – Your body will need as much energy as it can get to repair the damaged tissues in your knee. Stay off your feet when possible and take it easy for the first few weeks after surgery, when healing is happening the fastest.
~Use Ice pack – Cold therapy is proven to help reduce the pain and swelling that comes after knee surgery. Reducing swelling will help contribute to a faster recovery, so ice your knee regularly. If possible, use an active cold therapy system to get the most from cryotherapy.
~Use compression therapy – Compression bandages and modern active compression therapy systems help remove excess fluid from the area surrounding the knee joint to help accelerate healing.
~Do regular physiotherapy – Work with a physical therapist to learn the strengthening and stretching exercises that will help you heal faster and prevent future injuries.
~Don’t do too much too soon – Although it may be tempting to return to normal activity as soon as possible, especially after the initial pain fades away, your body needs more time to heal fully. Follow your physical therapist’s instructions closely and don’t do more than they recommend.
~Don’t skip doctor visits – Keep the appointment schedule your doctor provides. It is important to stay on track throughout your recovery and only your doctor can confirm that the repairs they performed are healing correctly.
~Don’t end physiotherapy early – Because the pain subsides and you can get a comfortable range of motion back relatively quickly, many people are tempted to stop going to physical therapy sessions before they have fully recovered. Follow the entire course of care to ensure that the healing process is completed fully.

7 Comments