KT TECHNIQUE FOR PCL INJURY
Table of Contents
Introduction :
Kinesio taping on posterior cruciate ligament injury is most effective technique for treatment of pcl tear. It is also provide support to the joint. It reduce the further damage to the joint. Kinesio taping is supportive and effective technique . it is Most popular technique now a days for treatment of the posterior cruciate ligament tear.
it is also called kinesiology tape or kinesiology therapeutic tape, is an elastic cotton strip with an acrylic adhesive that is purported to ease pain and disability from athletic injuries and a variety of other physical disorders. Taping your knee can help stabilize it when you’re active and can give relief from pain.its give static as well as dynamic support to the damage joint.
Kinesiological tapping is a rehabilitative cum protective use of stretchable kinesiological tapes to provide :
- reduction in knee pain while pcl injured
- enhancing performance of affected knee
- preventing further injuries to the knee
- support to the knee joint
- repositioning of structure of knee
- facial and ligamentous correction of knee.
- It facilitate the healing method whereas providing full memory board with support to the joints suppotive structure still as mobilization effects. Your posterior symmetrical ligament (PCL) runs on the rear of your knee and connects your femoris to the highest of your lower long bone.
- This ligament keeps your bones in situ and helps your knee move swimmingly. Injury to the posterior symmetrical ligament (PCL) will vary from a stretch to a complete tear or rupture of the ligament. These injuries area unit comparatively uncommon.
- The mean age of individuals with acute PCL injuries vary between 20-30’s. where as injuries to the PCL will occur in isolation, principally as a results of sport, they in the main occur in conjunction with different ligamentous injuries,usually caused by automobile accidents. The posterior symmetrical ligament keeps the leg bone from moving backward with relevancy the thigh bone.
- An injury to the posterior symmetrical ligament needs a robust force. a typical reason behind injury may be a bent knee striking a dashboard during a automobile accident or a football player falling on a knee that’s bent. to boot, harm to the PCL may result from a severe twisting injury or contact injury throughout sport.
Relevant anatomy :
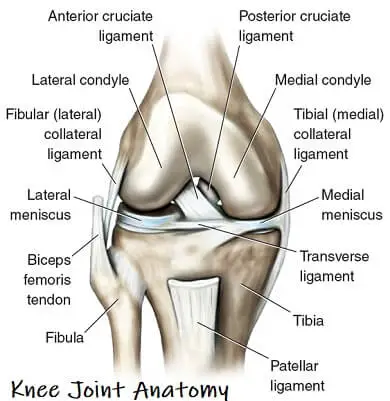
- origin: posterior leg bone fissure below the body part surface
- insertion : anterolateral medial limb process broad, crescent footprint
- Blood offer : supplied by branches of the center crooked artery and fat pad The PCL is one amongst the 2 symmetrical ligaments of the knee. It acts because the major helpful ligament of the knee.
- and prevents the leg bone from excessive posterior displacement in relevancy the femoris.
- It additionally functions to forestall hyper-extension and limits internal rotation, move and abduction at the hinge joint. The PCL is double as thick because the ACL which ends up in less injuries than the ACL thanks to the stronger nature. As a result, PCL injuries area unit less common than ACL injuries.
- It originates at the interior surface of the medial limb process and inserts on the center of the posterior facet of the leg bone upland, one cm below the body part surface of the leg bone.
- It crosses the ACL to create AN ‘X’. The PCL consists of 2 indivisible bundles: the wide anterolateral (AL) bundle and therefore the smaller posteromedial (PM) bundle. The AL bundle is most tight in mid-flexion and
- internal rotation of the knee, whereas the PM bundle is most tight in extension and deep flexion of the knee. The orientation of the fibers varies between bundles. The AL bundle is a lot of horizontally oriented in extension and becomes a lot of vertical because the knee is flexed on the far side 30°. The PM bundle is vertically oriented in knee extension and becomes a lot of horizontal through the same.
Function of PCL :
The function posterior cruciate ligament is to prevent the femur from sliding off the anterior edge of the tibia and to prevent the tibia from displacing posterior to the femur.
- Causes of PCL injury : The posterior cruciform ligament will tear if your leg bone is hit exhausting slightly below the knee or if you fall on a bent knee. These injuries area unit most typical during:
- Motor vehicle accidents : A “dashboard injury” happens once the driver’s or passenger’s bent knee slams against the dashboard, pushing within the leg bone slightly below the knee and inflicting the posterior cruciform ligament to tear.
- Contact sports : Athletes in sports like soccer and association football will tear their posterior cruciform ligament once they fall on a bent knee with their foot pointed down. The leg bone hits the bottom initial and it moves backward. Being tackled once your knee is bent can also cause this injury.
Symptoms of PCL injury :
- Sharp or boring pain round the back of the knee.
- Swelling on knee
- Stiffness of knee
- Difficulty bearing weight on the knee
- Knee instability.
- The back of the knee is also consider the bit.
- Tenderness round the knee.
- Knee tingling.
Risk factor of acl injury :
- You may be exaggerated risk of experiencing a PCL injury may you play sports such as:
- Baseball
- Soccer
- Football
- Skiing
Special test for PCL injury :
Posterior drawer test :
- procedure : patient supine with hips flexed to 45 degree and knee flexed to 90 degree. stabilize foot. apply anteroposterior force to tibia.
- positive sign : excessive movement.
Posterior sag sing :
- procedure : patient supine with hips flexed to 45 degree and knee flexed to 90 degree with feet on plinth.
- positive sign : tibia drops posteriorly.
Slocum test :
- procedure: patient supine with hips flexed to 45 degree and knee flexed to 90 degree. place foot in 30 degree medial rotation and stabilize. apply posteroanterior force to tibia.
Grades of injury :
There are main three grades of posterior cruciate ligament tear.
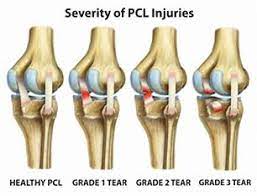
- Grade I : a partial tear
- exam shows 1-5 mm posterior tibial translation
- Tibia remains anterior to the femoral condyles.
- Grade II : a complete isolate tear
- exam shows 6-10 mm posterior tibial translation
- complete injury in which the anterior tibia is flush with the femoral condyles.
- Grade III : a combined PCL + capsuloligamentous injury
- exam shows >10mm posterior tibial translation
- tibia is posterior to the femoral condyles and often indicates an associated ACL and/or PLC injury.
Types of pcl injury :
- Isolated injury :
- Symptoms area unit usually obscure and nominal, with patients usually not even feeling or noticing the injury.
- Minimal pain, swelling, instability and full vary of motion is gift, likewise as a near-normal gait pattern.
- Combination with alternative ligamentous injuries: Symptoms take issue in step with the extent of the knee injury. This includes swelling, pain, a sense of instability, restricted vary of motion and difficulty with mobilization. Bruising might also be gift.
2. Chronic PCL injury :
- Patients with a chronic PCL injury does not seem to be continuously ready to recall a mechanism of injury. Common complaints area unit discomfort with weight-bearing during a semi flexed position (e.g. rising stairs or squatting) and aching within the knee once walking long distances. Complaints of instability are usually gift, mostly once walking on associate degree uneven surface. Retropatellar pain and pain within the medial compartment of the knee might also be gift. Potential swelling and stiffness rely on the degree of associated chondral harm.
- Symptoms area unit usually obscure and nominal, with patients usually not even feeling or noticing the injury. nominal pain, swelling, instability and full vary of motion is gift, likewise as a near-normal gait pattern.
Method of KT application :
- Follow the basic steps for ligament taping.
- Measuring the tape : The tape strip size depends on the physique of the subject. the strip should be 2cm more in length than the application area.
- Select the required strip design,generally ”I”strip are used.
- The corners of the tapes are rounded off.
- Application of tape : The backing paper is torn off from center, the tape is stretched to 75-100% of its length, the center of tape is applied posteriorly just below the inferior pole of patella while the subject is moving the the knee into flexion, and both the ends are attached without any stretch.
- The application is repeated with 2 strips if needed. First strip is always parallel to the ligament attachment. At the end of application rub the tape until the warmth is felt, this is necessary to activate the glue.
How to remove KT?
- So presently you’ve got your tape on and you’ve gotten that additional support throughout your chosen sporting activity, it’s time to need it off, so enable the United States to ease the tactic of removing physiology tape for you. the foremost effective tip we are going to provide once it involves removing your physiology tape is to peel the skin from the tape, not the tape from the skin.
- But in terms of the actual methodology, 1st ensure you’re removing the tape in an equivalent direction as a result of the expansion of the hair below it, and despite what you’re doing don’t rip the tape off kind of a plaster!
- Start slowly, folding the corners of the sting back bit by bit, guaranteeing that you’re birth the removed tape on the rear of the applied tape, as opposition propulsion the tape on top of and aloof from your arm.
- As you’re scraping the tape, hold your skin down beside your completely different hand and either regulator it or pull it gently among the opposite means of the tape. This helps the skin and so the tape to separate heaps expeditiously but with no discomfort.
- If the tape has been applied over a furred region of the body, it helps to maneuver on the tape as you are peeling it off, as a result of the pressure helps avoid a lot of pain.
- It’s knowing have shaved the realm before applying the tape but, as this isn’t frequently smart, taking this precaution square measure reaching to be necessary to some.
- want a bit additional assistance? Apply oil directly onto the tape, rub it in and wait around 10 to twenty minutes before removing it slowly. This will facilitate reducing the viscousness of the tape and build it easier to induce obviate.