
Laminectomy
Table of Contents
Description
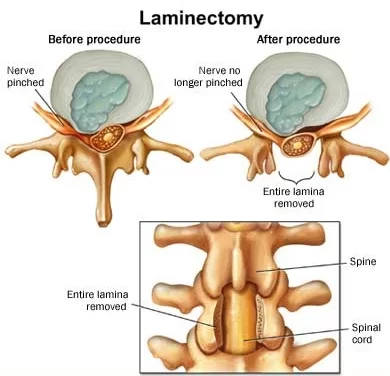
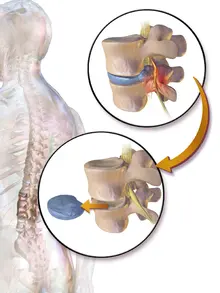
The word laminectomy means – excision of the lamina through surgery. However, in most cases, including the excision of the supraspinous ligament and some or all of the spinous process. A laminectomy is a surgical procedure that dispatches a part of a vertebra called the lamina. is a greater spine operation with residual scar tissue and can outcome in post-laminectomy syndrome.
This operation is performed to decompress the spinal canal. As medical science advances, there are too many techniques to accomplish spinal
decompression, like open or minimally invasive laminectomy, hemilaminectomy (half laminectomy), laminotomy, and laminoplasty.
- Decompression techniques classify as direct and indirect; direct procedures include those techniques with visualization of the dural sac at the time of the surgery like laminectomy.
- On the other hand, indirect decompression occurs without a dural sac visualization.
- Laminectomy alone or connected with fusion is one of the most common procedures done by a spinal surgeon.
- The word laminectomy typically means – excision of the lamina.
- However, in most cases, including the excision of the supraspinous ligament and some or all of the spinous process.
- Lamina is infrequently removed if utterly need rather, it is performed to break the continuity of the rigid ring of the spinal canal to permit the soft tissues within the canal to: expand (decompress); change the contour of the vertebral column; or allow access to deeper tissue inside the spinal canal.
Technique 1:
Conventional Laminectomy –
The skin was incised horizontally over a length of eight– cm in the midline along with lumbodorsal fascia. The paraspinal muscles were removed from the spinous process and bilaterally laminae in a subperiosteal level retracted.
- Decompression was done using standard techniques to dispatch the spinous process, lamina, and ligamentum flavum, along with partial medial facetectomy (limited to one-third of the facet joint) and hemolysis of the traversing nerve roots (that exit at the vertebral level below the surgical level).
Technique 2:
- Minimally Invasive ULBD – Minimally Invasive Surgical (MIS) techniques involve laminotomy and microendoscopic laminotomy with tubular retractors.
- Contemporary literature allows these techniques to result in better preservation of posterior musculature, reduced intraoperative bleeding, and postoperative pain.
Relevant Anatomy
- lamina and other elements of vertebrae.
- The lamina is a posterior arch of the vertebral bone lying in the middle of the spinous process and the more lateral pedicles and the transverse processes of each vertebra.
- The lamina, facets, and spinous process are greater than the posterior elements which help guide the movement of the vertebrae and protect the spinal cord.
- The supraspinous ligament is associated with the tips of the spinous processes from the 7t cervical vertebra to the sacrum. It runs over the posterior part of the vertebrae.
Indication
- Presence of spinal canal stenosis
- Primary or secondary tumors
- Infection (peridural abscesses)
- Trauma (fractures that compromise the spinal canal)
- Stenosis connected with the deformity
- Ankylosing spondylitis (Can help n reducing symptoms)
- Cervical myelopathy
Contraindication
- Spinal instability (is a contraindication for laminectomy without connected combined technique)
- Degenerative or isthmic spondylolisthesis (relative contraindication)
- Severe scoliosis (relative contraindication)
- Severe kyphosis (relative contraindication)
Symptoms
- Central stenosis- neurogenic claudication, which involves pain, tingling, or cramping sensation in the extremity lateral recess, foraminal, and extraforaminal lumbar stenosis – radiculopathy,
- patients with central stenosis can feel more symptoms in standing position and at the time walking and pain is generally reduced by leaning forward or in a sitting position.
Diagnostic Tests
Cervical tests
Spurling test ( Foraminal compression test)
Procedure:
- The person has to take a sitting position with a head turned as well as tilted to one side.
- A therapist stands behind a patient with one hand placed on the patient’s head. With another hand, a therapist lightly presses (compresses) a hand resting on a patient’s head.
- If a person tolerates the first step of a test, this is then repeated with a cervical spine extended as well.
How to do an assessment:
- A test gives clinical proof of both facet syndrome as well as nerve root compression.
- Where facet joint irritation or nerve root compression is present, an examination can increase the pain.
- Simultaneous extension of a cervical spine shortens the intervertebral foramina by 20–30%. Existing radicular pain can be improved by movement.
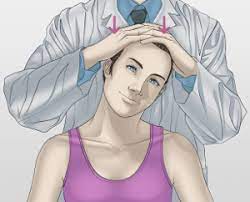
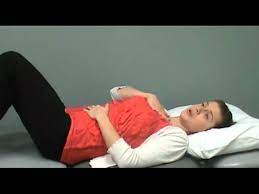
Distraction Test
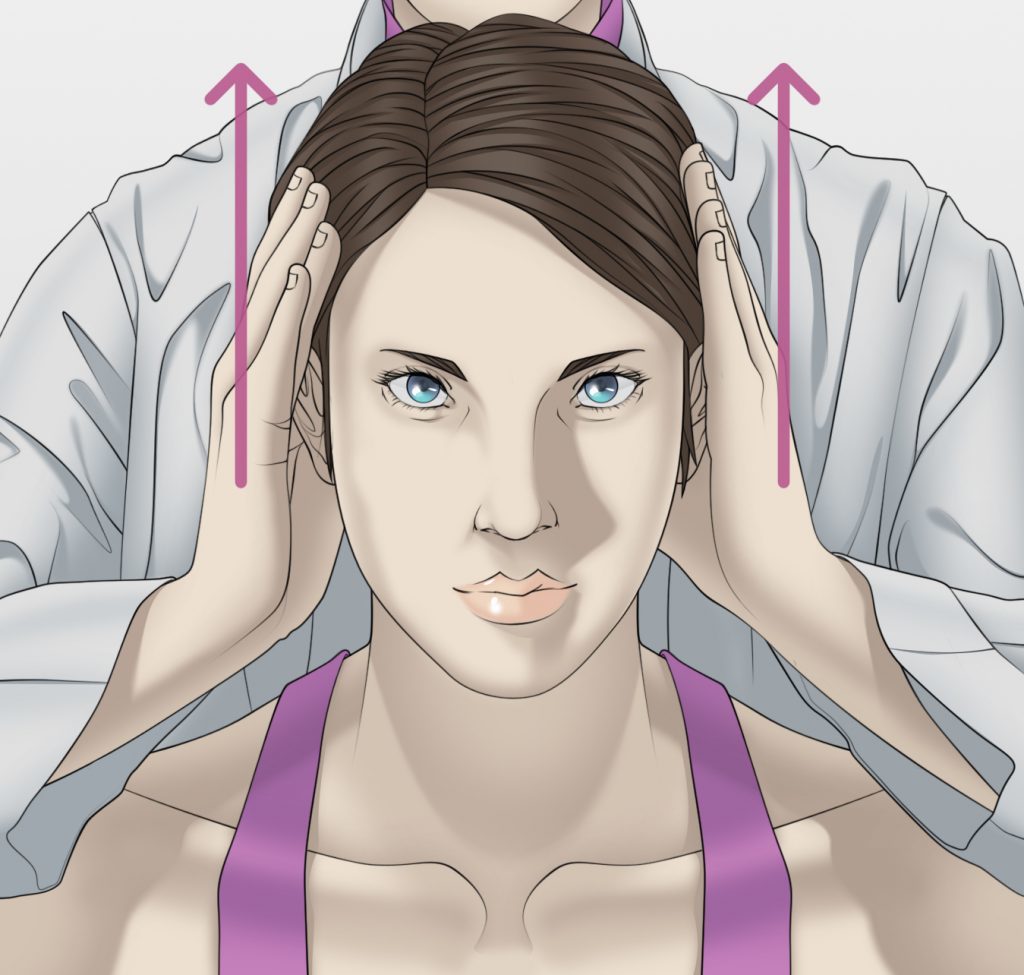
- The person is in the supine position.
- An examiner grabs under a chin as well as occiput flexes a person’s neck to the position of comfort, & gently gives the distraction force of up to an estimated fourteen kg.
- The positive test occurs with a decrease or elimination of a patient’s upper limb or scapular symptoms.
- A test is not positive if a patient has no upper limb or even scapular region symptoms.
- Sensitivity = 0.44
- Specificity = 0.90
- Approx Ratio = 4.40
- Approx Ratio = 0.62
Upper Limb Tension Test (ULTT)
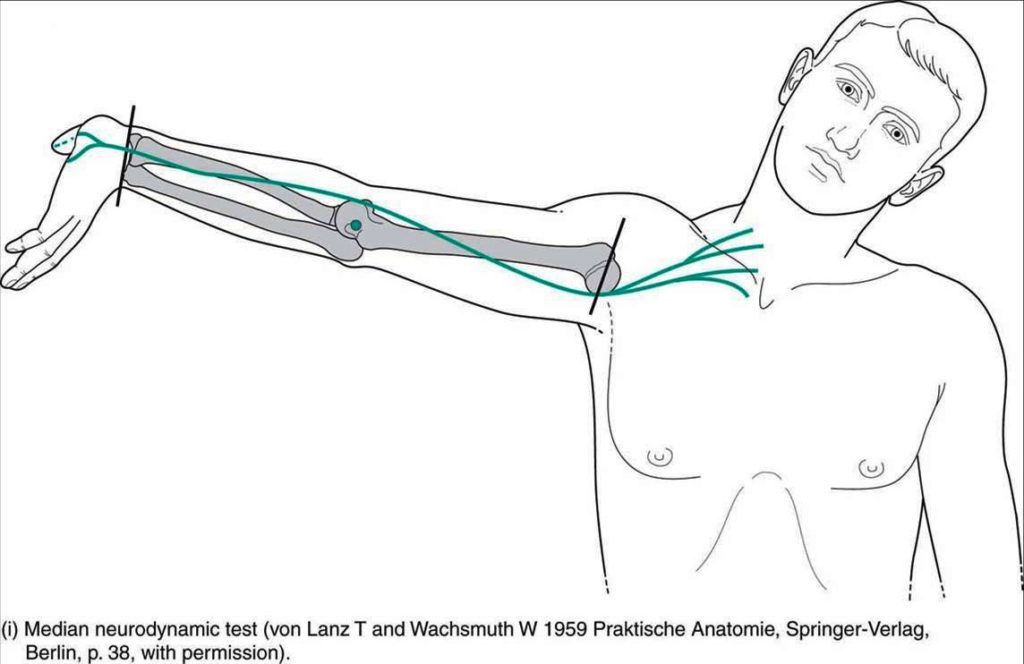
- Initially, a person is positioned in a supine.
- While the Upper Limb Tension Test put a bias toward testing a person’s response to tension put on a median nerve, an examiner sequentially introduces the following move to the symptomatic upper limb.
- Scapular depression,
- Shoulder abduction to an estimated 90 degrees with an elbow flexed position,
- Forearm supination, wrist as well as digits extension,
- Shoulder lateral rotation,
- Elbow extension,
- Contralateral after that ipsilateral cervical side-bending
- The positive test is suggested by the presence of any of the following findings:
- Reproduction of all or part of a person’s symptoms of tingling or numbness.
- Side-to-side differences of greater than 10 degrees of an elbow or the wrist extension on the symptomatic side, contralateral
- cervical side-bending improves a person’s symptoms, or ipsilateral side-bending decreases a person’s symptoms.
- Sensitivity = 0.97
- Specificity = 0.22
- Approximate Ratio = 1.3
- Approximate Ratio = 0.12
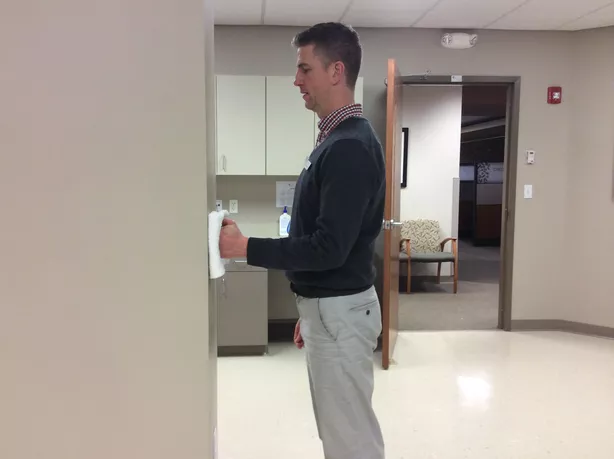
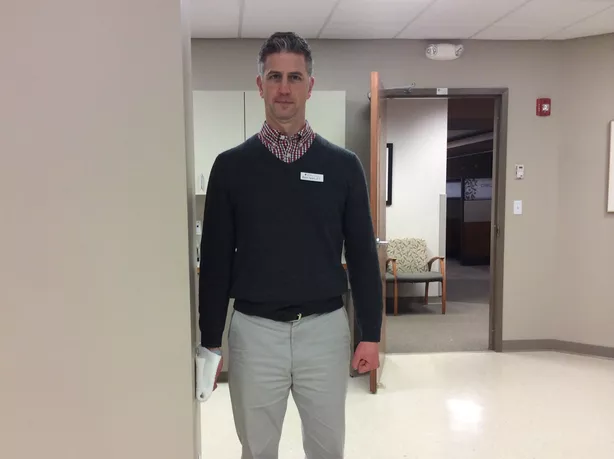
Shoulder abduction test

- The patient is positioned in a sitting or standing position, with the Stands in front of the person.
- The therapist asks the person to make an active or passive abduction of the shoulder, flex the elbow and put the palm of the hand on the top of the patient’s head (increase the arm through abduction, so that the hand or forearm rests on top of the head).
- The person is asked to maintain this position for thirty seconds.
- The shoulder Abduction Test (Bakody Test) is positive if the symptoms of nerve root irritation increase or resolve because abduction of the arm reduces the tension of the nerve roots.
- A cervical extradural compression problem, like a herniated disk, or nerve root compression should be suspected.
Tinel’s sign
Tinel’s test is utilized to test for compression neuropathy, generally in diagnosing carpal tunnel syndrome.
Technique
- It is done by slightly tapping (percussing) over the nerve to extract a sensation of tingling or “pins and needles” in the distribution of the nerve.
- The Tinel sign is the tingling or prickling sensation extracted by the percussion of an involved nerve
- trunk at or distal to the site of the lesion. The sign also indicates nerve regeneration.
Positive test: The test is positive when a tingling or prickling sensation is experienced in the distribution of the nerve.
Compression test
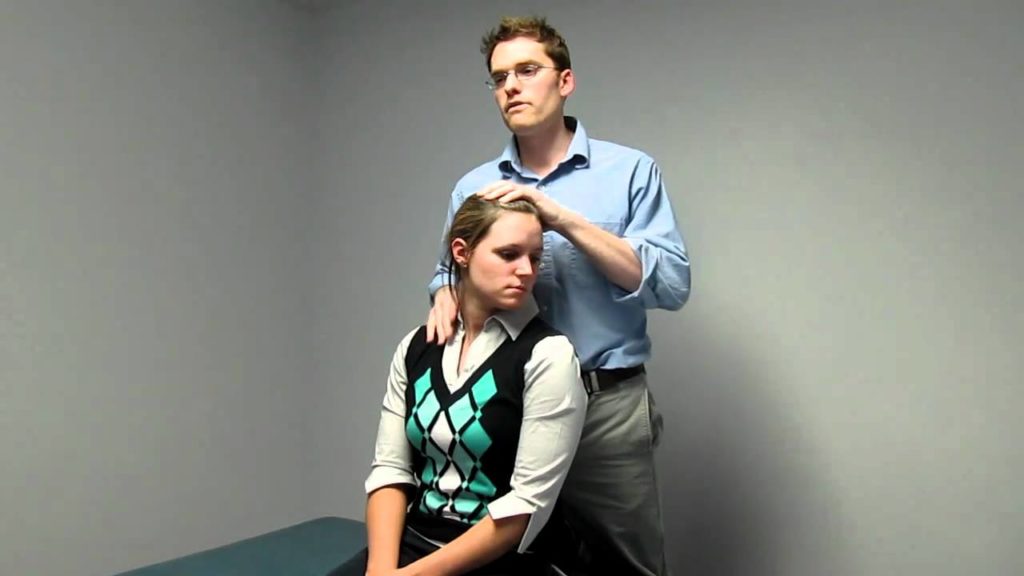
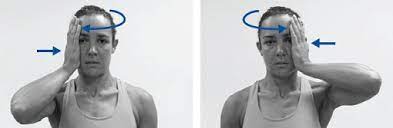
Jackson compression test
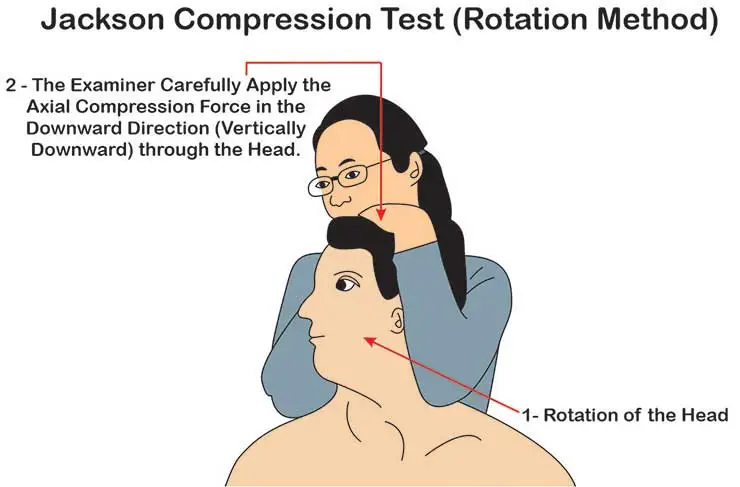
- A person requires to take a sitting position.
- A therapist stands behind a person with his or her hand on the top of the person’s head as well as passively tilts a head to the opposite side. In maximum lateral bending, a therapist presses down on a head to exert axial pressure on the spine.
- Assessment: An axial loading outcome in improved compression of intervertebral disks, exiting nerve roots, as well as facet joints.
- Pressure on intervertebral foramina performs on a facet joint to extract distal pain that does not exactly follow identifiable segmental dermatomes.
- The positive sign of nerve root irritation can cause radicular pain symptoms.
Flexion compression test
- A person needs to take a sitting position.
- A therapist stands behind a patient as well as passively moves a cervical spine into the flexion position(tilts a person’s head forward).
- After that, axial compression is given to the upper part of the head.
- It is a great test of the integrity of an intervertebral disk.
- In a presence of the posterolateral disk extrusion, the maneuver can press an extruded portion of a disk in the posterior direction, resulting in improving compression of the nerve root.
- An improvement in radicular symptoms may so indicate the presence of the posterolateral disk extrusion.
Lumbar tests
The straight leg raise test:
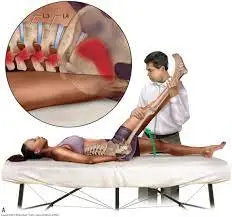
- This passive test utilizes to diagnose lumbar nerve root (L4-S1) impingement/irritation (lumbosacral radiculopathy) and sciatic neuropathy Compression of the spinal nerve root as it passes through the vertebral foramen causes painful radiculopathy with connected muscle weakness and dermatomal sensory loss, generally from a herniated disc.
Lying Straight Leg Raise Test:
- Have the person lying supine with legs extended
- Place the hand under the lumbar spine to make sure there is no compensatory lordosis
- Observe the lumbar spine at the time of the test because a change in the curve invalidates the test outcome
- Also, ensure the pelvis does not rise above the table
- Ask the person to relax their leg
- Grab the ankle of the leg and put the opposite hand on the front of the thigh to maintain the knee in full extension
- Gently lift the leg until the patient complains of pain or maximal flexion has been achieved (60-120 degrees)
- Check the degree of increment at which pain happens, the quality and distribution of pain, and the effects of dorsiflexion.
The availability of a painful arc recommends a protrusion so small that the nerve root merely catches against it and slips over
Back the leg to the table carefully
Results
- Positive: inducing/reproducing the patient’s pain down the leg Changing the back pain is not a positive test
- Negative: No pain is experienced by the patient upon maximal flexion of the leg
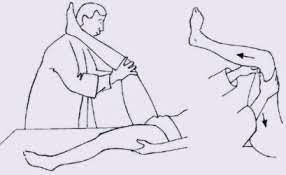
The contralateral (crossed) straight leg raise test
- The test is similar to the straight leg test, the difference being that it is done on the leg not affected by pain.
- Results
- Positive: while doing the straight leg test on the noninvolved leg the symptoms/pain are reproduced on the opposite (affected leg)
- Negative: No symptoms/pain is experienced on the other leg
- Note: the test has a sensitivity of 28%-29% and a specificity of 88%-90% for nerve root impingement.
Bowstring test
- To perform the test, have the patient in a supine lying position.
- Then do a regular straight leg raise test until symptoms happen.
- Keep up the leg in this position and flex the person’s knee slightly to 20°.
- This should lower the symptoms.
- Then apply gentle pressure to the popliteal area, which is a positive test, will reproduce symptoms and cause discomfort.
- A positive test will evaluate tension or pressure on the sciatic nerve.
Prone knee bending

- To perform the test the patient lying in a prone position.
- Then proceed to carefully flex the knee on the involved side maximally.
- If a person is unable to flex the knee further than 90° or if a person wants to emphasize stretch on the femoral nerve even further, a person can add the passive hip extension.
- The test is considered positive in case the person reports shooting pain down the leg or anterior thigh upon the maximal knee flexion with or without added hip flexion.
- Some authors suggest holding the knee flexion for 45-60 seconds though that can be too provocative in an active nerve root compression.
Hyperextension Test
- The person requires to passively mobilize the trunk over the full range of extension, while the knees stay extended.
- The test suggests that the radiant pain is caused by disc herniation if the pain deteriorates.
- Manual Testing and Sensory Testing take out for hypoaesthesia, hypoalgesia, tingling, or numbness Spinal canal stenosis.
Other tests
- Bicycle Stress Test
- Two-Stage Treadmill Test
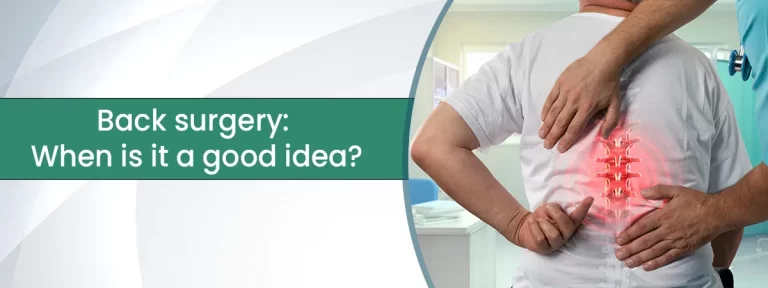
What are the potential risks or complications of a laminectomy?
Possible complications of laminectomy involve:
- Bleeding.
- Infection.
- Medical or anesthesia problems.
- Blood clots.
- Nerve damage.
- Spinal fluid leak.
- Bowel or bladder problems (incontinence).
- Worsening back pain.
Physiotherapy exercise
Pre-Operative Exercises
- Keep the advice in bed mobility, transfers, and body mechanics education with ADLs
- Instruction in basic home exercise program:
Ankle pumps
Ankle pumps are a little but great exercise that strengthens the ankles improves stability and staves off dangerous conditions such as blood clots. People do not need any equipment to complete them, and they have a myriad of benefits for both surgical and non-surgical patients. Ankle pumps are an easy but effective exercise that prevents clots. Here is how to do ankle pumps when sitting in a
chair.
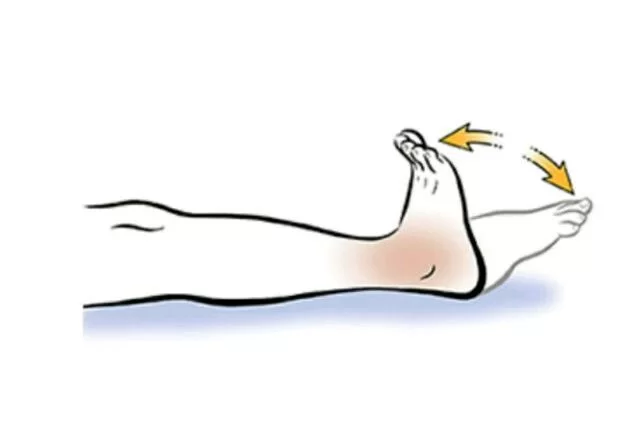
- Start with sitting with the back straight against a chair and legs extended in front of you, spread slightly apart.
- Point the toes up so the soles are flat.
- Pretend a person is pressing down on the gas pedal of an automobile and pointing the toes down.
- Hold the toes in this stretch for a brief count of three to 5 seconds.
- Gently back the toes so the foot is perpendicular to the floor
- A person just completed 1 round of ankle pumps.
- A person may also complete ankle pumps when people are lying down if people are unable to sit up in a chair.
- Instead of beginning the exercise with the back straight against a chair and the legs extended in front of you, just lie down and keep the legs straight in front of a patient with the feet spread slightly apart.
- Then complete the ankle pump exercise. Begin with the toes pointed to the ceiling.
- Flex the foot as if people are pumping the gas on a vehicle.
- Hold the foot flexion for a few seconds and then back the toes so they are pointing back to the sky.
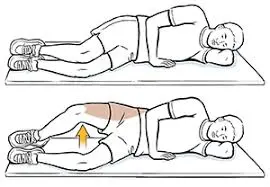
Quadriceps sets
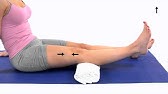
- Start with sitting on a mat with your legs extended in front of you.
- Roll up a tiny towel and put it under the knee.
- Use the quad muscles to fully straighten the leg and press the back of the knee into the towel.
- Hold the extension for 3 seconds, then release.
- Complete 3 sets of 10 reps on the injured leg.
- However, if the quad muscle reaches full exhaustion before a person completes repetitions, stop rest and shorten the next set as required.
Hamstring set (heel dig)
- Start with sitting with the affected leg bent. The good leg should be straight and supported on the floor.
- Tighten the muscles on the back of the bent leg (hamstring) by pressing the heel into the floor.
- Hold for about six seconds, and then rest for up to ten seconds.
- Repeat eight to twelve times.
Heel slides
A person may experiment with the toe placement. Point the toe or draw the toes back toward the shin. Or turn the toes to either side.
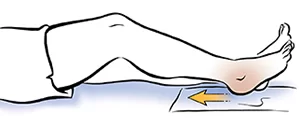
- Start with lying on the back with the legs extended and the feet slightly apart.
- Slide the affected leg as close to the buttocks as a person can.
- Hold this position for five seconds.
- Slide the heel back to the initial position.
Short Arc Quad Exercise
- The short arc quadriceps exercise is a great knee exercise that targets the muscles of the upper thigh (Quadriceps Muscle). In some cases, the long arc quad exercise may cause pain beneath the kneecap.
- For those who have discomfort at the time of the long arc quad, the same exercise may be done in a different position. While lying on a flat surface, roll up a pillow and put it under the knee to be exercised.
- From this bent position, straighten the knee while pulling the toes and ankle back towards you.
- Moving in this modified range of movement places decreased stress on the knee and is a good option for those not able to perform the long arc quad exercise.
Transverse Abdominis isometric contractions
- Put the first two fingers just inside the pelvic bone
- Take a deep breath in and out, relaxing all the ab muscles.
- At the end of the exhale, draw in the belly button toward the back.
Spine/kegel exercise
- A person should experience tension under the fingers and there should be no movement of the spine or pelvis
- Hold the contraction through ten normal breaths
- Perform two sets of ten repetitions, at least two times per day
Breathing relaxation exercises
- Make yourself as comfortable as you may. If a person may, loosen any clothes that restrict breathing.
- If a person lying down, place the arms a little bit away from the sides, with the palms up.
- Let the legs be straight, or try to bend the knees so the feet are flat on the floor.
- If a person is sitting, place the arms on the chair arms.
- If a person is sitting or standing, put both feet flat on the ground.
- Whatever position people are in, put the feet roughly hip-width apart.
- Let the breath flow as deep down into the belly as is comfortable, without forcing it.
- Try breathing in throughout Then and let it flow out slowly, counting from one to five again if a person finds this helpful.
- Keep up doing this for at least five minutes.
Other pre-operative instructions
- Focus on local muscle systems (tonic/postural/stabilizing) longus colli prior to global (phasic/primary movers) like SCM, and PCM.
- Local muscles are tiny in length and closer to the axis or rotation while the global muscles have no direct attachment to the spine.
- Avoid preloading the spine with overhead arm movements too initially in rehab.
- No pain no gain axiom generally does not apply to the spine Focus on low load-high repetitions to increase endurance rather than high load low repetition for strength.
- Focus on pain reduction with a Neck Disability Index of 50+, with scores of 3050 focusing on reducing pain, muscle reeducation, gradual strengthening, flexibility, and increasing cardiovascular endurance, with scores less than thirty focusing on work simulation and progressive strengthening.
Post-Operative Management of Cervical laminectomy
Phase I: Immediate post Surgical Phase (IPSP) six weeks
Cervical Range of motion exercises
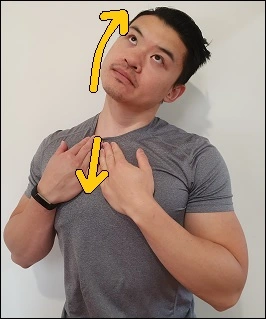
Cervical Chin Tuck
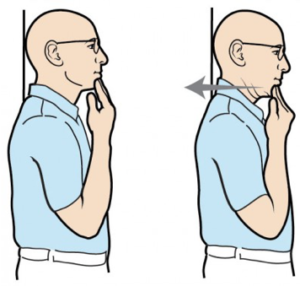
- Start with sitting upright with t shoulder blades squeezed together.
- Pull the chin in slowly (not fast or aggressively), keeping up the neck and head straight with the eyes looking
- forwards (not tipping the head upward or downwards).
- Hold at the end position for two seconds and experience the stretch behind the neck.
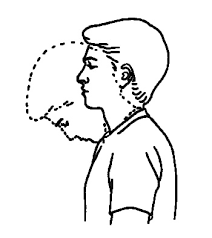
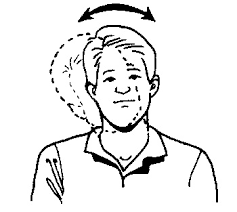
Cervical Extension with Chin Tuck
- Start with sitting upright with the shoulder blades squeezed together and the
- Repeat ten times
- Repeat slowly and frequently throughout the day
- chin tucked in slowly.
- Whilst keeping up the chin tucked in, look up towards the ceiling stretching the head backward.
- Go as far as comfortable and then back to the initial position.
- Remember to perform this at a relatively moderate pace (the person is trying to
- get the joints/muscles moving).
- If a person experiences severe pain you have gone too far; a mild to moderate dull ache is normal in the beginning.
- Slowly the pain and range of movement should increase the more a person does the exercise over the coming days/weeks.
Cervical Flexion with Chin Tuck
- Start with sitting upright with the shoulder blades squeezed together and the
- Repeat ten times
- Repeat slowly and frequently throughout the day
- chin tucked in slowly.
- Whilst keeping up the chin tucked in, bend the head forward until the feel the stretch behind the neck.
- Go as far as comfortable then back to the initial position.
- Remember to perform this at a relatively moderate pace (people are trying to get the joints/muscles moving).
- If a person experiences severe pain person has gone too far; a mild to moderate dull ache is normal initially.
- Gradually the pain and range of movement should increase the more person does the exercise over the coming days/weeks.
Cervical Rotation (Looking over your Shoulder)
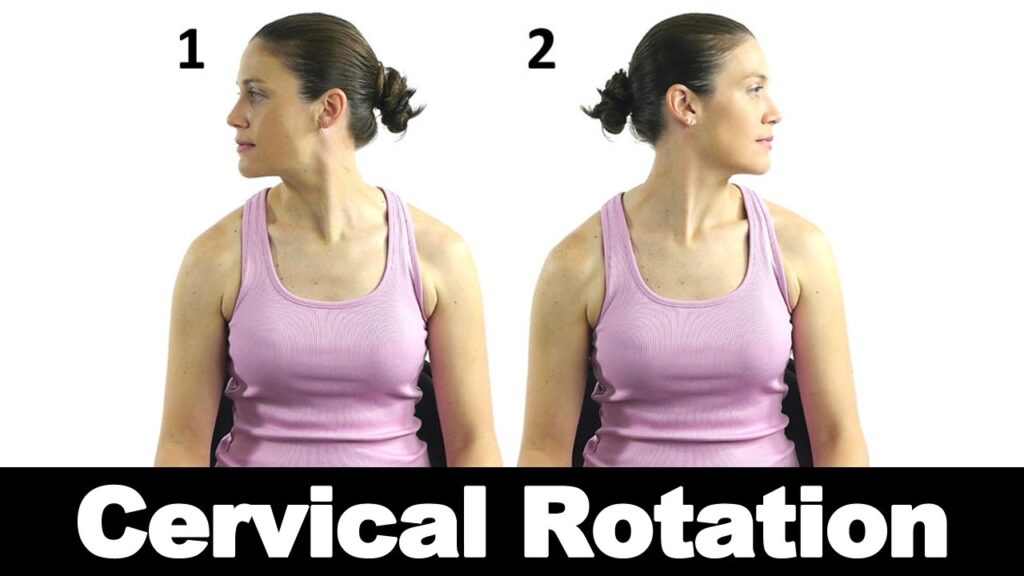
- Sit upright with the shoulder blades squeezed together and do the rotation. (Looking over the Shoulder)
- Repeat ten times
- Repeat slowly and frequently throughout the day
- chin tucked in slowly.
- Hold onto a chair with both hands to put the shoulders down.
- Rotate the neck so a person is looking over the Right shoulder.
- Go as far as comfortable and then back to the initial position.
- Remember to perform this at a relatively moderate pace (people are trying to get the joints/muscles moving).
- If people experience severe pain a person has gone too far; a mild to moderate dull ache is normal initially.
- Slowly the pain and range of movement should increase the more person does the exercise over the coming days/weeks.
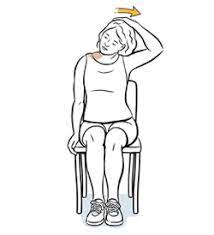
Cervical Lateral Flexion (Ear to Shoulder)
- Start with sitting upright with the shoulder blades squeezed together and then take the shoulder towards the ear.
- Repeat ten times
- Repeat slowly and frequently throughout the day
- chin tucked in slowly.
- Hold onto any object with both hands to fix the shoulders down.
- Bend the neck to the side bringing the Left ear towards the Left shoulder.
- Go as far as comfortable and then back to the initial position.
- Remember to perform this at a relatively moderate pace (people are trying to get the joints/muscles moving).
- If people experience severe pain person have gone too far; a mild to moderate dull ache is normal initially.
- Slowly the pain and range of movement should increase the more person does the exercise over the coming days/weeks.
Cervical isometrics
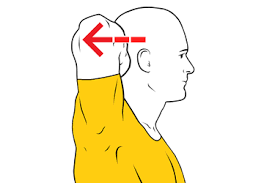
Isometric neck exercise in a Sitting position:
For sitting exercise, a person requires one chair or table. A person has to sit with an upright posture in a chair. in this position, a person will do all neck movements explain below, or if a person wants to perform this exercise in standing then the person has to stand with hip and shoulder-width apart with the torso aligned.
Neck flexion

- Put the hand on the forehead then slightly push the neck in a forward direction, the hand remains in the same position person giving little pressure against the movements like pushing the backside.
- Maintain this position for 7 to 10 seconds.
Neck extension
- Put the hand on the back of the head then gently push the neck backward direction, the hand remains in the same position person giving little pressure against the movements like pushing the forward side.
- Maintain this position for 7 to 10 seconds.
Neck Side flexion
- Put the hand left side of the head with the head straight and chin in a neutral position, now bring the head towards the left side shoulder by pushing the hand by the head.
- Maintain this position for 7 to 10 seconds. Repeat this for right-side neck flexion.
Neck Rotation
- Put the right hand on the left side of the chin and turn the head slowly towards the left side by pushing the hand try to look behind you.
- Maintain this for five to ten seconds.
- Repeat this on the other side by using the left hand.
Prevent excessive initial mobility or stress on tissues.
Diaphragmatic breathing(Supine)
- When a person first learns the diaphragmatic breathing technique, it can be easier for a person to follow the instructions lying down.
- Start with lying on the back on a flat surface or in bed, with the knees bent and the head supported.
- A person may use a pillow under the knees to support the legs.
- Put one hand on the upper chest and the other just below the rib cage.
- This will allow the person to experience the diaphragm move as the person breathes.
- Breathe gently through the nose so that the stomach moves out, causing the hand to rise.
- The hand on the chest should remain as unmoving as possible.
- Tighten the stomach muscles, so that the stomach moves in, causing the hand to lower as the person exhales through pursed lips.
- The hand on the upper chest should remain as unmovable as possible.
Diaphragmatic breathing technique (sitting)
A person gains more practice, a person may try the diaphragmatic breathing technique while sitting in a chair.
To do this movement while sitting in a chair:
- Start with sitting comfortably, with the knees bent and the shoulders, head, and neck relaxed.
- Put one hand on the upper chest and the other just below the rib cage.
- This will allow a person to experience the diaphragm move as the person breathes.
- Breathe gently through the nose so that the stomach moves out against the hand.
- The hand on the chest should remain as unmovable as possible.
- Tighten the stomach muscles, so that the stomach moves back in, as the person exhales through pursed lips.
- The hand on the upper chest must remain as unmovable as possible.
Relaxation exercises
- Do some relaxation exercises that decrease stress.
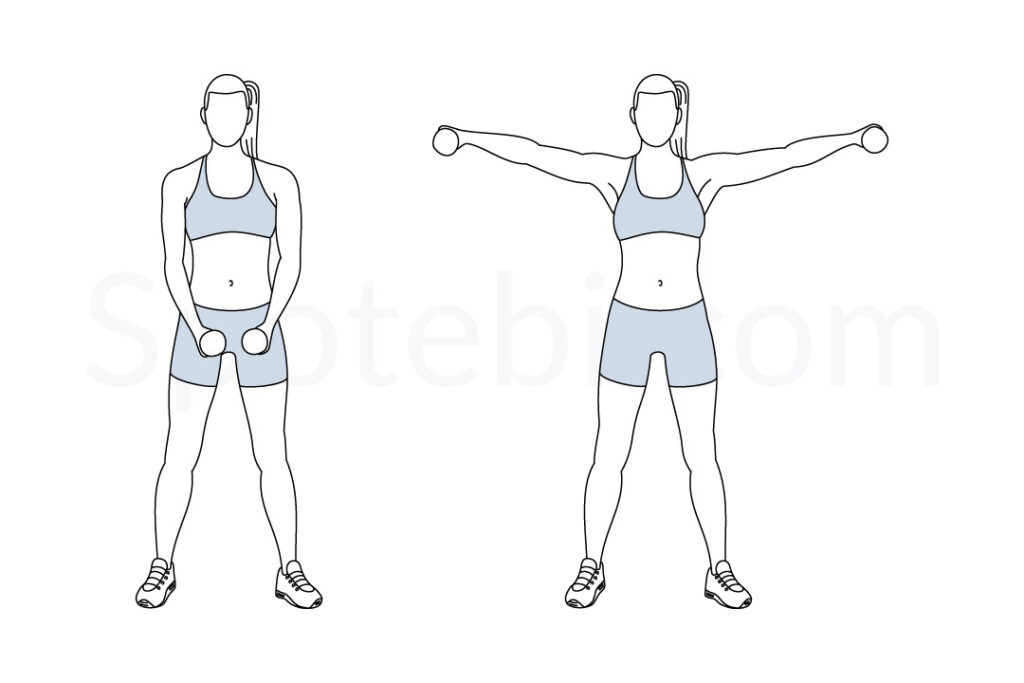
Upper extremity extension isometric exercises
Isometric Shoulder Flexion
- Start with standing facing a wall.
- Bend the elbow on the side of the shoulder person want to exercise and make a fist.
- Put a folded towel between the fist and the wall, and gently press the hand into the wall.
- Hold for 10 seconds, and then slowly release.
- There is no requirement to try to push the wall over.
- Just press slowly into the wall to activate the shoulder muscles.
- This is especially necessary if a person is just starting isometric exercise after shoulder surgery.
- If it causes pain, take a break.
- Do 10 to 15 repetitions, and then do the next exercise: isometric shoulder abduction.
Isometric Shoulder Abduction
To perform isometric shoulder abduction exercises:
- Stand about 6 inches from a wall, but turn the body so it is perpendicular to the wall.
- The shoulder a person wishes to exercise should be close to the wall.
- Make a fist and press it into the object.
- An individual can wish to use a folded-up towel for a little extra comfort.
- Slowly press into the wall as if people are trying to lift the arm out to the side, and hold it there for 5 seconds.
- Gently release pressure on the wall.
- Further, no need to push the wall over; gentle pressure will do.
- Perform ten to fifteen repetitions, and then move on to the next exercise, which is designed to get the rotator cuff muscles working.
Isometric Shoulder External Rotation
Isometric shoulder external rotation is an exercise that may help strengthen the rotator cuff muscles, especially the teres minor and the infraspinatus.
To do the exercise:
- Continue standing perpendicular to a wall about five inches from it.
- The shoulder person is exercising shoulder be closest to the wall.
- Bend the elbow ninety degrees, make a fist, and press the back of the hand into the wall as if a person were rotating the arm outwards.
- Use a small towel for a little padding, if required.
- Slowly press into the wall for about 5 seconds.
- Gently release pressure on the wall.
- Stop the exercise if the person experiences any increased pain.
- Do ten to fifteen repetitions, and then begin the next rotator cuff isometric exercise.
Isometric Shoulder Internal Rotation
To do isometric shoulder internal rotation:
- Position the body so that people are facing a door frame or an outside corner of a wall.
- The shoulder people are exercising should be near the door opening or corner.
- Bend the elbow 90 degrees, make a fist, and slowly press into the corner wall or door jamb as if a person were trying to rotate the hand inward towards the belly button.
- Press and hold for 5 seconds, and then gently release.
- Remember, no motion should happen in the shoulder during the exercise.
- Use a tiny folded towel for padding.
- Do ten to fifteen repetitions, and then move on to the final shoulder isometric exercise: isometric extension.
Isometric Shoulder Extension
To do isometric shoulder extension:
- Stand about 6 inches away from a wall with the back facing it.
- Keep up the elbow straight so the hand is down near the hip.
- Make a fist, and slowly press it into the wall behind you.
- Very little motion should happen at the shoulder.
- Hold the pressure against the wall for five seconds, and then release gently.
- Do ten to fifteen repetitions.
Multilevel fusions have hard collars for 6 wks; one-level fusions wear a collar as required for a week or two
Phase II: 6-9 weeks/2-3 times per week– Grade one or grade two joint mobs for neuromodulation of pain
Cervical Range of motion exercises
- As mentioned above.
Cervical Isometric exercises
- As mentioned above.
Cervical flexibility exercises:
Reduce stress on the cervical spine and makes it easier to maintain a neutral spine. (levator scapula, upper trapezius, pectoralis major/minor)
Initiate Scapular movement declination involving shoulder shrugs, shoulder rolls, scapular retraction/depression exercises
Trapezius stretch
- Start with sitting comfortably with the feet flat on the floor, back straight, and shoulders down
- To stabilize the stretch use one hand to either hold onto the side of the chair or put it under the buttock
- Tilt the head away from the stabilizing arm
- Bring the ear towards the shoulder until the person experiences a stretch
- To intensify the stretch put the other hand on the head and slowly use it to increase the stretch
- Hold for 30 seconds
- Repeat both sides twice
Levator scapulae stretch

- Place the hand behind the back
- Tilt the head to bring the nose towards the opposite shoulder, person should experience a stretch through the shoulder and the back of the neck
- Hold for thirty seconds
- Repeat on both sides twice
Shoulder shrug

- Follow these steps to do this exercise safely and in good form.
- Begin with the feet flat on the floor, in a standing position.
- The feet should be shoulder-width apart.
- With the arms at the sides, turn the palms to face each other.
- If a person is performing the exercise with weights, bend down and grab them now.
- Bend the knees slightly so that they line up with (not past) the toes. Keep up the chin, facing straight ahead, and the neck straight.
- While the person inhales, bring the shoulders as high up toward the ears as a person may.
- Do the movement gently so that person experiences the resistance of the muscles.
- Lower the shoulders back down and breathe out prior to repeating the movement.
- The goal is for three sets of ten repetitions to start.
- A person may reduce the number of repetitions as the person build-up shoulder strength.
Over time, try working up to doing three sets of twenty repetitions, four times a week. If a person is performing this exercise to reduce shoulder or neck pain, try doing the exercise without weights at first. Begin gently by doing fewer repetitions and sets to ensure a person is not aggravating an injury or pinched nerve.
Shoulder roll

- Stand straight with the arms by the sides and with the feet shoulder-width apart.
- Gently rotate the shoulders forward, making big circles.
- Repeat the movement return until the set is complete.
SCM muscle stretch
- Sit on the hand and tilt the person’s head away from that shoulder
- Turn towards the hand person are sitting on
- Slowly tilt the head backward until a person experiences a stretch through the front of the neck
- Hold for at least twenty seconds
- Back each side twice.
Upper thoracic mobilization exercises:
Cat/camel exercises

Come onto the hands and knees, making sure the hands are under the shoulders, the knees are under the hips and the back is in a neutral position.
- Cat: Sink the back down towards the floor and lift the head up at the same time, sticking the tailbone out to make a curve with the spine.
- Take a long breath out at the same time.
- Camel: Tuck the head and tailbone in, arching through the spine to mimic a camel hump.
- Take a long breath in at the same time.
Upper thoracic extension
- Begin lying on your stomach with the arms resting on the floor beside you
- Tuck the chin towards the neck then slowly lift the head and shoulders/upper back off the floor by pressing the chest into the floor
- This is not a big movement – a person does not need to lift very high off the floor but the person should experience the mid-back muscles along the spine contract
- Hold the head and shoulders up for 5 to 10 seconds then back to the floor and relax the muscles
- Perform 2 sets of ten repetitions one to two times per day.
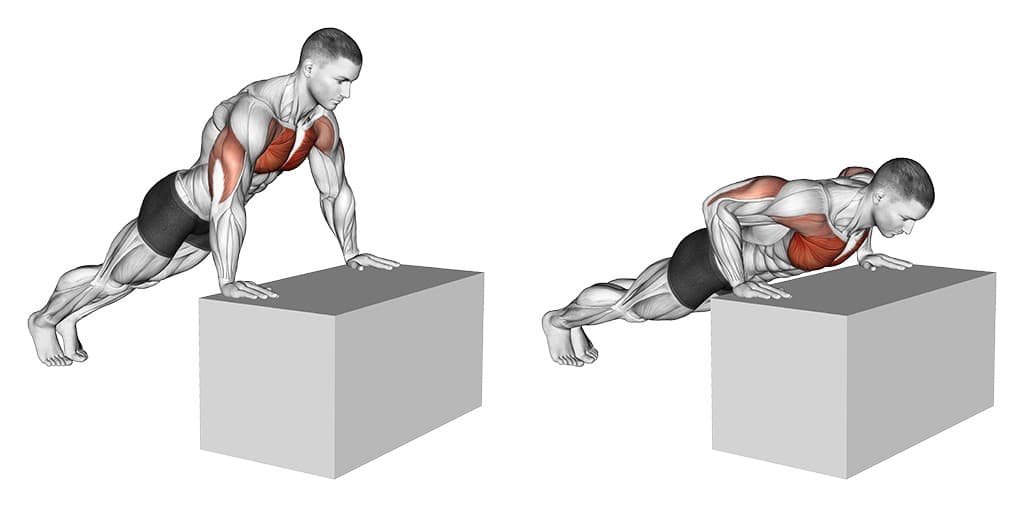
Downward Dog
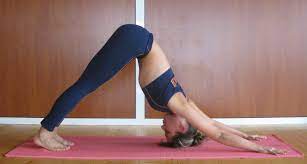
- Start in a plank position.
- Exhale to push the hips up, away from the floor, and bend at the hips until people are making an upside-down.
- Inhale to press down the chest through the arms towards the legs.
- Exhale to shift your weight forward, returning to the plank position again.
- Repeat 5 times.
Other management
- Neuromuscular reeducation of longus colli with pressure biofeedback (involving arm and leg movements in varying positions).
- Restricted (to 5 lbs) arm exercises.
- Progress to overhead after 6 weeks
- Modalities for symptom modulation if needed
Phase III: 9-12 weeks/2-3 times per week
- Posture emphasis with exercises, posture training
- Work/activity-specific training
- Soft tissue mobilization to reduce guarding
- Joint mobilizations over restricted joints (around fusion) to improve contribution to overall movement (OA/AA and upper thoracic).
- Protect fusion. Nerve mobilization (nerve glides).
- Do not reproduce symptoms.
- Upper limb strengthening (Rhythmic stabilization of upper extremity, free weight shoulder strengthening)
Shoulder Press
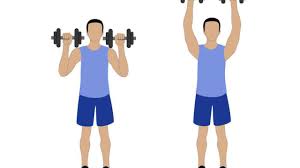
- Stand tall. Grab weights at shoulder height, elbows pointing forward.
- Press weights up by straightening the elbows.
- Back to the initial position.
- Repeat 3-5 times did not let the elbows open to the side.
- Try not to shrug your shoulders.
- Keep abdominals tight to avoid excessively extending the lower back.
Upright Row
- Stand tall, taking the weights in front of the hips.
- Lift weights to chest level, leading the movement with the elbows pointing outwards.
- Lower down in a safe manner.
- Repeat three to five times
- Keep the elbows greater than the weights at all times.
- Focus on shoulder muscles; try not to shrug the shoulders.
Shoulder Press
- Stand tall.
- Hold weights at shoulder height with the elbows pointing to the sides.
- Press the weights up to straight arms.
- Back to the starting position in a safer manner.
- Repeat three to five times
- Try not to shrug your shoulders.
- Keep up the abdominals tight to avoid excessively extending the lower back.
Bent Over Row

- Start with standing with the trunk and buttocks active taking weights in each hand.
- Tilt forward from the hips, keeping the spine and neck in a position.
- Pull the elbows back and squeeze the scapulae in and down.
- Lower the arms down in a safer manner.
- Repeat three to five times
- Do not let the shoulders rotate forward when pulling the elbows back.
- Maintain neck in a neutral position.
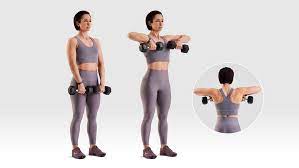
Lateral Raise
- Stand tall, with arms by the sides, holding weights.
- Lift the arms to the side, keeping up elbows straight.
- Put face downwards or forwards.
- Repeat three to five times
- Keep the chest open and try not to shrug your shoulders.
Lawnmower with a therabend

- Start with standing, holding a therabend in one hand.
- Bend forwards from the hips and bring the dumbbell in front of the opposite side knee/thigh, with the elbow straight.
- Pull the elbow backward, and shoulder blades together and slightly rotate from the trunk.
- Keep the pelvis in place and pointing straight forwards.
- Straighten the arm and rotate the trunk to return to starting position.
- Repeat three to five times
Scapular stabilization/strengthening exercises (shoulder shrugs/rolls, chest press, seated rows, pull-downs, incline push-ups)
Chest press
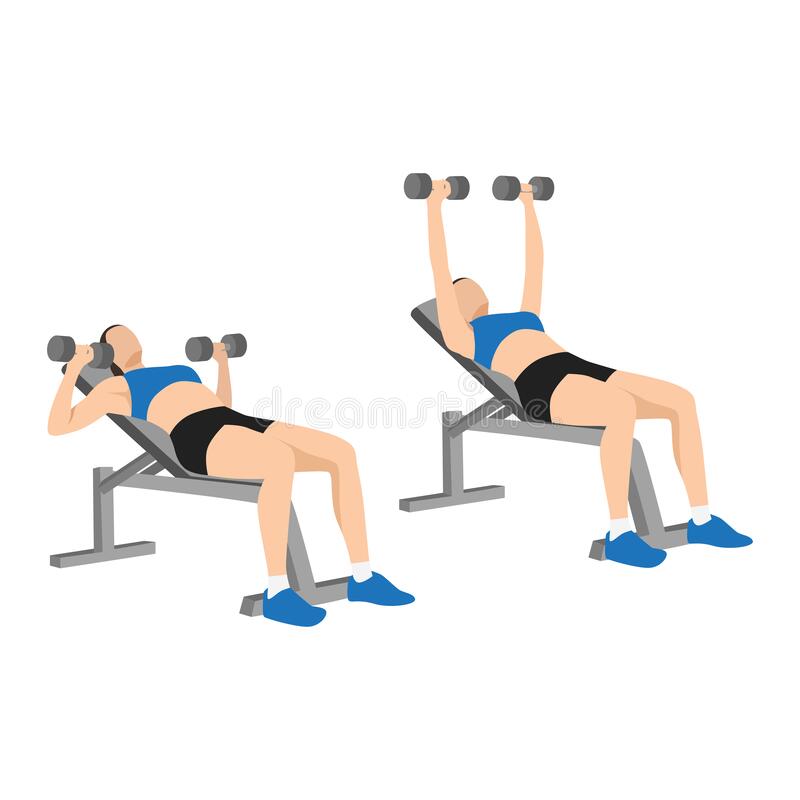
- Start with lying on a bench or floor with a dumbbell in each hand.
- If a person uses a bench, a person can have their feet up on the bench or on the floor, whichever is comfortable for bench height and the body and leg length.
- Position the dumbbells at the shoulders with upper arms at about forty-five degrees to the body.
- Keep up elbows forward of the shoulder line to avoid stress on the shoulder joint.
- The palms should face forward and the thumbs should be muffled around the handle
- Brace the abdominal muscles, tilt the chin gently toward the chest, and make sure the ear is in a stable and comfortable position.
- A person is ready to lift.
- Push the weights upward while exhaling, taking care not to lock out the elbows in outward movement.
- The weights should follow a shallow arc and almost meet over the high part of the chest.
- It is OK to straighten the arms as long as an individual does not do it with frequent or explosive force.
- The head and shoulder blades should not take off the bench or floor.
- Lower the weights, and muscles contracted while inhaling and controlling the back to the starting position.
- To begin with, try three sets of ten exercise repetitions of an appropriate weight.
- A person may place the weights down between sets.
seated row
- Start with sitting upright on the bench and planting the feet on the floor or foot pads, knees bent.
- Extend the arms and hold the handle or cable.
- Move the shoulders back and down.
- Brace the core.
- Exhale.
- Bend the elbows to pull the handle or cable, keeping up the elbows tucked in and the back neutral.
- Pause for one second.
- Inhale and gently extend the arms, counting to three.
- Complete 1 set of 12 to 15 reps.
Pull down
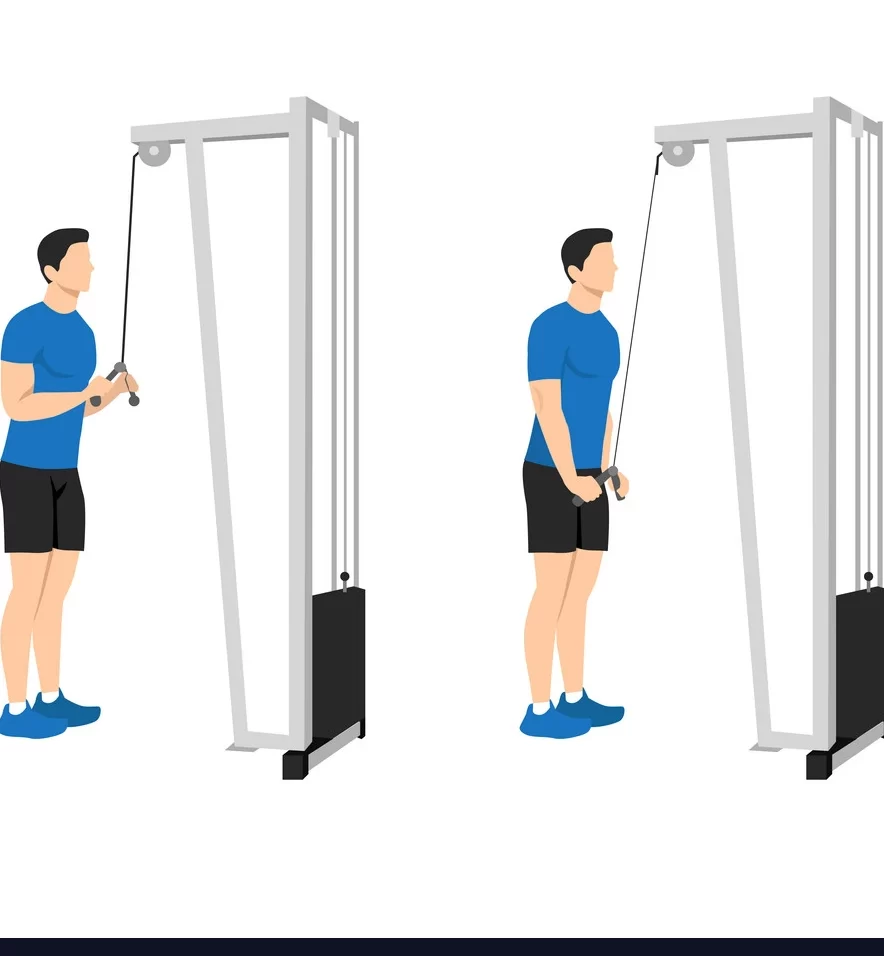
- Grab the bar with a wide grip with an overhand, knuckles-up grip.
- Other positions and grips are possible but begin with this standard position.
- Pull the bar down until it is estimated to level with the chin.
- Exhale on the downward motion.
- While shifting gently backward is OK, aim to keep up the upper torso stationary.
- Keep the feet flat on the floor and engage the abs as the person pull.
- The bottom of the motion should be where the elbows may not move downward anymore without moving backward.
- Be sure to stop at that point and do not try to go lower.
- Squeeze the shoulder blades altogether while maintaining square shoulders.
- From the bottom position, with the bar close to the chin, gently back the bar to the starting position while controlling its gradual ascent.
- Do not let it crash into the weight plates.
- Continue until the person completes 8 to 12 repetitions in a set.
- Rest, then continue to complete the program of sets.
Incline pushup
- Start standing facing the bench side, table, or edge of a bed.
- Place both hands on the edge of the bench just slightly wider than shoulder width.
- The arms are straight but the elbows have not loaded the elbows to gently lower the chest to the edge of the bench while inhaling.
- Keep the body straight and rigid throughout the movement.
- Push the body away from the bench until the elbows are extended, but not locked.
- Exhale as a person pushes up.
- Keep going with slow, steady repetitions.
Another stage
- Spinal stabilization exercises lumbar and cervical.
- Continue Upper thoracic mobilization exercises.
Post-Op treatment of lumbar laminectomy
Phase I (zero to two Weeks): Protective Phase
Avoid bending and twisting, lifting, pushing, and pulling 5kgs or more for 2 weeks. Limit sitting, incorporating the car, to no more than 20 minutes at a time (standing/walk breaks). No extension range of motion or rotation exercises for 8 weeks Educate regarding posture and body mechanics and start some basic exercises.
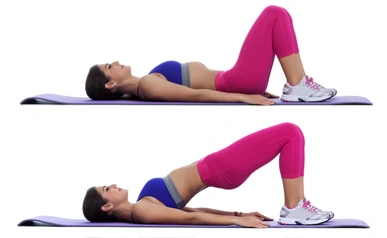
Bridging

- Perform the bridge to strengthen the core muscles.
- Lie on the back with the knees bent.
- Tighten the muscles in the stomach.
- Raise the hips off the floor until they line up with the knees and shoulders.
- Hold for 4 deep breaths.
- Back to the starting position and repeat.
Light Stretching: Hip flexors, quadriceps, hamstrings, calf
Seated butterfly stretch
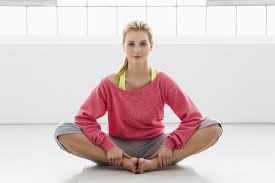
The seated butterfly stretch is a simple stretch that opens up the hips, thighs, and groin. This stretch is perfect for runners or people who want to increase the flexibility in their lower body. Here is how to perform the butterfly stretch:
- Start in a seated position with the legs in front of you.
- Grasp the ankles and bring the feet closer to the groin.
- If required, do this one leg at a time.
- Take both feet together, so the bottoms of the feet are touching.
- Continue to hold the ankles with the hands while using the elbows to press down on the knees.
- Give gentle pressure to the knees to get closer to the floor.
- Hold the stretch for 10-20 seconds before releasing and repeating if required.
Basic bridge
Basic bridges are frequently used as glute exercises, but a person may also use them to help open up the hips. This is how to do, them to really target the hip flexors:
- Start with lying on the back on an exercise mat or soft surface.
- Keep up the hands at the sides and the knees bent.
- Raise the hips.
- The shoulders and feet should be flat on the floor, creating a straight line from the knees to the shoulders.
- When a person reaches the top of this stretch, lift one foot off the floor at a time.
- This causes the hips to flex.
- Hold for 10-20 seconds.
- Then change to the other side.
Lying hip flexor stretch
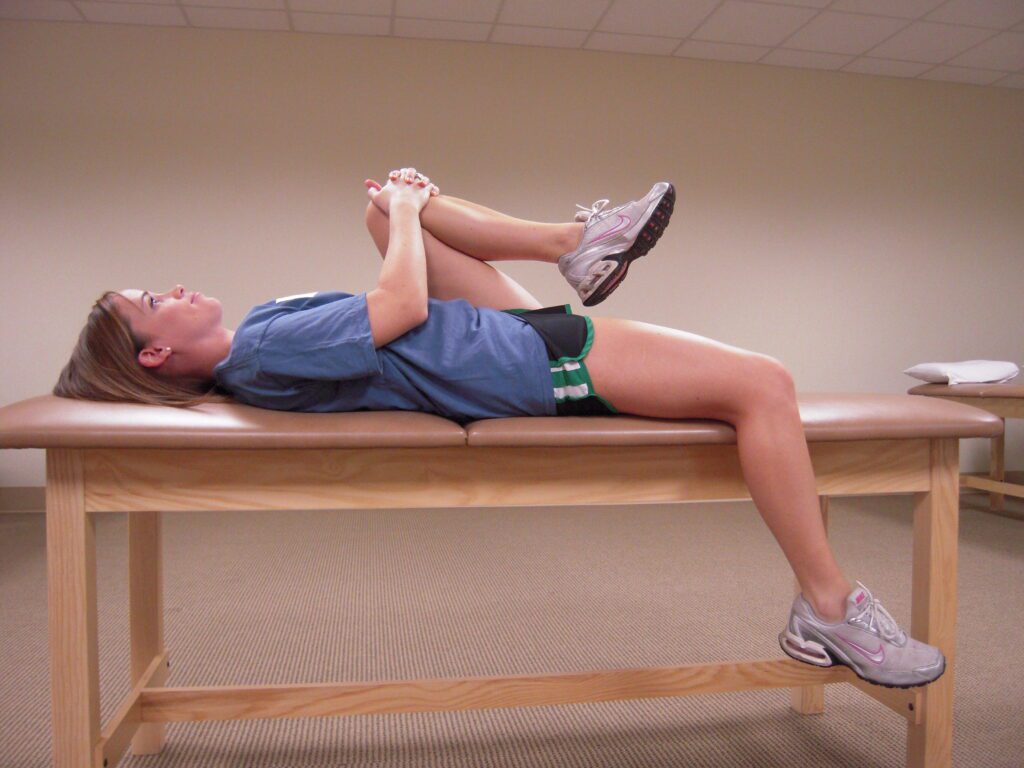
Hip flexion exercises may be performed seated or standing. It is a starter-friendly stretch that causes the hips to flex by moving the legs. Here is how to do lying hip flexion stretches:
- Start with lying flat on the ground.
- A person should stretch out the legs with the toes pointed up.
- Keep up the hands at the sides.
- Bend the left knee and gently bring it to the chest.
- As the knee draws nearer, muffle the hands around the knee.
- Slowly pull the knee as close to the chest as possible.
- To make the stretch more challenging, straighten the leg and pull it closer
- to a person with a resistance band.
- Rotate the hips to deepen the stretch.
- Hold for 10-20 seconds.
- Release the stretch and do it on the opposite side.
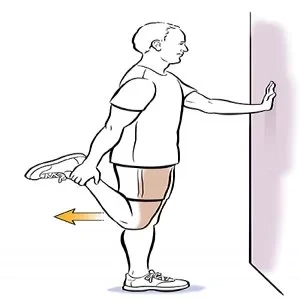
The Lying Quad Stretch
- The best quad stretches are those that address not just the quadriceps, but all aspects of the leg, from the hip to the thigh, to the foot.
- The lying quad stretch is perfect for individuals who suffer from knee pain, as well as those who prefer reclining to
- standing up.
- Start with lying in a face-down position, propping the head on the left hand.
- Alternatively, a person may lie on the side to do this stretch.
- After a few seconds, pull the right foot toward the butt and bend the left knee to stabilize yourself.
- Hold onto the ankle and maintain the position for 20 seconds prior to returning to the starting position.
- Change the side, pulling the left foot toward the back and bending the right knee.
The Simple Quad Stretch
- This simple stretch exercise is perfect for fixing the muscles, anytime, anywhere.
- Stand on the left leg, one knee touching the other.
- A person may hold a chair or the wall to keep up steady if require.
- Grasp the right foot, using the right hand, and pull it towards the butt.
- Make sure to push the chest up and the hips forward.
- Try not to worry about pushing the foot too close to the backside; the focus should be on feeling the stretch in the quad muscle and pushing the hips forward to get a good hip flexor stretch.
- Hold the position for 10 to 20 seconds, then repeat, changing from the left leg to the right.
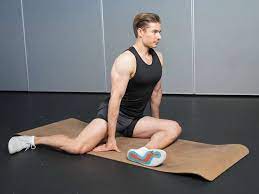
The Frog Pose
If a person is looking to stretch out the gluteus maximus and the thighs, then this could be a great stretching pose for the patient. It will also help to stretch the arms, chest, and shoulder blades.

- Start by lying on the stomach, propping the torso up on the elbows.
- Bend both of the knees, and reach back to hold onto the feet.
- A person should already experience stretching at this point. If
- an individual lacks the mobility to do this now, use a towel to fill the gap.
- Adjust the fingers to point the same way as the toes, then carefully lift up the elbows to point to the ceiling.
- Push the chest up as high as a person can.
- Stop the pose completely if the person feels any pain in the hip or knee.
- Stay here for 10 breaths, then relax.
Hamstring stretch
The hamstring muscle goes along the back of the upper leg. To stretch the hamstring muscles:
- Start with lying on the floor near the outer corner of a wall or a door frame.
- Raise the left leg and rest the left heel against the wall.
- Keep up the left knee slightly bent.
- Slowly straighten the left leg until the person experiences a stretch along the back of the left thigh.
- Hold for about 20 seconds.
- Switch legs and repeat
- As the flexibility improves, maximize the stretch by slowly scooting yourself closer to the wall or door frame.
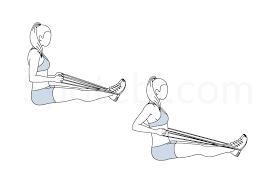
Gluteal, multifidus, and transverse abdominus (without pelvic tilt) bracing/isometrics Walk for 10 mins 2 times per day.
Phase II (two to six weeks): Initial Strengthening Phase
- Frequency – 1 to 2 times a week, for 4 or more weeks.
- Lifting Restrictions: Begin at five kg
- Keep the spine straight with a focus on proper neuromuscular control
- Walking Progression: At least thirty minutes or more •
- Stationary Bike Recumbent: Can initiate at 2 weeks
- Transverse Abdominis/Multifidi further Progression (maintain neutral spine) – start with isometrics and progress to SLR, marches, superman, etc.
- Continue with perfect Glute Activation Exercises Eg.: prone hip extensions, bridges, side lying clams, side lying 90/90 leg lifts, side lying hip abduction, quadruped hip extension, bird dog
Prone Hip Extension
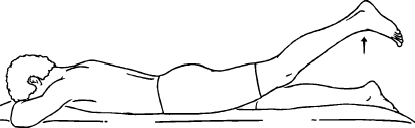
- Start with lying on the stomach on the floor with the legs straight.
- A person may lie on a mat or towel.
- Rest the head on the arms.
- Raise the weighted leg a few inches off the floor.
- Keep up the right knee straight. Hold for 10 seconds.
- Gently lower the leg back down.
- Repeat 10 times, or as instructed.
Side lying clams
- Start with Lying on one side with knees at a 45-degree angle, legs, and hips stacked. Contract the abdominal muscles to
- stabilize the core.
- Keep up the feet in contact with one another as a person raise the upper knee as high as a person can,
- without moving the hips or pelvis.
- Do not allow the lower leg to move off of the floor.
90/90 LEG LIFT
- This is for hip internal mobility and end-range strengthening exercises.
- Sit on the ground with the knees bent in front of you wider than shoulder distance apart. Rotate 1 leg into internal rotation and the opposite into external rotation.
- The thighs should be 90 degrees to each other, a person may reposition the body to achieve this if required.
- Take the internally rotated leg’s foot off of the ground and hold for up to 10 seconds.
- Lower the leg back down to the surface and repeat as required.
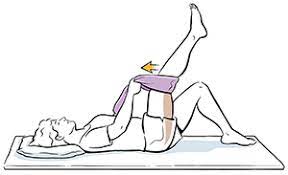
Side-lying hip abduction

- Start with lying on the side with both legs extended.
- Lift the top leg as high as possible and then lower it back down.
- Repeat this exercise for the duration of the set and then switch legs.
Quadruped hip extension

- Begin in a quadruped position on the yoga mat.
- Check the hand and knee placement.
- The hands should be directly beneath the shoulders and the knees directly underneath the hips. Engage the core, and make sure the back is straight and flat from the base of the pelvis to the top of the head.
- Shift the weight slightly to the right side, keeping up the torso stable as a person do—the hips and shoulders should not twist or rotate as the person shift.
- Press the left foot up toward the ceiling, keeping up the knee bent at a 90-degree angle as a person fully extend the left hip.
- Exhale as the person performs the hip extension.
- Again, be sure the torso remains flat and stable—do not allow the left hip to rotate out or up as the hip extends.
- Lower the left knee back toward the floor, gently and with control.
- Stop just prior to it touching down, then inhale and lower the kneeling down on the mat. Complete a full set of repetitions to one side before changing to the opposite side.
Bird dog
For this exercise, a person will require an exercise mat. Put a flat cushion or folded towel under the knees for extra cushioning. A person may use a mirror to check the alignment.
Here is how to do it:
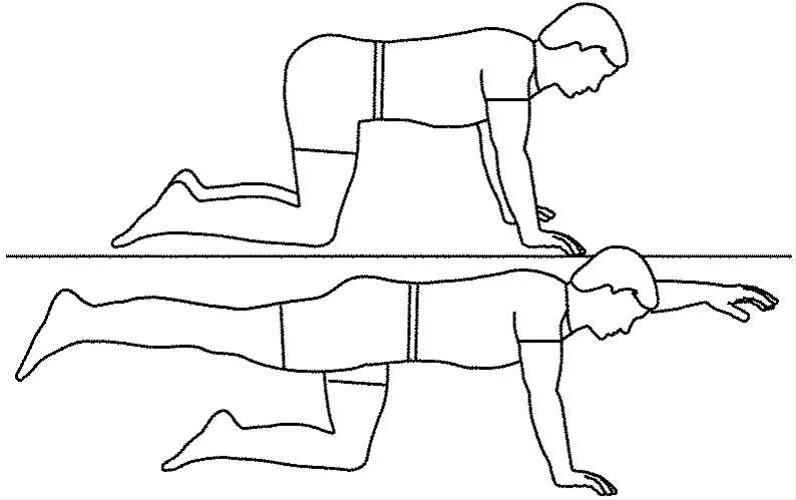
- Start on all 4 in the tabletop position.
- Put the knees under the hips and the hands under the shoulders.
- Maintain a neutral spine by involving the abdominal muscles.
- Draw the shoulder blades together.
- Raise the right arm and left leg, keeping up the shoulders and hips parallel to the floor.
- Lengthen the back of the neck and tuck the chin into the chest to gaze down at the floor.
- Hold this position for 5 sec, then lower back down to the starting position.
- Raise the left arm and right leg, holding this position for some seconds.
- Back to the starting position.
- This is one round.
- Do two to three sets of ten repetitions.
Upper Extremity/Lower Extremity Strength Training – Step ups, leg presses, wall squats, squats, etc. Balance (with Transverse
Abdominis is bracing): single leg stance, tandem, foam, etc. Upper limb light resistive exercises (machines, theraband, free weights). Continue stretching exercises
Step-ups
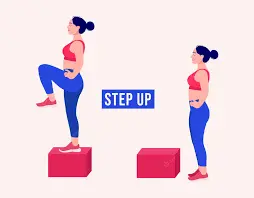
- Based on the hip mobility and strength, put the foot on a box so the knee is bent at a 90-degree angle or the hip crease is slightly below the knee.
- Make sure it is on a level ground surface.
- Either do with body weight, hold dumbbells by the side, and stand around one foot away from the box.
- Put the whole lead foot on the box with the toes pointed forward.
- Push through the lead foot to stand up.
- Think of driving in glutes forward into hip extension as a person stands up.
- Once the knee is extended, either put the other foot on the box, balance on one leg, or drive the non-working leg into a high knee.
- Step down gently with the non-lead leg and reset and repeat.
Leg press
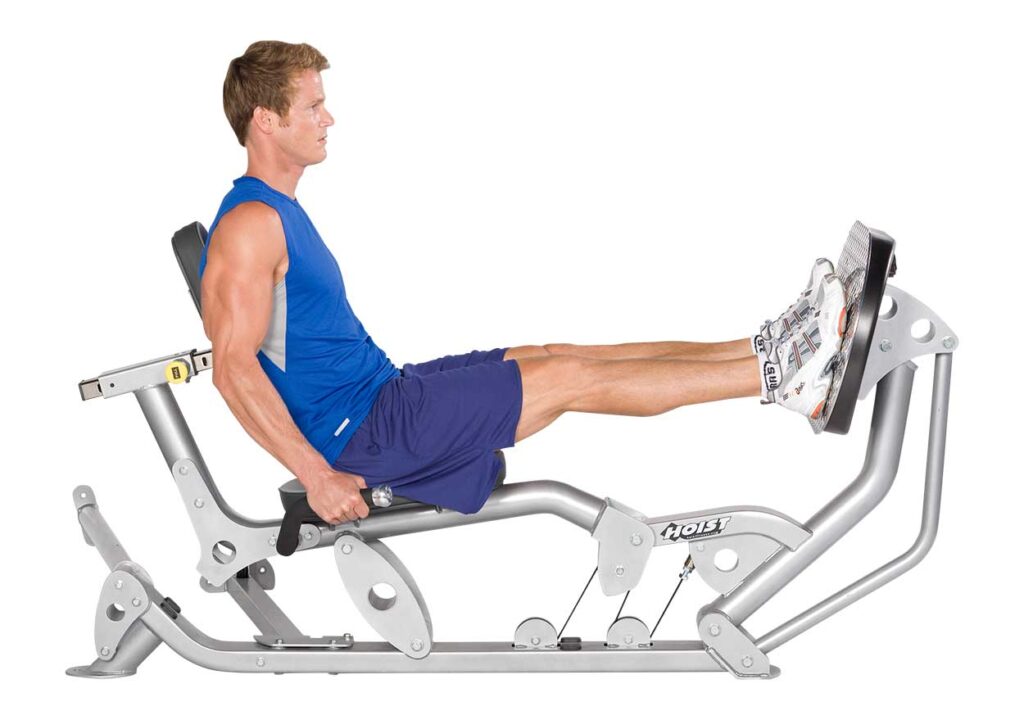
- A person press, make sure to keep this alignment.
- Grab the assist handles to give support and keep up the spine and head in
- position.
- Brace the abdominal muscles and push the platform away with the heels and forefoot.
- The heels should stay flat on the footplate.
- The front of the foot or toes should never be utilized exclusively to move the pad forward.
- While exhaling, extend the legs and keep up the head and back flat against the seat pad.
- Extend with rhythmic control rather than ten with an explosive movement.
- Pause at the top of the movement.
- Do not buckle the knees, and ensure that they are not bowing out or in.
- While inhaling, back the footplate to the initial position by gradually bending the knees.
- Keep up the feet and back flat throughout.
- If you have never done leg presses, begin modestly with three sets of 10-leg presses.
- A person can advance from there as you build strength.
wall squat

- As mentioned above
Squat
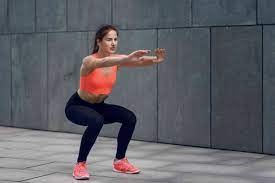
- Always have 1 or 2 competent spotters available.
- Position the squat rack so the bar sits on t upper back (trapezius muscles).
- Position the hands evenly on the bar and back up and under the bar, so it rests comfortably on the shoulders.
- Hold a wide stance, place the feet squarely under the bar, and lift it from the rack using the legs. Keep up the weight centered; do not lift from the heels or toes.
- Gently bend the knees while keeping the torso erect.
- Do not lean forward.
- Keep up the hips under the bar at all times.
- At the bottom of the movement, the angles of the knee joint and hip joint are nearly equal. Never relax or drop to the bottom position.
- Maintain constant, gentle, and controlled muscle tension.
- Inhale as a person lower.
- Gently back to starting position while keeping up the torso and back erect and hips under the bar.
- Exhale as a person pushes through the heels and stands tall.
- Repeat as many times as a person can do for a set.
- Try one to 3 sets of 6 to ten squats to begin.
- At the end of the exercise have the spotters help to guide the bar back to the rack.
Phase III (six to eight weeks): Progression to Advanced Strengthening
- Advanced core strength and stabilization exercises:
- Progress to weight bearing, balance, Swiss Ball, and Reformer.
- Further progress to multi-planar exercises with upper extremity/lower extremity
- Progress upper extremity/lower extremity strengthening
- Start running, agility, and plyometrics for return to sport after eight to twelve weeks (if symptoms stable and cleared)
Lumbar Spine:
More than 8 weeks to increase lumbar extension range of motion, but avoid end-range: prone lying, prone on elbows, press-ups, and/or standing extensions (if no personalization). Advanced balance training exercises
Single-Leg Stance with Squat
Start with standing on one foot with the other leg out in front, then gently squatting down.
- To initiate advanced balance exercises, try the single-leg stance with a squat.
- To perform this, stand on one foot with the other foot off the ground and directly in front of the person with the knee straight.
- Gently bend the knee of the stance leg and squat down a few inches.
- Be sure the knee goes directly over the toes and does not turn in or out as a person squat.
- After squatting a few inches, back up to the starting position.
- Repeat the single-leg squat for ten to fifteen repetitions.
Single-Leg T-Stance
- The T-Stance is a perfect exercise to build better balance.
- To do the single-leg T-stance exercise, stand on one foot.
- Extend both arms out to the side, and then extend the other leg out behind you.
- Be sure the person keeps up the back straight and the pelvis level.
- Hold the T-stance position for thirty seconds.
- Then, back to the standing position.
- A person may challenge themself further by rotating the torso left and right while maintaining the T-stance position.
Standing BAPS Board
- Lower extremity balance may be increased with a BAPS board.
- The BAPS board may be used to increase ankle stability and proprioception.
- The BAPS board is a therapy tool found in many physiotherapy clinics.
- It is designed to help increase lower extremities Using the BAPS board is a perfect way to work all of the muscles that support the ankle, knee, and hip.
- The BAPS board needs that person to place the foot on the unsteady board and move the ankle in specific directions.
- A person should hold onto some stable object when on the BAPS board. Control is key.
- Do not permit the board to rapidly slap in different directions.
- The movement on the BAPS board should be done for fifteen to twenty repetitions on both sides.
Wobble Board Exercises
A wobble board may give an unsteady surface on which to perform balance exercises. A wobble board is a plastic or wooden object with a curved shape on the bottom of it. Standing on the board challenges the balance because the wobble board creates an unsteady surface.
- Starting exercises on the wobble board should be performed with both feet.
- Stand on the board with feet on either side of the board.
- Try to maintain a steady balance for 20 to 40 seconds.
- Then, take a break.
- A person may challenge the balance further by closing her eyes while standing on the balance board.
- Working with a wobble board to increase the balance may be challenging.
- Use it on a flat, solid surface to remain safe.
- To again add a challenge to balance board exercises, try standing on the board with both feet, and then do a mini squat on the board.
- Hold the squat for some time. Then, back to the standing position.
- When double-leg standing on the wobble board becomes easy, the person may advance the exercise by standing on the board with one foot.
- Put one foot in the middle of the board and stand for 20 to 40 seconds.
- Again, close your eyes to improve the level of difficulty.
- Single-leg standing on the wobble board may be made even more challenging by performing a one-legged mini squat.
- Stand on one foot on the board, and then gently squat down a few inches by bending the knee.
- Hold the squatted position for a few seconds, and then back to the starting position.
BOU Ball Exercises

- A person may use a BOSU ball to perform advanced balance exercises.
- A BOSU ball is a therapy and exercise tool that helps to increase proprioception and balance by creating an unsteady exercise
- surface.
- BOSU stands for “both sides up,” which means a person may use the BOSU with the flat side on the floor or with the
- curved ball side down.
- Initiate BOSU exercises by standing on the BOSU with both feet on the bent side.
- Hold the balance for 20 to 40 seconds.
- Try closing your eyes to improve the challenge.
- Performing squats on the BOSU may again challenge balance and increase leg strength.
- Once double-leg standing on the BOSU becomes easy, change to standing on the BOSU with one leg.
- Further, improve the exercise intensity by closing your eyes or by doing mini squats on the BOSU.
- When the person flips the BOSU over and places the curved side down, a person may repeat the balance exercises by standing on the flat side.
- Once standing with both feet is easy, add difficulty by closing the eyes, then performing mini squats.
- Then, do the exercise progression with one leg on the BOSU.
Start progression with ADL and activity simulation with the recruitment of longus colli/neutral spine.
Cardiovascular training, treadmill, stationary bike
FAQ
The person will probably require to take two to four weeks off from work. But if the job requires physical labor, it can take our to eight weeks. It depends on the kind of work a person does and how the person feels. A person can have sex as soon as a person feels able, but avoid positions that put stress on the back or cause pain.
People will be motivated to walk and move around the day after surgery and it is likely people will be discharged one to four days afterward. It will take about four to six weeks for a person to reach the expected level of mobility and function (this will depend on the severity of the condition and symptoms before the operation).
Restrictions are generally lifted over the course of subsequent follow-up visits. In many cases, a person may be back to all of their normal activities in three months, but some people with multilevel decompression surgeries, heavy labor jobs, or other unique situations can necessitate some sort of permanent restrictions.
Laminectomy is the removal of the whole bony lamina, a part of the enlarged facet joints, and the thickened ligaments overlying the spinal cord and nerves. Laminotomy is the disattachment of a tiny portion of the lamina and ligaments, generally on one side.
The outcoming weakness and limited motion may have deleterious effects on the spine. Moreover, the removal of connecting tissues like ligaments between bones may create destabilizing effects. In some people, excessive spinal destabilization and muscle damage from laminectomy can result in chronic back pain.


3 Comments