19 Best Exercises For Patellar Dislocation
Table of Contents
Introduction:
At the front of the joint, the kneecap rests in a smooth, vertical groove. Kneecaps, also referred to as the patella, provide muscles like the quadriceps with flexibility, support, and leverage. A patellar dislocation may occasionally result from an unnatural twist, a fall, or a sports incident. Movement becomes challenging due to the kneecap slipping out of the groove.
Exercises for rehabilitation are essential for strengthening surrounding muscles, regaining stability, and averting further dislocations. The most effective workouts concentrate on strengthening the quadriceps, particularly the vastus medialis oblique (VMO), improving hip and core stability, and gradually increasing knee mobility.
Patella dislocations can be divided into two categories:
- Acute dislocation of the patella. A kneecap dislocation is typically an acute, or sudden, injury caused by force. Since your kneecap dislocates with less force than other joints, it is a common injury.
- Congenital dislocation of the patella. Displaced patella occurs rarely throughout development. When your patella grows outside of the trochlear groove, it’s also known as trochlear dysplasia.
Always take advice from a physiotherapist before beginning a new exercise program, especially if you have another injury or condition.
Causes:
Trauma or Direct Effects
- The patella may be forced out of its groove by a severe blow to the knee, which frequently occurs during sports or accidents.
Patellar Dislocation in the Past
- Stretched or weakened stabilizing structures make the patella more vulnerable to dislocations in the future.
Abnormalities in Structure
- Instability can be caused by flat feet, knock knees, or an unusually high patella position.
Unexpected Pivoting or Twisting Motions
- The patella may dislocate if there are sudden changes in direction while the foot is planted, as is frequently the case in basketball, football, or dancing.
Quadriceps muscle weakness
- Underdeveloped or unbalanced thigh muscles, particularly the vastus medialis, make it difficult to maintain proper patella position.
Exercises For Patellar Dislocation:
When it comes to rehabilitation after a patella dislocation, we aim to highlight not just strength and stability but also movement confidence, which is the capacity to perform daily duties, exercise, or sports without fear or uncertainty.
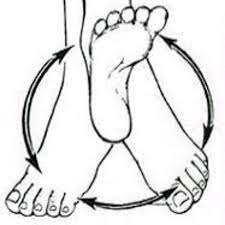
Ankle circle
- Maintain a straight back while sitting comfortably in a chair.
- Your foot should be off the ground while you extend one leg in front of you.
- Make a slow, circular motion with your ankle.
- From the ankle joint, move your toes in controlled, fluid circles.
- Turn 10 to 15 times in a clockwise direction, then 10 to 15 times anticlockwise.
- Don’t hold your breath; instead, breathe normally.
- Then return to your neutral position.
- Then relax.
- Repeat these exercises five to ten times.
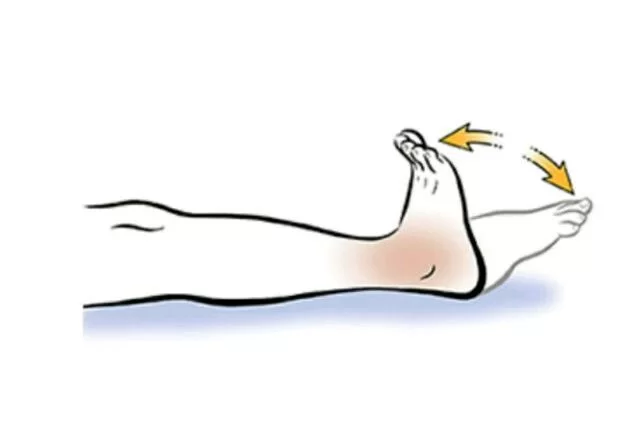
Ankle pump
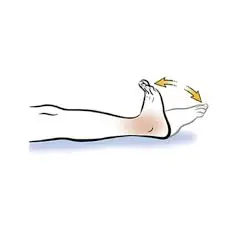
- Extend your legs while seated or lying down.
- Continue to relax and support your legs.
- Plantar flexion is the movement of your toes away from you as you push the gas pedal.
- The next movement is dorsiflexion, which includes flexing your foot and moving your toes closer to you.
- Continue to move in this way in a steady, adjustable rhythm.
- Then return to your neutral position.
- Then relax.
- Repeat these exercises five to ten times.
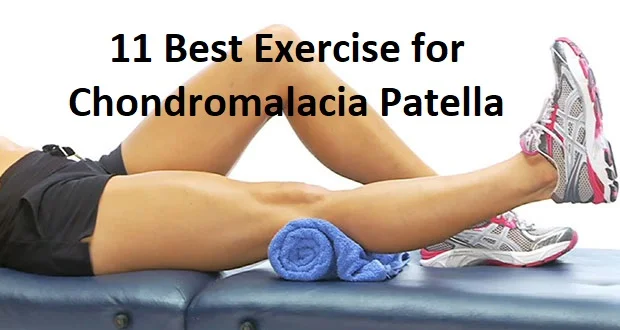
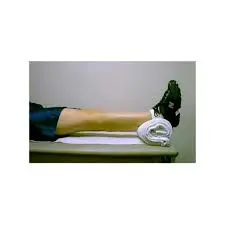
Heel prop
- Lie flat on your back in a recliner or bed.
- To elevate your ankle, calf, and the back of your knee, place a thick rolled-up blanket, bolster, or folded towel under your heel.
- Let your leg become completely relaxed.
- With your heel elevated, gravity will assist in straightening your knee.
- Hold this position for a few seconds.
- Feeling a light tug or stretch behind your knee without experiencing intense pain is the aim.
- Stretching should not be forced. Let gravity do the work and let your leg relax.
- Then return to your neutral position.
- Then relax.
- Repeat these exercises five to ten times.
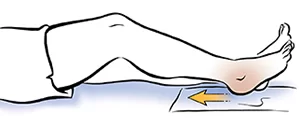
Heel slide
- To begin, lie down on the bed in a supine position.
- Slide your affected leg as close to the buttocks as you can.
- For a few seconds, maintain this posture.
- Then return to your neutral position.
- Then relax.
- Repeat these exercises five to ten times.
Static quadriceps strengthening
- Sit or lie down on a level surface with your legs extended in front of you.
- If you’re seated, make sure your knees are straight and not bent.
- When lying down, make sure your legs are fully extended and your feet are flat on the ground.
- The muscle at the top of your thigh is called the quadriceps. Pay attention to it.
- You can tighten your quadriceps muscles by pressing the back of your leg down toward the floor or the surface you are sleeping or sitting on.
- Consider attempting to extend your leg without actually moving your knee.
- The goal is to contract your quadriceps while maintaining a stationary knee.
- Hold the contraction for five to ten seconds while keeping the muscle taut.
- Continue to breathe during the exercise.
- You should not hold your breath.
- Then return to your neutral position.
- Then relax.
- Repeat these exercises five to ten times.

Straight Leg Raises
- Lie flat on your back on a comfortable surface, such as a mat or the floor.
- Your legs should be straight out in front of you, and your arms should be by your sides.
- The leg that bends one knee until its foot is flat on the ground will be your “supporting” leg.
- The opposing leg should remain straight and relaxed on the ground.
- Using the straight leg, tighten your quadriceps, which are the muscles on the front of your thigh.
- Try pushing the back of your knee toward the floor while keeping your leg straight.
- Maintaining your knee fully extended, carefully raise your straight leg a few inches off the ground.
- Focus on using your quadriceps to lift the leg rather than your hip or lower back muscles.
- Maintain your foot flexed or with the toes pointing upward to facilitate a stronger muscle contraction.
- Hold your leg up for two to five seconds, depending on your strength and comfort level.
- During the exercise, stay in control and keep your quadriceps active.
- Take care not to let your leg drop too quickly as you carefully and slowly return it to the ground.
- Then return to your neutral position.
- Then relax.
- Repeat these exercises five to ten times.

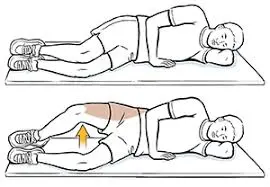
Clamshells
Clamshells Steps:
- With your legs stacked and your knees bent at a 45-degree angle, lie on your side.
- Use your upper arm to steady your body while resting your head on your lower arm.
- The top hip has a tendency to rock backward, so make sure your hipbones are stacked on top of each other.
- Pulling in your belly button will activate your abdominals and help stabilize your pelvis and spine.
- Raise your upper knee as high as you can without moving your hips or pelvis while keeping your feet in contact.
- Keep your lower leg on the ground at all times.
- Hold this position for a few seconds.
- Then return to your neutral position.
- Then relax.
- Repeat these exercises five to ten times.
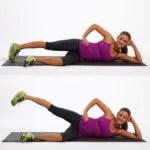
Lying leg lift
- On a workout mat, lie on your right side.
- To support your head and neck, place your right hand or a small towel beneath your head.
- Maintain a neutral stance with your head and neck.
- Throughout the exercise, your chin should stay tucked.
- To support your upper body, place your left hand in front of your waist or on the side of your left hip.
- You should have your ribs down and your pelvis tucked slightly.
- Make use of your core.
- Without locking your knees, put your legs on top of one another while fully extended.
- You should create a straight line with your body.
- Lift your left leg a few inches from your right leg to start the upward movement while keeping your alignment.
- Hold this position for a few seconds.
- Lower your leg.
- Then return to your neutral position.
- Then relax.
- Repeat these exercises five to ten times.
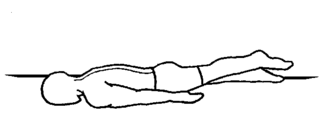
Prone hip extension
- Lie prone (on your stomach) with your legs straight on a mat or other level surface.
- To keep yourself stable, you can put your hands under your hips.
- Maintain firm core muscles throughout the workout to prevent your lower back from arching.
- Lift one leg off the ground while maintaining a straight knee and concentrating on your hip.
- At the top of the exercise, contract your gluteal muscles.
- Hold this position for a few seconds.
- Return your leg to the beginning position slowly and slowly.
- Then return to your neutral position.
- Then relax.
- Repeat these exercises five to ten times.
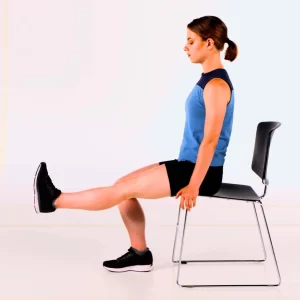
Knee extension
- Begin by positioning yourself in the chair.
- Make sure your knee is as straight as you can as you slowly extend one leg in front of you.
- Keep your foot flexed (toes pointing up) and use your quadriceps as you lengthen your leg.
- Hold this position for a few seconds.
- To maximize the benefits, keep the leg drop controlled and moderate rather than letting it happen too quickly.
- Then return to your neutral position.
- Then relax.
- Repeat these exercises five to ten times.
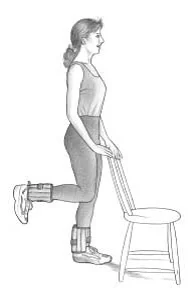
Standing Hamstring Curls
- Start by positioning yourself comfortably.
- The ideal distance between your feet is hip-width.
- Lift your heel toward the sky, extend your knee, and raise one foot.
- Keep your legs pointing forward and your upper body straight.
- Maintain this posture for a short while.
- Then return to your neutral position.
- Then relax.
- Repeat these exercises five to ten times.
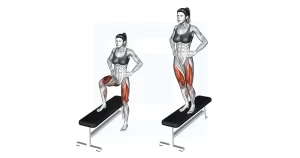
Lateral step up
- Stand sideways next to a step with the knee bent and the foot on top of it.
- Your knee should be perfectly straight, with the opposite foot firmly placed on the floor.
- You should bend at the hips and tilt your body slightly forward.
- While maintaining a straight knee, raise your other foot off the ground and push with it on the step.
- As you stay in this position, focus on balancing on your standing foot while maintaining your other foot hanging in the air.
- Then return to your neutral position.
- Then relax.
- Repeat these exercises five to ten times.
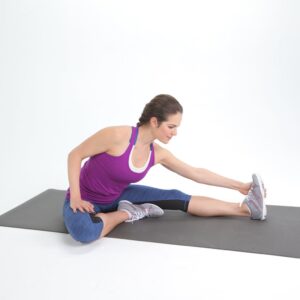
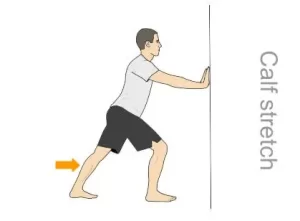
Standing calf stretch
- Then return to your neutral position.
- Then relax.
- Repeat these exercises five to ten times.
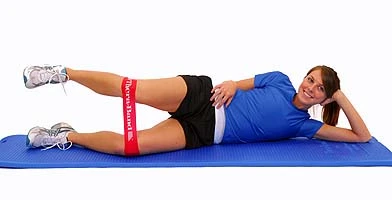
Resisted Hip Abduction
- Then return to your neutral position.
- Then relax.
- Repeat these exercises five to ten times.
Mini Squats
- Set your feet shoulder-width apart to start.
- Bend your knees as you would when sitting down.
- Tense your thigh muscles as you lift yourself back to standing after pausing one-third of the way down.
- Press through your heels and keep your back straight to maintain good posture.
- Move your knees straight forward toward your toes rather than falling in on one another.
- Then return to your neutral position.
- Then relax.
- Repeat these exercises five to ten times.

Wall sit
- With your feet shoulder-width apart, rest your back on a wall.
- Place your feet one to two feet away from the wall with your back flat on it.
- Keep your arms at your sides or in front of you at a relaxed position.
- Slide down the wall slowly while bending your knees until your thighs are parallel to the floor (or slightly higher, depending on your comfort level).
- Make sure your knees are in line with your toes and refrain from letting them go over them.
- Your knees should form a 90-degree angle at the lowest point; if this range is uncomfortable, don’t push yourself.
- Maintain proper form while holding a suitable squat position for as long as you can.
- To maintain the position, keep your back flat against the wall, engage your core, and concentrate on tightening your quads and glutes.
- Don’t hold your breath during the hold; instead, breathe normally.
- Hold this position for a few seconds.
- Then return to your neutral position.
- Then relax.
- Repeat these exercises five to ten times.

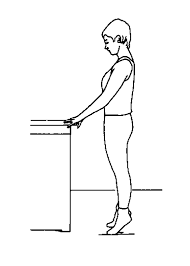
Standing heel raise
- Stand with your toes forward and your feet hip-width apart.
- Keep your shoulders relaxed, your core active, and your chest elevated.
- Place your hands on a solid chair, a wall, or a counter for balance.
- Push through your toes and heels as you slowly raise your heels off the ground.
- Observe how your calf muscles contract as you lift.
- Your lower leg muscles should begin to tighten.
- Continue to rise until your heels are as high as you can comfortably reach.
- Maintain your legs straight, but avoid locking your knees.
- Make sure your calf muscles are completely contracted and hold for one to two seconds at the exercise’s highest point.
- Refrain from overextending or bending forward.
- Keep your posture upright.
- To get back to the beginning posture, gradually lower your heels.
- Then return to your neutral position.
- Then relax.
- Repeat these exercises five to ten times.
Single-leg balance
- Stand on the ground to begin.
- Arms should stay at your sides.
- To lift your foot back, flex one leg at the knee.
- Use your other foot for balance as you stand up.
- Hold this position for a few seconds.
- Lower the elevated foot.
- Then return to your neutral position.
- Then relax.
- Repeat these exercises five to ten times.

What safety measures should be followed when exercising?
Get a medical clearance.
- Consult an orthopedic doctor or a physiotherapist before starting any exercise regimen.
- Verify that the dislocation is as little as possible and assess any damage to the ligaments, cartilage, or bones.
Keep Your Body Weight in Check
- Being overweight puts more strain on the knees.
- The patella and surrounding ligaments are under less strain when a healthy BMI is maintained.
Develop Your Proprioception and Balance
- Use stability ball exercises, balance boards, or single-leg stands to improve neuromuscular control and lower the chance of dislocation-causing missteps.
Get a warm-up and a cool-down.
- You can incorporate mild calf stretches into your warm-up and cool-down exercises.
- Reduces the possibility of injury by preparing muscles and joints.
- To warm up, perform simple exercises like leg swings or ankle pumps.
- Stretch gently and use ice therapy to cool down if needed.
Keep Up a Personalized Workout Schedule
- Your symptoms and healing stage should inform the exercises you do.
- Observe the recommendations of a physiotherapist, particularly during the initial stages of healing.
Make Gradual Advancement
- Start with non-weight-bearing, low-impact activities.
- Gradually switch to functional and weight-bearing workouts.
- Once cleared, resume jumping or sports.
Drink plenty of water and get some sleep.
- For the tissues to heal and respond well to exercise during rehabilitation, good quality sleep and hydration are essential.
Refrain from Painful Motions
- If your knee hurts sharply, swells, or pops, stop right away.
- While slight soreness in the muscles is common, joint pain is not.
Keep Your Knees Stable
- Use a brace, tape, or patellar strap throughout the initial phases of therapy or as instructed by your therapist.
- These assistants maintain proper patellar posture throughout the activity.
Keep Your Alignment Correct
- Throughout every exercise, keep your knees in line with your toes.
- Avoid valgus, or inward knee collapse, as this puts more strain on the patella.
Select the Proper Shoes and Surface
- Use a cushioned, non-slip surface for your exercise.
- Put on supportive footwear that gives your knees stability and a good grip.
Pay Attention to Your Body
- Rehabilitation takes time, so don’t rush it.
- A medical expert should be consulted if the pain or swelling persists.
When did you stop working out?
Suddenly, severe knee pain
- If you experience a sharp, stabbing, or worsening pain during or after exercise, you may have a reinjury or strain.
Reduced Range of Motion or Strength During Exercise
- A strain or re-injury may be the cause of an unexpected weakness or stiffness in your ankle or foot.
- Spend some time discussing it with your physiotherapist.
Inflammation or Complications
- If the knee swells during or after the activity, stop and apply ice.
- Persistent or worsening swelling could indicate irritation or damage to cartilage or soft tissues.
An experience of numbness or tingling
- This may lead to decreased blood flow or nerve involvement, both of which require medical care.
Fatigue or weakness in the knee
- Muscle fatigue during exercise is normal, but stop if your knee feels weak, unstable, or fatigued.
The incorrect structure or technique
- If patients are not closely supervised, they might perform tasks incorrectly.
- Because of bad posture, other joints may be strained and move in response.
Not Able to Carry Weight
- Over time, pain doesn’t get better; instead, it gets worse.
- Shows a poor reaction to the current treatment plan or a potential misunderstanding.
What kinds of exercises are best avoided if you have a patellar dislocation?
Lunges
- Lunges that are especially weighted or uncontrolled might put the knee in an unstable position and increase anterior knee stress.
Plyometric training or jumping
- Examples include tuck jumps, box jumps, burpees, and jump squats.
- Strong knee movements and high-impact landings raise the chance of re-dislocation.
Motions of Twisting or Turning
- Basketball drills, tennis, dance, and soccer routines
- The patella may become dislocated due to sudden changes in position.
What are some ways that can prevent a patellar dislocation?
Strengthening, flexibility, and appropriate movement mechanics are necessary to keep the kneecap tracking correctly in the femoral groove and prevent a patellar dislocation, or dislocation of the kneecap.
The best preventative measures are as follows:
Stay away from high-risk activities (or alter them)
- Risk is increased by sudden direction changes, twisting motions, and uncontrollable leaping.
- Learn how to land safely by bending and coordinating your knees instead of locking or turning them inward.
When assistance is required, use it.
- Particularly for those who have had prior dislocations, patellar stabilizing braces or taping can help preserve kneecap alignment.
- Correcting lower limb posture can be supported by proper shoes with strong arch support.
Correct Motion Mechanisms
- Dislocation risk is increased by poor form when exercising, playing sports, or performing daily tasks.
- Pay attention to correct knee position; when performing squats, jumps, and runs, the knee should remain parallel to the second toe.
- Prevent the inward collapse of the knee (valgus collapse).
- To stabilize lower body movements, contract your hips and core.
Increase Flexibility.
- To maintain balanced muscle tension, stretch the iliotibial (IT) band, quadriceps, hamstrings, and calves.
- The risk of dislocation can be increased by taut muscles pulling the kneecap out of position.
Summary:
When your kneecap pops laterally out of its vertical groove at your knee joint, it is known as a dislocated kneecap (patella dislocation). Although it can be painful and make walking impossible, a displaced patella can be easily corrected and sometimes heals on its own over time. The goal of end-stage rehabilitation is to get athletes ready for the unique requirements of their chosen sport. Meeting the requirements for a safe return to sport is part of the return-to-sport testing process.
The most frequent cause of patella dislocations is a non-contact twisting injury to the knee. The majority of patients with patella dislocations are active teenagers or those in their second or third decade of life. Patellar dislocations can be caused by many anatomical factors.
Restoring muscle strength, proprioception, and neuromuscular control in order to completely resume daily activities, including sports, is the aim of physiotherapy treatment following patellar dislocation.
Rehabilitation exercises are crucial for both preventing and recovering from patellar dislocations. Strengthening the muscles surrounding the knee, especially the quadriceps, hamstrings, and hip stabilizing muscles, helps maintain the patella in its normal position. With the proper assistance and dedication, most people can regain full function and return to their normal activities.
FAQ:
Can exercises help in managing patella dislocation?
Workouts may help treat patellar dislocation. Patella dislocation is a condition that causes pain and instability in the knee joint when the patella, or knee cap, moves out of its usual position. Exercise is an essential component of the rehabilitation process for patella dislocation. It can strengthen the muscles surrounding the knee joint, improve joint flexibility and stability, and reduce the risk of further dislocations.
When should exercise begin following a patella dislocation?
Remember that A progressive activity and exercise program to improve knee motion and muscle strength is essential to the rehabilitation of good knee function. Rehabilitation exercises will start three to four days following surgery. Your knee rehabilitation regimen will be guided by your physiotherapist.
Does walking help with patellar dislocation?
You might be able to walk after your displaced patella recovers. However, the injury will continue to cause pain and swelling in the knee. If walking is extremely painful, you shouldn’t attempt it. Always check for any further harm by visiting your healthcare physician.
Which muscles should I concentrate on building up?
To maintain correct patellar positioning, concentrate on strengthening the gluteal muscles, hip abductors, and quadriceps (particularly the vastus medialis oblique, or VMO).
Which exercises are best for recovering from patellar dislocations?
Quadriceps setting
Straight leg raises
Clamshells
Mini squats
Step-ups
Hip abduction
Are stretches beneficial?
Sure. It is possible to balance knee movement and lessen pressure on the patella by stretching tight muscles, particularly the hamstrings and lateral thigh (IT band).
Can I perform lunges or squats?
Once stability improves, partial or mini squats can be gradually added. To avoid re-dislocation, deep squats and lunges should be avoided in the early stages of recovery.
After a patellar dislocation, how long does recovery take?
Depending on the severity and how well you follow your treatment plan, recovery may take six to twelve weeks.
Should I use a knee brace when working out?
To support positioning and stop additional dislocation during activity, a knee brace or patellar stabilizing sleeve might be advised at first.
What should I stay away from following a patellar dislocation?
Until your healthcare provider gives the all-clear, refrain from twisting, pivoting, or high-impact activities like running or jumping.
References:
- Gym, 2020. severe dislocation of the patella. Exercises for Acute Patella Dislocation: https://www.uhcw.nhs.uk/download/clientfiles/files/AcutePatellaDislocation.pdf
- None (n.d.-b). Nothing CB Physiotherapy. CBPhysiotherapy: https://cbphysiotherapy.in/exercise/top-5-exercises-for-patella-dislocation
- J. Llewellyn (April 4, 2024). Is your kneecap loose? For patellar tracking, subluxation, and dislocation, try these seven exercises. Brace Ability. 7-patellar-tracking-exercises https://www.braceability.com/blogs/articles/
- Dislocated kneecap (dislocated patella). (August 27, 2025). Cleveland Clinic: https://health/diseases/21633-patellar-dislocations/my.clevelandclinic.org
- R. Orthopedic (2022, 28 April). The Top 5 Activities for a Patellar Dislocation Without Surgery. The company is called RIO Orthopedic. The top 5 exercises for a non-operative patellar dislocation can be found at https://rioortho.com/knee-injuries/knee-pain.
- J. S. P. D. O. Cscs and Cscs (2025, July 24). activities to treat patellar dislocation. (P] Rehab: https://theprehabguys.com/patellar-dislocation-exercises
- E. Lonsdale (October 27, 2022). Patellar Dislocation Management | POGO Physio Gold Coast. Gold Coast POGO Physio. https://www.pogophysio.com.au/blog/patellar dislocation management/
- Image 2, Exercises: 29453-heel-props-how-to-do-exercise https://www.skimble.com
- Image 12, Lift Manual, April 24, 2023. Lateral Step Up – instructions, benefits, and form. Lateral step-up: https://liftmanual.com/
- Image 18, Exercises for Hip Therapy: https://www.physio-pedia.com/