22 Best Exercise for Iliotibial Band Syndrome
Exercise for iliotibial Band Syndrome is an essential part of your overall treatment plan along with pain medication and Physiotherapy Treatment.
Table of Contents
Introduction
Iliotibial Band Syndrome (ITBS) is a common overuse injury that affects the iliotibial band, a thick band of tissue that runs from the hip down to the knee.
Iliotibial band syndrome (ITBS) is described as the most common second knee injury and it occurs due to inflammation of the lateral aspect of the knee due to friction between the knee ligament and the lateral epicondyle of the femur. Most often one feels pain lateral aspect of the knee and is most intense at 30 degrees of knee flexion. Risk factors for women include an enlarged hip joint and internal rotation of the knee. Risk factors found in men include increased hip internal rotation and knee adduction.
ITB syndrome is most commonly associated with long-distance running, cycling, weightlifting, and military training. a traumatic knee injury that is common in runners. hip abductor muscle weakness seen in this condition. If you have pain on the outside of your knee, especially if you are a runner, it could be a symptom of IT band syndrome.
This is an injury that is often caused by activities where you repeatedly bend your knee, such as running, cycling, hiking, and walking long distances. The athlete has pain or sharp pain on the outside of the knee or hip. tight iliotibial band.
When discussing what exercises to do for iliotibial band syndrome (IT band syndrome), a good place to start is to look at what other factors should you consider before doing a particular exercise. In this article, we will explain what factors you need to remember when building Your Iliotibial band recovery program and what exercises you should include based on your goals and stage of iliotibial band recovery.
In this article, we discussed the overview of iliotibial band syndrome, types of iliotibial band syndrome, and causes with the symptoms of this condition. then we explain the few stretching exercises for the specific muscles involved in this syndrome. then we explain the all-over exercise which provides mobility and flexibility to your hip muscles and knee muscles. We also add the strengthening exercise for your weakened muscles.
Types of iliotibial band syndrome
You are suffering from iliotibial band syndrome in one leg or you can have it in both knees. If it is in one leg it is called unilateral if you can have both legs it’s called bilateral.
Causes
Iliotibial band syndrome can result from one or more of the following: training habits, anatomical abnormalities, or muscular imbalances:
Training habits: Consistently running on a horizontally banked surface (such as the shoulder of a road or an indoor track) on which the downhill leg is bent slightly inward, causing extreme stretching of the band against the femur Inadequate warmup or cool-down
Anatomy: Changes in anatomy (such as hip and knee alignment) and excessive foot pronation position can develop strain on the iliotibial band.
Flexibility: Decreased flexibility in different muscle groups can affect the anatomical alignment of the foot, ankle, knee, and hip joints, causing compensations.
Muscle strength: Muscle strength imbalances in the pelvis, hip, knees, foot, and ankle can lead to faulty movement patterns and increase strain on the iliotibial band.
Muscle control: seen imbalance in muscle coordination and control of the hip can lead to changes in the alignment of the hip joint and lead to increased tension and stress at the knee.
Excessive uphill and downhill running
Running up and down stairs
Hiking long distances
Rowing
Breaststroke
Flat feet
preexisting iliotibial band tightness or prior injury
Knee arthritis
Bow leg
excessive sitting
unbalanced leg lengths
weaken of these muscles knee extensor muscles, knee flexors, and hip abductors
These physical conditions aggravate the syndrome.
Bowed legs
Knee arthritis
One leg is longer than the other
While any physical activity rotation of your foot or ankle inside move (during walking or running)
Rotating your whole hip inward during walking or running
Weakness of these muscles abs, gluteus, or hip muscles
Symptoms of iliotibial band syndrome
Aching, burning, or tenderness on the anterior part of your knee
Feeling a clicking, popping, or snapping on the anterior part of your knee
Pain up and down your leg
Warmth and redness on the outer aspect of your knee
pain located on the anterior part of the knee that increases when a person runs
How are IT band issues diagnosed?
Your doctor can check if you have iliotibial band syndrome by looking at your history, looking at your symptoms, and doing a physical exam. This may include a specific physical assessment, such as performing specific exercises to demonstrate movement patterns, strength, and stability. Your doctor can assess pelvic alignment and iliotibial band tightness. In some cases, an ultrasound, X-ray, or MRI scan may be
If you suspect you have iliotibial band syndrome or an iliotibial band problem, see your doctor for a diagnosis. They may find that your IT band is not affected, making different treatments and exercises more appropriate.
Exercise for Iliotibial Band Syndrome are:
Prone hip extension
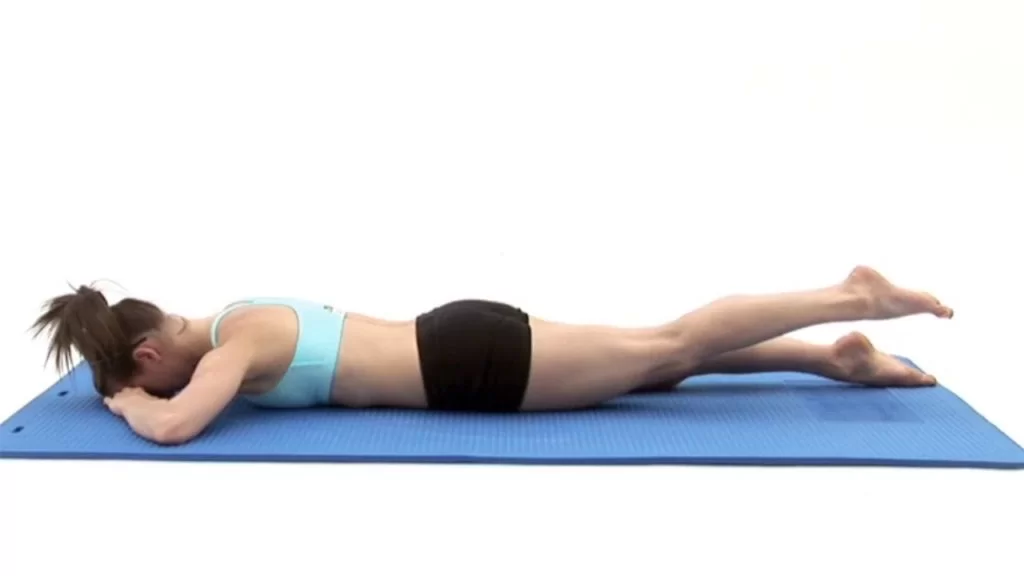
Begin the hip extension exercise in a prone position with straight legs. You can use of mat or plinth. Lift your right leg a few centimeters off the surface. Keep your both knees straight. Slowly lower your legs. Repeat five times per session or as directed. Switch legs and repeat when prompted.
This is a hip extension movement and strengthening exercise. Remember to minimize tilting of the lower back or front of the pelvis to isolate hip movement.
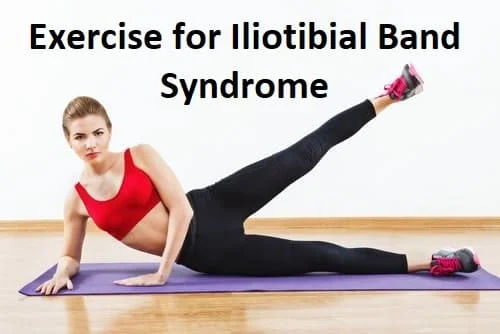
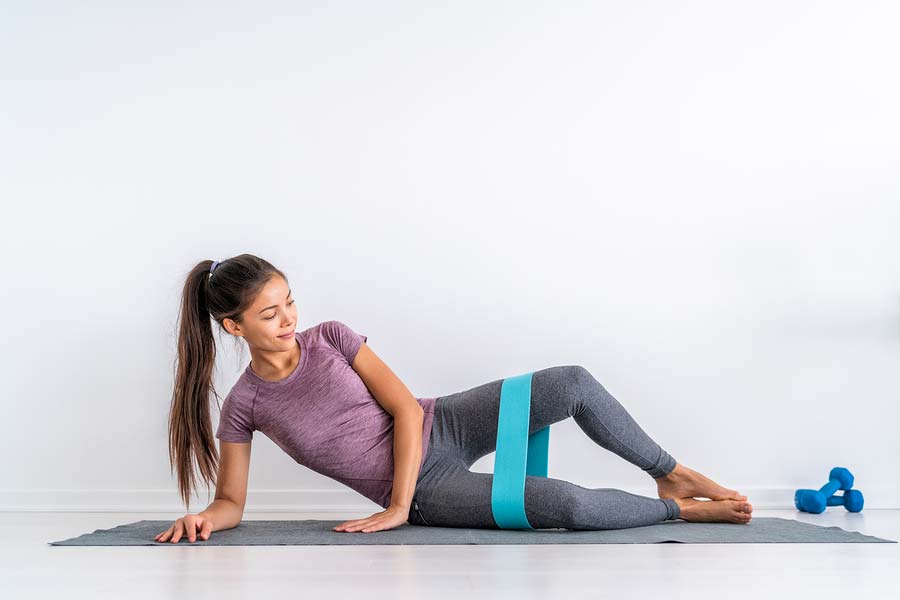
Side-lying leg raises(hip abduction)

This exercise targets the core, gluteus, and hip abductors to help improve mobility and stability. Bend at the bottom of the knee for extra support. You can wrap a resistance band or theraband around your ankles to increase the strength of the muscles from this exercise. Start on your side Lying on your right side, your left hip is directly over your right.
Keep your body straight and press your left hand into the floor for support. Use your right hand or a pillow to support your head. Slowly raise your left leg. Hold this stretch around you for two to five seconds. gradually return to the original position of these exercises. the benefit of the side leg raise is a leg lift exercise that, when you have done this exercise with the perfect procedure, will consider a number of muscle groups including the hip flexors, lower back, core, gluteus, and hamstrings.
This simple exercise if you do regularly will help maintain the strength of the abdominal muscles, lower back muscles, and hip muscles.
Performed 15-20 repetitions per session and did three sets per day and each side.
Towel (calf muscle) stretch
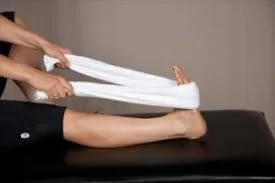
The towel calf stretch is a great way to stretch your calf muscles, especially if you don’t reach your arms up to your legs like you would when stretching.
Tight calf muscles can be one of the reasons for repetitive strain injuries in the lower limbs. Your calf muscles may need more flexibility if you have an injury or illness that prevents normal movement. By working to keep your calf muscles flexible, you can return to normal movement with little or no pain.
Sit on the mat with hip extension and hip flexion. The ball of one foot should be wrapped with a cloth or resistance band. Pull the towel gradually so that the toes and ankle bend up and off the floor. Hold the stretch for 30 seconds. Repeat with the other calf.
Hamstring muscle strech

Hamstring stretches help relieve back pain, improve posture, and prevent pain and injury. The hamstrings are a group of muscles that attach to the pelvis and legs. They allow you to bend your knees and tilt your hips. But when they are tight, they can cause pain in the lower back, knees, and feet. One way to stretch your hamstrings is to touch your toes. While standing, bend forward from the hips and try to touch your toes with your fingers.
Hold this position for 30 seconds. Repeat three times. Here are some tips to make it safer and more effective. Do not bounce back. This can lead to more muscle contractions, not less. Lift your sit bones toward the ceiling. It lengthens the hamstrings. Make sure your hips and knees are in the same alignment. Your buttocks should not be behind your legs.
This defect makes stretching less effective. If your core muscles are weak, consider using a table or other surface to help you stand. Rule of thumb to keep yourself safe: just go as far as you can without back pain or insecurity.
Knee stabilization
Wrap the elastic hose around the ankle of the uninjured leg. Tie a knot in one end of the hose and fasten it to the door at about ankle height. Stand facing the door with the leg without the tube (your injured leg) and bend the knee slightly, keeping the hamstrings tight.
Hold this position as you move your leg so that the pipe (the uninjured leg) is directly behind you. performed three sets of 15 repetitions.
Move the leg in the opposite direction of the resistance band. perfrormed Hold the chair if you need help balancing. This exercise can be made more difficult by standing on a firm cushion or foam mat while moving your leg with a hose.
Forward fold with crossed legs
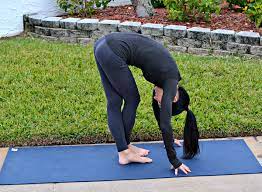
The forward bending stretch helps reduce stress and tension in your iliotibial band. You will experience the muscles in your sides tightening your thighs when you do. For a deeper stretch, put your entire body weight on your back leg.
Use supports or supports under your arms if they don’t reach the floor or if you have lower back pain. If you care about blood coming to your head, keep your back straight and your head up. Stand with your feet wide apart. Cross the left leg over the right and point the pinky toes as far as possible. start with the deep inspiration then extend your shoulders above your head. Exhale as you move your hips forward and lengthen your spine to lean forward. Extend your hands to the floor and lengthen your neck. Keep your knees slightly bent. Stay in this position for up to one minute and then do the opposite side.
the benefit of this exercise This simple forward fold stretches the lateral hamstrings — that’s your outer hamstrings, also known as abductors, which also provides relief to the iliotibial band syndrome.
Performed 15-20 repetitions per session and did three sets per day and each side.
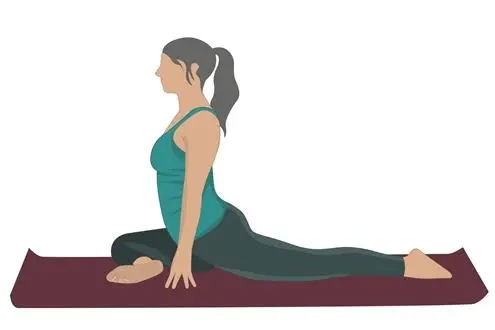
Cow face pose

This cow face yoga pose relieves deep tension in the gluteus, hips, and thighs, improving flexibility and mobility. It also stretches your knees and ankles. Avoid sinking to the other side.
Use a pillow to flatten both sit bones to the floor to keep your hips level. So stretch your legs for an easier pose. Bend your left knee and place it in the center of your body. Pull your left leg toward your hip.
Cross your right knee over your left hip, stacking your knees. Place your right heel and ankle on the posterior aspect of your left hip. keep the cow face position for no more than one minute. You can go deeper by walking your hands forward to lean forward. hold the position for around one minute and then do the other side.
Improves abdominal and diaphragmatic breathing capabilities. Enhances flexibility in stiff shoulders. this exercise provides strength to the triceps, hip muscles, and knee muscles.
Performed 15-20 repetitions per session and did three sets per day and each side.
Seated spinal twist

This stretch relieves tension in the spine, hips, and thighs. This allows for improved posture and stability by opening up the shoulders and chest. For a gentler stretch, stretch your legs.
You can put the pillow under your knees if you feel your thigh tight. start with the Sitting position on the plinth or mat, bend the left leg, and place the left foot outside the right hip. Bend your right leg and place your right foot on the floor on the outside of your left thigh. Exhale twisting the lower body to the right.
Keep your fingertips on the left side. keep your elbow on the opposite side of your knee or place your elbow on the posterior aspect of your knee, palm facing forward.
Performed 15-20 repetitions per session and did three sets per day and each side. the benefit of this exercise is stretching the muscles on one side of the body whilst compressing the muscles on the other side.
Gluteal stretch
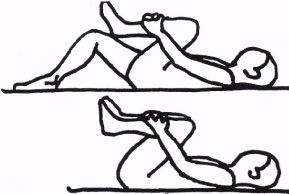
Gluteal stretches can help relieve muscle tension and stress, reduce lower back or hip pain, increase your flexibility and range of motion, and reduce your risk of injury.
Start on your back with your legs extended and your legs bent upwards. Bend and lift your right knee and place your hand around the knee. hold your knee by your hand and pull it towards the chest. Hold for 20-30 seconds.
Return your right leg to the starting position. Extend your right leg and repeat with your left leg. In some cases, it is important to consult your doctor or a qualified sports professional before stretching your glutes. See your doctor or physical therapist if you have had any of the following in your hips, legs, or back: surgery, injury, or pain. Also, if you haven’t started doing glute stretches or stretching in general, start slowly. hold the stretch for around ten seconds and then gradually increase the hold duration.
Standing IT band stretch
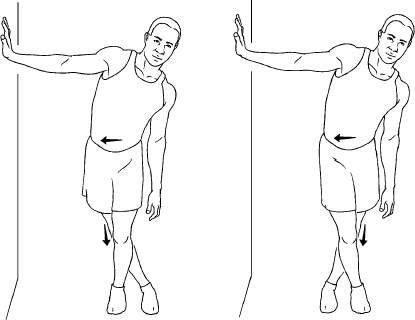
In general, IT band problems can be alleviated with exercises and stretches that reduce tension and increase flexibility and strength. You can also focus on knee, hip, and shoulder alignment.
Here are five stretches that focus on the IT group and supporting muscle groups. While standing, cross your right leg in front of your left and press firmly into both legs.
Try to keep your feet shoulder-width apart. Lean to your right side as far as your body allows and feel the stretch in your knee and hip. You can deepen the stretch by reaching your left arm above your head. Press your left hand against the wall to increase resistance or stability. Hold the stretch for 30 seconds. Performed this stretch three times on each side.
Foam roller stretch
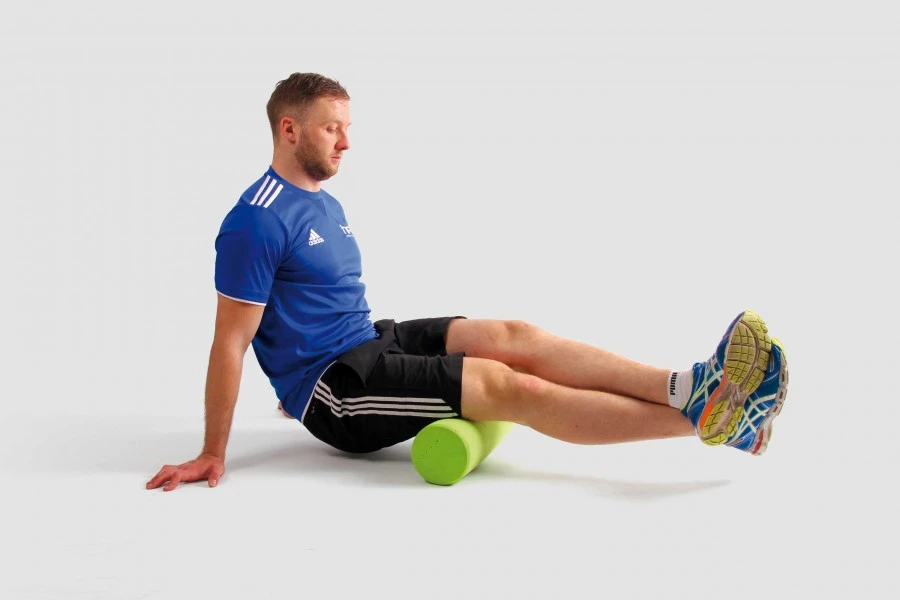
For the foam roller stretch exercise, you will require foam roller equipment. Use it to relieve tension, muscle knots, and tension around the IT band. Focus on certain areas where you feel tension or anger.
Go slowly through these areas. start with the exercise Lie position on your right side with your thigh resting on the foam roller. Keep your right leg straight and use the support of the floor by planting your left foot’s sole.
For stability, place both hands on the floor or raise yourself to the right. The foam rolls down to the knee before rolling back to the hip. Continue for up to 5 minutes and then do the opposite side. Look back over your shoulder. hold the stretch position for up to one minute and then do the other side.
Performed 15-20 repetitions per session and performed three sets per day and each side. The benefit of these exercises is maintaining muscular performance, improved postural control, and correcting muscle imbalances.
Figure 4 Stretch
For this exercise start with lying on your back with your feet on the floor. Cross your right ankle over your left knee and keep your right leg bent. Bring your left knee to your chest.
Extend your right hand through your legs and curl your fingers under the crease of your left knee. With your hands, pull your left knee toward your chest, stopping when you feel a stretch in your right glute and hip.
Hold there for at least five breaths (although you can hold the stretch for up to two minutes), then release and repeat on the left side. Do you want to change the tensile strength of Figure 4? One of the easiest ways is to change the angle of bending the knee on the extended leg. For a deeper stretch, you can also interlace your fingers in front of the leg behind the knee.
Figure 4 Stretch Variations
Seated Figure 4 Stretch
Figure 4 Pose at the Wall
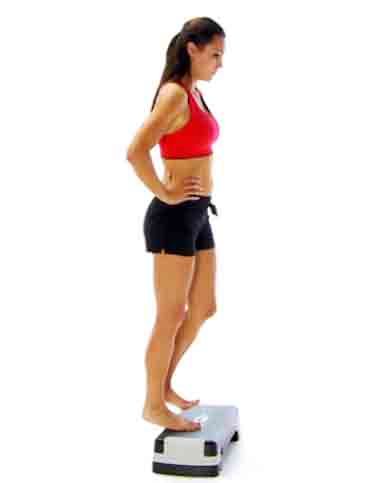
Hip hikes
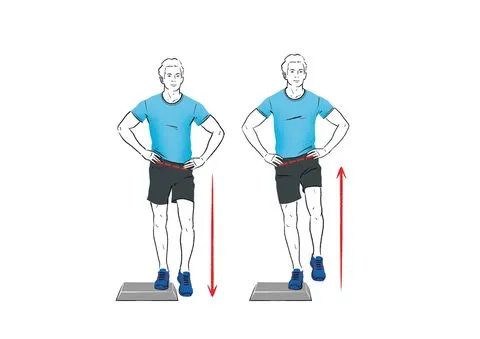
The gluteal muscles are important for being able to perform many functional tasks, including walking, running, or getting up from a chair. These muscles are also responsible for allowing you to walk up and down stairs. If you have hip weakness, you should see a healthcare provider or physical therapist to find the right exercises to strengthen your hips.
Basic hip exercises may help, or advanced hip strengthening may be necessary to return to normal activities. Standing on a step with one leg, keep the supporting leg straight and the abdominal muscles closed.
Then let the foot hanging from the rung slowly fall to the ground. Do this by letting the pelvis slowly descend.
It is important to keep the supporting leg as straight as possible on the step. Many people like to bend the knee to lower, but lower by letting the hips sink slowly.
Your foot should not come down far enough to touch the ground – remember to control the movement with a slow and steady drop. Once your hips drop as far as possible, hold the position for a second or two, making sure to keep your abs tight. Then continue with the last step of the exercise.
Heel drops
The heel drop exercise is a safe and effective exercise for osteoporosis. In today’s post, I will discuss why the exercise is effective, provide guidance for people interested in the effect of the exercise on the bones, demonstrate and describe how to perform the heel drop and suggest a modified lower-impact heel drop. Practice. You can find the heel exercise in the beginning section of the Exercise for Better Bones program.
The heel exercise targets the calf muscles. It also targets the bones of the heel, lower leg, calf, and hip, including the femoral neck. To perform the heel drop exercise, you literally drop your heels to the floor. Wear comfortable shoes or stand barefoot on a mat. Maintain the best position. Rest your hands on strong support.
Always keep your knees slightly bent or not locked. Tighten your abdominal muscles. Inhale as you lift your heels off the floor and shift your weight evenly onto the balls of your feet. Keep your back long and your eyes forward. Exhale, and gently tighten your pelvic floor and abs as you drop back onto your heels. Repeat until the set is complete.
Bridging exercise
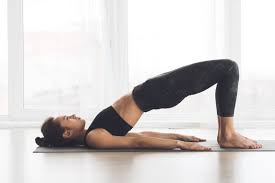
For the bridging exercise take the supine lying position on the mat or plinth. Rest your hands on your sides, bend your knees, and place your feet on the floor under your knees. provide contraction to your abs and gluteus by pressing your lower back into the ground.
Lift your hips to create a bridging position along with your knees to your shoulders. contract your core muscle and create the bridge then lift your body towards the ceiling. Hold the pose around 20-30 seconds. back your hips to return to the original position. The main work of the bridging exercise is the stabilizers of the posterior chain, including the hip abductors, gluteus maximus, and hamstrings.
Abdominal muscles, oblique muscles, and quadriceps, which stabilize the movement of the bridge, are trained as antagonists. maintain stability. Like many body and core stretches, the therapeutic effects of bridge exercises can be improved with exercise. sandbags, especially for less frequently used muscles.
Wide-legged standing forward bend
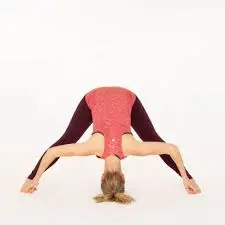
From Tadasana, spread your legs, with your feet as parallel as you feel comfortable. You are looking for stability and grounding. Raise your inner arches by pulling your inner ankles up. Attach the outer edges of the feet and the big toes to the floor.
Stretch your thighs by pulling them up. Place your hands on your hips. Extend your spine and open your chest as you inhale. Bend forward from the hips, keeping your back long and your chest open as you inhale. Go with a semi-straight back and place your hands under your shoulders on the floor or blocks. Take a few breaths here.
If you feel you can still go further without rounding your back, move your hands back as you fold deeper than your hips, keeping your hands under your elbows, elbows back, forearms perpendicular to the floor, and upper arms parallel to your hips floor Release the head down at the full front end. If it is available to you, place the crown of the head on the floor with the long neck.
To come out of this position, walk your hands forward and place them under your shoulders as you inhale, still with a long spine and straight arms. As you exhale, place your hands on your hips, and as you inhale, rise back up with a straight back. Return your legs to the mountain position.
Pigeon Pose
The pigeon poses exercise pose can release tension in your gluteus, hips, and back. Here’s the procedure for how to do this pigeon pose stretch. For this exercise start with four hands. Move your right knee to your right wrist and place your lower leg on the ground.
Move your right ankle toward your left wrist. Slide your left foot back, point your toes, and keep your hip forward.
Extend your spine. Gently move your hands forward. Hold for 5-10 breaths. Return to the starting position.
Switch legs and repeat. You can also challenge yourself by adding a fourth stretch. Bend the back leg, point the leg up, and hold the leg with the hand. performed two sets of seven to ten repetitions, holding the position for around five to ten seconds on each leg.
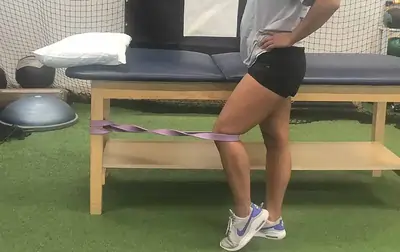
Lateral Band Walks
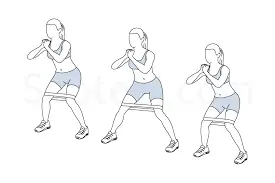
For the Lateral band walking exercise, you needed a resistance band and then wrapped the loop band over both ankles. Raise your feet about shoulder-width apart or until the band is taut. Get into an athletic stance with knees slightly bent, hips forward about 45 degrees, and hands on hips.
Keep your upper body forward and take a step to the right with your right foot. Feel the tension in your right hip, then slowly step your left foot to the right so that your feet are shoulder-width apart. Take ten steps to the right, right foot leading.
Then reverse your path and take ten steps to the left with your left foot. When doing the exercise, make sure the upper body, hips, and knees are all forward. Also, remember to step straight outside the hip joint. When you step, your feet should be in line with your hips and the rest of your body.
Lateral band walk variations
Monster walk
X band walk
Resistance band lateral leg lift
Glute Wall Press Isometric
For the glute wall press isometric exercise start with this standing position. It is an isometric exercise, you activate the muscle and hold the contraction without moving the body. Wall chairs and tables are common
isometry This isometric glute press is a great way to isolate the gluteal muscles that stabilize the pelvis during walking, running, and change the activity.
Start by placing the foam roller between the wall and your left thigh. With your left knee bent, press your left foot into the foam roller and hold for 5 seconds. You should feel the gluteus on the right side stabilize.
performed two sets of seven to ten repetitions, holding the position for around five to ten seconds on each leg.
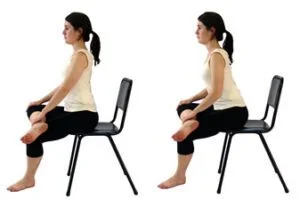
Clamshell exercise
Learning the correct clamshell exercise is only a matter of minutes. Follow the procedure step by step and do the exercise: will soon learn the side chest exercise:
Roll out the mat, lie on your side, and place your feet on top of each other.
flexed your knees to a 45-degree angle.
Place your head on one hand to rest and the other hand on the mat to support your body.
Make sure your hips are stacked during the box exercise because your upper pelvis will drop during the exercise. Now tighten your abs to stabilize both your pelvis and spine. Lift your knee up in the air above your head as high as possible.
You need to make sure you don’t move your hips or pelvis as you lift your knee.
Do not lift past the upper edge of the leg. Pause for a few seconds and then return to the position from which you started the exercise. Switch sides and do 20 repetitions of hip exercise.
Clamshell Variations To Try At Home
These variations of clamshell exercises you can do during the progression period. this variation is the strengthening exercise.
Clamshell Exercise With Band
Do exercises with resistance bands while stretching your muscles to your comfort level. This variation of shell exercise works the glutes, hamstrings, core, and back. Here’s a step-by-step guide to help you practice the clap exercise with a strap:
Lying on one side, place a resistance band around your legs above your knees.
Place your feet and hips on top of each other and bend your knees to a 45-degree angle.
Stabilize your core by contracting your abs and lifting your top knee into the air as high as possible. When lifting the knee, the legs should touch each other and the hip and pelvis should not move.
Do not lift past the upper edge of the leg.
Pause for a few seconds and then return to the position from which you started the exercise.
Switch sides and do 20 repetitions of this exercise with a resistance band.
Reverse Clamshell Exercise
This clamshell exercise for a glute variation hits the hips, glutes, and outer thighs. All you need to do this exercise is a softball. Here’s a step-by-step guide to help you practice the biceps curl:
Lie on the floor with your feet and hips flat, as you would for a regular crunches exercise.
Place a soft ball between your thighs and squeeze it as hard as you can using your inner thighs.
Switch sides and repeat the exercise in reverse. Here is a list of precautions and safety tips to keep in mind when doing pelvic floor exercises:
Keep your neck in a neutral position when doing clavicle exercises, otherwise, you will have to strain it.
Never twist your body when doing a regular butt exercise or variations of it. Instead, you should turn the body from the hips.
Activating the core during biceps training is important not only to activate the abs but also to protect the abs
your spine.
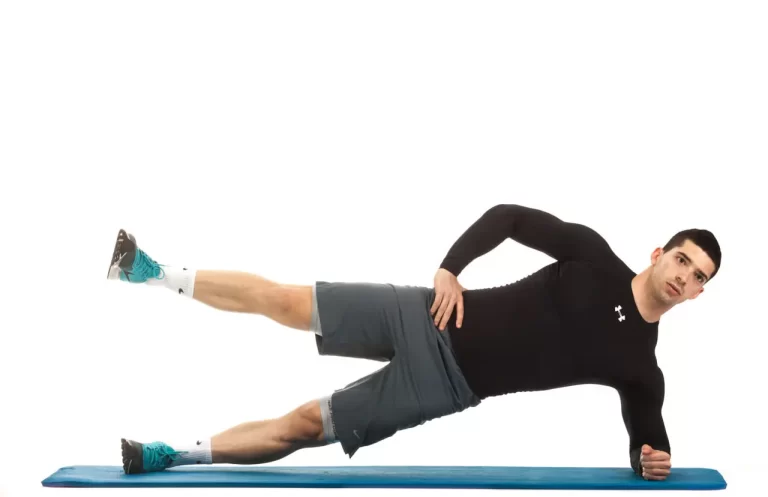
Side plank pose
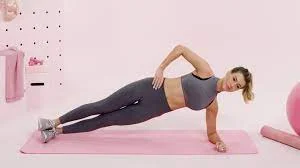
The side plank is one of the easiest ways to work two layers of muscles on the sides of the core, known as the obliques. These muscles help you twist and bend your body and also play a role in protecting your spine.
Ab exercises like crunches and planks target the front six abs. But if you’re looking to strengthen and tone your core, it’s also important to train your glutes regularly. In fact, many professional athletes incorporate the side plank into their training regimens.
Before starting, try to find a mat or other soft surface to make the side plate. This can help reduce stress on the arms and legs. start with the side Lying position on any side with your legs straight and feet on top of each other. Place your right elbow under your right shoulder with your forearm away from you and your hand in a fist. The pink side of the hand should be in contact with the ground. With the neck in a neutral position, exhale and tighten the core.
Lift your hips off the mat, resting your weight on your elbow and the side of your right leg. maintained a straight alignment of your hip, knee, and ankle joints. Maintain this position throughout the exercise. Hold the plank position for around five to ten seconds then gradually increase the hold duration. Repeat on your left side.
A few things to keep in mind while training:
If the side plate is hard to hold, that’s okay. You can try doing the exercise from your knees instead of your legs as you build your strength. Keep your hips stacked and facing forward. Try to avoid turning your body. Avoid tilting your pelvis during the exercise. If you can’t hold the position, try shortening the duration of the side plank. It’s better to go 20 seconds with good form than 50 seconds with bad form. Try to keep your face and hands relaxed during the exercise.
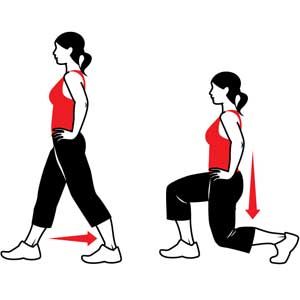
Low lunge variation
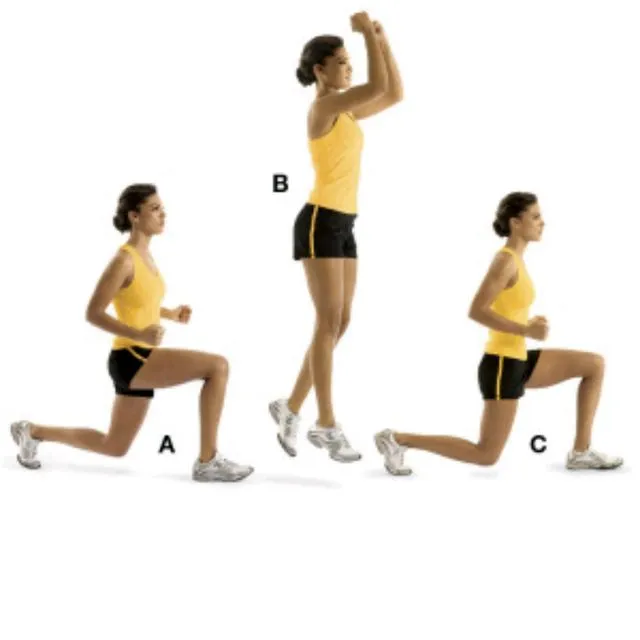
This exercise is useful for injury prevention and post-injury rehabilitation. It is often part of a core strength program or rehabilitation protocol that allows athletes and sports professionals to return to their sport or activity of interest as quickly as possible. Start the exercise with a standing position.
Take a longer step forward than the walking step, so that one foot is in front of the body and the other behind.
Your foot should keep flat on the surface. Your posterior heel will lift off to the surface. flexion of your knees to about 90 degrees as you go down. Remember to keep the frame upright and the core closed. Then forcefully push off the front leg to return to the starting position.
The lead knee should not go past the toes when landing. Try to keep your hips symmetrical (at the same height, without dropping the hip of the back leg or wandering the hip of the front leg). Contract your abdominal muscles as you move to keep your body upright. The feet should be hip-width apart during the descent and return.
- Variation for lunges
- Static lunge
- Back lunge
- Lateral lunge
- Curtsy lunge
- Walking lunge
- Adding weight to your lunges
Prevention and remedies for IT band syndrome
To avoid IT band problems, it’s important to take care of your body while exercising. Practice the correct exercise and don’t cross your boundaries. Always stretch, warm up, and cool down when exercising. If you want, you can use a foam roller to loosen your iliotibial band.
Keep doing regular exercise sessions to flex and stretch your body. It also helps balance your body when you often do the same type of repetitive activities. take the exercise sessions at least two to four times per week Take at least one complete rest day per week to give yourself time to recover between workouts.
There are several complementary treatments for ITB syndrome. Decide which ones are most beneficial to your routine and incorporate them into your exercise program. Here are a few to consider:
Sports or deep tissue massage. deep tissue massage can prevent injury and provide recovery, and professional massage procedures can improve flexibility, relieve muscle tenderness, and reduce muscle spasms.
Myofascial release. This type of physical therapy uses massage to relieve pain, tension, and tension in the myofascial tissues.
Acupuncture. This treatment can help relieve pain and discomfort while you heal from an IT band injury.
Hot and cold treatment. These simple treatments can help relieve pain and inflammation, although they may not completely cure the cause of the discomfort. Use a heater or take a warm bath or shower to warm and relax your muscles. Cryotherapy or ice massage reduces swelling and also reduce inflammation. Switch methods every 15 minutes or do one at a time.
anti-inflammatory drugs. Take nonsteroidal anti-inflammatory drugs such as aspirin, ibuprofen (Advil or Motrin), or naproxen (Aleve) to relieve pain and inflammation.
Healthy choices. Follow a healthy diet with fresh fruits and green vegetables. Stay well hydrated by drinking plenty of water and enjoying healthy beverages such as coconut water, vegetable juice, and herbal teas. As long as they don’t interfere with your medication, take herbal supplements that can reduce pain and inflammation.
Rehabilitation program for IT band syndrome:
What Caused Your IT Band Syndrome?
We previously explained that IT band syndrome develops when the IT band experiences excessive compressive forces as it crosses the outer knee. Excessive compression can be caused by one or more of several factors (tight muscles, weak glutes, fatigue, overpronation, running terrain, etc.).
For an Iliotibial band rehabilitation plan to be successful, it must address the cause of the injury. For example, if your case was due to overpronation, you can do gluteal exercises until the cows come home and may not see an effect. But if you add exercises that specifically improve ankle strength and stability, you may notice improvements. Or it could be that your case was just a training error and muscle weakness or control was not involved.
In this case, you really need advice on restructuring and better training planning. Therefore, it is useful to consult a physical therapist who can help you identify your cause and create a rehabilitation plan that takes into account all the important factors.
How annoying is your injury
A recently injured iliotibial band can be quite short and easily aggravated. Exercises (movement patterns, weight, volume) should vary depending on how sensitive or irritated your injury is. If not, you may irritate it further, or if you are too conservative, you may not notice any progress. We will explain this in more detail in the training in this article.
Your training goals
At first, Iliotibial band rehabilitation can look very similar to everyone. As injuries heal and more intense and complex exercises progress, the choice of exercises will be influenced by which sports one wants to return to and at what level.
For example, if you are a runner or do jumping sports, your legs have to withstand much stronger forces than someone who just wants to walk. In addition, the program must include exercises that develop the mechanics of counting (plyometrics), although this is not really necessary for a walker. If you are a soccer player, you also need to have control when changing direction quickly, while a normal runner doesn’t have to worry about that.
IT band syndrome exercises to avoid
So, we give the list of activities you should avoid if you have increased pain and inflammation during specific activities. In general, reduce the movements that caused your condition until your physical therapist gives you the go-ahead. These activities and exercises include push-ups, squats, running, and cycling.
If they are part of your regular exercise routine, ask your physiotherapist when and how you can safely resume your favorite activities. For example, distance runners may start with a half mile or a mile instead of jumping back into a 5K, or they may stick to flat surfaces and avoid running downhill, which can put stress on the knees.
A note from Samrapan Physiotherapy Clinic
Physical therapists are trained to help people with ITBS pain and stiffness. These include stretching and strengthening exercises, manual therapy, and other methods that promote good alignment and reduce discomfort. Physical therapists also included the modifications of exercises to decrease the stress on the knees and hips.
For example, they may recommend lowering your seat when cycling or adjusting your running form to promote healthy body alignment. They will assess your progress over time and adjust your treatment plan accordingly.
FAQ
What is the great management for iliotibial band syndrome?
Iliotibial band syndrome management can include:
Rest, ice, compression, and elevation (RICE).
Anti-inflammatory drugs such as ibuprofen.
Cortisone shots.
Temporary reduction of training.
Orthotics to correct alignment.
Stretching the IT band.
Is the Iliotibial band condition permanent or not?
IT band syndrome is usually not permanent. With proper medical care and physiotherapy treatment, a person’s back to his or her regular activities will depend on how long it takes the injury to heal. In many cases, this condition takes only duration for recovery if you start the treatment at the starting phases of the condition.
Can yoga help IT band syndrome?
There are three great stretches to Relieve Iliotibial Band pain – Yoga poses and stretches
How yoga stretches can help iliotibial band syndrome. Gentle yoga posture makes stretches to the tight muscles or your Iliotibial band and the surrounding muscles, decreasing the tension and encouraging fluid movement. By loosening those thick, fibrous Iliotibial bands, you minimize any rubbing opposite the femur and iliotibial bursa, which is what reason for discomfort.
What Exercises Should I Avoid With Iliotibial Band IT Band Syndrome?
Try running or cycling shorter distances than usual. If you are still suffering, avoid these activities altogether. You may need to do other exercises that do not aggravate the pain of your Iliotibial band syndrome, for example, swimming.
How long does it take for the IT group to recover?
Treatment can take anywhere from a few weeks to a few months for IT band syndrome to completely heal; four to eight weeks is the general recovery time. It was originally caused by overuse, so it needs time to recover and relax.
Can I still run with IT Band Syndrome?
Running with IT Band Syndrome
With Iliotibial band syndrome, you can continue to run in most cases, but you will need to reduce your training load to reduce tissue inflammation. The best treatments for IT band syndrome are rest and anti-inflammatory medications and a restorative exercise program that includes stretching.