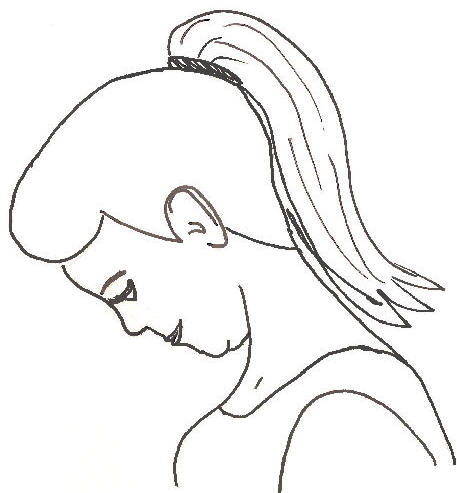
Text Neck
Table of Contents
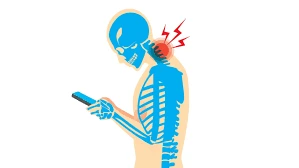
What is a Text Neck?
- Text neck is a term generally used for unusual posture created by bending forward neck for a prolonged period of time, for example seeing smartphones or mobile phones for a prolonged period while reading or chatting, is reported to have Neck stress injuries. This posture mostly concluded in upper back cervical or shoulder pain, headaches, or thoracic kyphosis.
- Doing this:
- the strain on the spine
- Causes upper-back pain
- Causes a lot of tightness in the neck or shoulders muscles
- The pain usually is there over time or might go away after several days and weeks, and it might go away or come back episodically over many years. The stiff neck or the neck soreness could spread downwards into the middle-back or the shoulder blades, sometimes even into the arms or the forearms. It can be sharp at times when you move the neck around and just slight. It might cause head pain. You may feel it when you are using electronic devices like smartphones or laptops, and it might be a pain at night. in the course of time, the pain will disturb you or have a negative impact on your daily routine life.
Symptoms of Text Neck
- Leaning or bending the head forward to use a cell phone cause directly damages to the spine.
- Flexing the head forward to fifteen degrees places approximately 12.25kg of force on the neck.
This might increase to 18kg at thirty degrees,22.22kg at forty-five degrees and27.22kg at sixty degrees. - Damage created by not treating the text neck might be similar to occupational overuse syndrome and continuous stress and strain injury.
- The most generic example of Text Neck is neck pain, tightness, or soreness.
- The major symptoms include:
- Stiff neck: soreness or difficulty in moving the neck after a prolonged period of time.
Pain: might be localized to 1 part of the body and may be diffused over the area, usually the lowest part of the neck. It can be described as chronic pain and in extreme cases, it could also be sharp.
Radiating pain: it mostly occurs in the shoulders or arms.
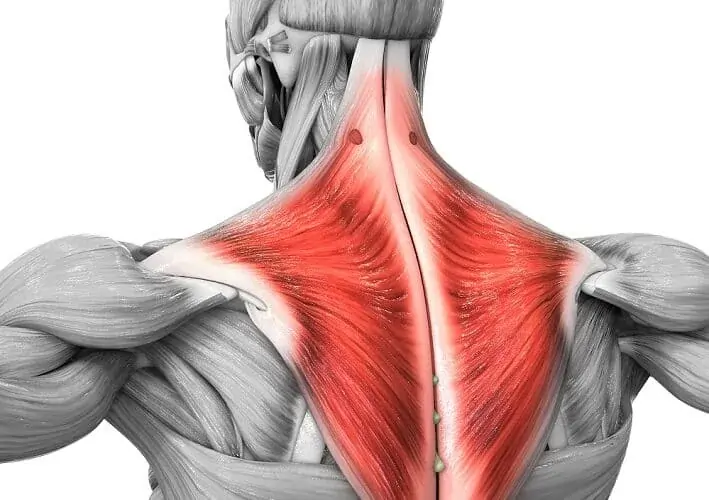
Muscular weakness: shoulders muscles are named, trapezius, rhomboid, or shoulder external rotators commonly and quickly become weak.
Headache: sub-occipital muscle tightness might cause tension-type headaches.
other symptoms there can also be:
- Early-onset arthritis (Cervical spondylosis)
- Flattening of thoracic kyphosis
- Disc compression
- Spinal degeneration
- Loss of lung capacity
- Muscle weakness and tightness
Diagnosis of Text Neck
- Sharp and severe pain is seen in the neck or shoulder muscles.
- Range of motion is reduced due to stiffness and tightness in the shoulder or neck
- Intermittent and continuous headaches.
- Nerve pain with tingling or insensitivity in the upper limbs.
- Pain in the eyes.
- X-ray: X-rays might help to reveal degenerative changes to the spine or problems like bone spurs.
- Computed tomography (CT): A CT scan is an imaging technology that can use multiple X-ray images to assist view the neck and spine in different “slices.”
- Magnetic resonance imaging (MRI): An MRI scan employs powerful magnetic or radio waves created by highly detailed images of bone or soft tissues, involving those of the spinal cord.
- Electromyography (EMG): An EMG or nerve conduction study involve the insertion of a needle into a muscle to test nerve signal speed, which will assist diagnose a pinched nerve.
- Blood tests: A complete blood count (CBC), erythrocyte sedimentation rate (ESR), or C-reactive protein (CRP) test will help to identify if inflammation and infection are present.
Treatment of Text Neck
- The following conditions from a systematic review of Text Neck should be kept in mind while using cellphones and other hand electronics devices:
- Avoid prolonged usage or take frequent breaks in between.
- Avoid prolonged static postures.
- Position the device in such a way that it reduces the stress on the upper extremities, head, or neck
- Avoid more reps of movements such as prolonged chatting and swiping
- Do not hold large and heavy devices in 1 hand for a prolonged period of time
- Rehabilitation proved to be very effective in treating the patients resulting from Text Neck. Rehabilitation can be treated as a two to four-week program that begins with soft tissue mobilization or we can also have Grade one or two joint mobilizations, active or passive stretching of stiff muscles, or go forward to muscle strengthening, and posture retraining or we can do a home exercise program.
Pain relief is the primary goal in active cases. It can be achieved by:
- Regular neck movements: rotations or side bending
- Restoring function to the upper trapezius or the serratus muscles
- Chin tuck exercises
- Stretching Exercises to the neck and Shoulder Muscles
- Strengthening Exercise to the Neck and Shoulder Muscles
- Massage To the Neck Muscles
- Ice/heat packs
- In severe chronic cases, pain medication, injection into the facet joint, or into the trigger point might be done.
Heat and Cold Compressors
- Cold is used to relieve pain or reduce inflammation in acute or chronic cases. It should be applied for 10 to 15 mins every two to three hours as needed or immediately after any activity that aggravates the symptoms. Use ice packs and an ice massage.
- Heat might be used before performing stretching or strengthening activities prescribed by the physician, physical therapist, and athletic trainer.
- Use a heat pack and a warm soak.
Using Self-Massage Techniques
Knead each side of the neck by using the opposite hand.
- Cross the left arm in front of the chest to bring the hand up to the right shoulder. With a kneading motion, rub the muscle back of the shoulder, much like kneading dough. Bring the arm slowly down the right shoulder, kneading as you go. Give enough pressure that you can feel it, but not so much that it hurts. Repeat the process on the opposite side. You can repeat both shoulders two to three times if you want.
Rub out the knots and trigger points with the fingertips.
- Press down on the area that’s triggering the pain with the fingertips. Push down enough so you feel it, or then hold for up to a minute. You should feel it and start to release the tension.
- The typical trigger points are in the middle of the spine just above where the shoulder blades meet or to the right or left of the spine where the neck meets the shoulder in the back.
- Alternatively, if you’re having trouble reaching the area with the fingertips, use a pressure tool, such as a Backnobber, which is a long, curved stick with knobs on the end for massaging your own back. These give you the added length to give added pressure on various parts of the back.
Stretching Exercise for Text Neck
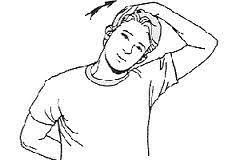
Trapezius Self Stretching:
- This is a good method to stretch the trapezius muscle.
- How to do it – Took a sitting or standing position. Place the ipsilateral hand on the back & touch the other side of the back.
- Now flex the head on another side. If you want to stretch on the right side then flex the head on the left side.
- When you felt stretched then stop there. Hold that position for 30 secs and then do it on the other side.
- Do it two to three times.

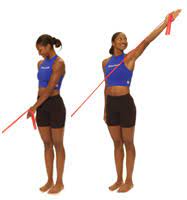
Shoulder stretch:
- You are extended one arm outwards in front of you.
- With the other arm, pull the elbow joint of the outstretched arm toward the chest.
- Hold this stretching position for about 30 secs.
- Repeat this stretching exercise ten times in one session & repeat this session three times per day.
Extended Child’s Pose on Fingertips stretch:
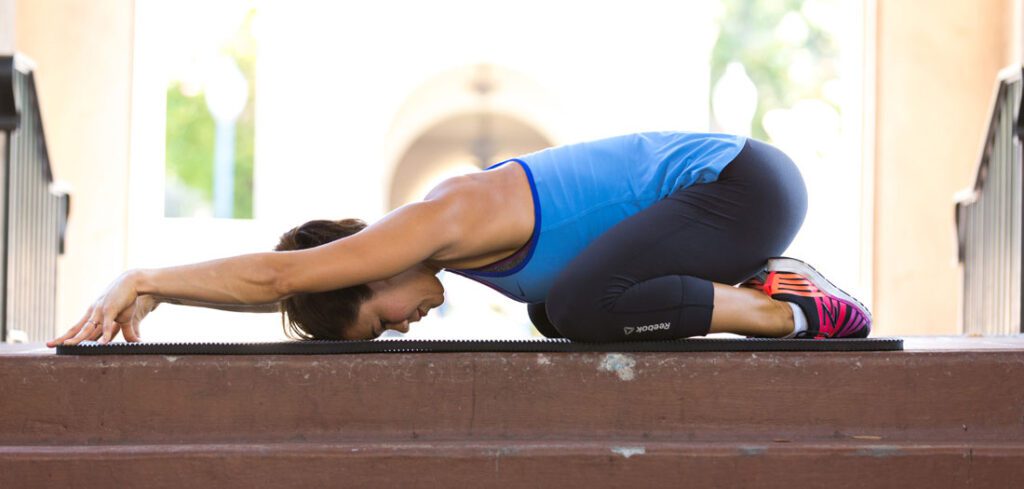
- The patient is Kneeling on the floor.
- Try to Touch the big toes together & the patient is sitting on the heels.
- Next, separate the knee joint about as wide as the hip joint.
- Then Bend the forward from the hip joint & walk the hands out as far in front of them as possible.
- With the arms extended palms are facing down then come up onto the fingertips as if the ball underneath the palms & melts the chest toward the floor.
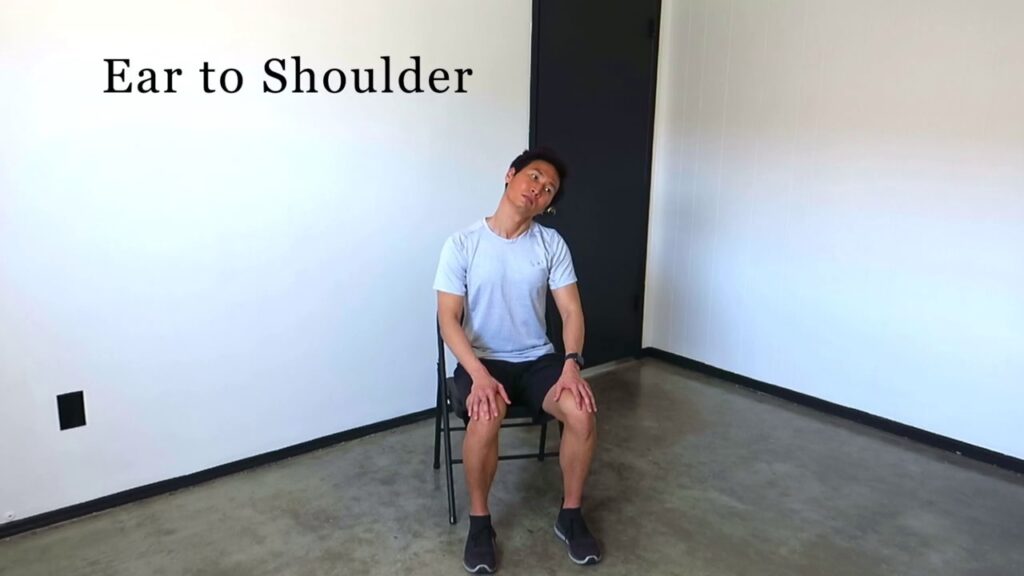
Ear to shoulder stretch:
- You are sitting with a straight spine, tilt your head toward your right shoulder joint.
- Then Go as far as you can without straining & lifting your left shoulder joint.
- For Deepen the stretch by using your right hand to gently pull your head down.
- Hold this stretching position for 30 seconds.
- Repeat this stretching exercise 3 times in 1 session & 3 sessions per day.
Cross arm stretch:

- Start with your left arm across the front of your body at about chest height.
- For Support use your left arm with the elbow joint crease of your right arm.
- Then use your right hand to hold your left arm.
- Stretch out your shoulder joint & continue to face forward.
- Hold this stretching for 30 seconds.
- Repeat this stretching exercise 3 times in 1 session and 3 sessions per day.
Thread the needle stretch:
- This exercise starts with all fours with your hands directly under your shoulders & your knee joint underneath your hip joint.
- Lift your right hand & slowly bring it over to the left with your palm facing up.
- Rest your body on your right shoulder & turn your head to face to the left.
- Make sure you are not sinking onto your shoulder joint.
- Hold this exercise position for 30 seconds.
- Slowly release & come back to the original position.
- Repeat this stretching exercise 3 times in 1 session & 3 sessions per day.
Across-the-chest stretch:
- Start this exercise with your right arm across your chest.
- Place the arm in the crease of your left elbow joint & use your left hand to support your arm.
- Hold this stretching position for up to 1 minute.
- Then Repeat on the opposite side.
- Do this stretching each side 3–5 times.
- To deepen the stretch, lift your arm at shoulder height.
- Repeat this stretching 3 times in 1 session & 3 sessions per day.
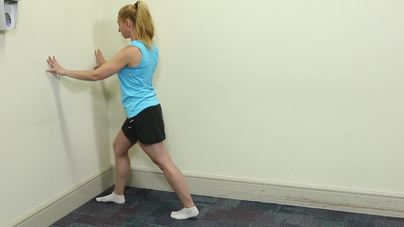
Doorway trapezius stretch:
- You are standing in a doorway with your elbow joint & arms forming a 90-degree angle.
- Then Step your right foot forward as you press your palms into the sides of the door frame.
- Lean forward & engage your core muscle.
- Hold this stretching position for up to 30 seconds.
- Repeat the stretching with your left foot forward.
- Repeat this stretching exercise 3 times in 1 session & 3 sessions per day.

Pendulum stretch:
- You are standing with the feet hip-width apart.
- Lean forward & look at the ground.
- Then Place the right hand on a table & chair for support.
- Let the left arm hang down.
- then Swing the left arm gently in small circular motions & letting gravity do most of the work.
- Continue this stretching for 30 seconds to 1 minute.
- Then Change the direction of the motion.
- Repeat this stretching exercise 3 times in 1 session & 3 sessions per day.
Cross-body trapezius stretch:
- You are standing with the feet hip-width apart.
- Then try to Stretch the right arm out straight.
- Start the right arm across the body, so that place the hand points to the floor on the other side of the left leg.
- Bend the left arm at the elbow joint.
- Then Hook the left forearm under the right arm & for support use the right arm above the elbow joint.
- Use the left forearm to pull the right arm further in & across the body & try to stretch the back of the right shoulder.
- Hold this stretching for 30 seconds, then repeat this stretching on the other side.
- Repeat this stretching exercise 3 times in 1 session & 3 sessions per day.
Eagle arm stretch:
- You are standing with your feet hip-width apart.
- During Inhale & lift the arms to the sides.
- During Exhale & swing the arms in toward the body.
- Then Allow the right arm to cross under the left arm.
- Cradle the left elbow joint in the crook of the right elbow joint.
- Start the palms together so that they reach for each other.
- When the palms are not touching & hold the backs of the hands together.
- Then take three or four deep breaths.
- Release the stretch & repeat it on the other side with the left arm crossed under the right.
- Repeat this stretching exercise 3 times in 1 session & 3 sessions per day.
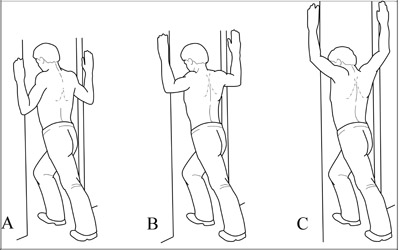
Standing wall trap stretch:
- First Place both hands on a wall from a 90-degree angle to your body.
- Then Walk your feet back till your arms are straight & bow, hinging forward at the hip joint.
- But take care of this thing Don’t push on the wall & don’t allow your arms to raise too high to avoid shoulder impingement.
- Must be Keep your shoulder blades set back & avoid scrunching your shoulder joint around your neck.
- Repeat this stretching exercise 3 times in 1 session & 3 sessions per day.
Across-the-chest stretch:
- Perform this stretching in a sitting or standing position.
- First, bring your right arm across your chest.
- Then place the arm in the crease of your left elbow joint.
- You are using your left hand to support your arm.
- Hold this stretching position for up to 1 minute & repeat on the opposite side.
- Do this stretching each side 3–5 times.
- To deepen the stretch, lift your arm at shoulder height.

Seated twist stretch:
- You are sitting in a chair with your ankle joint directly under your knee joint.
- Twist your upper body to the right & bringing the back of your left hand to your thigh.
- Then place your right hand down wherever you feel too comfortable.
- Hold this stretching position for up to 30 seconds & repeat on the left side.
- Do this stretching each side 3–5 times.
Doorway shoulder stretch:
- You are standing near a doorway with your elbow joint & arms forming a 90-degree angle.
- First, step your right foot forward as you press your palms into the sides of the door frame.
- Try to Lean forward & engage your core muscle.
- Hold this stretching position for up to 30 seconds.
- Then repeat the stretching with your left foot forward.
- Do this stretching exercise on each side 2–3 times.
Neck release stretch:
- This exercise is a gentle way to loosen tension in your neck & shoulder joints.
- Perform this stretching in a sitting or standing position.
- Then lower your chin toward your chest.
- You feel a stretch along the back of your neck.
- Try to gently tilt your head to the left side to stretch your right shoulder joint.
- Hold this stretching position for up to 1 minute & repeat on the opposite side.
- Do this stretching each side 3–5 times.
For to deepen in this stretch:
- First place 1 hand on your shoulder joint & 1 hand above your ear to gently guide the movement.
- Then lower your chin toward your chest.
- You feel a stretch along the back of your neck.
- Try to gently tilt your head to the left to stretch your right shoulder joint.
- Hold this stretching position for up to 1 minute & repeat on the opposite side.
- Do this stretching each side 3–5 times.
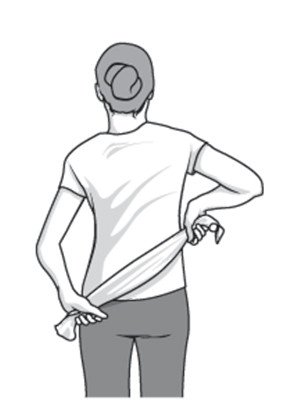
Towel stretch:
- First, hold one end of a three-foot-long towel behind your back & grab the opposite end with your other hand.
- You are holding the towel in a horizontal position.
- You must use your good arm to pull the affected arm upward to stretch it.
- You are also performing an advanced version of this exercise with your towel draped over your good shoulder joint.
- Then hold the bottom of the towel with the affected arm.
- Try to pull the arm toward the lower back with the use of the unaffected arm.
- Do this 10 to 20 times a day.
Bent Arm Scaption Plane Stretch:
- You are kneeling position next to an elevated surface.
- Then put one palm down on the surface with your elbow joint pointed up.
- Try to Roll the shoulder joint capsule in & out.
- You feel the best stretch in your pec during this stretching pose.
- Then move in & out of the stretch 10 times & hold this exercise for 15-30 seconds.
- Do the 1 set of 3 repetitions & 3 times per day.
Shoulder stretch:

- You are in a standing position.
- Try to raise your shoulder joint.
- Hold this exercise for 5 seconds.
- Then squeeze your shoulder blades back & together.
- Hold this exercise for 5 seconds.
- Try to pull your shoulder blades downward.
- Hold this exercise for 5 seconds.
- Relax & repeat this exercise 10 times.

Armpit stretch:
- Use the good arm, and lift with the affected arm about breast-high.
- Gently bend the knees and open up the armpit.
- Dee pend the knee bend slightly, gently stretch armpit.
- With each knee bend and stretch a little further, but not force it.
- Do this exercise 10 to 20 times each day.
Strengthening Exercise for Text Neck
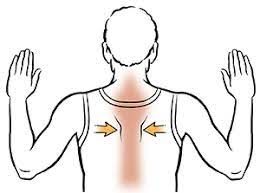
Prone rowing exercise:
- lies prone on your bed with the arm hanging freely off of the side.
- While holding on the shoulder blade ‘set’,
- raise the arm against the floor while bending at the elbow.
- The elbow should be raised and the side of the body until the hands touch the lower ribs.
- Always return slowly to the start position.
- Perform 2 sets of 10-15 repetition
Angel Wings exercise:
- Stand with your head, shoulders, upper back, and butt pressed close up to the wall. Your feet may need to be 10 – 12 inches from the wall.
- Keeping your knees slightly bent will reduce muscle pressure.
- With the reverses of your hands against the wall, stretch your arms straight above your head. you’re in the starting position.
- Squeeze your mid-back muscles as you slide your arms down close to your shoulders. Keep your body firmly pressed close to the wall.
- When elbows are just below shoulders, pause for just a sec, also slide your arms back to the starting position.
- Do 10 – 20 repetitions
Shoulder Diagonals exercise:
- The patient stands with theraband lower their opposite foot
- While grasping theraband, move shoulders up and down
- With your hand at your opposite hip, slowly raise it beyond
- your body, as if you’re pulling a blade
- Hold 3 seconds and repeat 10-15 times
Lateral Raises exercise:
- Stand with the arm at your side with the elbow straight and the hands twisted so that the thumb’s face is ahead.
- put up the arm straight out to the side, palm downward, until the hands reach the shoulder position.
- Do not put up the hands forward than the shoulder. Pause and slowly down the arm.
- Perform 3 sets of 10-15 repetitions. for progression do this exercise with a dumbbell
Upright row exercise:
- This is a common exercise for strengthening the trapezius. You can also try this exercise with dumbbells or a therabend in your hands.
- Stand up straight.
- With your fists held, pull up your fists as high as you can while bending your elbows, keeping your hands close to the front of your body. Hold for a count of ten.
- Release your arms back into a relaxed position, fists still hold
- Reprise 20 times.
Physioball Scapular Exercises:
- Stand with hand placed on physio ball beside a wall
- Bring shoulders up and down
- Slowly rotate your hand up and down over the ball
- Maintain shoulders up and down. repeat 15 to20 times
Horizontal Rows exercise:
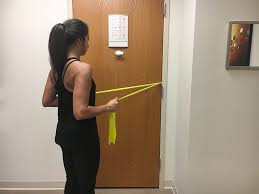
- Attach theraband around a stable object, like a pole
- The patient can either kneel or stand,
- Grasp both ends of the theraband, Bring shoulders up and down
- Slowly pull your elbows up, squeezing your shoulder blades together
- Hold 3 seconds and repeat 10-15 time
Wall Push-ups exercise:

- Stand facing a wall.
- Place your hands on a wall, slightly wider than shoulder-width apart.
- Gently bend your body to the wall while squeezing your shoulder blades together, repeat the 10-15 time
Push-up exercise:

- lying face down on the floor, positioning your hands slightly wider than your shoulders.
- Don’t lock out the elbows; keep them slightly bent.
- your legs should be straight back and balanced by your hands and toes. raise your body off the floor and back to starting position,
- 10-12 times.
Shoulder blade squeeze exercise:
- You are Standing up straight.
- Bring the elbow joint back & inward.
- Pulling the shoulder joint blades down & back.
- Then Return to the starting position.
- Repeat this exercise 10 times in 1 session & repeat this session 3 times per day.
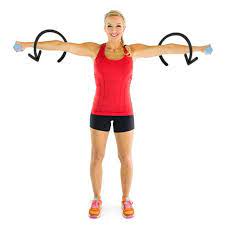
Arm circles exercise:
- You are standing upright with your arms are feet shoulder-width apart & your arms straight down your sides.
- Then Move your arms around in big circles going forward.
- Must Be sure to keep your arms straight.
- After several reps, switch – to the opposite direction so that you move your arms in a circle going backward.
- Repeat this exercise 10 times in 1 session & repeat this session 3 times per day.
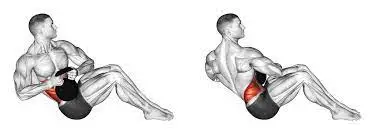
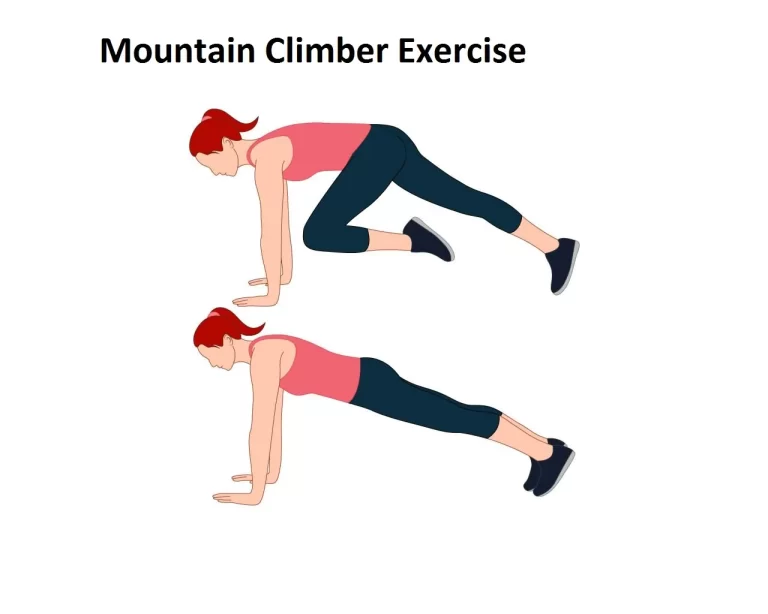
Plank exercise:
- You are lying on the floor facing down, with your elbow joint bent.
- Then Tighten your abdominal muscles as you lift the hip & knee joints off the floor.
- Then Hold this position for 30 seconds & return to starting position.
- Repeat this exercise 10 times in 1 session & repeat this session 3 times per day.
Shoulder raises exercise:
- You are standing or sitting position.
- This exercise starts with your arms by your side & a straight back.
- Then slowly lift your shoulder joint toward your ears.
- Hold this exercise for 10 seconds & return to the slowly starting position.
- Repeat this exercise 10 times in 1 session & 3 sessions per day.

Shoulder rolls exercise:
- First Maintain good posture in the standing or sitting position.
- Then Roll your shoulders joint up, back & down.
- Do this exercise movement 10 times.
- Then roll your shoulder joint up, forward & down 10 times.
- Repeat this exercise 10 times in 1 session & 3 sessions per day.
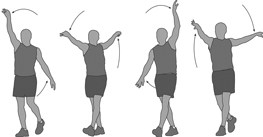
Standing arm swings exercise:
- You are standing with your arms by your side & your palms facing your body.
- Then Swing your arms forward to bring your arms as high up as they go without raising your shoulders joint.
- Lower the arms back down & bring them as far back as you can.
- Keep the rest of your body still.
- Continue this movement for 1 minute.
- Repeat this exercise 10 times in 1 session & 3 sessions per day.
Standing arm lifts exercise:
- First Make fists with your hands & bring them in front of your hip joint.
- Then do the Inhale as you lift your arms overhead so that your hands come together above your head.
- After that Lower back down to the original position.
- Repeat this exercise 10 times in 1 session & 3 sessions per day.
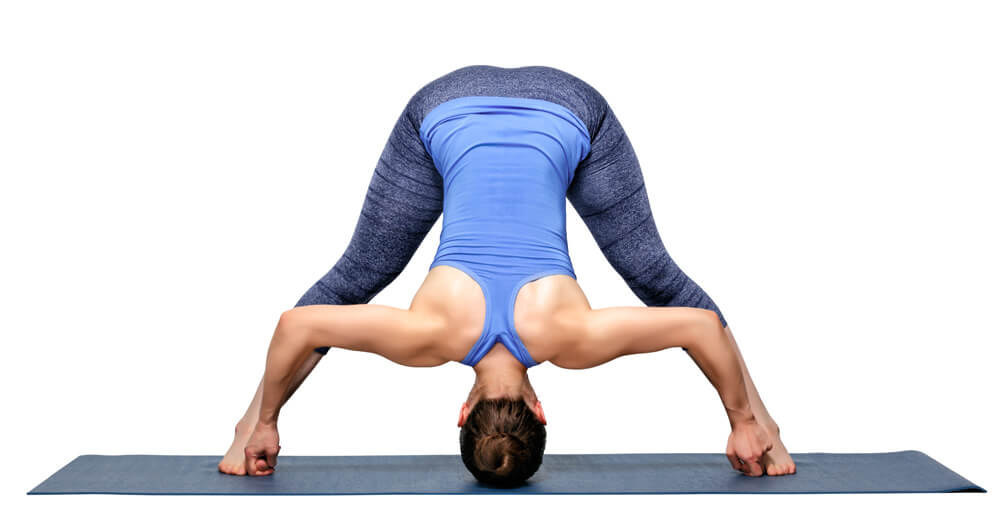
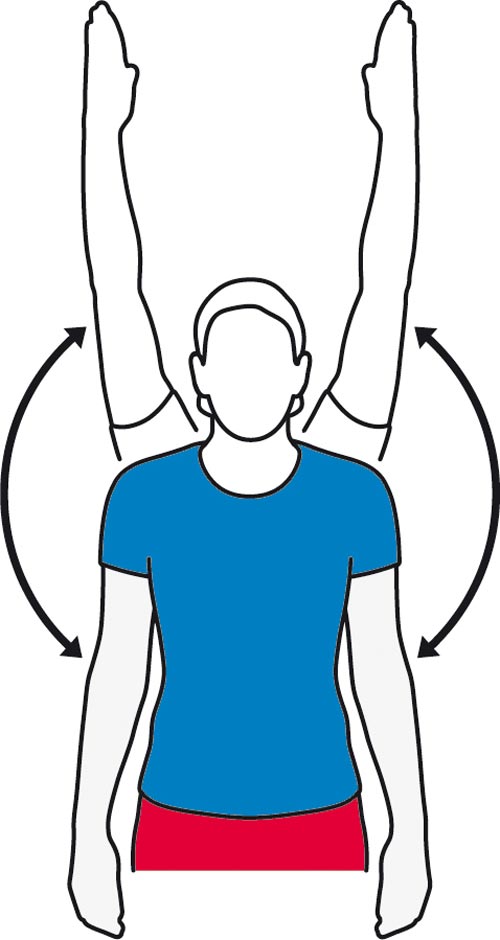
Wide-legged standing forward bend exercise:
- You are standing with your feet wider than hip distance with your toes facing forward.
- Then Interlace your hands behind your back & open your chest.
- Engage your leg muscles & must keep a slight bend in your knee joint.
- Hinge at the hip joint to fold forward & bringing your arms over your head toward the floor.
- Then Allow your head to hang down & tuck your chin in slightly to your chest.
- Remain in this pose for up to 1 minute.
- Repeat this exercise 10 times in 1 session & 3 sessions per day.

Cat cow pose exercise:
- First Place your hands underneath your shoulder joint & your knee joint underneath your hip joint.
- During inhale fill your belly with air & let it sink as you look up.
- During Exhale as you engage your abdominal muscle.
- Then try to tuck your chin into your chest & around your spine.
- Continue to do this movement for a few minutes & must focus special attention on your shoulder joint.
- Repeat this exercise 10 times in 1 session & 3 sessions per day.
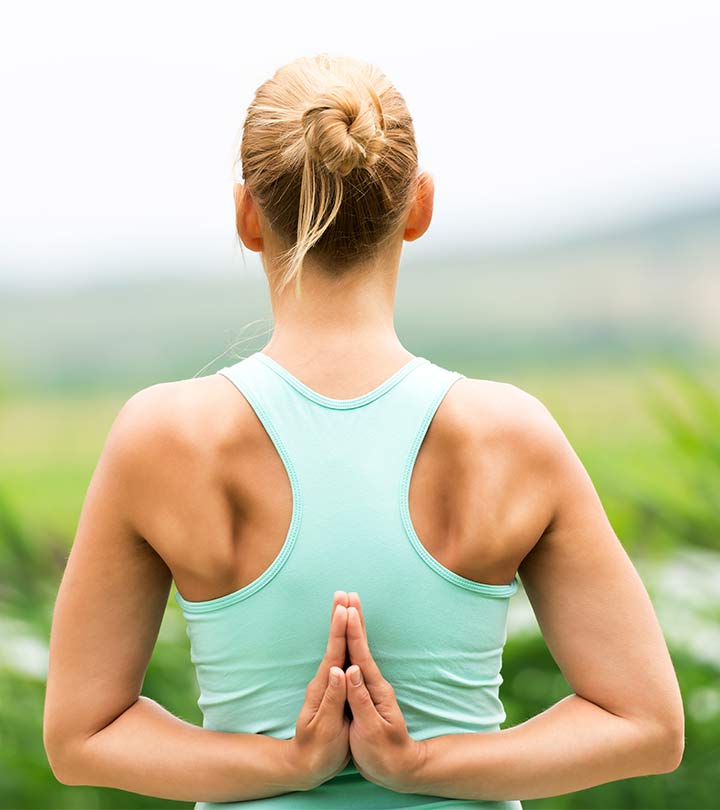
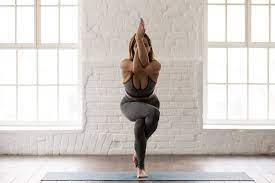
Reverse prayer pose exercise:
- You are performing this pose in the sitting, standing position & tree pose.
- Then start this exercise with your hands behind your back with the backs of your hands facing each other & your fingers facing down.
- From this position flip your hands in the other direction so that your fingers are facing up.
- Then turn your palms to face each other.
- Press your palms together & draw your elbow joint slightly back & open your chest.
- Must Keep your spine straight.
- Then Hold this pose for 10 seconds.
- Repeat this exercise 10 times in 1 session & 3 sessions per day.
Cow face pose exercise:
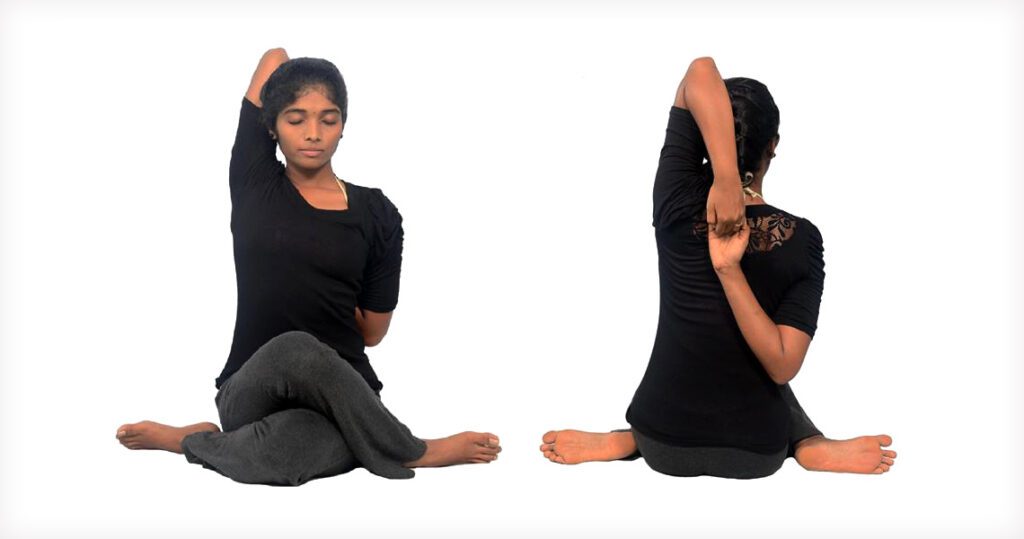
- Start this exercise in the sitting position & take to your left elbow joint up to the side of your head with your hand facing down your spine.
- With the help of your right hand draw your left elbow joint over to the right as your hand moves further down your spine.
- When you feel comfortable you can also bend your right arm & bring your right hand up to clasp your left hand.
- Hold the pose for 1 minute.
- Repeat this exercise 10 times in 1 session & 3 sessions per day.
Eagle arms spinal rolls exercise:
- In the sitting position, extend your arms out to the sides.
- Cross your elbows joint in front of your body with place your right arm on top.
- Then Bend your elbow joint & placing the backs of your forearms & hands together.
- Try to reach your right hand around to bring your palms together.
- Hold this position for 30 seconds.
- During the exhale, roll your spine as your draw your elbow joint in toward your chest.
- During the inhale, open your chest & lift your arms.
- Then Continue this movement for 1 minute.
- Repeat this exercise 10 times in 1 session & 3 sessions per day.
Cross-body arm swings exercise:
- You are standing with the feet hip-width apart.
- During Inhale lift the arms out to the sides & squeezing the shoulder blades together.
- During Exhale gently bring the arms in toward each other.
- Try to Cross the right arm under the left must keep both arms straight.
- During the Inhale & swing the arms back out to the sides & squeezing the shoulder blades together.
- During the Exhale & gently swing the arms in toward each other again.
- Cross the left arm under the right & must keep both arms straight.
- Repeat this exercise 10 times in 1 session & 3 sessions per day.
Shoulder rotation exercise:
- With your back to a wall allows your shoulder blades to rest in a neutral position & bring both elbow joints out to 90 degrees.
- Then Without moving your elbow joint & turn your right arm upward, so that the back of your right-hand touches the wall & your left arm downward, so that your left palm is touch the wall.
- Then Slowly switch for about 30 seconds & trying to must keep your arms at 90 degrees.
- Repeat this exercise 10 times in 1 session & 3 sessions per day.
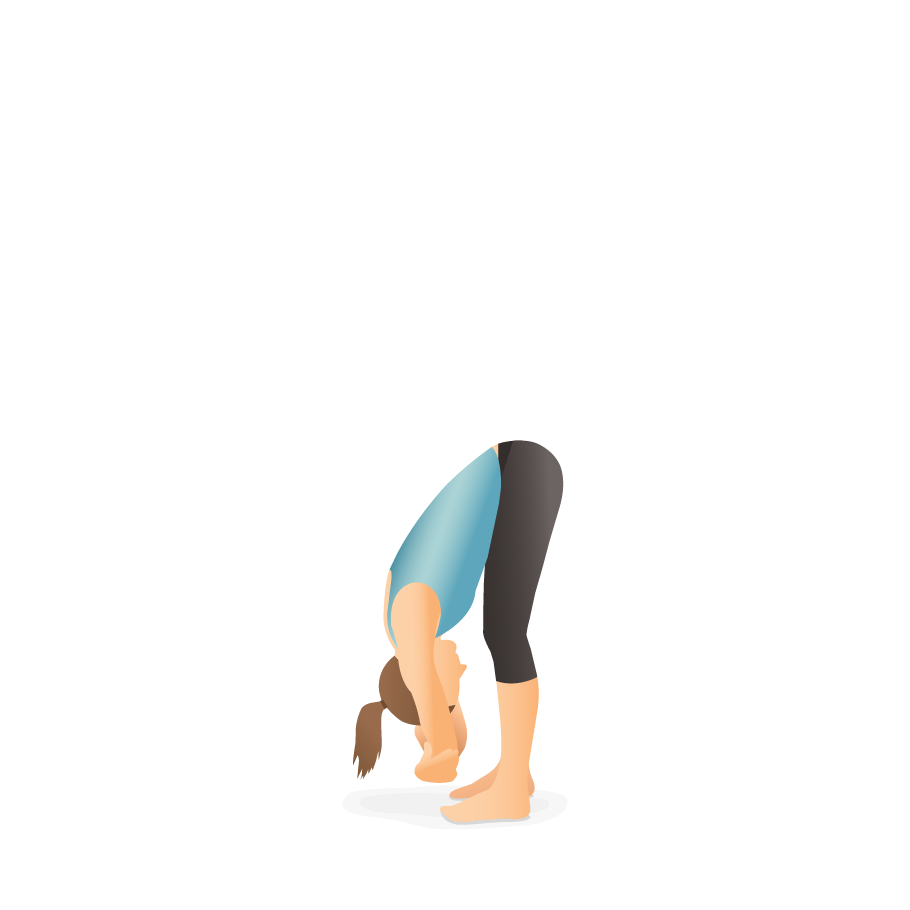
Ragdoll Pose exercise:
- It is a forward-bend yoga pose which is help to release tension in the shoulder joint.
- You are in a Standing position with the feet hip-width apart.
- Bend the knee joint slightly.
- Bend forward & try to touch the toes.
- Must be Keep the stomach against the bent knee joint to support the lower back.
- Then Place each hand on the elbow joint of the opposite arm.
- Try to crown the head should point toward the floor.
- Let the head hang heavily & releasing tension in the neck & shoulder joints.
- Hold this pose for 1 minute.
- Repeat this exercise 10 times in 1 session & 3 sessions per day.
T, Y & I movements:
- Start this exercise With your back to a wall & stand with your palms facing out.
- Then slowly bring your arms up to make a T shape & must be keeping your arms & back in contact with the wall.
- After that Continue to bring your arms up to make a Y shape, then do the I shape & try to touch your thumbs overhead.
- But must be kept focused on your shoulder blades flat against the wall.
- Repeat this movement 10 times in every shape & 3 sessions per day.
Pendulum exercise:
- The patient is in a standing position beside a table with the hand of the unaffected shoulder on the table & feet are slightly wider than shoulder-width apart.
- Then Bend the hip joint approximately to 75 to 90 degrees & let the affected arm hang down toward the floor.
- Shift the weight from side to side, letting the arms swing freely from side to side.
- Shift the weight forward & backward, letting the arms swing freely front to back.
- Once they feel comfortable with these movements, move the body so that the arm swings in a circle.
- Must be Keep the circle small, less than 8 inches.
- Continue for 30 seconds.
- Every day, increase the time to 3 to 5 minutes.
- Repeat this exercise 10 times per day.
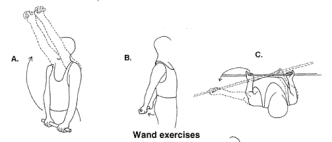
Wand exercise:
- This exercise is helpful to you for increasing ROM exercise.
- The patient is holding the wand with the help of both hands.
- Then perform the shoulder & elbow joint movement.
- Shoulder flexion, abduction, adduction, external & internal rotation & elbow flexion, and extension movement perform with the wand.
- Every exercise does the 2–3 times per day.
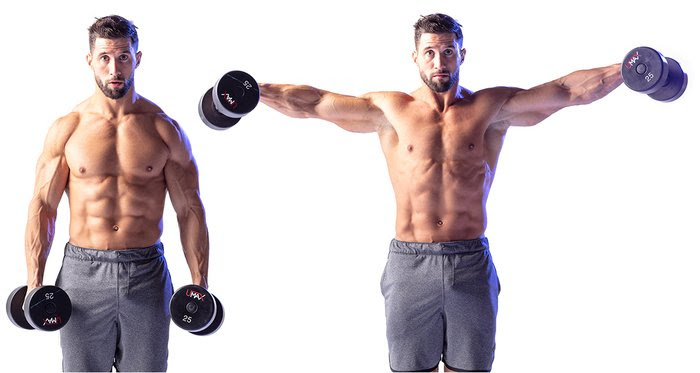
Lateral raises:
- First, hold a pair of light dumbbells for this exercise.
- You are standing with the feet slightly wider than the hip joint width apart.
- Try to raise the weights to the sides till are at shoulder level.
- Must be remembered to engage the core muscles & slowly lower the weights down to the sides.
- Repeat this exercise for 2 sets, in every set consisting of 12–15 reps & 3 to 4 times per week.
Bent-Over Horizontal Abduction:
- You are lying on your stomach means in a prone position on a table & bed with your injured arm hanging over the side.
- Must keep your arm straight & slowly raise it to eye level.
- Then slowly lower it back to the starting position & repeat this exercise.
- Do this exercise 2–3 times per day.
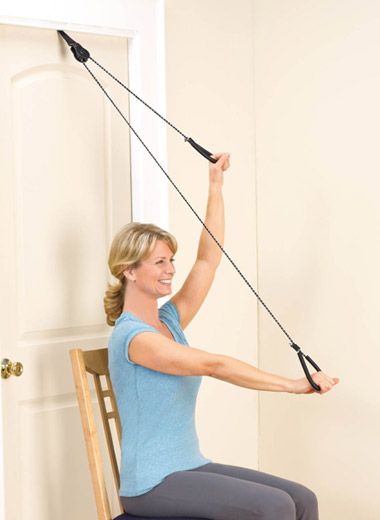
Pully exercise:
- For the shoulder active Assisted Exercise does the pully exercise.
- First, hold a rope–pully on both hands then perform the movement of the shoulder.
- Flexion,abduction,external & internal rotation.
- This exercise is performed 10 times in 1 session & 3 sessions per day.
Finger ladder Exercises:
- The patient is in a standing position & facing a ladder that is hanging over a wall.
- Ask them to patient place the affected hands on the ladder at a low level.
- Then slowly start an upward climb on the finger ladder till it reached the top & slowly down back to the starting.
- This exercise is performed 10 times in 1 session & 3 sessions per day.

Thread the needle:
- Start this exercise on your hands & knees.
- First, lift your right hand toward the ceiling with your palm facing away from your body.
- Then lower your arm to bring the arm under your chest & over to the left side of your body with your palm facing up.
- It activates your right shoulder joint & arm to avoid collapsing into this area.
- Must keep your left hand on the floor for support.
- Then lift the arm toward the ceiling & bring the arm around to the inside of your right thigh.
- Hold this exercise position for up to 30 seconds & relax in a Child’s Pose.
- Then repeat this stretching exercise on the left side.
- Do this exercise 2–3 times per day.
Chin tuck Exercise:
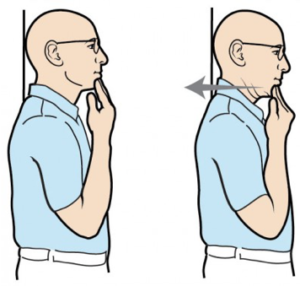
- Sit straight and look straight ahead with the ears directly over the shoulders.
- Put a finger on the chin.
- Without moving the finger, pull the chin and head straight backward until a good stretch is felt at the base of the head and top of the neck.
- Hold for 5 secs if possible.
Neck flexion Exercise (Neck tilt):
- In Relax sitting position flex your head down to rest your chin on your chest (Flex the neck fully).
- Gently tense your neck muscles and hold for 4 to 8 seconds.
- Return to a neutral position and repeat 10 times.
Neck flexion Exercise (side to side):
- Flex your head down towards your shoulder, and try to touch your shoulder with your ear (Without elevating your shoulder).
- Gently tense your neck muscles and hold for 8 seconds.
- Return your head to a neutral position and repeat in the opposite direction.
- Repeat 10 times on both sides.
Neck Rotation exercise:

- Rotate your head towards one side, keeping your chin at the same height and moving within comfortable limits.
- Gently stretch your neck muscles and hold for 8 seconds.
- Return your head to the neutral position and repeat in the opposite direction.
- Repeat 10 times on both sides.
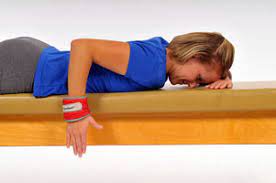
Prone Cobra Exercise:
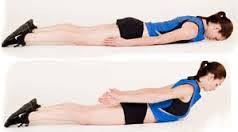
- This workout is done lying face down on the ground & uses gravity as resistance in the reinforcing process.
- Lying face down, put the forehead on a rolled-up hand towel for comfort.
- Place the arms at the side, palms downwards on the ground.
- Place the tongue on the roof of the mouth
- Pinch the shoulder blades together & lift the hands off the ground.
- Roll the elbows in, palms out, & thumbs upward.
- Gently lift the forehead about an inch off the towel keeping the eyes looking straight at the ground
- Hold the position for 10 secs.
- Perform 10 repetitions.
The isometric neck exercise:
The isometric neck exercise that you can do while sitting, standing, or lying on your back:
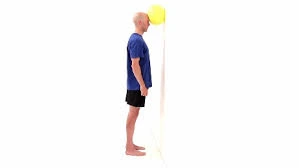
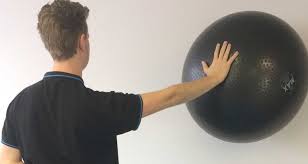
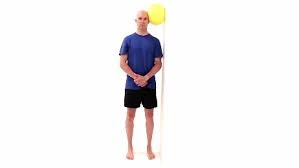
Isometric neck exercise in standing position:
- For this exercise, you require a medium size ball or you have to stand nearer to the wall side.
Neck flexion
- You have to stand straight with an erect posture, while the forehead is resting on a ball against the wall. By the forehead, you have to smoothly press the ball nearer to the wall.
- Maintain this position for 5 to 10 secs.
- The back should be straight or extended during the whole exercise.
Neck extension
- You have to stand straight with an erect or upright posture, with the back of the head resting on a ball opposite the wall. By the head, you have to smoothly press the ball nearer to the wall.
- Maintain this position for 5 to 10 secs.
- The back should be in an upright position during the whole movement.
Neck Side flexion
- You have to stand straight with an erect or an upright posture, with the left side of the headrest on a ball opposite the wall.
- Slowly press the ball by the left side of the head nearer the wall.
- Maintain this position for 5 to 10 secs.
- The back should be in an upright position during the whole movement. Repeat this on another side also.
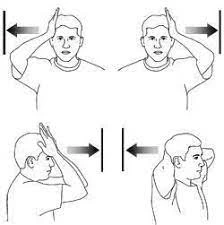
Isometric neck exercise in the Sitting position:
- In a sitting position for neck isometric exercise, you will need either a chair or a table. while you have to sit with an erect posture in a chair. In this position, you will do all neck motions which are explained under, or if you want to do this exercise standing then you have to stand with the hip or the shoulder-width apart with the torso extended.
Neck flexion
- Put the hand on the forehead then slightly push the neck in a forward direction, the hand remains in the same position you give light pressure opposite the movements like pushing the beside.
- Hold this for 5 to 10 secs.
- The back should be in an upright position during the whole movement.
Neck extension
- Put the hand on the back of the head then gently push the neck in the backward direction, the hand should be in the same position, just give little pressure opposite the movements like pushing to the forward side.
- Hold this for 5 to 10 secs.
- The back should be in an upright position during the whole movement.
Neck Side flexion
- Put the hand left side of the head with the head straight or the chin in a neutral position, now bring the head towards the left side shoulder by gently pushing the hand by the head.
- Hold this for 5 to 10 secs.
- The back should be in an upright position during the whole movement.
- Repeat this for right-side neck flexion.
Neck Rotation
- Put the right hand on the left side of the chin or turn the head slightly nearer the left side by gently pushing the hand and trying to look back at you.
- The back should be in an upright position during the whole movement.
- Hold this for 5 to 10 secs.
- Perform this exercise on the right side by taking assistance from the left hand.
Isometric neck exercise in Supine lying position:
- For this exercise, you have to lie down on the back over a plinth or the mattress by using a small pillow or a rolled towel below the head, the hand by the side.
Neck flexion
- For this exercise you have to lie on the tummy pillow used under the head you have to push the pillow by the forehead or hold it for 5 to 10 secs.
Neck extension
- For this exercise, you have to lie down on the back over a plinth or a mattress by using a small pillow or a rolled towel below the head, the hand by the side.
- Push the pillow by the back of the head, or hold this for 5 to 10 secs.
Neck side flexion
- For this exercise, you have to lie on any side right or left side.
- Take a pillow below the head, now gently push the pillow by you nearer to the plinth.
- Hold this for 5 to 10 secs.
- Perform this on the right side.
Prevention of Text Neck
Following are fewer precautionary steps that might be helpful:
- Change position how to grab and hold the phone
“Bring the phone up to the eye level so the head is not slouched or forward and extreme. Keep a neutral spine so the ear is in line with the shoulders,” says Cupp. This might prevent forward-head posture. - Take phone breaks
Frequent breaks from the phone can help, even if it’s just 2 to 3 mins every hour. “Getting bored of the pattern of looking downwards to use the phone and any work is commonly given the advice to cure text neck, but that’s highly uneasy for many people. So instead of that, It is suggested that people should always try to take breaks from their phones consciously,” says Goodrich. “Set reminders on the phone and computer, or use a sticky note. This small awareness may make a huge difference.” - Try the Text Neck app
There’s a Text Neck app for Android users that offers “instant real-time feedback” about the body posture (indicated by a green and red light). There’s also an alternate beep reminder to tell you when you have lapsed back into bad habits. - If you felt prolonged pain, find out the cause
If you felt prolonged pain recommends getting adjusted, which helps relieve pain or address the structural issues that text neck generates over time. And they might be into something. A 2007 review of trusted Sources highlighted chiropractic care as 1 of the major nonpharmacological interventions considered effective for acute or chronic neck or back pain. - Do 10 minutes of yoga
The better way to treat or prevent neck or back pain is yoga, Goodrich says. The reason behind it helps improve motion patterns, increases body awareness, or incorporates breath work. Neck pain is generated by a muscular imbalance, such as tight rhomboids, but daily yoga sessions might help correct those differences. Doing the exercises mentioned above and 10 mins a day of yoga, may make a difference in text neck condition.
Making lifestyle changes for pain relief
Sit up or stand up straight during the day.
- As you do, bring the shoulders down, and make sure the head is back. Imagine a string lifting the body, keeping you upright.
- Correct posture will help take off some of the strain from the trapezius muscles.
- Also, avoid activities that make you hunch on 1 and both shoulders, like holding a phone on 1 shoulder.
Sleep on the side to keep the head straight.
- If you sleep on the stomach, the head is always turned to 1 side, putting strain on the trapezius muscles. Try to sleep on the side, instead, which doesn’t turn the head to the side.
- You can also sleep on the back but only if the head doesn’t fall to 1 side or the other.
Skip carrying a heavy backpack and shoulder sling or shoulder bag.
- A heavy bag can strain your trapezius muscles. Instead, try a belt and purse, or only carry what you absolutely must.
- If you are required to carry a bigger bag, then try a rolling briefcase.
- If you must carry a shoulder bag, make sure you switch off the shoulders.
- Similarly, more tight bra straps can also gave excess pressure on the trapezius muscles.
- Make sure the bra should get fitted properly.
Elevate the electronics so you don’t slump over.
- Slumping over can cause soreness in the trapezius muscles, and if you’re on a smartphone and computer, you may find yourself slumping a lot. To fix the issue, move the device so it is at eye level. That may mean that you are holding the smartphone up in front of you, but that is better than slumping over.
- If you work at a desk, try getting an elevated stand for the screen and laptop to bring it up to eye level or higher.
Adjust the keyboard or armrests to the correct height.
- Work in a chair with armrests, as the weight of the arms can put a strain on the muscles after a while. Also, make sure the keyboard is even with the arms when you’re sitting up straight with the elbows at a right angle. You should not be required to lift your arms up to type.
- If you need to lower the keyboard, try a keyboard shelf.
- Other exercises or training which is helpful to strengthen the trapezius muscle is:
- Strengthening or Improve Range:
- Muscle energy techniques for the trapezius
- Positional release technique for trapezius.
- Theraband resisted exercises.
- Upper body strengthening exercises.
Precautions While Doing Exercises
- Do not overdo the exercise.
- Wear light and proper clothes while doing exercise always.
- Keep your breathing normal.
- If you feel any discomfort while doing exercise, stop doing it and consult it your physiotherapist or doctor.
- Do not unnecessarily strain your neck muscles.
- Do not overstretch the muscles while doing neck exercises.
- Always begins neck exercise simply then and under the supervision of your physical therapist.
- Increase repetitions gradually.
Common Mistakes
- Be sure to breathe deeper as well as evenly while doing the stretch. Focus on inhaling as you reach into the stretch or exhale to deepen the extension. Hold each stretch for a few secs of breaths then relax a hold. Activate a stretch again during resuming deeper breathing.
The simple act of deep breathing may increase the effects of a stretch significantly. - Additionally, not relaxing the face, neck, as well as shoulder muscles is also a common mistake when doing cow face poses. Assist decreased head and neck pain by actively relaxing the facial as well as neck muscles. Remember to embark at the top relax the forehead, cheeks, mouth, chin, neck, and finally, shoulders. This mental exercise will ensure that the patient is not tense during the whole stretch.
Safety and Precautions
- If the patient experiences any pain, numbness, and even pinching during performing any of these stretches, stop and cut out of the stretch and exercise you are doing.
- Make sure to breathe deeper as well as evenly while also relaxing the neck, face, and shoulder muscles.
FAQs
Can Text Neck Be Corrected?
Yes, it can be cured without any cracking of the neck. It can be corrected by just doing proper Strengthening and Stretching Exercises of the Neck.
How Long Does Text Neck take to Recover?
Usually, it can be completely healed within four to eight weeks, if proper care and strengthening of the neck muscle should be done.
What is the Common of Text Neck?
Text neck is a term generally used for unusual posture created by bending forward neck for a prolonged period of time. The Most Common Cause example of a Text Neck is seeing smartphones or mobile phones for a prolonged period while reading or chatting and is reported to have Neck stress injuries.
How do you Sleep while having a Text Neck?
By, properly Positioning the pillows one can easily sleep with a Text Neck. For Example; If you sleep on the stomach, the head is always turned to 1 side, putting strain on the trapezius muscles. Try to sleep on the side, instead, which doesn’t turn the head to the side.
You can also sleep on the back but only if the head doesn’t fall to 1 side or the other.Best Exercise for the Text Neck
Sit straight and look straight ahead with the ears directly over the shoulders.
Put a finger on the chin.
Without moving the finger, pull the chin and head straight backward until a good stretch is felt at the base of the head and top of the neck.
Hold for 5 secs if possible.