

Pseudobulbar Palsy
Table of Contents
What is Pseudo-bulbar palsy?
- Pseudobulbar palsy is a condition, that occurs due to an upper motor lesion coming from bilateral disturbance of the corticobulbar tracts. Pseudobulbar palsy symptoms are dysarthria, dysphagia, facial and tongue weakness, and emotional lability.
- It is represented by the inability to control facial movements such as chewing and speaking and cognate by a variety of neurological disorders. Patients experience difficulty chewing and swallowing, have accelerated reflexes and spasticity in the tongue and the bulbar area, and establish slurred speech which is often the initial presentation of the disorder, sometimes also establishing uncontrolled emotional outbursts.
- The pseudo bulbar palsy is generally caused by bilateral damage to corticobulbar pathways, which are upper motor neuron pathways that travel from the cerebral cortex to the nuclei of cranial nerves in the brain stem.
Signs and symptoms of the Pseudobulbar palsy
Signs and symptoms of pseudobulbar palsy involve:
- Slow and indistinct speech
- Dysphagia is difficulty in swallowing
- Small, stiff, and spastic tongue
- Brisk jaw jerk
- Dysarthria difficulty in speaking
- Labile affect
- The gag reflex may be expected, exaggerated, or absent
- The examination may reveal upper motor neuron lesions on the limbs
Causes of Pseudo bulbar palsy
- Pseudobulbar palsy is the conclusion of damage to motor fibers encompassing from the cerebral cortex to the lower brain stem. The damage might awake in the course of a variety of neurological conditions that subsist of demyelination and bilateral corticobulbar lesions. Examples include:
- Vascular causes: bilateral hemisphere infarction, cerebral autosome dominant arteriopathy with subcortical infarcts leukoencephalopathy syndrome, artery of Percheron infarct
- Progressive supranuclear palsy
- Amyotrophic lateral sclerosis
- Parkinson’s disease and connected multiple system atrophy
- numerous motor neuron diseases, especially those subsisting demyelination
- Multiple sclerosis and other inflammatory disorders
- High brain stem tumors
- Metabolic causes: osmotic demyelination syndrome
- Neurological involvement in Behçet’s disease
- Brain trauma
Rare causes of pseudobulbar palsy
- Central pontine myelinolysis: Common symptoms pseudobulbar palsy.
- Bilateral thalamic infarction: Very rarely infarction of specific nuclei evinced as pseudobulbar palsy.
- Methotrexate-convinced neurotoxicity: It is uncommon, but acute or subacute neurological clinical signs and symptoms, subsisting pseudobulbar palsy,
- Progressive multifocal leukoencephalopathy: It hardly causes pseudobulbar symptoms.
- Cerebral malaria: Pseudobulbar palsy in cerebral malaria may happen probably because of demyelination.
- Bacterial endocarditis: Cerebral disturbance may happen in bacterial endocarditis and can be evinced as pseudobulbar palsy.
- Syphilis: Requires Cerebral spinal fluid examination.
- Large petroclival meningioma: It presents bulbar motor dysfunction and emotional lability representing pseudobulbar palsy.
- Neurocysticercosis: It is uncommon.
- Autoimmune encephalitis and Hashimoto encephalopathy suffering pseudobulbar palsy; this highlights the importance of early identification of anti-thyroperoxidase antibodies in a patient with pseudobulbar palsy
prevalence of the Pseudo bulbar palsy
- Pseudobulbar palsy prevalence depends on the cause that can lead to corticobulbar pathway damage. prevalence of motor neuron disease, including pseudobulbar palsy, suggests that bulk accelerates, particularly after 50 years of age. Incidence is higher in males rather than females among all age groups.
- Pseudobulbar apathy influence 1 in 5 patients present with acute stroke and 1 in 8 patients current with chronic stroke.
Pathophysiology of the Pseudo bulbar palsy
- Three chief contents are dysphagia, dysarthria, and emotional apathy.
- They can be elaborate in the stages of
- Shock swallowing and speech defect
- Loss of function (difficulty in breathing)-spirometric assessment showed decreased vital capacities and lung volumes, and
- Release of function emotional incontinence.
- Loss of cerebellar modulation cortico-pontocerebellar pathways happening emotional dysmetria unable to control range of motion and disinhibition due to lesions of corticobulbar volitional pathways are the main pathogenesis
- anarthria unable to articulate speech, sialorrhoea excess salivary secretion over the lip margin, drooling
- Dysphonia, hypernasal voice Donald duck tone, and/or slurred speech. Speech has abnormality both in the rhythm and in the tone, which may have connected palilalia and finally, anarthria occur.
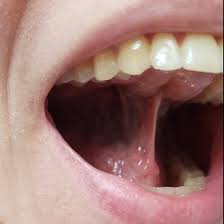
- Glossplegia is paralysis of the tongue with paresis of the tongue. Bilateral supranuclear lesions of the hypoglossal nerve in pseudobulbar palsy can initiate an inability of the tongue to function.
- Impaired mastication process of chewing, and paresis of facial muscles
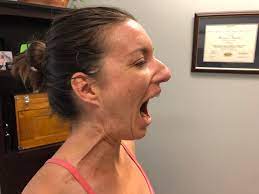
- Emotional lability of the pseudobulbar affect is the abnormal expressions of emotion anytime defined in patients with pseudobulbar palsy, such as pathological laughter and emotional outburst, which is represented by involuntary, not uncontrollable laughter, or sobbing with convoluted poverty of facial expression. Pathological laughter has also been reported in connection with many tumors of the posterior fossa, particularly those including the pons and midbrain.
- Trismus: Acute pseudobulbar palsy can present with trismus because of the bilateral infarction of the internal capsule.
- On physical examination, there is a presence of brisk jaw jerk. Other facial reflexes are also exaggerated. There are retained or accelerated palatal reflexes. There is a deviation of the angle of the mouth, and uvula to the normal side, and the tongue falls on the paretic side. Unlike lower motor neuron bulbar palsy, in pseudobulbar palsy, there is no atrophy or fasciculation of the affected muscles.
- Frontal release signs
- Cognitive impairment and seizures are observed in almost 85% of pediatric people.
Diagnosis of Pseudo bulbar palsy
- The diagnosis of pseudobulbar palsy is generally clinical and based on clinical features. interpretation of the condition subsists define the underlying cause. Possible causes of pseudobulbar palsy are neoplastic, inflammatory, demyelinating, and myasthenic should merit based attention. Detailed history, subsisting any previous history of stroke, is necessary. Complete neurological examination with the Mini-Mental State Examination score. Investigations focus on checkout for stroke, neoplasia, multiple sclerosis, or other demyelination disorders, such as:
- total blood count, metabolic profile, and serology
- Electroencephalogram
- CSF analysis (oligoclonal bands)
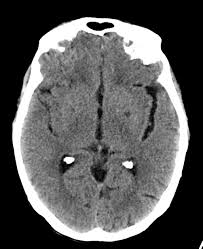
- In imaging studies, such as computed tomography (CT) and MRI of the brain- the lesions are most often seen within the operculum, corona radiata, and the genu of the internal capsule. Bilateral perisylvian dysgenesis is repeatedly observed among pediatric people.
- Motor- and sensory-evoked potential tests
- Videofluoroscopic swallowing study and Fiberoptic Endoscopic Evaluation of Swallowing for screening and grading of dysphagia
- Speech assessment
- Cognitive assessment
- Psychiatric consultation
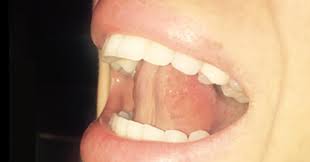
- hypoglossal nerve: The hypoglossal nerve gives motor supply to the muscles of the tongue like a tongue depressor, or elevator. asses for fasciculation at rest, and ask the patient to stick their tongue out. side If the tongue diverges to either side right or left, it appears a weakening of the muscles on that appropriate side.
- glossopharyngeal nerve: The glossopharyngeal nerve afford a sensory supply to the soft palate. It can be assessed with the gag reflex by touching the pharynx with a tongue depressor or by touching the arches of the pharynx.
- vagus nerve: The vagus nerve grants motor supply to the pharynx. To check the vagus nerve, tell the patient to say “AH,” which will generate the pharynx to elevate and show the position of the uvula. When the soft palatal muscles work properly, the “AH,” sound should be listen apparently and the uvula can not move to one side either right or left.
- accessory nerve: The accessory nerve gives motor supply to the sternocleidomastoid and the trapezius muscles. tell the patient to shrug their shoulders and turn their head in opposition to resistance. The general abnormalities subsist lower motor neuron lesions which generate weakness of both muscles on the same side and upper motor neuron lesions which generate ipsilateral sternocleidomastoid weakness and contralateral trapezius weakness, due to different sources of cerebral innervation.
Treatment of pseudo bulbar palsy
Dysphagia ( difficulty in swallowing )
Effortful Swallow

- Step 1: Gather the salivary secretion in the mouth in the center of the tongue.
- Step 2: Keep the lips pressed together.
- Step 3: Swallow all over the salivary secretions at once time like you’re swallowing grapes or/and a pill.
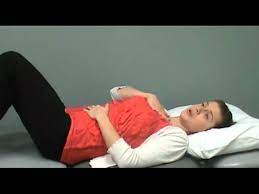
Dynamic Shaker
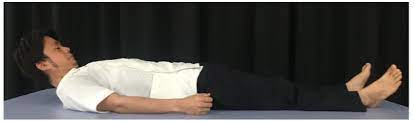
- Step 1: Lie on your back supine lying on a flat surface or treatment table. Make sure the shoulders have against the surface and do not use a pillow or/and headrest.
- Step 2: To manage the shoulders on the flat surface, lift up the chin as if you’re trying to look at your feet.
- Step 3: Lower the head back down to the flat surface.
- Step 4: Repeat 30 times. Then rest for 2 minutes. Repeat more times as indicated by a therapist.
Jaw Thrust
- Step 1: give thrust the lower jaw as far front side as possible, placing the lower teeth in front of your upper teeth.
- Step 2: Hold the position of jaw thrust for the amount of time decided by the doctor or/and physical therapist.
- Step 3: Repeat the jaw thrust more times as indicated by the doctor or physical therapist.
Masako Maneuver

- Step 1: rod your tongue out of the mouth.
- Step 2: Bite down gently on the tongue to keep it in place.
- Step 3: Swallow while holding the tongue in the center of the teeth.
- Step 4: Release your tongue. Then, repeat more times as indicated by a doctor or therapist.
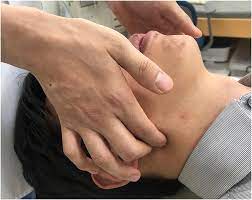
Mendelsohn Maneuver
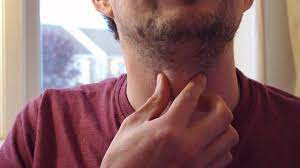
- Step 1: Press the index, middle, and ring finger of one hand either right or left on the neck to locate your apple—the small bump or/and simply the skin on the front side of the neck underneath the chin.
- Step 2: Swallow once time, noticing how the apple moves ups and downs when you swallow.
- Step 3: Swallow again, but this time, squeeze the throat muscles to hold the apple at its greatest point.
- Step 4: Hold it for the prolonged time indicated by the therapist, or as long as you can if you can’t yet hold it for that long.
Supraglottic Maneuver

- Step 1: arrange a bit of saliva in the mouth.
- Step 2: Take a deep breath/inhalation and hold that deep breath/inhalation.
- Step 3: Swallow while holding your breath.
- Step 4: Immediately after swallowing, cough.
- Step 5: Once you have swallowed downward with saliva, you can try the food or drink, at the location of a therapist.
Hyoid Lift Maneuver

- Step 1: arrange materials like a drinking straw, pieces of paper towel, and a cup. You should start with 3 to 5 pieces of paper and work up to 10 times as your strength accelerate.
- Step 2: Put the straw in the mouth.
- Step 3: absorb with the straw, and pick up a piece of paper with the suction that hammers.
- Step 4: Keep the suction strong enough to obtain each/every piece of paper beyond a cup.
- Step 5: Stop absorbing and let the paper fall down into the cup.
- Step 6: Repeat till all pieces of paper fall down in the cup.
- straw drink: Put a straw into a cup and the other flat end opposite the upper teeth. Put the tip of the tongue on the spot with elastic. Seal lips tight. You must keep the teeth together, then time start for the drinking process. Goal: suck up a ¼ cup of water in under 30 seconds
- balloon pops: Fill your cheeks with the air, seal your lips tight, and use a flat hand to instantly squeeze the air out with a burst of sound.
- blowing balloon using the nose
Dysarthria
Oro motor exercises
Tips for Oral Motor Exercises
- These specific oral motor exercises can be chosen based on the specific requirement of the child. Each exercise may not work for all individuals. And, the oromotor exercises should be upgraded as needed to grade up or down and make them easier or harder based on the requirement of the individual.
- .Add the number of days or motor exercises that should be completed each week.
- Integrated function whenever possible. Add real foods of interest. Use utensils or cups when possible. integrated the designation of play to make the exercises motivating and fun.
- Consult with a pediatric occupational therapist
- Bring their hands and fingers to their mouth and lips.
- Play tongue with a mirror. many oral motor commands that can be used to target specific motor skills with the lips, jaw, cheeks, and tongue.
- Play the game “hokey pokey” with your tongue and cheeks.
- Try messy play with food.
- Encourage tolerance of a spoon or other feeding utensils in different parts of the mouth.
- Open and close your mouth.
- Move your tongue in distinction from side to side.
- Press your lips together and then plumb your lips away.
- analyze different types of utensil textures plastic, metal, plastic covered, etc
- Hold and play with a toothbrush, bearing the brush to the patient’s mouth and face.
- inspire mirror play activity, define parts of the mouth.
- Add rhythmical, whole-body play with therapy balls, and uneven surfaces such as trampolines or crash pads to enhance proprioceptive input. tremendous for core strengthening and stability needed for feeding, teeth brushing, etc.
- analyze mouth play with teething toys and tools.
- analyze the use of teething toys and tools in different positioning prone, supine, side lying, etc.
- Use rhythmical music inclusive of tapping the cheeks or lips.
- Offer frozen fruit on a tongue depressor. Try the frozen fruit recipe for frozen fruit skewers.
- Chew a straw.
- Pucker your lips in assuming kiss.
- Blow a party noise maker
- Use a straw to pick up squares of paper and drop the paper into a bowl.
- Make fish lips
- execute to use a stick with a sweet smell and press your lips together as you move your lips from side to side.
- Puff up your cheeks.
- Square your lips.
- buzz the sounds the letters of the alphabet make from A-Z. Notice how your mouth moves. Or, spell out your name or other words by buzzing the sounds the letters make.
- Blow bubbles
- Blow through a straw to move a cotton ball or small craft pom along a line.
- Freeze water to a stick and suck the ice until the ice melts.
- Try making Shirley Temple with sticks. popsicles are a tasty oral motor exercise tool.
- Pour water into an ice cube tray. Add popsicle sticks to generate a cube pop. Lick and absorb until the ice melts.
- Scoop peanut butter onto a spoon. Lick the peanut butter off with the tip of the tongue.
- mark your tongue to the end of your nose. Hold the position more times as you can.
- mark your tongue to your chin. Hold the position more time as you can.
- Push your tongue into your right cheek. Hold it and then press the end of your tongue into your left cheek.
- Count your teeth using your tongue. Touch individual teeth with the tip of your tongue.
- Chew bubble gum
- Deep breathing mouth exercises. Use these printable deep breathing cards.
puffy cheek breathe

- puff out your cheeks and press the lips together
- take a deep breath with the nose
- hold your breath in
- keep your cheeks puffed out and breathe out with your nose
- repeat 3 to 5 times
submerged cheek breathe
- suck your cheeks and press the lips together
- take a deep breath with the nose
- hold your breath in
- keep your cheeks sucked in and breathe out with your nose
- repeat 3 to 5 times
pressed lip breathe

- press the lips together in a straight line
- take prolonged breathing through the nose
- slowly breathe out through the nose
- repeat 3 to 5 times
reverse tongue breathe
- open your mouth wide
- pull your tongue back into the back of the mouth
- take a deep breathe in while you open your mouth
- hold your breath in for a few seconds then breathe out
- keep the mouth open
- repeat 3 to 5 times
tongue touch breathe
- place the tip of your tongue on the root of the mouth
- take a deep breathe in through the side of your mouth
- hold your deep inhalation for a few seconds
- breathe out through the side of the mouth
- repeat 3 to 5 times
Breath Control Exercises
- Breath in slowly for 3 seconds
- Hold your breath for 3 seconds
- exhale the air slowly for 3 seconds
- Continue breathing in this controlled manner
- Now, when you exhale breathe out the breath, hold out these sounds for as much as you can:hhh, ss,thh,ff, shh
- Now, add vowels to the end of the sounds and hold that vowel out for as more as you can: haha,hhoe,hhi, how, who,ssah, so, see,ssow, issue,thhaw,thho,thhe,thhow,thhew,ffa,ffoe,ffee,ffow,ffoo, shh, shhow, shhe, shho,shhoe
Hyperadduction Exercises
- Patients with hyperadduction of the articulate folds may present with abnormal articulate quality and too much loudness. Treat by applying light articulatory contacts and easy phonation.
- practice doing low pitched Sounds like ha, how, hoe, he, hi, who, hey, hall, hose, hot, hole, hear, hug, ham
Diaphragmatic Breathing
Patient Instructions:
- Position one hand on the stomach and your other hand on the chest. Feel your stomach raise and fall down with each individual breath. Continue for 1 minute.
- When you do breathe in and inhale: the stomach pushes out. The hand on the chest should remain still and maintain its position.
- When you breathe out or exhale: Tighten the stomach muscles and feel them pull in. The hand on the chest should remain still and maintain its position.
- Breathe in, feeling your stomach push out. As you breathe out or exhale, say the following sounds and words, remaining aware of the stomach gently pulling in.
- Start breathing with easy sounds like “sss” and “shh”
- normally work up to vowel sounds like “ahh” and “ooh”
- perform tasks up to single words like “hello” and your first name etc
- gently work up toward longer words, phrases, and sentences
Pursed lip breathing

- Improves ventilation
- Releases trapped air in the lungs
- conduct the airways open prolong and decelerate the work of breathing
- continuous exhalation to slow down the breathing rate
- recover breathing patterns by moving old air out of the lungs and permitting new air to enter the lungs
- Relieves shortness of breath
- Create general relaxation
Pursed lip breathing technique
- Relax your neck and shoulder muscles.
- Breathe in or inhale slowly beyond your nose for 2 counts, keeping your mouth closed. Do not take a prolonged breath inhale; a normal breath pattern will do. breathe in may help to count to yourselves for inhale, 1, 2.
- Pucker you’re lips as if you are going to use a whistle or gently flicker the flame of a candle.
- Breathe out or exhale slowly and slightly through the pursed lips while counting to 4. Breathing out may help to count to yourselves for exhale, one, two, three, four.
Pursed lip breathing reminders
- Do not force the air out.
- Always breathe out and exhale for prolong then you breathe in and inhale.
- Breathe slowly, and easily, and relaxed in and out till you are in complete control.
segmental breathing
- it will be important to accentuate the expansion of problems areas of the lung and chest wall
lateral costal expansion
- lateral costal expansion sometimes called lateral basal expansion may be done unilaterally or/and bilaterally
- the patient is in a sitting or in a hook-lying relaxed position
- place your hands over the lateral aspect of the lower ribs to fixate the patient’s concentration on the part at which movement is to happen
- ask the patient to exhale and feel the movement of the rib cage downward and inward
- as the patient start exhales put firm downward pressure into the ribs with the palm of your hands
- just preceding to inspiration, administer quick downward and inward stretch to the chest, this placement is quickly stretch on the external intercostal muscle to facilitate the promoted contraction
- external intercostal muscles turn the ribs outward and upward during inhalation
- tell the patient to extend their lower ribs as opposed to your hands as he or she inhales
- apply gentle firm manual resistance to the lower rib part to accelerate sensory awareness as the patient breathes in and the chest expands and the ribs flare
- then again as the patient exhales, help the patient by squeezing the rib cage in a downward and inward path
- then when the patient is taught to perform maneuvers independently, he/she may put the hand over the ribs or apply resistance using a belt
posterior basal expansion

- the patient has to sit and leaned forward on a pillow, slightly bending the hips relaxed position
- place your hands beyond the posterior aspects of the lower ribs
- tell the patient to exhale and feel the movement of the rib cage move downward and inward
- as the patient exhales put firm downward pressure into the ribs with the palm of the hands
- just promote to inspiration, apply instant downward and inward stretch to the chest, the placement is instant stretched on the external intercostal muscle to facilitate their contraction
- external intercostal muscles which move the ribs outward and upward during inhalation
- ask the patient to expand their lower ribs as opposed your hands as he or she inhales
- apply gentle manual resistance to the lower rib area to accelerate sensory awareness as the patient inhale and the chest expands and the ribs flare
- then again as the patient exhales, help the patient by squeezing the rib cage in a downward and inward path
- then when the patient is taught to perform the maneuver independently, he/she may place the hand beyond the ribs or apply resistance using a belt
right middle lobe or lingula expansion
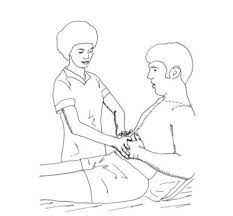
- the patient position is sitting on the chair
- place your hands on either right or the left side of the patient’s chest just beneath the axilla
- ask the patient to exhale and feel the movement of the rib cage downward and inward
- as the patient exhales place or applies the firm downward pressure into the ribs with the palm of your hands
- just promote to inspiration, apply quick downward and inward stretch to the chest, the placement is instantly stretched on the external intercostal muscle to facilitate their contraction
- external intercostal muscles turn the ribs outward and upward during inhalation
- ask the patient to expand their lower ribs as opposed your hands as he or she inhales
- apply gentle manual resistance to the lower rib area to accelerate sensory awareness as the patient inhale and the chest expands and the ribs flare
- then again as the patient exhales, help the patient by squeezing the rib cage in a downward and inward direction
- then when the patient is taught to perform the maneuver independently, he/she may place the hand beyond the ribs or apply resistance using a belt
apical expansion
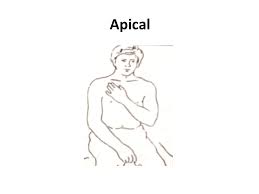
- the patient is sitting position
- apply the pressure beneath the clavicle with the fingertip
Glossopharyngeal breathing
- glossopharyngeal breathing is a means of elevating the patient’s inspiratory capacity when there is severe weakness in the inspirator’s muscle
- it is taught to that patient who have difficulty in taking deep breathing and who can develop respiratory muscle problems due to weakness of that muscles
- the patient takes in several draughts of air then the mouth is closed and the tongue pushes the air back and catches in the pharynx, then the air is forced to pushes air back into the lungs while the glottis is opened
- glossopharyngeal accelerates the depth of the inhalation and the patient’s vital capacity
- Postural adjustments, such as sitting upright enhance breath and assist with speech.
- deep inhalation prior to the onset of speech vocalization is termed prefatory inhalation.
- Use maximal breath groups when speaking, so for each/every breath, speak merely the number of words that can be created with calm.
- Use expiratory muscle strength training to develop the durability of the expiratory muscles. The patient blows into a pressurized device with sufficient effort to pass a preset threshold value.
- Use inspiratory muscle strength training to develop the durability of the inspiratory muscles to permit better prolonged or connected inhalations. The patient uses a handheld instrument which is called spirometry which is set to need a minimum inspiratory pressure for inspiration to continue.
- Use maximal vowel prolongation exercises to recover the length and volume of speech.
- Use controlled exhalation exercises, where the air is exhaled gently beyond a period of time to enhance control exhalation for speaking.
- Use speech within exercises to improve subglottal air pressure and respiratory support, for occurrence, blowing into a water glass manometer.
- Respiratory muscle strength training has been demonstrated to be effective in the treatment of dysarthria.
improve respiratory function
- nasogastric tube
Incentive spirometry
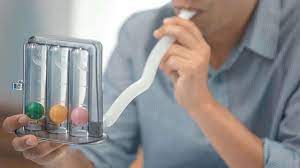
- Sit on the end range of the bed if possible. If you can’t, sit on the bed as far as you can.
- Hold the incentive spirometer in a perpendicular position.
- Place the mouthpiece of incentive spirometry in your mouth and tightly close your lips to surround it.
- inhalation as slowly and deeply as possible. You’ll notice a yellow piston elevate toward the top of the column. The yellow piston should reach the blue-pointed part.
- Hold your breath for a prolonged period of time if possible, or at least five seconds. Exhale slowly and permit the piston to fall down to the bottom of the column.
- Rest for a few seconds, and then repeat the first 5 steps at least 10 times every/each hour you’re awake.
- Place the yellow indicator on the side of your incentive spirometer to observe your best breath. Use the indicator and aim to work toward it during each/every slow, deep breath.
- After each session of 10 deep breaths, cough deeply to clear your lungs. If you have an incision from surgery, firmly press a pillow or rolled-up towel as opposed to your incision when coughing to give support.
- Once you can get outside of bed safely, take instant short walks and practice coughing. You can usually stop using the incentive spirometer once you can walk surround unless otherwise instructed by your healthcare provider.
coughing and huffing
- The Huff Coughing Technique:
- Sit up straight with chin deviated gently up and mouth open.
- Take a slow deep breath to fill up your lungs about three-quarters full.
- Hold your breath for 2 or/and 3 seconds.
- Exhale forcefully, but gently, in a continuous exhalation to move mucus from the smaller airways to the larger airways.
- Repeat the huffing maneuver two more times and then follow with one strong cough to clear mucus from the larger airways.
- Do the cycle of four to five huff coughs as part of your airway clearance procedure.
coughing
- Hold your breath just for two or three seconds. Exhale forcefully, but gently, in a continuous exhalation to move mucus from the smaller airways to the larger airways. Repeat the coughing maneuver two more times and then follow with one strong cough to clear mucus secretion from the larger airways.
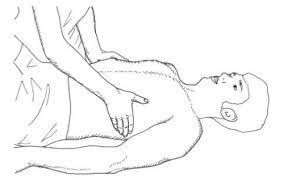
- Heimlich maneuver: Bend the person beyond at the waist level to face the ground. Strike five separate times in the middle of the person’s shoulder blades with the heel of your hand. Give five abdominal pressure. If back blows don’t dismiss the stuck object, give five abdominal thrusts, also known as the Heimlich maneuver
To improve chest mobility
To mobilize one side of the chest
- when sitting the patient bends away from the tight side to lengthen the tight structure and extend the side of the chest during inhalation
- then the patient pushed the fisted hand into the lateral aspect of the chest as he/she bends towards the tight side and exhalation
- progression by the patient having to raise the arm on the right side of the chest beyond the head and side bend away from the tight side
- this will put an additional stretch on the tight tissue
To mobilize the upper chest and stretch the pectorals
- while the patient is sitting in a chair with hands grasped behind the head, have him/her horizontally abduct the arms elongating the pectorals during deep inhalation
- then instruct the patient to bring both elbows together and bend forward during exhalation
To mobilize the upper chest and shoulders
- patient sitting in the chair, have him/her reach with both arms beyond the head 180 degrees with bilateral shoulder flexion and slight abduction during inhalation
- the patient has to bend forward at the hips and reaches for the floor during exhalation
To increase exhalation during deep breathing
- when the patient breathes in a hook-lying position hips and knees are gently flexed
- instruct the patient to pull both knees to the chest once at a time to protect low back during exhalation
- knee to chest pushes the abdominal contents superiorly into the diaphragm to assist with exhalation
Tips for speaking
- Speak slowly and loudly.
- Start with a topic heading and or/and name, so the audience knows what you want to talk about.
- Avoid talking when you feel tired.
- Pause frequently.
- Use shorter sentences.
- make sure your listeners understand.
- Write or/and draw the word if you are having difficulty talking.
Strategies for Clear Speech:
- Think SLOW. The gradually you speak, the simple and easy it is for others to know you, and also permit time for the tongue, lips, and another expresser to get where to require for assured speech sounds.
- Open your mouth and beyond utter the words.
- Make sure you are face-to-face with your listener and use movement and eye contact to add to the message.
- Reduce or/and eliminate background noise. Turn the TV or radio volume off when you are about to speak to anyone.
- give the audience the situation which aids to prepare the audience to expect certain words.
- Do not be afraid to repeat the vocab yourself if anyone does not understand you the first time.
- Using the strategies for speaking mentioned above, practice the following 3-4 times a day.
- PRACTICE saying Days of the Week
- PRACTICE counting 1-20
- PRACTICE saying favorite sports teams
- PRACTICE saying “My name is ”
- PRACTICE saying Months of the Year
- PRACTICE saying the alphabet like “A, to Z”
- PRACTICE saying “My birthday is ”
- PRACTICE saying different holidays (Thanksgiving, Christmas)
- PRACTICE saying names of family members
- PRACTICE saying precise sounds with extra strength: “P”, “B”, “K”, “G”
- PRACTICE saying simple sentences and phrases you say frequently
To improve and maintain ROM
- passive movement
- active movement and free exercises to all the limbs
- walking, standing, mobility exercises
- sit to stand, transfer activities, squatting
To reduce spasticity
- quick ice, slow sustained stretching, slow gentle passive movement
- relaxation technique
Passive movements of the shoulder joint
- shoulder flexion
- patient position: supine lying
- position of therapist: stand apart from patient
- procedure: therapist’s left hand restricts the wrist and carpometacarpal movement
- therapist’s right hand should grasp the lower part of the arm of the patient .mild long axial traction is applied and maintain the traction throughout the movement
- in the starting, stage traction is applied by the right hand and beyond 90-degree traction maintain by the therapist’s left hand
- do the movement up to an available range
- do the finger walks exercise 10 to 20 times per day.
shoulder extension
- patient position: side lying
- position of therapist: stand back side of the patient show shoulder joint
- procedure:foream and elbow are placed beyond the right side foream of the therapist by flexion of the elbow of the patient’s wrist movement restricts by the therapist’s hand
- the left hand of the therapist stabilizes the shoulder joint of the patient and the therapist’s right-hand does extension movement
shoulder abduction
- patient position: supine lying
- position of therapist: stand apart from the patient and face the patient’s face
- procedure: patient elbow flex 90-degree .wrist grasped by the left hand of the therapist .dorsal aspect of the elbow and lower part of the arm is grasped by the therapist’s right-hand .therapist’s both hands perform abduction movement of the shoulder
shoulder medial and lateral rotation
- patient position: supine lying
- position of therapist: stand apart from the patient facing the patient’s shoulder
- procedure: patient’s shoulder abducted 90 degrees and elbow flexed 90 degrees.
- the therapist’s left hand clasped the lower end of the humerus of the patient and the right-hand clasped wrist and hand of the patient.
- long axial traction applies and the medial side and lateral rotation of the shoulder is performed
passive movement of the elbow joint
elbow flexion and extension
- patient position: supine lying
- therapist position: stand apart from the patient and face the patient’s elbow
holding
- the therapist has to fix the arm of the patient with the plinth on his left hand
- the therapist’s right-hand clasps the wrist and hand of the patient
- procedure therapist’s right hand is doing the elbow flexion and extension
forearm joint
supination and pronation
- patient position: supine lying
- position of the therapist: standing apart from the patient and facing him
holding
- wrist and hand are clasped by the therapist’s right hand
- the arm is fixed with the plinth by the therapist’s left hand
procedure
- therapist’s right hand is doing the supination and pronation
wrist joint
flexion and extension
- patient position: supine lying
- position of the therapist: stand beside the patient facing him
holding
- the lower part of the forearm is held by the therapist’s left hand
- the right hand of the therapist grasping the MCP and PIP joint
procedure
- with mild long axial traction, the flexion and extension movement is done by the therapist’s right hand in the available range
To improve hand function
- ball squeeze, picking up and lifting objects
- improve precision handling
- proper position of hand and wrist by using a splint
- putty clay activities
To prevent contracture, deformity, pressure sores
- orthotic devices to maintain the position of the limb
- frequently change positions
- use a pillow for spastic joints
Facial muscle exercises
Brower raise

- place your index and middle fingers combine in a closed peaceful position
- Rest your fingernails beyond your eyebrows and slightly push the skin down
- Lift your eyebrows up and down, while generating resistance with the weight of your fingernails
- Repeat 10 times
- Complete 6 sets
cheekbone lift

- Place your fingers over each cheekbone
- Gently lift the skin until taut
- Open your mouth to form an elongated “O” position; you should feel resistance in your cheek muscles
- Hold for 5 seconds
- Complete 10-15 sets
the cheeks squeeze

- divide fat cheeks and an excuse to make a fish face beyond and beyond again Sign us up.
- Tilt your head all the pathway backward and push the chin forward
- Suck your cheeks in as more as possible
- Hold for 5 seconds
- Complete 10-15 sets of repetitions
jaw flexion
- Tilt your head backward till you’re looking at the ceiling
- Move your lower lip beyond your upper lip as long as you can; you should feel this in the jaw muscles close your ears
- Hold for 10 seconds
- Complete 10-15 sets of repetitions

puffer fish press
- puffer fish press facial exercise will help to inhibit the very un-funny appearance of laugh lines surrounding your mouth. Here’s how:
- shut down your mouth and puff the cheeks
- passes the air from one cheek to the other cheeks
- Repeat for 30 seconds
FAQS
- How can describe the difference between bulbar and pseudobulbar palsy?
Bulbar palsy is a lower motor neuron contusion of cranial nerves IX, X, and XII. A pseudobulbar palsy is an upper motor neuron contusion of cranial nerves IX, X, and XII.
- How can you prevent pseudobulbar from being affected?
Antidepressants, such as tricyclic antidepressants and selective serotonin reuptake inhibitors (SSRIs), can help decrease the frequency and severity of your pseudo-bulbar palsy episodes. Antidepressants for the treatment of pseudo-bulbar palsy are typically prescribed at doses lower than those used to treat depression.
- Can trauma cause the pseudobulbar effect?
Pseudobulbar palsy is a neurological condition involving involuntary, sudden, and frequent episodes of laughing or crying. It happens secondary to neurological disease – meaning that pseudo bulbar palsy is caused by another disorder – and is most commonly found in patients with Traumatic Brain Injury
- What happens in pseudobulbar palsy?
Pseudobulbar palsy is because of an upper motor contusion caused by bilateral disturbance of the corticobulbar tracts. Pseudobulbar palsy is indicated by dysarthria, dysphagia, facial and tongue weakness, emotional lability, joint weakness
- What percent of people have the pseudobulbar effect?
The prevalence of pseudobulbar affect (PBA) symptoms is approximately 9% among nursing home residents. The presence of Pseudo bulbar palsy symptoms was connected with more frequent use of psychopharmacological medication, involving antipsychotics.


One Comment