
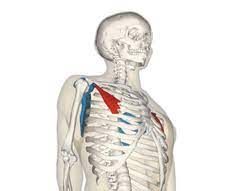
Pectoralis Minor Muscle
Table of Contents
What is Pectoralis Minor Muscle?
- The pectoralis minor muscle is triangular in shape & is located under the pectoralis major, & both formed the anterior wall of the axilla.
- The pectoralis minor muscle is one of the most surfaced muscles on the anterior aspect of the chest or thoracic wall, situated deeply only to the pectoralis major muscle.
- It is one of the anterior axioappendicular (thoracoappendicular) muscles, together with the pectoralis major, subclavius & serratus anterior.
Relations of Pectoralis Minor Muscle
- The important anterior relation is the pectoralis major muscle, situated superficial to the pectoralis minor & almost fully covering it. Found between the 2 muscles are the lateral pectoral nerve & the pectoral branches of the thoracoacromial artery. Situated deep to the pectoralis major & its covering fascia is another connective tissue layer called clavicopectoral fascia. It covers the pectoralis minor, superior to it forming a fascial layer called the costocoracoid membrane & inferior to it forming the suspensory ligament of the axilla, continuous with the axillary fascia. Together the pectoralis minor & minor, as well as with their associated fascia, form the anterior wall of the axilla.
- Posteriorly the pectoralis minor is related to the serratus anterior & intercostal muscles, the ribs & several neurovascular & lymphatic structures.
- The pectoralis minor is important clinically & as a surgical landmark, due to the structures that lie beneath or deep into the muscle & its tendon. running deep to the pectoralis minor muscle are the nerves & blood supply to the upper limb.
- the posterior, lateral, & medial cords of the brachial plexus
- the axillary artery & vein
- The pectoralis minor is used as the referencing point for the 3 divisions of the axillary artery. Medial to the medial border of the pectoralis minor is the 1st part of the axillary artery, directly posterior to the muscle is the 2nd part, & lateral to the lateral border of the muscle, is the 3rd part of the axillary artery.
- Together with other muscles of the region, it produces a variety of movements of the scapula & can be used as an accessory muscle of respiration.
Origin of Pectoralis Minor Muscle
- It originates from the 3rd to 5th ribs, near the costochondral junction, the intervening fascia covering external intercostal muscles.
Insertion
- It inserts on the medial border & upper surface of the coracoid process.
Nerve supply
- It is supplied by the medial & lateral pectoral nerves.
Blood supply
- The blood supply to the pectoralis minor comes from several sources:
- Thoracoacromial artery (branch of the second part of an axillary artery) gives 2 supplying branches – pectoral & deltoid.
- Superior thoracic artery (branch of the 1st part of an axillary artery).
- Lateral thoracic artery (branch of the axillary artery).
Action:
The action of pectoralis minor is to:
- draws the scapula forward.
- depresses the point of the shoulder.
- also helps in forced inspiration.
The function of Pectoralis Minor Muscle
- The Pectoralis muscle has many functions, mostly related to the movement of the scapula.
- Together with the serratus posterior, it works in protraction of the scapula, i.e. moving it laterally & anteriorly against the ribcage. This movement is necessary for reaching the arm forward.
- Medial or downward rotation (the inferior angle of the scapula turns medially) of the scapula against resistance is done by the pectoralis minor which exerts the force on the coracoid process, which pulls the lateral aspect of the scapula inferiorly, while the levator scapulae & the rhomboids pull upwards on the medial side of the rotation axis.
- Depression of the scapula can normally occur out by gravity alone, however, when additional force is required, the action is aided by the pectoralis minor & serratus anterior muscles.
- When the scapula is fixed the pectoralis minor can be considered an accessory muscle of respiration when inspiration is deep & forced, as it will help raise ribs third and fifth during inspiration & aid in expanding the thoracic cavity.
Clinical significance of Pectoralis Minor Muscle
- The pectoralis minor is not injured by direct injury because this muscle is located deep under the pectoralis major so that this muscle is injured by overuse.
- This pectoralis minor muscle is injured when the patient is participate in weight training, swimming, rugby & bodybuilding.
Stretching Exercise of Pectoralis Minor Muscle

Gross Stretch:
- Lie on a table at the back. Allow one arm to hang off the side with the shoulder positioned at the edge.
- Bend the elbow at 90 degrees so that the hand is facing the direction of the therapist’s head.
- Now a therapist gently presses on the forearm of the hanging arm until they feel of slight pressure at the front of the chest & shoulder.
- Hold for 30 secs, & then repeat on the other side.
- Repeat 3 repetitions at a time.
Doorway Pectoral Stretch:
- Stand beside a door frame or corner of a wall.
- Keeping your back straight and your inner core engaged, bring your arm up against the wall with the elbow and shoulder bent at 90 degrees.
- With the arm planted on the wall, draw your opposite shoulder back followed by your torso in a straight line. Keep the back straight and core engaged.
- Hold this for 30 seconds and repeat 3 times on each side 2 times per day.
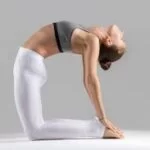
Camel Pose Stretch:
- Kneel on the floor with knees hip-width apart and your hands on your waist. Tuck your toes or place them flat against the floor.
- Slowly reach back and place one hand on each heel.
- Keep your chest lifted, shoulders back and down, engage your core, and slowly push your hips forward.
- Hold for 15-20 seconds and repeat 3 times.
Hand Behind the Back Stretch:
- Stand tall with your feet shoulder-width apart. Interlace your fingers behind your back and straighten your arms.
- Keep your chest lifted and pull your shoulder blades downward.
- Hold for 15-20 seconds and repeat 3 times.
Floor Angels Stretch:
- In supine position with feet hip-width apart and flat on the floor.
- Position both arms to the side at a 90-degree angle with palms facing upwards toward the ceiling.
- Keeping in contact with the floor at all times, slowly bring your arms up over your head until they are fully extended.
- Then slowly bring both arms back to the 90-degree starting position.
- Repeat 10 times for 3 sets.
- Remember to keep your back flat against the floor and ribs tucked at all times
Above-the-head Chest Stretch:
- The patient is in a sitting or standing position, interlock the fingers, then bend the elbow joint & raise the arms above the head.
- Then Gently squeeze the shoulder joint blades together & move the elbow joint &hands backward.
- Vary the height of the hands to emphasize the shoulder joint & chest means hands are behind the head, hands are on top of the head, and the hand is also a few inches above the head.
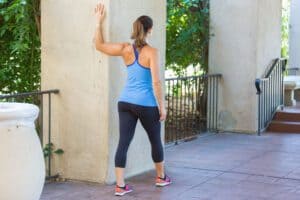
Bent-arm Wall Stretch:
- The patient is Assume a split stance, Right leg is in the front & the left leg in the back, in a doorway & at the end of a wall.
- Then Bring the left arm up to shoulder height & position the palm & inside of the arm on the wall surface or doorway.
- The patient arm looks like a goal post.
- Then Gently press the chest through the open space to feel the stretch.
- Moving the arm higher & lower which is allow to you stretch the various sections of the chest.
- Then Repeat this exercise on the other side.
Extended Child’s Pose on Fingertips Stretch:
- The patient is Kneeling on the floor.
- Try to Touch the big toes together & the patient is sitting on the heels.
- Next, separate the knee joint about as wide as the hip joint.
- Then Bend the forward from the hip joint & walk the hands out as far in front of them as possible.
- With the arms extended palms are facing down then come up onto the fingertips as if the ball underneath the palms & melts the chest toward the floor.
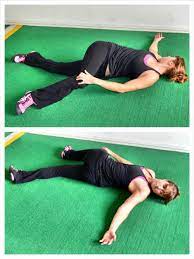
Side-Lying Parallel Arm Chest Stretch:
- The patient is lying prone on the stomach then bring both arms out to the sides then palms facing down & to create the letter, T.
- Then Start to roll onto the right side by pushing with the left hand.
- Lift the left leg, bend the knee joint & place the left foot behind you on the floor for stability.
- Then Rest the right temple on the floor.
- Must be Keep the left hand on the floor for balance.
- For the feel of the extra stretch, lift the left hand toward the ceiling.
- Then Repeat this stretching on the other side.
Strengthening Exercise of Pectoralis Minor Muscle
Push-Ups:
- Begin this Exercise in the push-up position as demonstrated.
- Keeping your back and neck straight, slowly straighten your elbows until they are straight tightening the pectoral muscles, then return to the starting position.
- Perform 3 sets of 10 repetitions provided the exercise is pain-free.
Incline push-up:
- This exercise is Start with the hands on the wall & a countertop of the height surface.
- Then Walk the feet back so that the body makes roughly a 45-degree angle with the floor.
- Keep the body straight & spine neutral & lower the chest to the surface leaning against it.
- Pause for a moment, and after that return to the starting position.
- This resistance must be light enough & do complete up to 20 repetitions.
- For easy exercise, step closer to the hands
- To make the harder exercise, step farther away.
Flat bench press:
- Lie on the back on the bench with the knees bent & feet flat on the floor.
- Grasp the barbell, with the thumb, wrapped around the barbell & palms facing toward the feet.
- Press the arms straight toward the ceiling which lifts the weight off the rack.
- Then Move the weight over chest level.
- Bending the elbow joint down at a 45-degree angle slowly lowers the weight of the chest.
- Must be Keep the bar approximately in line with the nipples.
- Then Pause for a moment after that press the weight back into the starting position.
- Do the Complete 3 sets of the 8–12 repetitions.
Incline bench press:
- The patient is lying on the back on the incline bench with the knees bent & feet flat on the floor.
- The patient is Grasping the barbell, with the thumb which is wrapped around the barbell & palms facing toward the feet.
- Press the arms straight toward the ceiling to lift the weight off the rack.
- Position the weight above the collarbone.
- Then Slowly lower the weight down to the chest, approximately in line with the mid-chest to just above the nipples.
- Then Pause for a moment after that press the weight back into the starting position.
- Do the Complete 3 sets of the 8–12 repetitions.
Decline bench press:
- The patient is lying on the back on the decline bench, with the knees joint bent & ankles which is secured behind the ankle rests.
- The patient is holding a barbell, with the thumb wrapped around the barbell & palms facing toward the feet.
- Press the arms straight to lift the weight off the rack.
- Position of the weight above the lower chest to the upper abdomen region.
- Then Slowly bend the elbow joint to lower the weight down to the chest, approximately in line with the nipples.
- Then Pause for a moment after that press the weight back into the starting position.
- Do the Complete 3 sets of the 8–12 repetitions.
Resistance Band Adduction:
- Begin this exercise by standing or kneeling with your back straight and holding a resistance band as demonstrated.
- Keeping your back and elbows straight, slowly pull the resistance band to your hip as shown, tightening your pectoral muscles.
- Perform 3 sets of 10 repetitions provided the exercise is pain-free.
Pectoral Dumbbell Pull-on Swiss Ball:
- Slowly take your arms overhead and then slowly return to the starting position tightening your pectoral muscles.
- Perform 3 sets of 10 repetitions provided the exercise is pain-free.
Cable crossover:
- This exercise starts with the standing position away from a set of high pulley cable machines & resistance band anchored overhead.
- Select light to moderate weight which adds to the challenge but gives success.
- Grasp the hands (or the ends of the band) as they step forward with 1 foot.
- Keep enough tension & control on the handles to keep them in front of the chest.
- Contract the chest muscles & bring the handles down forward across the body at roughly belly button level.
- The hands are crossed to add emphasis to the serratus anterior muscles.
- Hold for a moment & then slowly return to the start.
- Then repeat to another side.
- Do 3 sets of 8–12 repetitions.
Chest dip:
- The patient is in the Standing position which is facing the two parallel bars and grasps them, palms facing in.
- Then Straighten the elbow joint & press into the hands, lifting the body so that it is in line with the hands.
- Then, bend the elbow joint & lower the chest toward the hands.
- Pause, then press back into the starting position.
- Repeat Do the 3 sets of the 8–12 repetitions.
Scapular Retraction/Protraction movement:
- You are lying on the stomach means in a prone position on a table & bed with the injured arm hanging over the side.
- Must keep the elbow joint straight & lift the weight slowly.
- Try to squeeze the shoulder blade toward the opposite side as you can possible.
- Then return slowly to the starting position & repeat this exercise.
- Do this exercise 2–3 times per day.
Bent-Over Horizontal Abduction:
- You are lying on the stomach means in a prone position on a table & bed with the injured arm hanging over the side.
- Must keep your arm straight & slowly raise it to eye level.
- Then slowly lower it back to the starting position & repeat this exercise.
- Do this exercise 2–3 times per day.
- Do the exercise by pressing on the side of your head. Repeat 8 times, then alter sides.
Prone Rows Exercise
- Lie on your stomach with the arms dangling off the side of the bed (try angling the body so the head is facing the corner of the bed).
- Use a pillow beneath the stomach for comfort. Begin by pulling arms backward while bending elbows & squeezing shoulders blades together then slowly return to starting position.
- Do not lift the head up while pulling the arms back.
- Repeat 20 times. Perform 2 times a day.
Breathing Exercises
Diaphragmatic Breathing Exercise
In supine position
- Lying on your back on a surface or in bed, together with your knees flex and your head supported to the bottom. you’ll use a pillow behind your knees to support the legs.
- Place one hand on his higher chest and therefore the alternative slightly below your skeletal structure. as you’re feeling your diaphragm move as you breathe.
- Breathe in slowly exploiting your nose so your abdomen moves away and it’ll permit your hand to rise. The hand on your chest ought to persist as still as connected
- Tight the abdominal muscles and allow them to fall within as you expire exploitation of your lips. The hand on your belly ought to move down to its original position
- In sitting position in a chair, with your knees flex and your shoulders, head, and neck neutral position. you can perform for 7 to 10 minutes, several 5to 6 times a day. Diaphragmatic exercise also call as relation exercise
In sitting position
- Sitting in a chair straight position and lengthen the distance between your umbilicus and sternum.
- your shoulders and neck should be relax.
- pelvis is in neutral position.
- your hands position should be at the side of your lower ribs.
- Breath in slow using your nose. As you inspirited feel your ribs should be outwards and upwards. During inspiration expansion of the trunk in three area forward, sides and back. expiration using your nose. As you expirate your lower ribs moving inward direction.
Segmental Breathing Exercise
Lateral costal expansion
- it is also call lateral basal expansion.it usually done unilaterally or bilaterally.it can also done in sitting or lying position
- place your hand lateral aspect of the rib cage
- and ask the patient to breathe out and the rib cage should be downward and inward
- as the patient expired therapist should apply pressure on the rib cage with the palms of your hand
- before inspiration you need to downward and inward stretch to the chest to facilitate the external intercostal contraction
- apply normal force on lower rib cage to get stimulate and patient get inspirited deeply and chest will expand
- when patient expiration therapist will squeezing the rib cage downward and the inward
- patient may perform manually ask to apply force by with his hand or with towel.
Posterior basal expansion
- This form of deep breathing exercise accent post-surgical maneuver who have bedridden and cannot sit up for prolonged the time period. because of that time secretion move to the posterior segment of the lower side of the rib.
- sit and lean onward on a pillow, slightly bend your hips
- place the physiotherapist’s hand over a posterior segment of the rib
- place your hand lateral aspect of the rib cage
- ask the patient to breathe out and the rib cage should be downward and inward
- as the patient expired therapist should apply pressure on rib cage with the palms of hand
- before inspiration you need to downward and inward stretch to the chest to facilitate the external intercostal contraction
- apply normal force on lower rib cage to get stimulate and patient get inspirited deeply and chest will expand
- when patient expired therapist will squeezing the rib cage downward and an inward
- patient may perform indirectly ask to apply force by with his hand or with towel
Right middle lobe expansion(lingual expansion)
- the patient is in a sitting position therapist’s hand should be right or left side at the below axilla level
- ask the patient to breathe out and the rib cage should be downward and inward
- as the patient expired therapist should apply pressure on the rib cage with the palms of hand
- before inspiration you need to downward and inward stretch to the chest to facilitate the external intercostal contraction
- apply normal force on lower rib cage to get stimulate and patient get inspirited deeply and chest will expand
- when patient expiration therapist will squeeze the rib cage downward and the inward
- patient may perform manually ask to apply force by with his hand or with towel
Apical expansion
- Patient in a sitting position on a chair or bed therapist’s hand should be below the clavicle
- As the patient breathes out apply pressure with the palm or fingertip just below the clavicle
Pursed lip breathing exercise
- Sitting with using your back straight or lying down. Relax each shoulder and neck the maximum amount as potential.
- inspiration using your nose for two to three seconds, the air is get into your abdomen. fill your abdomen with air instead of your lungs.
- Purse your lips like you’re processing on hot food then expire slowly, taking double as long to exhale as you took to respire.
- you can repeat For several times. you’ll rise the inspiration and expiration counts from a pair of seconds to four seconds, and so on pursed lip breath effective


2 Comments