How do relive muscle pain quickly?
If you want to know how to relive muscle pain quickly? Then this article is really informative for you, In this article we discuss various option of how to relive muscle pain quickly?
When people occur to any injury in any body part it produces muscle pain directly.
This pain occurs due to many reasons like spasms, swellings, sprain, strain in a muscle, and fracture.
On a quick basis, this pain is reduced by pain relieving medication, gel, patches, use of the RICE principle, and Physiotherapy treatment.
Table of Contents
Which causes is produce muscle pain?
- Hundreds of the diseases, disorders & conditions which is produced pain like as inflammatory syndromes, malignancy, trauma & infection.
- but In some cases, pain is produced by serious & life-threatening conditions, like a heart attack & cancer.
- So that this pain is produced by too many causes including:
- Fall
- If you stay in any position for a prolonged time like when you work in front of a computer for the whole day it produces neck pain, prolonged walking produces leg pain.
- If occur to any injury in body part like as burn, sports injury, outstretched hand & many other injuries.
- This all-cause is produced by pain in the injury part.
What is the treatment for relieving muscle pain quickly at home?
First of all, when the injury occurs do the rest for some time.
RICE principle:

When you feel the pain must be followed to RICE principle at home :
- R- rest = When to occur to any injury do the rest for some days means do not any painful activity.
- I – ice = On the pain area you can apply ice for 20 minutes but do not apply ice directly to the skin because it is lead to redness of skin & sometimes burn so always put the towel between the skin & ice & when you feel an itching sensation or redness on that time as soon as possible remove the ice. you can also be used an ice pack & frozen peas in the area of pain. this ice helps you relive the pain & swelling.
- C- compression = On the pain area you can also apply to compression bandage for 4-5 hours which is helpful to you release to pain.
- E- elevation = Elevate the limb with the help of a pillow for release to swellings & pain.
Pain medication:
- When you feel severe pain you can also take to pain relief drugs release to muscle pain.
- You can take to an anti-inflammatory group of drug mostly Non-steroidal anti-inflammatory drugs (NSAIDs) like ibuprofen & many other drugs.
- You can also apply volini gel & spray on the area of pain release intense pain.
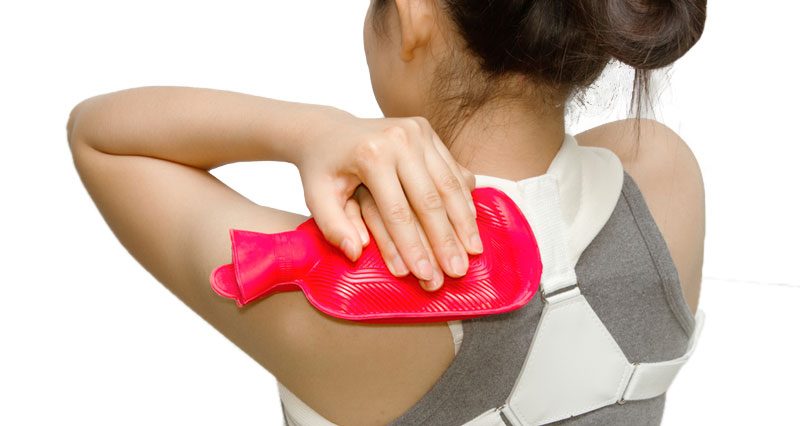
Heat therapy :
- When you present swelling & inflammation in the area of pain you can also use heat therapy.
- This heat therapy is applied for 20 minutes to the area of pain.
- You can be used to hot pack & warm water on the area of pain at home.
When do you need to call the doctor?
- When you follow the home treatment for 3 to 4 days & no decrease in pain you need to contact the doctor.
- The doctor is follow the assessment of muscle pain & tries to cause muscle pain.
- Then follow the treatment which is provided by the doctor.
- The doctor has also advised physiotherapy treatment for the release of pain.
What is physiotherapy treatment for relieving muscle pain?
Massage :
- On the area of pain applied to massage when any tender & trigger points are present so that massage is helpful to you for releasing the tender points.
- This massage is applied with the help of oil & powder to the area of pain.
- It is applied for 5 – 10 minutes & 3 times per day.
- You can also use to massager machine for release of trigger pain points.
Electrotherapy treatment :
In the electrotherapy treatment include SWD, US, TENS, IFT, and Deep heating therapy.
- When any tender points & trigger points are present therapists are advised to you US = ultrasound therapy for 5 minutes with the help of gel because ultrasound is not applied directly on the skin so apply gel between to skin & ultrasound prob, this ultrasound is help to you release the swelling, spams & pain.
- To reduce the pain therapist is used SWD, TENS, and IFT machines for 10 minutes on the area of pain.
Stretching & exercise:
- the stretching & exercise depends on which part of the body muscle is affected means when an injury occurs to the neck do the neck exercise & for an injury in the leg do the leg exercise.
- This stretching & exercise help you release muscle pain & swellings as well as muscle weakness & tightness.
- When an injury occurs on that day do not any exercise quickly because it is increased to risk so that does the rest for someday & when the doctor advice to physiotherapy treatment meet to physiotherapist & start to exercise with the help & advice of them.
Active exercise :
In the starting phase of the exercise, the therapist is advised to active exercise means doing the normal movement of joints does not any forceful movement in starting phase.
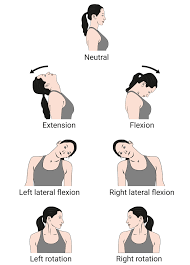
Neck exercises:
- You are in a sitting & standing position.
- Face to forward.
- The shoulder joint straight & relaxed.
- It is a starting position for the neck exercise.
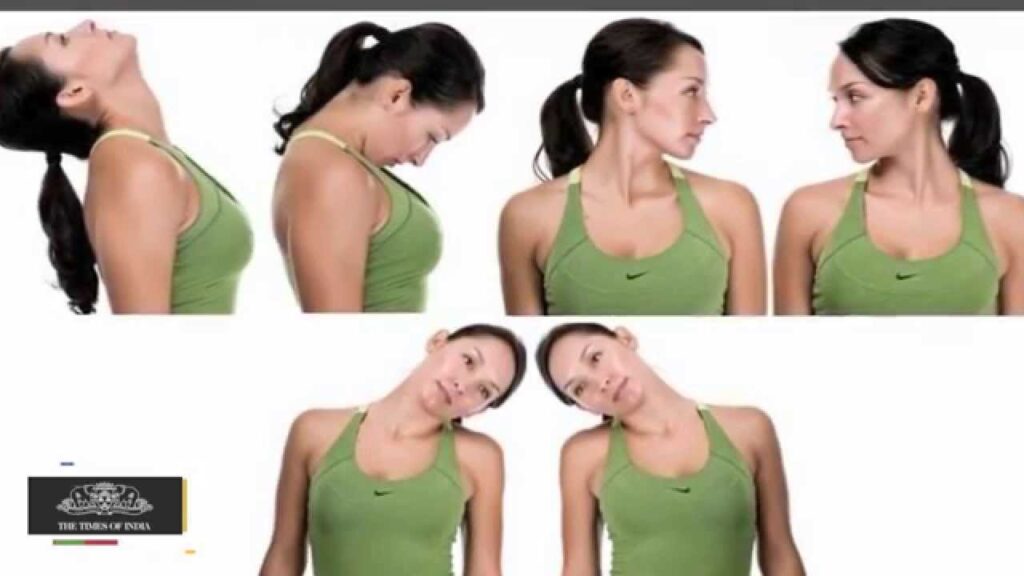
- Head tilts = forward & back:
- Then Gently bow the head & try to touch the chin to the chest.
- Raise the chin back to the starting position.
- Tilt the head back as far as possible so that you are looking up at the ceiling.
- Then Return the head into the starting position.
- Perform 10 times in 1 session.
- Head Tilt = side to side:
- Tilt the head to the side, bringing the ear toward the shoulder joint.
- Do not raise the shoulder joint to the ear.
- Must be Keep the shoulder joint still.
- Then Return to head into the starting position.
- Perform 10 times in 1 session.
- Head turns:
- Turn the head to look over the shoulder joint.
- Tilt the chin down & try to touch it to the shoulder joint.
- Do not raise the shoulder joint to the chin.
- Then Face forward again.
- Perform 10 times in 1 session.
Shoulder & elbow joint exercises:
- You are in a Standing & sitting position.
- Hold the arm straight down at the side.
- Face the palms in toward the body.
- For the best exercise use to chair without arms when you are in a sitting position.
- It is a starting position for the shoulder exercise.
- Shoulder movement = up and down:
- Raise the arm forward & then up over the head.
- Then try to raise the arm so that the inner arm touches the ear.
- Bring the arm back down to the side.
- Then Bring the arm back as far as possible behind the body.
- Return the arm into the starting position.
- Perform 10 times in 1 session.
- Shoulder movement = side to side:
- Raise the arm to the side & then up over the head as far as possible.
- Return the arm to the side.
- Bring the arm across the front of the body & reach the arm for the opposite shoulder.
- Return the arm into the starting position.
- Perform 10 times in 1 session.
- Shoulder rotation:
- Raise both shoulder joints toward the ears, when we try to shrug.
- Then Lower the arm into the starting position & relax the shoulder joint.
- Pull the shoulder joint back, Then relax to arm again.
- Then Roll the shoulder joint in a smooth circle.
- Then roll the shoulder joint in a smooth circle in the other direction.
- Perform 10 times in 1 session.
- Elbow bends:
- With the palm facing forward, bend the elbow joint.
- Then try to touch the shoulder joint with the fingertips.
- Return the arm to the starting position.
- Perform 10 times in 1 session.
Arm and wrist exercises:
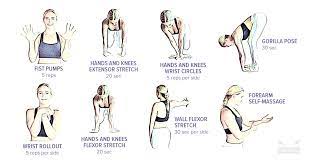
- The patient is in a Sitting position.
- Bend the elbow joint & rest the forearm on a flat surface, like a table & your lap.
- Make sure the wrist joint hangs loosely over the side.
- This is a starting position for the Arm and wrist exercises.
- Wrist bends:
- Bend the hand back toward the wrist so that the fingers point toward the ceiling.
- Then bend the hand down so that the fingers point toward the floor.
- Perform 10 times in 1 session.
- Wrist rotation:
- Move the hand from side to side.
- Then roll the hand in circles in one direction.
- Roll the hand in circles in the other direction.
- Perform 10 times in 1 session.
- Palm up, palm down:
- The patient is Stay in the same position but tucks the bent elbow joint against the side.
- Face the palm down.
- Then Turn the palm so that it faces up toward the ceiling.
- After that turn the palm so it is facing down.
- Perform 10 times in 1 session.
Hand & finger exercises:
- The patient is in a Sitting & standing position.
- Place the hand out in front of the body.
- This is a starting position for the Hand & finger exercises.
- Finger bends:
- The patient is Making a tight fist.
- Then open & relax the hand.
- Perform 10 times in 1 session.
- Finger spreads:
- Open the hand &stretch the fingers as far as apart as possible.
- Bring the fingers together again.
- Perform 10 times in 1 session.
- Finger-to-thumb touches:
- One time, touch each fingertip to the pad of the thumb.
- Perform 10 times in 1 session.
- Thumb-to-palm stretches:
- Move the thumb & rest it across the palm.
- Move the palm out to the side again.
- Perform 10 times in 1 session.
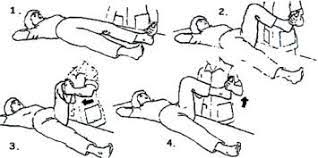
Hip and knee exercises:
- The patient is in the supine position.
- Hip and knee bends:
- Point the toes.
- Then Slowly bend the knee up as close to the chest as possible.
- Straighten the leg &return the knee to a flat position on the bed.
- Perform 10 times in 1 session.
- Leg lifts:
- Raise the leg so that the foot is 6 to 12 inches means 15 to 31 centimeters off the bed.
- Hold the leg in the air for a few seconds. Return the leg to the bed.
- Perform 10 times in 1 session.
- Leg movement, side to side:
- Flex the foot so that the toes point up toward the ceiling.
- Move the leg out to the side as far as possible.
- Bring the leg back to the middle.
- Perform 10 times in 1 session.
- Leg rotation, in and out:
- Put the leg flat on the bed.
- Roll the leg toward the middle so that the big toe touches the bed.
- Then roll the leg out & try to make the smallest toe touch the bed.
- Perform 10 times in 1 session.
- Knee rotation, in and out:
- Lie on the back of the bed.
- Bend the knee joint so the bottom of the foot is flat on the bed.
- Slide the heel towards the buttocks.
- Then Return the foot to the starting position.
Ankle and foot exercises:
- The patient is sitting in a chair with both feet flat on the floor.
- Ankle bends:
- Must be Keep the toes on the floor & raise the heel as high as you can.
- Lower the heel.
- Then keep the heel on the floor & raise the toes as high as you can.
- Perform 10 times in 1 session.
- Ankle rotation:
- Raise the foot slightly off the floor.
- Roll the ankle joint in circles [ clockwise].
- Then roll the ankle joint in circles but in the other direction [anti-clockwise].
- Perform 10 times in 1 session.
- Toe bends:
- Curl the toes down toward the sole (bottom) of the foot.
- Then Straighten the toes.
- Curl the toes up toward the ceiling.
- Then straighten the toes again.
- Perform 10 times in 1 session.
- Toe spreads:
- Spread the toes apart.
- Then Bring them together again.
- Perform 10 times in 1 session.
Active Assisted Exercise:
- When you feel some pain relive to the injury, the therapist starts active Assisted Exercise
- Active assisted exercise = In the exercise assistance is provided by either manual outside force & mechanical
- But in some conditions avoid active Assisted Exercise including to:
- Immediately followed myocardial infarction.
- If active assisted exercises induced pain during movement.
- Greater swelling, fever & redness.
- Acute tears & fracture.
Neck active Assisted Exercise:
- Neck Extension:
- Slowly pull the head back & tuck the chin.
- This places the head directly above the shoulders.
- Slowly tilt the head back looking up at the ceiling.
- then Gently rotate the head back & forth about 3 – 4 times.
- the head is only turned about 1 centimeter.
- This helps you bring the neck to the end range.
- Stop this exercise when a stretch is felt in the muscles in the front of the neck.
- Repeat this exercise 5 times.
- Neck Flexion:
- Slowly tuck the chin & look down at the toes.
- Place one hand on the back of the head & gently assist this motion.
- Stop this exercise when a stretch is felt in the muscles in the back of the neck.
- Repeat this exercise 5 times.
- Neck Rotation:
- Slowly turn the head & look over the left shoulder.
- Place one hand on the right cheek & gently assist this motion.
- Stop this exercise when a stretch is felt in the muscles on the right side of the neck.
- Repeat this exercise in the opposite direction.
- Repeat this exercise 5 times.
- Side Flexion:
- Slowly tilt the left ear down to the left shoulder.
- Place one hand on the right ear & gently assist in this motion.
- Stop this exercise when a stretch is felt in the muscles on the right side of the neck.
- Repeat this exercise 5 times.
- Repeat this exercise in the opposite direction.
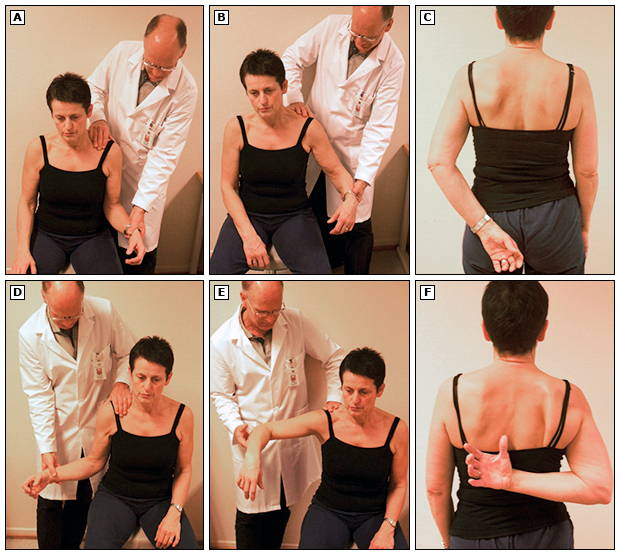
Upper limb active Assisted Exercise:

- Pendulum exercise:
- You are standing beside a table with the hand of the unaffected shoulder on the table & feet are slightly wider than shoulder-width apart.
- Bend the hip joint approximately 75 to 90 degrees & let the affected arm hang down toward the floor.
- Shift the weight from side to side, letting the arms swing freely from side to side.
- Shift the weight forward & backward, letting the arms swing freely front to back.
- Once they feel comfortable with these movements, move the body so that the arm swings in a circle.
- Must be Keep the circle small, less than 8 inches.
- Continue for 30 seconds.
- Every day, increase the time to 3 to 5 minutes.
- Repeat this exercise 10 times per day.
- Pully exercise:
- For the shoulder active Assisted Exercise does the pully exercise.
- First, hold a rope – pully on both hands then perform the movement of the shoulder.
- Flexion,abduction,external & internal rotation.
- This exercise is performed 10 times in 1 session & 3 sessions per day.
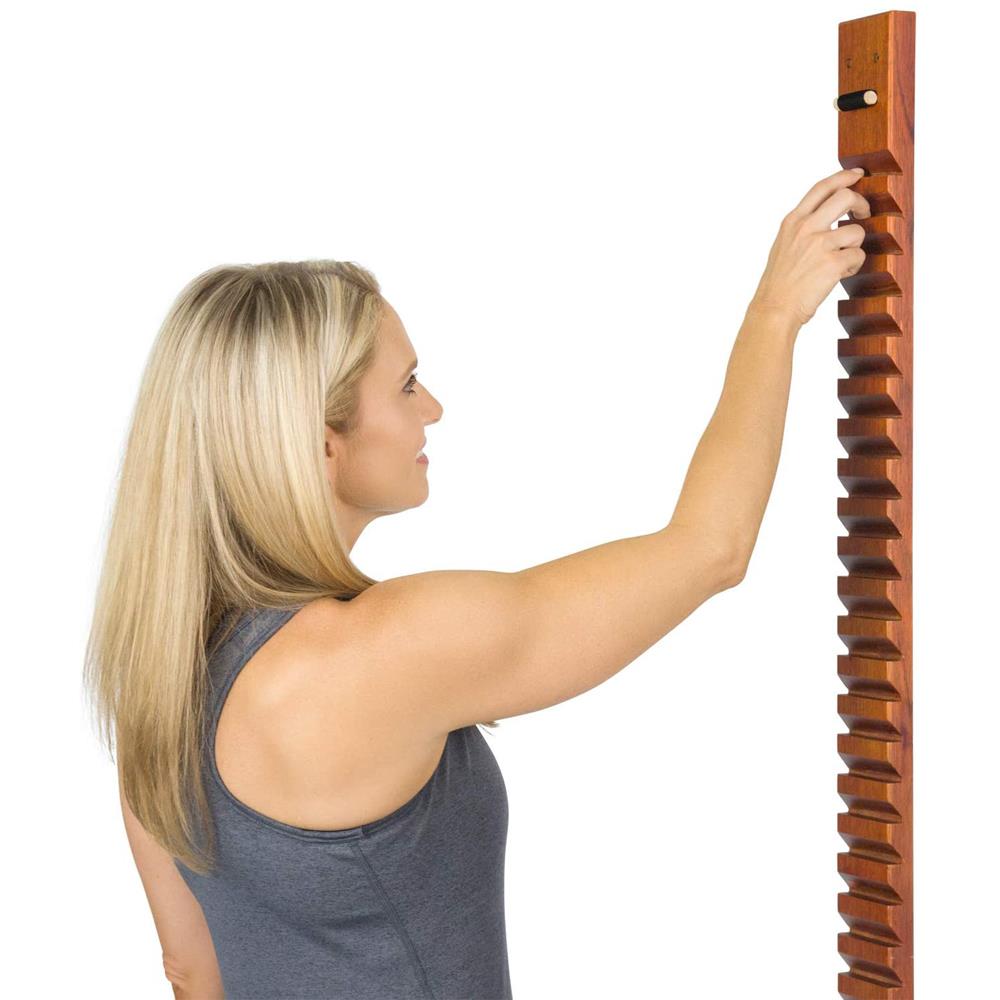
- Finger ladder Exercises:
- The patient is in a standing position & facing a ladder that is hanging over a wall.
- Ask them to patient place the affected hands on the ladder at a low level.
- Then slowly start an upward climb on the finger ladder till it reached the top & slowly down back to the starting
- This exercise is performed 10 times in 1 session & 3 sessions per day
- Wand exercise:
- This exercise is helpful to you for increasing ROM exercise.
- The patient is holding the wand with the help of both hands.
- Then perform the shoulder & elbow joint movement.
- Shoulder flexion,abduction,adduction,external & internal rotation & elbow flexion,extension movement perform with the wand.


- Supination pronation board:
- With the help of supination pronation, board Equipment does the supination & pronation movement.
- This Equipment exercise is performed in the clinic.
- In the home with the help of a lock-key do the supination & pronation movement.
- This exercise is performed 10 times in 1 session & 3 sessions per day.
Lower limb active Assisted Exercise:
- CPM – continuous passive motion:
- This equipment is used for knee ROM.
- When the TKR and any knee injury occur this machine helps you increase the ROM.
- This machine is applied for 10 to 15 minutes per day.
Passive exercise :
- After some days when the pain is relieved then the therapist is starting to passive exercise and increase the ROM of the joint movement.
- In the passive exercise, the therapist is applied stretching, hold & relax exercises & mobilization to increase the ROM.
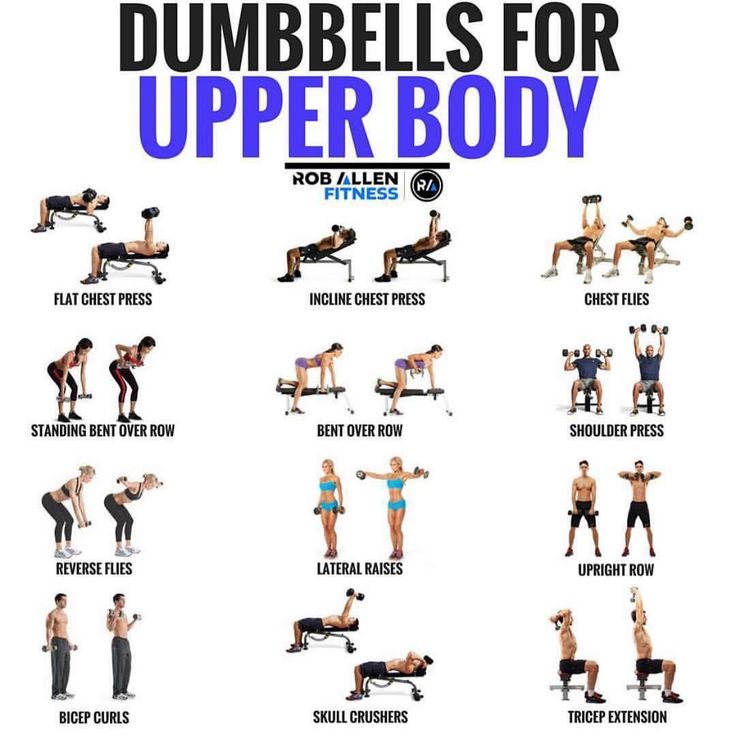
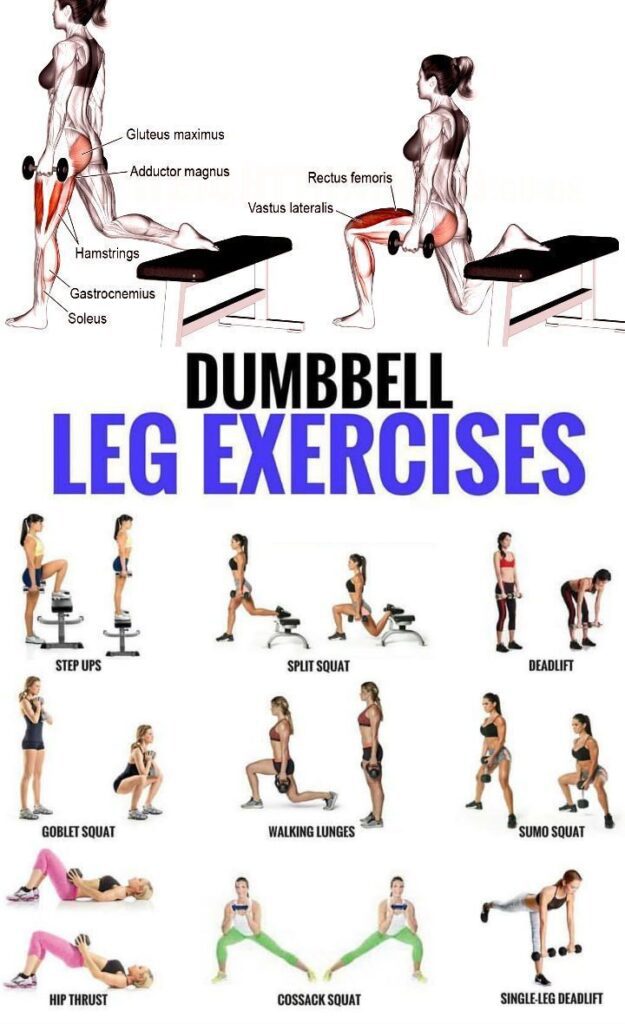
Strengthening exercise:
- When you achieve full ROM then the therapist is advised to strengthen exercise to increase the strength of the muscle.
- This strengthening exercise is doing the help of a dumbbell & weight cuff.
- In starting phase do the low weight exercise then gradually increase the weight in the exercise.