Intersection syndrome of the foot
Table of Contents
Introduction of intersection syndrome of the foot
The case of “intersection syndrome” of the foot with marked fibrosis of an intersection between a flexor hallucis longus as well as the flexor digitorum longus tendons is reported and the flexor digitorum longus tendon, as well as the fibrous interconnection, was extended proximally.
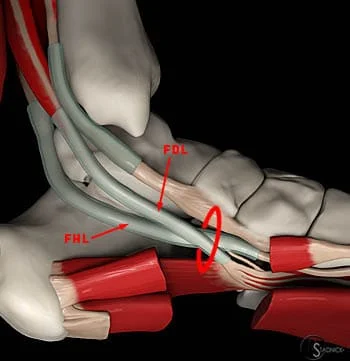
This condition is happen in the foot, the intersection of the flexor hallucis longus and flexor digitorum longus tendons.
Anatomy of the foot
Bones and Joints
- The foot is comprised of 28 bones. Where two bones meet the joint is formed –often supported by strong ligaments. This is helpful to think of the joints of the foot based on their mobility. A few of the joints are quite mobile & are required for the foot to function normally from the biomechanical point of view. These are often referred to as mandatory joints. There are some joints that move a moderate amount, & there are other joints that are held tightly together with strong ligaments of the ankle joint.
- These non-mobile joints are mostly referred to as the non-essential joints. (It can be a poor term in that it incorrectly implies that the joints are not important; they are important. Rather the correct sense is only that motion from these joints is less critical.)
The ankle is the large joint made up of three bones: - The shin bone (tibia), the thinner bone running next to a shin bone (fibula), and the foot bone that sits above the heel bone (talus).
- The tarsal bones are seven in number and are named the calcaneus, talus, cuboid, and navicular, as well as the medial, middle, and lateral cuneiforms.
- The ankle is composed of three joints: the talocrural joint (also known as the talotibial joint, tibiotalar joint, talar mortise, talar joint), and the subtalar joint (also known as the talocalcaneal), as well as the Inferior tibiofibular joint.
Ligaments
- The anterior talofibular ligament (ATFL)
The anterior talofibular ligament is the most commonly affected ligament when the ankle is sprained. The ATFL runs from the anterior aspect of the distal fibula (lateral malleolus) down as well as to the outer front portion of the ankle in order to connect to the neck of the talus. This stabilizes an ankle against inversion, especially when an ankle is plantar-flexed. - The calcaneofibular Ligament (CFL)
The calcaneofibular ligament is also on a lateral side of an ankle joint. This starts at the tip of the fibula & runs along a lateral aspect of an ankle as well as into the calcaneus. It too resists inversion, but more when an ankle is dorsiflexed. - Posterior TaloFibular Ligament
The posterior talofibular ligament runs from the back lower part of the fibula and into the outer back portion of a calcaneus. This ligament functions to stabilize an ankle joint as well as a subtalar joint. - The Deltoid Ligament
A deltoid ligament is the fan-shaped band of connective tissue on a medial side of an ankle. This runs from a medial malleolus down into a talus as well as the calcaneus. The deeper branch of a ligament is securely fastened in a talus, the more superficial, broader aspect runs into the calcaneus. The ligament functions to resist eversion. - Lisfranc Ligaments
A Lisfranc joint complex is a series of ligaments that stabilize the tarsometatarsal joints. These ligaments prevent the joints of the midfoot from moving much, & as such provide considerable stability to an arch of the foot. All the plantar ligaments are stronger as compared to those on the dorsal side. A Lisfranc ligament is the strong band of tissue that connects a medial cuneiform to the base of the second metatarsal. - The Inter-Metatarsal Ligaments
These ligaments run between the metatarsal bones at the base of the toes, which connects the neck region of each metatarsal to the one next to it and bind them together. It keeps the metatarsals moving in sync. While this is possible to tear these ligaments, it is also possible for them to irritate a digital nerve as it crosses the ligaments creating Morton’s neuroma. - The 1st metatarsal joint capsule of the great toe
The connective tissue of this ligament takes the form of the capsule. This goes from a medial portion of the first metatarsal
head as well as stretches to a distal phalanx on the same side. It allows the ligament to stabilize a great toe on a medial side. In the situation where the individual develops the bunion, this band gets stretched out, as well as the great toe changes position and becomes angulated outward.
Joint capsule
An articular capsule surrounds the joints, & is attached, above, to the borders of the articular surfaces of the tibia as well as malleoli, & below, to the talus bone around its upper articular surface. A joint capsule anteriorly is the broad, thin, fibrous layer. Posteriorly, the fibers are thin as well as run mainly transversely, blending with a transverse ligament. Laterally a capsule is thickened as well as attaches to a hollow on the medial surface of the lateral malleolus. A synovial membrane extends superiorly between Tibia as well as the Fibula as far as the Interosseous Tibiofibular Ligament.
Muscles involved in the intersection syndrome of the foot

- Flexer hallucis longus
Origination: (Distal 2/3 of) Posterior surface of fibula bone, interosseous membrane, the posterior intermuscular septum of the lower leg, and fascia of tibialis posterior muscle.
Insertion: Base of distal phalanx of the great toe of the leg.
Innervation: Tibial nerve (S2, S3)
Action: Metatarsophalangeal as well as interphalangeal joint: Toe flexion; Talocrural joint: Foot plantar flexion; and Subtalar joint: Foot inversion
Blood supply: Posterior tibial artery, and fibular artery - Flexors digitorum longus
Origination: Posterior surface of the tibia bone (inferior to soleal line)
Insertion: Bases of distal phalanges of digits second to fifth.
Action: Metatarsophalangeal as well as interphalangeal joints second to fifth: toe flexion, Talocrural joint: foot plantar flexion, and subtalar joint: foot inversion
Innervation: Tibial nerve (L5, S1, S2)
Blood supply: Posterior tibial artery.
Epidemiology
This syndrome happens typically as a result of repetitive finger flexions as well as plantar flexion and inversion exercises or even activities. It is most commonly seen in sporting activities, such as soccer or football. There is no significant difference in injury patterns found in men as well as women.
Pathophysiology
The repetitive plantarflexion, toe flexion as well as inversion result in friction injury at the crossover junction of the flexors hallucis longus and flexors digitorum longus muscles tendons leading to the inflammatory response as well as subsequently the tenosynovitis. There may also be swelling and crepitus that is palpable on the exam with foot plantar flexion, inversion, and toes flexion.
What are the causes of the intersection syndrome of the foot?
An intersection of the foot is caused by the repetitive actions that stress the toe flexors tendons. It is most common in athletes, particularly competitive footballers, and may also affect office workers or anyone who carries out repetitive foot and leg movements. Sometimes, it happens on sudden injury to the muscles or direct injury.
Signs and symptoms
- Described symptoms of intersection syndrome are very predictable. Patients with the complaint almost always have the same symptoms. These symptoms typically develop a day or even two after the repetitive activity, namely sports or even gardening activity. Often the described condition occurs in competitive rowers a day or two after a particularly difficult workout session. Typical signs of intersection syndrome include:
- Pain and tenderness of the foot tendons,
- Inflammation at the tendons,
- Swelling of the tendons,
- The grinding sensation (crepitus) with the movements of the toes and fingers.
- In rare circumstances where the diagnosis is unclear, an injection of the local anesthetic into that particular part can be helpful in making the definitive diagnosis. Individuals who have immediate relief of symptoms following injection directly at an intersection of these tendons will have the diagnosis confirmed.
Diagnosis
- Intersection syndrome of the foot is a clinical diagnosis, although the musculoskeletal ultrasound can easily confirm it. The initial steps for diagnosis include the focused physical exam of the knee, ankle, and foot.
As with all musculoskeletal exams, a clinician must have a structured approach that includes inspection, the range of motion, palpation, muscle testing, and other special tests. Each joint above & below the injury must be tested in all movement. Look for swelling over the distal lower leg as there may be some cases that present with the palpable finding on the exam. Crepitus is the most common finding on the exam over the site of irritation. It is the finding which is specific to the intersection syndrome of the foot. - Plain film imaging, and CT scan, will not be useful in the diagnosis of Intersection syndrome. Magnetic resonance imaging would give an excellent soft-tissue picture and diagnosis, although MRI should not be the cost- or time-effective choice.
Ultrasound technology has pushed musculoskeletal medicine forward in both diagnoses and treatment provided by the doctor. Remember that as in most musculoskeletal conditions, anatomy is mostly superficial. Thus, the linear ultrasound probe is utilized. When observing Intersection syndrome under ultrasound, the ideal image is in a transverse plane on the short axis. A finding that would correlate to the diagnosis would be a hypoechoic part in between the two dorsal compartments as they are on top of each other. This represents swelling/edema as caused by friction. There may be a thickening of the tendon sheaths. - Ultrasound can show peritendinous edema and fluid within the tendon sheaths at an intersection point between the tendons of the flexors hallucis longus and flexors digitorum longus.
- Magnetic resonance imaging typically shows features of peritendinous edema (peritendinitis) around the flexors hallucis longus and flexors digitorum longus compartment tendons, just medial to calcaneum bone.
Treatment of intersection syndrome of the foot
Medical treatment for the intersection syndrome of the foot
- Corticosteroid injection has shown significant improvement and is a known next best step if little or no improvement has been made with other conservative treatments.
- Anti-inflammatory medications are helpful for acute injury and pain relief.
- Common medications are ibuprofen, naproxen, meloxicam or diclofenac. Acetaminophen can be utilized for pain relief.
Physiotherapy treatment of intersection syndrome of the foot
Electrotherapy
To reduce the swellings, spam as well as the pain the therapist is advised the patient to electrotherapy treatment. In electrotherapy, the therapist used various types of machines.
- When the trigger, as well as tender points, are present therapists are advised to apply
- US = Ultrasound therapy for the reduction of muscle pain. This treatment is applied with the assistance of gel and applies for 5 to 10 minutes on the area of pain. It helps the patient to release pain and swelling.
- SWD = short wave diathermy, IFT = Interferential Therapy
- TENS = Transcutaneous Electrical Nerve Stimulation, these types of modalities are used for reduction of the pain on the affected foot.
- SWD = Short wave diathermy is hot therapy and used to release the spasms in the area of pain.
- IFT = Interferential Therapy, as well as TENS = Transcutaneous Electrical Nerve Stimulation, is applied with the assistance of gel and electrodes on the foot area of pain. This therapy is applied for 10 minutes to the affected foot
Massage Techniques
- Massage therapy is an age-old type of treatment that uses both stretching and pressure in a rhythmic flow. Massage therapy helps reduce tension in specific muscles that have built up because of injury or even stress. Massage therapy helps an individual to get blood flowing which speeds up the recovery process at any level.
- Some benefits of massage:-
- Reducing stress as well as improving relaxation.
- Decreasing pain, muscle soreness, and tension as well.
- Improving circulation, energy, as well as alertness.
- Lowering heart rate and blood pressure.
- Increasing the immune function of the body.
- Effleurage (Stroking) massage
The hands are passed rhythmically as well as continuously over the patient’s affected part, in one direction and straight only, with the aim of increasing blood flow in that direction, stretching tissues, relaxing the patient, and helping the dispersal of waste products. This described technique involves the stroking motions of the hands sliding over the skin of the ankle joint, and foot as well as is always the first and last fingers of the foot. Effleurage may be used with varying tempo and pressure according to the stage of the situation as well as whatever the desired effect of the massage is. - Petrissage (Kneading) technique
The affected skin is lifted up, pressed down and squeezed, pinched, and rolled. Alternate squeezing and relaxation of the
tissues stimulate local circulation and can have a pain-relief effect with some muscular disorders. A basic motion is to
compress, pick up, and release the soft tissues. This is generally used when a deeper effect than effleurage is wanted, more interestingly it is techniques include: - Squeezing
First of all, the physical therapist should tell the patient to take a relaxed position, supine or sitting. Next, the therapist applies the squeezing technique, as well as a circular hand stroke, is used for the full ankle and foot the technique uses a circular motion. The physiotherapist will bring a tissue between the patient’s two hands lifting it up as well as away from the body. - Picking up
To begin with, a clinician gives the command to the patient that takes a relaxed position, then pick-up technique applying equal pressure on the sides of the tissue of the foot as well as lifting it away from the body. The hands of the therapist are parallel to the limb being treated to avoid hyperextension of an outer wrist. - Shaking
The vibration or shaking massage technique is the fine, gentle, trembling motion performed with hands or fingers. Shaking can be used to stimulate soft tissues in the body. Vibration motions may help to stimulate nerves, relieving muscular tension and decreasing stress. This technique is performed by hands, the physical therapist should put one hand on another hand and place it on the affected side during stroking to give vibrations. - Rolling
A skin rolling technique is performed using a thumb and fingers to pull the skin away from the tissue. This is then rolled forwards in constant movement to help separate it from being stuck in muscle. Skin rolling can be used around areas of scar tissues to help in breaking them down. - Wringing
The wringing technique consists of lifting as well as squeezing the muscle forwards and backward motion. Wringing is used to treat tight muscles, for relaxation, & as part of a post-event massage. The benefits of wringing are relief of tight muscles, reduced DOMS, and increased recovery.
- Myofascial Release
The myofascial release technique is manual for stretching the fascia aiming to decrease fascia restrictions. Fascia is situated between the skin and the underlying structure of muscle as well as bone and connects the muscles, organs, and other skeletal structures in the body as well. Fascia can become restricted through injuries, stress, trauma, or even poor posture. Three strokes have been provided to the tight muscle. The clinician should place one hand on the other and apply stroking on the affected part to release tightness and for relaxation of the injured tissue of the body. - Trigger Point Therapy
Trigger point therapy involves the application of pressure to tender muscle tissue in order to reduce pain as well as dysfunction in other parts of the body. Trigger points are active centres of muscular hyperactivity, that often cross over with acupuncture points in a body. - Deep Transverse Frictions
These are transverse connective tissue therapy applied directly by the therapist’s fingers. Oscillating pressure is provided across the direction of the tissue fibres. Mainly used on the tendon or even ligament injuries to assist break down thickened, pain-producing scar tissue. - Compression Massage
In this useful technique, rhythmic compression into muscles is used to originate deep hyperaemia as well as softening effects in the tissues. This technique is often used for sports massage as a warm-up for deeper, more specific massage work. - Cross-Fibre Massage
Cross-fibre friction massage techniques are applied in a general manner to originate the stretching as well as broadening effect in large muscle groups of the foot or on site-specific muscle as well as connective tissue, deep transverse friction is applied to decrease adhesions and to assist in creating strong, flexible repair while the healing process.
- Planterfascia Massage
Target the muscles in the foot and ankle to reduce sore foot. Open the affected hand. Place the thumb of the injured foot into the base of the affected foot and wrap the fingers around the back of the affected foot. Gently move the thumb in circles as the patient feel that release tension in the large thumb pad. - Tennis Ball Roll
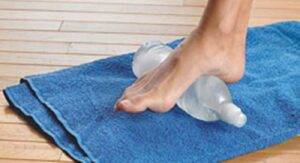
Hold onto a tennis ball between both feet in a sitting position. Vigorously roll the ball between the feet to decrease muscle tension and ankle pain. If the patient cannot find a ball, use the smooth rock, or the frozen water bottle or the patient can place a frozen water bottle on the floor and with the use of the affected foot roll it on the floor.
Exercise
Stretching exercise
Stretching exercises can improve the performance in the physical activities, decrease the risk of injuries, help the joints to move through its full range of motion, increase muscle blood flow, enable the muscles to work most effectively, and improve the ability to do daily activities.
- Big toe stretch
Keeping a wide range of motion in a big toe is mandatory. The big toe stretch exercise also has three steps and this is designed to stretch as well as relieve pain in the toes from wearing tight shoes. To do this exercise: the therapist tells the patient to sit up straight in the chair, with the feet flat on the ground. Bring a left (affected) foot to rest on a right thigh. Using the fingers, gently do stretching of the big toe up, down, and to the side. Keep the big toe in each position for thirty seconds. Repeat it three times in a session before switching to the other foot. Do three sessions per day.
- Toe splay
To begin with, doing a toe splay exercise may improve control over the toe muscles. A patient can do it on both feet at once or on alternate feet, it totally depends on which a patient finds more comfortable. To do this exercise: a physical therapist should give a command to a patient to sit in the straight-backed chair, with the feet gently resting on the floor. Spread the toes apart as far as possible without straining. Hold the position for 30 seconds. Repeat this movement three times in a session. Do three sessions in a day. Once the person has built up their strength, he/she may try looping the rubber band around the toes. This will provide resistance as well as make the exercise more challenging in the later stage. - Golf ball roll
Rolling a golf ball under the foot can help the patient to relieve discomfort in the arch as well as ease pain associated with plantar fasciitis. To do this exercise: Ask the patient to take the sitting up straight in a chair position, with the feet flat on the ground. After that, place a golf ball or even another small, or hard ball on the ground next to the feet. Lay one foot on a ball as well as move it around, pressing down as hard as is comfortable. The ball should be massaging the bottom of the affected foot. Continue for thirty seconds, a frozen bottle of water can be the soothing alternative if there are no suitable balls available. Do it three times per session. Do three sessions per day. - Achilles tendon and plantar fascia stretch
To embark with, a physical therapist tells the patient to take the loop of a towel around a ball of the foot and pull it back towards the body, while the knees must be straight. Hold the position for thirty seconds per repetition. Do three repetitions in one session. Do three sessions per day.
- Sitting plantar fascia stretching exercise
To start with, tell the patient to cross the foot over the contralateral knee, and the base of the toes put on the floor, and gradually pull back till the patient feels the stretch along with the underside of the foot. Hold the position for 30 seconds per repetition. Repeat three times in a session. Do three sessions per day. - Standing calf stretch
The patient should stand facing a wall and put both hands on the wall that is in front of the patient. Place one foot anterior to an opposite foot with the anterior foot about 30cm away from the wall, and keep the back knee straight with the back heel flat on a floor. After that, slowly bend the front knee until the patient can feel a stretch in a calf of the back or even lower leg, after holding for thirty seconds return to the starting position. Repeat three times in one session. Do three sessions per day. - Deep calf stretch
A patient may stand on a step with a heel hanging off the edge. A patient may allow holding onto something for support, next allow the patient heels to drop towards the floor as well as feel a stretch in the calf muscles and Achilles tendon. Hold it for thirty seconds. Repeat the described exercise three times per session. Do three sessions in a day. - Eversors stretching
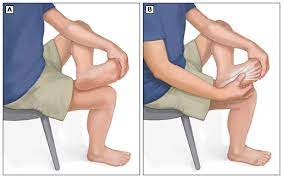
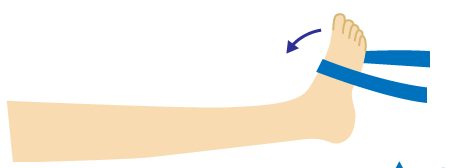
First of all, tell the patient to sit with the towel or the band around the affected foot. Firmly hold each end of the towel with a patient’s hands. Then, gradually turn the ankle inward, like the patient is facing the sole of the foot to the opposite. After that, pull up with the unaffected hand side of the towel to deepen the stretch. Repeat on the other side of the patient has an issue. Hold for thirty seconds per repetition. Do three repetitions per session. Do three sessions per day. - Inversors stretching
First of all, the therapist may ask the patient to sit with a towel or band around the injured foot. Firmly hold each end of the towel with the patient’s hands. This time, slowly turn the ankle outward, such as the patient facing the sole of the foot to the affected foot. Pull up with a left-hand side of a towel to deepen a stretch. Try to hold these stretches for 30 seconds and repeat them three times in a session. Do three sessions per day. - Cross leg ankle stretch
To start with, a physical therapist should tell a patient to sit comfortably with the affected leg crossed over the unaffected knee. After that, hold the right foot with the hands, and use a right hand to bend the left toes, as well as the ankle downward, such as the patient, is pointing the toes. The patient should feel a stretch on the front of the ankle and the foot. Hold it for 30 seconds. Repeat three times per session. Do three sessions in a day. - Chair Pose
To start with, stand tall in a tadasana position. Inhale as a patient raise both of the affected and nonaffected arms overhead, palms inward. As the patient exhales, bend both of the knees slightly, working toward getting the thighs parallel with the floor. The torso should make a right angle with the tops of the thighs. Try holding this position for thirty seconds. To come out of it, inhale and straighten the knees. Do three repetitions per session. Do three sessions in a day.
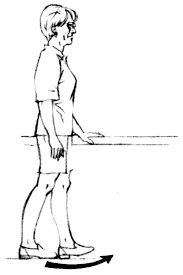
Active-assisted ankle range of motion exercise
When the patient cannot perform the full range of motion exercises of the ankle due to pain, swelling or even inflammation then the therapist may help the patient to complete the entire range of the ankle joint and foot also.
- Active-assisted dorsiflexion
To start with, the physical therapist may tell a patient to take a comfortable position, such as lying on a bed with the knee straight as well as the foot should out of a bed. Next, a physical therapist cups a heel with one strong hand and places another hand on the bottom of the foot. After that, a therapist gives an instruction to a patient that moves the foot upward as far as the patient can, & when a patient is not able to move the foot while performing the motion, a therapist helps a patient to reach the entire range of the dorsiflexion. Hence, the toes move towards the face. Perform it ten times per session. Do three sessions per day.
- Active-assisted plantarflexion
To start with, ask a patient to take a comfortable position, like lying on a bed with the knee straight & the foot should out of a bed. After that, a physical therapist cups a heel with one strong hand and places another hand on the bottom of the foot. Next, a clinician gives a command to the patient that moves the foot down as far as a patient can, and when the patient is not able to move the foot between the motion, the therapist aids the patient to reach the entire range of the motion. Be careful about a thing which is, the toes should be away from the face. Do it ten times in a session. Do three sessions in a day.

- Active-assisted inversion
First of all, the physical therapist should tell the patient to take a comfortable position, such as lying on a bed with the knee straight and the foot should be out of the bed. After that, a physical therapist cups an inner border with one strong hand as well as places another hand on the bottom of the foot. Then, a clinician gives a command to the patient that moves the foot inward as far as the patient can, and when the patient is not able to move the foot inward in between the movement, a therapist helps the patient to reach the entire range of the motion. Perform it ten times in a session. Do three sessions in a day.
- Active-assisted eversion
To begin with, the therapist tells a patient to take a comfortable position, namely lying on a bed with the knee straight as well as the foot should be out of a bed. After that, a physical therapist cups the inner border with one strong hand as well as places another hand on the bottom of the foot. Next, a clinician gives a command to a patient that moves the foot outward as far as a patient can, as well as when the patient is not able to move the foot outward in between the movement, a physiotherapist helps a patient to reach the entire range of the motion. Do it ten times in a session. Do three sessions per day. - Active assisted toe flexion
To start with, the therapist should tell the patient to take a relaxed position, such as lying on a bed with the knee straight and the foot should out of the bed. Then, a clinician cups the toes with one strong hand and places another hand on the bottom of the foot. Next, a clinician gives a command to a patient to move the toes toward the ground as far as the patient can, and when a patient is not able to bend the toes in between the motion, a therapist helps a patient to reach the entire range of the toe motion. Do it ten times per session. Do three sessions per day. - Active-assisted toe extension
To begin with, ask a patient to take a comfortable position, namely lying on a bed with the knee straight and the foot should out of the bed. Next, the clinician places one hand on the backside of the toes as well as places another hand on the bottom of the foot. After that, a clinician gives a command to the patient to move the toes upward meaning toward the face side as far as a patient can, and when a patient is not able to extend the toes in between the motion, a physical therapist assists a patient to reach the entire range of the toe extension action. Do it ten times per session. Perform three sessions in a day.
Active ankle range of motion exercises
- Active ankle circles
This exercise can help with a range of motion. The patient may do ankle circles from either the sitting or even lying position:
To begin by turning an ankle around slowly in circles to the left, next to the right side. The patient may find this exercise easier to try drawing the alphabet in the air with an affected foot. Lead it with a big toe. Keep the movement small initially and focus on only using the foot and the ankle, not the entire leg. For circles, try doing ten in every direction with an affected foot. If the patient is doing the alphabet, complete three sessions of it on the injured foot per day. Do ten repetitions per session.
- Active toe extension
To do this exercise: The physical therapist tells a patient to take the sit-up straight in the chair, with the feet flat on the ground. Place an affected foot on the normal thigh. Next, pull the toes upward toward the ankle. There should be a stretching feeling along the bottom of the foot and the heel cord. Massaging the arch of the foot during stretching will assist ease tension as well as pain. Repeat this action ten times per session. Do three sessions in a day. - Active toe flexion
To start with, the physical therapist tells the patient to take a sit-up straight on a chair, with the feet flat on the ground. Then, place the affected foot on the unaffected thigh. After that, move the toes down toward the ground. Do ten repetitions per session. Do three sessions per day. - Active dorsiflexion
First of all, the clinician asks a patient to take a comfortable position, namely lying on a bed. Next, a physical therapist should give a command to a patient to bend the foot toward the face side meaning upward as far as a patient can. Perform ten repetitions per session. Do three sessions per day.

- Active plantarflexion
To start with, the therapist should tell a patient to take a comfortable position, namely supine on the bed. Then, a physical therapist should give a command to a patient to move the foot away from a body meaning downward as long as a patient can but at the endpoint, a hold should not be taken. Do it ten times per session. Do three sessions in one day. - Active ankle inversion
Firstly, the physical therapist tells a patient to take a comfortable position, namely lying on a bed. Then, a therapist should give a command to the patient to move the foot inside as far as the patient can. Repeat this action ten times per session. Do three sessions per day. - Active ankle eversion
To begin with, a clinician should tell the patient to take a comfortable position, namely lying on the bed. After that, a physical therapist should give the command to a patient to move the foot outside as far as the patient can. Do ten repetitions per session. Do three sessions per day. - Heel raises
To perform heel raises, start with the feet flat on the floor. Then, point the toes as well as lift the heels off the ground. Repeat ten times per session. Do three sessions per day. - Toe raise
First of all, the physical therapist should take a sitting position on the chair, with the back supported. After that, the clinician gives the command to the patient that raises the toes meaning the toes should be off from the ground. Do ten repetitions per session. Do three sessions per day.
Strengthening exercises
- Single leg stands
First of all, standing on one foot is another best way to exercise ankle eversion and a challenge to ankle stability in general.
To begin with, the patient with the intersection syndrome of the foot has enough strength and balance and can try to stand on their affected leg for ten seconds at a time. Be sure to hold onto the back of the chair for stability so that a patient does not fall. Do it ten times per session. Perform three sessions per day.

- Toe-to-heel rocks
Stand in front of the table, chair, wall, or another stable object a patient can hold onto for support. Rock a weight forward and rise up onto the toes. Hold the described position for ten seconds. After that, rock a weight backward onto the heels as well as lift the toes off the floor. Hold it for ten seconds. Repeat the sequence ten times per session. Do three sessions per day. - Marble Pickup
To start with, the therapist should tell a patient to sit on a chair with both feet flat on the floor. Place 10 to 20 marbles and the bowl on the ground in front of the patient. Using the toes of an affected foot, pick up each marble as well as place it in the bowl. Repeat this exercise until a patient has picked up all the marbles. Do it three times per session. Do two sessions per day.
- Ball lift
To start with, the patient may sit on the chair with both feet flat on the ground. After that, place a small round object on the ground in front of the patient (about the size of a tennis ball). Hold an object between the feet as well as then slowly lift it by extending the legs. Hold for ten seconds after that slowly lower. Repeat ten times per session. Do three sessions in a day. - Toe splay
Doing a toe splay exercise can increase control over the toe muscles. Individuals can do it on both feet at once or on alternate feet, mainly depending on which the patient finds more comfortable.
To do this exercise:
To begin with, sit in a straight-backed chair, with the feet gently resting on the floor. After that, spread the toes apart as long as
possible without straining. Hold the position for ten seconds. Repeat the motion ten times per session. Do three sessions per day. Once the patient has built up their strength, he/she can try looping the rubber band around the toes. It will provide resistance and make the exercise more challenging. - Toe curls
Doing toe curls builds up the flexor muscles of the toes as well as the feet, and increases overall strength.
To do this exercise:
To embark with, sit up straight in the chair, with the feet flat on the ground. After that, lay the small towel on the ground in front of a body, with the short side facing the feet. Next, place the toes of one foot on a short side of the towel, and try to grasp the towel between the toes & pull it toward oneself. Repeat it ten times per session. Do three sessions per day. To make the exercise more challenging, try weighing down the opposite end of the towel with the object.
- Sand walking
Walking barefoot on sand is the best way to stretch as well as strengthen the feet & calves. This is the best exercise in general due to a sand’s soft texture making walking more physically demanding.
To do this exercise:
To begin with, head to a beach, a desert, a volleyball court, or any other location with the sand. Remove the shoes as well as socks. Walk as far as possible. Try increasing the distance slowly over time to avoid overexerting the muscles in the feet and calves as well. - Seated ball lift exercise
To start with, a physical therapist tells the patient to sit on the chair with their feet flat on the ground. Then, place a small ball (e.g., the tennis ball) on the ground in front of the patient. After that, grab a ball using both the feet and slowly extend the legs to lift it. Hold it for ten seconds, lower back to a floor. Repeat it ten times per session. Do three sessions per day. - Toe-to-heel rocks exercise
First of all, rock weight forward to rise onto the toes as well as hold the position for ten seconds. Next, rock the weight backward as well as lift the toes off the floor as well as hold for ten seconds. Repeat ten times per session. Do three sessions per day. For more difficulty, the patient can do the described standing on one leg. The patient may want to do it near the wall or even with a chair or counter in front of a clinician so the therapist can hold on for added support. - Towel pickup exercise
To embark with, place a towel on the ground in front of the chair. After that, tell the patient that with the heel on the floor, try to pick up the towel by grabbing it with the toes. Repeat described exercise ten times per session. Do three sessions per day. This exercise can be increased by adding a small weight to the towel. When the patient is able to pick up a towel ten times, increase the number of repetitions by 10-15-20.
- Step-ups exercise
To begin with, the affected foot on the bottom stair as well as the good foot on the ground. Straighten a knee so he/she can lift herself up on the affected leg, then put it down. Repeat the described exercise ten times in a session. Minimally three sessions in a day. When a patient becomes comfortable with low repetition, then increase the number of repetitions. - Heel raises
To start with, the physical therapist tells the patient to sit on a chair with their feet flat on the ground. Even though raising the heels up slowly, keep the toes on the floor. Lower the heels back down. Repeat the described exercise ten times in a session, minimally three times in one day. As muscles start to gain strength, do the exercise in a standing position also. - Dorsiflexors strengthen with the theraband
First of all, the clinician may tell a patient to sit on the chair as well as tie the theraband around a stable surface that would not move, like a heavy table. Extend a lower leg as well as wrap the other end of the band around the top of the foot. Do flexion of the foot meaning taking the foot towards the face side, with the band resisting the movement? Hold it for ten seconds. Repeat ten times per session. Do three sessions per day for strengthening. After 5 to 6 days increase weight from 500 gm to 1 kg as well as also increase repetitions.
- Planterflexors strengthening with a theraband
To embark with, the therapist tells a patient to sit on the chair, and take one side of a theraband in each hand, as well as wrap it around the ball of the affected foot. Next, stretch the leg out in front of the p[atient’s face side. After that, extend the foot away from a face. Hold it for the next ten seconds. Repeat ten times in a session. Do three sessions per day. - Inversors strengthen with the use of a theraband
To begin with, the therapist ties the theraband around the leg of the chair or even with a table on the same side of an affected foot. After that, wrap the other end of the theraband around the inside of the affected foot, and try to turn the foot inside. Hold it for the next ten seconds. Do the described exercise ten times in a session. Do three sessions per day. When the patient is adapted to the 500gm weight, increase the weight to 1 kg & increase the repetitions.

- eversors strengthen with the use of the theraband
First of all, tie the theraband on a leg of the chair opposite to the affected foot. After that, wrap another end around the outside of the affected foot. Then, the clinician should give the command to the patient that tries to turn the foot outside, as well as hold for ten seconds, repeat it ten times in a session. Do three sessions per day. When the patient is adapted to the 500gm weight, increase the weight to 1kg and increase the repetitions.
Once symptoms have decreased, athletes may gradually return to them to ensure an issue is completely resolved. Even if there is no pain while performing an activity, too early the return can cause inflammation that is not apparent for several days. Therefore, those early workouts when the athlete is returning from management are critically important. Having an athletic trainer or a well-versed coach supervise this return to sport may help to prevent the recurrence of the symptoms.
In some persistent situations, more aggressive treatment may be considered. Sometimes, the cortisone injection is used to assist with management. In some situations, surgery to clean up the inflammation may be considered, but most patients will recover with 1-2 weeks of simple treatment. In very rare circumstances, surgical debridement (clean-up) of the tendons can be performed. While surgery, an abnormally tight tissue, called fascia, would be released from around the tendons to prevent the issue from coming back. The good news is that almost all patients may recover without having to undergo a surgical procedure for this problem.
Home care for the intersection syndrome of the foot
Rest: Most people get to benefit from the use of the foot brace to fully rest the tendons for at least five to seven days. The optimal position of a splinted ankle joint has been shown to be at about 5 degrees of dorsiflexion. Some activities that cause an aggravation of the symptoms can be avoided. Often changing techniques may help to reduce the stress on the involved tendons.
Ice: Ice may help to relieve the symptoms of inflammation. An application of ice can actually be of significant benefit given the superficial location of inflammation in people with intersection syndrome. Compared to other conditions that are deeper within the body as well as icing is of questionable benefit, it is the scenario where ice must have significant effects.