Gluteus minimus muscle: Anatomy, Origin, Insertion, Function, Exercises
Table of Contents
Introduction
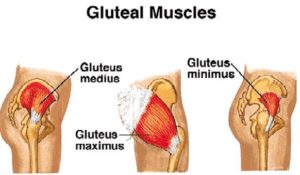
- The gluteus minimus muscle is the small triangular muscle located deep in the posterior region of the hip, spanning from the gluteal surface of the ilium to the proximal end of the femur. It belongs to the group of gluteal muscles, along with the gluteus maximus, gluteus medius & tensor fascia lata.
- The Gluteus minimus acts in synergy with the gluteus medius to produce the motion of the hip joint; the internal rotation & abduction of the thigh. Moreover, this muscle is an important stabilizer of the pelvis in the gait cycle.
Origin of Gluteus minimus muscle
- The outer surface of the ilium is between the middle and inferior gluteal lines.
Insertion
- The anterior surface of the greater trochanter of the femur.
Function of Gluteus minimus muscle
- The gluteus medius & gluteus minimus abduct the thigh, when the limb is extended, & are principally called into action in supporting the body on one limb, in conjunction with the tensor fascia lata.
- Their anterior fibers also flex the hip, and by drawing the greater trochanter forward, rotate the thigh inward, in which action the Tensor fascia lata also assists them.
- Additionally, with the hip flexed, the gluteus medius & minimus internally rotate the thigh. With the hip extended, the gluteus medius & gluteus minimus externally rotate the thigh.(contradictory)
- The attachment to the superior capsule of the hip may also serve to retract the capsule away from the joint during movement.
- This mechanism may prevent the capsular impingement similar to the role of the articularis genus in the knee.
Nerve supply
- Superior gluteal nerve (L4, 5, S1) .
Variations
- The muscle may be divided into an anterior & a posterior portion, or it may send slips to the piriformis, the superior gemellus, or the outer part of the origin of the vastus lateralis.
Blood supply
- The blood supply to the gluteus minimus muscle comes from the deep branch of the superior gluteal artery. The distal part of the muscle & its tendon also receives the contribution from the trochanteric anastomosis; an arterial network formed by the ascending branch of the medial circumflex femoral artery & descending branches of the superior & inferior gluteal arteries.
Relations
- The gluteus minimus is the smallest & the deepest of all 3 gluteal muscles. Its deep surface is entirely related to the ilium, while superficially it is covered by the gluteus medius muscle. The branches of the superior gluteal artery & nerve course between these 2 muscles.
- The anterior margin of muscle is related to tensor fascia lata, while the posterior one is related to the piriformis muscle. At the insertion level, the gluteus minimus’s tendon lies superficial to the reflected tendon of the rectus femoris & the capsule of the hip joint.
Assessment
- Weakness in the gluteus minimus outcome in Trendelenburg gait, where the pelvic drops on the unsupported side.
- Trendelenburg sign is used to examine the strength of the hip abductors (gluteus medius & gluteus minimus). It is done by the asking patient to do single-limb support on the tested leg while observing the patient from behind to observe the pelvic alignment. If the pelvic drops or deviates from the midline it is indicative of hip abductor weakness.
- The lateral step-down test is used to assess the quality of movement around the lower kinetic chain.
- Gluteus minimus tendinopathy frequently results in Greater Trochanteric Pain Syndrome.
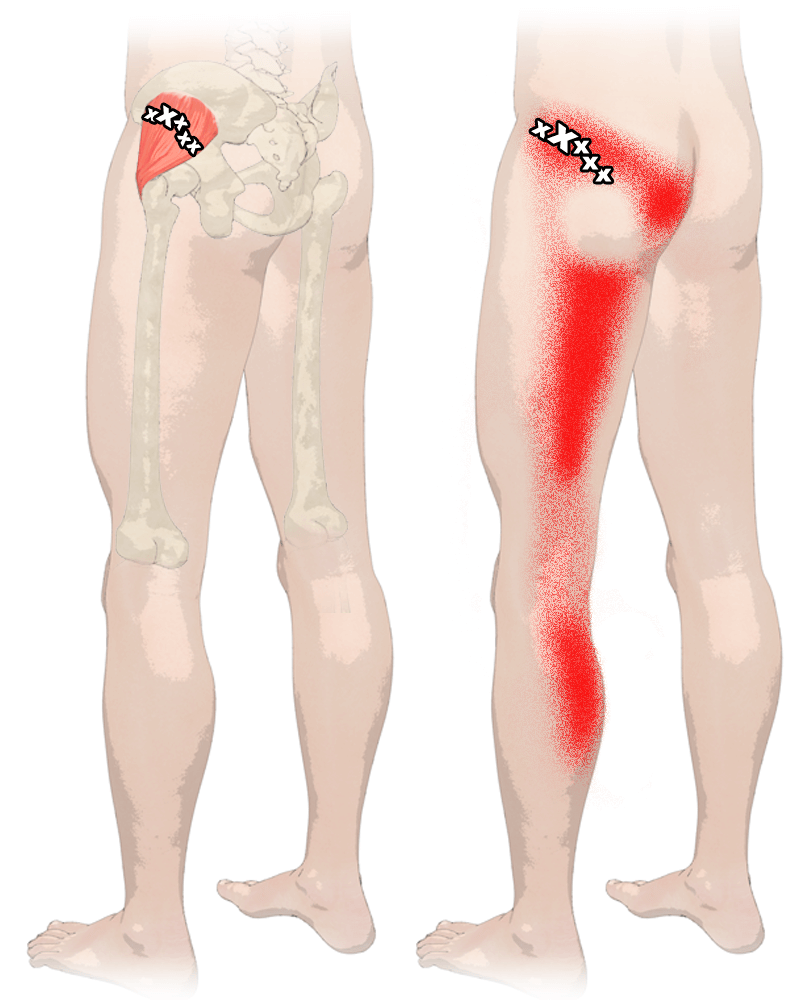
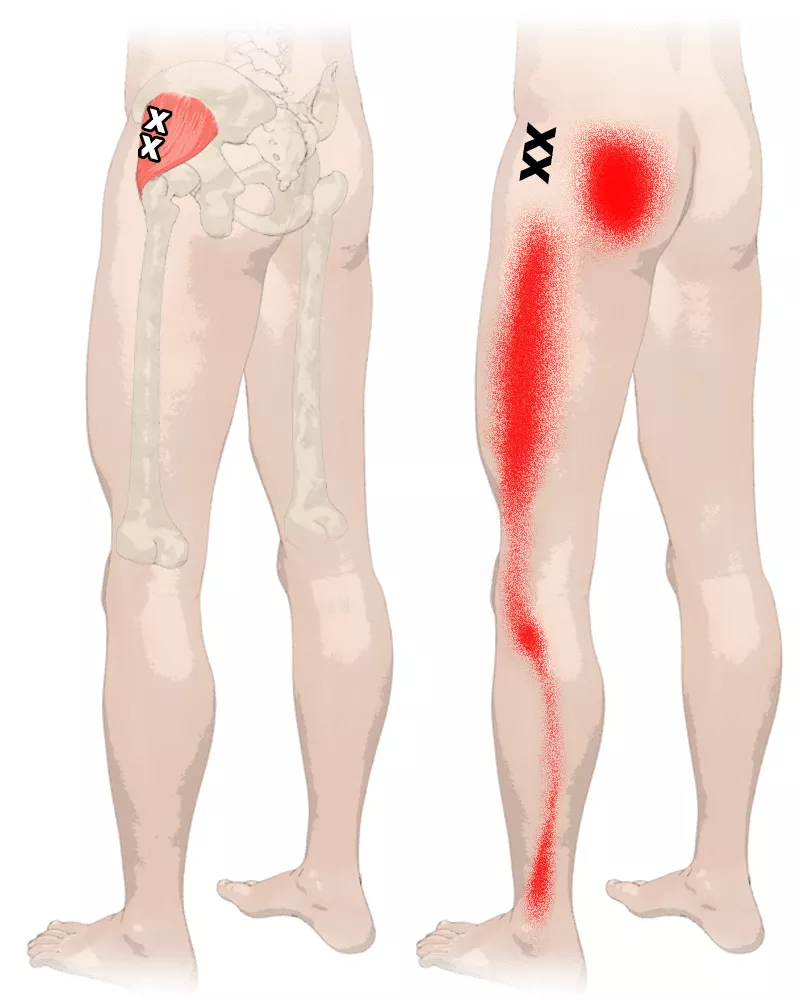
Gluteus minimus trigger points: Glutseu Minimus is a multipennate muscle with multiple anterior, middle, & posterior trigger points referring to strong pain in the lumbar spine & at the ankle, following a similar pain pathway of the sciatic nerve but without the neurological symptoms of the sciatic nerve such as weakness & numbness.
Clinical anatomy
- One of the most common complaints with the gluteus minimus muscle is worn & tear on the muscle, which can cause pain. This is often called greater trochanteric pain syndrome (GTPS) because it results in pain (especially when lying on the side) in the greater trochanter site of the thigh—which includes the gluteus medius & gluteus minimus as well as the piriformis muscle & another hip muscle known as the obturator internus.
- For a gluteus minimus tear, the pain will happen on the outside of the hip, especially when rolling onto the affected side. Activities like walking & exercising may also be painful. A gluteus minimus tear can occur suddenly—there may not be any particular activity that caused the tear to occur aside from daily use & stress on the muscle.
- Gluteus minimus tendinopathy results in a Greater Trochanteric Pain Syndrome (GTPS). Which is characterized by lateral hip pain, tenderness at the greater trochanter & Trendelenburg gait, it might be differentiated from trochanteric bursitis which is very rare.
- An anteroposterior radiograph of the pelvis is done to rule out hip osteoarthritis. Gluteus minimus trigger points referred pain that starts at the end of the lumbar spine & ends at the ankle, following a similar pain pathway of the sciatic nerve but without the neurological symptoms of the sciatic nerve such as weakness & numbness.
- A supplemental injury of the superior gluteal whim-whams may lead to loss of motor function. The classical sign is the pelvis dropping to the healthy side when standing on one leg( Trendelenburg’s sign). In order to maintain the balance, the cases compensatorily bend their upper body to the side of the station leg. likewise, they walk with conspicuous sideward movements( Duchenne gait, also “ lurching gait ”).
Physiotherapy Relevance of Gluteus minimus muscle
Weak gluteal muscles have been associated with a variety of lower limb issues. It may be lead to other muscles or tissues becoming overloaded through a cascade of events
- Patellofemoral pain syndrome
- Gluteal Tendinopathy
- Iliotibial Band Syndrome
- Trochanteric Bursitis
- Greater Trochanteric Pain Syndrome
- Differentiating Buttock Pain – Gluteal Tendinopathy
- Exercise to strengthen the muscles of the gluteus plus exercises to improve core strength results in a greater decrease in low back pain & disability than core strengthening alone.
- Patients with impaired hip abduction may present with an abnormal gait. Impaired hip abduction is commonly due to damage to the superior gluteal nerve. This may occur secondary to pelvic fractures, or space-occupying lesions & as a complication of hip surgery.
Gluteus Minimus muscle exercise:
The gluteus medius is composed of 2 segments (anterior & posterior) with 2 different roles, the anterior segment reduces the stresses on the hip anterosuperior structures & the posterior segment stabilizes the head of the femur. Atrophy in the anterior segment is associated with an increased risk of falls, aging, & total hip replacement.
- Exercises that strengthen the anterior part: resisted hip abduction-extension exercise.
- Exercises that strengthen the Posterior part: single leg bridge, side lie abduction, the resisted hip abduction-extension exercise, and single-leg squat.
- Exercises that build low activity in both segments: side lie clam.
- Low activity was produced in the anterior segment of the single-leg bridge.
- After the initial resting & use of ice, it is important to rehabilitate the damaged muscle. Physiotherapy is vital to achieving this. If the muscle damage is very severe may be required for crutches to be used for a short period of time to reduce strain on the muscle and accelerate the healing process.
- Early rehabilitation of the muscle will involve the performing motion that involves the muscle, before moving on to some resisted movements. Later rehabilitation will involve starting activities that use the muscle such as jogging & climbing stairs, prior to progressing to running & jumping.
The specific treatment that can be used alongside the rehabilitation may include:
- Electrotherapy eg. IFT, TENS, Ultrasound Therapy
- Massage
- Stretching exercises
- Mobilisation exercises
- Education on activity & technique
Stretching for Gluteus muscle
- Gluteus stretch
- Lying Deep Gluteus Stretch
- Groin and long adductor muscle stretch
- Seated figure-four stretch
- Seated glute stretch
- Supine Hip Twist Stretch
- Wall Glute Stretch
- Supine Leg Extension Stretch
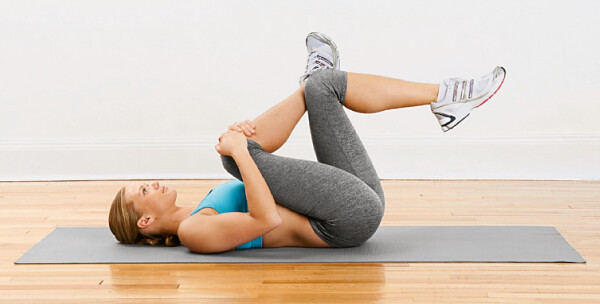
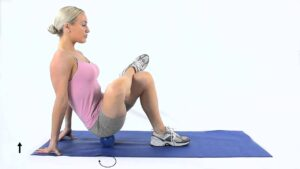
- Gluteus stretch:

- The starting position for the exercise is the supine position.
- The patient is Lying down on the back after that lift to the knee joint & cross to the right ankle joint over to the left knee joint.
- Then Grip the left thigh gently.
- Pull the hip joint in towards the chest.
- Hold this stretching position for 30 seconds.
- Then repeat this stretching one the other leg.
- Do this stretching 3 times in 1 session.
- Then do the 3 sessions per day.
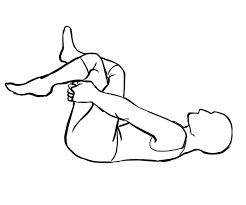
2. Lying Deep Gluteus Stretch:
- The starting position for the exercise is the supine position.
- the patient is lying on the back with the legs being too bent.
- then Raise to the right ankle joint & rest the right ankle on the left knee joint.
- then Using both hands lace with the fingers behind the left thigh & gently pull it toward the patient,
- and keep the head & back onto the floor.
- Hold this stretching position for 20 to 30 seconds.
- then Repeat this exercise with the other leg.
- do this stretching 3 times in 1 session.
- then do the 3 sessions per day.
- Groin and long adductor muscle stretch

- The starting position for the exercise is the sitting position.
- The patient is Sitting down on the floor with the legs spread out too far as the patient so that are straight in front of the body.
- Place the hands onto the floor in front of the body onto the floor & angle the torso toward the floor.
- Lean-to the forward, leaving the elbows on the floor.
- Hold to the position for 30 seconds.
- Stop this stretch if they feel any pain.
- Do this stretching 3 times in 1 session.
- Then do the 3 sessions per day.
- Seated figure-four stretch:
- This is also known as the Seated Pigeon Pose.
- The starting position of the exercise is the sitting position.
- The patient is sitting upright in a sturdy chair.
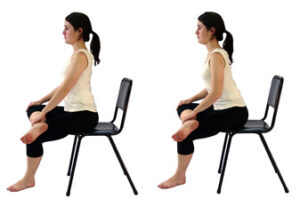
- Place the right ankle on the left thigh, just above the knee joint.
- Then Place the hands on the shins.
- After that Keep the spine straight & then lean slightly forward to deepen the stretch.
- Hold for the stretching position for 30 seconds & do the 3 times in 1 session.
- Then return to the starting position of the stretching.
- After that Repeat with the other leg.
- This stretching is also done in sitting on the floor & standing position.
5. Seated glute stretch:

- The starting position of the exercise is the sitting position.
- Sit on the floor & extend your legs in front of you.
- Keeping the back straight, lift the left leg.
- Place the left ankle joint on the right knee joint.
- Then Lean-to slightly forward &feel the patient deepen the stretch.
- Hold this stretching position for 30 seconds & do the 3 times in 1 session.
- Repeat this stretching on the other side.
- Do the 3 times in 1 session.
- Z – Sit exercise
- Start by sitting comfortably on the ground.
- Bring the left knee to a 90-degree position in front of the body (as much as your body allows).
- Do the same with your right leg, toward the back of your body.
- You can sit upright in this pose or lean the torso forward toward your front leg.
- Hold the pose for 30 seconds, & then repeat on the other side.
6.Supine Hip Twist Stretch:
- This exercise stretches the outer hip, where the gluteus minimus muscle is located, without placing stress on your spine. Lie on the floor on the back with arms out to your sides & with your hands on the floor. Put the feet flat on the floor about hip-width apart. Cross left foot over right thigh near your knee. Exhale & turn your pelvis toward your right so that your outer right knee & your left foot move toward the floor. Do not lift your left shoulder off the ground or twist your upper back. Hold this stretch for 5 to 6 deep breaths. Perform 2 sets of stretches on each side of the body.
7. Wall Glute Stretch:

- This exercise stretches the entire hip region, which also takes the pressure off the sciatic nerves, which run through either side of the buttocks. Lie on the ground on your back, & put your feet on the wall about hip-width apart. Cross the left foot on your right thigh near the knee. Do not change the position of your pelvis as you cross your foot. Push your left knee toward the wall by using your hip. Hold this stretch for 5 to 6 deep breaths. Switch leg position, & repeat the stretch on the opposite hip.
8. Supine Leg Extension Stretch
- This exercise stretches the entire back of your hip & leg from your buttocks & into your calves. Lie on the ground on your back, & lift your left knee to your ribs. Grab the back of your knee, & point your knee so that it faces toward your right shoulder or the right side of your chin. Slowly extend your leg straight up, & flex your left foot toward your right shoulder. Hold the stretch for 5 to 6 deep breaths. Repeat the stretch on the opposite leg.
Strengthening exercise of the gluteus muscle
- Buttocks
- Knee to the opposite shoulder
- Side Leg Raises
- Prone Straight Leg Raises [ hip extension ]
- Glute bridge with band
- Seated hip abduction with resistance band
- Spiky ball roll on glutes
- Bridges
- Knee to Chest
- Downward-Facing Dog
- Pigeon Pose
- Clamshell exercise
- Leg bridge exercise
- Standing side bend exercise
- Weighted deadlift

- Buttocks:
- The starting position for the exercise is supine.
- Patient Lay on to the back.
- Then bring the affected leg up to the right angle.
- Grasping the with the help of both hands behind the thigh.
- Then locking to the fingers of the head.
- Do the take unaffected leg & place to the ankle joint against to the knee joint.
- This exercise Repeat to the opposite sides.
- Do this exercise 3 times in 1 session.
- Then do the 3 sessions per day.
- Knee to the opposite shoulder:

- The starting position for the exercise is the supine position.
- The patient is lying on the back with both legs extended & feet flexed upward.
- Then Bend to the right leg & clasp both hands around the knee joint.
- After that Gently pull the leg across the body toward the left shoulder.
- Hold this exercise position for 30 seconds.
- Push the knee joint so that the leg is returned to the starting position.
- Do this exercise 3 times in 1 session.
- Then do this exercise 3 sessions per day.
3. SIDE Leg Raises (hip abduction) exercise

- The starting position for the exercise is the side-lying position.
- The patient is lying on one side with the legs stacked.
- The patient is bent to the bottom leg for support.
- Then Straighten to the top of the leg and maybe upraise to 45 degrees.
- Hold this exercise position for 10 seconds & then relax.
- Then Repeat this exercise 10 times in the 1 session.
- Do this exercise in 3 sessions per day.
- Woman doing Side Leg Raise Exercise with lying in 2 Step on the blue mat. Illustration about Thighs Workout.
4. Prone Straight Leg Raises (hip extension) exercise :

- The starting position for the exercise is the prone position.
- Patient Lie flat on their stomach.
- Must be Keep the legs straight.
- Then Tighten to the muscles in the bottom & then the hamstring muscle of the one leg.
- One leg is lifted toward the ceiling.
- Hold this exercise position for 10 seconds.
- Repeat this exercise 10-15 times in 1 session.
- Do this exercise in 3 sessions per day.
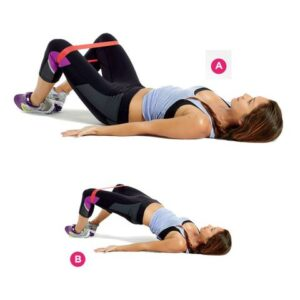
5. Glute bridge with the band:
- The starting position for the exercise is the supine position.
- Place a small & tight resistance band around the calves.
- The patient is lying on their back & lifting their hips.
- Must be Keep tension in the band & tap the hip joint down to the floor before raising the hip back up again.
- This is important to keep the spine straight & do the movement from the hip joint.
- Repeat this exercise 10 times in 1 session.
- Do this exercise in 3 sessions per day.
6. Seated hip abduction with resistance band:

- Starting position is the sitting position.
- The patient is Sitting on the floor & placing the resistance band around the calves.
- Bend the knee joint & keep your feet on the floor.
- Then Place the hands slightly behind the patient.
- Must be Keep the back straight back & press the legs out to the sides as they externally rotate the hip joint.
- Then Gently & with the control, bring the legs back together.
- Repeat this exercise 10 times in 1 session.
- Do this exercise in 3 sessions per day.
7. Spiky ball roll on glutes
- The starting position for the exercise is the supine position.
- Use the spiky ball to roll out the tight muscles into the buttock.
- Then Roll the ball around to the fleshy part of the buttock for 30 seconds 1 time.
- Do this exercise 10 times in 1 session.
- Perform this exercise in 3 sessions per day.
8. Bridges :

- The starting position of the patient is in the supine position.
- The patient is lying on the back with the knees bent.
- Then patient feet are touching the floor.
- After that Raise the hips toward the ceiling.
- Must be kept back into the straight line with the knees joint & shoulders joint.
- Hold this exercise position for 10 seconds.
- Do this exercise 10 times in 1 session.
- Perform this exercise 3 sessions per day.

9. Knee to Chest :
- Starting position is supine.
- Lie onto the back.
- Starting with the left or right knee.
- Use the hands to gently pull by to the bent knee toward the chest.
- Hold for 10 seconds.
- Repeat this knee-to-chest exercise with to the opposite knee.
- Repeat this exercise 10 times per session & 3 sessions per day.
10 Downward-Facing Dog :
- Start this exercise with the hands & knees.
- Then press into the hands as far as to the lift of the hip joint toward the ceiling.
- Drop to the head down to the bring the ears into the line with the upper arms & chin all to the way into the toward the chest.
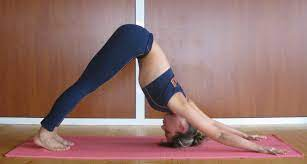
- Bend to the knee joint for the tilt of the pelvis slightly the forward.
- Then move to the body through to any variations of to the feel for to the appropriate.
- Hold this yoga pose for up to 1 minute.
- do this yoga pose 3 times a day.
11 Pigeon Pose:

- Starting with the all fours limb.
- Move the right knee joint toward to right wrist then place the shin on the floor.
- Then Move to the right ankle toward to left wrist.
- Slide the left leg back, point the toes & keep the hip joint facing forward.
- Then Extend the spine.
- Gently walk the hands forward.
- Hold this position for 5–10 breaths.
- Then return to the starting position.
- Switch the legs & repeat.
- Do this yoga the 3 times per day.
- Clamshell exercise

- Lie on your side, with legs stacked & knees bent at a 45-degree angle.
- Rest your head on your lower arm, & use your top arm to steady your frame. …
- Engage your abdomen by pulling your belly button in, as this will help to stabilize your spine & pelvis.
13. Leg bridge exercise:
- Tighten your abdominal & buttock muscles.
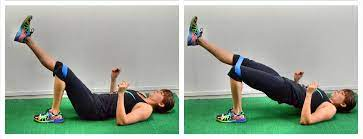
- Raise the hips up to create a straight line from your knees to shoulders.
- Squeeze your core & try to pull your belly button back toward your spine.
- Slowly raise & extend one leg while keeping your pelvis raised & level.
- Hold.
- Return to the starting position with the knees bent.
- Perform the lift with the other leg.
14. Standing side bend exercise
- Using a wall for balance, stand with one side of the body to a wall.
- Cross the leg farthest from the wall in front of the other.
- Place one hand on the wall & the other on the hip. Then lean your upper body away from the wall, & push your hip toward the wall.
- Hold for 20 to 30 seconds, then repeat on the other side


- Weighted deadlift
- Stand with your feet parallel & hip-width apart. If you feel comfortable, hold light dumbbells.
- Keep your spine long & your gaze forward. Your shoulders should be back & down.
- Squeeze the glutes as you fold from the hips, bending the knees so that your seat reaches back past the heels. Resist the urge to round the spine in order to “give in to the weight.”
- Allow your glutes & belly to control the descent & ascent.
monster-walks
- Isometric Single-leg Wall Lean: Standing parallel to the wall, flex the hip closest to the wall to 90 degrees, with the knee bent. Press the foot of the stance leg into the ground while driving the bent leg into the wall. The gluteus medius muscle of the standing leg will fire to stabilize the pelvis.
- Lateral Band Walks: Place a Versa Loop band around the ankles, shins, or directly above or below the knees & assume a quarter-squat position. Do not change the position of the squat while stepping laterally, keeping tension on the band throughout.
- Banded Triplanar Toe Taps: Place a Versa Loop band directly above the knees & shift into a single-leg, quarter-squat position. While balancing on the standing leg, tap the alternate leg forward, to the side & directly behind. The core & hip muscles will fire to maintain single-leg balance against the band’s resistance in 3 different directions. This exercise works the gluteus medius of both the moving leg & the stabilizing leg, as they fire to maintain single-leg balance against the band’s resistance in 3 different directions.
Self-Myofascial Release:
- This is a self-massage technique that breaks apart muscle & tissue adhesion that causes sensitivity, pain & stiffness. Use a foam roller to massage your gluteal complex near your outer hip & the head of the femur. Put the foam roller on the floor, & sit on top of it with both feet flat on the floor. Cross your left foot over your right thigh, & put your left hand behind you near the roller. Your weight should shift toward your left hip.