Shoulder Sprain
Table of Contents
What is a Shoulder Sprain?
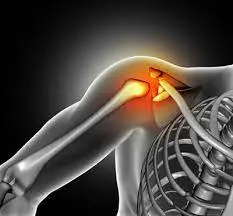
A shoulder sprain happens when a ligament in the shoulder is stretched or torn. Ligaments are the tough tissues that link bones. Ligaments allow you to lift, lower, and rotate the arm.
Anatomy of shoulder Joint
- The shoulder is made up of 3 bones: the upper arm bone (humerus), the shoulder blade (scapula), and the collarbone (clavicle).
- The head of the upper arm bone supplies into a rounded socket in the shoulder blade. This socket is comprehended as the glenoid.
- A combination of muscles and tendons maintains the arm bone centered in the shoulder socket.
- These tissues are comprehended as the rotator cuff. They surround the head of the upper arm bone and connect it to the shoulder blade.
- The range of motion (ROM) of the arm relative to the trunk does not just arise from the glenohumeral joint.
- Motions also happen in the acromioclavicular (a.c.) joint, sternoclavicular (s.c.) joint, and the upper costosternal and costovertebral joints.
- Another prerequisite for normal motion is that the scapula should be able to move freely, relative to the dorsal thorax wall.
- The glenohumeral joint is a multiaxial, ball-and-socket, synovial joint with a moderately shallow socket: the cavitas glenoidalis.
- The joint is based primarily on the muscles and ligaments for its support, stability, and integrity.
- The ring of fibrocartilage labrum (glenoid labrum), surrounds and deepens the glenoid cavity of the scapula by about 50%.
- Stability is mostly offered by the periarticular muscles, which originate from the scapula and insert on the caput humeri.
- This rotator cuff involves the supraspinatus, infraspinatus, and subscapularis.
- The spina scapulae is a bony ridge on the dorsal side and is the insertion location of the trapezius and deltoideus.
- The spina scapulae broaden on the lateral side, shaping the acromion.
- The space in the middle of the acromion and humerus head is known as the subacromial space.
- In this space a person will find the tendons of the rotators and the bursa subacromialis (= bursa subdeltoidea).
- The tuberculum minus and tuberculum majus are divided by the sulcus intertubercularis, where the tendon of the caput longum biceps brachii runs.
- This tendon continues into the joint and has its insertion on the top ridge of the cavitas glenoidalis (labrum glenoidale).
Epidemiology of Shoulder Sprain
- There are substantial variances in the prevalence of shoulder pain, ranging anywhere from 1% up to 66%.
- This may in part be as an outcome of the complex structure of the shoulder and close functional biomechanical connection with adjacent areas, involving the spine.
- Some further causes of variability in reporting related to the fact that the shoulder can be a primary or a secondary source of pain, so many authors and clinicians try to summarise such an exhibition simply as shoulder pain syndrome.
As a point of consideration, epidemiological studies have documented:
- Point Prevalence ranging from 6.9% – 26%
- 1-Month prevalence ranging from 18.6% – 31%
- Annual Prevalence ranging from 4.7% – 46.7%
- Lifetime Prevalence ranging from 6.7% – 66.7%
- Chronic Pain Prevalence ranges from 15.5% – to 41% rising from 23% in 18 – 24-year-olds, reaching a peak of 50% in 55 – 64-year-olds.
Prevalence related to Specific Conditions:
- Primary Adhesive Capsulitis reported a prevalence of 2 % to 5.3 %, mostly affecting females with sedentary jobs, non-dominant shoulder, over 40 years old Secondary Adhesive Capsulitis related to Diabetes Mellitus and Thyroid Disease reported a prevalence of 4.3% and 38%.
- Patients with diabetes have been found to be 5 times more likely to develop adhesive capsulitis than the general public.
- Rotator Cuff Related Abnormalities reported prevalence ranged from 9.7% – to 62%.
- Prevalence is generally higher in females (15% – 26%) than in males (13 – 18%), with a greater number of females presenting to Primary Care.
- Prevalence increases with age while incidence increases at around 50 years and then remains stable at around 2%.
- Most prevalent in middle age (45 – 64 years, from 21 – 55%), which can be attributed to the normal aging process of shoulder structures involving the rotator cuff but is also usual in the younger age group (adolescents aged 12 – 18 years, from 12 – 57%), which may be attributed to a postural relationship connected with improved periods of sitting, and improved technology use.
- It is also a usual complaint in older adolescent athletes: overall prevalence has been found to be 43.5 percent, with higher rates in adolescents who participate in handball and judo.
- The shoulder was the 2nd most usually affected site for musculoskeletal pain behind low back pain in the Netherlands.
- Some other interesting findings from that study involved that 30% described continuous pain, while 55% had recurrent pain with mild pain more usual (70%) than severe pain (15%).
- While Koojman et al recommend that shoulder pain is the 3rd most common musculoskeletal complaint presenting to physiotherapy, representing 14% of annual referrals to physiotherapy outpatient services in the UK.
Causes of Shoulder Sprain
Bursitis or tendinitis
Instability
Arthritis
Fracture (broken bone)
Other much less usual causes of shoulder pain are tumors, infection, and nerve-related problems.
Bursitis
- Bursae are tiny fluid-filled sacs that are situated in joints throughout the body, involving the shoulder.
- They perform as cushions in the middle of bones and the overlying soft tissues and help decrease friction in the middle of the gliding muscles and the bone.
- Sometimes, too much use of the shoulder leads to inflammation and swelling of the bursa in the middle of the rotator cuff and part of the shoulder blade called the acromion.
- Subacromial bursitis is the disorder that results from this.
- Bursitis frequently happens in connection with rotator cuff tendinitis.
- The many tissues in the shoulder could swell and hurt. Many daily activities, like combing the hair or getting dressed, can become difficult.
Tendinitis
A tendon is a cord that links muscle to bone. Most tendonitis is an outcome of inflammation in the tendon. Usually, tendinitis is 1 of 2 types:
Acute- Excessive ball throwing or other overhead activities at the time of work or sport may lead to acute tendinitis.
Chronic.-Degenerative diseases such as arthritis or repetitive wear and tear because of age, may tend to chronic tendinitis.
The most usually affected tendons in the shoulder are the 4 rotator cuff tendons and one of the biceps tendons. The rotator cuff is made up of 4 small muscles and their tendons that cover the head of the upper arm bone and keep it in the shoulder socket. The rotator cuff permits provide shoulder motion and strength.
Tendon Tears
- Splitting and tearing of tendons can result from acute injury or degenerative changes in the tendons because of advancing age, long-term overuse and wear and tear, or a sudden injury.
- These tears can partially or completely separate the tendon from its attachment to bone.
- In most cases of complete tears, the tendon is stretched away from its attachment to the bone.
- Rotator cuff and biceps tendon damages are among the most typical of these injuries.
Impingement
- Shoulder impingement happens when the top of the shoulder blade (acromion) puts pressure on the underlying soft tissues when the arm is lifted away from the body.
- The acromion “impinges” on the bursa and rotator cuff tendons as the arm is raised.
- This may tend to bursitis and tendinitis, causing pain and limiting movement.
Instability
- Shoulder instability occurs when the head of the upper arm bone is moved out of the shoulder socket.
- This may occur as an outcome of a sudden injury or from overuse.
- Shoulder dislocations may be partial, with the ball of the upper arm coming just partially out of the socket.
- This is known as a subluxation.
- A full dislocation means the ball comes all the way out of the socket.
- Once the ligaments, tendons, and muscles near the shoulder become loose or torn, dislocations may happen repeatedly.
- Recurring dislocations, which can be partial or complete, cause pain and unsteadiness when a person raises the arm or moves it away from the body.
- Repeated episodes of subluxations or dislocations lead to an improved risk of developing arthritis in the joint.
Arthritis
- Shoulder pain may also outcome from arthritis.
- There are many types of arthritis.
- The most common type of arthritis in the shoulder is osteoarthritis, also called “wear and tear” arthritis. Symptoms like swelling, pain, and stiffness, typically start at the time of middle age.
- Osteoarthritis develops gradually and the pain it causes worsens over a period of time.
- Osteoarthritis can be related to sports or work injuries or chronic wear and tear.
- Another form of arthritis may be related to rotator cuff tears, infection, or an inflammation of the joint lining.
- Frequently individuals will avoid shoulder movements in an attempt to lessen arthritis pain.
- This sometimes tends to a tightening or stiffening of the soft tissue parts of the joint, resulting in a painful restriction of motion.
Fracture
- Fractures are broken bones. Shoulder fractures usually involve the clavicle (collarbone), humerus (upper arm bone), and scapula (shoulder blade).
- Shoulder fractures in older people are frequently the outcome of a fall from standing height.
- In younger patients, shoulder fractures are frequently caused by a high-energy injury, like a motor vehicle accident or contact sports injury.
- Fractures frequently cause severe pain, swelling, and bruising around the shoulder.
Signs and symptoms
Signs and symptoms of a shoulder sprain can involve:
Pain: Usually felt around the shoulder joint and, may range from mild discomfort to severe pain.
Swelling: The involved area might become swollen due to inflammation.
Limited Range of Motion: A person can find it difficult to move the arm in certain directions or perform specific movements.
Bruising: Sometimes, there might be bruising around the shoulder area.
Tenderness: The area around the torn ligament might be tender to touch.
Weakness: A person can feel weakness in the involved arm because of pain and reduced muscle function.
Stiffness: The shoulder joint might feel stiff and less flexible than usual.
Instability: A person can experience as if the shoulder joint is loose or unstable.
If a person feels these symptoms after an injury, it’s necessary to seek medical attention to assess the severity of the sprain and determine the appropriate course of treatment.
Diagnosis of shoulder sprain
Doctor’s Examination
- In the case of an acute injury causing intense pain, get medical care as early as possible.
- If the pain is less severe, it can be safe to rest for a few days to see if time will resolve the problem.
- If symptoms persist, see a physicianThe physician’s doctor will conduct a thorough evaluation in order to determine the cause of the shoulder pain and provide you with treatment options.
Medical History
- The initial step in the diagnosis is a thorough medical history.
- The physician can ask how and when the pain began whether it has happened prior to and how it was treated, and other questions to help determine both the general health and the possible causes of the shoulder problem.
- Due to most shoulder conditions being aggravated by particular activities, and relieved by specific activities, a medical history may be a valuable tool in finding the source of the pain.
Physical Examination
- A comprehensive examination will be needed to find the causes of the shoulder pain.
- The physician will look for physical abnormalities, swelling, deformity, or muscle weakness, and check for tender areas.
- He or she will observe the shoulder range of motion and strength.
Tests
The physician can order specific tests to help identify the cause of the pain and any other problems.
X-rays- These images will show any injuries to the bones that make up the shoulder joint.
Magnetic resonance imaging (MRI) and ultrasound- These imaging studies develop more profitable pictures of soft tissues. MRI may help the doctor identify injuries to the ligaments and tendons surrounding the shoulder joint.
Computed tomography (CT) scan– This tool merges X-rays with computer technology to produce a very detailed view of the bones in the shoulder area.
Electrical studies-The doctor can order a test, like an EMG (electromyogram), to evaluate nerve function.
Arthrogram- During this x-ray study, dye is injected into the shoulder to better show the joint and its near muscles and tendons. It can be connected with an MRI.
Arthroscopy this surgical procedure, the physician looks inside the joint with a fiber-optic camera. Arthroscopy can show soft tissue injuries that are not apparent from the physical examination, x-rays, and other tests. In addition to assisting in finding the cause of pain, arthroscopy can be used to correct the problem.
Treatment of shoulder sprain
The treatment of a shoulder sprain usually includes the following steps:
Rest: Give the shoulder time to heal by avoiding activities that could worsen the injury.
Ice: Apply ice to the involved area for about 10-15 minutes every few hours to decrease pain and swelling.
Compression: Using a compression bandage may help control swelling and provide support to the injured area.
Elevation: Elevate the arm above heart level when possible to further reduce swelling.
Pain Relief: Over-the-counter pain medications may help manage pain and discomfort.
Physical Therapy: A healthcare professional might recommend exercises to increase range of motion, strengthen muscles, and aid in recovery.
Immobilization: In some cases, a sling might be suggested to immobilize the shoulder and promote healing.
Professional Evaluation: If the sprain is severe, a physician might conduct imaging tests to assess the extent of the damage and suggest proper treatment.
Gradual Return to Activities: Once the shoulder starts to heal, a gradual return to normal activities, involving sports, under professional guidance is important to prevent re-injury.
Remember it’s necessary to follow the advice of a medical professional for the most appropriate treatment plan depending on the severity of your shoulder sprain.
Physiotherapy treatment
General Exercise Interventions for Shoulder Girdle:
Exercise Techniques at the time of acute and early sub-acute stages of tissue healing. The early motion of the Glenohumeral Joint generally involves passive ROM within pain-free ranges. If tolerated, Active-assisted ROM exercises are started.
Passive range of motion (PROM) exercises for the glenohumeral joint involve moving the joint through its full range of motion with the assistance of an external force, like a therapist or a device. These exercises are frequently used at the time of the primary stages of shoulder rehabilitation to prevent stiffness and maintain flexibility. Below are a few examples of PROM exercises for the glenohumeral joint
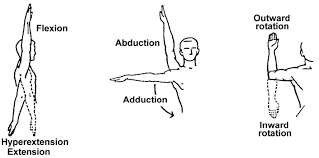
Shoulder Flexion: Gently raise the arm forward and upward, and put the elbow straight. The therapist or a device would help in lifting the
arm.
Shoulder Extension: Lower the arm backward, again with the assistance of a therapist or device.
Shoulder Abduction: Raise the arm sideways away from the body, with the assistance of the therapist.
Shoulder Adduction: Bring the arm back toward the body, across the chest, again with external assistance.
Shoulder Internal Rotation: Bend the elbow at 90 degrees and use external assistance to rotate the arm inward toward the abdomen.
Shoulder External Rotation: Bend the elbow at 90 degrees and use assistance to rotate the arm outward away from the body.
Shoulder Horizontal Adduction: With the elbow bent at 90 degrees, move the arm across the front of the body with assistance.
Shoulder Horizontal Abduction: With the elbow bent at 90 degrees, move the arm away from the body with assistance.
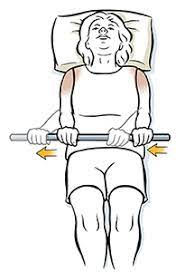
Wand Exercises –
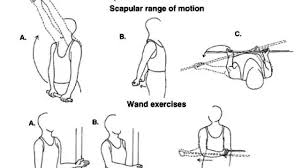
Shoulder Flexion
Keep the stick in both hands with the knuckles facing forward. Slowly raise both arms up whilst putting the elbows straight. A person
may use the good arm to assist in elevating the injured/painful shoulder. Maintain for 10 seconds and repeat 15 times.
Shoulder Extension
- Keep the stick behind the back, again with the knuckles facing forward.
- Gradually elevate the stick away from the back and hold this position for 10 seconds.
- Repeat 15 times.
Shoulder Abduction/Adduction
- Keep the stick in both hands with the palms facing forward.
- Put the elbows straight, and use the opposite arm to elevate the involved shoulder up past 90 degrees if possible.
- Maintain this position for 10 seconds and repeat 15 times.
Shoulder Internal Rotation

- Keep the stick with both hands behind the back, with the uninjured shoulder behind the head, and the injured shoulder behind the back at waist level.
- Move the stick up and down by flexing at the elbows, with the opposite arm (at the top) helping the injured shoulder through gradual movements. Keep the elevated position for 10 seconds, repeating 15 times
Shoulder External Rotation
- This exercise is easiest performed lying on the back.
- Keep the stick in both hands with the palms facing upwards, and the elbows bent at 90 degrees.
- Ensure the back of the upper arms are resting against the floor.
- Use the good arm to swing the injured arm away from the body, whilst keeping the elbow of the involved arm by the side.
- Keep the stretch for 10 seconds and repeat 15 times.
These exercises are meant only as a guide, and should not replace proper consultation with the health practitioner. For some individuals, these exercises can not be appropriate and could cause further irritation if performed incorrectly. If a person is unsure as to the appropriate course of treatment for shoulder pain, feel free to contact the clinic to book a chiropractic assessment.
Wall Washing/Finger Walk-Up Wall
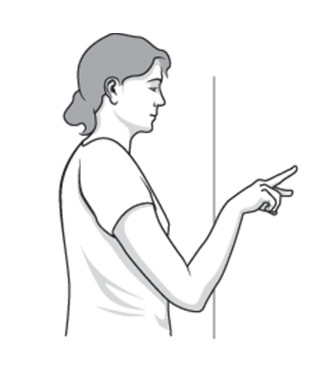
- Wall-washing is one of the great home exercises for frozen shoulder or shoulder arthritis.
- This is an active movement in which a person does the work while the shoulder joint moves.
- To perform the exercise:
- Locate a clear wall, standing from it at arms-length.
- Then, facing the wall, extend out the right arm so that it is lined up with the shoulder.
- After putting the fingers on the wall, move the fingers up the wall, pretending they are spider legs. Use only 1 to 2 fingers at a time.
- Reaching as high as a person comfortably may keep the stretch for 15 seconds.
- Finally, slowly walk down the fingers, repeating the process 2 more times.
- Repeat the exercise, using the opposite arm.
Pendulums Exercise
The pendulum exercise is done to maintain shoulder mobility.
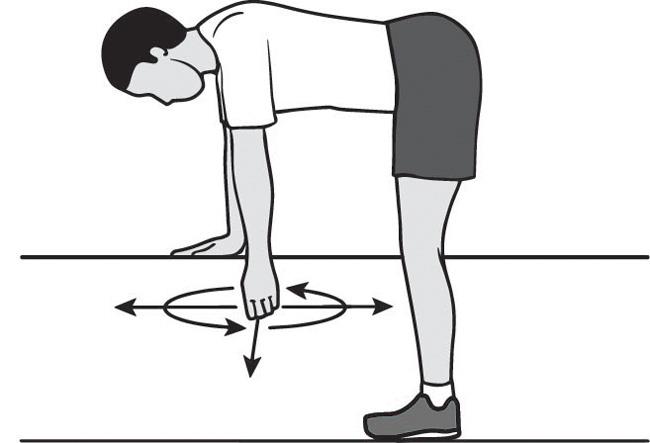
- Flex at the waist with one arm hanging down. For support, maintain on to a chair or table.
- slowly rock the body back and forth, using circular motions to move the arm in a circular direction.
- Next, reverse the movement so that a person’s arm goes in the other direction.
- Repeat this exercise 5 times.
The Towel Rotation Stretch
This is another great stretching exercise for treating shoulder joint pain and frozen shoulders.
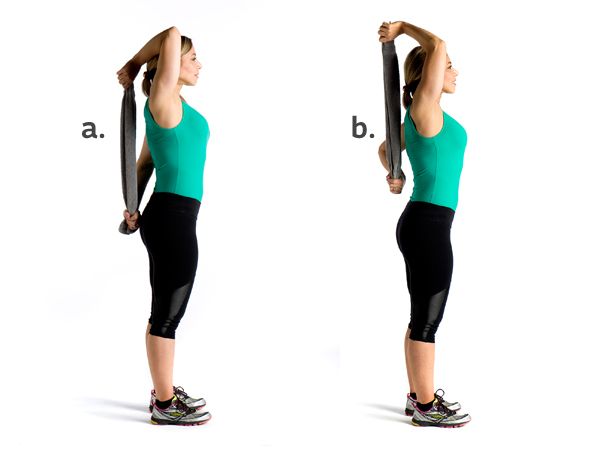
- Keeping the end of a long towel, belt, or strap in one hand, have the towel draped over the shoulder, letting it hang down the back.
- Use the other hand to grip the towel that’s behind the back.
- Then, slowly pull up the towel, letting the hand that’s behind the back slowly travel up and across the back.
- This should result in feeling a gentle stretch on the side or the front of the shoulder.
- After a person has felt the stretch, keep the position, keeping it for 2 to 3 seconds.
- Then, release the stretch gradually repeating these steps 15 times.
- With each stretch, try to pull the arm up the back a little further.
- Do not use any jerking or sudden motions, making sure a person moves gradually.
Early PROM/A-AROM motion of Scapula
ITYWs
Complete 5 to 7 sets for 10 seconds each, in all 4 positions. Lie prone on the floor, arms at sides.
Without moving anything other than the arms, complete the following:
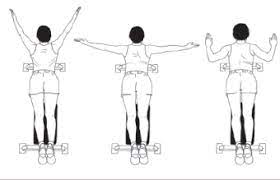
I: Hands down at sides, palms up, thumbs towards the thighs, fluttering up and down.
T: Keep hands out to the sides to create a “T” with the body. Flutter arms up and down with palms facing the ground.
Y: Keep arms up in a “Y” position and flutter arms up and down with palms down.
W: From the “Y” position, pull arms into the body leading with the elbows finishing at the sides to create a “W.” Extend back to the “Y” position and repeat.
Scapular pushups
Complete 5 to 7 sets of 10 to 15 repetitions.
- Start with standing facing a wall with hands placed on the wall, chest height, and shoulder width apart.
- Put arms locked out and palms flat on the wall.
- Without bending your arms, reach with your sternum towards the wall until both shoulder blades come together behind you.
- Driving through both hands equally push the sternum away from the wall until both scapula open up and the upper back is slightly rounded. Repeat.
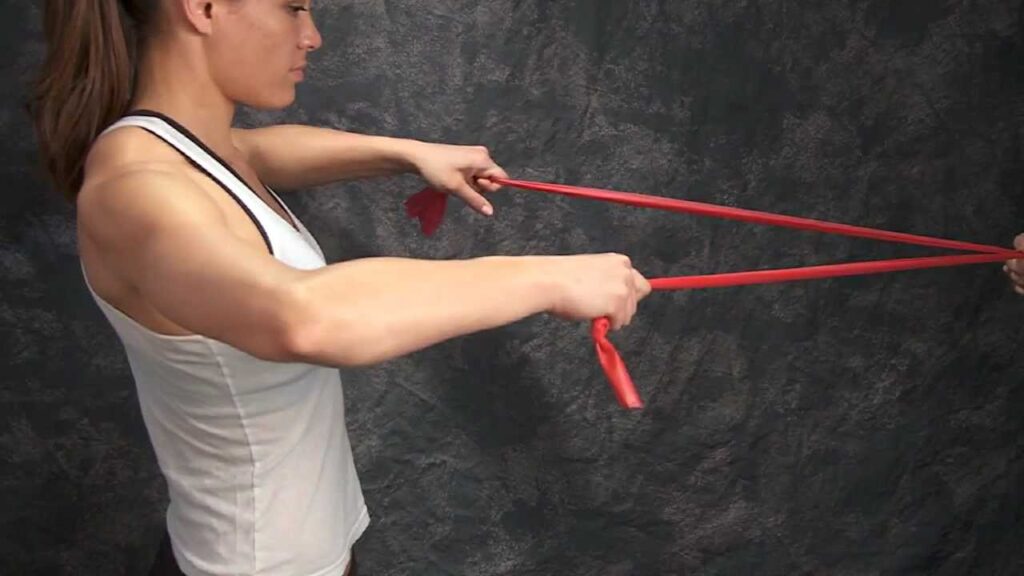
Band pull-parts
Do 7 sets of 10 to 15 repetitions with a light band.
- Start with standing holding a long band with both hands, palms facing each other, about shoulder-width apart. There should be no pressure in the band.
- Pull the band apart with both arms to the sides as wide as possible, maintaining them about shoulder height.
- Gradually allow arms to come back together, controlling the pull of the band until hands are back to normal position. Repeat.
Wall ball circles
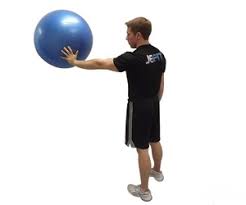
- Do 5 to 7 sets and 10 to 15 repetitions on both arms in each direction with a medicine ball.
- Start with standing facing a flat wall and putting the medicine ball in front of you, feet shoulder-width apart.
- Press the medicine ball up against the wall with one hand, flat palm about shoulder height off the ground. Do not let the ball drop.
- Using the palm only, roll the ball around in small circles both clockwise and counter-clockwise.
Exercise Techniques to Improve Flexibility and Range of Motion
Stretching exercises to improve capsule mobility and muscle lengthening. Do stretches for Latissimus Dorsi, Pectoralis Major,
Latissimus dorsi stretch:

- Start this latissimus dorsi stretch standing tall with the back straight and hands above the head.
- Slowly lean to one side until a person feels a mild to moderate stretch in the side of the upper back and shoulder.
- Keep for 10 seconds and then back to the normal position.
- Repeat 15 times provided the exercise is pain-free.
- Then perform the exercise on the opposite side.
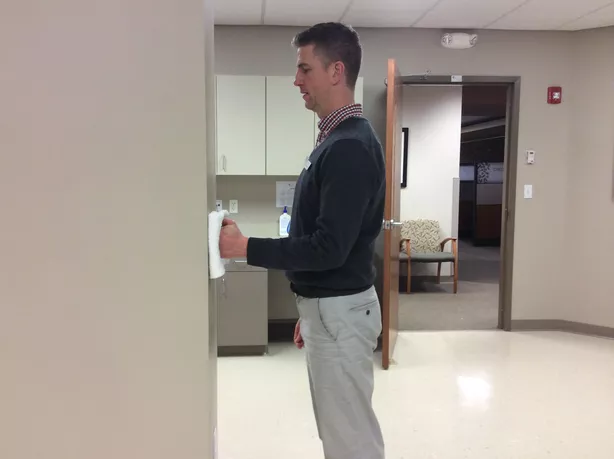
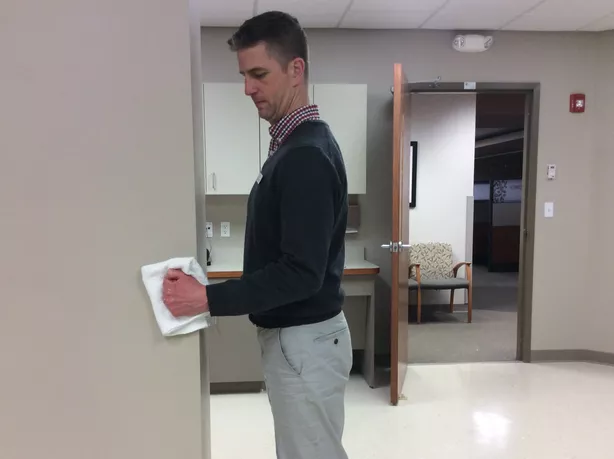
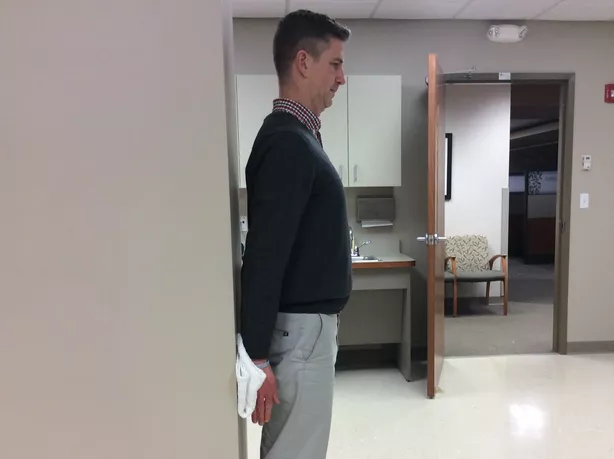
Doorway Pectoral Stretch (Flexibility)
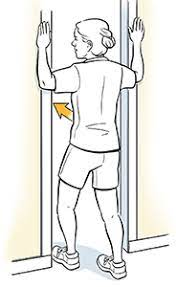
- Start with standing in an open doorway.
- Lift each arm up to the side, flexed at 90-degree angles with palms forward.
- Rest the palms on the door frame. If this is too painful, try moving the elbows down slightly.
- Gradually step forward with one foot. Feel your chest and shoulders stretching.
- Stand upright and do not lean forward.
- keep for 10 seconds, or as instructed.
- Step back and relax.
- Repeat 5 times, or as instructed.
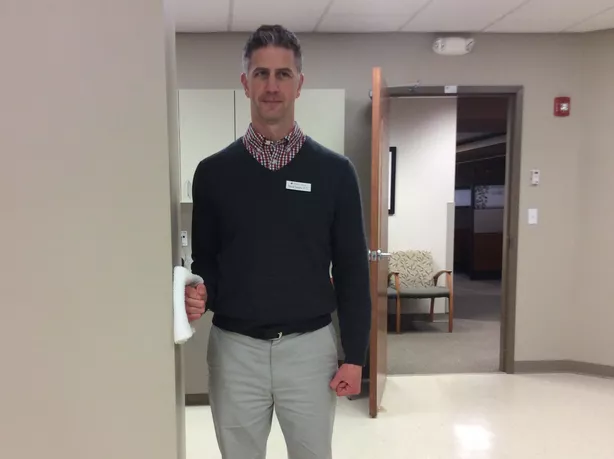
Doorway Lunge Stretch
Step 1. Put the hands on the door frames above head height with the elbows flexed.
Step 2. Lunge through the door until a person feels a stretch then slide the hands further up or down until a person feels a deeper stretch.
Step 3. Keep for 60 seconds or try a contract-relax version. This may also be done one side at a time in the doorway for a stronger stretch.
Levator Scapulae Stretch
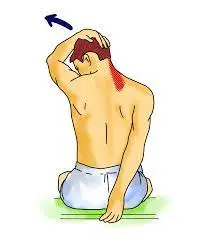
- Begin by sitting in a chair with the shoulders relaxed.
- Turn the head 45 degrees to one side and look down, tucking the chin into the chest (this position should make a person look like they looking at the underarm).
- Use the arm of the side the look towards to slowly pull the head further down.
- A person should experience a stretch on the back of the neck.
- keep this position for 15– 20 seconds.
- Repeat on the other side.
- This is a sustained stretch, to bypass injury please avoid bouncing activities or stretching into pain.
Trapezius stretch
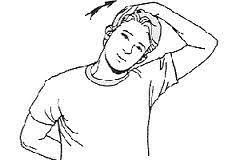
- Gradually and with ease, take the right ear toward the right shoulder. It is natural for the left shoulder to lift as a person does this.
- If this occurs ease the head back toward the center until a person may relax the left shoulder back down.
- Raise the right hand up and over the head, resting the hand on the left cheekbone. Do not pull on the head now, though.
- Simply rest the hand there for just slightly more pressure.
- This very slowly stretches the upper trapezius.
- Breathe as you sit here for at least 20 seconds.
- Slowly release this side, and then ease the left ear toward the left shoulder and complete the stretch on the opposite side, breathing deeply through it.
Exercises to develop and increase muscle performance and functional control
These exercises should be progressed slowly from the least stressful levels to the complex. In the beginning, choose exercises that help the patient focus on activating the correct muscles with appropriate timing and sequencing.
Isometric contractions of scapular muscles and glenohumeral muscles may be performed
Isometric Shoulder Flexion
To perform shoulder flexion:
- Start with standing facing a wall.
- Flex the elbow on the side of the shoulder when a person wants to exercise and make a fist.
- Put a folded towel in the middle of the fist and the wall, and gently press the hand into the wall.
- Keep for five seconds, and then gradually release.
- There is no requirement to try to push the wall over. Just press gradually into the wall to trigger the shoulder muscles.
- This is especially important if a person is just starting isometric exercise after shoulder surgery.
- If it generates pain, take a break.
- Do 15 to 20 repetitions, and then move on to the next exercise.
Isometric Shoulder Abduction
To do isometric shoulder abduction exercises:

- Start with standing about 6 inches from a wall, but turn the body so it is perpendicular to the wall.
- The shoulder an individual wishes to exercise should be compared to the wall.
- Create a fist and push it into the wall.
- A person can wish to use a folded-up towel for a little extra comfort.
- slowly press into the wall as if a person is trying to lift the arm out to the side, and keep it there for five seconds.
- Gradually release pressure on the wall. Again, no required to push the wall over; gentle pressure will do.
- Perform 15 to 20 repetitions, and then move on to the next exercise, which is designed to get the rotator cuff muscles working.
Isometric Shoulder External Rotation
Isometric shoulder external rotation is an exercise that may help strengthen the rotator cuff muscles, specifically the teres minor and the infraspinatus.
To do the exercise:
- Resume standing perpendicular to a wall about 6 inches from it.
- The shoulder a person is exercising should be closest to the wall.
- Flex the elbow 90 degrees, make a fist, and press the back of the hand into the wall as if a person were rotating the arm outwards.
- Utilize a little towel for a little padding, if needed.
- Gradually press into the wall for about 5 seconds.
- Gradually release pressure on the wall.
- Stop the exercise if a person experiences any increased pain.
- Do 15 to 20 repetitions, and then begin the next rotator cuff isometric exercise.
Isometric Shoulder Internal Rotation
To do isometric shoulder internal rotation:
- Position the body so that a person is facing a door frame or an outside corner of a wall.
- The shoulder a person is exercising should be near the door opening or corner.
- Flex the elbow 90 degrees, make a fist, and gently press into the corner wall or door jamb as if a person were trying to rotate the hand inward towards the belly button.
- Press and keep for 5 seconds, and then slowly release.
- Recognize, that no movement should occur in the shoulder during the exercise. Use a little folded towel for padding.
- Perform 15 to 20 repetitions, and then move on to the final shoulder isometric exercise.
Isometric Shoulder Extension
To perform isometric shoulder extension:
- Start with standing about 6 inches away from a wall with the back facing it.
- Hold the elbow straight so the hand is down near the hip.
- Make a fist, and slowly press it into the wall behind a person. Very little movement should occur at the shoulder.
- keep the pressure against the wall for 10 seconds, and then release gradually.
- Do 15 to 20 repetitions.
Stabilization of the scapula may be achieved with open chain/close chain exercises using manual resistance or wall progressing from static to dynamic. E.g.. Push-ups, upright press-ups, superman motion in prone, etc.
Scapula Squeeze
With all scapular stabilization exercises, the lower traps should be engaged – think of them as part of the core. The scapular compression is the perfect spot to start setting the shoulder blade in the right initial position.
Scapular Retraction Exercises
- Once a person has got the hang of using the lower traps to set the scapular into the right position, a person is ready to go with the rest of these scapular stabilization exercises.
- Always begin each one with a scapular squeeze as described above to activate those lower traps.
Scapular Squeeze With Arm Lift
- Scapula Retraction Exercises:
- Do not let the shoulder blades stick out. Lie on the back, head resting on a towel, both arms by the side, palms facing in, and set the shoulder blade with a scapula squeeze.
- Holding that position, lift the lower arm and hand up about 2cms.
- Keep the position, then lower the hand and arm, and finally relax off the scapular squeeze.
- Repeat 5 times aiming to build up to a 20-second hold.
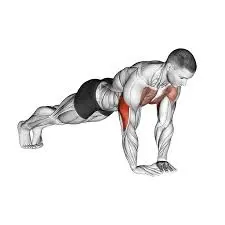
Here are some push-up modifications to improve shoulder mobility
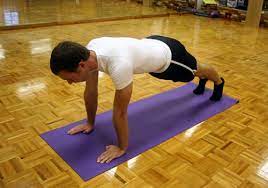
Strict (Military) Push-Up
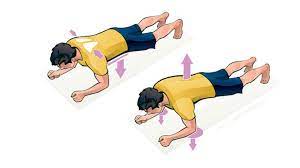
- How to Do It
- Begin in a standard push-up position (as described above), with the feet together or no more than 1o inches apart, hands flat on the ground below the shoulders, and arms straight.
- Breathe in as a person flexes the elbows—put them tracking back alongside the body—to lower the chest to slightly below the level of the bent elbow, and then breathe out as a person pushes back up to the initial position for one repetition.
Wide Hands Push-Up
- How to Do It
- Perform a strict push-up, as described above, but with the hands farther out to each side, roughly 2.5 to 3 feet apart (the farther apart, the more difficult).
- Put the elbows tracking back throughout the motion.
Triangle (Diamond) Push-Up
- How to Do It
- Start in a plank position, with the hands together and angled inward at 45 degrees so that the index fingers and thumbs touch to form a triangle (or diamond).
- Put the elbows tight to the body and flex them to lower the chest toward the triangle.
- Reverse the motion to the initial position for one repetition.
- Put the triangle directly below the chest throughout the motion.
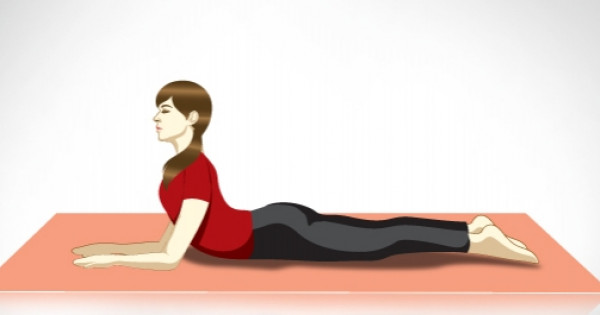
Pike Push-Up
- How to Do It
- Start in a downward dog yoga position, with the feet and hands just wider than shoulder width.
- Put the hips high, heels low, and maintain the inverted-V position as a person flexes the elbows and lowers the head toward the floor between the hands.
- Reverse the motion to the initial position for 1 repetition.
Super (Hindu) Push-Up
- How to Do It
- Gradually swoop from downward dog to cobra pose:
- From the downward dog position, flex the elbows and lower the nose to the floor between the hands, like a pike push-up, but then, without rising, continue moving the torso forward to slide the chin, chest, and then the rib cage between the hands.
- As the ribs meet the hands, begin to arc the head and torso upward.
- Continue this upward arc until the arms are straight, hips are pressed toward the ground, and the back is hyperextended in cobra pose.
- Reverse the motion exactly until a person is back in a downward dog.
Staggered Hands Push-Up
- How to Do It
- From a standard push-up position, move one hand forward and the other backward so they are offset by about 6 to 12 inches (the farther, the more difficult).
- Flex the elbows to lower the chest until it is slightly below the level of the bent elbow, and then extend the elbows to push back up to the initial position.
- Put the elbows tight to the body throughout the motion.
- After 1 or more repetitions, switch the fore and aft positions of the hands to work each side evenly.
Sphinx Push-Up (Triceps Extension)
- How to Do It
- Begin in a plank position, with the forearms flat on the ground, shoulder-width apart and parallel.
- Push up with the triceps to lift the elbows off the ground; continue until the arms are fully extended, then lower the elbows until just above the ground (don’t weigh the forearms again) for 1 repetition.
- The farther forward you place the arms, the more difficult.
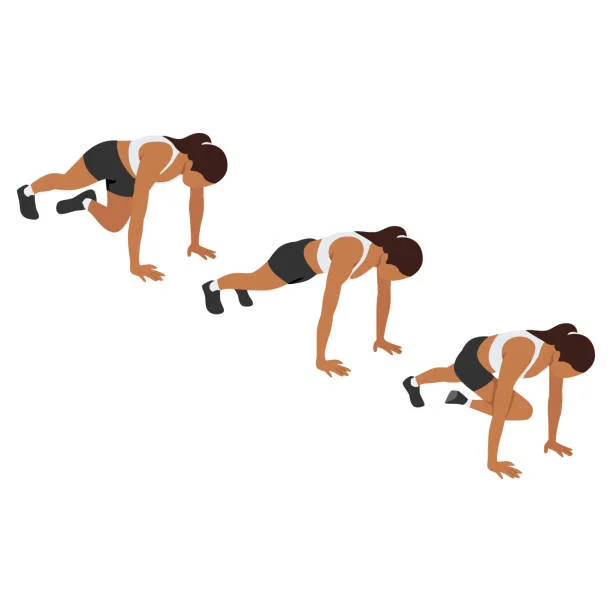
Spiderman (Side Kick) Push-Up
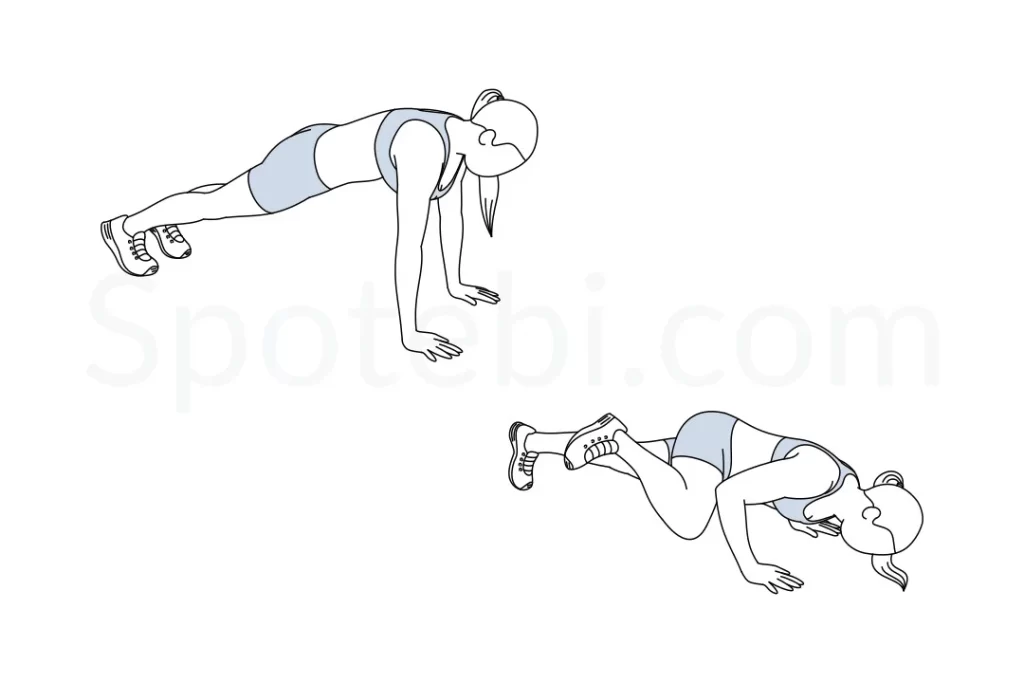
- Assume a standard push-up position.
- As a person lowers herself toward the ground, simultaneously bring one knee out to the side and up to touch the elbow, with the leg parallel to the ground.
- The knee should feel the elbow at the lowest point of the push-up.
- Reverse the motion to the initial position and repeat on the opposite side.
Cross-Body Push-Up
- How to Do It
- Assume a standard push-up position.
- As a person lower yourself to the ground, simultaneously pick up one leg and cross it beneath the body as you rotate the hip toward the ground.
- Reverse the motion to the initial position and repeat on the opposite side.
Superman Push-Up (hardest):

- Perform the same exercise, but while in the air, fully extend the arms in front of you so that the body is in a single plane, parallel to the ground, like a flying Superman.
- Requires even more airtime and power.
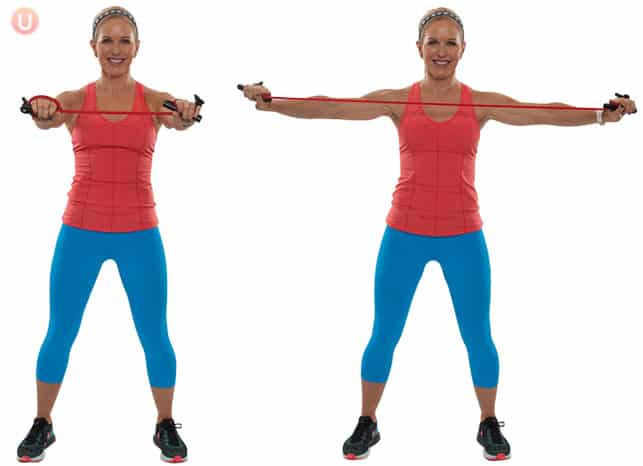
Dynamic Strengthening of the Glenohumeral Joint is achieved by using elastic resistance, pulley, or handheld weights.
FAQ
How long does it take for a sprained shoulder to recover?
Recovery from shoulder strain or sprain
For a mild to moderate shoulder sprain or strain, a person can be able to return to normal activities within 1 to 2 weeks. Moderate sprains or strains can take as long as 6 to 8 weeks before a person may resume day-to-day shoulder activities.
What does a shoulder sprain feel like?
Instantaneous pain in the shoulder after a direct blow or landing on it. Pain and stiffness at the joint with motion or workout. Sometimes a bump or obvious deformity is noticed at the AC joint.
How do you sleep with a sprained shoulder?
Here are a rare suggestions: Avoid sleeping on one side. Instead, try lying on the back to help reduce pressure on the affected shoulder. Use specialized pillows.
Should you massage a sprained shoulder?
As is the case for muscle and tendon strains, deep tissue massage to the injury itself is avoided in the acute stage of any sprain. However, massage for the injury in the surrounding musculature may aid in reducing inflammation and speed up the healing process.
What is the difference between a strain and a sprain?
The distinction between a sprain and a strain is that a sprain injures the bands of tissue that connect 2 bones together, while a strain implicates an injury to a muscle or to the round of tissue that connects a muscle to a bone.