
Shoulder Abduction and Adduction
Table of Contents
What is a Shoulder Abduction and Adduction?
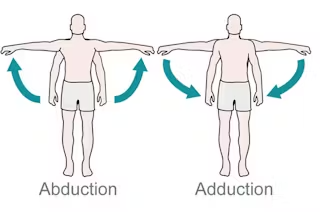
Shoulder abduction and adduction are movements that occur at the shoulder joint, allowing for the movement of the arm away from or toward the body, respectively. These movements are essential for various daily activities and sports involving the upper extremities.
Shoulder Abduction
What is Shoulder abduction?
When your arms are Away from your body’s center, this is called abduction. A shoulder abduction occurs when you elevate your arm away from your body’s sides.
In order to move the arm straight out and away from the body, shoulder abduction involves rotating the shoulder joint. This Anatomical phrase of motion particularly refers to the arm’s movement away from the body’s midline. This action may be used by workers when they reach for materials, equipment, or goods. A associated with work musculoskeletal injury is more inclined to occur when there is uncomfortable placement, repetitive action, and overloading.
When your shoulders are abducted, you are only moving laterally because you are moving in the frontal plane. Abduction is the specific mechanism that enables you to move your arm away from the body, such as when you raise your arms in a jumping jack exercise.
You can imitate the stretch for your internal rotators (exercise #1 from the mobility portion) with this exercise. One hand on either end of a stick should be held in front of you at approximately hip height. Using your unaffected arm, push the stick across your body while keeping your shoulders and upper back relaxed.
Your injured arm will be pulled up and to the side if you don’t fight the push. Make sure you don’t twist your body or slouch your shoulders since these deviations will distract you from only performing abduction at the shoulder joint. (This is not necessarily a negative thing, but the goal of these exercises is to isolate certain shoulder ROM components to make sure there is enough control in each plane of motion.)
When your shoulder has reached its maximum level of abduction, carefully manage the fall of your arm as you return it to its starting position using the opposite action, “adduction.”
Testing Explains Shoulder Abduction
Shoulder abduction means extending the arm away from the body; shoulder adduction, on the other hand, involves moving the arm toward the body’s center.
The middle deltoid and supraspinatus shoulders muscles work together to move the arm away from the side of the body during shoulder abduction. The location of articulation for shoulder abduction is the glenohumeral joint, which joins the scapula and humerus.
When shoulder abduction is performed, a healthy shoulder can move 150 degrees; however, if the rotator cuff, the shoulder’s main muscular support, is injured, this range of motion will be considerably lowered. Shoulder abduction will be hampered by shoulder tendons or muscles that are weakened, inflamed, or torn.
Employees doing activities that often need shoulder abduction should be encouraged to practice shoulder strengthening exercises and given enough time for recovery periods to prevent injuries.
The reverse of shoulder adduction is shoulder abduction. When you bring the arm toward the midline of the body, shoulder adduction happens.
The Glenohumeral Joint is involved in shoulder abduction. The Glenoid Fossa of the Scapula is where the Head of the Humerus enters. Shoulder abduction cannot be performed without this joint and the muscles that stabilize it.
Shoulder Abduction Test
Physical exams called “shoulder abduction tests” or “shoulder abduction signs” are used to determine whether a patient has specific illnesses such as cervical root pathology. The patient should be seated upright to perform a shoulder abduction test. Bring the patient’s hand up to rest on the top of their head and instruct them to conduct a shoulder abduction. A beneficial test result would be if shoulder abduction reduced the patient’s symptoms.
Shoulder Horizontal Abduction
When you abduct the shoulder in the horizontal plane, it is known as shoulder horizontal abduction. Start with your arm straight out in front of you, aligned with your shoulder. Next, extend your arm out to the side horizontally, keeping the hand always parallel to the shoulder. The Banded Pull Together physical activity, where you start with both arms in front of the body and finish with both arms extended out to the sides of the body, demonstrates shoulder horizontal abduction. Exercises like shoulder horizontal abduction are excellent for building the Deltoids, Infraspinatus, and Teres Minor muscles’ strength.
Shoulder Abduction Muscles
- Several muscles in the shoulder and upper back are activated when you do shoulder abduction. The primary shoulder flexion muscles are,
- Anterior Deltoid
- Medial Deltoid
- Posterior Deltoid
- Supraspinatus
- Serratus Anterior
- Trapezius
Each of the major muscles contributes in various ways to the entire abduction of the shoulder when doing the exercise. The Deltoid abducts the arm to a maximum of 15 degrees, the supraspinatus from 15 to 90 degrees, and the trapezius and serratus anterior together abduct the shoulder to a maximum of beyond 90 degrees.
Shoulder Abduction Exercises
- Shoulder abduction is part of a few exercises. Several shoulder flexion exercises include:
- Lateral Raises
- Shoulder Press
- Jumping jacks
- Arm Circles
- Shoulder Fly
- Wall Slides
Isometric Shoulder Abduction

To perform effective exercises for isometric shoulder abduction:
- While keeping your body perpendicular to the wall, position yourself approximately six inches from the wall.
- You should place the shoulder you want to train close to the wall.
- Put your hand up against the wall. For a little added comfort, you might want to use a towel that has been folded.
- Try to lift your arm out to the side while gently pressing into the wall, and keep it there for five seconds.
- Release the wall’s pressure gradually.
- Again, modest pressure will be fine; there’s no need to force the wall over.
Proceed to the following exercise, which is intended to start your rotator cuff muscles functioning, after doing 10 to 15 repetitions of the first one.
Exercise with an exercise band
- Near your foot, wrap the workout band around a substantial, rigid item. Your impaired shoulder’s hand should be used to grasp the bar. Maintain a straight arm. Thumb pointing up, slowly lift your arm to the side. Then, gradually draw the bar as far over your head as you can without hurting yourself. Unless your doctor or physical therapist authorizes it, never elevate your arm over your head. Keep your shoulder from shrugging. Keep your body in this position for the specified duration. Return to the starting position gradually.
Exercise with a weight
- With your palm towards your body, hold a weight in your hand while standing. Raise your arm slowly to the side while pointing your thumb upward. Then extend your arm as high over your head as you can without experiencing pain. Keep your body in this position for the specified duration. Unless your doctor or physical therapist authorizes it, never elevate your arm over your head.
AAROM Shoulder Abduction – Wand Exercise
Slowly elevate your wounded arm to the side while holding a wand or cane with the injured side’s palm facing up and the uninjured side facing down.
- Repeat 8 Times
- Hold 12 Seconds
- Complete 2 Sets
- Perform 2 Times a Day
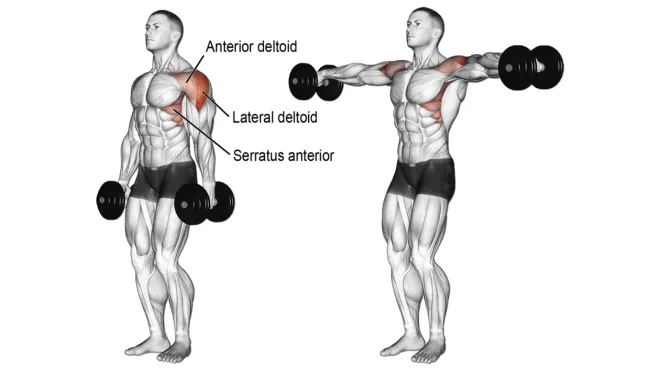
Lateral Raises
- Start by standing in a relaxed position with your feet hip-width apart and your knees slightly bent. Hold a pair of light dumbbells by your sides with your hands facing inward.
- Tighten your core while bringing your shoulders back and down.
- Lift your arms straight out to the sides so that they are shoulder height.
- Lower the weights back down to your sides slowly and steadily.
- Repeat as many times as necessary.
Dumbbell Shoulder Press
- The short instructions for the Dumbbell Shoulder Press while standing are given below:
- Stand with your legs slightly bent and your feet shoulder-width apart.
- Raise the dumbbells so that they are in line with your ears while holding one in each hand with your palms facing away from you (outward). Your elbows won’t be locked out, but they will be bent.
- Inhale deeply and raise the weights to your shoulders at the same time. Bring the dumbbells slowly back to ear level as you breathe.
- The movement should be repeated for the necessary number of repetitions and sets.
Jumping Jacks
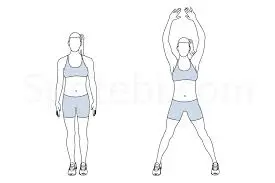
Jumping Jacks are a simple exercise to learn and execute. To perform a jumping jack, just follow these easy steps:
- Start by taking a tall stance and keeping your arms at your sides.
- Inhale deeply and flex your knees to get your body ready to launch higher. Bring your arms up as you stretch your knees to jump. and legs spread apart from the torso.
- Your feet should be around shoulder-width apart and your arms should create an arch over your head as you land after a leap. Keep in mind that this is one continuous motion, so as you jump, you are also extending your arms and feet apart.
- To execute a second jump, stoop at the knees. Bring your arms and legs back together as you are jumping. Back in the beginning position, you should be standing tall with your feet together and your arms at your sides as you land.
- For as long as you like, keep bouncing back and forth between the initial position and the stretched position!
Arm Circle Exercise
- Swing both of your arms behind you to begin, then bring them both forward in a circular motion. Make them as large as you can while maintaining a secure range of motion. Make sure that you perform the opposite circles as well after the forward ones.
Shoulder Abduction Pain
Shoulder Abduction Problems An impingement in the shoulder can cause pain. When a muscle or tendon becomes stuck in the bones of the shoulder, this happens. This could cause discomfort and make it challenging to abduct the shoulder. Shrugged Shoulders Overusing the shoulder joint and other Rotator Cuff injuries can both result in pain. In some cases, people’s subacromial spaces are too small, which might make shoulder impingement more likely.
Reduced range of motion, discomfort with movement, pain when sleeping, swelling, and radiating pain are just a few of the signs of shoulder abduction pain. Your physician can do specific tests to determine whether you have shoulder impingement and can then recommend the best course of action.
Prime Mover for Shoulder Abduction
The Deltoid is the main muscle involved in shoulder abduction. To be accurate, the Medial Deltoid.
Shoulder Abduction Pillow
A shoulder abduction pillow is an arm sling that offers support after an operation or other type of damage. These shoulder abduction pillows have a cushion that makes it possible to detach the arm from the body without using the shoulder abduction muscles.
Shoulder Abduction Degrees
The muscles that abduct the shoulder will contribute to a specific number of degrees of abduction, as we previously discussed. Supraspinatus starts shoulder adduction at a 15-degree angle. The Deltoid will then abduct the shoulder at an angle of 15 to 90 degrees. Finally, the shoulder will be abducted over 90 degrees by the trapezius and serratus anterior.
Shoulder Abduction Sling
A shoulder abduction pillow and sling are interchangeable terms. After a shoulder injury or surgery, it is beneficial to unload the muscles used in the abduction of the shoulder.
Shoulder Abduction Relief Sign
Relief from Shoulder Abduction The Shoulder Abduction Test, which we previously explained, is also known as a Sign. Ask the patient to lay the affected arm on top of their head while they are sitting up straight. It is a successful test for cervical root pathology if the patient’s symptoms are reduced.
Shoulder Abduction Goniometry
An instrument called a goniometer is used to assess a joint’s range of motion. Place the axis close to the Acromion Process, the stationary arm parallel to the Sternum, and the moving arm on top of the Humerus to perform shoulder abduction goniometry. Shoulder abduction has a typical range of motion of 180 degrees.
Shoulder Abduction Stretch
One Shoulder Abduction A wall slide or table slide can be used to stretch. Take a seat next to a table that is slightly over shoulder level. The wrist should be moved forward as the arm is extended across the table so that the armpit and head are becoming closer to the surface. Repeat the exercise while returning to your starting position. To help the arm go back and forth, it may be beneficial to slip a cloth beneath the wrist.
When carrying out the wall side, sit next to a wall with your fingertips resting at shoulder level on the wall. With your fingertips, slowly scale the wall until you get shoulder strain. 30 seconds should be spent in this position before switching sides.
Abduction Brace Shoulder
The Shoulder Abduction Sling and the Shoulder Abduction Pillow are sometimes referred to as the Abduction Brace Shoulder.
Shoulder Adduction
What is Shoulder Adduction?
When the arm moves toward the center of the body, it is said to be shoulder adducted. The opposite of shoulder abduction is shoulder adduction. The arm is added to the body (brought toward the body) in shoulder adduction, which makes it simple to recall the distinction between the two shoulder movements.
Shoulder Horizontal Adduction
Starting with the arm straight out in front of the body, the shoulder horizontal adduction is performed. The shoulder will be parallel to the hand.
Bring the arm toward the midline of the body while maintaining the hand and arm at shoulder height.
Shoulder Adduction Muscles
- Adduction of the shoulder involves many different kinds of muscles. The muscles involved in shoulder adduction include,
- Coracobrachialis
- Teres Major
- Biceps Brachii
- Latissimus Dorsi
- Pectoralis Major
- Trapezius
Prime Mover for Shoulder Adduction
The Pectoralis Major is the main muscle that performs adduction.
Shoulder Adduction Exercises
- The following are some examples of shoulder adduction exercises:
- Bench Press
- Cable Crossover
- Upright Row
- Face Pull
- Shoulder Adduction
Exercise with an exercise band
- The workout band should be tightened around a heavy, heavy object. Face away from the band’s anchor point as you stand. With your elbows bent, grasp the band’s ends in both hands. It would help if you didn’t have your elbows behind your body. Maintaining a parallel position with the floor, slowly straighten your elbows. Keep your body in this position for the specified duration. Return to the starting position gradually.
Exercise with a weight
- Lay on your back on an even surface and adduct your shoulders. Put your arm out in the shape of a “T.” To raise your forearm, bend your elbow. Weight should be in your hand. Straighten your elbow as you raise your arm slowly toward the ceiling. Keep your body in this position for the specified duration. Return to the starting position gradually.
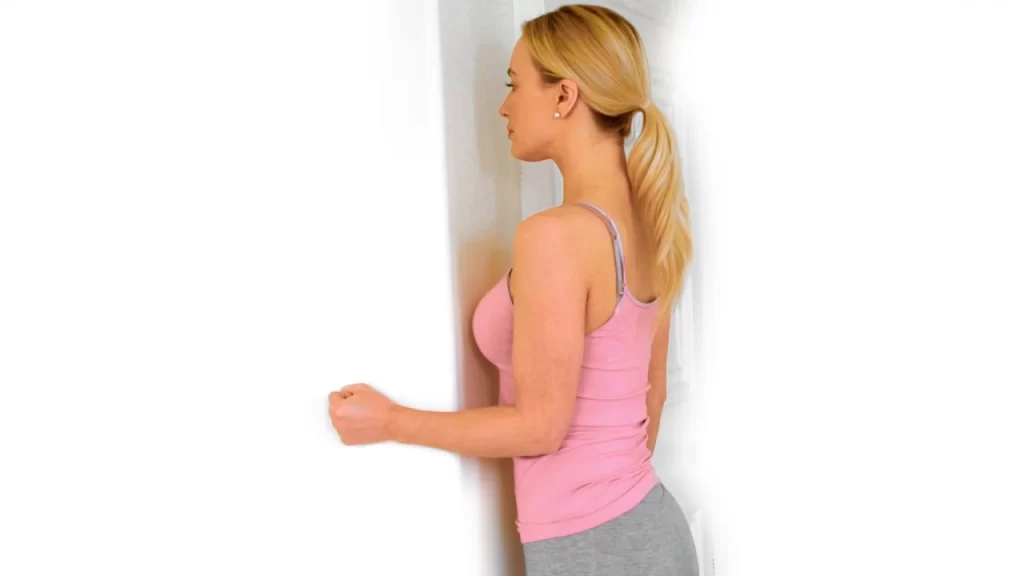
Isometric Adduction
- The shoulder adductor muscles can be first strengthened by performing simple isometric exercises.
- Put a cushion between your elbow and torso and bend your right elbow to a 90-degree angle at your side. The inside of your right palm should be up.
- Try to bring your elbow closer to your body by pressing it firmly on the pillow.
- Five to ten seconds of holding this squeeze before relaxing. Before resuming with the left arm, perform the exercise 10 times. Start by squeezing with 25% of your effort, and as it gets easier, increase it to 100%.
Shoulder Fly
- This exercise helps to adduct the shoulder by strengthening the pectoralis major muscle.
- Your arms should be at shoulder level when you are resting on your back. With your palms up and your elbows slightly bent, hold a weight in each hand.
- Slowly draw your palms together so that they touch in the middle of your chest.
- Lower the weights back to the ground after holding this posture for one to two seconds. Ten repetitions are required before a break. Start with a low weight (5 to 10 pounds) then increase it as you get more comfortable.
Resistance Band Adduction
- The adductor muscles of the shoulder are worked out with the use of an elastic band in this workout.
- Put an elastic band in the door and secure one end of it. Your right arm should be at shoulder level while you stand with your right side towards the entrance. With the palm of your right hand facing down, hold the opposite end of the band.
- Without bending your elbow, slowly bring your arm to your side.
- Hold your hand on your right side for one to two seconds before letting go and coming back to the beginning position. Before moving to the left arm, repeat this procedure ten times.
Lat Pull Down
- Your latissimus dorsi muscle, which joins to the front of your shoulder and aids in adduction, is strengthened by this exercise.
- A door’s top is secured with the center of a resistance band. Hold onto the ends of each band while holding your arms overhead.
- As you bend your elbows, pull the ends down and back towards your hips. Squeeze the shoulders together while doing this. Return the arms to their initial position after holding this position for one to two seconds. 10 times through the workout.
Bench Press
- Depending on the person’s objectives, there are several ways to do the bench press. This tutorial will go through the proper form required to maintain shoulder health and maximize strength:
- The barbell should be held exactly above your eyes when you lie down on the bench.
- Place your feet in a relaxed position; greater hip mobility will be required the closer your feet are to your torso. During the exercise, keep your feet stationary by pressing down through them for stability.
- Although it is safe to have an arch in the spine, it is recommended to do so in the upper back rather than the lower. Maintain a firm core throughout the exercise. To reduce energy losses, it is crucial to make the entire body tight.
- The muscles needed for a bench press will vary depending on how you hold the bar. activate a medium grip to activate all the muscles equally, as long as the grip is adequate if the hands are near the bar’s ring or surrounding it. Make little modifications and experiment to find the most comfortable grip.
- Throughout the whole lift, tighten your grip on the bar and keep your knuckles pointing up. you establish appropriate form, be sure you externally rotate the arms by visualizing bending the bar towards the body.
- Inhale as you raise the bar to your shoulders to complete the rep. It will be easier to keep the shoulder in a certain posture if you have a spotter to assist you when you first unrack the weight.
- Consider lifting the bar to the chest as an alternative to lowering it. By doing so, you’ll be able to pull back your shoulder blades and work your shoulder-supporting Latissimus Doris muscles. Bring the bar up to the sternum, being careful not to let the sternum drop at any time.
- Reverse the motion by pressing the weight back over the shoulders while maintaining a tight grip with the elbows.
Upright Row
Make careful to warm up properly before beginning the barbell upright row. To assist establish good technique, this can entail performing a warm-up set of the barbell upright row with less weight. The Barbell Upright Row is frequently performed improperly because of too much weight; using fewer weights during this exercise helps to better connect to the muscle and is safer. To learn how to execute the barbell upright row, follow these instructions:
- Like the deadlift or bench press grips, hold the barbell around shoulder width. Try out several grips to see which one feels the greatest and engages the upper back and shoulders the most. Grip position differs from person to person.
- Squeeze your glutes while maintaining balance on your feet and breathing into your lower abs (the diaphragm). This will stop energy leaks and promote the inclusion of the movement’s core.
- Pull the bar up while keeping it close to your body, stopping when it hits your sternum or the highest comfortable height. Throughout the motion,
- keep the elbows high and directly over the wrists.
- With a deep breath, drop the bar while keeping the elbows up and close to your body. Try to maintain the arms moving throughout the full rep and switch to the next one just before lowering the arms all the way down for a strong deltoid contraction.
Face Pull
If you’re unsure how to do the Face Pull, just follow the simple instructions below:
- Position the pulley so that it is above the head. Attach a rope to the pulley securely. Hold the attachment’s handle with both hands. As soon as your arms are completely stretched in front of you, step back from the machine. Your upper body will be slightly leaned back and your feet will be firmly planted on the ground.
- Pulling the rope towards your forehead with your arms after bracing your core. Instead of bringing your elbows straight back, you should get them back and out. Your hands should be facing each other while you hold the object with an overhand grip. Before returning the arms to their extended state, pause for two counts.
- Use a calm, deliberate movement to go back to the starting position. For the necessary number of reps and sets, perform the Face Pull.
Shoulder Adduction Pain
The Acromioclavicular Joint may be dysfunctional if you feel pain with shoulder adduction. Your doctor can do a specialized test called the Cross-Arm Test to discover whether you have a positive result and then provide you with the right course of therapy.
ROM OF Shoulder Adduction
Shoulder Adduction as Per Usual In a healthy shoulder, the range of motion is typically between 30 and 50 degrees
Shoulder Adduction Test
The Cross-Arm Test is a shoulder adduction test that can identify whether the Acromioclavicular Joint is dysfunctional. Ask the patient to elevate the injured arm to a 90-degree angle in front of them. The arm should then be adducted across the torso. If there is discomfort, the test is positive.
Shoulder Adduction Stretch
The Shoulder Adduction Stretch is an easy exercise that helps in stretching the shoulder muscles. Adduct the arm across the body after raising it to 90 degrees of flexion. To intensify the stretch, you can draw the elbow of the active arm closer to the body with the free arm.
Shoulder Adduction Range of Motion
Shoulder adduction generally involves a range of motion of 30 to 50 degrees. Depending on each individual’s muscle makeup and limb length, this range will vary.
FAQs
Abduction is the term for the humerus moving laterally upward and away from the body in the scapular plane.
Adduction is the downward, medial movement of the humerus toward the body following abduction in the scapular plane.
Keep in mind that shoulder abduction occurs when you move your arm away from your body’s midsection. Shoulder abduction can be seen during the first half of a Jumping Jack when the arms are raised over the head.
A joint or limb is said to be abducted when it moves away from the midline of your body. While in the instance of adduction, the limb or joint is moving in the direction of the body’s midline.
Adduction moves the fingers or toes toward the middle of the hand or foot. Drawing two fingers together in adduction would be similar to doing so if they were far apart. Other examples of adduction include pulling the arms to the chest or drawing the legs together.
You may externally rotate your arm in the shoulder socket thanks to the infraspinatus. The teres minor muscle in your arm helps in rotation. Arm abduction—holding your arm straight out and away from your body—is controlled by the subscapularis.

One Comment