
Sartorius muscle Anatomy, Origin, Insertion, Function, Exercise
Table of Contents
Introduction
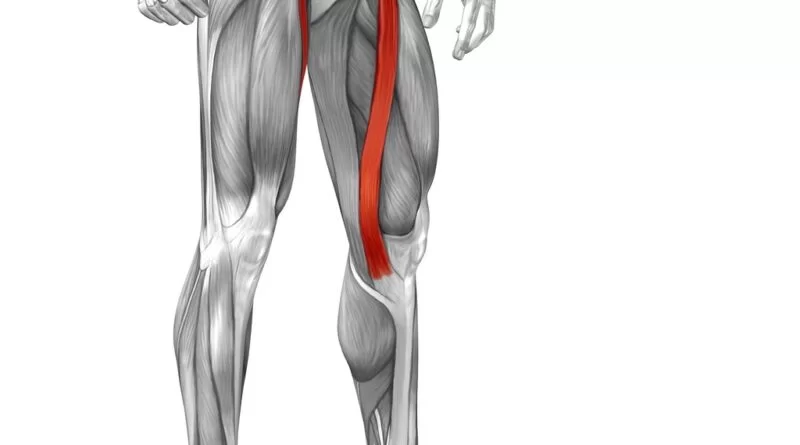
- You have a sartorius muscle on the sides of the body, each starting on the anterior superior iliac spine of the pelvis. From its start, the sartorius then crosses the front of the thigh, angling inward, ultimately ending on the medial side of the tibia.
- Because the sartorius runs through the two joints-the hip and the knee-the muscle plays a role in motion at both joints. The actions of the sartorius involve:
- Hip flexion: Flexing at the hip, as when a person marches in place with high knees
- Hip abduction: Dragging your leg away from your midline, as when you draw a step to the side
- External hip rotation: Rotating the leg outside so the thigh, knee, & toes turn toward the side of the room
- Knee flexion: Flexing the knee to move the heel toward the glutes
- The tree poses in yoga are an example of an exercise that needs all of the sartorius actions. When you do a tree pose, you have to flex the hip & knee to move the foot upward.
- You then have to abduct & rotate the hip outward of the room to put the bottom of the raised foot on the inside of the stationary leg. Cross-legged sitting is also the best example of sartorius muscle action.
Origin & insertion of Sartorius muscle
- The sartorius muscle originates from a round tendon from the anterior superior iliac spine & the upper half of the notch between the anterior superior iliac crest & the anterior inferior iliac spine. The fibers form a thin, flat muscle, which extends anteromedially across the anterior surface of the thigh.
- The muscle descends in an almost vertical fashion through the medial side of the thigh. It crosses the medial side of the knee joint & then inserts onto the medial side of the proximal tibia, anterior to the gracilis & semitendinosus muscles.
- The inserting tendons of these 3 muscles form a wide aponeurotic sheath known as the pes anserinus. Some fibers from the inferior portion of the tendon blend with the medial collateral ligament of the knee joint, & the deep fascia over the medial aspect of the leg, while some superior fibers merge with the knee joint capsule. These connections give to the medial stability of the knee joint.
Structure of Sartorius muscle
- The sartorius muscle arises from the anterior superior iliac spine, & the part of the notch between the anterior superior iliac crest & anterior inferior iliac spine. It runs obliquely across the upper & anterior portion of the thigh in an inferomedial direction.
- It passes behind the medial condyle of the femur to end in a tendon. This tendon curves anteriorly to join the tendons of the gracilis & semitendinosus muscles in the pes anserinus, where it inserts into the superomedial surface of the tibia.
- Its upper part forms the lateral border of the femoral triangle, & the point where it crosses the adductor longus marks the triangle’s apex.
- Deep to the sartorius & its fascia is the adductor canal, through which the saphenous nerve, femoral artery & vein, & nerve to vastus medialis pass.
Function of Sartorius muscle
- At the hip it flexes, weakly abducts, & rotates the thigh laterally. At the knee, it can flex the leg; when the knee is flexed, it also turns the leg medially.
- This muscle plays a central part in the stabilization of the pelvis—especially in women. This is due to the constrictive affect the muscles on both sides of the body have on the pubic symphysis.
Relations
- The sartorius muscle is located superficially in the thigh, with only fascia & skin over its surface. Deep to the sartorius muscle is the quadriceps femoris muscle.
- As it crosses from the lateral to the medial side of the thigh, the sartorius muscle crosses the surfaces of the iliopsoas, pectineus & adductor longus muscles. The tensor fasciae latae muscle arises just lateral to the proximal attachment of the sartorius muscle.
- The medial edge of the sartorius forms the lateral border of a main anatomical space called the femoral triangle. The triangle is completed superiorly by the inguinal ligament & medially by the medial margin of the adductor longus muscle. The structures found within the triangle, the femoral artery, vein & nerve, therefore, lie medial to the sartorius. The femoral artery resume inferiorly, deep to the sartorius.
Nerve supply
- Like the other muscles in the anterior compartment of the thigh, the sartorius is supplied by the femoral nerve.
Variation
- It may arise from the outer end of the inguinal ligament, the notch of the ilium, the ilio-pectineal line, or the pubis.
- The muscle may be split into 2 parts, & one part may be inserted into the fascia lata, the femur, the ligament of the patella, or the tendon of the semitendinosus.
- The tendon of insertion may end in the fascia lata, the capsule of the knee joint, or the fascia of the leg.
- The muscle may be absent in some people.
Blood supply
As sartorius is such a long muscle, it comes as no surprise that it needs extensive vascular supply from several sources:
- The proximal 3rd may receive its vascular supply from the branches of the femoral, deep femoral, lateral circumflex femoral arteries & or artery of quadriceps (branch of either the femoral, deep femoral, & lateral circumflex femoral artery).
- The middle 3rd is supplied by branches of the femoral artery.
- The distal 3rd receives blood supply from the femoral artery & descending genicular artery.
Clinical important:
Pes anserine bursitis:
- One of the many conditions that can disrupt the use of the sartorius muscle is pes anserine bursitis, an inflammatory condition of the medial portion of the knee. This condition usually happens in athletes from overuse & is characterized by pain, swelling, and tenderness.
- The pes anserinus involves the tendons of the gracilis, semitendinosus, and sartorius muscles; these tendons attach to the anteromedial portion of the proximal tibia. When inflammation of the bursae underlying the tendons happen, they separate from the head of the tibia. If the inflammation is overseen & poorly treated (rest, cooling, pain medication, local corticoid injection if necessary) bursitis often becomes chronic.
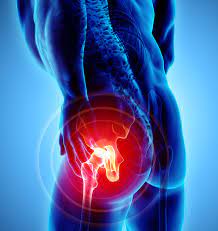
Anterior Superior Iliac Spine (ASIS) Avulsion
- Young athletes are permitted to ASIS avulsion injuries through the physis. These injuries typically happen secondary to indirect trauma via a sudden, forceful contraction of the sartorius muscle, along with the tensor fascia lata. The ossification of the apophysis usually does not happen until ages 21 to 25. Prior to this ossification happening, there is a weak point at the muscle-tendon-bone interface, which permitting to an avulsion. This generally occurs while the hip is in an extended position, like sprinting and swinging a bat
- Avulsions of ASIS is most often treated conservatively. This involves rest, stretching, protected weight-bearing with the aid of crutches, & the early commencing of range of movement exercises. There are indications, for operative treatment of this injury. If there is a displacement of the piece, there is a risk of irritation, and loss of strength, as well as healing of the part in a displaced position if the injury is treated by conservative means.
- Open reduction internal fixation (ORIF) is specified when the avulsion of the ASIS displaces by a distance of more than 2-3 centimeters. Painful non-unions are also an indication of surgical fixation. There are many different options, including the lag screw & the tension band fixation.
Sartorius muscle strain:
- Musculus sartorius is an upper leg muscle that has an origin at the spine iliaca anterior superior of the pelvic bone, it down diagonally along the whole length of the femur & then connects to the proximal medial portion of the tibia. It is the longest muscle on the human body & its function is knee flexion, but it also has a synergistic role with the internal rotation of the hip. It is commonly called the tailor muscle, due to the fact that it is active in a position that is very general for this profession, ie. when the legs are crossed with one leg going over the other, the muscle. the sartorius muscle is active during the movement of crossing the legs & it can also very often lead to problems if this position & movement is perpetuated continuously.
- Injuries or damage to the sartorius muscle can lead to pain & problems in the groin & the hip region, due to the simple fact that its origin is in that part. Sartorius muscle strain can lead to difficulties during daily activities such as walking, getting dressed & sports activities. A strained sartorius occurs when during a movement anterior upper leg musculature gets overly extended & excessive loads are put on it leading to the muscles, along with the sartorius muscle getting overstretched. Smaller & bigger muscle fiber ruptures can also happen when the muscle gets strained & overstretched.
Sartorius muscle tendonitis:
- Tendonitis causes Sartorius muscle pain & limited mobility of the muscle. You may feel pain in the front of the hip while flexing & rotating it during walking. Therapy may help decrease the inflammation of the muscle & improve its ability to contract properly to help you regain mobility.
Sartorius muscle tear:
- A tear to the sartorius muscle may need a significant period of immobility & rest to allow for the muscle to heal. Once healing has taken place, the PT may work with you to improve scar tissue mobility, improve sartorius muscle flexibility, & improve the strength of the muscle.
Weakness due to nerve injury:
- Nerve compression in the lower back due to herniated disc & spinal foraminal stenosis can produce pain & weakness in the front of the thigh, affecting the sartorius. Treatment may include exercises to relieve nerve compression & to correct the posture.
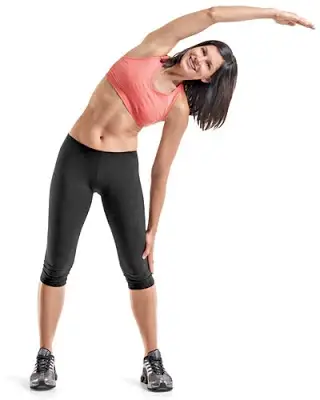
Sartorius muscle stretching exercises:
There are some types of stretching you can perform :
- Kneeling Stretch
- Standing Stretch
- Butterfly stretch
- Fire Log Pose

Kneeling Stretch
- How to perform this stretch: Kneel with your left knee on the ground, the right knee bent at a 90-degree angle in front of you, with that foot flat on the floor. Support yourself against a wall, if you need, to keep the balance.
- Maintain the spine upright and imagine the pelvis as a bucket full of water. Maintaining the pelvis in neutral position-that is, neither tilting forward nor backward-will maintain the imaginary water from spilling out.
- Lean forward with the spine still completely straight. Think of pushing the pelvis forward while still keeping its level.
- Clenching the buttock muscles while you perform may help you get a feel for the right motion.
- Pause the stretch for between 10-30 seconds, breathing normally as you perform so, then gently release and repeat on the other side. Repeat the kneeling stretch 2 to5 times on each leg.
Standing Stretch
- How to perform this stretch: Stand on the left leg. Support yourself against a sturdy piece of equipment if necessary to keep your balance.
- Put the right heel close to the buttocks.
- Grasp the right foot in both hands if possible or in the right hand to help maintain it close to the body.
- Imagine pushing the hips forward without any arching of the back. You can feel the stretch in the front of the hip & possibly down the inner side of the thigh as well.
- Breathe normally. Pause the stretch for 15-30 seconds, then gently release and repeat on the other side.
Butterfly stretch
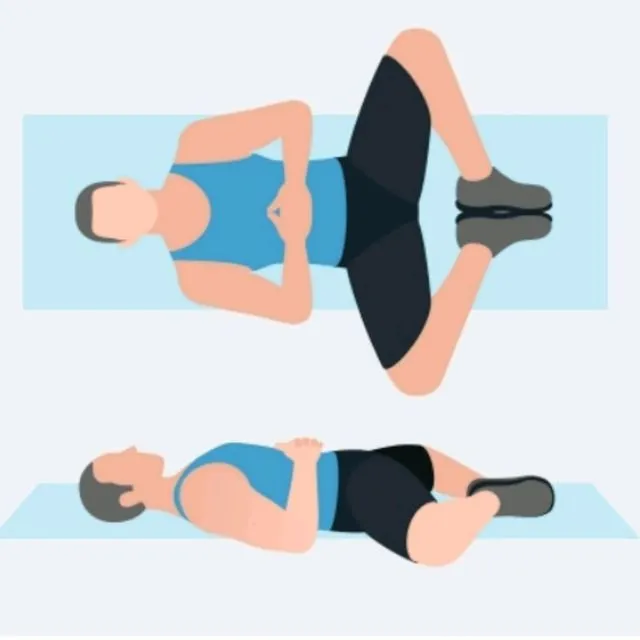
- How to perform this stretch: Sit down on the mat with the legs in front of you.
- Reach forward and grab the left foot. It is ok to flex the knee to help the hand and foot join.
- Slowly pull your left foot up towards the groin bending until it is at a cozy spot and the sole is facing the right thigh.
- Flex the right knee to bring your right foot toward your groin so that it’s sole touches the sole of the left foot.
- Grasp the feet with your hands & place your elbows on the knees.
- While keeping the back upright, allow your knees to fall toward the ground. You can give some pressure on the inner thigh by pressing slowly on the knees with the elbows.
- When you feel stretched hold it for 60 seconds.
- Repeat 3- 4 times.
Fire Log Pose
- How to perform this: In a sitting position on 1 edge of a thickly-folded blanket, knees bent, and feet on the ground. slowly shrug your shoulders up, and maintain the spine upright.
- Slide the right foot under the left leg to the outside of the left hip, and lay the outer leg on the ground. Then, stack the left leg on top of the right.
- If you have more flexibility in the hips, you can slide the right shin forward directly below the left to increase the challenge; otherwise, maintain the right heel beside the left hip. If the hips muscles are tight, you may perceive that bringing the ankle to the outer knee is uncomfortable. In this take sit with the shins crossed in the Sukhasana position.
- Press through the heels & spread the toes. Keep your front upper body long, exhale & bend forward from the groins. Tell that not to round forward from the belly. Lay the hands on the floor in front of the shins.
What are the common mistakes you might be taken care of?
There are some mistakes you require to know about are :
- Bouncing – Bouncing in the stretch can pull on tendons & muscle ending points instead of lengthening the muscle. Bouncing beats the purpose of the stretch, which is to lengthen & relax the muscles. Use slow, smooth motion when doing the stretch.
- Pressing Down Forcefully – Do not press down with more force during the butterfly stretch. Just like bouncing, this can put extra pressure on the tendons, insertion points,& ligaments-so making you more prone to injury & overstretching.
- Holding the Breath – you do have not to hold your breath during stretching. Inhale as you release & exhale as you start performing the work.
What are the safety precautions you require to follow?
Some safety matters you need to know:
- You will feel a stretch in the sartorius muscle, but you might not feel any pain. If you do perceive pain, let go of the stretch.
- If you have had a knee, talk to the physical therapist about whether you might perform this stretch.
- Never perform stretching into prior injury parts. such as fracture, & strain.
Health Benefits of sartorius muscle stretching:
There are many benefits you can gain. those are:
- It improves the range of motion in the hip & knee joints such as hip flexion, abduction, external rotation, and knee flexion.
- It assists you during walking.
- It is also for cross-leg sitting positions.
- You can perform daily tasks better if you don’t have sartorius muscle tightness.
- It releases tightness of surrounding muscles because its origin and insertion are covers 2 joints.
- It improves blood circulation in the portion.
- It increases the flexibility & mobility of muscles.
- Reduce the risk of sartorius muscle pain
Strengthening exercise for Sartorius’s muscle:
- Plie Squats
- Clam Exercise
- Step-ups
- Lateral band walks

Plie Squats
- For the Plie Squats first abduct the hip joint by creating a wide base of support, stepping the feet out laterally from the midline.
- Then rotate the hip joint outward, so that the thighs, knees & feet point toward the sides of the room.
- Bend the knee & hip joint lowering the glutes muscle straight down while keeping the hip joint externally rotated so that the knee joint remains aligned with the toes.
- When the knee joint form a 90-degree angle, press the heels & return to the standing position.
- This exercise is performed to 10 repetitions in 1 session.
- This exercise is also done with dumbbells & a barbell to increase the resistance.
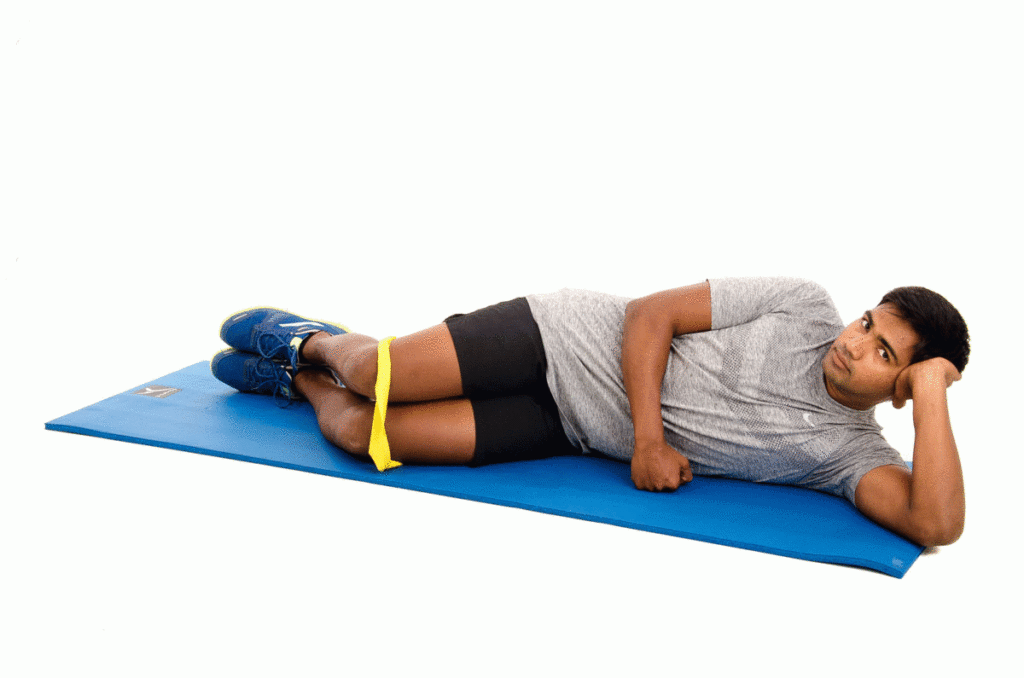
Clam Exercise
- The patient is lying on the affected side & bottom the arm extended upward to support the head & neck.
- Flex the hip & knee joints so that the thighs are positioned at a 90-degree angle to the torso & knees are also bent at roughly 90 degrees.
- Make sure the shoulder joint, hip joint & knee joint are stacked, and the body is perpendicular to the floor.
- Keep the big toes touching, tighten the core muscle & externally rotate the hip joint & knee joints open, as though the clam opening up.
- Rotate as far as comfortably with good form, then reverse the movement of exercise means, internally rotating the hip joint back into the starting position.
- Perform this exercise in 10 repetitions before repeating it on the opposite side.
- For the resistance used a small looped resistance band in the exercise.

Step-ups
- The starting position for the test is the standing position.
- Place one foot onto a platform, or step bench /to the lowest step of the staircase.
- The patient must be kept straight onto the pelvis level.
- Bend to the knee joint then slowly lower to the opposite foot onto the floor.
- Lightly touch the toe onto the floor, then rise to back up the position.
- Repeat this Step-ups exercise 10 times in 1 session & 3 sessions per day.
- This Step-up exercise targets almost all the muscles of the lower body but mostly the sartorius muscle.

Lateral band walks:
- For this exercise, used one prop-looped resistance band.
- The patient places the band around the legs, above the ankle joint.
- Then Bend both legs slightly & move the right leg laterally.
- Pull the band against the resistance & move the left leg closer.
- Then Take at least 10-12 steps in the right direction in the same way.
- Repeat this exercise with the other side.
Yoga pose for Sartorius’s muscle
- Reclining Hero Pose (Supta Virasana)
- Half-Reclining Hero Pose (Ardha Supta Virasana)
- Bow Pose (Dhanurasana)
- Camel Pose (Ustrasana)
- Firefly Pose (Tittibhasana)
- High Lunge
- Low Lunge (Anjaneyasana)
- One-Legged King Pigeon Pose
- Tree pose
Supta Virasana (Reclining Hero Pose)

- The patient is first to Perform Virasana means Exhale & lower the back torso toward the floor.
- The patient is First to lean onto the hands, then the forearms & elbow joints.
- Once the hand is on the elbow joint, place the hands on the back of the pelvis & release the lower back & upper buttocks by spreading the flesh down toward the tailbone.
- Then Sink the heads of the thighbones deep into the back of the hip joint sockets.
- It is alright to lift the knee joint a little away from the floor to help soften the groins
- The patient is also raising the knee joint a few inches with a help of a thickly folded blanket.
- In To begin position, stay in this pose for 30 seconds to 1 minute.
- Then Gradually extend the time & try to stay in the yoga pose for 5 minutes.
Ardha Supta Virasana (Half-Reclining Hero Pose)
- The patient is in a kneeling position towards the front of the mat.
- Bring the right foot flat to the mat & drop down inside the left foot.
- Walk the right foot out to the right as far as the patient needs to so that both sitting bones are flat on the mat.
- Check the left foot & toes point straight back& that the right knee points straight ahead.
- Place the hands behind, palms down & fingertips facing forwards & lean back till the feel the stretch in the left quad.
- The patient is come down onto the elbows or lowers the down to the mat, brings the arms up overhead & holds onto the opposite elbow joint.
- To increase the intensity, the patient hugs the right knee into the chest.
- The patient holds this pose for 3-5 slow breaths.
- Then Release the arms, bring the hands to the mat & carefully press the back up for the other side.
Dhanurasana (Bow pose)
- The patient is lying on the belly on the mat, with a blanket under the pelvis.
- Press all of the toes into the floor & then bend the knee joint, must keep the toes active.
- Grab the outer edges of the ankles with the hands & flex the feet strongly.
- During the inhalation, lift the rib cage & shoulders toward the ears.
- During the exhalation lengthen the tailbone & kick the legs back into the hands as they hold on firmly.
- Then lift the head & heart.
- Press down through the thighs to lift the chest.
- The patient is stay in the pose for 30 seconds.
Ustrasana (Camel Pose) :
- The patient is in a Kneeling position on the mat with both knees shoulder-width apart.
- Then Reach to the back & place the hands on to the bottoms of the feet.
- The patient becomes an Arch into a backbend
- So that the head is falling back & gazing at the wall behind the body.
- Hold this yoga pose for 30 seconds & repeat for several times.
Tittibhasana (Firefly Pose)

- Start with a Standing Forward Bend, with the toes pointing slightly out toes & the knees slightly bent.
- Take the right hand through the legs to clasp the right calf, placing the right shoulder behind the right knee.
- Then place the right hand on the floor behind the heel with fingers facing forward.
- Repeat this pose on the left side.
- Tilt the chest forward & carefully lower the legs onto the backs of the upper arms.
- Inhale, lift the feet off the mat & straighten the legs.
- The patient’s feet are pointed/flexed.
- Hold this yoga pose for 15 seconds & for a longer time, then release the feet to the floor with an exhale.
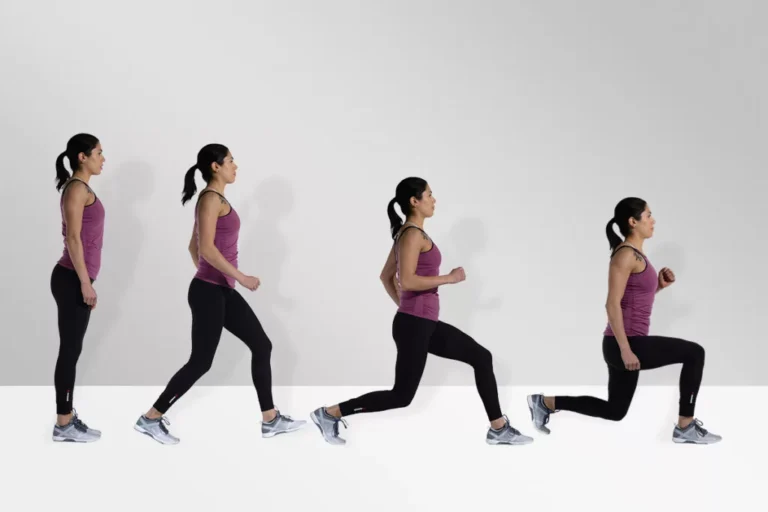
High Lunge
- Start with this yoga pose Adho Mukha Svanasana = Downward-Facing Dog.
- Exhale & step the right foot forward between the hands, aligning the knee joint over the heel.
- Keep the left leg strong & firm.
- The patient is Inhale & raises the torso to upright.
- At the same time, sweep the arms wide to the sides & raise them overhead, palms facing
- Must Be careful not to overarch of the lower back.
- Lengthen the tailbone toward the floor & reach back through the left heel.
- Be sure not to press the front ribs forward.
- Draw them down & into the torso.
- Then Lift the arms from the lower back ribs, reaching through the little fingers.
- Hold this pose for 30 seconds to 1 minute.
Low Lunge
- Start with the Downward-Facing Dog then exhale & step the right foot forward between the hands, aligning the right knee joint over the heel.
- Then lower the left knee to the floor & keep the right knee fixed in place, and slide the left back till they feel a comfortable stretch in the left front thigh & groin.
- Turn the top of the left foot to the floor.
- Inhale & lift the torso upright.
- Sweep the arms out to the sides & up, perpendicular to the floor.
- Draw the tailbone down toward the floor & lift the pubic bone toward the navel.
- Lift the chest from the firmness of the shoulder blades against the back torso.
- Take the head back & look up, being too careful not to jam the back of the neck.
- Hold for a minute, exhale the torso back to the right thigh & hands to the floor,& turn to back toes under
One-Legged King Pigeon Pose
- Starting on the hands & knees, slide the left knee forward, angling the left shin under the torso so that the left foot is at the front of the right knee & the outside of the left shin is resting on the floor.
- Slowly slide the right leg back, straightening the knee & resting the top of the thigh on the floor.
- Lower the outer left backside to the floor.
- Position the left heel just in front of the right hip joint.
- left knee is an angle slightly to the left, outside the line of the hip joint.
- Look back at the right leg. It extends the straight back from the hip joint.
- Lift the torso away from the thigh.
- Lengthen the lower back by pressing the tailbone down & forward.
- Draw the right front hip point slightly forward, toward the left heel.
- Stay in the pose for a few breaths, release the hands one by one & lower the torso over the left leg & down to the floor.
- The patient is held for a few breaths & repeats with the other side.
Tree pose

- This yoga pose is also known as the Vrksasana.
- The patient is standing in the Tadasana position means Spreading the toes, pressing the feet into the mat & firm the leg muscles.
- Then Raise the front hip points toward the lower ribs which are gently lifted in the lower belly.
- The patient inhales deeply, lifting the chest & exhales as they draw the shoulder blades down the back.
- The patient is looking straight ahead.
- Place the hands on the hip joint & raise the right foot high onto the left thigh or shin.
- Avoid making contact with the knee joint.
- Press the right foot & left leg with each other.
- Hold this yoga pose for several breaths, then step back into Mountain Pose & repeat this yoga pose on the other side.
FAQ
Sartorius’s muscle is called the honeymoon muscle as it causes abduction & lateral rotation at the hip.
Due to its oblique course, the sartorius muscle flexes, abducts & externally rotates the thigh, and flexes & internally rotates the leg.
This inflammation may be experienced as pain and hypersensitivity on the inside of the knee. Other symptoms of sartorius-
related muscle pain can include a burning or stinging sensation at the front of the hip. This pain may be on by an overt trauma, such as an athletic injury.
Most problems with the sartorius muscle and the associated muscles heal within 4 to 6 weeks. The specific course of treatment may be shorter or longer depending on the severity of the injury & any other health issues or injuries you have.
For individuals who sit for longer periods, tight hips & tight hip flexors including the sartorius muscle are common. As a result, hip pain or an uneven gait may happen. However, the anterior hip pain caused by a tight sartorius is also mistaken for issues with the psoas & the iliacus.
General treatments include a combination of anti-inflammatory medication to reduce pain & swelling, stretching exercises, icing the part affected rest, & rehabilitation exercises.
To achieve a sartorius muscle stretch, find a position that combines the motion of hip extension, internal rotation &adduction. In a seated position turn the thigh inwards, push the hips forward, & the pressing your knee to the floor.
If the bursa underlying the tendons of the sartorius, gracilis,& semitendinosus gets irritated from overuse & injury, a patient can develop this ailment. This condition commonly occurs in athletes from overuse & the is a common cause of chronic knee weakness and pain.

3 Comments