PROCEDURE FOR NECK AND TRUNK RANGE OF MOTION
Table of Contents
Introduction of the neck and trunk ROM
- The range of motion of the cervical spine and trunk is measured by the physiotherapist using a goniometer or inclinometer or even by tape. The goniometer is a metal or plastic handheld device with two arms. Numbers representing angular distance are on a device, much like the protractor. The physical therapist lines up the arms along with the body, and then the therapist can move the body in specific directions as well as measure the amount of motion that occurs in the cervical and lumbar spine.
- Measuring the range of motion of the cervical as well as lumbar spine is usually a painless procedure. There are some instances after surgery or injury where measuring the range of motion may be painful, but the pain is usually short-lived as well as only occurs during the measurement.
What is the goniometer?
- A goniometer is a metal or plastic device with two arms that are used to measure the range of motion of the lumbar spine as well as the cervical spine. The goniometer is placed on a head as well as measured by looking at the numbers to represent angular distance on a device. To measure the cervical as well as lumbar spine range of motion a physical therapist most commonly use the goniometer. If a patient is suffering from a reduced range of motion in the cervical and lumbar spine, a physiotherapist may use a goniometer to assess what a range of motion is at the starting of the assessment, and then a physical therapist makes sure that the intervention is working by using the goniometer in subsequent sessions as well.
Various types of a Goniometer
There are many types of goniometers available, but of all the types, a universal goniometer is the most widely used.
- Universal Goniometer
The universal goniometer comes in two forms, the first one is the short arm, as well as the second one, is the long arm. A short arm goniometer is used for smaller joints namely, the wrist, elbow, or even ankle, while long arm goniometers are more accurate for the joints along with long levers namely the knee and hip joints as well. - Gravity Goniometer/Inclinometer
In the type of goniometer, one arm has a weighted pointer that remains vertical under the influence of gravity. - Software/Smartphone-based Goniometer
A smartphone as the digital goniometer has several benefits namely availability, ease of measurement, application-based tracking of the measurements, as well as one-hand use. These types of goniometers use the accelerometers in phones to calculate knee joint angles. - Arthrodial Goniometer
This is ideal for measuring cervical rotation, anteroposterior flexion, as well as lateral flexion of the cervical spine. - Twin axis electrogoniometer
An inter-rater, as well as intra-rater reliability of the electrogoniometer, is higher than un universal goniometer still challenging to apply in a clinical evaluation of the patient, thus used more often for research purposes.
Measurement for the cervical range of motion
Techniques for using a goniometer
- It is essential that the single notation system is used in measuring the cervical range by a goniometer. The neutral zero method meaning 0 degrees to a 180-degree system is the most widely used system for measuring the cervical range of motion. The same goniometer can always be used to reduce the chances of instrumental error.
Position and stabilize the cervical spine correctly
- Move a body part through its appropriate cervical range of motion (ROM).
- Determine a cervical spine’s end of a range of motion and end-feel as well.
- Palpate the appropriate bony landmarks.
- Align a goniometer with a cervical spine’s landmarks.
- After that, read the measuring instrument properly.
- Record measurements correctly (both cervical’s active as well as passive range of motion should be measured and recorded respectively).
- The range of motion of a cervical spine should be measured in isolation, to avoid trick movements (simultaneous motion of another joint) and muscle insufficiency which may alter the reading.
Cervical movements
- Cervical flexion: Bending a head forward towards the chest side.
- Cervical extension: Bending a head backward with a face towards the sky as well as away from the chest.
- Cervical rotation: Turning a head to the left or even the right side.
- Cervical side-bending: Tipping a head to the left or even the right side or touching the ear to a shoulder of the same side.
Measurement
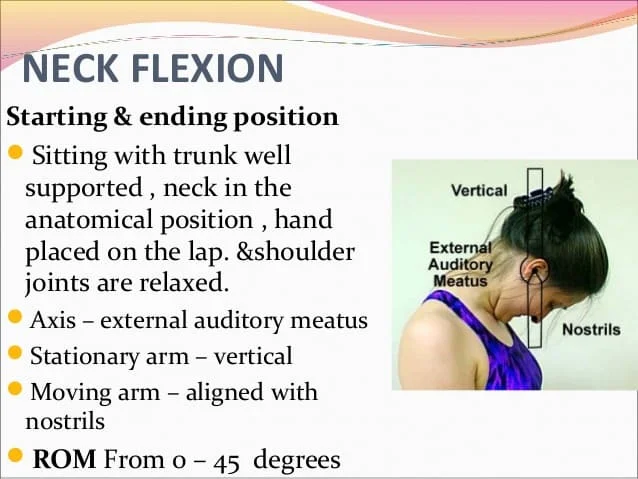
- Anatomical motion: Cervical flexion
- Recommended testing position: Sitting, with thoracic as well as lumbar spine well supported by the back of the chair. The tongue depressor can be held between teeth for reference.
- Stabilization: A shoulder girdle is stabilized to prevent flexion of the thoracic as well as the lumbar spine.
- Center: Over the external auditory meatus
- Proximal arm: Perpendicular or parallel to the ground.
- Distal arm: With a base of nares or parallel to a longitudinal axis of the tongue depressor
- Normal range: From 0 degrees to 45 degrees.
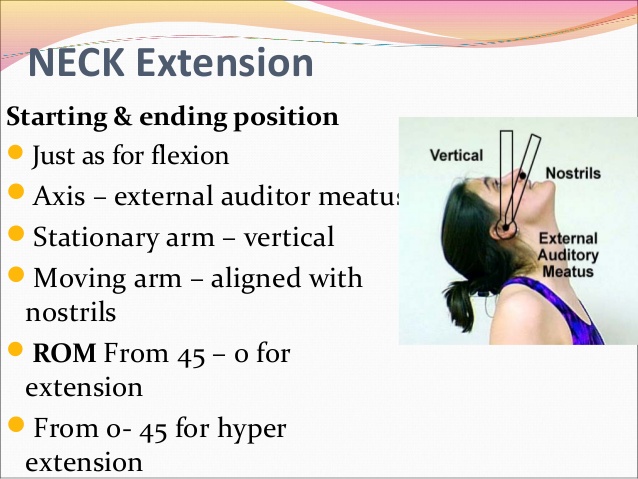
- Anatomical motion: Cervical extension
- Recommended testing position: Sitting, along with thoracic as well as lumbar spine well supported by the back of the chair. The tongue depressor can be held between teeth for reference
- Stabilization: A shoulder girdle is stabilized to prevent flexion of the thoracic as well as the lumbar spine
- Center: Over the external auditory meatus
- Proximal arm: Perpendicular or parallel to the ground.
- Distal arm: With the base of nares or even parallel to a longitudinal axis of the tongue depressor
- Normal range: From 0 degrees to 45 degrees.
- Tape Measure for the flexion and extension of the movement
The lowest end of a sternal notch should be identified as a fixed point or even a reference point. After that, ask a patient to flex as well as extend their neck. Measure the distance between a reference point to the chin while maximal flexion as well as extension. - Inclinometer for the measurement of the flexion and the extension movement
Place an inclinometer device on the top of a patient’s head, along with the sagittal plane, and ensure the reading on an inclinometer is at 0°. After that, ask the patient to flex as well as extend the neck. Record readings of an inclinometer at each extra
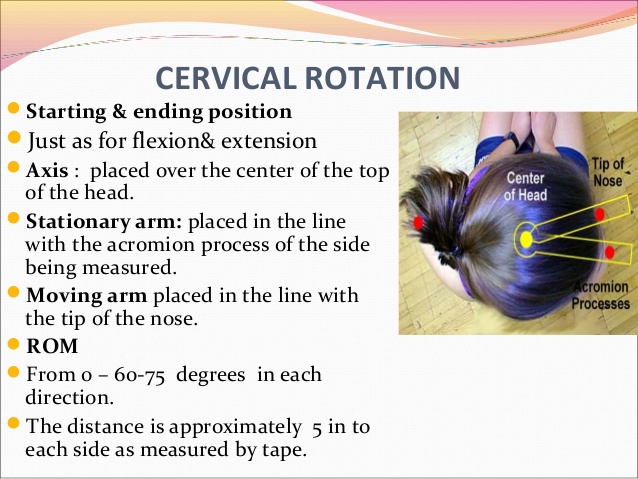
- Anatomical motion: Cervical rotation
- Recommended testing position: Sitting, along with thoracic as well as lumbar spine well supported by the back of the chair. The cervical spine in 0 degrees of flexion, 0 degrees of extension, as well as 0degree of lateral flexion. The tongue depressor can be held between teeth for reference.
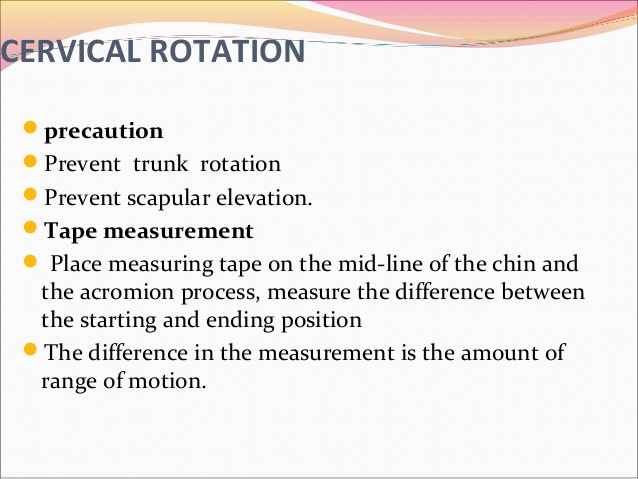
- Stabilization: A shoulder girdle is stabilized to prevent rotation of the thoracic as well as the lumbar spine.
- Center: Over the center of a cranial aspect of the head
- Proximal arm: Parallel to the imaginary line between the two acromial processes
- Distal arm: With a tip of the nose. If using a tongue depressor, then parallel to the longitudinal axis of a tongue depressor.
- Normal range: From 0 degrees to 90 degrees.
- Tape Measurement for the cervical rotation range of motion
An acromion process on each side is identified as a fixed point or even a reference point. After that, ask the patient to turn his/her head to one side. Measure the distance between the reference point to a chin while maximal cervical rotation. Repeat this procedure on the same for the contralateral side. - Inclinometer for the measurement of the cervical rotation range of motion
First of all, ask a patient to lie supine on a bed with his/her face looking straight upwards. After that, place an inclinometer device along his/her forehead, just above the eyebrows. Ensure that the reading on an inclinometer is at 0°. Next, ask a patient to turn his/her head sideways as well as record readings of the inclinometer at each extreme of the motion.
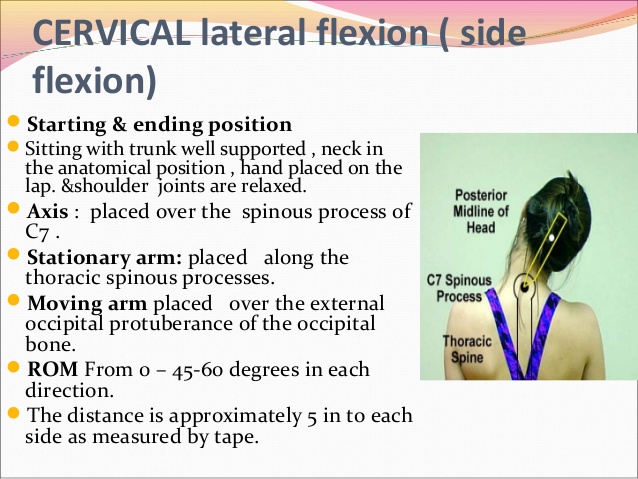
- Anatomical motion: Lateral flexion
- Recommended testing position: Sitting, along with thoracic as well as lumbar spine well supported by the back of a chair. A cervical spine is 0 degrees of flexion, extension, and rotation as well. The tongue depressor can be held between teeth for reference.
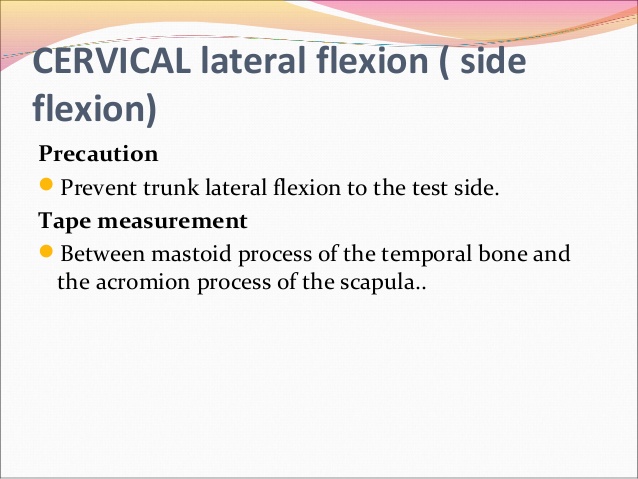
- Stabilization: A shoulder girdle is stabilized to prevent lateral flexion of a thoracic as well as the lumbar spine.
- Center: Over a spinous process of C7
- Proximal arm: Spinous processes of the thoracic vertebrae hence that arm is perpendicular to the ground.
- Distal arm: Dorsal midline of the head. Reference occipital protuberance.
- Normal range: From 0 degrees to 45 degrees
- Tape Measurement for the cervical lateral flexion
An acromion process on each side should be identified as a fixed point or even a reference point. After that, ask a patient to flex his/her neck sideways. Then, measure the distance between a fixed point to the lowest point of an earlobe while maximal lateral flexion. Repeat the same procedure on the contralateral side too. - Inclinometer for measurement of the cervical lateral flexion
Place an inclinometer device on the top of a patient’s head, along with a coronal plane, and ensure the reading on an inclinometer is at 0°. After that, ask a patient to flex his/her neck laterally as well as record the readings of an inclinometer at each extreme of the motion.
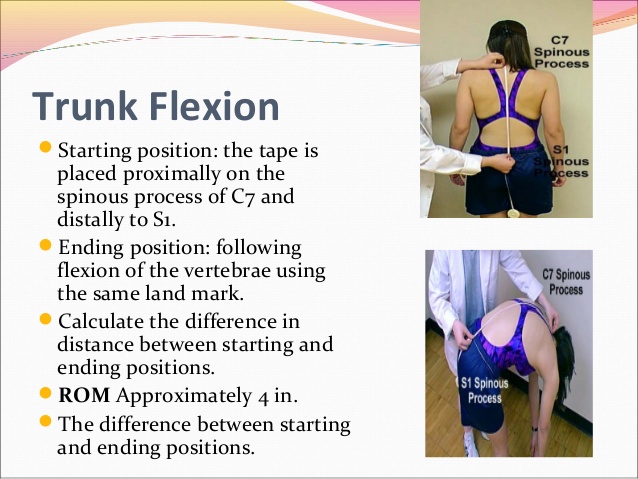
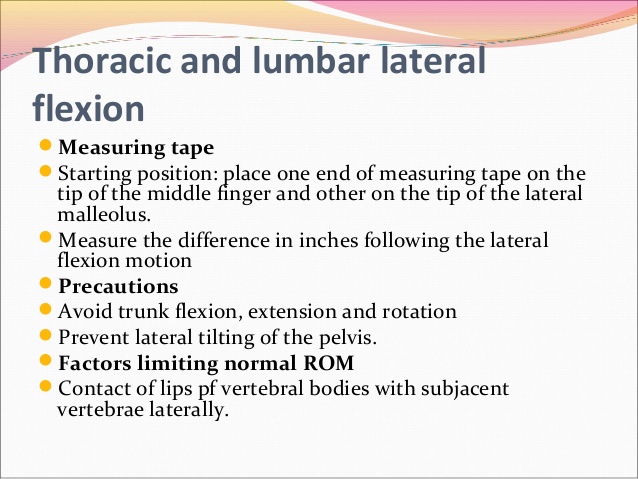
Measurement for the trunk range of motion
- Tape Measurement
- The least expensive apparatus for measuring spinal movement, and perhaps the easiest to use, is a tape measure. Furthermore, a tape measure probably has been used in a clinic for measuring the range of motion of the lumbar spine longer than any other measurement.
Movements of the trunk
- Flexion: When a spine is bent forward meaning towards the ground side from anteriorly.
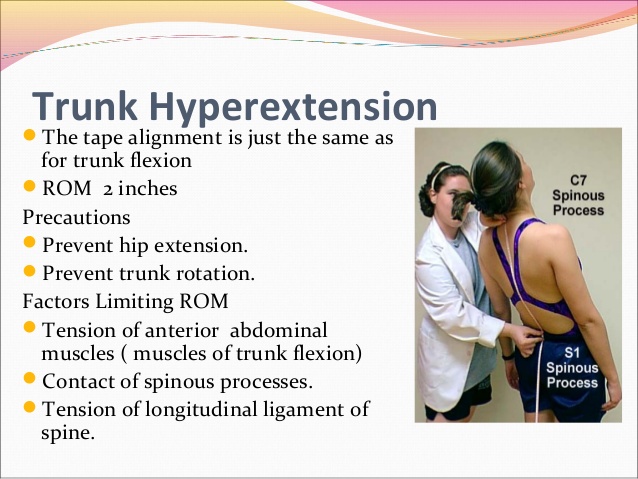
- Extension: When a spine is bent backward meaning towards the ground side from posteriorly.
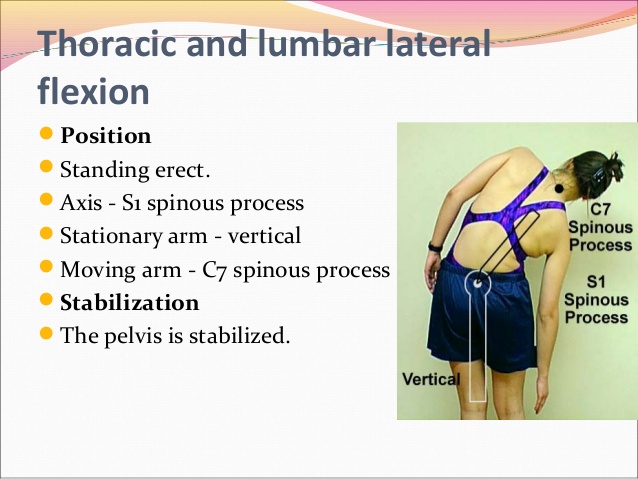
- Lateral flexion: When a spine moves laterally on the left as well as right sides.
- Rotation: When a spine rotates to right as well as left sides.
Measurement of the lumbar flexion and extension
- SCHOBER METHOD
- One of the most common tape measurement methods used to measure lumbar flexion relates to a technique originated by Schober as well as subsequently modified for a measurement of the spinal flexion. Macrae and Wright Schober described the original two-mark method for measuring lumbar spine flexion, in that one mark, is made at the lumbosacral junction, and the second mark is made 10 cm above the first mark, while the patient stands with the spine in the normal position. After that, the standing patient bends forward as far as possible, and the increase in distance between the first and second marks provides the estimate of the amount of flexion that is present in a lumbar spine. Owing to the tape measurement technique relying on the stretching or distraction of skin overlying a spine, the described technique is sometimes referred to as the skin distraction method.
- Macrae, as well as Wright, modified the original Schober method by introducing the third mark, a measurement mark placed 5 cm below a lumbosacral junction, which is a modification that uses a mark at the lumbosacral junction and other marks 5 cm inferior and 10 cm superior to the lumbosacral junction. A rationale offered by Macrae and Wright for making the modification of an original Schober technique is that when using the Schober technique in their pilot work, as well as authors observed that skin above and below a lumbosacral spine was distracted during flexion of the lumbar spine, leading to inaccuracies in the measurement. This, the technique that Macrae, and Wright8, referred to as a “modified” Schober technique included three marks: The first one is a lumbosacral junction, the second one is 5 cm inferior to a lumbosacral junction, and the last one is 10 cm superior to a lumbosacral junction.
- Van Adrichem and van der Korst13 suggested that using the lumbosacral junction (a base mark used for the Schober technique), which had to be identified by the palpation, added difficulty to a method of measurement. Given this information, Williams et al14 suggested that the “modified-modified Schober,” rather than the Schober or the modified Schober method, should be used.
- A modified-modified Schober uses two skin landmarks (as opposed to the three skin landmarks used with the modified Schober). These two landmarks include a point bisecting the line that connects the two posterior superior iliac spines (PSIS) (baseline) and the mark 15 cm superior to a baseline landmark.
Lateral Flexion
- Two methods for using a tape measure to examine lateral flexion of a lumbar spine have been introduced in the literature, with neither method becoming predominant in clinical use. These two methods include placing marks at the lateral thigh and a fingertip to floor method. Measuring lateral flexion by placing a mark at the location on the lateral thigh that the third fingertip can touch while erect standing and after lateral flexion was first introduced by Mellin. A distance between two marks represents the range of lateral flexion to that side.
- Using the fingertip-to-the-ground method, a distance from the third fingertip to the ground is measured, first with the patient standing erect, and then the patient laterally flexes a spine. The change in distance from an erect standing to lateral flexion is considered the range of lateral flexion.
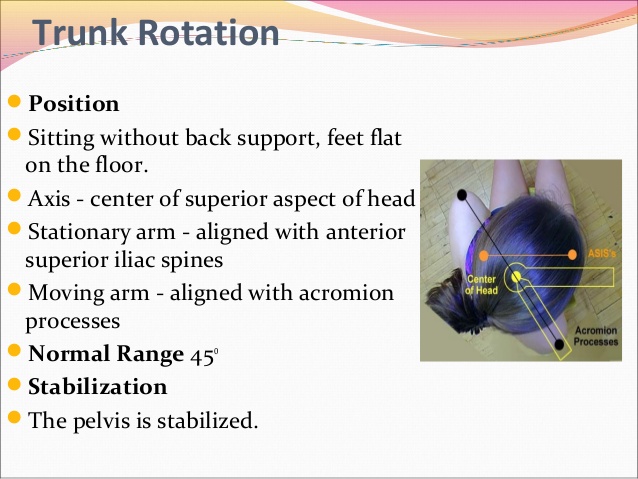
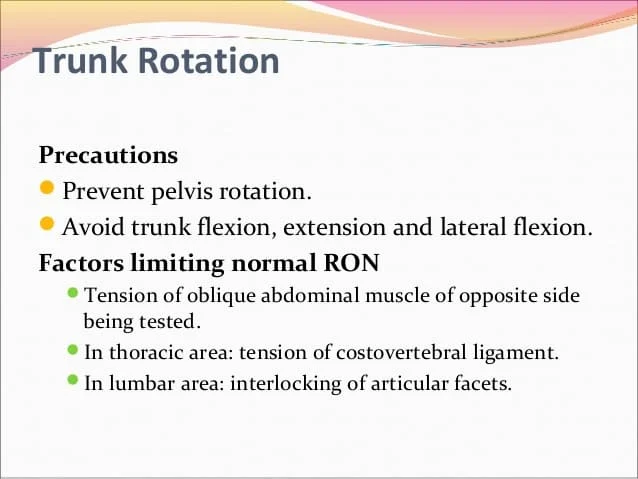
Trunk rotation
- First of all, the patient should take a sitting position without back support. After that, the center of the superior aspect of the head should be the patient’s axis for measuring the rotation. The stationary arm must be aligned with the anterior superior iliac spine(ASIS), and the moving arm must be aligned with the acromion processes of the shoulder joint. The therapist must focus on pelvis stabilization. The normal range of trunk rotation is o degrees to 45 degrees. Prevent pelvis rotation as well as trunk flexion, extension, and lateral flexion.