Piriformis muscle Anatomy, Origin, Insertion, Function, Exercise
Table of Contents
Introduction
- The Piriformis muscle is a flat muscle & the most superficial muscle of the deep gluteal muscles. It is part of the lateral rotators of the hip (obturator internus, superior & inferior gemelli, quadratus femoris, obturator externus, & gluteus maximus). It leaves the pelvis through the greater sciatic notch until its fixation extends the superior margin of the greater trochanter. It has a pyramidal shape that is situated almost parallel to the posterior margin of the gluteus medius.
- The muscle inserts on the medial side of the superior face of the greater trochanter of the femur after traveling through the greater sciatic notch from the pelvis to the gluteal area. Before attaching to the femur, the piriformis muscle tendon meets the tendons of the obturator internus and the inferior and superior gemellus, sometimes known as the conjoint tendon. The muscle is next to both the hip joint’s and the pelvis’ posterior walls.
- A neurological condition called piriformis syndrome frequently manifests as hip and buttock discomfort. The condition is frequently undertreated and misdiagnosed.
Origin of Piriformis muscle
- The piriformis muscle arises from the anterior (front) surface of the sacrum by 3 fleshy digitations attached to the 2nd, 3rd, and 4th sacral vertebra.
- It also originates from the superior margin of the greater sciatic notch, the gluteal surface of the ilium (near the posterior inferior iliac spine), the sacroiliac joint capsule, & (sometimes) the sacrotuberous ligament ( the superior part of the pelvic surface).
Insertion
- The muscle attaches to the greater trochanter of the femur(its tendon also unites with the tendons of the superior gemellus, inferior gemellus, & obturator internus muscles prior to insertion)
Structure
- The piriformis muscle is a flat muscle, & is pyramidal in shape.
Nerve supply
- The nerve supply to piriformis comes from the nerve to piriformis, formed from the anterior rami of S1 & S2 spinal nerves.
Variation
- In around 80% of the population, the sciatic nerve travels below the piriformis muscle. In 17% of people, the piriformis muscle is pierced by parts or all of the sciatic nerve. Many variations happen, but the most general type of anomaly (81% of anomalies) is Beaton’s type B which is when the common peroneal nerve pierces the piriformis muscle.
- It may be united with the gluteus medius, send fibers to the gluteus minimus muscle, or receive fibers from the superior gemellus.
- It may have 1 or 2 sacral attachments, and it may be inserted into the capsule of the hip joint.
Blood supply
- The arterial supply is from the inferior gluteal, superior gluteal & internal pudendal arteries, all branches of the internal iliac artery.
Relations
- The posterior side of the muscle is located against the sacrum. The anterior surface of the muscle is related to the rectum (especially on the left side of the body), & the sacral plexus.
- The muscle is located almost parallel to the posterior margin of the gluteus medius. It is located partly within the pelvis against its posterior wall, & partly at the back of the hip joint.
- It exits the pelvis through the greater sciatic foramen superior to the sacrospinous ligament.
Function of Piriformis muscle
- The piriformis muscle is a portion of the lateral rotators of the hip, along with the quadratus femoris, gemellus inferior, gemellus superior, obturator externus, & obturator internus.
- The piriformis muscle laterally rotates the femur with hip extension & abducts the femur with hip flexion. Abduction of the flexed thigh is essential in the function of walking because it shifts the body weight to the opposite side of the foot is lifted, which prevents falling.
- The function of the lateral rotators can be understood by crossing the legs to rest an ankle on the knee of the other leg. This sources the femur to rotate & point the knee laterally.
- The lateral rotator muscle also opposes medial rotation by the gluteus medius muscle & gluteus minimus muscle. When the hip is flexed to 90 degrees, the piriformis muscle abducts the femur at the hip & reverses primary function, internally rotating the hip when the hip is flexed at 90 degrees or more.
Assessment
Palpation
- It may be palpable indirectly through the gluteus maximus muscle into the greater sciatic notch.
Test
- Piriformis Test
Clinical importance
Piriformis syndrome
- Piriformis syndrome (PS) is a painful musculoskeletal condition, characterized by a combination of symptoms including buttock and hip pain. In some articles, piriformis syndrome is defined as peripheral neuritis of the branches of the sciatic nerve caused by an abnormal condition of the piriformis muscle (PM), such as an injured and irritated muscle. Synonyms that are used commonly for PS are deep gluteal syndrome, extra-spinal sciatica, wallet neuritis, etc. There are more women diagnosed with Piriformis syndrome than men, with a female–to–the male ratio of 6:1. This ratio can be simplified by the wider quadriceps femoris muscle angle in the os coxae of women.
Total hip replacement
- In minimally invasive total hip arthroplasty, such as the direct anterior approach, the hip joint is surgically approached in a way that minimizes soft tissue dissection. This method increases the postoperative stability of the joint & reduces the risk of dislocation. However, during the detachment of the joint capsule, the short external rotators of the hip, including the piriformis muscle, are at risk of damage.
What is piriformis muscle stretching?
- Piriformis stretching is the main exercise to increase the flexibility of the gluteal region, has many health benefits as well as decreases the risk of injury namely, sciatica pain, Back pain, and Piriformis syndrome.
- The piriformis muscle is located in a gluteal region below the gluteus maximus muscle.
- The muscle is a flat pyramidal shape &1 of the 6 muscles of a lateral rotator group. A piriformis muscle arising from the front part of a sacrum.
- This is connected to the 2nd, 3rd & 4th sacral vertebra & from there it is attached to the upper surface of the thigh bones.
- A piriformis muscle is responsible for externally rotating a femur while hip extension. To get the idea of this motion, during sitting, raise one leg & cross it over the other so that the outside ankle is placed against the knee of the other leg.
- The 2nd main function of the piriformis muscle is the abduction of the femur with hip flexion. It is most important for walking. Abduction of the thigh takes body weight to the opposite side of the foot is raised. Without the person would fall.
- Even though many individuals should not know about the piriformis muscle, they might be known for sciatic pain. This is due to the sciatic nerve running under a piriformis muscle or for some people the sciatic nerve will pass through the muscle.
- Stretching of the piriformis muscle has many benefits while daily life activities
What are the advantages of Piriformis muscle stretching?
There are some common advantages the patient may gain by doing Piriformis muscle stretching:
- Help to decrease ankle and knee Pain: When the piriformis muscle becomes tight the routine activity of walking may be the actual pain. A knee joint is under greater strain forming an unstable joint. The exterior of the knee joint becomes too tight construct the interior of the joint weaker. This imbalance may source knee as well as ankle pain.
- Alleviates Sciatic Pain: A sciatic nerve passes through the piriformis muscle area & whenever there is too much pressure owing to tight piriformis muscles there is a chance to feel sciatica-like pain. The extra pain may the glutes as well as the hips numb or send shooting pain downwards to the legs. By stretching of the muscle, the strain on a sciatic nerve is decreased.
- Relieve Lower Back Pain: Tight piriformis muscle sources lower back pain. piriformis muscle stretching may relieve stress on the lower back as the hip’s range of motion will increase.
- Alleviates Plantar Fasciitis: Plantar fasciitis is when a fascia enhances swelling. The patient with very tight piriformis muscles is walking like a duck which puts too much stress on the soles of the feet. Releasing a piriformis muscle may fix the body mechanics hence relieving nagging injuries such as plantar fasciitis.
- Eases Risk of Injury: By stretching piriformis muscles the patient will decrease the chances of occurrence of potential injuries. The person who enjoys sports and activities requiring running or any unexpected change of direction needs to stretch their piriformis muscles to prevent injuries or muscle tears.
- Good Overall Muscular Function: Tight piriformis muscle causes a reduced range of movement in the lower back as well as hips. Piriformis muscle stretches may assist us in moving better through a complete range of movement.
- This also improves blood circulation to that area & gives nutrients to muscles.
- Increases range of movement to hip joint like hip abduction as well as a hip extension & lateral rotation of the hip
Types of stretching exercise
- Standing Piriformis Stretch
- Standing Step Behind Piriformis Stretch
- Short Adductor Stretch
- Long Adductor Stretch
- Half Spinal Twist
- Supine Piriformis Stretch
- Lying Knees Side Stretch
- Knee to Chest
- Sleeping Pigeon
- Outer Hip Stretch
- Seated Piriformis Stretch
- Modified Pigeon Stretch
- Seated Piriformis Leg Cradle Stretch
- Lying Side Clam-shell
- Glute Bridge With Feet Externally Rotated
- Prone Adductor Side Stretch
- Kickback
- Fire Hydrant
Standing piriformis stretching
- How to do: initiating with feet hip-width apart next to the wall to help with balance.
- Take a leg with pain over the knee of the opposite leg.
- Let go of the hips down and as back as much as you can while bending the leg you are standing on.
- Hold the standing pose for 20 to 30 seconds
- Repeat with the opposite leg & repeat 3 to 4 times on each side.
Standing step behind piriformis stretch
- How to perform: Stand up with feet hip-width apart.
- Step back then perform the internal rotation of the hip pointing the toes inward.
- Then perform an internal rotation of the front foot by turning the toes inward.
- Rotate the hips to the side of the back leg and then transfer the weight to the back leg.
- Pause for 30-60 seconds and release.
Short adductor stretch
- How to do: While sitting on the ground, place the soles of the feet together in front of the pelvis.
- Pause both ankles with the opposite hands (right hand & left ankle and vice versa).
- Slowly push downward with the knees the try to touch the ground with them.
- The patient needs to hang on right before any pain occurs, which means that if the patient feels pain, go reverse an inch or two & stay there.
- Hold for 15 to 30 seconds, release, & flutter the legs in that position for 30 seconds.
Long adductor stretch
- How to perform: Sitting on the ground, extend the legs straight out in front of you, and widen them as far apart as possible.
- Put the hands on the ground next to each other while angling the upper body forward toward the ground.
- Bend forward & put the elbows on the ground. If the patient feels pain, stop right there.
- Remain in the position for 20 -30 seconds & release.
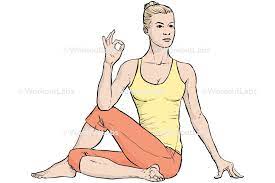
Half spinal twist
- How to perform: Take the sitting position on a mat, the spine is straight as well as both legs are straight in front of you.
- Cross 1 leg over the opposite to the outer thigh.
- Rotate towards the crossed leg resting the elbow on the knee & the other hand on the mat or ground behind you.
- When you feel stretched, pause in that position for 30 seconds.
- perform to the opposite leg.
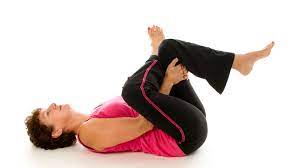
Supine piriformis stretch
- How to perform: Lie down on the back with knees bent and feet on the floor.
- Blend the sore leg over the other leg.
- Take the hands under the unaffected leg & pull them towards you.
- Hold for 40-60 seconds and release.
- Do it on the opposite leg.
Lying knees side stretch
- How to perform: Lie down on the mat with your legs extended.
- Bend both knees as well as take them towards the chest.
- Place arms out to the sides.
- Rotate the knees to the side so they place on the ground.
- Pause for 30-60 seconds & release.
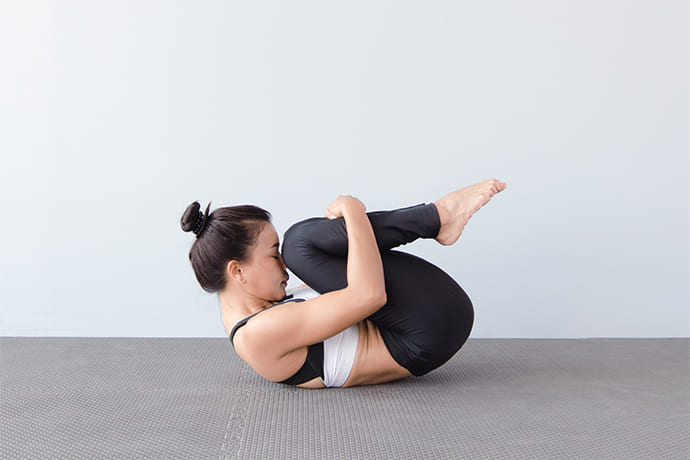
Knee to chest
- How to perform: Lie down on the back with the legs stretched out.
- Take the left leg up towards the chest.
- Pull the knee towards the right shoulder.
- Pause for 15 – 30 seconds & release.
- Repeat with the right leg.
Modified pigeon stretch
- How to do: Sit down with the knees bent.
- Lower the knee on the floor straight in front of you so that the outer ankle is against the floor with the knee bent at 90 degrees.
- Take the opposite leg behind you with the knee bent.
- Lean forward, when the patient feels stretched pause there for 30 seconds.
- Repeat with the opposite leg.
Seated piriformis leg cradle stretch
- How to do: Sit down on the ground with your legs out in front of you.
- Bend the right knee & bring the foot up towards the chest.
- Grab the bent leg’s ankle with your hands & pull it towards you.
- Hold that pose for around 20-30 seconds & release.
- Repeat on the opposite side leg.
Lying side clamshell
- How to perform: Lie down on the side of the body.
- Bend both legs back, holding 1 foot over the other & keeping the legs side by side to each other.
- The patient might be forming an “L” shape.
- Keeping the feet together, raise the top knee during keeping the rest of the body in the embarking position.
- Gradually bring the knee to the starting position.
- Do 10-15 times.
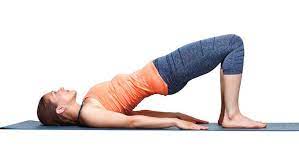
Glute bridges with feet externally rotated
- How to perform: Take a supine position with knees bent & feet flat on the ground, hip-width apart, & arms to either side.
- Move the toes outwards.
- Drive through the heels and conduct the waist up until you are in a bridge position.
- Contract the glutes & hold for 5-10 seconds then slowly return to the initiating position.
- Do 10-12 times.
Sleeping pigeon stretch
- How to perform: Get down on the floor on the hands as well as knees.
- Bring one knee up towards the hands then fold the knee under the middle of the body with the outer ankle against the floor.
- Extend out the other leg behind you while placing the elbows on the floor in front of you.
- Lean down & push your hips towards the floor.
- Hold the position for 40-60 seconds.
- Repeat with the opposite leg.
Outer hip piriformis stretching
- How to perform: Take the supine position then turn on the right side bringing the left foot up and placing the left foot on the back of the right leg’s upper calf.
- Place the right hand on the left knee pressing towards the ground.
- Reach up with the left arm, keeping it straight & rotate away to the left side as far as possible.
- Pause the stretch for 20 to 30 seconds & release.
- perform to the right leg.
Seated piriformis stretching
- How to perform: Take a sitting position on the chair.
- Then lift the right leg upward by bending the knee & placing the outer ankle on the left knee.
- Maintain the back straight then lean forward.
- When the patient feels a stretch, stop there for 30 to 60 seconds & return to start.
- Repeat on the left side.
Prone adductor stretch
- How to perform: Take a prone position then brace yourself with the forearms on the ground.
- Bring the right knee out & up to the side until the patient feels the piriformis muscle stretch.
- Pause for 40-60 seconds.
- do with the left leg.
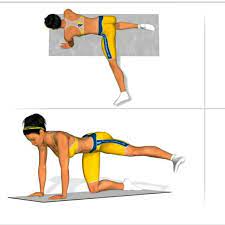
Kickback
- How to perform: Get on the knees & hands with the hand stacked under the shoulders.
- Raise 1 leg off the floor then kick up & back away from you until the leg is fully straight.
- Gradually lower to the starting position.
- Repeat for 8 to 10 repetitions then switches sides.
Fire hydrant
- How to perform: Get on your knees & hands.
- Raise the leg out to the side as comfortable keeping the knee bent.
- Lower back to the initiating position.
- Repeat for 5 to 10 repetitions then switches sides.
What is the piriformis muscle stretching safety guidelines?
There are certain safety tips the patient might know:
- Stretching is dangerous if the patient cannot do it properly.
- performing stretching you have to breathe normally otherwise this can increase the blood pressure. So, never hold your breath while stretching. Deep breathing exercise helps the patient to stretch longer as well as deeper.
- perform not stretch beyond the limits.
- If the patient perceives pain while stretching stop right there.
- Stretch every day a few times a day rather than doing it once a week. This increases flexibility as well as a range of movement.
- Wear loose clothes while stretching to avoid discomfort & restricted motion.
What is Piriformis strengthening exercise?
- Piriformis muscle strengthening exercises are a great way to improve the strength of the gluteal region importantly external rotators & if the patient is performing this exercise regularly, may have many health benefits as well as improve the Physique & performance & also reduces the risk of injury.
- The Piriformis muscle is a very small muscle in the glutes region that is flat as well as band-like. This originates the internal surface of the sacrum & inserts at the superior border of the trochanter of the femur. It is also why issues related to piriformis may be described as pain that the patient feels in the hip/buttocks. The piriformis muscle helps us with lower limb motion since this stabilizes our hip joint & lifts & rotates our thighs away from the body.
- The piriformis muscle rotates the femur while the hip extension & abducts the femur during the hip flexion. If the piriformis muscles are weak then this will put extra strain on the knee joints by making the inner side weak & the outer side tight. It will make the joint unstable.
Health benefits of Piriformis strengthening exercise
- Helps relieve the pain of the sciatic nerve
- Helps the patient in running more efficiently & avoid injury.
- The piriformis muscle rotates the femur while the hip extension & abducts the femur while flexion of the hip Healthy piriformis can ease knee and ankle pain as well.
- It helps to decrease piriformis syndrome pain.
- Helps to improve hip as well as knee range of motion.
strengthening exercises for the Piriformis muscle:

Resistance band abduction
- How to do: In this exercise, the patient has to stand on one end of a resistance band as well as which is tied around the ankle & the second end is attached to the stable object, close to the ground. Move the leg out to the side, away from the body, the knee might be straight.
- Once the patient gets as far as is comfortable, gently come back to the leg to the starting.
- Repeat 15 to 20 times & slowly improve the repetitions up to 2 sets of 20 repetitions in one session. perform two sessions per day.

Side-lying clam exercise
- How to do: For this exercise, the patient has to Lie on the left side with the hip to be worked on top.
- Flexed the knees & position them forwards so that the feet are in line with the spine.
- Make sure the right hip is directly on top of the other & the back is straight.
- The ankles might be together, raise the right knee away from the bottom one.
- Remember, do not move the back or tilt the pelvis, all the motions should be started from the hip.
- Gradually come back to the initial position. Repeat 15 to 20 times initially & gradually build this up to 2 sets of 25 repetitions on both sides in a session. Do 3 sessions in a day.

Bridging
- How to do: Initiate this exercise while lying on the back with both knees flexed at about a 45-50 degree angle & both feet flat on the ground.
- Put the arms rest at the sides.
- Gradually raise the hips by pushing on the floor with the feet until the knee, hip, as well as shoulder are in a straight line.
- Repeat for 12 to 15 repetitions in a day in a session.
Seated Abductions
- How to do: For this exercise, the patient has to take a sitting position. The back might be straight.
- Wrap the resistance band around the ankle joint. Support the upper limb with the arms.
- Then Slightly rotate the feet out. Make sure the patient is not lifting the feet out to help pull a band.
- Complete 8-14 slow & controlled repetitions.
Leg Raises
- How to do it: To do this strengthening exercise, a patient has to stand against a wall.
- Elevate the leg up along a wall during externally rotating the foot when the patient reaches the up motion.
- Now slowly Lower the leg down & internally rotate the foot on the way down.
- The hips are not rotating forward. Repeat 10 to 20 times initially & gradually build this up to 2 sets of 25 repetitions in a session.

Side-lying Hip Abduction
- How to do: Side-lying Hip Abduction exercise, the patient has to lie on the left side.
- Then, slowly lift the right leg towards the sky.
- Now, lower this back to the initiating position.
- The knee might be straight & do not let the hips roll backward or even forward while the exercise.
- Repeat 10 to 15 times start & gradually build this up to 2 sets of 25 as well.
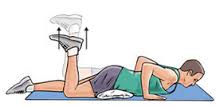
Prone Hip Extension
- How do this: Start by lying on your stomach with both Legs stretched straight behind you.
- Slowly lift one leg upward as far as the patient can.
- Without arching the low back, then lower It back to the embarking position.
- The knee should be straight & the torso steady while the exercise.
- Repeat 10-15 times initially & slowly build this up to 2 sets of 20 repetitions. Do 2 sessions in a day.
Clamshell (Small lifts)
- First, to do this strengthening exercise the patient should keep the pelvis stable.
- Lift the knee up slowly until the patient feels the contraction.
- Slowly bring the knee down.
- This exercise does not require big lifts. Avoid rocking back & forth to help raise the knee. Small lifts go a long way in Clamshell exercise.

Side-to-side walks
- Here is how to do lateral band walks with the proper form: Wrap the looped band just above both of the ankles. Step the feet out to about shoulder-width apart, and until there is tension in the band.
- Get into the athletic stance with the knees slightly bent, hips hinged forward about 45 degrees, as well as hands on the hips.
- Keeping the upper body facing forward, take one step to the right with the right foot. Feel the tension in the right hip, then slowly step the left foot to the right so that the feet return to shoulder-width apart.
- Take ten steps to the right with the right foot leading. Next, switch directions & take ten steps to the left with the left foot leading.
- As the patient does the exercise, make sure that the upper body, hips, & knees all stay facing forward. Also, make sure to take a step outwards directly from the hip joint. As you step, the foot should be in line with the hips & the rest of the body.
Hip Hinging Technique Lowering portion (Hip Flexion)
- To do this strengthening exercise: Brace the core slightly
- Start the motion from the hips (Butt goes back first)
- The upper body might naturally lean fwd, as the butt goes back.
- Maintain a Neutral spine position (Avoid flexing or overextending the spine).
Coming up portion (Hip Extension):
- Use the knees as well as the glutes to initiate the coming-up movement.
- Push through the hips fwd, as you straighten the knees.
- Avoid arching the low back as you rise up.
- Keep the spine in a neutral position the entire time.
- In order to get better with hip hinging so that this becomes second nature, it is important to practice the motion often & to strengthen all the muscles involved. The following exercises provide different hip-hinging variations and are great for all levels.
Abduction Circles
- How to do: The patient should take a side-lying position. When the patient lifts the leg, keep the foot points straight forward as well as maintain the glutes engaged.
- This exercise will engage the piriformis muscles as the therapist adds the rotational movement.
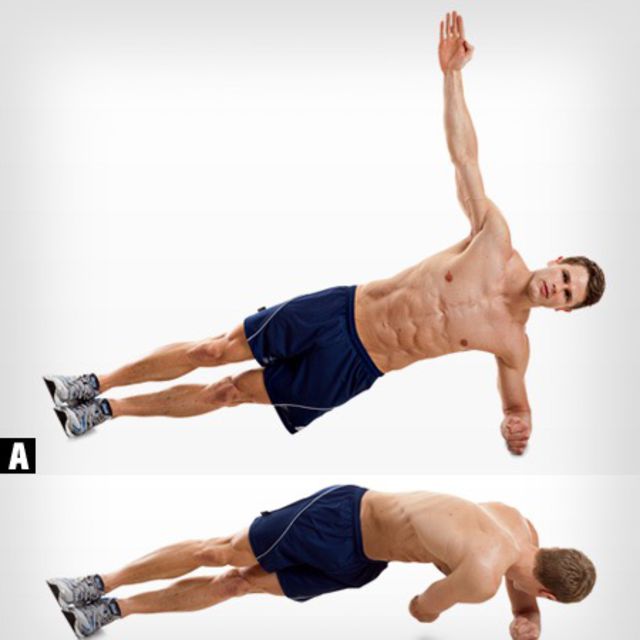
Side plank leg raises
- How to do: Place either the right or left elbow on the ground, lift the hips, as well as extend both legs. Balance on the outside edge of the bottom foot & lift the top leg up just a bit higher than the hip. gradually lower the top leg back down. Repeat on the other side. When the patient gets into the plank position, keep the back straight & avoid arching or rounding the back.
- Pull the belly in a bit to make sure the patient is not using the hip flexors too. The patient also wants to keep the glutes tight. This exercise strengthens the glutes & the core at the same time.
Six Hip Hinge Exercises
- First of all, Stand up straight & brace the core.
- Initiate the motion from the hips (butt going back).
- Allow the torso to move forward slightly, to counterbalance the hips.
- Lower down to a 90-degree angle with knees, or as low as comfortable for you.
- As the patient lower down, externally rotate the knees.
- Hold the down position for 3 sec before coming up.
- To come up, start the motion from the knees & then bring the hips forward.
- Strive for 10 repetitions with 3 sets in a session in a day.
- Keep your chin tucked in and keep a Neutral spine.
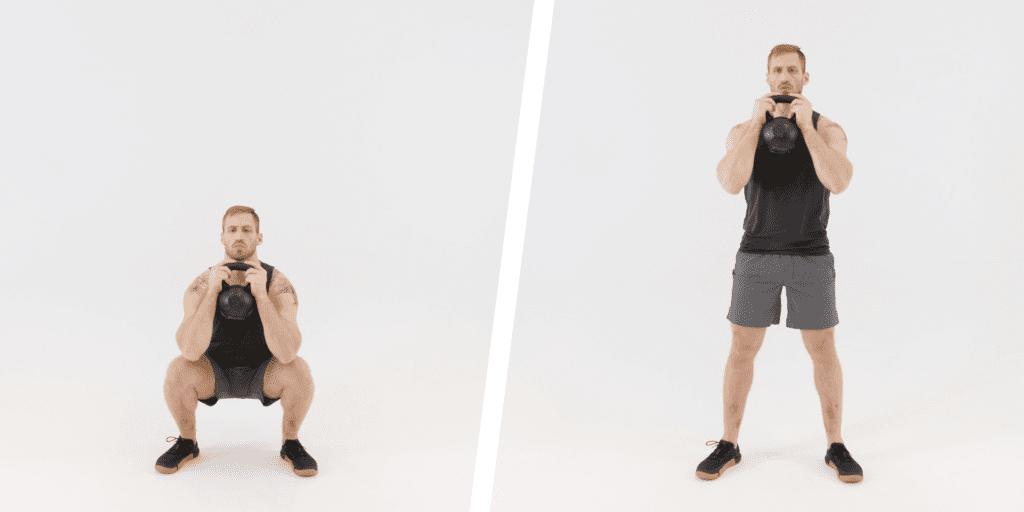
Goblet Squat
- To perform this exercise: Hold the Kettlebell (or dumbbell) in both hands & lock the shoulders.
- Brace the core.
- Start the movement from the hips (butt going back).
- Then, allow the torso to move forward slightly, to counterbalance the hips.
- Lower down to a 90-degree angle with knees, or as low as comfortable for the patient.
- Hold the down position for around three seconds before coming up.
- To come up, embark on the motion from the knees & then bring the hips forward.
- Strive for 10 repetitions with 3 sets per session. Do two sessions in a day. Most probably focus on Keep’s chin tucked in & Keep Neutral spine.

Single Leg Deadlift
- Stand with weight on one leg as well as brace the core.
- Start the motion from the hip of the standing leg (butt going back).
- The free leg (back leg) will lift up slightly as the patient moves more forward.
- Allow the torso to move forward slightly, to counterbalance the back leg.
- When the patient has reached the depth that he is comfortable with, use the knee & glutes to rise back up into embarking position.
- Strive for nearly 10 repetitions with 3 sets in a day.
Single Leg Deadlift with Kettlebell
- First of all, to do this strengthening exercise: Stand with weight on one leg & hold the kettlebell in the opposite arm.
- Press the scapulae down as well as lock the shoulders down.
- Start the motion from the hip of the standing leg (butt going back).
- The free leg (back leg) will lift up slightly as the patient moves more forward.
- Allow a patient torso to move forward slightly, to counterbalance the back leg.
- When the patient has reached a depth that he is comfortable with, use a knee as well as glutes to rise back up into embarking position.
- Strive for 10 repetitions in the 3 sets in a session. Do two sessions per day.
Romanian Deadlift with Barbell (No Weight)
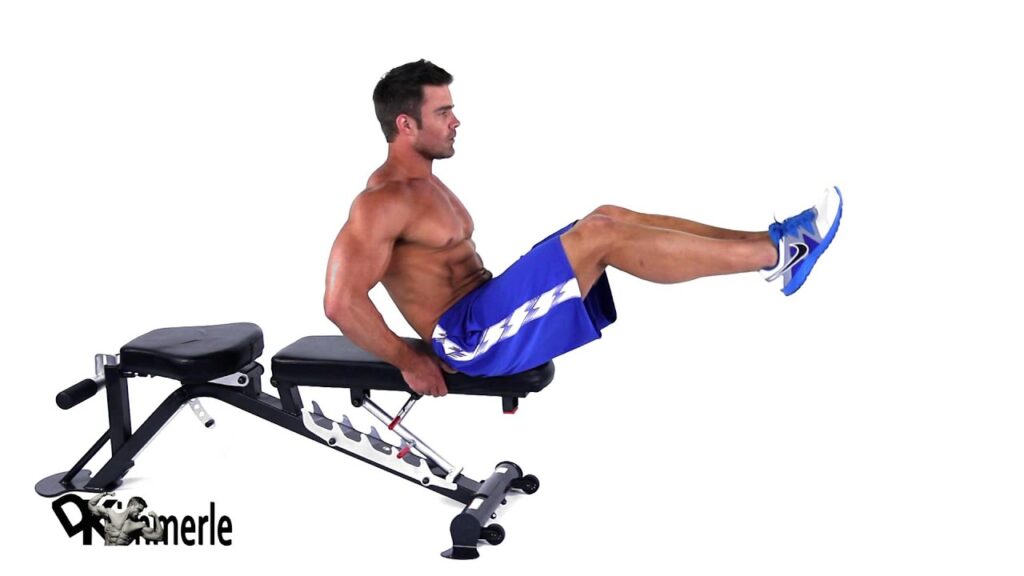
- To Initiative with, Stand with feet just outside shoulder width
- Hold the barbell without weights, & externally rotate the shoulders (feel like the patient is breaking the bar), to engage the lats.
- Now, start hanging down from the hips (the butt goes back).
- Externally rotate the knees as the patient lowers them down it.
- Keep a neutral spine the entire time.
- Go down with the barbell to mid-shin level.
- After that, use the knees as well as glutes to push off the ground & come up.
- Squeeze the glutes when the patient stands up.
Romanian Deadlift with Dumbbells
- To start this strengthening exercise: Stand with feet just outside shoulder width.
- Hold 2 dumbbells (one in each arm), & press the shoulders down
- Brace the core before you start moving.
- Now, start hanging down from the hips (the butt goes back).
- Externally rotate the knees as you lower.
- Keep a neutral spine the whole time.
- Keep the dumbbells in front of you, & go down to mid-shin level.
- Now use the knees as well as glutes to push off the ground and come up.
- Squeeze the glutes when he stands up.
How To Effectively Strengthen a Piriformis muscle Without Triggering Pain?
- This is essential to do these routines without pain. Do not push through the pain if the patient feels the muscles are getting to spasm.
- That is why I broke down the exercises into 3 separate routines.
- To make sure the patient is not triggered by the pain, make sure he always starts by activating the Gluteus Medius & Maximus first (and we perform that in all the workouts above).
- Gluteus maximus as well as medius are primary hip stabilizers, & when it is inactive, compensation happens when the piriformis is doing more than it should.
When did the patient not do this exercise?
- If the healthcare provider advised the patient to take rest.
- If the leg bone is recently fractured then avoid these exercises.
- If the patient feels any pain or even discomfort while these exercises then stop immediately and consult the physical therapist.
FAQ
Piriformis syndrome happens when your piriformis muscle compresses your sciatic nerve and results in inflammation. It can cause pain or numbness in your buttock and down the back of your leg. It can happen on one side of your body or both.
If you require to release the piriformis on the left side, start by lying on your left side & placing your left elbow on the mat or floor. This will stabilize your upper body. Place the foam roller beneath the back side of the left hip, under your piriformis. Roll back & forth to release the tension in the muscle.
The pain gets worse during activities that cause the piriformis muscle to press against the sciatic nerve, such as sitting, walking up stairs, and running.
A tight piriformis can be sourced by vigorous exercise or an accident. Vivian Eisenstadt is a Los Angeles-based physical therapist who specializes in pain prevention. “Think of the body as a pulley system,” she says. “Muscles cross joints and connect bone to bone, and pull the bones in one direction.
The piriformis muscle is a flat, narrow muscle. It runs from your lower spine through the butt to the top of your thighs. The piriformis muscle extends to each side of your body and aids in almost every movement of the lower body. The sciatic nerve most commonly runs underneath the piriformis.
The piriformis muscle arises at the internal surface of the sacrum and inserts at the superior border of the trochanter of the femur. It functions in helping lateral rotation of the hip joint, abducting the thigh when the hip is flexed, & assisting stability of the head of the femur in the acetabulum.
lateral rotators
Piriformis is a flat muscle and the most superficial muscle of the deep gluteal muscles. It is part of the lateral rotators of the hip (obturator internus, superior & inferior gemelli, quadratus femoris, obturator externus, & gluteus maximus).
Symptoms
A dull ache in the buttock.
Pain down the back of the thigh, calf and foot (sciatica)
Pain when walking up stairs or inclines.
Increased pain after prolonged sitting.
Reduced range of motion of the hip joint.


5 Comments