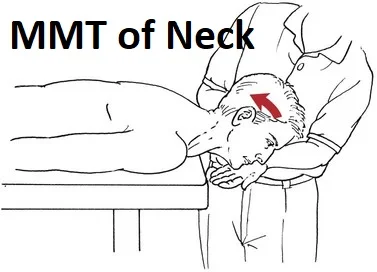
Manual Muscle Testing of Neck
Manual muscle testing of the neck involves assessing the strength and function of the muscles that control movements of the neck. It is commonly performed by healthcare professionals, such as physical therapists or chiropractors, to evaluate muscle imbalances, weakness, or injuries in the neck region.
Table of Contents
Capital extension
Testing muscles

- Rectus capitis posterior major and minor
- Longissimus capitis
- Obliques capitis superior
- Obliques capitis inferior
- Spinalis capitis
Patient’s position
For grades 4 and 5 patients should be Prone with the head off the edge of the plinth. Arms by sides.
For grade 3 patient should be in a Prone position with the head off the end of the table. the therapist has to support his head. Arms by sides.
For grades 2 to 0 patient should be in a Supine position with the head on a plinth. Arms by the sides. For grades 2 and below, the gravity-minimized position such as side-lying is not advised for any neck examinations since it can lead to test abnormalities when the therapist tries to support the head without assisting the motion.
Therapist’s Position
For grades 4 and 5 therapist Stands by the side of the patient next to the head.
A hand applies pressure with resistance on the occiput. The other hand is placed behind the drooping head, ready to hold it should it fall with resistance that is generated in opposition to the head’s movement.
For grade 3 Standing by the side of the patient’s head. One hand should be ready under the head to hold it if the muscles are not able to maintain position
For grades 2 to 0 Standing at the end of the table facing the patient. The therapist should support the patient’s head by putting his hands under the occiput. The therapist’s fingers should be put on the base of the occiput lateral side to the vertebral column to do the palpation of the
Capital extensors. The patient’s head should be a little off the plinth to decrease the frictional force
How to test?
To assess grades 5 and 4 ask the patient for extension of the head by bending the chin in an upward direction such as nodding movement. Make sure not to do the Cervical spine extension.
Ask the patient to look towards the wall and maintain that position opposite to the resistance force
For grade 5 Patient should complete the present range of motion without replacing the cervical extension. Bear higher resistance. The cervical extension is a powerful muscle group.
For Grade 4 Patient should complete the present range of motion without replacing the cervical extension. Bear higher to the moderate resistance force.
For grade 3 ask the patient to look towards the wall.
The patient should complete the present range of motion without resistance force.
For grades 2 to 0 Patients should try to look back at the therapist, without lifting their head off the examination table.
Ask the patient to raise their chin OR turn to face me. Keep your head down.
For grade 2 patient should finish movement in the present range.
In grades 1 and 0 do palpate the flicker contraction of extensor muscles at the base of the occiput, just lateral to the spine. The splenius capitis sets most lateral, and the recti lie just adjacent to the spinous process
Capital flexion
Testing muscles
- Rectus capitis anterior
- Rectus capitis lateralis
- Longus capitis

Patient’s position
For grades 4 and 5 Patient should be prone with the arm by the side.
To assess grade 3 patient should be in a supine position with the arm by the side.
For grades 2 to 0 patient should be in a supine position with his head resting on the plinth. Arms by sides.
Therapist’s position
For grades 4 and 5 therapists should Stand at the aide where the patient’s head is resting. Tell the patient to tuck his chin. If enough range is available, put
cupped hands beneath the mandible to provide resistance force against chin tuck, into an upward direction
For grade 3 therapist should stand by the side of the patient’s head.
For grade 2 to 0 therapist Stand by the side of the patient’s head and ask the patient to tuck his chin.
How to test?
For grades 4 and 5 Patient is supposed to tuck his chin into his neck without lifting his head from the plinth. No movement should take place at the cervical spine. This motion is called the nodding movement.
Give the command to the patient to tuck his chin and maintain his eyes straight ahead. Do not raise his head from the plinth. Maintain this position. Do not let me raise your chin.
- Grade 5: Patient maintains examination position opposite maximum resistance force. These are very powerful muscles.
- Grade 4: Patient maintains examination position opposite to the moderate resistance force.
For grade 3 patients have to tuck.his chin without raising his head from the examination table
- Grade 3: the patient should complete the motion in the present range.
For grade 2 to 0 patient have to try to tuck his chin.
- Grade 2: patient finished the partial motion in the available range.
- Garde 1: contraction movement can be palpable in the capital flexors muscles group but it is a very minor movement. We can use pressure to feel contractions.
- Grade 0: No visible contraction happens.
Cervical extension
Testing muscles
- Longissimus cervicis
- Semispinalis cervicis
- Iliocostalis cervicis
- Splenius cervicis
- Trapezius
Patient’s position

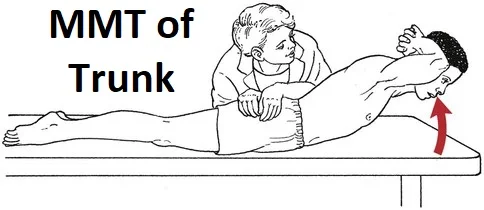
To assess grades 4 and 5 patient should be in a prone position with the head off the table at the edge of the table and arms by the side.
For grade 3 patient should be in a prone with his head off at the end of the table
For grades 2 to 0 patient should be supine with his head supported on the table and arms by the side.
Therapist’s position
For grades 4 and 5 therapies should stand at the side of the patient’s head. Tell the patient to raise his head while looking at the ground surface. If enough range is available, put hand-giving resistance force on the parieto-occipital area. put the other hand under the chin, ready to support the head while movement occurs.
For grade 3 therapist should stand on the side of the patient’s head with one hand supporting or ready to give support to the patient’s forehead
For grades 2 to 0 therapist should stand by the side of the patient’s head, towards the patient. Put both hands beneath the patient’s head. Fingers have been placed distal to the occiput at the level of the cervical vertebrae for palpation. Tell the patient to press his head into the therapist’s hands without doing any tilting movement.
How to test?
For grades 4 and 5 Patient have to the extension of the neck except by tilting his chin.
Ask the patient to press up on the therapist’s hand but continue to look at the floor. Maintain it. Do not let the therapist press it downward.
- Grade 5: Patient maintains examination position opposite to the strong resistance force. Therapists must use clinical precautions the reason is these muscles are not powerful, and their maximum effort will not bear much resistance force.
- Grade 4:The patient maintains the examination position opposite to the moderate resistance force.
For grade 3: Patient does the neck extension without looking up or tilting their chin.
Raise your forehead from my hand, and maintain looking at the ground.
- Grade 3:The patient holds the test position but without resistance
For grade 2 to 0 Patient try to neck extension into the plinth without tilting movement.
Ask the patient to attempt to press her head down into her hands.
- Grade 2: The patient does the movement in a small range of neck extension by pressing into the therapist’s hands.
- Grade 1: contraction movement can be palpated in the cervical extensor region.
- Grade 0: No visible palpable muscle movement can occur
Cervical flexion
Testing muscles
- Sternocleidomastoid
- Longus colli
- Scalenus anterior
- Scalenus medius
- Scalenus posterior

Patient’s position
For grades 4 and 5 patient should be in a Supine position with knees bent and feet on the plinth just as the hook lying, arms by the side.
For assessing grade 3 patient should be in a Supine position with arms by the side.
To assess grades 2 to 0 patient should be in a Supine position with the head resting on the plinth. Arms by the sides.
Therapist’s position
For grades 4 and 5 therapists should stand on the side of the patient’s head. Ask the patient to raise his head from the plinth while maintaining his chin tucked in with looking towards the ceiling. If enough range is available, put hand for resistance force on patient’s chin .only use two fingers. The other hand may be put on the chest, but stabilization is necessary only when the trunk muscles have a weakness.
For grade 3 therapist should stand by the side of the patient’s head with one hand placed on the patient’s chest.
For grades 2 to 0 therapist should stand at the head of the table, facing the patient. The fingers of both hands or maybe just the index finger are put on the sternocleidomastoid muscles for palpation during the examination.
How to test?
For grades 4 and 5 Patient raises his head straight upward from the plinth while tucking the chin. This muscle group is not strong enough.
Ask the patient to raise her head from the plinth; maintain your chin tucked in while looking upward. Do not raise
your shoulders from the plinth. Maintain it. Don’t let me pressure your head downward.
- Grade 5 and 4: Patient capable enough to maintain examination position opposite to moderate to mild two-finger resistance force.
- grade 3: patients allow movement without resistance.
Grade 2 to 0 Patient rotates his head from side to side, maintaining head support on the plinth.
Ask the patient to rotate her head to the left and then toward the right.
- Grade 2: Patient finished the partial range of motion. The right sternocleidomastoid muscle does the rotation to the left side and then the right side.
- Grade 1: No movement can occur, but only contraction movement in one or both muscles can be noted.
- Grade 0: No movement and no visible contraction movement present.
Cervical Rotation
Half percent of the total neck rotation occurs between C1 and C2 vertebrae before any rotation is detected in the remainder of the cervical spine.
Testing muscles
- Rectus capitis posterior major
- Obliquus capitis inferior
- Longissimus capitis
- Splenius capitis
- Semispinalis capitis
- Semispinalis cervicis
- Splenius cervicis
- Rotatores cervicis
- Longus capitis
- Longus colli (Inferior oblique)
- Scalenus anterior
- Scalenus medius
- Scalenus posterior
- Sternocleidomastoid
- Trapezius
- Levator scapulae

Patient’s position
For grades 5 to 3 The patient should be in a supine with the cervical spine in a neutral position Head resting on a plinth with the face rotated to one side as far as possible. Sitting is an optional position for all examinations.
For grades 2 to 0 patient should be in sitting. The trunk and head may be resting on a high-back chair. The head should be in a neutral position.
Therapist’s position
For grades 5 and 4 Therapist should be standing at the head of the plinth, facing the patient. Instruct the patient to rotate his head. If enough range is present, put a hand for resistance force on the side of the patient’s head over the ear
For grade 3 therapist should assist the movement without resistance force.
For grades 2 to 0 therapist should stand in front of the patient.
How to test?
For grades 5 to 3 Patient suppose to turn his head to neutral opposite to the maximum resistance force. This is a powerful muscle group. Repeat for the rotator muscle group on the opposite side.
On alteration, the patient supposes to turn from the left side of the face on the plinth to the right side of the face on a plinth.
Ask the patient to rotate his head and face the ceiling. Maintain it. Do not let me rotate your head back.
- Grade 5: Patient should maintain examination position with maximum resistance force.
- Grade 4: Patient should maintain examination position with moderate resistance force.
- Grade 3: Patient should turn head throughout the full present range of motion to both sides right and left without any resistance force.
For grades 2 to 0 Patient attempts to turn their head from side to side, maintaining the neck in a neutral position, chin neither downward nor upward.
Ask the patient to rotate your head to the left side as far as you can. Maintain your chin level.do it same for the rotation to the right.
- Grade 2: Patient able to do completes the range of motion.
- Grade 1: contraction movement in sternocleidomastoid or posterior muscles seen or noted by palpation.
- Grade 0: No visible palpable contraction movement occurs.
Precautions
When performing manual muscle testing of the neck, it is important to take certain precautions to ensure the safety and comfort of the patient. Some precautions to consider include:
- Patient positioning: The patient should be positioned comfortably and securely, with their head and neck supported as needed. The healthcare professional should also ensure that they have a clear view of the patient’s neck and can access all muscle groups easily.
- Communication: The healthcare professional should communicate clearly with the patient throughout the test, explaining what they are doing and what the patient should expect. The patient should also be encouraged to speak up if they experience any discomfort or pain during the test.
- Gradual resistance: The healthcare professional should apply resistance gradually and steadily, starting with a low level of resistance and increasing it as needed. Sudden or excessive resistance can cause injury or discomfort to the patient.
- Proper technique: The healthcare professional should use proper technique when performing manual muscle testing, including using appropriate hand placement and body mechanics. This can help prevent injury to both the patient and the healthcare professional.
- Safety considerations: The healthcare professional should be aware of any safety considerations related to the patient’s condition or medical history. For example, patients with certain neck injuries or conditions may not be able to tolerate certain movements or levels of resistance.
Overall, manual muscle testing of the neck can be a safe and effective way to assess neck muscle strength and function. By taking appropriate precautions and working with a qualified healthcare professional, patients can undergo this test with minimal risk of injury or discomfort.
FAQ
Manual muscle testing of the neck should not be painful, but some discomfort or mild soreness may be experienced during or after the test. The healthcare professional will work with the patient to ensure that the test is performed safely and comfortably.
Manual muscle testing of the neck is generally considered safe, but there is a small risk of injury if the test is performed incorrectly or if the patient has an underlying condition that makes the test unsafe. It is important to work with a qualified healthcare professional who is trained in manual muscle testing and can perform the test safely.
The results of manual muscle testing of the neck can help determine if there are any muscle imbalances or weaknesses that may be contributing to pain or other symptoms. If a muscle group is found to be weak, specific exercises or other treatments may be recommended to improve strength and function.