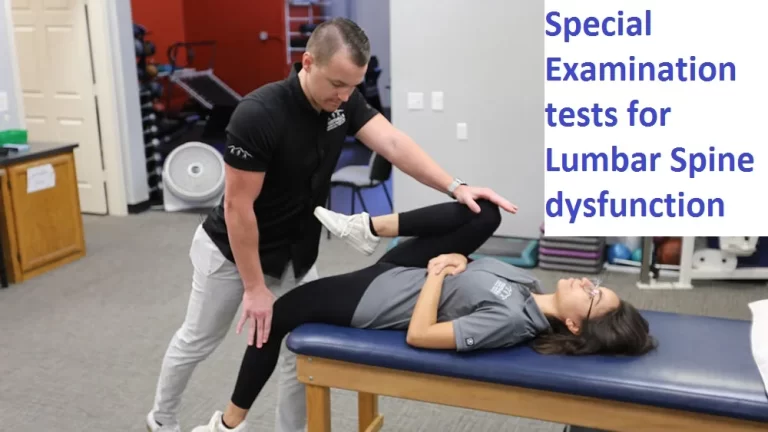
Knee Examination
A knee examination is important and performed as part of a physical examination to diagnose Knee pain-related conditions.
To examine the Knee Doctor takes medical and family history with inspection and palpation of the Knee. They also performed a special test to differentiate from other conditions.
The Knee examination is divided into several parts:
- History
- Subjective examination
- Inspection / Palpation
- Special test
Table of Contents
Subjective
- The patient Intake
- History of the present condition (HPC) (Was there trauma or this insidious onset? Mechanism of the Injury?).
Additional Information
- Past Medical History (PMH) (Pre-existing medical conditions)
- Drug history (DH) (Any relevant medications?)
- Social History (SH) (Work/sports/hobbies affected?).
Red Flags
- These described are special questions that can indicate that something more sinister can be going on. If the patient suspects that the issue is not musculoskeletal and something sinister can be going on a patient must be referred immediately back to the physician with the concerns noted.
- Bilateral pins as well as needles or numbness in the lower limb
- The issues with bowel as well as bladder function where a patient is unable to feel themselves going to a toilet.
- Incontinence.
- Paraesthesia in a groin region.
- Loss of the pulses in the lower limb(Vascular compromise).
- Obvious deformity.
- If sinister but the symptoms are great severe as compared to a patient might expect to ask the seniors for advice on whether as well an A as well an E referral is more appropriate. Mechanism of the injury is essential here, what force may be exerted through the leg? Was this enough for the tibia/femur fracture? Loss of the pulses in the foot can indicate vascular compromise.
Clinical Reasoning
What does the History tell the patient?
- Knowing a history gives clues as to the structures affected.
- The mechanism of an injury is extremely essential. If the patient may work out a force of an injury this gives the patient clues on likely stretched/ damaged structures (Valgus force can indicate a medial cruciate ligament sprain, varus force may indicate a lateral cruciate ligament sprain, foot planted as well as twisted can indicate an anterior cruciate ligament sprain/rupture).
- Make sure the patient rules out a back as well as a hip unless there is a clear mechanism of injury as a knee may be a preferred site of pain for both these areas.
- Immediate swelling along with bruising mainly indicates significant trauma which may require an X-Ray to find or rule out tibial plateau fractures, bone bruises, or an MRI to investigate the integrity of the ligaments.
- Go into the objective examination with the working hypothesis. Use the physical examination to identify dysfunction as well as special tests to prove or disprove the hypothesis.
Inspection as well as Palpation
- Inspection
- Effusion
- Poor Alignment
- Muscle Wasting
- Palpation
- MCL
- LCL
- Joint Line
- Patella
- Retinaculae
- Patellar Tendon
- Hamstrings Tendons
- Popliteus.
Special Tests
Lachman Test
- Purpose
- The purpose of the Lachman test is the passive accessory motion test of a knee performed to identify the integrity of an anterior cruciate ligament (ACL). This described below test is designed to assess single as well as sagittal plane instability.
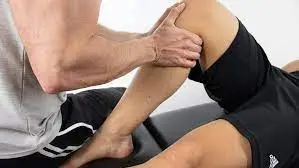
- Technique
- How to perform this test
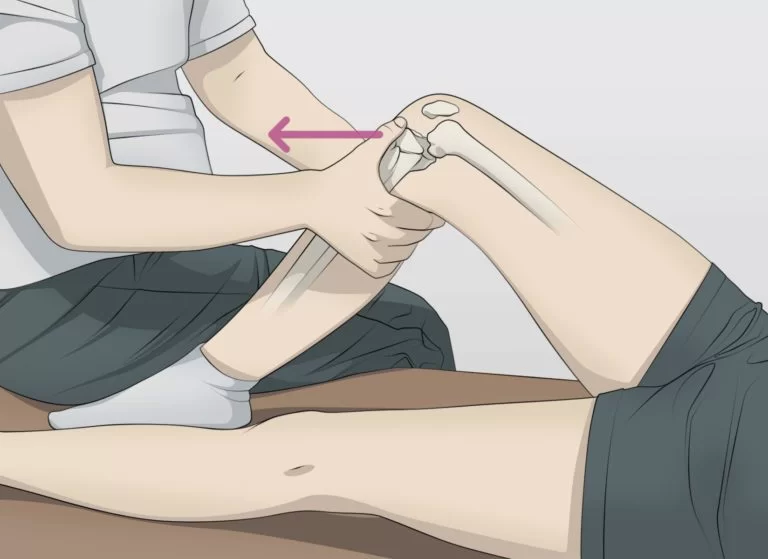
- First of all, lie a patient supine on a bed. Applied a patient’s knee in about 20-30 degrees of knee flexion. Next, According to Bates’ Guide to Physical Examination, a leg may also be externally rotated slightly.
- An examiner may place one hand behind a tibia as well as the other on a patient’s thigh. This is essential that an examiner’s thumb be on a tibial tuberosity. On pulling a tibia anteriorly, an intact anterior cruciate ligament should prevent forward translational motion of a tibia on a femur (“firm end-feel”).
- Anterior translation of a tibia associated with the soft or the mushy end feel indicates a positive test. More than about 2mm of anterior translation compared to an uninvolved knee suggests the torn of the anterior cruciate ligament(“soft end-feel”), as does 10mm of total anterior translation.
- Technique Modification
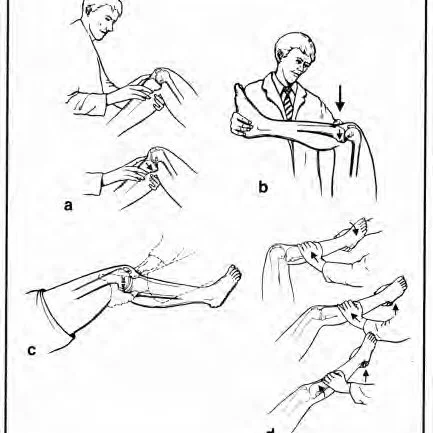
- A Stable Lachman test is recommended for examiners with small hands.
- A patient may lie supine with a knee resting on an examiner’s knee. One of an examiner’s hands stabilizes a femur against an examiner’s thigh, as well as the other hand applies anterior stress. Adler as well as associates described the modification of the method, which they called a “drop leg Lachman test.” A patient lies in the supine position. The described test leg is abducted off a side of an examining table, as well as the knee is flexed to 25°.
- One of an examiner’s hands stabilizes a femur against a table while a patient’s foot is held between the examiner’s knees. An examiner’s other hand then is free to apply an anterior translation force.
- These researchers found that greater anterior laxity was demonstrated by the version of a Lachman test than by a classic version. The two legs are compared.
Anterior Drawer Test of the Knee
- Purpose
- The purpose of this test integrity of an anterior cruciate ligament (ACL)
- Technique
- How to perform this test
- A patient is in the supine lying position on the plinth with their hips flexed to 45 degrees, his knees flexed to 90 degrees, as well as feet flat on a plinth. The clinician sits on the toes of the tested extremity to give assistance to stabilize it.
- The clinicians grasp the proximal lower leg, just below the tibial plateau or even the tibiofemoral joint line, as well as attempt to translate the lower leg anteriorly.
- The described test is considered positive if there is a lack of end feel or even excessive anterior translation relative to a contralateral side. Theoretically, an anterior translation is less than 6mm. If this is more than 6mm, a test is considered positive.
- Clinical Note
- The examination may be done with particular care due to the embark position may result in a false-positive anterior drawer test result for n anterior cruciate ligament if the posterior sag (the indication of the posterior cruciate problem) goes unnoticed before a test is started.
- If minimal or no swelling is seen, a sag is evident owing to an obvious concavity distal to a patella.
Pivot Shift
- Description
- A pivot shift is a dynamic, however, passive test of knee stability, carried out by an examiner without any activity of a patient. This shows the dysregulation between rolling as well as gliding in a knee joint. A patient is in the supine lying position. An action is a combination of the axial load as well as valgus force, applied by an examiner, while the knee flexion from the extended position. When the test is positive, this indicates the injury of an anterior cruciate ligament.
- Clinically Relevant Anatomy
- A knee joint or even the articulatio genus is the biggest as well as most complicated synovial joint in the human body. This is formed by a distal end of a femur as well as a proximal end of a tibia. Between these two, a medial, as well as lateral meniscus, is located.
- An anterior part of a femur (facies patellar is femoris) articulates with a patella which forms a patellofemoral joint. The cruciate ligaments, situated in an intercondylar space, as well as the collateral ligaments are essential ligaments in a knee joint.
- The anterior cruciate ligament (ACL) joins an area intercondylar anterior with a medial aspect of a lateral condyle. The ligament extends upwards, dorsally as well as laterally from a tibial plateau. This prevents a tibia from moving ventrally.
- The posterior cruciate ligament (PCL) joins an area intercondylar posterior with a lateral aspect of a medial femur condyle. A ligament runs medially, straight up as well as slightly forward.
- The posterior cruciate ligament prevents posterior instability in a knee joint, which means that a tibia does not displace posteriorly.
- The posterior cruciate ligament is stronger than the anterior cruciate ligament. Both cruciate ligaments run in the torsion. They stabilize a knee in a sagittal plane. When a knee is in end rotation, the cruciate ligaments are strongly crossed. When in exhortation, this runs more parallel. The cruciate ligaments are primarily located in a posterior part of a joint capsule, so flexion, as well as extension, are not hampered.
- Purpose
- The purpose of the test is to detect anterolateral rotary instability of a knee joint. The structures which could be compromised if the test is positive are the anterior cruciate ligament, lateral cruciate ligament, posterolateral capsule, arcuate complex as well as iliotibial track.
- Technique
- How to perform this test
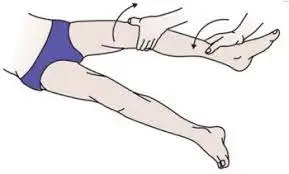
- A patient is in the supine lying position with legs relaxed. An examiner grasps a heel of an involved leg with the examiner’s opposite hand placed laterally on a proximal tibia just distal to a knee joint.
- An examiner after that applies the valgus stress as well as the axial load while internally rotating a tibia as a knee is moved into flexion from the fully extended position.
- The positive test is indicated by the subluxation of a tibia whereas a femur rotates externally followed by the reduction of a tibia at 30-40 degrees of the flexion position.
- The results of a pivot shift test are various according to a rotation.
- Grade I pivot shift: When a tibia is held in the maximal medial rotation, it is the abnormal motion that may be felt as the small as well as gentle sliding reduction. It does not happen in the neutral or even lateral rotation.
- The comment here is that it is barely palpable when a patient is awake but more obvious when he is under general anesthesia. The grade I knee is a result of residual laxity or even partial cruciate injury. A result is an instability that is anterolateral.
- Grade II pivot shift: There is a definite ‘clunk’ when a tibia is in a medially rotated position as well as it is abnormal motion in a neutral position. This test is a negative sign when a tibia is held in the position of definite lateral rotation. Owing to a clunk as well as an abnormal motion in the neutral position, the difference between grade I as well as grade II may be detected.
- In the grade II knee is a more obvious anterior instability, because of the non-functioning anterior cruciate ligament. The grade of the pivot shift is seen after the fresh ‘isolated’ rupture of anterior cruciate restraints & in chronic instability of moderate degree.
- Grade III pivot shift: When a tibia is held in the normal position or moderate lateral rotation, the abnormal motion with the pronounced clunk takes place. A tibia may follow its path to maximal anterior laxity. Owing to gravity, a femur falls posteriorly as well as a tibia is located in the anteriorly translated position with the lateral rotation. With the medial rotation, a shift is less obvious.
- With the acutely injured knee with moderate to severe damage of a posteromedial as well as the posterolateral structures, including the complete anterior cruciate rupture, we find the grade III pivot shift. It is a case when a knee has severe chronic instability as well as consequent stretching of a secondary posterior restraint.
Slocum’s Test
- Description
- A Slocum’s test represents the modification of an Anterior Drawer test which tests anteromedial rotary instability (AMRI) as well as anterolateral rotary instability (ALRI) of a knee.
- An anterior drawer test evaluates the anterior cruciate ligament. When inserting the internal or even external rotation to the test, anterolateral as well as anteromedial rotary instability may be evaluated.
- Clinically Relevant Anatomy
- Following structures can be involved when this test comes out positive:
- Anterolateral: Anterior as well as posterior cruciate ligament, posterolateral capsule, arcuate–popliteus complex, lateral collateral ligament as well as iliotibial band.
- Anteromedial: The Anterior cruciate ligament, medial collateral ligament, posterior oblique ligament, as well as posteromedial capsule.
- Purpose
- The purpose of the testing for the anterior rotatory instability of a knee.
- Technique
- A patient is in the supine lying position with a knee flexed 90 degrees as well as the foot fixed to the examining table by an examiner. 30 degrees of internal rotation is applied to a tibia by rotating the foot. The clinician pulls anteriorly on the tibia to assess for anterolateral rotary instability. Results are compared bilaterally.
- Positive: Increased amount of the anterior tibial translation with the tibial internal rotation or excessive motion on a lateral aspect of a knee indicates anterolateral instability.
- Anterolateral rotatory instability (ALRI) is the manifestation of the anterior cruciate ligament (ACL) deficient knee.
- The technique allows the hamstrings to relax due to the 90 degrees of flexion of a knee (origin, as well as insertion of the hamstrings, are closer to each other in flexion).
- To examine anteromedial rotary instability a tibia is laterally rotated 15 degrees as well as a tibia is once again pulled forward. Results are compared bilaterally.
- Positive: When pathologically increased forward as well as outward displacement of a tibia on a femur is possible, Excessive anterior rotation of a medial tibial plateau indicates laxity of the medial structures.
- There is also another technique described for an anterolateral rotatory instability test
- The patient may be in a supine lying position with his uninvolved side & uninvolved hip as well as knee flexed. A patient rolls a pelvis backward until this reaches a position that is 30 degrees from a supine position. A medial side of the foot of an involved extremity is placed firmly on a surface of an examining table with a knee in the full extension. The position eliminates any rotation of a hip, allows a knee to fall into the valgus position as well as causes internal rotation of a tibia on a femur.
- With both hands placed on a lateral aspect of a knee joint, during a patient gradually flexes a knee, an examiner helps the maneuver & also exerts downward pressure to produce the valgus stress on a knee as well as anterior subluxation of a tibia if rotatory instability is available. The subluxation can be seen as well as felt to decrease as the knee flexes from 25 to 40 degrees of the flexion position.
Posterior Drawer Test (Knee)
- Purpose
- The purpose of this test integrity of a posterior cruciate ligament (PCL).
- Technique
- How to do this test
- A patient is in the supine position as well as the knee to be tested is flexed to approximately 90 degrees. An examiner after that sits on the toes of a tested extremity to assist stabilize this. An examiner grasps a proximal lower leg, approximately at a tibial plateau or even joint line with the thumbs placed on a tibial tuberosity. After that, an examiner attempts to translate a lower leg posteriorly. This test is considered positive if it is the lack of end feel or even excessive posterior translation.
Valgus stress test
- Purpose
- The purpose of the valgus stress test, which is also known as the medial stress test, is to evaluate the integrity of a knee’s medial collateral ligament (MCL). Injuries to the medial cruciate ligament are common in athletes and can occur by themselves or in conjunction with other structural injuries.
- Start with the patient in a supine position before beginning the technique. During the test, the leg may be relaxed.
- During the test, the examiner places one hand on the outside of the knee to serve as the pivot point and the other on the foot. An examiner simultaneously applies an abducting force to the foot and a valgus force through a knee joint to palpate a medial joint line.
- The test is typically performed with the knee bent at 30 and 0 degrees, respectively. When performed at 30 degrees, the average cruciate tendon is more separated from other average joint designs, with responsiveness of .86-.96 for MCL tears. The second version of this test, which can be performed at 0 degrees of knee flexion, allows for the evaluation of additional medial joint structures.
- The two versions are summed up as follows:
- 0° knee valgus: A Medial Joint Capsule of the Knee, the medial collateral ligament, the anterior cruciate ligament (ACL), and the posterior cruciate ligament (PCL) are all stressed.
- 30° knee valgus: A primary structure to be evaluated is the medial cruciate ligament, which serves as the position’s primary stabilizer. In this position, a capsule of the medial joint is under strain.
- Positive findings
- Positive findings include excessive gapping at a medial joint and/or pain, which may indicate damage to the medial collateral ligament. It can show capsular or even cruciate tendon laxity, contingent upon what level of knee flexion a test is finished at.
- It should be noted that at 30 degrees, some joint gapping is considered normal. At 0 degrees, there may not be any gapping.
- Meaning of this test
- The average security assumes the fundamental part in a solidness of a knee as well as goes about as an essential valgus restriction in the flexed knee. With valgus forces, the anterior cruciate ligament is put under greater stress if the medial cruciate ligament is sprained, resulting in knee hypermobility (especially at 45 degrees of knee flexion). As a result, individuals who present with a lax medial cruciate ligament should be given extra care to reduce the likelihood of further injury, particularly to the anterior cruciate ligament.
Adduction stress test or varus stress test
- The purpose of the adduction (varus) stress test is: The lateral joint line gap can be seen in a varus stress test.
- Execution of this test: The varus stress test is performed by palpating a lateral joint line and stabilizing a femur. An ankle is stressed in varus by another hand. This test is finished at 0° as well as 20-30°, consequently, a knee joint is in a shut-pressed position. While another hand adducts an ankle, a physical therapist uses one hand to stabilize a knee.
- Interpretation
This test is positive if the knee joint adducts more than usual when compared to an unaffected leg. the sign of a tear in the lateral cruciate ligament. - Additional structures are involved:
- 0°: The lateral gastrocnemius, the arcuate-popliteus complex, the anterior and posterior cruciate ligaments, and the posterior capsule.
- 20-30°: The iliotibial band, posterolateral capsule, and biceps femoris tendon are also present.
Recurvatum Test for External Rotation
- The initial examination of a patient suspected of having posterolateral rotatory instability involves an external rotation recurvatum test.
- An examiner evaluates whether this knee hyperextension is greater than on the opposite side during the test.
- Lifting the great toe while applying a stabilizing force to the distal thigh is how the test is carried out to determine how much knee recurvatum is present.
- Typically, the heel height in cm is used to calculate this. The medial aspect of the foot is often measured, and the results are compared to the contralateral normal knee.
- According to studies, an increased quantity of recurvatum following a posterolateral knee injury is typically a sign of a combined anterior cruciate ligament tear.
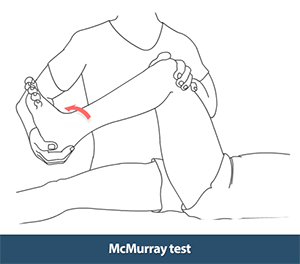
McMurray Test
- Introduction of the McMurray test
- The most frequent knee injury is a torn meniscus. At a ratio of about 2:1, medial meniscus tears are often more common than lateral meniscus tears. Younger people with acute knee injuries may get meniscal tears, while elderly patients may experience them as a result of degenerative conditions. The weight-bearing, partially extended knee that sustains the acute tearing usually occurs in sports injuries.
- The goal of McMurray’s test is to find out whether the knee has a meniscal tear.
- Technique
- Patient position: resting on their back with their knee fully extended.
- On the side being tested is the position of the therapist.
- Distal Hand: holds the bottom of the foot and supports the limb while allowing for the necessary range of motion. Proximal Hand: holds the knee and palpates the joint line with the thumb on one side and fingers on the other.
- Extend the knee with internal tibial rotation (IR) and VARUS stress from a maximally flexed posture. Then, return to maximal flexion and extend the knee with external tibial rotation (ER) and a VALGUS stress.
- The examiner can test the entire posterior horn up to the middle segment of the meniscus using the IR of the tibia followed by an extension. Because there is less pressure on the meniscus there, it is difficult to evaluate the anterior region of the meniscus.
- The lateral meniscus is produced by the varus tension and tibial IR.
- The medial meniscus is produced by the tibial ER and valgus stress.
- Positive results
- Any of these symptoms, including pain, locking, audible clicking, and snapping, can point to a damaged medial or lateral meniscus.
Test Bounce at Home
- Purpose
- The menisci are examined for integrity using the bounce home test.
- Technique
- The therapist passively flexes the patient’s knee while the patient is supine, holding the patient’s foot’s heel in his palm. The knee is then allowed to stretch passively. Fully extending the knee should allow it to “bounce home” with a sharp end feel.
- The knee must fully extend or feel rubbery at the end, with signs of a torn meniscus or another intra-articular disease, to pass the test.
- The bounce-home test has undergone two modifications in the literature. The knee-jerk test was the first modification that Oni mentioned. In it, the knee is forced to extend, and the injured tissue causes pain.
- Shybut and McGinty described the second modification, which was merely a modification of forced knee hyperextension. When forced hyperextension is blocked, the test is positive.
The Joint Line Tenderness
- Purpose
- Description and Purpose of the Joint Line Tenderness(JLT) test is a common physical examination test used to check for meniscal injury sensitivity.
- If pain is restricted to either the medial or lateral sides of the joint, the test can be utilized. Degenerative pathology of the articular joint cartilage or compromised integrity of the medial or lateral meniscus is thought to be associated with this.
- When a person has JLT, their joint pain gets worse when they press on the joint’s surface or move the joint outside of its normal range of motion. Joint stiffness, swelling, redness, warmth, pain, and deformity are some of the symptoms that may occur alongside joint tenderness.
- The test is usually done while the patient is relaxed and lying on the table, but it can also be done while the patient is sitting with their knees bent 90 degrees. The test can be performed on the knee’s lateral (lateral meniscus) and medial (medial) borders, respectively.
- Clinically Relevant Anatomy
- The patellofemoral and tibiofemoral joints of the knee make it the largest joint in the body. The latter contains a medial and lateral meniscus that is situated between the corresponding tibial plateau and femoral condyle. The meniscus is a tissue of specialized extracellular matrix molecules that has a shiny, white color. Each of them has vascularization and innervation that are specific to the area. The two menisci are basic for a well-working knee joint.
- Technique
- Technique To determine the maximal joint line sensitivity, which is the palpated point from the joint line that causes discomfort and is more tender than the unaffected leg at the same anatomic location, each side of the tibiofemoral joint line is palpated separately.
- The knee must be flexed at 90 degrees. The soft border between the highness of the femur above and below the tibia and the border of the joint line at the sides of the patellar ligament should be identified. The knee joint line is palpated from the medial border of the patellar ligament to the knee’s posterior aspect.
- The lateral joint line is palpated in the same manner along the joint line in the posterior direction starting at the lateral border of the patellar ligament. It is necessary to palpate the medial and lateral joint lines separately. The presence of isolated posterior/medial joint line tenderness is confirmed by palpating the tibial plateau and femoral condyles. To determine whether the patella’s borders are tender, they are not palpated.
- If the patient feels pain or tenderness when palpating the medial or lateral joint lines, the test is positive.
- Diagnostic accuracy
- Diagnostic accuracy is regarded as a valuable clinical skill in the practice of physiotherapy. This skill involves selecting the most accurate diagnostic tests by evaluating their clinical performance. Test Diagnostics contains a quick reference guide to the test statistics and interpretations that are utilized the most frequently in physiotherapy practice.
- The proportion of people with the disorder who show a positive test result and actually have the disease or dysfunction is known as the test’s sensitivity. In the case of the joint line tenderness test, sensitivity refers to the test’s ability to correctly identify individuals with JLT who have a meniscal tear. On the other hand, a test’s specificity indicates the proportion of people who do not actually have the disorder and have a negative test result. In other words, this is the probability that a person who does not have a meniscal pathology will have a negative JLT result.
- The likelihood ratio (LR) can be calculated by combining the values of sensitivity and specificity. The following formula is typically used to calculate the LR:
- When we simplify the likelihood ratio formula, the following holds true: The likelihood ratio of a positive test is equal to sensitivity divided by (1-specificity). The likelihood ratio of a negative test is equal to (1-sensitivity) divided by specificity.
- True positive value: LR+ = true positive/false positive; LR- = false negative/true negative the proportion of people with the disorder whose tests come back positive.
- A negative value in error: The proportion of people who do not have the disorder who take a positive test.
- Negative real value: The proportion of people who do not have the disorder and who receive negative results.
- A negative value in error: The proportion of people with the disorder whose tests come back negative.
- There are a few straightforward rules for how the LR should be interpreted. First, a positive test’s likelihood ratio (LR) must be greater than 1, and the higher the LR, the more certain you can be that the person has a particular disorder.
- Second, in contrast to the positive test, the negative test’s LR must be lower than 1. If it is lower, you can be more confident that a person does not have the disorder because the test came back negative.
- The JLT test appears to have high diagnostic accuracy due to its high specificity and sensitivity in general. However, it appears that the test results for the lateral meniscus are significantly higher than those for the medial meniscus.
- Medial sensitivity was 86% and specificity was 67% in an Osman study, while lateral sensitivity was 92% and specificity was 97%. Other authors have also confirmed this.
- Similar to this, the scores on the lateral test have a higher LR than those on the medial test. As a result, there is a positive correlation between JLT and meniscal lesions, which has a high sensitivity but relatively low specificity.
- This means that patients with JLT may not only have meniscal tears, particularly medial meniscus tears. When there is an anterior cruciate ligament tear, the JLT’s ability to predict meniscal pathology also decreases.
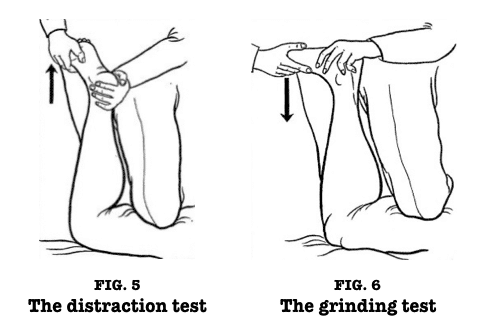
Apley’s test
- Introduction
- Introduction to the Apley’s Test The Apley’s grind test, also known as the Apley Compression test, is used to assess individuals for knee meniscus issues. Alan Graham Appley, a British orthopedic surgeon who developed this method and died in 1996, is the name of this test. The Apley distraction test is used in conjunction with this test.
- Meniscal injuries are very common and cause a lot of pain and other problems. Children under the age of 10 who sustain meniscal injuries are at a lower risk. It is hypothesized that the higher prevalence among males than among females is due to males participating in a greater number of activities that result in rotational injuries (contact sports). A meniscal injury has not been linked to race or ethnicity in any way.
- In order to guarantee patients’ successful treatment and a prompt diagnosis, it is essential. A comprehensive physical examination, provocative tests like the Apley’s Grind and Apley’s Distraction tests, and advanced imaging like an MRI are all needed to make a diagnosis. Because the menisci are avascular and lack a nerve supply to their inner two-thirds, injuries to the menisci rarely cause pain or swelling and can be challenging to diagnose.
- Meniscus anatomy
The meniscus is C-shaped cartilage that cushions the knee joint between the proximal tibia and distal femur. It has an average width of 10 to 12 millimeters and a thickness of 4 to 5 millimeters. Fibro-elastic cartilage is what makes up the meniscus. It is a network of collagen, proteoglycan, glycoproteins, and other cellular components that are interwoven together, and about 70% of it is water. - The meniscus is connected to three ligaments. The medial and lateral meniscus are connected by the transverse (inter-meniscal) ligament, which is anterior. The meniscus is connected in the periphery by the coronary ligaments. The meniscus and the posterior cruciate ligament (PCL) are connected by the meniscofemoral ligament. The posterior horn of the lateral meniscus is where the meniscus-femoral ligament gets its start. The lateral inferior genicular artery and the medial inferior genicular artery supply blood to the meniscus.
- As was mentioned earlier, the meniscus is known to have a lack of blood supply, particularly in its central region, where nutrients are distributed. The meniscus’s structure of cartilage provides the knee joint with a cushion or shock absorber. The meniscus can tear in various number of different ways. The flap tear, the radial tear, the horizontal cleavage, the bucket handle tear, the longitudinal tear, and the degenerative tear are examples of these.
- The knee’s two menisci are:
- Medial Meniscus
- Lateral Meniscus
- Indication
A clinician should suspect a meniscus injury when a patient presents with knee pain, particularly when the foot is firmly planted on the ground after a twisting injury. The knee injury could occur even if no external force was applied. Pain typically radiates along the knee’s joint line. Mechanical issues like knee locking, clicking, or not being able to fully extend the knee are also common complaints. - Frequently, these injuries occur alongside ligamentous injuries. The “unhappy triad” can occur when an external force is applied to the lateral knee. Damage to the medial or lateral meniscus along with injuries to the anterior cruciate ligament (ACL) and medial collateral ligament (MCL) are included in this category of injuries. The most common outcomes of a physical examination are joint line tenderness, joint effusion, and restricted range of motion.
- Test description
- The patient is placed in the prone position with the knee flexed to 90 degrees for Appley’s grinding test. The examiner’s knee is then used to anchor the patient’s thigh to the examination table. The examiner rotates the tibia laterally and medially using distraction first, noting any excessive movement, restriction, or discomfort.
- Following that, the procedure is repeated using compression rather than a distraction. The lesion is most likely ligamentous if rotation plus distraction is more painful or demonstrates increased rotation in comparison to the normal side. The lesion is most likely a meniscus injury if the rotation plus compression is more painful or shows less rotation than the normal side.
The Ege’s test
- The Ege’s Test is also known as the weight-bearing McMurray test because patients are required to put weight on their knees when they perform this test. The patient’s feet are turned either inward (lateral meniscus) or outward (medial meniscus) depending on the meniscus we want to investigate.
- Clinically Relevant Anatomy
- Clinically Relevant Anatomy The menisci are just one of the many anatomical structures that make up the Articularis Genus. We have a lateral and medial meniscus. These cover the articular surfaces of the tibia.
- The medial meniscus has a C shape and is larger than the lateral meniscus. The Lig and this will work together. Medial Collateral.
- The lateral meniscus has an O-shape and is smaller than the medial meniscus. This will join the M. Popliteus because it is more mobile than the medial meniscus.
The test’s objective is to determine whether a meniscus tear exists on the medial or lateral side of the knee. - The Ege technique test is performed standing up.
- Start Position: The patient stands with their knees extended and their feet 30 to 40 centimeters apart. Depending on which meniscus you are testing—medial or lateral—the patient’s feet are positioned to allow maximum knee rotation (medial meniscus) or maximum knee rotation (lateral meniscus).
- The patient performs the test movement for medial meniscus tears by standing slowly after squatting with both lower legs in maximum external rotation. As the squatting continues, each knee becomes externally rotated and the distance between them grows. Genu varus (knees outward) will be induced by performing the squat with maximum external rotation. After doing as much squatting as possible, the patient returns to the starting position (with the knee extended).
- While the patient squats and stands, both lower extremities are held in maximum internal rotation of the knee to detect a Lateral Meniscus tear. The patient is permitted to steady himself or herself for a slightly less-than-full squat because a complete squat in the full internal rotation is rarely possible, even with healthy knees.
- As opposed to the average meniscus test, the distance between the knees diminishes and the knees become inside-turned as the crouching continues. Genu valgus (knees inward) will be induced by performing the squat with maximum internal rotation. After doing as much squatting as possible, the patient returns to the starting position (with the knee extended).
- Test Outcome
When the patient experiences pain or a click at the joint line’s related site, the test is considered positive. As soon as the pain or click is felt, further squatting is stopped; consequently, not all patients require a full squat. Occasionally, the patient may not experience pain or click until the maximum squat or as soon as they exit the squat, both of which are still considered positive for this test. Torment or potentially click are regularly felt at around 90° of knee Flexion.
The Steinman Test
- The Steinman test is a diagnostic procedure used to identify meniscal pathology at the knee joint. Steinman part 1 and Steinman part 2, also known as the tenderness displacement test, are the two parts of the test. Meniscal pathology can be distinguished from ligament or osteophyte injury using this test.
- Steinman procedure 1: Either the patient is lying on the bed supine with the examiner holding the knee at 90 degrees of flexion or the patient is sitting on an edge of a table with a knee hanging over.
- Laterally and medially rotate the tibia.
If lateral pain is felt during medial rotation and lateral pain during medial rotation, the test is positive.
In various degrees of knee flexion, the test is performed once more. - The Steinman tenderness displacement test, also known as Steinman Part 2:
- Because the tenderness does not move during flexion and extension in cases of pathology, this test is specifically designed to distinguish between injury and meniscal pathology.
- Tenderness along the joint line is felt.
- The joint line is palpated while the knee is flexed. If the tenderness moves posteriorly with increasing flexion, the test is positive.
- The joint line is again palpated while the knee is extended. If the tenderness moves anteriorly when the knee is extended, the test is positive.
- In various degrees of flexion and extension, the test is repeated.
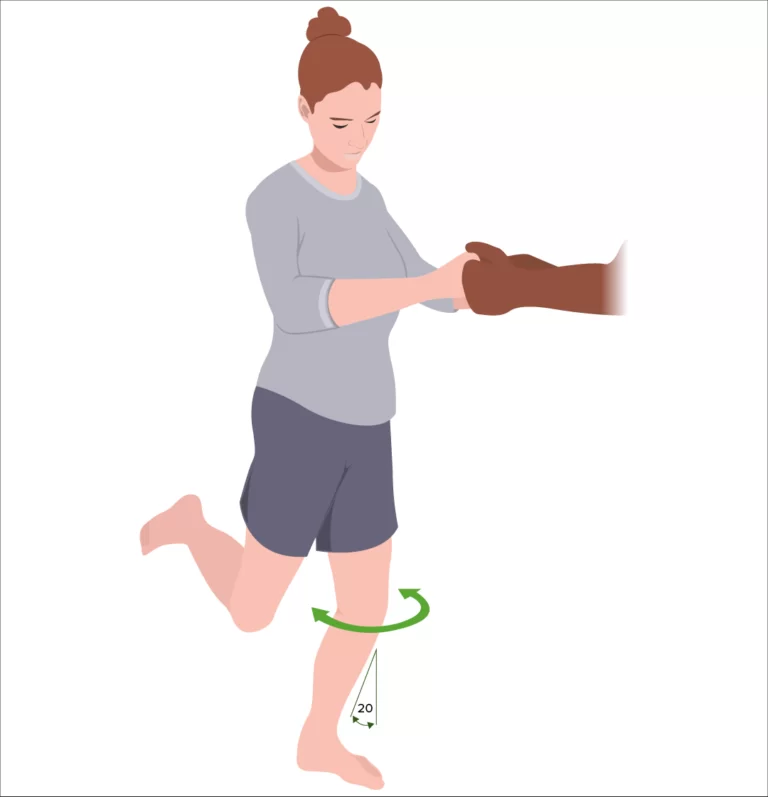
Thessaly test
- The purpose of the Thessaly test is as a clinical screening tool for meniscal tears and lesions.
- Medial or lateral joint line discomfort and possibly a sense of locking or catching are signs of suspected meniscal tears. The hypothesis behind the Thessaly test is that a knee with a meniscal tear will exhibit the same symptoms as the patient. The test is a dynamic simulation of knee joint loading.
- Strategy
- The patient stands levelly footed on one leg while the analyst upholds the patient by holding their outstretched hands. The patient then maintains the 5° knee flexion and rotates the femur on the tibia medially, laterally, and medially three times. In order to instruct the patient on how to maintain the flexed position of the knee, the uninjured leg is tested first. After that, the test is repeated with 20° flexion.
- If the patient experiences discomfort along the medial or lateral joint line as well as a sensation of locking or catching in the knee, the test is deemed positive for a meniscus tear.
Moving Patellar Apprehension Test
- The Moving Patellar Apprehension Test serves the purpose of clinically identifying lateral patellar instability.
- Technique
- There are two parts to the moving patellar apprehension test. Part I is a test with a provocation focus. The examiner extends the knee fully during the examination.
- The examiner applies lateral force to the patella with the thumb. After that, the examiner moves the knee from full extension to 90 degrees of flexion and back to full extension while keeping the force applied laterally to the patella.
- A symptom relief maneuver is the second part of the test, Part 2. With a force applied medially to the patella, the examiner repeats the first part of the test.
- The examiner extends the knee fully during the examination. The examiner applies a medial force to the patella with the index finger. After that, the examiner moves the knee from full extension to 90 degrees of flexion and back to full extension while maintaining the force applied to the patella from the medial side.
- Orally expressed anxiety or anxious quadriceps recruitment on the provocation test (part 1) and relief of these symptoms with normal ROM in the test ROM in part 2 constitute a positive test.
Patellar grind test
- The purpose of the patellar grind test is to determine whether or not there is a patellofemoral joint disorder (also known as patellofemoral pain syndrome, chondromalacia patellae, or patellofemoral DJD). Clarke’s Test is another name for this test.
- Method
The patient is supine or long-sitting, with the knee in question extended. While applying pressure, the examiner places the web of his hand just above the patella. The patient is instructed to contract the quadriceps muscle gradually and gently. Pain in the patellofemoral joint is a sign that this test is positive. - Alternative Method
Rieder suggests directly pressing on the patella. The examiner then presses down and asks the patient to contract the quadriceps muscles. - The subject is lying on their side, knees bent.
- Standing next to the affected side, the examiner places the thumb’s web space on the patella’s superior border.
- The subject is approached to get the quadriceps muscle while the inspector applies descending and substandard tension on the patella.
- Patellofemoral dysfunction is characterized by pain during patellar movement or inability to complete the test.
- In the event that the patient can finish and keep up with the compression without torment, the test is viewed as negative.
The test is deemed positive if it causes retro patellar pain and the patient is unable to maintain a contraction without experiencing pain. - Precautions
The amount of pressure that is applied needs to be carefully controlled because even normal people can respond positively to more pressure. - Sensitizer
The most effective approach is to carry out the procedure a number of times, increasing the pressure as needed, and then comparing the outcomes to those obtained on the unaffected side.
The knee should be tested at 30 degrees, 60 degrees, 90 degrees, and full extension to test various patellar parts.

Noble test
- Noble’s test, also known as Noble’s Compression test, is a provocative examination of the iliotibial band that was developed by Clive Noble. It is frequently used as a sign that iliotibial band syndrome has occurred; However, no evidence-based research has yet been conducted to verify this test’s validity. The modified Ober’s test and the Renne Creak test are two additional tests that could be utilized.
- Clinical Anatomy
Knowledge of the iliotibial band is relevant to the test and clinically relevant anatomy. The iliotibial tract, which begins at the iliac crest, is a thickening of the fascia lata. - From the femur, the iliotibial tract descends laterally. The fibers of the tensor fascia lata muscle and gluteus maximus muscle insert into the iliotibial tract at the greater trochanter.
- The iliotibial tract divides into two structures as it approaches the knee joint, passing through the femur’s lateral epicondyle: the band around the iliopatella and a distal extension that goes into the Gerdy tubercle.
- Over the lateral epicondyle, the Iliotibial Band experiences compressive and frictional forces while walking and running. Increased friction is caused by muscle imbalance, improper footwear, lower extremity misalignments, and repetitive strain.
- Overuse injuries like iliotibial band (ITB) friction syndrome affect runners, cyclists, weightlifters, skiers, and soccer players. Pain over the lateral femoral epicondyle is its defining feature.
- Purpose
- The purpose of this test is to look for pain, abnormalities, and tightness in the iliotibial tract, all of which could be signs of iliotibial band syndrome. Iliotibial band syndrome can be distinguished from other common causes of lateral knee pain with this information.
- Technique
- The patient is lying on their side or supine, with the injured side facing up. With the thumb on the other hand, palpate and exert firm pressure on the lateral epicondyle of the femur for crepitus. Grasp just above the ankle and slowly bend the knee several times from 0-90°.
- Interpretation
- ITB syndrome is characterized by palpable rubbing, snapping, or “squeaky hinge-like” crepitus, as well as localized pain that increases with pressure at or above the epicondyle (often at 30 degrees of flexion).

Ober’s test
- The objective of Ober’s test is to assess an inflamed, contracted, or tight Tensor Fasciae Latae (TFL) and iliotibial band. It is important not to confuse Ober’s test with Noble’s test and the Renne test, which are two other tests that are frequently used to look for iliotibial band syndrome.
- Relevant to Clinical Practice
- Anatomically, the ITB is a continuation of the tendinous TFL muscle, with some help from the gluteal muscles. In hip abduction, the gluteus medius muscle works together with TFL/ITB.
- Origin:
- The outer surface of an anterior superior iliac spine, the deep surface of fascia lata, and the anterior part of the external lip of the iliac crest are where TFL comes from.
- A lateral thickening of the fascia lata in the thigh is known as the iliotibial band (ITB) or tract. It divides proximally into superficial and deep layers, enclosing and securing the tensor fasciae lata muscle to the iliac crest. Additionally, it receives the majority of the gluteus maximus tendon.
- Insertion:
- At the junction of the proximal and middle thirds of the thigh, the TFL inserts into the ITB.
- Most people think of ITB as a band of dense, fibrous connective tissue that connects to Gerdy’s tubercle on the anterolateral side of the tibia and passes over the lateral femoral epicondyle.
- Action:
- The hip joint is flexed, rotated medially, and abducted by TFL; stretches the lata fascia; and might make knee extension easier. The primary synergistic muscles of the hip abductors are the gluteus medius, gluteus minimus, and upper fibers of the gluteus maximus
- Because these muscles are inserted into the ITB, the TFL and Gluteus maximus are able to influence the stability of the extended knee joint.
- Technique Frank Ober discussed the connection between a contracted TFL and ITB and low backache in an article titled “Back Strain and Sciatica” in May 1935. In that article, he described the test for tightness of the TFL and ITB. In 1937, this was updated to include a warning about avoiding hip internal rotation and flexion during the test.
- Position of test:
- The patient should lie on their side with the side that is hurt facing up.
To flatten the lumbar curve, flex the bottom knee and hip. - To stop the patient from moving in any direction, stand behind the patient and firmly stabilize the pelvis and greater trochanter.
- The patient’s affected leg should be flexed to a right angle at the knee with the patient’s other hand grasping the distal end.
- Abduct and extend the hip joint.
Adduct the hip and slowly lower the leg toward the table until the motion is restricted. - During the test, the pelvis must be stabilized and the hip must not rotate or flex internally. Because allowing the thigh to drop into flexion and internal rotation would “give in” to the tight TFL and prevent an accurate length measurement.
- Results:
- The patient will not feel any pain because, if the ITB is normal, the leg will adduct, with the thigh dropping slightly below the horizontal; The test is deemed negative in this instance.
- The patient would experience lateral knee pain and the leg would remain in the abducted position if the ITB were tight; in this case, the test is deemed positive.
- In Posture and Pain, Kendalls offered the first recommendation for modifying the Ober test. This test provides a complete stretch on TFL and places less strain on the medial knee joint, less tension on the patella, and less interference from a tight Rectus Femoris.
- Position of test:
To flatten the low back, the patient is lying on their side with one leg flexed at the hip and knee.
The examiner keeps the lateral trunk in contact with the table and stabilizes the pelvis.
Note: A downward lateral tilt would “give in” to a tight TFL, which is equivalent to hip abduction. - Test:
The examiner moves the leg forward. Make sure the leg is not turned inward. - Results:
The thigh drops about 10 degrees below the horizontal with the knee straight and the pelvis neutral. It hints at a normal length.
Tight ITB and TFL are indicated by the leg not dropping.

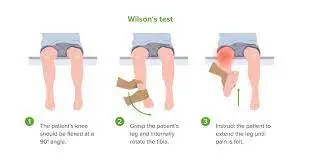
Wilson’s test
- The Wilson’s Test is a method for determining whether or not osteochondritis dissecans of the knee is present.
- Clinically Useful Anatomy
- Method The test must be carried out as follows:
- Request that the patient sits on a table with his legs outstretched over the edge.
- Bend the patient’s knee at an angle of 90 degrees.
- Take hold of the patient’s foot and rotate the tibia inward.
- Tell the patient to keep extending their leg until they feel pain.
- When the patient complains of pain in the knee about 30 degrees from full extension and the pain goes away when the foot is turned back (externally rotating the tibia) into its normal position, the test is positive.
FAQ
A physical examination may include careful inspection of a knee, palpation for the point tenderness, assessment of the knee joint effusion, range-of-motion testing, evaluation of the ligaments for injury or laxity, as well as assessment of a meniscus.
A clinical examination of the knee is addressed to evaluate three aspects: 1) patellofemoral joint/extensor mechanism; 2) articular (meniscal and chondral) lesions; as well as 3) knee instability. The series of the most known exams, signs as well as tests utilized for each of the three aspects may be here discussed.
Bony Landmarks of a knee joint.
Femoral condyles: Palpate medial as well as lateral femoral condyles. Gerdy’s tubercle (lateral tubercle of a tibia), palpate for insertion of an iliotibial band. Fibular head: Palpate below a knee joint laterally for a fibular head. Note this is position as well as mobility.
Lachman test: A Lachman test is one of the best tests to diagnose an anterior cruciate ligament tear. With a knee slightly bent, an examiner stabilizes a thigh during pulling a shin forward. A torn anterior cruciate ligament allows a shin to shift too far forward. Anterior drawer test: This test is done with a patient lying flat on the back.
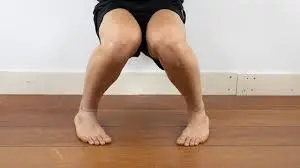
Stand & then balance on one foot (the side the patient wants to test). Done the single-leg squat during trying to keep the body as straight as possible. If you are able to balance so that you are knee is straight about the hip for about one-half of a deep knee bend as well as the come back up, then the patient passes the test on that side.
Two tell-tale signs of knee injury are pain as well as swelling of a knee joint. The patient may also have difficulty with a joint moving. This may feel stiff, lock up, or feel like this is catching as he bends as well as straighten the leg.
Wear as well as tears associated with aging is one of the most common causes of knee pain. The risk of osteoarthritis is higher in individuals over the age of 50. However, youth does not protect patients from osteoarthritis. This degenerative joint disease happens in younger adults too.
A patella has four different planes of motion: Flexion–extension, medial–lateral rotation, medial–lateral patellar tilt, as well as medial–lateral patellar shift.