Cervical Rotation
Table of Contents
What is Cervical rotation?
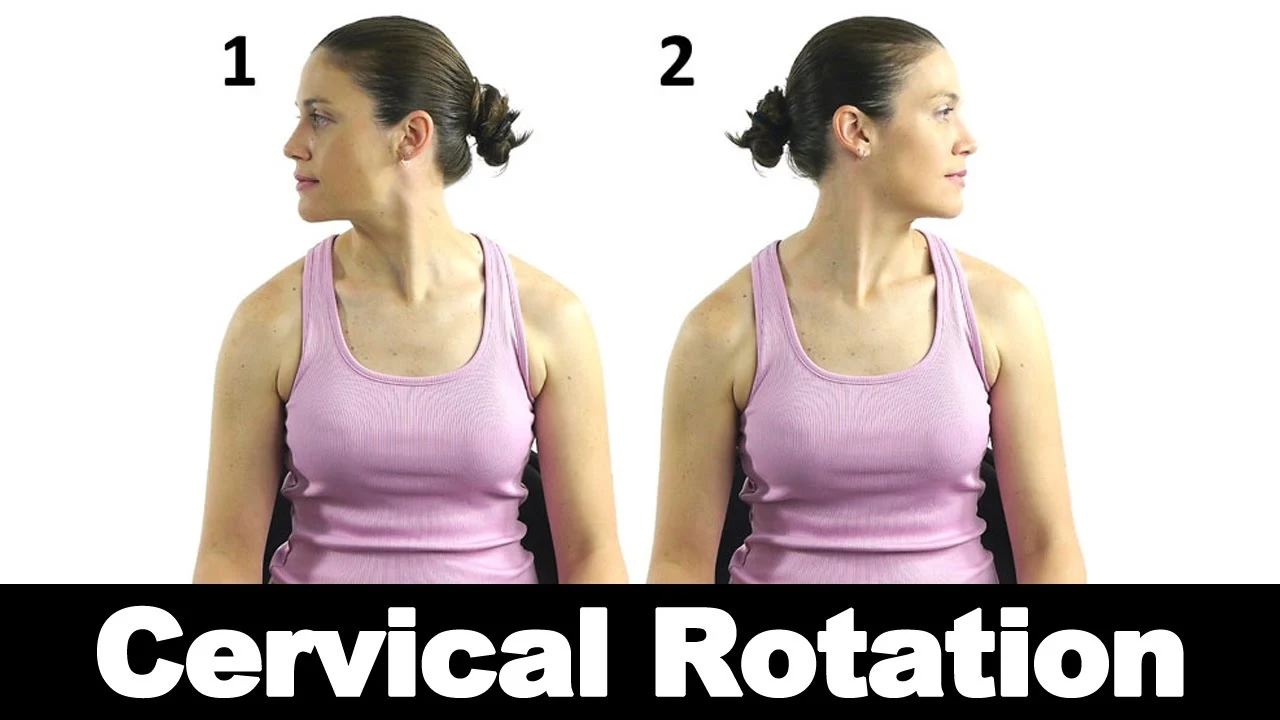
Cervical rotation refers to the movement of the neck or cervical spine in which the head turns to either side. This move allows you to turn your head to look over your shoulder or change your field of vision without moving your entire body. The cervical spine consists of seven vertebrae known as C1-C7 and is the upper part of the spine located in the neck region.
Cervical rotation is necessary for everyday activities such as driving, crossing the street, or checking blind spots. It is controlled by the muscles and ligaments around the neck and is a combination of several smaller movements of individual vertebrae that allow smooth movement. However, it is important to carefully perform cervical rotation and avoid sudden or excessive movements, as the neck is a sensitive area and improper rotation can cause injury or strain, especially if conditions such as cervical spondylosis or neck pain are present.
Cervical Rotators Muscles
The cervical rotators, also known as rotators cervicis, are a group of small muscles located in the cervical (neck) region of the spine. They are part of the deep intrinsic musculature of the back and play a crucial role in stabilizing and controlling the movement of the cervical spine. These muscles are often overlooked compared to the larger surface muscles, but they are important for good motor control and maintaining proper spinal alignment.
The cervical muscles consist of short single muscle fibers that connect the vertebral bodies (the bony projections at the back of the vertebrae) of one cervical vertebra to the vertebral laminae (the thin bony plates on each side of the spine) and one or two levels higher Thanks to their direction, they contribute to the rotation and extension of the cervical spine. Although they are relatively small and may not be prime movers for large neck movements, the cervical rotators contribute to the complex coordination and stability required for various neck movements and positions. They work with other neck muscles, such as the suboccipital muscles, splenius capitis, and longissimus capitis, to facilitate precise movements and support the head and neck in daily activities.
As with any muscle group, maintaining good posture and performing regular neck exercises can help keep the cervical rotators healthy and functioning optimally. If you have specific concerns or problems with your neck or cervical spine, it is recommended that you consult a doctor or qualified physical therapist for personal guidance and exercises.
ROM of Cervical Rotation
Cervical rotation, also known as the range of motion of the neck while turning the head from side to side, can vary from person to person. This is influenced by factors such as age, flexibility, individual anatomy, and any underlying medical conditions. On average, the normal range of motion for cervical rotation is usually as follows:
- Turn to the right: Turning your head to the right is usually slightly larger than turning to the left.
- Turn left: This movement involves turning the head to the left.
The full range of motion of cervical rotation (right and left combined) is usually about 90-110 degrees. In other words, a person should be able to turn their head about 45-55 degrees on both sides.
It is important to note that many factors such as injuries, arthritis, muscle strains, or neck pain can affect a range of motion. If you have a limited range of motion in your neck or are concerned about the health of your neck, it’s a good idea to see a doctor, such as a doctor or physical therapist, for evaluation and proper guidance. They can help determine the cause of the limitations and recommend appropriate exercises or treatments to improve flexibility and reduce discomfort.
How to check the Range of motion of Cervical Flexion
The cervical range of motion can be controlled through a simple and straightforward process. Here’s a step-by-step guide to performing a basic cervical rotation assessment:
- Preparation: Sit or stand straight, back straight and shoulders relaxed. Make sure your neck is also in a neutral position (looking straight ahead).
- Mark the reference point: Before starting the measurement, it is useful to mark the reference point on the wall or floor directly in front of you. This point will help you measure the degree of rotation.
- Keep Your Eyes Ahead: Keep your eyes on the reference point marked in front of you throughout the test. This ensures that the movement is isolated to the neck without affecting the shoulders or torso.
- Measure to the right: Slowly turn your head to the right, trying to bring your chin over your right shoulder. Make sure you only move your neck, not your shoulders. Notice how much your chin sticks out. If necessary, the angle can be measured with a ruler or protractor.
- Measure to the left: Bring your head back to the center (forward) and then turn your head to the left, trying to bring your chin over your left shoulder. Mark the degree of rotation again.
- Calculate the area: Add the right and left turns together.
This total will give you your cervical range of rotation. Consider the following points:
- Perform the test slowly and carefully to avoid sudden jerks or movements that may cause tension or discomfort.
- If you experience pain, dizziness, or unusual symptoms during the test, stop immediately and contact a doctor.
- Remember that this test gives basic indicators of cervical motion. For a more comprehensive assessment and personalized advice, it is recommended to consult a doctor who can perform a comprehensive assessment and make appropriate recommendations.
Test Of Cervical Rotation
This test is usually used as part of a physical exam to assess neck flexibility and range of motion. Remember, however, that this test is not a substitute for professional medical advice or a comprehensive evaluation by a qualified healthcare provider.
Cervical Range of Rotation Test:
- Preparation: Sit or stand straight, back straight and shoulders relaxed.
- Reference Point: You can accurately measure a range of motion with a visual reference point. For example, place a piece of tape on the wall or floor directly in front of you so you have a clear point to focus on during the test.
- Test Procedure: a). Try to slowly move your head to the right such that your chin is above your right shoulder.
b) Bring your head back to the center (forward).
c). Slowly turn your head to the left, trying to bring your chin over your left shoulder. Keep your eyes on the reference point again. - Measurement: When you turn your head to either side, mark the furthest point from the chin. Alternatively, you can use a goniometer, a medical tool specifically designed to measure joint angles, to get a more accurate reading.
- Calculate the range of motion: Add the degrees of rotation to the right and to the left. This total will give you your cervical range of rotation.
Note that this test provides basic information about your cervical rotation and should only be performed gently and without force. If you experience pain, discomfort, or concern about your neck, it is very important to stop the test and consult a qualified doctor. They can perform a comprehensive assessment and provide appropriate guidance and treatment based on your individual needs and medical history.
Exercises for Cervical Rotation
Performing cervical rotation exercises can help increase neck mobility and flexibility. Here are some simple and gentle exercises you can try. Be sure to do these exercises slowly and without force, and if you have neck problems or ailments. It is best to consult a health professional or physical therapist before starting these exercises.
1. Rotation Neck Stretch:
- With your shoulders relaxed and your back upright, sit or stand.
- Try to slowly move your head to the right such that your chin is above your right shoulder.
- Hold the stretch for about 15-30 seconds keeping your eyes on a point in front of you.
- Carefully return the head to the center.
- Repeat the stretch on the left side, trying to bring the chin over the left shoulder. – Do 3-5 repetitions on each side.
2. Active range of motion (AROM) – clockwise and anticlockwise:
- With your shoulders relaxed and your back upright, sit or stand.
- Slowly turn your head clockwise, trying to make a full circle with your chin. Keep your movements smooth and controlled.
- Do 5-10 circles clockwise.
- Then do 5-10 rounds anti-clockwise.
3. Pressure of the shoulder blades together with turning the neck:
- With your shoulders relaxed and your back upright, sit or stand.
- Press your shoulders together and hold this position during the exercise.
- Try to slowly move your head to the right such that your chin is above your right shoulder.
- Turn your head back to the center and then turn it to the left side, trying to bring your chin over your left shoulder.
- Do 5-10 repetitions on each side.
4. Chin Tucks:
- With your shoulders relaxed and your back upright, sit or stand.
- Gently press your chin to your chest to elongate your neck.
- Hold the position for a few seconds and then return the head to a neutral position.
- Repeat the movement 10-15 times.
5. Chest stretches with neck rotation:
- Stand near a door frame or wall corner.
- Place your forearm on the door frame or wall, elbow at shoulder level.
- Slowly turn your body away from the wall to feel the stretch in your chest and front shoulder.
- Maintain the stretch, slowly turn your head to the opposite side, trying to bring your chin over your shoulder.
- Once you’ve held for 15 to 30 seconds, flip sides and do it again.
Be sure to perform these exercises carefully and stop as soon as you feel pain or discomfort. If you have any doubts or concerns, consult a doctor or physical therapist for guidance and personalized exercise recommendations.
Special Test for Cervical Rotation
“Special test” usually refers to a specific clinical examination or evaluation performed by health professionals to assess a specific problem. Regarding cervical rotation, there are some special tests that can be used to assess the range of motion of the neck. Identify potential problems or limitations. These tests are often used by physical therapists, chiropractors, and other health care providers to gather information about the function of a patient’s cervical spine. Two commonly use cervical rotation tests:
1. Cervical lateral flexion test:
- The patient usually sits or stands with a straight back and relaxed shoulders.
- The examiner stands behind the patient and asks the patient to turn his head to the other side (e.g. to the right).
- The examiner observes the movement while the patient turns his head to both sides.
- The test is then repeated on the other side (e.g. left).
- The inspector can use a goniometer to measure degrees of rotation in any direction.
2. Cervical flexion test (Spurling test):
- Usually, the patient sits.
- The examiner stands behind the patient and asks the patient to turn and bend the head from side to side. (e.g. right ear to right shoulder).
- The examiner then gently pushes the patient’s head down.
- The test is considered positive if this procedure repeats or intensifies the patient’s symptoms, such as pain, tingling, or numbness on the side to which he turns.
- It is important to note that these special tests should only be performed with qualified health professionals who have received training in their administration and interpretation. They are part of a comprehensive evaluation that may include a medical history and other physical examinations.
- These tests help healthcare providers diagnose and treat various conditions affecting the cervical spine, such as cervical radiculopathy, muscle strain, herniated disc, or facet joint dysfunction. The results of these tests, along with other clinical findings, help determine the appropriate treatment plan for the patient.
Summary
Cervical rotation refers to the movement of the neck or cervical spine in which the head turns to either side. They work with other neck muscles, such as the suboccipital muscles, splenius capitis, and longissimus capitis, to facilitate precise movements and support the head and neck in daily activities.
The full range of motion of cervical rotation (right and left combined) is usually about 90-110 degrees. In other words, a person should be able to turn their head about 45-55 degrees on both sides. Exercises for Cervical Rotation are Rotation Neck Stretch & Chin Tucks. Special Tests for Cervical Rotation are the Cervical lateral flexion test And the Cervical flexion test (Spurling test).
FAQs
The movement of turning the head left and right occurs almost entirely in the joint between the atlas and the axis, the atlantoaxial joint. A small amount of vertebral rotation itself affects movement.
3-finger cervical flexion rotation
1) Your ring, middle, and index fingers should be together. 2) Tilt your chin down toward your ring finger. Then turn around and look to the left. 3) Then sweep your chin up to your fingers and turn and look to the right.
In particular, the vertebrae of the cervical spine are most closely related to the spinal cord. By moving the muscles around your neck, you can encourage blood flow to the spinal cord and brain – the central parts of the nervous system. Increased circulation promotes healthy functioning of the nervous system.
Rotation to the right is limited to the left link and vice versa. Damage to the Alar ligaments due to injury or inflammatory disease can result in increased axial rotation between the occiput and atlas and atlas and axis. Victorian Diaphragm: Connects the rear surface of the axle frame to the base tube.
A healthy cervical spine has a natural lordotic curve that curves gently forward from the base of the skull and then back to the upper chest/upper back. If the head moves forward in a bad position: the lordosis curve flattens the lower spine.
Spurlings test
The examiner can apply an axial load to the top of the patient’s head. After that, the patient places the extended neck in a lateral direction in the direction of the patient’s symptoms. The inspector uses an axial load. Repeat with the head turned to the uninjured side.