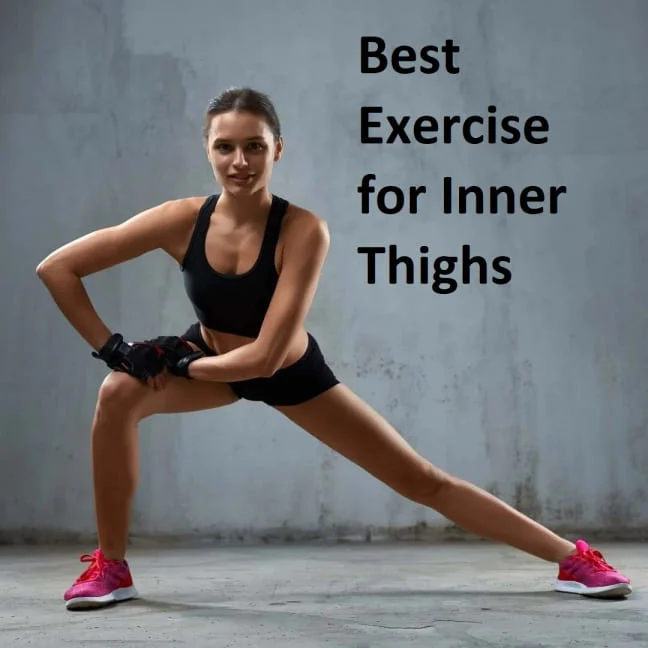
40 Best Exercise for Inner Thighs
Table of Contents
Introduction:
The inner thigh refers to the area of the leg located between the groin and the knee on the inner side. It is an important and often overlooked region of the body. The inner thigh is primarily composed of a group of muscles known as the adductor muscles, which play a key role in leg movement and stability.
The adductor muscles of the inner thigh consist of the adductor longus, adductor magnus, adductor brevis, and gracilis. These muscles work together to bring the legs toward the midline of the body, a movement called adduction. They also assist in other leg movements, such as hip flexion and rotation.
Strengthening and toning the inner thigh muscles can have several benefits. It can enhance leg stability, improve athletic performance in sports involving lateral movements, and contribute to overall lower body strength and conditioning. Strong inner thigh muscles also play a role in maintaining proper posture and can help prevent certain injuries.
There are various exercises that specifically target the inner thigh, such as inner thigh lifts, sumo squats, side lunges, and inner thigh squeezes. Incorporating these exercises into your fitness routine can help strengthen and tone the inner thigh muscles, promoting better overall leg strength and stability.
Structure of inner thigh:
The inner thigh region, also known as the medial thigh, is a region of the leg located on the inner side between the groin and the knee. It consists of various structures, including muscles, bones, blood vessels, nerves, and connective tissues. Following overview of the structures in the inner thigh:
- Muscles: The primary muscles of the inner thigh are the adductor muscles, which include the adductor longus, adductor magnus, adductor brevis, and gracilis. These muscles help with leg adduction, bringing the leg toward the midline of the body.
- Bones: The thigh bone, also called the femur, runs through the inner thigh. This is the longest and most durable bone in the human body. The femur connects the hip joint to the knee joint and provides support and stability for the leg.
- Blood Vessels: The inner thigh is richly supplied with blood vessels, including arteries, veins, and capillaries. The femoral artery, one of the major arteries of the lower limb, runs through the inner thigh, supplying oxygenated blood to the muscles and other tissues in the region. The femoral vein carries deoxygenated blood back to the heart.
- Nerves: Several nerves innervate the muscles and skin of the inner thigh. The main nerve in this region is the femoral nerve, which originates from the lower spine and supplies sensation and motor control to the muscles and skin of the inner thigh.
- Connective Tissues: Various connective tissues, such as fascia and ligaments, provide support, structure, and stability to the inner thigh. The fascia encloses and separates the muscles, while ligaments connect bones and help maintain joint stability.
The structure of the inner thigh is complex and interconnected, allowing for coordinated movement, support, and function of the lower limb. Understanding the anatomy of this region is important for proper exercise technique, injury prevention, and overall leg health.
Inner thigh muscles:
The inner thigh, also known as the medial thigh, is composed of several muscles that work together to control leg movement and stability. The primary muscles of the inner thigh are the adductor muscles. There are the main muscles of the inner thigh:
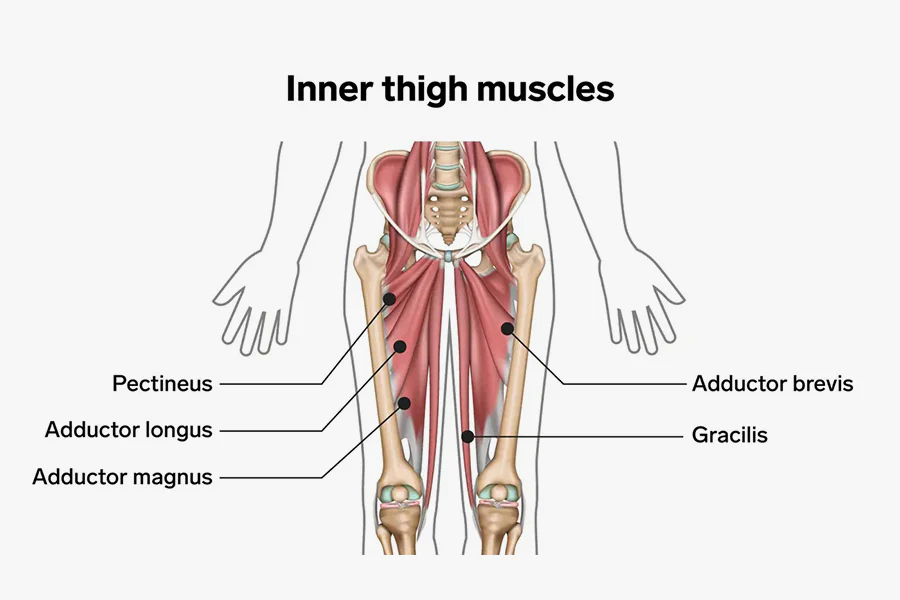
- Adductor Longus: This muscle originates from the pubic bone and runs down the inner thigh to attach to the middle region of the femur (thigh bone). It helps bring the leg toward the midline of the body.
- Adductor Magnus: The adductor magnus is a large, triangular muscle located in the inner thigh. It is divided into the hamstring and adductor portions. The adductor part runs from the pelvis to the inner thigh and contributes to adduction and stabilization of the hip joint. The hamstring part extends from the inner thigh to the back of the knee and assists in hip extension.
- Adductor Brevis: Situated between the adductor longus and adductor magnus, the adductor brevis also originates from the pubic bone and attaches to the inner thigh. It aids in leg adduction and stabilization.
- Gracilis: The gracilis muscle is the most superficial muscle in the inner thigh. It runs from the pubic bone to the inner side of the tibia (shinbone). Along with adduction, it also helps with hip flexion and assists in knee flexion.
These muscles work in coordination to bring the legs toward the midline of the body (adduction) and provide stability during various lower body movements. Strengthening and conditioning these muscles can improve leg stability, enhance athletic performance, and contribute to overall lower body strength and balance.
Benefits of inner thigh exercise:
Inner thigh exercises are specific exercises that target and strengthen the muscles in the inner thigh region. These exercises are designed to tone and firm the inner thigh muscles, helping to improve overall leg strength and stability.
- Strengthening and Toning: Inner thigh exercises target the adductor muscles, helping to strengthen and tone them. This can lead to improved muscle definition and firmness in the inner thigh area.
- Enhanced Lower Body Stability: Strong inner thigh muscles contribute to better stability and balance in the lower body. This can be beneficial for various activities, including walking, running, and participating in sports that involve lateral movements or changes in direction.
- Increased Leg Power: Inner thigh exercises, especially those involving resistance or weight-bearing, can help improve leg power. Strong inner thigh muscles assist in generating force and power during movements like jumping and kicking.
- Improved Athletic Performance: Athletes who engage in sports that require lateral movements, such as soccer, basketball, or skating, can benefit from strong and well-conditioned inner thigh muscles. These exercises can enhance agility, quickness, and overall athletic performance.
- Injury Prevention: Strengthening the inner thigh muscles can help reduce the risk of certain injuries. By promoting better stability and alignment, strong adductor muscles can help prevent strains, sprains, and overuse injuries in the lower body.
- Postural Support: Well-developed inner thigh muscles can contribute to improved posture and alignment. They work in conjunction with other muscles in the hip and core region to support proper posture, reducing the risk of imbalances or postural issues.
- Body Symmetry: Working on the inner thigh muscles helps create a balanced and symmetrical appearance in the lower body. This may help create a more appealing body overall.
The best exercise for inner thighs
Adductor Raises:
The adductor raise exercise, sometimes referred to as the inner thigh raise or adductor side raise, is efficient for working the muscles in the inner thighs.
How to do it is as follows:
Lay on your side on a mat or the ground to start. Keep your legs straight out in front of you and rest your lower arm beneath your head for support.
Lift your upper leg as high as you can comfortably while maintaining straight legs. Pay attention to starting the action with the inner thigh muscles.
At the peak of the action, pause for a little while before slowly lowering your leg back to the beginning position. Then, transfer to the other side and execute the same number of repetitions with the other leg. Repeat the exercise for the appropriate number of repetitions (for example, 10–12 repetitions).
Tips:
To keep your balance during the workout, contract your core muscles.
Avoid lifting it with your leg swinging or utilizing momentum. Instead, emphasize deliberate motions.
You might include ankle weights or a resistance band around your thighs to make the workout more difficult.
Twisted leg raise (vmo) exercise:
The Vastus Medialis Oblique (VMO), a muscle in the quadriceps on the inside side of the thigh, is the focus of the “twisted leg raise” exercise. Exercises that increase knee stability and lessen knee discomfort frequently target the VMO, which aids in stabilizing the kneecap.
The “twisted leg raise” exercise for the VMO should be done as follows:
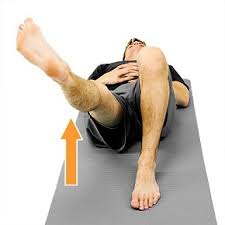
In a supine position with your legs out in front of you.
To support your upper body, place your hands on the floor just behind your hips with your fingers pointed backward.
Lift your upper body a little bit off the ground by bending your elbows. This will support your balance while you perform the activity.
Right now, flex your right knee and tuck your right foot under your left knee. You’ll adopt a “twisted” pose with your legs.
To maintain the twisted leg posture, raise your left leg as high off the ground as you can comfortably do while using your VMO and other quadriceps muscles.
Returning to the beginning position, lower your left leg.
After performing the necessary number of repetitions of the leg lift on the same side, transfer to the other leg.
Tips:
During the leg lift, concentrate on contracting your VMO and quadriceps muscles.
To maintain stability during the workout, keep your core engaged.
It is important to move gently and cautiously.
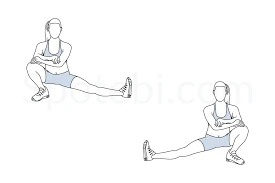
Lateral Lunge:
The adductor muscles located in the inner thighs are the main focus of the great exercise known as the lateral lunge. Other leg muscles, including the glutes and quadriceps, are also activated. How to do a Lateral Lunge is as follows:
With your hands on your hips or in front of your chest for balance, stand with your feet hip-width apart.
Move your body weight over your right leg by taking a large stride to the right. Keep your left leg straight and your right foot firmly planted on the ground.
Your body will be lowered into a lunge stance as you bend your right knee and push your hips back. Make sure your left leg is still stretched and your right knee is precisely over your right foot.
Maintain a raised chest, a straight back, and a tight core. Put your attention on keeping appropriate form and pushing your hips back.
At the bottom of the lunge, pause for a brief while before pushing through your right foot to return to the starting position.
Step to the left and execute a lateral lunge with your left leg to repeat the technique on the left side.
Lunges should be performed alternately on the right and left sides for the required repetitions, typically 10 to 15 on each side.
Tips:
Throughout the action, keep your feet firmly planted on the ground.
During the lunge, make sure your knees and toes are in line to maintain appropriate alignment.
Don’t curve your back or lean forward; keep your torso straight.
Instead of racing through it, regulate your movement as you lower yourself into the lunge posture.
Curtsy Lunge:
The glutes, quadriceps, hamstrings, and inner thighs are all worked out during the Curtsy Lunge, a modification of the standard lunge exercise. How to do a Curtsy Lunge is as follows:

With your hands on your hips or in front of your chest for balance, stand with your feet hip-width apart.
Step back with your right foot, crossing it behind your left leg in a diagonal motion. Consider crossing your leg behind you or curtsying as though you were welcoming someone.
While maintaining your torso erect and your chest up, lower your body by bending your knees. The angles of both knees should be close to 90 degrees. Your right knee should be facing downward, and your left knee should be parallel to your left ankle.
Bring your right foot back to where it was at the beginning next to your left foot by pushing through your left foot.
Step back with your left foot diagonally, cross it behind your right leg, and execute a curtsy lunge with your left leg to repeat the exercise on the opposite side.
Curtsy lunges should be performed alternately on the right and left side for the necessary number of repetitions (for example, 10–12 repetitions on each side).
Tips:
Keep your core engaged and maintain a straight spine throughout the whole workout.
As you return to the starting position, concentrate on pressing through the front foot’s heel.
Avoid any swaying or imbalance during the exercise by remaining in control and steady.
Lunge depth should be progressively increased as you gain flexibility and comfort. Start with a range of motion that feels natural.
Forward lunge:
How to do it:
Put one foot on the step.
Hold on to the wall in front of you with both hands.
Throughout the entire exercise, keep your leg’s knee on the step parallel to your toes.
Squat forward.
It is recommended to bend your knee as far without letting it click as you can.
Support the situation with your hands as much as necessary.
20 repetitions are required.
Allow the knee to advance more. Reduce the support of your arms are giving you gradually.
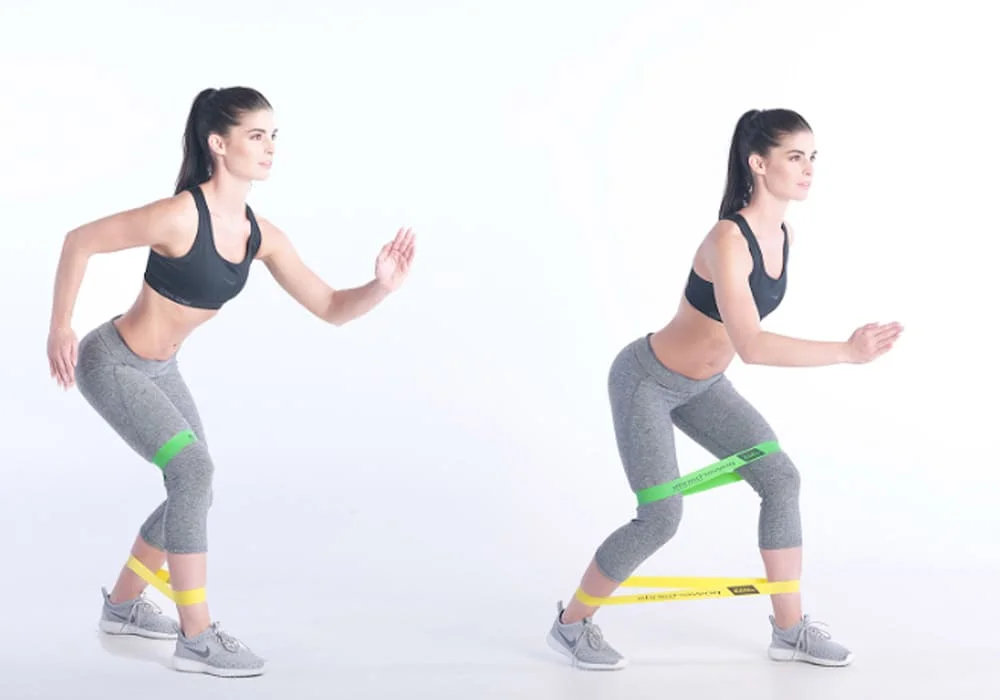
Resistance Band Squat Walk:
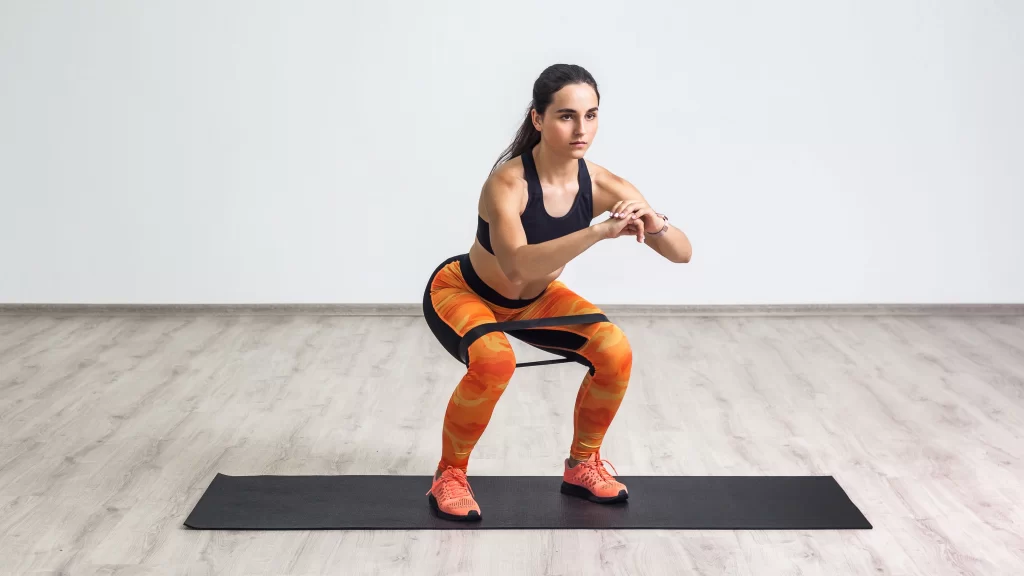
To increase resistance and difficulty, it is carried out while wearing a resistance band. How to do the Resistance Band Squat Walk is as follows:
Wrap a resistance band around your legs just above the knees. The band should fit comfortably but not too tightly.
Your toes should be pointing slightly outward when you stand with your feet shoulder-width apart. Keep your shoulders back, your core engaged, and your chest up.
You may bring your body down into a squat position by bending your knees and pushing your hips back. Keep your knees in line with your toes and your heels firmly planted on the ground. Your starting point is here.
Maintaining tension on the resistance band, step to the side with your right foot while in the squat posture. To feel the resistance and keep your form, take a step that is broad enough.
Step with your left foot towards your right foot after that, maintaining tension on the band this time. Keep your body in a squat stance throughout the exercise.
For the specified distance or number of repetitions, keep walking sideways while alternating your right and left foot placement.
Tips:
By applying a modest outward push to the resistance band during the movement, you can maintain continuous tension on the band.
Step sideways and squat, concentrating on contracting your glutes and inner thigh muscles.
Avoid letting your knees cave inward by keeping them in line with your toes.
Throughout the workout, keep your shoulders back and your chest up in an upright position.
To preserve perfect form and maximize the benefits, slow down and avoid hurrying through the workout.
The Resistance Band Squat Walk is a useful workout for working the lower body’s muscles, particularly the ones in the inner thighs.
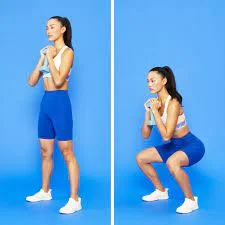
Sumo squats:
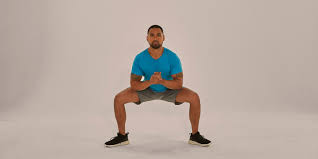
In addition to the glutes, quadriceps, and hamstrings, the Sumo Squat, often referred to as the Sumo Squat or Plie Squat is a variant of the standard squat exercise. The sumo squat technique is as follows:
Stand with your toes pointing outward at a 45-degree angle and your feet wider than shoulder-width apart. Keep your shoulders back, your core engaged, and your chest up.
You may bring your body into a squat by bending your knees and pushing your hips back. Imagine reclining on a chair of your imagination. Make sure your knees are tracking in line with your toes and maintain your weight on your heels.
Continue lowering yourself until your thighs are parallel to the floor or as low as you are able to go without losing appropriate form. Leaning too much forward should be avoided, so try to maintain your back straight.
At the bottom of the squat, pause for a brief moment before pushing through your heels to return to the starting position with fully extended hips and knees.
The practice should be repeated for the required number of times (for example, 10–12 times).
Tips:
Throughout the workout, maintain a straight posture and keep your core active.
As you climb back up to your starting posture, concentrate on pressing through your heels.
To preserve perfect form and maximize the benefits, slow down and avoid hurrying through the workout.
Find a position that feels comfortable and efficiently targets your inner thighs by adjusting the breadth of your stance.
Sumo squat heel lifts:
A version of the basic sumo squat exercise that works the inner thighs as well as other lower body muscles is the sumo squat heel lift.
Starting Position: Stand with your toes turned out about 45 degrees and your feet wider than shoulder-width apart. Maintain a straight back, a raised chest, and a tight core.
Squat Down: You may lower your body into a sumo squat by bending your knees and pressing your hips back. Lower your body as far as is comfortable while keeping your knees in line with your toes. At least somewhat parallel to the ground should be your thighs.
Heel Lifts: While maintaining a solid grip on the ground with your feet planted on the balls, pull your heels off the floor once you are in the sumo squat posture. Lifting your heels should cause the inner thighs to contract.
Hold and Squeeze: At the peak of the heel lift, squeeze your inner thighs for a brief period of time.
Lower Heels: To finish one repetition, bring your heels back to the floor.
Repetition: Perform the exercise as many times as your fitness program or the required number of reps specifies.
Guidelines for Proper Form:
Keep your chest and back straight throughout the action to prevent rounding your back.
Utilize your core during the workout to keep your body stable.
Avoid allowing your knees give way and keep them parallel to your toes.
To improve the impact, control the movement as you lift and drop your heels.
In addition to working the inner thighs, the sumo squat heel lift also works the glutes, hamstrings, quadriceps, and calves.
It is a great addition to any lower-body training regimen, encouraging lower-body strength and flexibility.
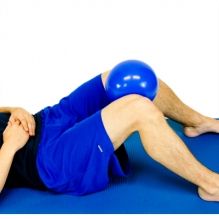
Ball Squeeze:
The “ball squeeze” exercise is frequently used to target and develop the adductor muscles, which are located within the thighs. It is an easy workout that may be performed at home or at a gym. How to conduct the ball squeeze exercise is as follows:
Equipment required:
a compact, inflatable stability ball, Pilates ball, or other workout ball that is similar in size to a soccer ball.
Instructions:
Sit down on a soft surface, such as a carpeted floor or an exercise mat.
Keep your feet level on the floor or mat, hip-distance apart, and place the exercise ball between your knees.
Pull the center of your abdomen towards your spine to activate your core muscles.
Squeeze the ball lightly between your inner thighs, applying pressure with your leg muscles. As you perform the exercise, keep your upper body relaxed.
Hold the pressure for three to five seconds while continuing to breathe normally.
Your inner thigh muscles should be relaxed as you progressively release the strain.
Initial squeeze repetitions should range from 10 to 15 times. The number of repetitions may be gradually increased as you become more used to the workout.
Tips:
Throughout the workout, be careful to maintain a straight back and refrain from arching it. This aids in properly using the appropriate muscles.
Instead of utilizing your knees or hips, concentrate on engaging the muscles in your inner thighs.
Don’t squeeze the ball too firmly because this might make you uncomfortable or put a strain on your muscles.
Don’t hold your breath during the workout; instead, breathe normally.
Variations:
Double Squeeze: Continue squeezing the ball with both legs while lifting your feet just a little bit off the ground. This makes the activity a little bit more difficult.
Squeeze the ball between your knees while seated in a chair with your feet flat on the ground. While sitting, squeeze the ball while contracting your abs to keep your balance.
Your lower body training program may benefit from including the ball squeeze exercise to help tone and strengthen your inner thighs. Like with any new workout, it’s important to begin at a comfortable level of intensity and increase it gradually as you get more accustomed to the action. Stop the workout and get advice from a fitness expert or healthcare practitioner if you feel any pain or discomfort.
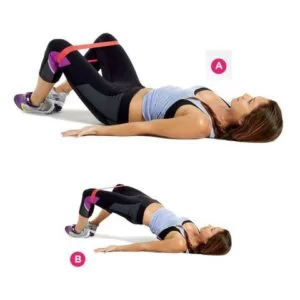
Bridge with squeeze ball:
The bridge with a squeeze ball is a variation of the glute bridge exercise that adds an extra challenge by incorporating a squeeze ball or any small exercise ball between your knees. This exercise targets the glutes and engages the inner thighs, promoting better stability and strengthening of the lower body. Here’s how to perform the bridge with a squeeze ball:

With your knees bent and your feet flat on the floor, lie on your back on a yoga mat or the floor. Your arms should be by your sides when you lie on the ground.
Position the squeeze ball or tiny exercise ball between your knees, and gently press down to keep it there throughout the workout.
Push through your heels as you engage your core and start to raise your hips off the ground. Your feet and upper back (shoulder blades) should support your whole weight.
Your body should create a straight line from your shoulders to your knees at the peak of the exercise. Maintain level hips and avoid arching your lower back excessively.
Utilizing the muscles in your inner thighs, squeeze the ball firmly between your knees.
After a little period of holding the pressure, release it while keeping the bridge posture.
Controlled hip retraction means bringing your hips back to the floor.
The practice should be repeated as many times as necessary, with the ball remaining squeezed the entire time.
Tips:
Focus on using your glutes and hamstrings to lift your hips, rather than straining your lower back.
Keep your core tight throughout the exercise to stabilize your body and avoid excessive arching.
Breathe steadily and naturally during the movement, exhaling as you lift your hips and inhaling as you lower them back down.
Avoid lifting your hips too high, as it may cause discomfort in your lower back.
Start with a few repetitions and gradually increase as you get more comfortable with the exercise. The squeeze ball adds an isometric component to the exercise, challenging both the glutes and the inner thigh muscles.
Single-leg glute bridge with a squeeze:
The single-leg glute bridge with a squeeze is an excellent exercise that targets the glutes (butt muscles) and the inner thighs. It helps strengthen the gluteal muscles, hamstrings, and inner thigh muscles while also engaging the core for stability. Here’s how to perform the single-leg glute bridge with a squeeze:
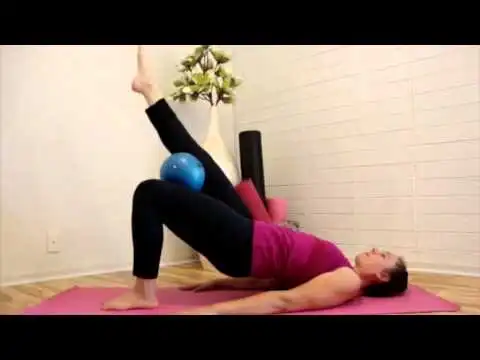
With your knees bent and your feet flat on the floor, lie on your back on a cozy workout mat. While lying on the ground, keep your arms by your sides.
Lift your right leg off the ground and extend it straight up toward the ceiling. Your left leg remains bent with the foot still planted on the floor.
Engage your core and begin to lift your hips off the ground, pushing through your left heel. Your body weight should be supported by your left foot and upper back (shoulder blades).
At the top of the movement, your body should form a straight line from your shoulders to your left knee. Keep your hips level and avoid letting them tilt to one side.
Now, for the “squeeze” part, gently bring your left knee inward, engaging your inner thigh muscles. You can place a small ball or cushion between your thighs to add resistance.
Hold the squeeze for a few seconds, then release it while maintaining the glute bridge position.
Controlled hip retraction means bringing your hips back to the floor.
Repeat the exercise for the desired number of repetitions on one side, then switch to the other leg.
Tips:
Focus on using your glutes and inner thigh muscles to lift your hips, rather than pushing off with your lower back.
To stabilize your body and safeguard your lower back during the workout, keep your core engaged at all times.
Control your movements and avoid arching your back excessively during the exercise.
Breathe steadily throughout the movement, exhaling as you lift your hips and inhaling as you lower them back down.
Start with a few repetitions on each leg and gradually increase as you get comfortable with the movement. As with any exercise, proper form is crucial, so take your time to perform it correctly.
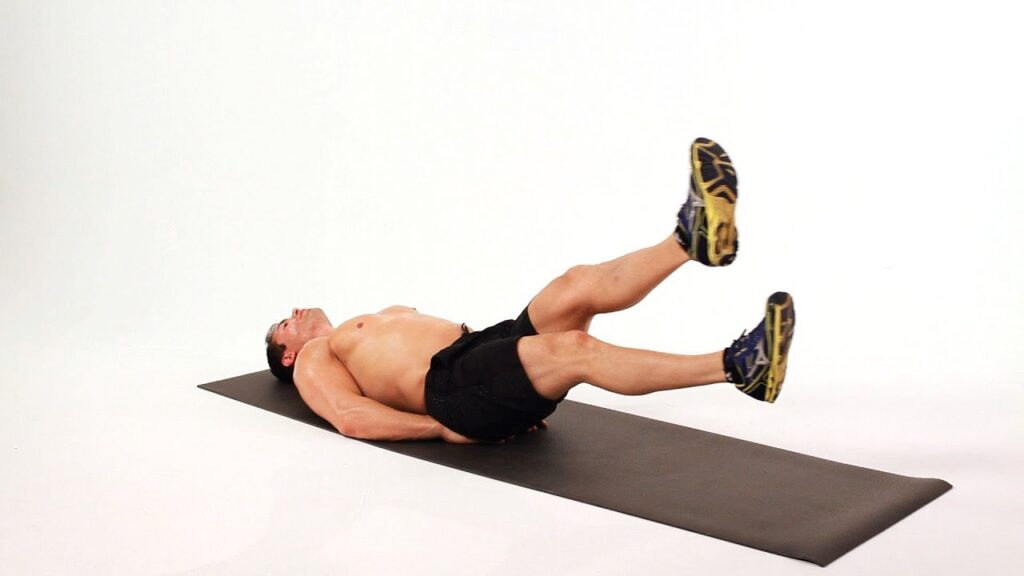
Scissor legs plank:
The scissor legs plank is a difficult version of the standard plank exercise that works both the core and the inner thigh muscles. It involves overall body stability and strength, making it an excellent complement to any inner thigh training regimen. The scissor legs plank is performed like follows:
Instructions:
Begin in a plank posture, with your forearms shoulder-width apart and your elbows just beneath your shoulders. From your shoulders to your heels, your body should be in an upright position.
Maintain a firm plank position by using your core muscles.
Lift your right foot off the ground slightly while maintaining your leg straight.
Now, spread your legs wide to the sides while working your inner thigh muscles.
Rep the action with your left leg after returning your right leg to the center.
Maintain the plank posture by alternating legs in a scissor-like action, opening and shutting them broadly.
Perform the scissor legs plank for the required number of repetitions or time (e.g., 30 seconds to 1 minute).
Tips:
Maintain a level hip position and avoid twisting or tilting them during the action.
As you do the scissor action, concentrate on activating your core muscles and squeezing your inner thighs.
Throughout the workout, keep your breathing constant.
The scissor legs plank works the whole core, including the rectus abdominis, transverse abdominis, and obliques, as well as the inner thighs. It’s a dynamic exercise that works for numerous muscle groups at the same time, which helps to enhance total core strength and stability.
As with any workout, make sure your form is correct and pay attention to your body. Perform the exercise on your knees rather than your toes if you’re new to planks or first find the scissor legs plank to be too difficult. Work your way up to the full plank posture gradually as you gain strength and self-assurance.
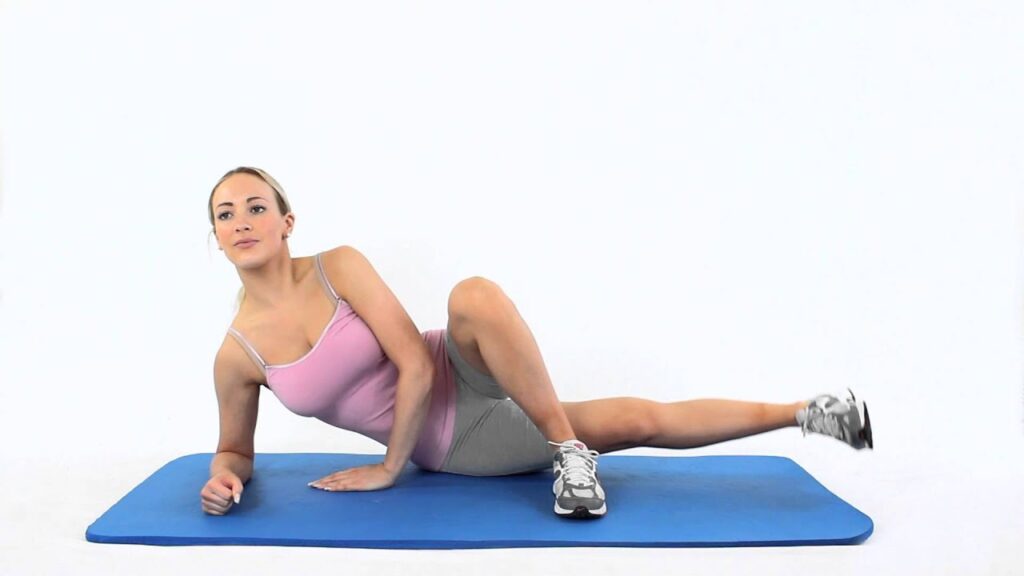
Side lying hip adduction:
Exercises that target the inner thigh muscles (adductors) and assist enhance and strengthen the hip area include side-lying hip adduction. It is a straightforward workout that people of all fitness levels may complete. This is how you do it:
Instructions:
On a comfortable surface, such as an exercise mat, lie on your side. You can support your head by resting it on your arm or a cushion.
Keep your legs straight and stack them atop one another.
Keep your lower leg slightly bent during the exercise to maintain stability.
To stay upright and use your free arm to support your upper body, contract your core muscles.
Now raise your upper leg slowly, concentrating on making the motion with your inner thigh muscles. The movement should imitate raising your straight leg away from the bottom leg.
To avoid tension on your lower back, lift your leg to a comfortable height—ideally, no higher than hip level.
Hold the raised position for a brief period of time to amplify the inner thigh contraction.
You can get back to your starting position by slowly lowering your leg.
Before transferring to the opposite side, do the necessary number of repetitions of the movement on the first side.
Tips:
During the exercise, try to avoid moving your hips forward or backward. Keep your hips stacked and in the right positions.
To properly engage the target muscles and lower the chance of injury, do the exercise slowly and deliberately.
Reduce the range of motion or get advice from a fitness expert if your lower back is in any way uncomfortable or painful.
Goblet squat:
As previously stated, the goblet squat is a squat variant in which you hold a weight near your chest and target the quadriceps, hamstrings, glutes, and core.
Instructions:
Stand with your feet shoulder width or slightly further apart.
Hold a dumbbell or kettlebell with both hands close to your chest, elbows pointing downward.
Keep a straight back and a firm core.
Lower yourself into a squat by pulling your hips back and bending your knees.
Once your thighs are at least parallel to the ground, lighten up a bit.
Return to the beginning posture by pushing through your heels.
Sumo Goblet Squat:
The sumo goblet squat is a goblet squat variation that emphasizes the inner thigh muscles.
Instructions:
Stand with your feet wider than shoulder-width apart and your toes pointing slightly outward (about a 45-degree angle).
Hold a dumbbell or kettlebell with both hands close to your chest, as in a conventional goblet squat.
Brace your core and hold your chest up throughout the exercise, keeping your back straight.
Begin the squat by pulling your hips back and bending your knees, exactly like you would in a typical goblet squat.
Lower your body, striving to maintain your thighs parallel to or slightly below the ground and your knees in line with your toes.
Your elbows should rest on the inside of your knees at the bottom of the squat, slightly pushing them outward to work the inner thigh muscles even more.
To return to the beginning posture, push through your heels and engage your glutes and quads.
At the height of the exercise, stand tall and clench your glutes.
Repeat the sumo goblet squat as many times as you like.
The sumo goblet squat, with its broader stance and emphasis on pushing the knees outward, places greater stress on the inner thighs than the normal goblet squat.
Cossack Squats:
Cossack squats are a great exercise for working the quads, hamstrings, glutes, and hip adductors as well as the inner thighs. They are a strenuous form of the squat that requires lateral movement, making them useful for developing inner thigh strength and tone.
How to do Cossack squats is as follows:
With your toes pointing slightly outward, stand with your feet wider than shoulder-width apart.
To lower your body into a lateral squat on one side, shift your weight to that side and bend your knee.
Keep the opposite leg completely extended and the foot flat on the floor with the toes facing up as you squat to one side.
Go as low as you are comfortably able to while keeping your back straight and your chest up.
To go back to the beginning position, push with the bent leg’s heel.
By moving your weight to the other leg, repeat the squat on the opposite side.
Tips:
Avoid letting your knees sink inward and maintain alignment with your toes.
As you move, contract your core to maintain balance and stability.
Avoid leaning too much forward or backward and keep your body upright.
Cossack squats can be difficult, particularly if you’ve never done them before or have restricted mobility. Begin with a wider stance and work your way up to a deeper squat as your mobility and strength improve.
Do 2-3 sets of 8–12 repetitions on each leg, or do them for a fixed amount of time (for example, 30 seconds on each leg).
Inner Thigh Squeeze with Ball:
The Inner Thigh Squeeze with Ball is an effective exercise for targeting and toning the inner thigh muscles (adductors). This exercise can be performed easily at home or in the gym using a small exercise ball or a soft pillow. Here’s how to do it:
Instructions:
Sit on the floor or on a mat with your knees bent and your feet flat on the ground, hip-width apart.
Place the exercise ball or pillow between your knees.
Sit up tall, engage your core muscles, and keep your back straight.
Begin the exercise by squeezing the ball or pillow with your knees, focusing on engaging your inner thigh muscles.
Hold the squeeze for a few seconds (about 3-5 seconds) and then release the pressure, allowing your knees to separate slightly.
Repeat the squeeze and release for the desired number of repetitions.
Tips:
Keep your upper body relaxed throughout the exercise, and avoid holding your breath.
Make sure you’re not using your hands or arms to assist with the squeezing motion. The work should be done by your inner thigh muscles.
Focus on quality rather than quantity. Squeeze with control and intention.
Variations:
To increase the intensity, you can place a resistance band around your thighs just above your knees and perform the same squeezing motion with the band resistance.
You can also lie down on your back and perform the inner thigh squeeze in a supine position.
The Inner Thigh Squeeze with Ball is a simple yet effective exercise for targeting the inner thigh muscles. It’s great for strengthening and toning the adductors, especially when combined with other inner thigh exercises in a well-rounded workout routine.
Skater:
The skater exercise is a dynamic movement that engages multiple muscle groups, including the inner thighs. It’s a great cardio and strength exercise that helps tone the lower body and improve overall balance and agility.
How to perform the skater exercise:
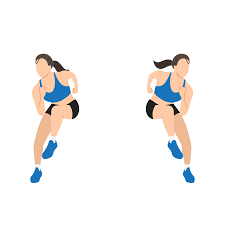
Stand with your arms by your sides, knees slightly bent, and feet shoulder-width apart.
Take a lateral (sideways) hop to the right, shifting your weight onto your right leg. Your left foot should lightly tap the ground behind your right foot.
As you land on your right foot, swing your left arm across your body while extending your right arm out to the side for balance.
Push off your right foot and hop laterally to the left, tapping your right foot lightly behind your left foot.
Swing your right arm across your body and extend your left arm out to the side as you land on your left foot.
Continue this side-to-side hopping motion, imagining that you’re skating or gliding across the ice.
Perform the skater exercise for the desired number of repetitions or for a set amount of time (e.g., 30 seconds to 1 minute).
Tips:
Keep your movements controlled and land softly to reduce the impact on your joints.
Maintain a slight bend in your knees throughout the exercise for added stability.
Keep your chest up and look forward to maintaining good posture.
To intensify the exercise, hop further to the side and increase the speed of your movements.
The skater exercise not only targets the inner thighs but also works the outer thighs, glutes, hamstrings, and calves. It’s an excellent addition to your lower body workout routine, especially if you’re looking to tone and strengthen your legs while getting your heart rate up.
Jumping jacks:
Exercises that put much force on the knees can be taxing, especially if you already have knee issues. If you want to modify jumping jacks to make them less taxing on your knees, here is an alternative that could help:
Put your arms by your sides and stand with your feet width apart.
Instead of jumping, step your right foot out to the side while simultaneously lifting both arms high and out to the sides.
Put your right foot back in the starting position while bringing your arms back down to your sides.
To repeat the exercise on the opposite side, step your left foot out to the side and raise your arms high and out to the sides.
Step out to the sides with your feet as you continue to raise and drop your arms alternately.
The reduced version still requires arm movement and works your shoulders, thighs, and back while putting less strain on your knees. It enables you to conduct a similar movement pattern to jumping jacks while lowering the potential stress on your knee joints.
HIIT Exercise:
HIIT exercises increase metabolism and burn a tonne of calories rapidly.
High-Intensity Interval Training (HIIT) is an effective way to target the inner thigh muscles while also burning calories and boosting cardiovascular fitness.
If your goal is to decrease knee fat and strengthen your knee without adding bulk to your thighs as a result, stay away from HIIT workouts that incorporate squats and lunges. Your quadriceps will be strengthened and expanded by these workouts.
If you want to prevent weight gain, try one of the HIIT routines.
Heel Elevated Squats:
Heel-raised squats, another name for heel-elevated squats, are an adaptation of the standard squat exercise that require you to lift your heels off the floor. This adjustment emphasizes the lower quadriceps and glutes while focusing on your quadriceps (front thigh muscles).
How to do heel-elevated squats is as follows:
Setup: Place a stable raised surface behind your heels, such as weight plates, wooden blocks, or a squat platform. Your toes should be pointing slightly outward when you stand with your feet shoulder-width apart. Depending on your flexibility and comfort, there should be a slight elevation of between 1 and 2 inches under your heels.
Maintain good posture during the workout by keeping your back straight, your chest up, and your core muscles active. Depending on how it feels for you, you can either have your arms stretched forward, crossed across your chest, or resting on your hips.
Squatting motion: Push your hips back and bend your knees to begin the squat. As though you were reclining into a chair, lower your body. As you drop, pay attention to maintaining your knees in alignment with your toes.
Depth: Squat as low as your mobility will allow or until your thighs are at least parallel to the ground. Ideally, if your flexibility allows it, try to get your thighs to be just below parallel.
Rise: Fully extend your legs as you push through your heels and propel your hips forward to the beginning position.
Breathing: As you lower yourself into a squat, inhale, and as you raise yourself back up, exhale.
Aim for 8 to 12 repetitions in each set while counting repetitions. You may begin with two to three sets and progressively add more as you get stronger.
For people who have trouble with ankle mobility or find it difficult to keep their heels on the ground during standard squats, heel-elevated squats may be helpful. It helps to encourage improved form and lower the danger of forward-leaning too much.
Crab kicks:
The adductors, or inside thigh muscles, may be worked out by performing crab kicks. The main muscles involved in this exercise are the adductor magnus, adductor longus, and adductor brevis, which assist to tone and strengthen the inner thighs.
Crab kicks are performed as follows:
Place your hands and feet on the ground as you sit down on the floor to begin. Your knees should be bent at a 90-degree angle, and your fingertips should be pointed down towards your feet.
Lift your hips off the floor such that your body resembles a tabletop. Your shoulders should be directly above your wrists, and your hips should be directly above your knees while you support your weight with your hands and feet.
To stabilize your body and maintain your back straight, contract your core muscles.
Lift one foot off the ground to start the exercise, keeping your knee at a 90-degree angle. This will be where you start.
Kick your lifted leg out to the side slowly and firmly, keeping your attention on the inner thigh muscles. As much as you can, try not to contact the ground with your knee.
Bringing the leg back to its initial position while retaining control.
Once the necessary amount of kicks has been performed on one side, transfer to the other leg and repeat.
Tips:
In order to successfully target the inner thighs and prevent any strain or damage, keep your motions gradual and controlled.
Pay attention to how your inner thigh muscles tighten throughout the kick.
Throughout the exercise, strive to maintain your hips elevated and in alignment with your shoulders and knees.
As with any workout, it’s important to pay attention to your body and avoid overexerting yourself, especially if you’re just starting out or have any health issues.
Side Step-ups:
Side step-ups can be a great exercise to target the inner thighs, along with other leg muscles. This is how side step-ups are performed:
It’s best to start by standing next to a sturdy platform or seat with your feet hip-width apart. The platform should be somewhat higher than knee height.
Place your right foot firmly on the platform to ensure that it is entirely supported by it. Keep your posture upright by contracting your core muscles.
Push through your right foot and elevate your body to the platform using your glutes and quads to help you. The left leg of your body should be raised off the ground and slightly bent.
Bring your body back to the starting position by bending your right knee and hip and dropping your left foot.
Step-ups should be repeated on the same side for the necessary number of times. Then, turn to the other side, step with your left foot onto the platform, and repeat the procedure.
Tips for performing side step-ups:
To avoid any inward or outward collapse, be sure to maintain your knee in line with your toes when you stand up.
While using your glutes and quadriceps to raise yourself onto the platform, maintain your core stable.
You can utilize your arms for balance by naturally swinging them or by keeping them relaxed.
When the activity is at its peak, squeeze your glutes. Once you are standing entirely straight on the platform, maintain your balance.
Choose a platform height that enables you to do the exercise effortlessly and in the best form possible. As you become more comfortable and stronger, move up to higher heights starting at a lower level.
To add resistance, you can use a weighted vest or hold dumbbells in your hands.
Pilates Scissor Kick:
Targeting the inner thighs is made easy with the Pilates Scissor Kick. The hip flexors, inner thighs, and core are all worked out during this Pilates mat workout. The Pilates scissor kick is demonstrated here:
Place a mat or other comfy surface under your back and lie there.
Maintaining a straight upward stance with your legs together, raise yourself to the ceiling. Your toes need to be pointing towards you as your feet should be flexed.
With your palms facing down, place your hands by your sides to provide support.
Draw your navel towards your spine and press your lower back into the mat to tighten your abdominal muscles.
In order to avoid raising your lower back off the mat or arching your back, lower your right leg as far toward the floor as you can.
Scissor your legs by raising your right leg off the ground. As you drop your left leg toward the floor, you will bring your right leg back up.
Maintain carefully scissoring your legs back and forth.
Tips:
To keep your pelvis stable and safeguard your lower back, keep your core engaged throughout the workout.
Be careful not to lift your head or shoulders off the mat; keep your neck and upper body relaxed.
Throughout the workout, breathe rhythmically and consistently.
Depending on your level of fitness, perform the Pilates Scissor Kick for a specified number of reps or seconds on each leg. To strengthen and tone your inner thighs, add this exercise to your usual Pilates practice or leg-focused workouts.
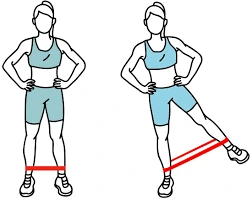
Monster Walk (Side Steps):
The Monster Walk is a great workout for the adductors, which are the muscles in the inner thighs. The muscles in your hips, thighs, and glutes are worked out during this resistance band workout. How to do the Monster Walk is as follows:
A resistance band, often known as a micro band or loop band, is required equipment.
Just above your knees or around your ankles, place the resistance band.
Standing with both of your feet shoulder-width apart, your knees should be slightly bowed.
Exercise stability by tightening your core muscles.
With your right foot, take a stride to the side while pressing against the band’s resistance.
Follow with your left foot, taking a right step to go back to where you were.
Bring your right foot in to retrace your steps and repeat the side step with your left foot.
Continue taking controlled sideways steps, switching the right and left foot back and forth.
Tips:
Maintain some stress on the resistance band even when your feet are together to keep it taut throughout the whole workout.
To properly engage the inner thigh muscles as you walk to the side, concentrate on pressing against the band with your feet.
Throughout the action, keep your knees slightly bent; do not arch your back or lean too far forward or back.
Depending on your level of fitness, do the Monster Walk for a particular number of steps—roughly 10-15 in each direction. To strengthen and tone the inner thighs, use this exercise as part of your warm-up routine or as part of your leg and glute workout.
Hip bridge with resistance band:
A great exercise for the inner thigh muscles (adductors) and the glutes is the hip bridge using a resistance band. You may more fully engage the inner thighs by adding a resistance band to the standard hip bridge. The hip bridge with a resistance band can be done as follows:
A resistance band (loop band or micro band) is required equipment.
On a mat or other comfortable surface, lie on your back.
Wrap the resistance band around your thighs just above your knees.
Put your feet hip-width apart on the floor with your knees bent.
With your palms facing down for stability, position your arms by your sides.
To engage your core muscles, move your navel towards your spine.
Create a straight line from your shoulders to your knees by pressing your heels into the ground and tightening your glutes while you lift your hips off the ground.
Pushing your knees outward against the resistance band will activate the inner thigh muscles as you elevate your hips.
For a little period, maintain the bridge posture while contracting your glutes and inner thighs.
Bring your hips back to where they were at the beginning in a controlled manner.
Tips:
Throughout the exercise, keep your knees parallel to your feet and try not to let them cave in.
Avoid arching or rounding your lower back throughout the exercise by keeping your spine neutral.
To get the most out of the exercise, contract your glutes and inner thighs at the peak of the motion.
Seated Leg Adduction:
With your feet flat on the floor and your back straight, take a seat on a firm chair or bench.
Put a cushion or a small exercise ball between your knees.
Keep your upper body calm and your core engaged for stability.
Press your knees together while applying pressure to the exercise ball or cushion in between them.
Squeeze for a little while before releasing softly.
For the required number of repetitions, repeat the motion of squeezing and releasing.
Tips:
During the exercise, maintain a straight back and refrain from forward or backward tilting.
You should concentrate on squeezing the ball or cushion with your inner thigh muscles.
The inner thigh muscles may be effectively worked with this sitting leg adduction exercise without placing too much strain on the knees or other joints. It is particularly appropriate for those who might have mobility issues or prefer sitting activities. To produce a thorough leg workout, use it in your regimen together with other inner thigh movements.
Standing hip abduction:
A fantastic exercise for the inner thigh muscles (hip adductors) and outer hip muscles (hip abductors) is standing hip abduction. How to do a standing hip abduction is described below:
With your feet together and your arms at your sides, take a tall stance.
Utilize the muscles in your core for stability.
Place your weight on one leg, bending the knee of the other leg just a little.
Lift the non-weight-bearing leg as far to the side as you can while maintaining its straight position.
Hold the posture for a little while while concentrating on tightening your inner thigh muscles.
Slowly return the leg to its initial position.
Before transferring to the second leg, perform the appropriate number of repetitions of the action on the first leg.
Tips:
Throughout the exercise, maintain a straight posture and refrain from bending or tilting your upper body.
Keep your forward-facing hips square.
You can practice the exercise near a wall so that you can gently touch it with your fingers, or you can lay your hands on a solid object like a chair or a wall for greater balance.
Perform 2-3 sets of ten to fifteen repetitions on each leg, or you may perform them for a specified amount of time (for example, 30 seconds for each leg). Use ankle weights or resistance bands around your ankles to increase the exercise’s level of difficulty if you so want.
A useful exercise that strengthens the inner thighs while also enhancing balance and stability is standing hip abduction.
Supine hip abduction:
Another efficient exercise for the inner thigh muscles (hip adductors) is supine hip abduction. Given that it is carried out while lying on your back, it is a perfect alternative for people who may have trouble standing for long periods of time or have restricted mobility. Supine hip abduction instructions are as follows:
Lay on the floor on a mat or other cozy surface with your legs straightened.
For support, position your arms at your sides with the palms facing down.
Stabilize your pelvis and lower back by contracting your abdominal muscles.
Lift the second leg off the floor and extend it out to the side as far as you are able while maintaining one leg straight.
Hold the posture for a little while while concentrating on tightening your inner thigh muscles.
Slowly return the leg to its initial position.
Before transferring to the second leg, perform the appropriate number of repetitions of the action on the first leg.
Tips:
Be deliberate in your motions and refrain from jerking or swinging.
Avoid arching or rounding your lower back during the workout and keep your spine neutral.
If necessary, you can make the exercise more comfortable by slightly bending the knee of the lifting leg.
Perform 2-3 sets of ten to fifteen repetitions on each leg, or you may perform them for a specified amount of time (for example, 30 seconds for each leg). You can use ankle weights or a resistance band positioned just above your knees to increase the exercise’s level of difficulty.
Knee touch extensions:
Legs bowed and upper knee stretched upward and outward while lying on your side.
Your starting point is here. Quickly raise your leg back across your torso after exhaling.
To finish one rep, quickly reverse the motion by pushing your knee forward and towards the floor.
Quickly switch between bending your knee and stretching your foot back. Till you start to feel the heat, perform as many as you can.
Do five more after feeling the burn, then stop. To finish a set, perform the same amount of repetitions with your opposite leg.
Tip: During the action, maintain a square posture with your hips.
Thigh flyes:
Legs straight up and toes pointing, lie on your back. Your starting point is here. As far as you can, flex your feet and extend your legs out to the sides. To complete one rep, reverse the motion and pull your legs back up to the starting position while pointing your toes.
Standing abduction with theraband:
Targeting the adductors, which are located in the inner thigh muscles, is possible with a standing abduction workout using a Theraband. Your legs are moved towards your body’s midline by the adductor muscles. How to do this exercise:
Required Equipment
A resistance band or Theraband
a strong anchor point to which the Theraband may be fastened at ankle height, such as a doorknob or other permanent item.
Instructions:
Set Up:
One Theraband end should be attached to an ankle-height fixed point.
Standing with your feet together and facing the anchor point.
Positioning:
The leg that is furthest from the anchor point and is your outer leg should have the opposite end of the Theraband wrapped around its ankle.
The limb executing the exercise should be your inner leg, which is the one closest to the anchor point.
Exercise:
Move your inside leg gently away from your body’s midline (abduct the leg) while keeping it straight or slightly bent at the knee.
Throughout the exercise, pay attention to maintaining control of the action and concentrating on using the inner thigh muscles.
When your leg has fully abducted at the end of the exercise, pause briefly.
Return:
Return your leg to the beginning position slowly while controlling your resistance to the Theraband’s pull.
Don’t allow the band suddenly pull your leg back; keep control of the action the entire time.
Repetitions:
Initially, aim for 10 to 15 reps on each leg.
During your workout, you can do 2 to 3 sets of this exercise.
Tips:
As you perform the exercise, keep your upper body straight and contract your core muscles to stay stable.
Be careful not to swing your leg or use momentum to make the motion. Avoid putting undue effort into other areas of your body by concentrating just on the muscles that are being worked.
If required, change the Theraband’s resistance. Your muscles may not receive the proper challenge if the band is too loose or too tight.
Pillow squeeze in supine:
The inner thigh muscles, commonly known as the adductors, may be targeted and strengthened with the pillow squeeze exercise while supine (laying on your back). This workout is straightforward, efficient, and requires little to no equipment to perform practically any place. How to conduct the pillow squeeze exercise is as follows:
Required Equipment
If you don’t have a cushion, a little exercise ball will do.
Instructions:
Set-Up:
On a soft surface, such as a yoga mat or an exercise mat, lie on your back.
Your feet should be roughly hip-width apart on the floor when you bend your knees.
Place the cushion or exercise ball in that position.
Holding the Pillow Tight:
Gently compress the cushion or exercise ball in between your knees by contracting the muscles in your inner thighs.
Throughout the exercise, be sure to maintain relaxed feet and a low back.
Hold and then let go:
The squeeze should be held for seven to ten seconds. Without retaining your breath or tensing up other muscles, concentrate on keeping your inner thighs contracted.
When the necessary amount of time has passed, carefully release the pressure while relaxing the muscles in your inner thighs.
Repetitions:
The squeeze should be performed 10 to 15 times.
During your workout, you can do 2 to 3 sets of this exercise.
Tips:
Throughout the workout, keep your upper body calm and your breathing even.
Aim to focus the action solely on your inner thighs. To help with the squeezing motion, refrain from utilizing your abdominal muscles or forcing your lower back into the floor.
Instead of focusing on the quantity of the squeeze, consider its quality. Performing the repetitions slowly and deliberately is preferable to moving quickly through the workout.
As you get more accustomed to the workout, you can lengthen the squeeze or add resistance by using a larger exercise ball or a harder cushion.
The pillow squeeze exercise works the inner thigh muscles gently but effectively without placing too much stress on the knees or other joints.
Lunge with Knee Up:
A combo workout called “Lunge + Knee Up” entails doing a lunge and then switching to a knee-up position. It’s a fantastic complex exercise that works the legs, glutes, and core, among other muscle groups. Here is how to do it:
As you stand, keep your shoulders back, your core tight, and your feet hip-width apart.
Step forward with your right leg while maintaining a straight spine and square shoulders.
Your body should be lowered until your right knee is at or almost at a 90-degree angle. You should be in a lunge position with your left knee virtually on the floor.
Bring your left leg forward while lifting your left knee towards your chest. Push through your right heel.
Your left knee should be bent at a 90-degree angle and your right thigh should be parallel to the ground at the top of the exercise.
Step your left leg backward into the starting lunge posture by lowering it once more.
For the necessary number of times, perform the lunge and knee-up exercise on one side.
Implement the same procedure on the opposite leg.
Tips:
To stabilize your body and safeguard your lower back during the workout, keep your core engaged at all times.
To keep your balance, keep your emotions under control and move at a moderate speed.
Dumbbells or other weights can be added to the workout to up the difficulty and resistance.
Benefits:
The Lunge + Knee Up workout has the following advantages:
strengthens the quadriceps, hamstrings, and glutes, as well as other leg muscles.
enhances coordination, stability, and balance.
uses the muscles in the core to increase stability and strength.
increases hip flexibility and mobility.
Calories are burned, and it adds a new challenge to cardiovascular exercises.
Side Lunge with Knee Up:
A combination workout called “Side Lunge + Knee Up” combines the side lunge and knee-up motions. The quadriceps, hamstrings, glutes, inner and outer thighs, as well as core muscles, are all targeted by this exercise. It’s also a wonderful functional workout because it requires balance and coordination. How to do a side lunge with a knee up is as follows:
- To maintain balance, stand with your feet together and your hands on your hips or out in front of you.
- Move your weight to the right side of your body by taking a step to the right with your right foot.
- Lower your body into a side lunge stance while bending your right knee. Your left leg ought to be completely extended, and your right knee needs to be bent at a 90-degree angle.
- When performing the side lunge, keep your back straight and your chest up.
- In order to go back to the beginning posture, push through your right heel.
- Now, raise your left knee up towards your chest as you return your right foot to the beginning position.
- Engage your core for stability as you balance on your right leg and lift your left knee.
- After bringing your left foot back to the floor, instantly switch to the right side and perform the side lunge again.
- After finishing the right side lunge, transfer to the left side and carry out the identical motions (side lunge to the left + knee up with the right leg).
For the side lunge, keep your knees in line with your toes to reduce stress on your knees.
- To keep your body stable throughout the knee-up action, keep your core muscles active throughout the exercise.
- Exercise should be done carefully to preserve good form and balance.
Modifications: – While completing the side lunges, you may add dumbbells or other weights to make the workout more difficult.
- If you struggle with balance or find it difficult to lift your knee up, you can support yourself by holding onto a wall or chair.
Use the Side Lunge with Knee Up as part of your lower body or overall training regimen to engage a variety of muscle groups and enhance coordination and balance.
Inner thigh circles:
A pilates-inspired exercise known as the inner thigh circles target the inner thighs while simultaneously working the core and hip muscles. It promotes hip joint stability, inner thigh muscle strength, and flexibility improvement. How to do the inner thigh circles exercise is as follows:
- Lie down on your back and support yourself with your arms outstretched. For further support, you can utilize your forearms or to lay your palms on the ground with the palms facing down.
- Kneel down with your feet flat on the ground. As you create a diamond shape with your legs by bringing your feet together and allowing your knees to fall open to the sides.
- To keep yourself stable during the workout, contract your core muscles.
- While maintaining your knees bent and your legs in the diamond position, slowly elevate your feet off the ground.
- Starting with your heels, start circling your body with your feet. The rings should be carefully planned and regulated.
- Reverse the orientation of the circles after a few in one way.
- Keep circling your feet as long as you like, paying special attention to activating your inner thigh muscles.
- After finishing the circles, controllably and softly drop your feet back to the starting position.
Tips:
- In order to get the most out of the workout and avoid discomfort, keep your movements moderate and controlled throughout.
- To more fully activate the inner thigh muscles, concentrate on squeezing your thighs together as you circle your feet.
- Throughout the exercise, maintain a neutral spine and refrain from arching your back.
Variation:
You may execute the circles while standing with your legs vertically extended towards the ceiling for extra difficulty. The inner thighs and core muscles are additionally activated by this version, which ups the resistance.
Precautions:
Before performing this workout, speak with a fitness expert or healthcare physician if you have any hip, knee, or lower back difficulties. They can offer tailored adjustments and guarantee that the workout is secure for your particular condition.
Like with any activity, pay attention to your body’s signals and stop right away if you feel any pain or discomfort. As you gain strength and confidence in the exercise, start with a limited number of repetitions and progressively increase the amount.
Plie squat:
The plié squat is a useful exercise for developing the adductor muscles in the inner thighs. The plié squat especially engages and works the adductor muscles more vigorously than standard squats because of the wide stance and turned-out toes.
Here is a detailed explanation of the plié squat:

When standing, space your feet farther apart than shoulder width.
You should point your toes out at around a 45-degree angle (you can slightly alter this angle to suit your comfort level).
Maintain a straight back, a high chest, and relaxed shoulders.
Keep your core active for stability.
Bending your knees while keeping them in line with your toes can help you lower your body.
Descent as far as you can while maintaining your form. Ideally, you should be able to lower yourself until your thighs are parallel to the floor, but it’s acceptable if you can’t.
Avoid letting your knees cave inward and maintain alignment with your toes.
Push your heels to return to your starting position.
During the plié squat, concentrate on pushing your knees outward as you lower your body down to maximize the engagement of your inner thighs. The adductor muscles will contract more forcefully as a result of this action.
The plié squat can be done as a full-body exercise or as part of your lower-body workout program. You may develop balanced strength and flexibility throughout your body by using a range of workouts that focus on various muscle groups.
Plie squat jumps:
The plyometric workout known as plié squat jumps, commonly referred to as plié jump squats, combines the advantages of plié squats and explosive jumping movements. This workout challenges the heart while also working the muscles in the lower body and inner thighs. How to do plié squat leaps is as follows:
When standing, spread your feet wider about apart.
You should slant your toes out around 45 degrees (or as comfortable as it is for you).
Maintain a straight back, a high chest, and relaxed shoulders.
Keep your core active for stability.
Bending your knees while making sure they are in line with your toes can help you lower your body into a plié squat. Ideally, you should have your thighs parallel to the floor or as low as you can comfortably get them.
Push through your heels forcefully and leap off the ground.
Quickly draw your feet together while in the air, tucking your knees in towards your chest.
As soon as you touch down, instantly plié squat again with your knees bent and your feet further apart.
The appropriate number of times should be performed in the jump squat position.
Tips:
To lessen the impact of the landing, bend your knees just a little.
To prevent overworking your knees, keep them in line with your toes during the whole exercise.
Keep your balance and composure during the squatting and leaping movements.
As an advanced workout, plié squat leaps might not be ideal for everyone, especially for those who have knee or joint problems. It’s important, to begin with ordinary plié squats and eventually progress to plié squat leaps if you are new to plyometric activities.
Low-side lunges:
Exercises that focus on the inner thighs (adductor muscles) while also working the outer thighs, glutes, and core muscles include low-side lunges. They offer a useful lateral exercise that strengthens the lower body and increases hip flexibility. How to do low-side lunges is as follows:
- To maintain balance, stand with your feet together and your hands on your hips or out in front of you.
- With your right foot, take a step to the right, lightly landing as you shift your weight to the right side of your body.
- Consistently place your left foot on the ground.
- Bend your right knee and drop your body into a lunge as you take a step to the right. Your left leg ought to be completely extended, and your right knee needs to be bent at a 90-degree angle.
- Make sure your left leg is still straight and your right knee is squarely over your right ankle.
- Keep your chest high and your back straight throughout the workout.
- To return to the beginning position, push through the opposite heel.
- Carry out the exercise on the right side as many times as needed.
- Switch to the left side and repeat the technique after finishing the repetitions on the right side.
Use your core muscles to help stabilize your body as you lunge.
- Aim to maintain a neutral spine and avoid leaning too forward or backward.
- Exercise should be done carefully to guarantee appropriate form and avoid injuries.
Variations: – While completing the low-side lunges, you can carry dumbbells or kettlebells in your hands to increase the difficulty of the exercise.
- You can execute the low-side lunges continuously in a side-to-side motion, switching between the right and left sides without stopping to go back to the beginning position, for a more intense workout.
To target and develop the inner thighs and improve total lower body strength and flexibility, incorporate low-side lunges into your lower body training regimen. As with any workout, it’s important to pay attention to your body and refrain from overexerting yourself, especially if you’re new to this action.
Yoga for inner thighs:
The Importance of Inner Thighs in Yoga:
The inner thighs play a crucial role in yoga, as they are engaged in various poses that require flexibility, strength, and stability. Practicing yoga for the inner thighs can lead to improved mobility, enhanced performance in other physical activities, and a deeper mind-body connection.
Benefits of Yoga for Inner Thighs:
- Increased Flexibility: Yoga poses like Butterfly Pose (Baddha Konasana) and Wide-Legged Forward Bend (Prasarita Padottanasana) gently stretch and open up the inner thighs, improving flexibility and range of motion.
- Strengthened Muscles: Poses such as Goddess Pose (Utkata Konasana) and Lizard Pose (Utthan Pristhasana) engage and tone the inner thigh muscles, leading to increased strength and stability in the lower body.
- Improved Circulation: Through various yoga poses and breathing techniques, blood circulation to the inner thighs is enhanced, promoting better nutrient supply and muscle recovery.
- Mind-Body Connection: Yoga encourages a stronger connection between the mind and the body. As you become more aware of the sensations in your inner thighs during poses, you cultivate mindfulness and learn to listen to your body’s needs.
- Reduced Tension and Stress: Yoga’s calming and meditative aspects help release tension held in the inner thighs, providing relief from physical discomfort and promoting relaxation.
- Balanced Hip Flexors: Yoga postures that focus on the hip flexors, especially the inner thighs, encourage better posture by keeping the hips balanced.
- Enhanced Joint Health: The gentle movements in yoga help lubricate the joints, including those in the inner thighs, preventing stiffness and promoting joint health.
Getting Started:
If you’re new to yoga, consider joining a beginner’s class or following online tutorials to learn the foundational poses and principles. Start with simple stretches for the inner thighs and gradually progress to more challenging poses as your flexibility and strength improve.
Yoga for the inner thighs offers a wealth of physical and mental benefits, from increased flexibility and strength to reduced stress and enhanced mind-body awareness. Embrace the journey of self-discovery and well-being through yoga, and experience the profound transformation it can bring to your life.
Yoga can be a great way to strengthen and stretch the inner thighs. Here are some yoga poses that specifically target the inner thighs:
Butterfly Pose (Baddha Konasana):
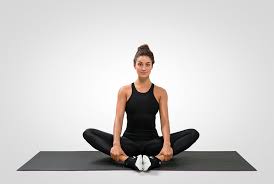
- Sit with your spine straight and bring the soles of your feet together.
- Let your knees fall to the sides, opening up your hips.
- Holding your feet in place with your hands, slowly lower your knees to the ground.
- Take a few deep breaths and hold the stance for 30 to 60 seconds.
Wide-Legged Forward Bend (Prasarita Padottanasana):
- Stand with your feet wide apart (about 3 to 4 feet) and parallel to each other.
- Inhale and lengthen your spine, then exhale as you fold forward from your hips.
- Place your hands on the floor directly under your shoulders or hold onto your ankles.
- Press your heels into the floor and engage your inner thighs.
- Hold it for 30 to 60 seconds.
Goddess Pose (Utkata Konasana):
- Your toes should be pointed outward when you stand with your feet wide apart.
- Squat down into a posture with your knees bent.
- Keep your knees in line with your toes, and press your thighs outward.
- Bring your palms together at your chest and lengthen your spine.
- Hold the posture for between 30 and 60 seconds.
Lizard Pose (Utthan Pristhasana):
- Start in a high plank position and step your right foot forward outside of your right hand.
- Lower your back knee to the ground and slide it back a bit.
- Keep your right knee in line with your right ankle and flex your foot.
- Lower down onto your forearms and allow your hips to sink toward the floor.
- Your left inner thigh should stretch.
- Keep holding for 30 to 60 seconds, then alter sides.
Pigeon Pose (Eka Pada Rajakapotasana):
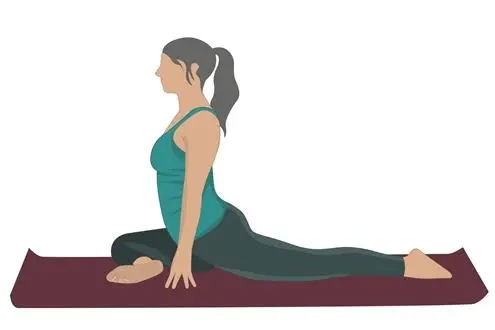
- Starting from a tabletop posture, move your right leg forward and behind your right wrist.
- Keep your hips square and extend your left leg straight back.
- Fold forward over your right leg, and walk your hands out in front of you.
- Keep your hips level and square, feeling the stretch in your right inner thigh.
- Keep holding for 30 to 60 seconds, then change sides.
Upavistha Konasana (Wide-Angle Seated Forward Bend):
- Position yourself in a “V” on the floor with your legs spread far apart.
- Take a deep breath to stretch your spine, then let it out as you bend forward from the hips while maintaining a straight spine.
- Extend your hands as far as you can comfortably go.
- Maintain tightness in your inner thighs and press them down towards the floor.
Bound Angle Pose (Variation of Baddha Konasana):
- Settle down on the ground and extend your legs out in front of you.
- Kneel down and bring your feet’s soles together.
- Hold your feet firmly in place with your hands and, if you can, interlace your fingers beneath them.
- To intensify the inner thigh stretch, gently push your knees toward the floor.
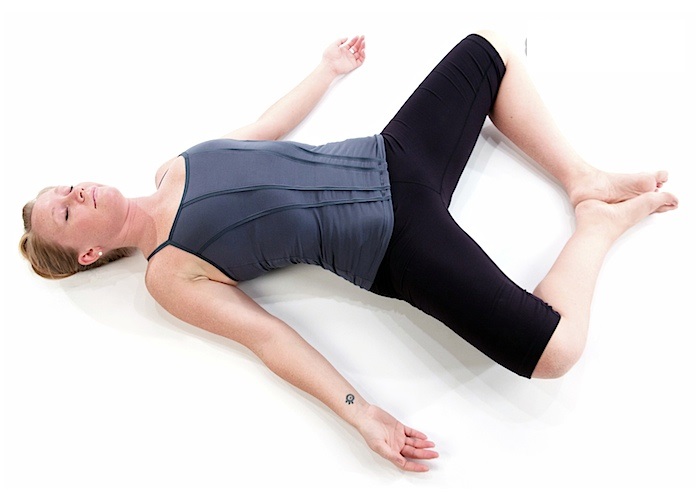
“Supta Baddha Konasana,” or the Pose of the Reclining Bound Angle:
- While lying on your back, bend your knees and put your feet on the ground.
- Your knees should be at a sideways angle as you bring the soles of your feet together.
- For support, you can put cushions or blocks beneath your knees.
In this supine posture, unwind and let gravity open up your inner thighs.
Mandukasana (Frog Pose):
- Get into a tabletop position and start off on your hands and knees.
- Slowly open your knees as wide as you find comfortable.
- Maintain a straight line from your ankles to your knees, and rest your forearms on the ground.
- To feel a stretch in your inner thighs, gently glide your hips back.
Malasana (Garland Pose):
- Place your feet hip-width apart to begin.
- Kneel down and clasp your hands over your chest.
- Encourage your inner knees to move outward by pressing your elbows on them.
- Squeeze your inner thighs together to support holding the posture.
FAQs:
Some of the best exercises for targeting and toning the inner thighs include:
Sumo squats
Inner thigh leg lifts
Side lunges
Inner thigh ball squeeze
Plié squats
Scissor kicks
Inner thigh circles
Many of these exercises can be done at home without the need for gym equipment. Bodyweight exercises like side lunges and scissor kicks are effective for targeting the inner thighs. However, using resistance bands or weights can add variety and challenge to your workouts.
Consistency is essential for seeing results. Aim to perform inner thigh exercises 2 to 3 times per week. To avoid overtraining, provide enough time for rest and recovery in between sessions.
No, inner thigh exercises are unlikely to make your legs bulky. These exercises primarily target and tone the inner thigh muscles without significant hypertrophy. If your goal is leaner legs, focus on incorporating a mix of cardiovascular exercises and strength training into your routine.
Yes, you can combine inner thigh exercises with other leg workouts to create a comprehensive lower body workout. Include exercises that target different muscle groups in the legs, such as the quadriceps, hamstrings, and glutes.
Yes, beginners or individuals with knee issues can modify inner thigh exercises. For example, you can perform exercises on a padded surface or use a chair for support during side lunges. Start with lower repetitions and gradually increase as you build strength and confidence.
The timeline for seeing noticeable changes varies from person to person. With consistent exercise and a balanced diet, you may start noticing improvements in muscle tone and strength within a few weeks to a few months.
Yes, you can incorporate inner thigh exercises into a full-body workout routine. Combining exercises that target different muscle groups allows for a well-rounded workout and helps prevent muscle imbalances.
When performing inner thigh exercises, it’s essential to maintain proper form and avoid putting excessive strain on the knees. Stop the workout and see your doctor if you feel any pain or discomfort.
Yes, some inner thigh exercises, particularly yoga poses, can help improve flexibility in the inner thighs. Consistent practice can lead to an increased range of motion and suppleness in the hip and groin areas.
To ensure safety during your workouts, keep these tips in mind:
Warm up before exercising to prevent injuries.
To prevent strain or damage, use the right form and technique.
Increase difficulty progressively after beginning with lower-intensity workouts.
Stop the workout and see a doctor if you feel any pain or discomfort.
During your workout, stay hydrated and take breaks as necessary.
Spot-reduction, the idea of targeting fat loss from a specific area of the body, is a common myth. Unfortunately, you cannot exclusively reduce fat from the inner thighs by doing inner thigh exercises alone. To lose fat from any specific area, including the inner thighs, you need to engage in regular cardiovascular exercises, along with a balanced diet to create an overall calorie deficit.
Inner thigh exercises can contribute to the overall toning and firming of the muscles, which may help improve the appearance of cellulite to some extent. However, it’s important to note that cellulite is a common condition caused by the way fat and connective tissue interact under the skin. While exercise can help, it may not completely eliminate cellulite. Combining inner thigh exercises with a healthy diet and cardiovascular workouts may yield better results.
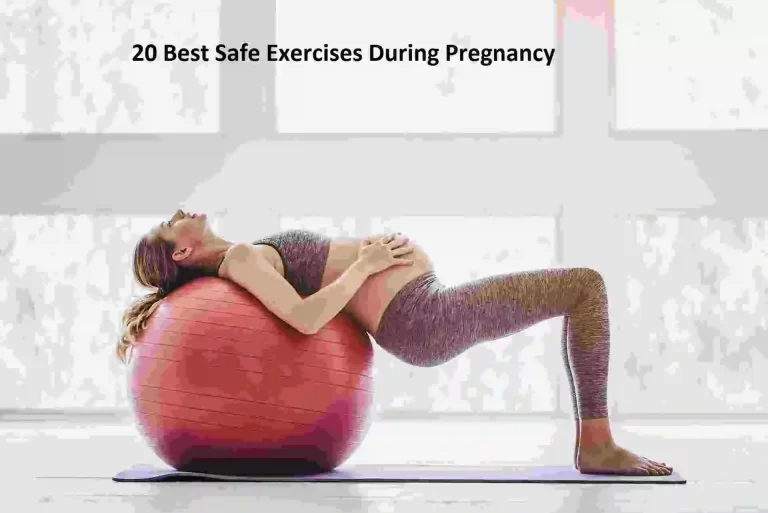
As with any exercise during pregnancy, it’s essential to consult with a healthcare provider before performing inner thigh exercises. In some cases, certain modifications may be recommended to ensure safety and comfort during pregnancy.
Yes, inner thigh exercises are beneficial for both men and women. Strengthening the inner thigh muscles can improve overall lower body stability and contribute to better athletic performance and injury prevention.
To increase the intensity of your inner thigh exercises, you can:
To add further resistance, use resistance bands or ankle weights.
Perform the exercises on an unstable surface like a balance board or stability ball.
Increase the number of repetitions and sets.
Incorporate plyometric movements like jumping lunges or lateral jumps.
For inner thigh exercises that involve isometric contractions (where the muscles are held in a static position), aim to hold each repetition for 10-30 seconds. For dynamic exercises, such as leg lifts and squats, perform each repetition with controlled movements, and focus on proper form rather than specific time durations.