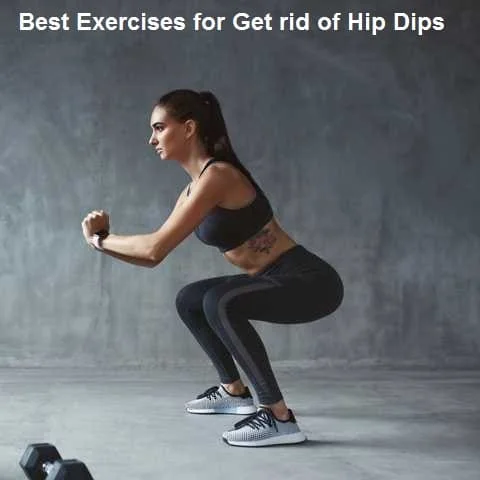
15 Best Exercises for Get rid of Hip Dips
Table of Contents
Introduction
Hip dips, also known as violin hips, are a normal part of the human body, but many people seek exercises to minimize their appearance. While spot reduction is not possible, targeted exercises can help build muscle and improve overall body composition, potentially reducing the prominence of hip dips.
Incorporating a well-rounded workout routine that focuses on the lower body, including exercises such as side leg lifts, squats, lunges, and side-lying leg raises, can help strengthen and tone the muscles around the hips and thighs.
However, it’s essential to combine these exercises with a healthy diet and overall fitness regimen for the best results. Always consult a healthcare professional before beginning any new exercise routine, particularly if you have any pre-existing health conditions.
What are Hip Dips?
Hip patterns are a common and common feature, but some people find them annoying. You may find that they interfere with the contours of your lower body or prevent clothes from fitting well. Having hip joints means that your femur meets your pelvis at a certain angle. Muscles and other underlying structures are attached to these bones, so the angle of the thigh and hip can form a socket. The shape of the hip and femur cannot be changed, but if the hip drop is uncomfortable, we offer several options to reduce their appearance.
Hip dips is a relatively new term that is quite common. This refers to the hollow where the thighs and hips meet. A person with a hip joint has an inward curve between the pelvis and the thigh. People of all shapes, sizes, and body types can have hips. These are completely normal features and do not indicate a medical problem. As already mentioned, hip sockets are naturally occurring depressions that characterize the upper leg. It is located under the hip bone. For some women, the drop is larger. This is due to nothing more than a tighter connection with the greater trochanter of the femur. For others, the decline is less noticeable. How common these drops are depends on the bone structure of the femur and pelvis. The appearance can also be determined by the muscle mass and fat reserves of the structure.
In this article, we describe the condition of hip dips, the causes of hip dips, and the physical appearance of hips. after that, we described the exercise related to this condition and lastly, we gave you a special note from our Samarpan physiotherapy clinic.
Relevant anatomy
Hip dips are a common anatomical feature characterized by a slight depression or inward curve just below the hip bone on each side of the body. This indentation occurs where the skin is tethered to the deeper structures, such as the trochanteric prominence of the femur and the underlying muscles, including the gluteus medius and maximus.
Here is an overview of the anatomy of the hip area related to hip dips:
Trochanteric Region: The greater trochanter is the bony prominence at the proximal end of the femur. this region provides the attachment of several muscles, including the gluteus medius and minimus.
Gluteal Muscles: The gluteus maximus is the largest muscle in the buttocks and is responsible for hip extension and outward rotation of the thigh. The gluteus medius is located on the outer surface of the pelvis and plays a role in hip abduction and stabilization.
Fascia and Connective Tissue: Fascia and connective tissue contribute to the overall structure and support of the hip area, helping to maintain the shape and contours of the body.
The presence and visibility of hip dips can be influenced by various factors, including the distribution of fat and muscle in the hip and thigh area, as well as the shape and structure of the pelvis and underlying bones. While some individuals may have more prominent hip dips, they are a natural part of the body’s anatomy and can vary in appearance from person to person.
Hip Dips Are Normal?
Absolutely! They are completely normal. you don’t take it too much seriously. They are part of your unique makeup and should not be used as a sign of your health.
Also, hip dips may not reflect your overall body fat percentage. So don’t be put off by one of the Kardashians or a frugal impersonator making a career out of embarrassing real people.
Fortunately, there is a growing trend to eliminate body shame. As with everything, real life eventually wins out, and many celebrities and influencers celebrate rap for what it is: a beautiful part of the normal human body.
What causes Hip Dips?
The occurrence of hip dips is largely determined by your anatomy and genetics. Where you carry fat, which is different for everyone and can be influenced by genetics, determines whether or not you have visible hip joints. Fat and muscle in your hips and glutes can affect how much your hip wings stick out.
People with naturally high hips are more likely to have exaggerated hip joints which are more common in women who camp with men.
The visibility of your dip depends on several factors, including the width of your hips, the size of the top of your femur, and the length of your “femoral neck.” Not to mention the dimensions of the ilium, the pelvic floor, and the greater trochanter.
These aspects not only shape and define the shape of your hips but also your glutes. In short: hip sockets are more noticeable if you have wider hips and a greater distance between the hip bone and the iliac bone.
The angle, size, and position of features such as the greater trochanter and femoral head also directly affect the visibility of your hips. Don’t try to resist these aspects, you will get nowhere. In fact, you could harm yourself.
Symptoms of Hip Dips
“Hip dips” are a natural part of the body’s structure for many individuals and are not associated with any specific symptoms. They are the inward curve just below the hip bone on each side of the body, creating a slight depression between the upper thigh and the hip. They may become more or less prominent depending on various factors such as body weight, muscle distribution, and bone structure.
While some people might feel self-conscious about their hip dips, it’s important to remember that they are a normal and natural part of the body for many individuals. They do not typically indicate any underlying health condition or cause any specific symptoms. However, if you are experiencing pain or discomfort in the hip or thigh area, it’s advisable to consult a healthcare professional to determine the cause and appropriate treatment.
Exercise to get rid of Hip Dips
Side leg raise

The side leg raise is an effective exercise for targeting the muscles of the hips and thighs, particularly the outer thighs (abductors). Here’s how you can perform a side leg raise:
Start with the side-lying position on the mat or plinth both the hips are in extension. You can place your lower arm under your head for support and your upper arm resting on your hip or in front of your body for balance.
Keep your body in a straight line from head to toe, engaging your core muscles for stability.
While keeping your leg straight, slowly lift the top leg upward as high as you can without rotating your hip or leaning your torso.
Hold the raised position of the hip for around five seconds.
Slowly back your hip to the starting position and take a rest for a few seconds.
Repeat for a sufficient number of repetitions and then change to the other side.
Make sure to focus on the muscle you are trying to target (the side of the hip and thigh) and avoid using momentum to lift the leg. Performing the exercise slowly and with control will maximize its effectiveness. You can increase the intensity by adding ankle weights or a resistance band around your ankles. As with any exercise, consult a fitness professional or physical therapist if you have any concerns or specific conditions before beginning a new exercise routine.
Prone leg raise
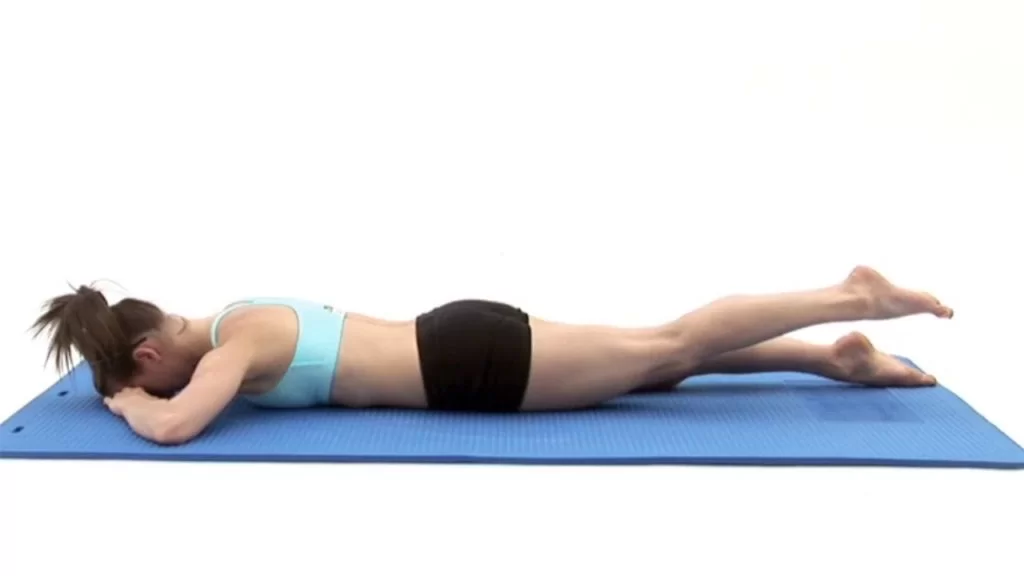
The prone leg raise is an exercise that primarily targets the muscles of the lower back, glutes, and hamstrings. Here’s how you can perform a prone leg raise:
Lie face down on a comfortable surface such as a mat or a carpet.
Keep your legs straight and together.
Place your forehead on your hands or on the mat to keep your neck in a neutral position.
Contracted your core muscles to stabilize or hold your lower back.
While keeping your legs straight, lift one leg off the ground by squeezing your glutes and hamstrings. Lift it as high as you can without causing any discomfort or pain.
Hold the raised position for a moment to engage the muscles fully.
Slowly back your hip to the starting position and after that take the rest of a few seconds.
Repeat the movement with the other leg.
Make sure you should maintain the proper alignment and avoid arching your back area during the exercise. Focus on engaging the target muscles, and avoid using momentum to lift your legs. During the starting phase choose a comfortable number of repetitions and sets, gradually increasing the number of repetitions according to your strength. As always, consult a fitness professional or physical therapist if you have any concerns or specific conditions before beginning any new exercise routine.
Straight leg raise
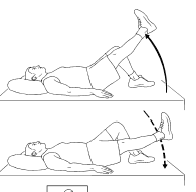
The straight leg raise exercise is a fundamental movement that primarily targets the muscles of the abdomen, particularly the hip flexors and the quadriceps. Here’s how you can perform a straight leg raise:
Lie on your back on a mat or a flat surface with your legs straight out and your arms by your sides.
Keep one leg flat on the ground while slowly raising the other leg off the ground. Ensure that you keep the leg as straight as possible without locking the knee.
Lift your leg to a height that is comfortable for you and that does not cause any strain or discomfort.
Hold the raised position for a second or two, engaging your abdominal muscles and hip flexors.
Ensure that you perform the exercise with controlled movements and avoid jerking or swinging your legs. Focus on engaging the target muscles and maintaining proper form throughout the exercise. You can also add ankle weights for added resistance and intensity. Start with a comfortable number of repetitions and sets, and gradually increase them as your strength improves. As always, consult a fitness professional or physical therapist if you have any concerns or specific conditions before beginning any new exercise routine.
Squat
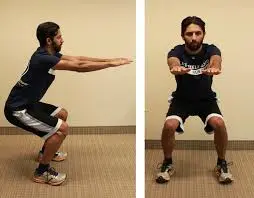
For the squat start with the standing position. your base of support is kept wide for proper support. start with the Standing position, gently pull your whole upper back, and gently lift your upper back to your knee. As you exhale, try to pull. navel on the back to engage the deep abdominal muscles that hold the spine.
Bend your knees keeping your upper body as straight as possible, as if you were going down
to the seat behind you.
It’s good that you allow your body to lean naturally when you squat, not just hunch your chest or roll your shoulders forward. If you’re too upright, your hips won’t release properly and you’ll put too much stress on your knees. move forward yourself as far as possible, leaning your upper extremity forward more than extra leaning. Go as deep as you comfortably can. If you have knee problems, do not go deeper than a 90-degree gradual angle, thighs parallel to the floor. avoid locking the position of the knee when you do a standing position after completing the squat. Repeat three sets of 10-15 repetitions. while the exercise maintains your knee position. Also, don’t let your knees sink. Press them out (much like you would press on an invisible resistance band) so they are in line with your feet as you squat.
Variation of squat exercise:
Wall squat
Prisoner squat
Side squat
Pistol squat
Single-leg squat
Side-kick squat
Lunges
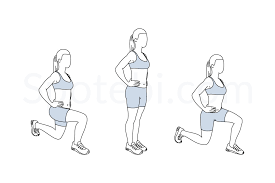
Lunges work on the largest muscles of the lower body – mainly the quads glutes maximus and adductor Magnus (inner thigh muscle). Other muscles will also include the hamstrings, gluteus medius, calves, and core stabilizers come into play.
Front or forward lunge
With a standing position keep your feet(wide base of support), and hands at your sides. Step 1-2 feet forward with your right foot, keeping your body upright with your knees above the toes.
Do flexion of your right knee to a 90-degree angle so that your right thigh is parallel to the surface.
Press the right foot through the heel and shift the weight to the left foot, take a step.
right leg back to the starting position.
Repeat on the other side.
Back or reverse lunge
With a standing position keep your feet(wide base of support), and hands at your sides.
Step your right foot about one to two feet away from you, landing on the ball of your right foot.
Keep your body upright. Lower to the ground, bending your right knee to a 90-degree angle. Push your right leg through the ball and return to the starting position. Repeat on the other side.
Side or lateral lunge
With a standing position keep your feet(wide base of support), and hands at your sides. Keep your left leg planted and lift your right leg out to the side about 2-3 feet.
Lower toward the ground until your right knee forms a 90-degree angle and your right thigh is parallel to the floor. Keep your left leg straight.
Push through your right heel to shift your weight to your left leg to return to the starting position. Repeat on the other side.
Lateral band walk
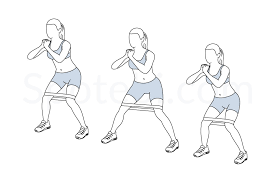
The lateral band walk, also known as the mini band walk, is a resistance band exercise. Sideband walks primarily target and strengthen the hip abductor muscle group. The exercise strengthens and tones these hip and gluteal muscles. Lateral bands are excellent strength exercises for the glutes and hips. As mentioned above, sidewalks target the hip abductors located in the pelvis and glutes.
Wrap a loop tape over both ankles. Raise your feet about shoulder-width apart or until the band is under tension. In the starting phase both knees are slightly in flexion, the hips mild forward about 45 degrees, and keep your hands on your hips. Keep your upper extremity forward and take a step to the dominant side. you can feel the tension in your right hip muscles slowly walk right to left side if you want to hold so you can hold the pose for at least two to four seconds.
Take ten steps to the dominant foot, right foot leading. Then change your path and take ten steps to the left with your left side. During the whole exercise, make sure the upper extremities, hips, and knees are all lean on the front side of the body. Also, consider stepping straight outside the hip joint. When you step, your feet should be in alignment with your hips and the rest of your body.
Lateral band walk variation:
Monster walk
X-Band walk
Resitace band latral leg lifts
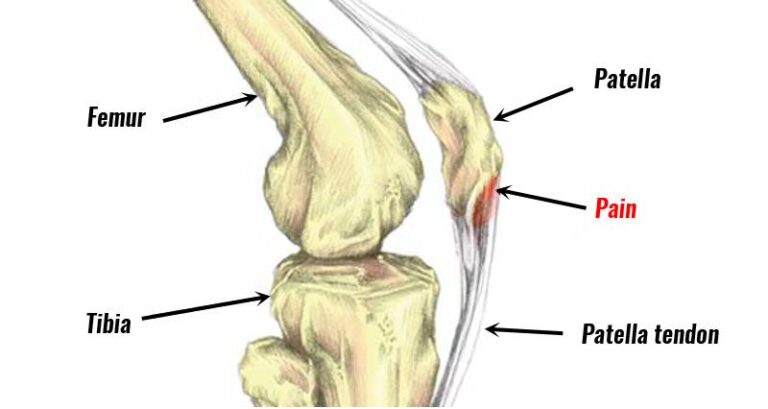
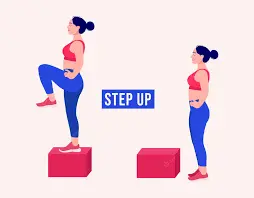
Step down
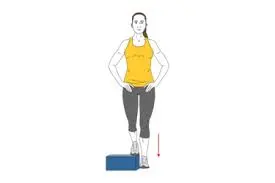
This step-down exercise is more therapeutic than muscle building and can help stabilize the knee. Your hips, patella, and quadriceps muscles work together to help the patella move properly, it’s necessary to strengthen and work all of these muscles to keep it strong and flexible. That’s exactly what this movement does.
Consider some of the benefits of adding exercise to your daily routine.
Steps can increase leg strength. Lunges activate muscle groups throughout your lower body, including the quadriceps, hamstrings, glutes, and adductors. Upgrades can even out power imbalances. Stand on a sturdy low stool, bench, or step. Engage your core and glutes as you slowly step onto one leg. Tap the ground with your lower leg. Slowly bring it back to the starting position as you squat. Do ten repetitions on each side.
Stair climbing
These stairs can be located in the stairwell of a building, outside in a park, or at a local stadium or gym that has a stair-climbing machine that simulates climbing stairs. This activity can also be done on the stairs of your house. Stair exercises can be done for free on existing stairs at home, outside or in public places, or indoors with equipment. This is what you need.
Stairs can be found in your home, apartment, or office building, or outside in a park or stadium (such as a high school football field). Just make sure you know in advance if there are any restrictions on which floors you can return to or if there is an elevator.
Stair Machine The gym has a range of stair or climbing machines such as the FreeClimber, StepMill, Versa Climber, and Jacobs Ladder. You can also buy a stair machine, although they are expensive – up to thousands of dollars. Before you buy, find out what style you like and consider using it in your area, like the Facebook Marketplace.
If you’re buying one for your home, consider the height of the machine – and the ceiling height you need to use it safely. Dress like you’re going for a run or the gym. comfortable and loose clothes provide you relief during the whole exercise.
Clamshell exercise
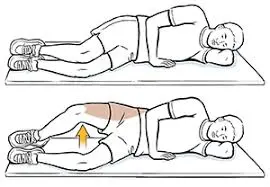
The clamshell exercise is a physical therapy exercise that primarily targets the muscles of the hips, particularly the gluteus medius. It is often used to improve hip stability and strengthen the muscles around the hip joint. Here’s how you can perform the clamshell exercise:
Lie on one side with your legs stacked on top of each other and your knees bent at a 45-degree angle. Verify that the alignment of your hips, shoulders, and head is straight.
Keep your feet together and your heels touching as you perform the exercise.
provide the contraction with your core muscles which provide the stabilization to the spine.
While maintaining the position of your feet and pelvis, slowly lift your top knee as far as you can without moving your pelvis or losing contact between your feet.
Hold the clam position for five to ten seconds.
Slowly back your knee back to the starting position and take a rest for a few seconds.
repetition should be seven to ten times with proper hold.
It’s important to perform this exercise in a slow and controlled manner, focusing on the muscles of the hips and not allowing other muscle groups to compensate for the movement. This exercise can be helpful in improving hip strength, stability, and mobility, especially for individuals recovering from hip injuries or those looking to prevent hip issues. Always consult a healthcare professional before starting any new exercise regimen, especially if you have any pre-existing health conditions or concerns.
Modification of clamshell exercise
You should make a looped-resistance band around your thighs, just above your knees.
Lie on your side with your legs stacked on top of each other and your knees bent at a 45-degree angle. maintain an alignment with Your head, shoulders, and hips which is necessary.
Ensure that your feet are together and your heels are touching.
Provide the contraction with your core muscles which provide the stabilization to the spine.
While maintaining the position of your feet and pelvis, slowly lift your top knee as far as you can without moving your pelvis or losing contact between your feet. You will feel the strength of the band.
Hold the clam pose for five to ten seconds.
Slowly lower your knee back to the starting position under the tension of the resistance band.
The resistance band adds an external resistance, making the exercise more challenging and increasing the engagement of the muscles in your hips. Make sure to maintain proper hold and control throughout the movement. Start with a light resistance band and gradually increase the resistance as your strength improves. As always, consult a fitness professional or physical therapist if you have any concerns or specific conditions before starting any new exercise routine.
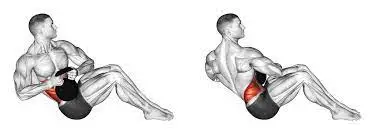
Crunches(partial curl)
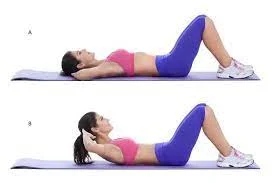
Starting Position: start with the supine position on the plinth or mat. do the flexion of both knees. Your feet should be hip-width apart, and your hands can be either crossed over your chest or placed lightly behind your head, without pulling on your neck. Gently contract your abdominal muscles to stabilize your spine. Make sure your lower back stays in contact with the floor/mat throughout the exercise to avoid straining your back.
Slowly exhale as you lift your upper body off the floor, using your abdominal muscles to perform the movement. Your head, neck, and shoulder blades should be lifted off the ground, while your lower back remains in contact with the floor.
At the top of the movement, pause for a second and squeeze your abdominal muscles. Focus on keeping the tension in your abs rather than pulling on your neck or using momentum to lift yourself higher.
Inhale as you slowly lower your upper body back to the starting position, with control. Your upper back, mid-back, and lower back should all make contact with the floor before beginning the next repetition.
Repetitions should be according to your strength level and goals during the starting phase you should do 5 to ten repetitions and gradually you can increase the repetition of the exercise. Aim for proper form and controlled movements throughout the exercise.
Crunches primarily target the rectus abdominis muscle, commonly known as the “six-pack” muscle, and can help improve core strength and stability. However, it’s essential to combine crunches with a variety of other exercises to achieve overall core strength and stability. Additionally, maintaining proper form and breathing technique is crucial to prevent strain or injury. If you have any pre-existing back issues, it’s advisable to consult a healthcare professional or a certified trainer before incorporating crunches into your workout routine.
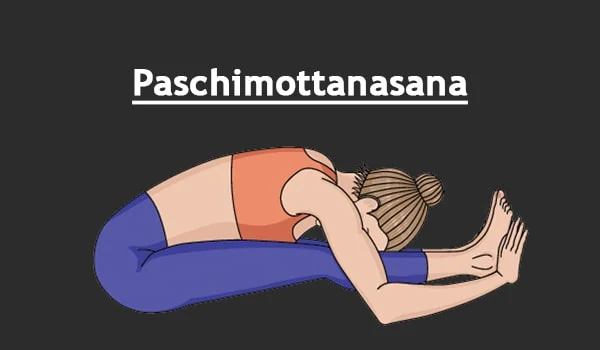
Butterfly stretch
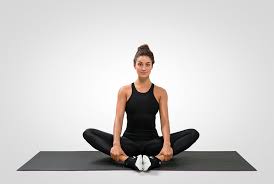
The butterfly stretch is an excellent stretch that targets the inner thighs, groin, and hips. It is relatively simple to perform and can be beneficial for improving flexibility. it is the whole procedure of the butterfly exercise:
Starting Position: Sit on the floor or on a yoga mat with your back straight and your legs extended in front of you.
Bend Your Knees: Bend your knees and bring the soles of your feet together, allowing your knees to fall outward to the sides.
Hold Your Feet: Hold your feet or ankles with your hands. You can gently grasp your feet or interlace your fingers around your toes to help keep them in position.
Flap Your Knees: Gently begin to “flap” your knees up and down, like the wings of a butterfly. This motion can help to deepen the stretch over time, but be sure not to force the movement.
If you feel comfortable and want to deepen the stretch, you can lean forward from your hips, keeping your back straight. Try to avoid rounding your back excessively.
Hold the stretch which is necessary and the duration of hold is 15 -30 seconds. Feel the gentle stretch in your inner thighs and hips.
Release Slowly: Release the stretch slowly, bringing your knees together and extending your legs out in front of you.
Performing the butterfly stretch regularly can help improve flexibility in the hips and groin area. It’s important to maintain proper posture and avoid forcing your knees down, as this can lead to strain. If you have any pre-existing conditions or concerns, consult a healthcare professional or a certified fitness trainer before starting any new stretching routine.
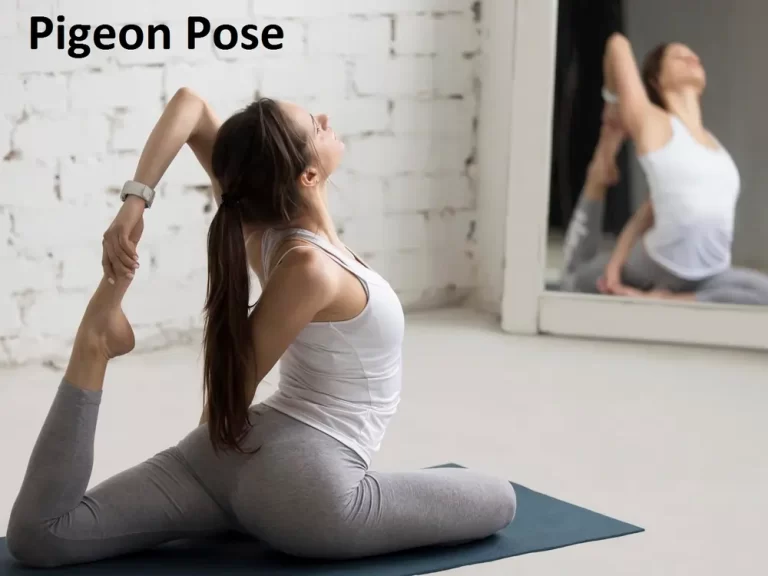
Kneeling Hip Flexor Stretch
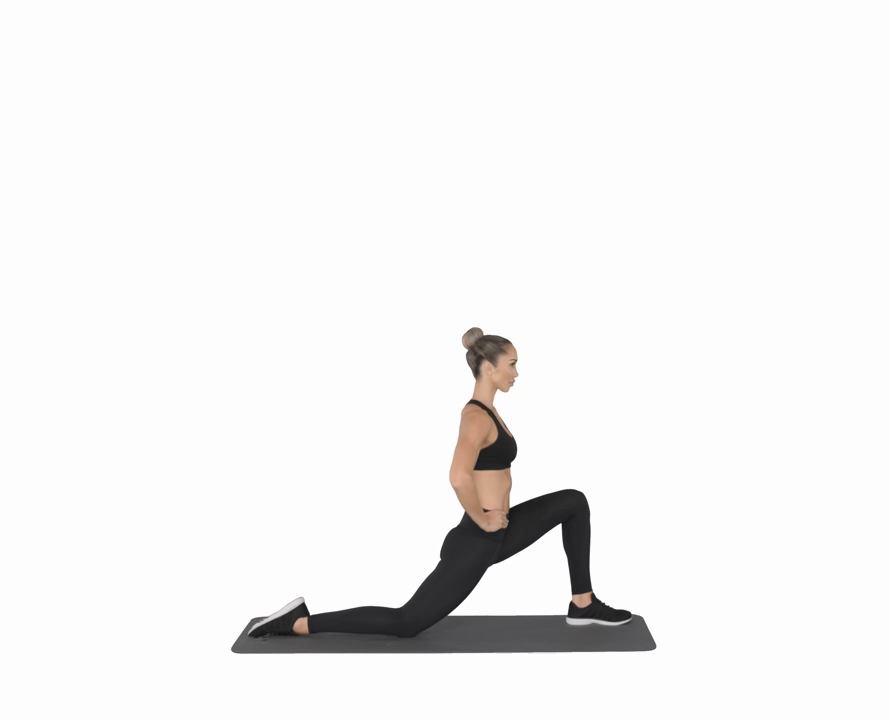
Start in a kneeling position with one knee on the ground and the other leg positioned in front with the knee at a 90-degree angle.
Keep your back straight and your pelvis tilted slightly forward.
Slowly shift your weight forward onto your front leg, feeling the stretch in the front of the hip of the leg that’s on the ground.
Hold the stretch for 20-30 seconds while keeping your core engaged.
Change the side and follow the same procedure for the other side.
Remember, stretching should not cause pain. If you experience pain during exercise you should stop the exercise immediately or take rest for a few seconds. It’s always a good idea to consult a healthcare professional before starting any new exercise routine, especially if you have any pre-existing conditions or concerns.
Bridging exercise
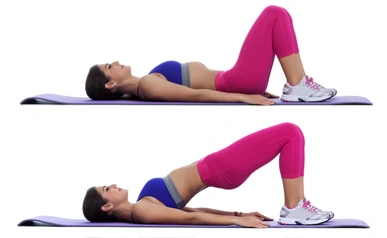
Bridging exercise is a type of strength-training exercise that targets the muscles of the lower back, buttocks (glutes), and hamstrings. It is particularly effective for building core strength and stability while also improving the strength and flexibility of the hip muscles. The basic bridge exercise involves lifting the hips off the ground while lying on your back, creating a straight line from the shoulders to the knees. There are various progressions and modifications of the bridge exercise that can be used to target different muscle groups or increase the level of difficulty.
This is the whole procedure for the bridging exercise:
Start with the supine position with your both knees in flexion.
Contract your core muscles during the procedure of the exercise.
Press your heels into the floor, exhale, and lift your hips up off the ground until your body forms a straight line from your shoulders to your knees.
Squeeze your glutes at the top of the movement, then slowly lower your hips back down to the starting position while inhaling.
To make the exercise more challenging, you can try single-leg bridges, where you lift one leg off the ground while keeping the other leg bent, or you can place your feet on an elevated surface. Additionally, incorporating resistance bands, stability balls, or weights can add extra resistance and intensity to the exercise.
Bridging exercises are beneficial for improving overall core strength, stabilizing the spine, enhancing athletic performance, and preventing lower back pain. They are commonly included in various workout routines, including those aimed at improving flexibility, balance, and overall muscle strength. However, it is important to perform this exercise with proper form to avoid any strain or injury. If you have any pre-existing health conditions or concerns, it’s advisable to consult a fitness professional or healthcare provider before starting any new exercise program.
Variation of bridging
Single-Leg Bridge: This variation involves performing the bridge exercise while keeping one leg extended straight in the air. It places more emphasis on each side of the glutes and hamstrings, as well as the stabilizing muscles of the core.
Bridge with Leg Lift: In this version, you lift one leg off the ground while holding the bridge position. Alternate lifting each leg to work on strengthening the glutes, hamstrings, and hip flexors.
Bridge March: Start in the bridge position and then alternate lifting one knee toward the chest while maintaining the bridge. This variation adds a dynamic element to the exercise, engaging the core muscles more intensely.
Elevated Bridge: Place your feet on an elevated surface, such as a step or a sturdy bench, to increase the range of motion and intensify the resistance placed on the glutes and hamstrings.
Weighted Bridge: Hold a weight, such as a dumbbell or a barbell, across your hips while performing the bridge exercise to add an extra challenge and increase the resistance on the targeted muscle groups.
Bridge Pulses: Hold the bridge position and perform small, controlled pulses up and down with your hips. This variation can further engage the glutes and hamstrings, providing an intense isometric and dynamic workout for these muscle groups.
Bridge with Stability Ball: Place your feet on a stability ball while performing the bridge exercise. This variation adds instability, requiring more engagement from the core muscles to maintain balance, and intensifies the challenge for the glutes and hamstrings.
Fire hydrant exercise
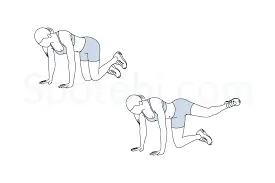
Fire hydrants, also known as quad squats, are a type of bodyweight exercise. these exercises mainly focus on the muscles gluteus maximus, but some variations also work the core. To get the most out of a fire hydrant, it’s important to use proper form and technique. Keep your core and hips stable. while this exercise only hip movement is allowed. Otherwise, your hips and glute muscles will not work properly. Lifting the hip, the hip should be towards the opposite wall. This helps the pelvis rotate properly
You don’t need any special equipment. You just need a mat.
Start on your hands and knees. you should keep your shoulders over your hands and your hips on your knees. Tighten your core and look down. Lift your hip away from your body at a 45-degree angle. Keep your knee at a 90-degree angle. Lower your hips to the starting position it is counted as one repetition. Do three sets of 10 repetitions. Repeat with the other leg.
Variation of fire hydrant exercise
Fire hydrant with looped resistance band
Fire hydrant with ankle weights
Fire hydrant kick
A fire hydrant with pulses
Fire hydrant with hand lift
Standing fire hydrant
Plank

The plank exercise provides many physical advantages. Core strengthening is an important aspect of any exercise program. A strong, solid core looks and feels good. But most importantly, it helps stabilize, balance, and power the body during almost any other activity. Choose a position where you can stretch the length of your entire body. When you use an exercise mat, you get enough cushion to be comfortable on all four feet. You can choose to do the plank on your palm.
A variety of wrist wraps are available to support the joints. Start in a plank position with your hands on the ground and your toes on the floor. Your elbows are directly under your shoulders and your forearms are pointed forward. Your neck feels relaxed and you should be looking at the surface. Brace your abs and pull your navel toward your spine.
Keep your body straight and rigid and in a straight line from ears to toes without sagging or bending. This is a neutral spine position. Your heel should be above your feet. Hold this position for ten seconds. Release to the floor. repetition should be five to ten seconds then gradually increase the repetition of the exercise.
Modification of plank
Tabletop Plank
Incline Plank
Plank With Leg Lift
Plank With Arm Lift
Risk factors of hip dips
Hip dips are a natural part of the body’s structure for many individuals and are not typically associated with any specific risk factors. They are primarily determined by the shape of the pelvis and the distribution of muscle and fat in the hip and thigh area. However, some factors may contribute to the visibility of hip dips or affect their appearance:
Body Composition: The distribution of muscle and fat in the hip and thigh area can affect the prominence of hip dips. Lower levels of muscle mass and higher levels of body fat may make hip dips more noticeable.
Bone Structure: The natural shape and structure of an individual’s pelvis can determine the presence and prominence of hip dips. Variations in pelvic shape can lead to differences in the appearance of the hip dip area.
Genetics: Genetics plays a major role in developing the structure of body shape and fat distribution. Some individuals may be genetically predisposed to have more noticeable hip dips.
While there are no direct health risks associated with hip dips themselves, it’s crucial to focus on maintaining a healthy lifestyle and body image. Embracing your natural body shape and staying physically active can help promote overall well-being. If you have concerns about your body shape or are experiencing any discomfort or pain in the hip or thigh area, it’s advisable to consult a healthcare professional for appropriate guidance and support.
Can Hip Dips Be Treated?
Hip problems are not medical problems, so they really don’t need treatment. For some people, they are completely normal. However, if you are not satisfied with the appearance of your hips, you may want to ask if they could be improved.
It is important to note that you cannot locate the hip joints. There is no way to contact any part of the body, including the pelvic floor. Losing weight will not improve the appearance of hip joints if you have them, as they are not caused by excess fat. Certain exercises can help reduce their appearance, such as lunges and gluteal bridges. But these exercises do not completely eliminate them. In fact, it is best to avoid certain exercises when trying to minimize the occurrence of hip impingement. You should avoid exercises that are considered to increase the strength of hip flexors and quads and choose exercises that increase the strength of the glutes. Despite this, hip dips are still visible to some extent.
There is one surgical solution that can help improve the appearance of the hip joints. Liposuction of saddlebags or love handles can create smoother curves and lines in this area. This can help simplify the pelvis and make the hips less noticeable.
Removes excess fat from the hip area under local anesthesia. The surgeon makes small incisions and then sucks out the fat cells. after removing excessive fat remaining fat provides an attractive body. Thanks to this, you will benefit from slimmer hips and a more attractive curve in the hip area.
Other ways to lose hip fat
Exercise is a great tool to help you build muscle and reduce body fat. It is also one of the best ways to keep the pounds off after dieting. However, if you want to maximize overall weight loss, it’s important to consider other lifestyle choices.
Eat a healthy diet
A healthy diet is key to losing weight and trimming your hips. Try to follow a meal plan that focuses on whole foods in all food groups. Avoid foods and drinks with added sugar and watch your portions. Try to consume fewer calories than you consume every day.
Get quality sleep
Getting the right amount of sleep each night can support your weight loss. for sleep quality, you should take eight to nine hour of sleep which provide the proper rest to your body.
Keep stress under control
We all have stress in our lives, but studies show that too much stress can lead to health problems like weight gain, high blood pressure, and headaches. That’s why stress management is an important part of a weight loss program. If you regularly dealing with stress, you should start stress-reducing activities such as yoga, meditation, or deep breathing exercises. Exercise can also help reduce stress. Consider talking to a doctor or therapist about ways to manage your stress.
How Do You Get Rid of Hip Dips?
No treatment can really get rid of hip pain. But treatment can significantly reduce their appearance and give you smooth, symmetrical curves. The following list covers the available treatments. We recommend a consultation to find out what we offer and which ones are right for you.
Exercises
Hips are caused by bone structure, so exercise cannot change them. However, exercises that strengthen and repair the hip and gluteal muscles can help reduce their appearance. A trainer can help you develop a safe exercise routine.
Fillers
Dermal fillers can be used to add volume and minimize the dimpling of the hips. The fillers used to plump the hips are often the same ones used to add volume to the cheeks or to fill in deep lines and wrinkles. fillers are a safe option for this condition.
Fat transfer
Fat transfer is technically more advanced than dermal fillers, but the results last much longer. BeautiFill fat transfer removes fat from the donor area and injects it into the hip. The fat cells integrate and stay in place, adding a natural look to soften the hips. These transferred fat cells can last your entire life, although they change as your weight fluctuates. This is the most popular hip injection method among our patients.
Implants
Hip implants can be used to fill out the images of the hip joint. These implants are usually made of silicone, which is safe for the body. Although implants are meant to be permanent, they may need to be removed due to side effects. sometimes the hip implants do not look natural due to the procedure.
Body shaping
Body contouring can shape the area and reduce hips. Flattening the hips and thighs can create a smoother contour, making hips less noticeable. This treatment is non-invasive and safe for almost everyone.
Precaution while Exercise Get Rid of Hip Dips
While exercises can be beneficial in toning and building muscle around the hips, it’s essential to practice caution to prevent any injuries or strain. Here are some precautions to keep in mind while exercising to reduce the appearance of hip dips:
Warm-Up: Always start your workout after a proper warm-up exercise. This can include light cardio, dynamic stretches, or movements that prepare your muscles and joints for the upcoming exercises.
Proper Form: Focus on maintaining proper procedure during exercises. Incorrect forms can lead to injuries and may not yield the desired results. If you’re unsure about your form, consider working with a personal trainer who can guide you through the exercises.
Gradual Progression: Don’t take much pressure off exercise. Gradually increase the repetitions and duration of your exercises to avoid overexertion and muscle strain.
Variety in Exercises: Incorporate a variety of exercises targeting different muscle groups in the hips and thighs. This can prevent overuse injuries and help in overall muscle development.
Rest and Recovery: You should have proper rest in between the exercise sessions this rest provides the proper relaxation to your muscles. Proper rest is necessary for muscle repair and growth.
Listen to Your Body: take care of any discomfort or pain during exercises. If you experience any sharp pain or discomfort, stop the exercise immediately and consult a healthcare professional.
Stay Hydrated: Drink plenty of water before, during, and after your workout to stay hydrated and maintain optimal muscle function.
Balanced Diet: Along with exercise, ensure you’re consuming a balanced diet to provide your body with the necessary nutrients for muscle development and recovery.
Consult a Professional: If you’re new to exercising or have any underlying health concerns, it’s advisable to consult a fitness professional or a healthcare provider before starting any new exercise regimen.
By taking these precautions, you can minimize the risk of injury and ensure a safe and effective workout routine to target the muscles around the hip area.
Benefit of exercise
Exercise can offer several benefits, even when targeting the hip dip area. While it’s important to keep in mind that hip dips are a natural part of many body shapes and should be embraced, exercising to strengthen and tone the surrounding muscles can contribute to an overall improvement in body composition and well-being. Here are some benefits of exercising for the hip dip area:
Muscle Toning: Engaging in targeted exercises can help build muscle around the hips, thighs, and glutes. Strengthening these muscles can improve the overall appearance of the hip dip area, making it appear more toned and firm.
Improved Body Symmetry: Developing the muscles around the hips can help create a more balanced and symmetrical look. As the muscles grow and become more defined, they can contribute to a smoother transition between the waist and hips.
Enhanced Posture: Strengthening the muscles in the hip area can promote better posture, which can have a positive impact on overall body alignment. a good posture look taller and more attractive or confident as a person.
Increased Strength and Endurance: Regular exercise can improve your overall strength and endurance, making it easier to perform daily activities and exercise routines. This can lead to an overall improvement in physical fitness and well-being.
Boosted Metabolism: Engaging in regular physical activity can help boost your metabolism, which can contribute to better weight management and overall body composition.
Improved Overall Health: Exercise is essential for maintaining overall health. It can help reduce the risk of chronic diseases, improve cardiovascular health, and enhance mood and mental well-being.
Enhanced Self-Confidence: As you work on improving your body through exercise, you may experience a boost in self-confidence and self-esteem, leading to a more positive body image.
It’s important to approach exercise with a balanced mindset, focusing on overall health and well-being rather than solely on changing specific body features. Always consult a fitness professional or a healthcare provider before starting any new exercise regimen, especially if you have any underlying health concerns.
Clothing choices while the hip dips
Choosing the right clothing can help create an illusion of smoother curves and minimize the appearance of hip dips. Here are some clothing tips that can be helpful:
High-Waisted Bottoms: Opt for high-waisted jeans, pants, or skirts that sit above the hip dip area. They can help create a more defined waistline and provide a smoother transition from the waist to the hips. A-line skirts and Dresses: A-line skirts and dresses can help balance out the hip area and create a more symmetrical silhouette. They can gently flare out from the waist, concealing the hip dips and creating a more seamless look.
Wrap Dresses or Tops: Wrap-style clothing can create the appearance of a more defined waist, drawing attention away from the hip dip area.
Layering: Layering clothing can help create dimension and draw attention to other parts of the body. Consider layering with a stylish jacket, cardigan, or scarf to divert attention from the hip area.
Structured Fabrics: Structured fabrics, such as denim or tailored materials, can provide a more defined shape and create a smoother appearance around the hips.
Ruffles and Embellishments: Clothing with ruffles, embellishments, or details around the hip area can add volume and create the illusion of a fuller silhouette.
Dark Colors and Patterns: Dark colors and patterns can be flattering and help minimize the appearance of any unevenness around the hips. Opt for solid dark-colored bottoms or clothing with subtle, small patterns.
Belts and Accessories: Use belts and accessories strategically to highlight the waist and draw attention away from the hip dips. A statement belt can create a focal point at the waist, balancing out the overall look.
Choose fabrics that do not cling to the body. Loose, flowing fabrics like cotton are the best choice for hiding hip dips because they fall around the body without clinging to it. Thick, structured materials like denim can also provide good camouflage, keeping their shape outside of your silhouette. Avoid clingy fabrics like spandex and lycra, which accentuate the dips in the hips.
Choose clothes that look, not tight. Tight clothes emphasize the hips by clinging to the body. Instead, choose looser-fitting clothes or clothes that are tailored to fit well without hugging your body. Pair long, loose tops with slim bottoms to balance your look. Fitted and flared dresses can give you an hourglass shape by covering your hips. Tailored blazers and blouses can camouflage your hips without looking overbearing.
Remember one thing you feel safe and comfortable and confident in what you wear or with your dressing sense. Embrace your body shape, as it is a unique and beautiful part of who you are.
Home Remedies For get rid of hip dips
While it’s important to note that hip dips are a natural part of the body’s structure and are completely normal, some individuals may wish to minimize their appearance. Here are a few home remedies and lifestyle changes that may help reduce the visibility of hip dips:
Strength Training: Performing exercises that target the muscles around the hips, such as squats, lunges, leg lifts, and side leg raises, can help build muscle and improve the appearance of the hips.
Cardiovascular Exercise: Engaging in regular cardiovascular exercises, such as running, cycling, or swimming, can help reduce overall body fat, which may help minimize the appearance of hip dips.
Healthy Diet: Maintaining a balanced and nutritious diet can aid in weight management and overall body fat reduction. In your diet, you can include a variety of fruits, green vegetables, and meals full of proteins.
Hydration: Staying hydrated by drinking an adequate amount of water each day can help maintain skin elasticity and promote overall skin health.
Posture Correction: Improving your posture can help enhance your body’s natural shape and alignment, potentially reducing the prominence of hip dips.
Massage and Fascia Release: Regularly massaging the hip and gluteal muscles can help improve blood circulation and loosen the tight fascia, potentially leading to a smoother appearance.
Body-Positive Mindset: Remember that everyone’s body is unique, and having hip dips is completely normal. Embrace self-acceptance and focus on overall health and well-being rather than solely on appearance.
While these methods may help minimize the appearance of hip dips, it’s essential to keep realistic expectations and remember that individual results may vary. Additionally, consulting a healthcare professional or a certified fitness trainer can provide personalized guidance and ensure that you are following a safe and effective approach.
Surgical treatment
there are various cosmetic procedures that can be used to enhance body contours and improve the appearance of the hips. These procedures are typically performed by licensed and experienced plastic surgeons. It’s essential to consult with a qualified healthcare professional to discuss the risks, benefits, and potential outcomes of any surgical procedure.
Some procedures that might be considered to address concerns related to the hip area include:
Fat Transfer (Fat Grafting): This involves transferring fat from one part of the body to the hips to create a smoother and more rounded appearance.
Hip Augmentation with Implants: This procedure involves the surgical placement of implants to enhance the shape and size of the hips.
Liposuction: While not specifically designed to target hip dips, liposuction can be used to remove excess fat from specific areas of the body, including the hips and thighs, to create a more contoured appearance.
It’s crucial to have a thorough discussion with a board-certified plastic surgeon who can provide detailed information about the risks, potential complications, recovery process, and expected outcomes associated with any surgical procedure. Additionally, ensuring that you have realistic expectations and understand the limitations of these procedures is important before making any decisions. Always prioritize your safety and well-being when considering any surgical intervention.
Complications of Hip Dips
Hip dips themselves do not typically cause any complications or health issues. They are a natural aspect of the body’s structure for many individuals and are not considered a medical concern. However, some individuals may experience emotional or psychological distress related to body image concerns, self-esteem, or confidence due to the visibility of hip dips.
It’s important to remember that everybody is unique and that natural variations in body shape are common and normal. Embracing and accepting one’s body is essential for overall well-being and mental health.
If you are experiencing emotional distress related to your body image, consider seeking support from a mental health professional who can provide guidance and help you develop a healthy and positive self-image. Additionally, practicing self-care, surrounding yourself with positive influences, and engaging i
n activities that promote self-confidence and self-acceptance can be beneficial.
FAQ
Can Exercise Really Get Rid of Hip Dip Condition?
Because hip sockets are caused by bony anatomy, building muscle or losing fat won’t make them go away, Mansour says. Experts point out that there really is no exercise or diet that can “fix” hip depression or fill in the indentation, no matter what you see online.
Can hip pain go away on its own?
However, hip sockets are a normal part of the body and do not cause concern. Although exercise and lifestyle can change the appearance of the body, hip depression is governed by bone shape, muscle, and fat distribution, which cannot really be changed.
How do you fill hip dips naturally?
Hip Dips: Exercises are done correct them properly, But They Will Make or provide them a good shape
At-home hip-strengthening exercises
Fire hydrant with many variations These movements target your posterior aspects of thighs, hips, and side buttocks. …
Standing kickback lunges. …
Standing side leg lifts. …
Squats. …
Standing side-to-side squats. …
Side lunges. …
Side curtsy lunges. …
Glute bridges.
step down…
What body type has hips?
Hip bulges are also known as violin hips and are most common on figure eight, A, and X-shaped bodies (but can occur on any body shape). They are a depression between the high and low pelvis, which are normal and part of the skeletal structure. They are not because you are currently wearing a waistcoat.
Which jeans hide your hips?
Which jeans hide your hips? If you want to reduce the drop in your hips, look for these features in jeans. High-waisted: Look for high-rise jeans (or even mid-rise jeans) instead of low-rise jeans. High-waisted pants draw the eye higher at the waist so the eyes don’t fall on the hips
References
- Schwartz, P. V. A. B. B., & Schwartz, P. V. A. B. B. (2022, December 12). What are Hip Dips, and How Can You Get Rid of Them? Premier Vein and Body by Schwartz. https://www.premierveinandbody.com/blog/what-are-hip-dips-and-how-can-you-get-rid-of-them/
- What Causes Hip Dips? – Art Lipo. (2022, November 4). Art Lipo. https://artlipo.com/what-causes-hip-dips/
- Vertson, A. (2023, September 25). Heard of Hip Dips? -. Intecore Physical Therapy. https://intecore-pt.com/heard-of-hip-dips/
- Nunez, K. (2019, May 23). How to Do Fire Hydrant Exercises. Healthline. https://www.healthline.com/health/exercise-fitness/fire-hydrant-exercise#alternative-exercises
- Neumann, K. D., & Seaver, M. (2023, March 8). Here’s How to Do Squats Properly, Safely, and Effectively Every Time. Real Simple. https://www.realsimple.com/health/fitness-exercise/workouts/squat-form
- Davis, N. (2019, June 18). 45 Squat Variations to Keep You on Your Toes. Healthline. https://www.healthline.com/health/squat-variations#bodyweight-squats
- Asp, K. (2023, February 8). How to Do a Lunge and Why They’re So Good for You. EverydayHealth.com. https://www.everydayhealth.com/fitness/how-to-do-a-lunge-and-why-theyre-so-good-for-you/
- Colletta, M. (2021, October 13). How to Lateral Band Walk: Techniques, Benefits, Variations. Steel Supplements. https://steelsupplements.com/blogs/steel-blog/how-to-lateral-band-walk-techniques-benefits-variations