Sacroiliitis
Table of Contents
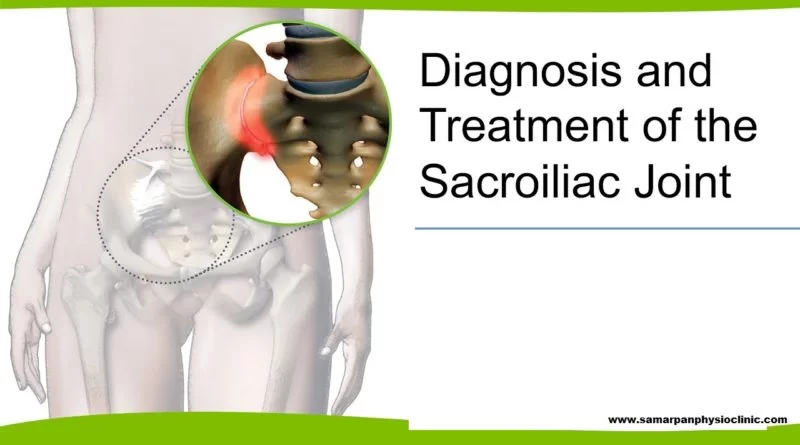
What is a Sacroillitis?
Sacroiliitis is a painful sacroiliac joint condition that affects one or both SI joints. These joints meet where the lower spine and pelvis meet. Sacroiliitis can lead to joint pain and stiffness in the lower back and gluteal area and the pain is referred to down one or both legs.
What are the Causes of Sacroillitis?
- The SI joint can become inflamed from a variety of conditions, causing significant pain.
- It is possible for osteoarthritis to lead to joint degeneration, resulting in pathological articulation and motion.
- Spondyloarthropathies, such as Ankylosing spondylitis, reactive arthritis, psoriatic arthritis, and arthritis of chronic inflammatory bowel disease, can cause significant inflammation of the joint itself. Another cause of inflammation is pregnancy, as the hormone relaxin causes the SI joint(s) to relax, stretch, and possibly widen. Additionally, the additional mechanical stress placed on the joint by pregnancy results in additional wear and tear.
- The SI joint can be damaged and stressed either directly or indirectly by trauma.
- The most common cause of acute sacroiliitis is pyogenic sacroiliitis.
- Both the posterior sacral ligaments and the synovial joint can be the source of pain.
Epidemiology
- Sacroiliac pain prevalence reports vary widely in epidemiology.
- The prevalence ranges from 10% to 25% according to some studies.
The ipsilateral buttock (94 percent of the time) and the midline lower lumbar area (74 percent of the time) were the primary sites of pain for those with a confirmed diagnosis. - Radiation to the lower extremities is present in up to 50% of cases: 6% to the upper lumbar region, 4% to the groin, and 2% to the lower abdominal region.
Over 90% of patients with ankylosing spondylitis and 2/3 of those with reactive and psoriatic arthritis suffer from symmetrical sacroiliitis. - In reactive arthritis, psoriatic arthritis, arthritis of CID, and undifferentiated spondyloarthropathy, it is less severe and more likely to be unilateral and asymmetrical.
- Sacroiliac diseases are found in hospitals at a rate of 0.55%, with a mean age of 25,58 years and a predominance of women (82.35%). The most common risk factors are gyneco-obstetric events (47,05 percent). Osteoarthritis (11,7 percent), pyogenic bacterial arthritis (70,58 percent), and ankylosing spondylitis (5,9 percent) were the etiologies identified (82,3 percent).
Symptoms of Sacroiliitis
- Sacroiliitis symptoms can vary. Sacroiliitis patients frequently complain of pain in their buttocks, midline lower lumbar area, or both. Up to 50% of people may experience pain that spreads to the lower extremity.
- The following can exacerbate sacroiliitis pain:
Standing for an extended period of time, putting more weight on one leg than the other, climbing stairs, running, or taking long steps to diagnose the condition. A medical history, including any previous inflammatory conditions, will be taken.
Diagnosis
- Additional tests include:
Physical examination and movement test The spine is checked for alignment and rotation, and a variety of physical movement tests are done. - Blood tests: seeking evidence of inflammation.
- Tests for images: Ordering X-rays, CT scans, or MRI scans may be necessary.
Injection of steroids: If steroids are injected into the sacroiliac joint, they can be used as a treatment as well as a diagnostic test. - Outcome Measures Roland-Morris is more suitable for mild to moderate disability, while the Oswestry Disability Index (ODI) is best suited for persistent, severe disability.
- The Assessment of Pain and Occupational Performance and the Short-Form McGill Pain Questionnaire may also be useful.
Examine
- The pelvis should be rotated and aligned properly; an inspection may reveal pelvic asymmetry. A difference in leg length can be ruled out by measuring the limbs. Examine the spine for any abnormal rotational or curvature features.
- Exceptional provocative tests can be extremely useful in repeating the patient’s aggravation:
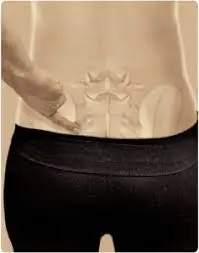
Fortin Finger Test
- The Fortin Finger Test is used to identify dysfunction in the sacroiliac joint.
Low back and lower limb pain can be caused by problems with the sacroiliac joint. Although sacroiliac joint pain is thought to be localized from the buttock to the upper thigh, the primary location of pain would be around the SIJ, which the patient can indicate with a finger. - Technique: Ask the patient to indicate their area of pain with one finger.
A positive test is when the patient uses one finger to twice identify the painful area as being within 1 cm of the posterior superior iliac spine (PSIS).
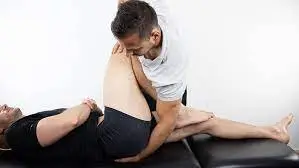
Faber Test
- Description
- A Faber (Patrick’s) Test stands for Flexion, Abduction as well as External Rotation. These 3 motions combined result in the clinical pain provocation test to help in the diagnosis of pathologies at the hip, lumbar as well as sacroiliac region.
- Clinically Relevant Anatomy
- Hip articulation is a true diarthrodial ball as well as a socket-style joint.
- Formed from a head of a femur as this articulates with an acetabulum of a pelvis. This joint serves as the chief connection between a lower extremity as well as a trunk, & typically works in the closed kinematic chain. Hence is designed for stability & weight-bearing – rather than a large range of motion.
- Motions available at a hip joint are flexion, extension, abduction, adduction, internal rotation as well as external rotation. The ligaments of a hip joint act to increase stability. It may be divided into two groups – intracapsular & extracapsular as well.
- For more detailed information on the anatomy of the hip, lumbar spine as well as Sacroiliac Joint.
- Purpose
- A purpose of the faber test is chiefly utilized to identify the presence of hip pathology by attempting to reproduce pain in a hip, lumbar spine, or sacroiliac region. This test is the passive screening tool for musculoskeletal pathologies, namely hip, lumbar spine, sacroiliac joint dysfunction, or the iliopsoas spasm.
- This test also assesses a hip, because of forces being transferred through a joint. A position of flexion, abduction, as well as external rotation, when combined with overpressure, stresses a femoral-acetabular joint & produces pain if irritated.
- In conjunction with other tests like the range of motion as well as the hip quadrant test, fabers may be a useful tool to guide practitioners on when to refer for further imaging in patients with persistent hip or groin pain.
- When the faber test is clustered, this can provide highly useful information in identifying those suffering from sacroiliac joint dysfunction. The tests a sacroiliac joint, as a horizontal abduction force goes through a femur, soft tissues under tension transfer the forces to a sacroiliac joint. Therefore, the test may indicate pathology located in a hip or sacroiliac joint.
- Technique
- A patient is positioned in the supine position. A leg is placed in the figure-4 position (hip flexed as well as abducted with a lateral ankle resting on a contralateral thigh proximal to a knee. During stabilizing an opposite side of a pelvis at an anterior superior iliac spine, the external rotation, abduction as well as posterior force is then lightly applied to an ipsilateral knee until an end range of movement is achieved. A further few small amplitude oscillations may be applied to check for pain provocation at the end range of movement. The positive test is one that reproduces a patient’s pain or even limits the range of motion.
- Interpretation
- The following findings of the positive faber test can assist to guide the clinical diagnosis;
- Sacroiliac Joint Pain on external hip rotation motion,
- Sacroiliac Joint Dysfunction,
- Sacroiliitis,
- Groin Pain on external hip rotation motion,
- Iliopsoas Strain or Iliopsoas Bursitis,
- Intraarticular Hip Disorder,
- Hip Impingement (femoral acetabular impingement),
- Hip Labral Tear,
- Hip loose bodies,
- A hip chondral lesion,
- Hip Osteoarthritis,
- Posterior Hip Pain on external hip rotation action,
- Posterior Hip Impingement.

Sacroiliac Distraction Test
- One of the special tests utilized in the Laslett SIJ Cluster testing is the Sacroiliac Distraction Test, also known as the Gapping Test. The SIJ Distraction Test, which is also called the Gapping Test, is used to support the hypotheses that an SIJ sprain or dysfunction has taken place. Tests are done on the anterior sacroiliac ligaments. This test is also known as the Transverse Anterior Stress Test and the Sacroiliac Joint Stress Test.
- Technique: The examiner applies a force to the patient’s supine position, vertically oriented, to both of the anterior superior iliac spines (ASIS).
- Note: Cook and Hegedus (2013) suggest applying a sustained force for 30 seconds before applying a vigorous force repeatedly in an effort to replicate the patient’s symptoms. However, Laslett does not suggest any timings or adjustments force.
- Due to the lack of standardization in the method, it is quite possible that different therapists will practice this test in a variety of ways. Response variability and decreased reliability between tests will result from this. Additional evidence is required because there is no evidence to suggest that either strategy is superior.
- The sacroiliac joint’s anterior aspect is likely to be damaged.
- A test is positive if it matches the patient’s symptoms. This suggests an anterior sacroiliac ligament strain or SIJ dysfunction.
- However, this test should be used in conjunction with an SIJ testing cluster to ensure maximum reliability and validity when confirming hypotheses. See the Laslett SIJ testing cluster for more details.
Sacroiliac Compression Test
- Purpose
- The Sacroiliac Joint (SIJ) Compression Test, also known as the “Approximation Test,” is a pain provocation test that places stress on the SIJ structures, particularly the posterior SIJ ligament, in an effort to replicate a patient’s symptoms.
- The examiner presses their hands over the upper part of the iliac crest as the patient lies on their side toward the floor. As it moves forward, the movement puts pressure on the sacrum. An increased sensation of pressure in the sacroiliac joints is a sign of a possible sacroiliac lesion and/or a sprain of the posterior sacroiliac ligaments. Positive outcomes are indicated by the patient’s recurrence of symptoms or pain.
- Positive results are indicated by the patient’s recurrence of symptoms or negative test pain.
Thigh thrust test
- What exactly is the thigh thrust test?
The provocative Thigh Thrust Test is used to diagnose dysfunction in the sacroiliac SI joint. Posterior Pelvic Provocation Test and Posterior Shear Test are two other names for it. - How is the Thigh Thrust Test Performed?
On the side being tested, the patient is lying in a supine position with 90 degrees of hip and knee flexion.
The examiner applied light manual pressure to the participant’s flexed knee along the longitudinal axis of the femur and stabilized the contralateral side of the pelvis over the anterior superior iliac spine (ASIS). One of the examiner’s hands cups the sacrum while the patient is supine, hip flexed to 90 degrees, and the other applies force through the femur that is directed posteriorly. - What Is the Meaning of the Positive Thigh Thrust Test actually?
When the patient felt a familiar, well-located pain deep in the gluteal area on the provoked side, the test was positive.
Sacral Thrust Test
- Purpose
- The objective of the sacral thrust test is to use a pain provocation test to diagnose sacroiliac dysfunction. The combination of other sacroiliac pain provocation tests yields reliable evidence for sacroiliac dysfunction, despite the fact that a single positive test has low diagnostic accuracy.
The exam is also known as:
Sacral pressure test
Downwards pressure test
Sacral spring test - Method
The inspector applies an anteriorly coordinated tension over the sacrum while the patient is resting for the sacral pressure test and the descending strain test. The hand that is directly on the sacrum is being supported by the other hand. The objective is to apply an anterior shear force to both sacroiliac joints as the examination bench holds the ilia in place. The test is positive if the sacroiliac region experiences additional pain.
Treatment of Sacroiliitis
- Treatment Your symptoms and the condition of your sacroiliitis determine the course of treatment.
Medical treatment
- Treatment may include the following, depending on the cause of your pain:
- Treatments for pain: Stronger versions of over-the-counter painkillers may be ordered if they do not provide sufficient relief.
- Anti-stress drugs: The muscle spasms that are frequently associated with sacroiliitis might be alleviated by taking medications like cyclobenzaprine (Amrix, Fexmid).
- TNF blockers: Ankylosing spondylitis-related sacroiliitis can often be alleviated with the help of tumor necrosis factor (TNF) inhibitors like etanercept (Enbrel), adalimumab (Humira), and infliximab (Remicade).
- Repeat corticosteroid injections if the condition does not improve by at least 50% after six to eight weeks. Start strengthening exercises like sit-ups and weighted side bends as soon as possible. Beginning with general back conditioning, gradually progress to low-impact activities like swimming or walking. Perform regular activities while taking care of your back.
Some doctors will think about radiofrequency ablation if the previous treatments don’t help enough.
Fusion of joint. Although sacroiliitis is rarely treated surgically, fusing the two bones together with metal hardware can occasionally alleviate pain.
Physical Therapy Treatment in Sacroiliitis
Aims of the physiotherapy
- Management of the physical therapist aims to reduce inflammation with ice packs and painkillers. A sacroiliac belt can also be used if the sacroiliac joint is severely inflamed.
- Utilizing mobilizations, manipulation, and exercise therapy, improve SI joint function and core strength to stabilize the sacroiliac joint.
- If hypermobility is the cause of the pain, physical therapy can be very helpful. The lumbopelvic musculature can be stabilized and strengthened with therapy. Physical therapy can help increase SI joint mobilization if immobility is the cause of the pain. The following methods can be used, depending on the diagnosis.
- Heat, cold, or alternating cold and heat are effective pain relievers in the early stages of treatment.
Belt SI
- In the early stages, a pelvic girdle or belt can be used for exercise and daily activities. In hypermobile patients, these SI belts reduce SI mobility and provide compression. The belt ought to be positioned anteriorly below the superior anterior iliac spines and posteriorly across the base of the sacrum. When this condition becomes chronic (10 to 12 weeks), this belt may also be utilized.

Flexibility Training
- The patient can begin flexibility and stabilizing exercises once the acute symptoms are under control. Stretching is the most important form of exercise for keeping SI and lowering back flexibility. With the intention of stretching the paraspinal muscles, the gluteus muscles, and the SI joint, these exercises include side bends, knee-chest pulls, and pelvic rocks.
- These types of exercises ought to be started once the hyperacute symptoms have subsided. Sets of 20 are performed for each stretch. The patient’s level of mild discomfort during these exercises should never be exceeded.
Exercises for stabilization
- Patients with sacroiliac joint dysfunctions may benefit from specific pelvic stabilizing exercises, postural education, and training of the trunk and lower extremity muscles. See core strengthening Following rehabilitation, low-impact aerobic activities like water aerobics and light jogging are chosen to prevent a recurrence.
- Correcting the underlying defect would be the most reliable treatment option in the event that the patient has a difference in leg length or an altered gait mechanism. Spondyloarthropathies also frequently present with sacroiliitis. This condition should also be treated in this case.
Core Stability Exercises
- This exercises have been shown to be effective in treating sacroiliac pain, making them an essential part of any program.
- Introduction
Our core stabilizes the trunk while the arms and legs move during functional movements, making it the center of our bodies. This perspective reveals that the core actually consists of the following: - Muscles that keep the hips in place.
The system of muscles that make up the torso (on the sides, back, and front of the body)
muscles that keep the shoulders in place. - The function of the core: protecting the spine from excessive load and transferring force from the lower to the upper body and back again, is what drives its significance.
- We can perform at our best and prevent injuries by having a strong, stable core.
To safeguard the back, preferably we need to make 360 levels of firmness around the spine as we move, run, bounce, toss, lift items, and move forces all through our body.
This is accomplished when the muscles in our shoulders, hips, and torso work together.
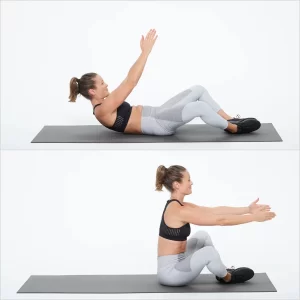
Crunch Exercise
- The best form of core strengthening is the crunch exercise. The abdominal muscles, which are a part of the core, get the majority of the training here.
- Additionally, the exercise strengthens the muscles in your pelvis, lower back, and hips as well as the oblique muscles on the sides of your trunk. In general, these muscles help keep the lower back stable.
- How to Complete the Crunch Exercise:
- To begin, lie down on the back in the supine position using the Soft MAT. After that, stand with your feet hip-width apart on the ground. After that, put your arms behind your heads and bend your knees. After that, inhale as well as raise the head and shoulders toward the left knees.
- Return to your normal position after exhaling. Maintaining the normal position of the head and neck, lift the upper body once more towards the right knee.
- Relax once more before resuming your embarking position.
Oblique crunch
- This crunches can help you tone your abdominal muscles and strengthen your core. By keeping the fingertips on the back of the head, rolling the knees to one side, and bringing one side up at a time to meet the knees on the opposite side, work on maintaining proper form.
- By synchronizing your breathing while performing the exercise, adding more repetitions, or raising your legs off the ground, you can make your oblique workout more intense. Increasing your core strength and lateral stability through oblique crunches can help prevent back injuries.
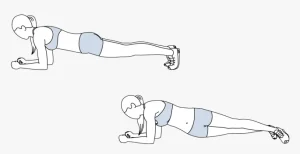
Plank Exercise
- This exercise aids in body stability, balance, and strength development alongside virtually every other activity. A stability test and core muscle strength test can both be based on the plank exercise. A plank is more of a back exercise that builds strength.
- How to Perform the Plank Exercise:
- You can begin by lying face down on a soft mat in a plank position with your forearms and toes touching the ground. Your forearms are facing forward, and your elbows are under your shoulders. The head is loose and you might be checking the floor out.
- Draw your navel in toward the spine as you make contact with the abdominal muscles. After that, maintain a straight and rigid torso and a straight body from your ears to your toes without sagging or even bending. The neutral spine position is this one. Make sure the shoulders are not rising toward the ears. Your heels might be higher than the balls of your feet.
- On the first day, hold the action for seven to ten seconds before gradually increasing it to thirty to forty seconds. The majority of the time, exercise may be painless.
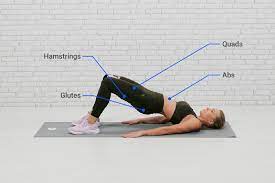
Bridging Exercise
- This exercise helps strengthen the glutes muscle in conjunction with the hamstrings, lower back muscles, and abdominal muscles.
- Additionally, this bridging exercise is essential for strengthening the back’s core muscles. The glute bridge has many advantages that are comparable to those of the squat, including the fact that it does not put any pressure on the lower back. It is also an important exercise for people who can’t squat because they have back, hip, or knee pain.
- How to perform this mild strengthening exercise:
- First, lie on your back on the mat in a supine position with your knees bent. Then, lift your hips off the ground until your hips and shoulders are aligned with your knees.
- The next step is to hold for 10 to 15 seconds, then return to the embarking position and repeat. 6 to 7 repetitions on the first day, 10 to 11 repetitions on the second day, and gradually increase the number of repetitions based on stamina.
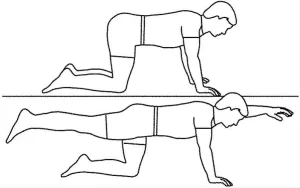
Bird dog
- Muscle Group of the Bird Dog
- Type of Erector Spinae: enhancing Mechanisms: Equipment for a compound: Mat for exercise Difficulty:
- How to perform this strengthening
- Bird Dog Exercise for Beginners or Intermediates Now for the fun part. Performing this strengthening exercise is outlined in detail here.
- First things first, get on your hands and knees so that your knees are under your hips and your hands are under your shoulders.
- Then, keep your spine straight by extending your torso in all directions while keeping your head neutral and looking down at the ground.
- After that, firmly press into the floor and feel the shoulder blades move downward and away from one another. Check that the core is secure.
- With the palms facing inward and the thumbs elevated, raise one arm straight out in front of you.
- After that, raise the other side leg behind you and flex the toes until they are pointing down. You long to draw a straight line from your fingers to your toes. You’ll get a picture, even though the line won’t be perfectly straight.
- Repeat with the opposite hand and leg after remaining in the position for five to six seconds. During a session, perform this strengthening exercise ten times. Do the exercise twice or even three times per day.
Superman exercise
- Anyone of any fitness level can do the superman exercise, which is both efficient and effective. It works your abs, glutes, hamstrings, and lower back muscles.
- In addition, it works in conjunction with other core exercises like situps and leg raises, which primarily target the front abdominal muscles.
Having said that, you might be wondering how to perform it correctly and safely to ensure that you are targeting the appropriate muscles without injuring yourself.
The benefits of the superman exercise, how to perform it, and some common blunders are discussed in this article.
If you add this exercise to your fitness routine, even if you don’t become a superhero, you will definitely have a super strong core. - How to Perform the Superman Exercise Today, you can Perform the Superman Exercise with Ease.
- How to do it:
- With your arms extended in front of you and your legs straight, lie on the floor prone (face down).
Maintaining a neutral head position and avoiding looking up, slowly lift your arms and legs approximately 6 inches (15.3 cm) off the ground, or until you feel your lower back muscles contract. Engage simultaneously your core, glutes, and muscles between your shoulder blades. - To tighten your abs, aim to lift your belly button slightly off the floor. Imagine yourself as Superman and flying through the air to get a good idea of this.
Keep this position for two to three seconds. Ensure that you are breathing throughout.
Gradually lower down to the floor with your arms, legs, and belly. Perform this exercise for two to three sets of eight to twelve repetitions.
Tabletop leg press
- How to Perform
- A Tabletop Leg Press This exercise is great for strengthening your legs.
- To obtain started, all the patient needs is the yoga mat. Lay on your back with your arms at your sides and the yoga mat on the ground.
- Place your back on a mat, knees bent, and feet flat on the ground to begin. The shoulders may be in a relaxed, neutral position. Inhale.
- As you exhale, raise one leg, enlarging the ribs and contracting the abdomen. With the knee bent over the hip and the thigh straight up, you want the shins to be in line with the knee and at 90 degrees to the ankle.
- Reach the same position with the other leg.
- Holding this position for more than five seconds, inhale and exhale.
- As you exhale, slowly lower each leg back to the ground.

Straight leg raise (SLR)
- Instructions for performing this strengthening exercise:
- Begin by lying on your back with one leg bent and the other straight.
- From that point onward, do a back pelvic slant to shield your back from injury.
- The next step is to raise your leg about 45 degrees while keeping your knee straight and pointing your toes toward the roof.
- Lower your leg back to the ground gradually.
- Two to three times in a set, repeat ten to fifteen times (repeats).

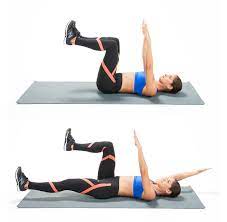
Hundreds
- Lie on your back with your arms at your sides and your legs straight. After that, raise both legs until the hips and knees are at a right angle. Straighten your arm a few inches above the ground. Keep your back flat and your legs and hips completely still.
Stability Ball Crunches
- How to Perform Stability Ball Crunches Standing on the stability ball, walk forward with your feet so that your thighs, neck, and shoulders are parallel to the ground. Put your hands behind your head while you relax your neck. Lift your shoulder blades off the ball with your core engaged, stopping when your body is at a 45-degree angle.
- To avoid putting too much stress on your neck, keep your gaze directed toward the ceiling or sky. After a brief pause, slowly bring your upper body back down. Since speed is not important in this movement, the slower the better. Ten times, do this.
Stability Ball Y-T Extensions
- How to Use Stability Ball Y-T Extensions:
- With your legs straight behind you, lie on a stability ball with your chest up. Cover your feet with your toes. Your head should be in a neutral position and your body should be in a plank.
- With your arms hanging down from your shoulders but not touching the ground or the ball, keep your core, glutes, and back engaged. Now, raise your arms up and straight overhead, making a “Y” with your body. Then, lower your arms. After that, raise your arms so that they are pointing straight out from your sides, creating a “T” shape with your body. Then, lower your arms.
- Ten times, go over each letter.
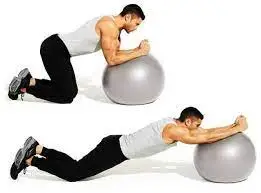
Roll-Out Stability Balls
- How to:
- With your toes tucked under your feet, kneel on the ground to begin. You should have the stability ball in front of you. Make a 90-degree angle with your arm by placing your forearms on the ball. Start on your toes and roll forward so that you are in a plank position and balanced on the ball.
- From your head to your heels, your body should be straight. Hold for one second, then slowly roll back to the starting position by bending your knees. Ten times, do this.
Stability Ball Glutes Bridges
- How to:
- Stability Ball Glutes Bridges With your feet flat on the ground, sit on the stability ball. Roll your back onto the ball as you walk with your feet pointing forward, supporting your upper back and shoulders with the ball.
- Lift your glutes off the floor and squeeze them. While you hold for two seconds, your shoulders and back should still be supported by the ball. After lowering your hips to the ground, squeeze and raise your glutes once more. Ten times, do this.
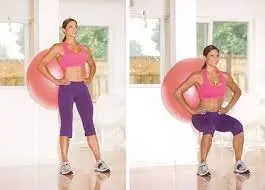
Stability Ball Squats
- How-To:
- Stability Ball Squats Place a stability ball between a wall and your lower back while standing. Standing tall with your shoulder blades pulled back, you should have your back to the wall. Lean against the ball with your heels supporting the weight.
- Slowly lower into a squat position with your hands on your hips until your knees are bent at a 90-degree angle and your thighs are parallel to the ground. As you drive through your heels to stand, squeeze your glutes and work your quads, hamstrings, and core. Ten times, do this.
Rolling like a ball
- Rolling exercises not only work the abs deeply and stimulate the spine, but they also help you tune into the inner flow of your body’s movement and breath. You will discover your natural balance point and learn to control your movement. You are going to give yourself a back massage, which could help you relax.
- How to perform this exercise for strengthening:
- First, sit on the mat and clasp your hands just above your ankle over your shins.
- The next step is to widen your back, deepen your abdominals, drop your shoulders, and create a nice curve in your spine. However, do not crane your neck; Keep your eyes on the navel and duck your chin slightly because your neck is part of the long curve.
- After that, take your feet off the mat and balance on your sit bones or just behind them.
- Inhale: To get going, you can roll back on the inhale and pull the lower abs in and up. After that, only roll to the shoulders. Roll away from a neck.
- Pause.
- Exhale: You can maintain a curved spine and a deep scoop. To come back upright, use the exhale as well as your abdominals.
- In a single session, repeat five to six times.
Butterfly sit up
- Perform the butterfly sit-up approximately twice to three times per day.
- How to perform this strengthening exercise:
- Sit on the ground and press your feet together to begin. Next, locate a cozy spot where you can sit while working out, such as a yoga mat or padded gym floor. Then, like butterfly wings, press the soles of your feet together while keeping your knees bent to the sides.
- Your feet should then be firmly planted on the ground and you can embark by performing standard sit-ups or even crunches. The feet are pressed together at the soles when doing butterfly sit-ups.
- The heels of your feet will then be at least one foot (12 inches) in front of your hips.
- In the event that you can’t press your feet together yet, work on extending and opening up your hips consistently so you become more adaptable. An exercise will be easier for you to do if you are more flexible.
- Ten times a session, perform this strengthening exercise. Try doing two to three sessions each day.
Dead bug
- Since dead bug exercises are performed on the ground, you’ll need about the same amount of space as a yoga mat. Also, for comfort, you might want to use a yoga mat or another kind of exercise mat.
- How to perform this exercise for strengthening:
- First, lie on a mat with your arms straight over your chest, making a perpendicular angle to your torso. Lift your feet off the ground while bending your knees and hips 90 degrees. Your thighs and shins, as well as your torso, ought to form a right angle. It’s the starting point.
- Engage your core and keep your lower back in contact with the mat. During an exercise, you may need to ensure that the spine remains in a neutral and steady position.
- Then, while simultaneously extending your right knee and hip and reaching your right heel toward the ground, keep your right arm and left leg exactly where they are and gradually move your left arm backward, over your head, and toward the ground. As you perform the extensions, move slowly and steadily, inhaling as you go, and try not to twist your hips or move your abs. Just as your arm and leg are about to touch the ground, stop the motion.
- Return your left arm and right leg to their embarking positions as well as the motion in the opposite direction. Exhaling as you go, move slowly and steadily.
- Perform ten sets of each side each session. Simply return your feet to the floor and sit up after completing a set.
C-curve
- Step-by-Step Instructions for the C-curve:
- First things first, sit with your feet flat on the ground and your knees bent. Start with a straight, tall spine and draw your abdominals in and up. The shoulders are relaxed and the top of the head is reaching for the sky.
- The next step is to put your hands behind your knees and raise your elbows up and out. Feel what’s going on in your abdominals by taking a few deep breaths here. Your abdominal wall will slightly expand as you inhale. Draw your waistline in and upward as you exhale, growing even taller.
- After that, take another breath in and exhale while pulling your abs in to form the deep scoop. Make it appear as though the person behind you has the string attached to your belly button.
- Feel a string pulling your belly button back through your spine and up toward the top of a wall behind you as you exhale. Maintain a long neck, relax your shoulders, and let your hips curl below you as the abdominals move closer to the spine to open the lower back. Make sure not to collapse as you make the curl deeper. Instead, create a high hollow C-curve rather than a low shallow one by lengthening up and out.
- Hold a position at the lowest point, the deepest. Watch what happens when you breathe by lowering your gaze to your abdominals. Pull even deeper into a curve while taking two to three deep breaths in and out. Pull your abs in strongly with each exhalation.
- To return to sitting after the third breath, round up and over your legs. Before rolling up and resuming your starting position in an upright position, go through the sequence at least twice more.
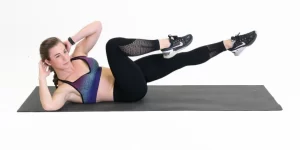
Bicycle crunch
- This twist on the classic exercise targets your hips, rectus abdominis, and obliques.
- Take off with your back to the ground and your left knee bent and pointing in the direction of your chest. Maintain a slight lift off the ground with your right leg while remaining straight. Place your hands behind your neck or on the lower part of your head after that. During this step, be careful not to pull on your neck.
- Lift the right shoulder off the ground and move your right elbow toward the left knee while keeping your right leg straight and your left knee bent.
- Extend the left leg while bending the right knee and bringing it close to the chest as the person brings the right shoulder back to the floor.
- Lift your left shoulder off the ground and move your left elbow close to your right knee as the affected knee moves inward.
- Begin by performing ten to fifteen alternate repetitions in one to two sets. With three sets, you can increase the number of repetitions to thirty when you are comfortable with fifteen.

Stabilization Exercises
- In order to isolate the co-contraction of the local muscle system—which occurs without global muscle substitution—during the lumbar exercises, awareness is required.
- The specific isometric co-contraction of two important core stabilizers must be trained: the lumbar multifid and the transversus abdominis muscle. Training these muscles at low levels of maximal voluntary contraction is necessary. When performing weight-bearing exercises, it is essential to maintain neutral lordosis and controlled respiration.
- It is critical to keep the following principles in mind: Breath in and out, then slowly and carefully tighten the lower abdomen below the umbilicus without moving the upper stomach, back, or pelvis to the point of hollowing.
- The physiotherapist may also feel a bulging of the multifidus muscle. To ensure efficient muscle activation, precise muscle palpation is required.
Isolated Lumbar Stabilizing Muscle Training
- It is recommended to begin in a quadruped position specifically for stabilization exercises. The spine can be manually guided through the entire flexion and extension arc by the physiotherapist.
- Tilting the pelvis posteriorly is essential for hollowing out the abdomen and tucking in the chin. Lift one arm slowly while keeping the spine in a neutral position and not altering the natural curves of the spine; After returning the arm, proceed with the other.
Both sides can feel the lumbar multifidi medially to the lumbar facet joints; This allows the physiotherapist to ensure that the patient is doing the exercise correctly by avoiding changes in the activity of the long spinal extensor muscles. - It is essential to simultaneously activate the musculus transversus abdominis and multifidus in sitting and standing positions, as well as while performing stepping and balance activities.
- Integration of lumbar stabilization into Light Dynamic Functional Tasks To improve lumbopelvic control, perform the following individual stabilizing exercises while seated on an unstable support base and co-contracting the transverse abdominis and multifidus muscles: co-contractions allow for hip extension, lumbar spine extension, and thoracic spine extension. These co-contractions can also be done while walking or doing other things you do every day.
- Integrating Lumbar Stabilization into Heavy-Load Dynamic Functional Tasks The following isometric co-contractions should be performed with heavier external loads placed on the lumbar spine: quadrupeds have bridging and single-leg extension.
- With alternating arm/leg extensions, quadrupedal single-leg extensions can present additional difficulty.
Single-leg and bilateral bridging exercises can be performed with the lower extremities on an unstable base of support like a Swiss ball to increase their complexity and load. - Last but not least, single-leg bridging with alternating lower extremities on an unstable support base is one exercise that can help improve coordination. On the Swiss ball, alternating the stabilizing lower extremity further challenges coordination and balance while strengthening the core musculature’s stabilization capabilities.
- Co-contraction of the multifidi and transverses abdominus muscles is essential during these exercises.
Manipulation
- This therapy in the treatment of sacroiliac joint (SIJ) syndrome is best approached by a multidisciplinary team, and the program may include techniques like manipulation. Manual therapy and exercise therapy are two forms of conservative treatment.
- During treatment, it is essential to identify and address the underlying causes of dysfunction. SIJ manipulation and lumbar manipulation both have evidence.
- Patients diagnosed with SIJ syndrome experience significant reductions in pain and functional disability following the application of each of these manual therapy techniques. Patients with SIJ syndrome may benefit from manual spinal thrust manipulation as part of their treatment.
- SIJ Manipulation
The patient is lying on his back, and the therapist is standing on the side that needs to be manipulated. The therapist moves the patient passively into side bending to end range toward the target side after the patient places his hands behind his head. After that, the therapist gives the Anterior Superior Iliac Spine (ASIS) a quick thrust that goes posterior and inferior. - Lumbar Rotational Manipulation: The patient lies on their side unaffected, and the therapist stands opposite them and flexes their hip until the lumbar spine is flexed. In order to stabilize the patient, the therapist moves him into left trunk side bending and right rotation until motion is felt at the desired lumbar spine segment.
- The patient’s arms are raised above the therapist’s. The patient is rolled toward the therapist while remaining in this position. The other arm of the therapist is used to apply an anterior high-velocity, low-amplitude thrust to the pelvis.
- Posterior Iliac Rotation Sacroiliac Joint Manipulation
- This method aims to restore posterior ilium rotation and manipulate an iliac anterior rotation displacement sacroiliac joint dysfunction. The patient faces the therapist while lying on his side. The therapist touches the ASIS with one hand and the ischial tuberosity with the other. The other leg is somewhat extended, and the top hip is flexed to 90 degrees.
- Pull the patient’s bottom arm in an anterior and superior rotation as you rotate the spine until it reaches the level of the L5-S1 segment. The other hand on the ASIS push from the front, while the first pushes from the back. Maintaining this for 10 to 30 seconds is required.
- Anterior Iliac Rotation Sacroiliac Joint Manipulation
The goal is to restore anterior ilium rotation by manipulating a posterior iliac rotation displacement. A pillow is placed under the patient’s pelvis as he lies prone. - The advisor upholds the thigh simply over the knee. The opposite hand is pushing anterolaterally on the ipsilateral PSIS (Posterior Superior Iliac Spine) to stabilize the ilium.
- The fingers of the therapist ought to be pointing toward the patient’s feet. The therapist then positions the patient and brings the leg above the table into hip extension just enough to fill in the hip flexor slack. Holding this position with the knee extended or flexed for ten seconds is recommended.
Stabilization
Pelvic Belt
- The transversus abdominis (and obliquus internus abdominis) muscle’s activity is comparable to that of a pelvic belt’s tension. With its anterior attachment to the iliac crest and stiff dorsal sacroiliac ligaments, the transverse abdominal is ideal for acting on the ilium and compressing the SIJ.
- According to Richardson et al., the stability of the pelvis can be achieved by contracting the transversus abdominis to a minimum of 30-40% of its maximum voluntary force. Because the lever arm of the transversus abdominis is nearly equivalent to the lever arm of the pelvic belt, joint stabilization requires no additional contraction. In addition, increasing the belt tension from 50 to 100 N does not significantly alter stability; however, if the belt is positioned too low, it may cause a slight decrease in laxity. Due to the possibility of skin pressure and discomfort, using a belt with a higher tension is not recommended.
- The laxity of the sacroiliac joint decreases when the pelvic belt is worn. The belt’s position is to blame for the disparity in laxity. The high position, which places the pelvic belt just below the anterior superior iliac spines, is better than the low position, which places it at the top of the pubic symphysis. The SI-joint’s stability, on the other hand, is unaffected by the belt’s tension.
- Sacroiliac Binder: The sacroiliac belt should be worn 24 hours a day for six to twelve weeks when it is appropriate to use it for a hypermobile SI joint. In cases of joint dysfunction and muscle imbalance, this belt should be used in conjunction with manual therapy and exercise. Once the patient has better control over the lumbopelvic musculature, the belt can be taken off. To help stabilize and support the pelvis, the sacroiliac belt should be at the superior aspect of the PSIS.
FAQs
Inflammatory spine arthritis and sacroiliitis are linked. Autoimmunity, microtrauma, exercise, and occasionally infections may all contribute to the inflammation. Crohn’s disease, inflammatory bowel disease, ulcerative colitis, and gout can all be linked to sacroiliitis.
It’s rare for sacroiliitis to go away on its own. Acute cases may occasionally resolve on their own with rest, but most will require treatment. If your symptoms do not improve after a few days of rest and over-the-counter painkillers, it is best to schedule an appointment as soon as possible.
Unless you have an infection that is causing it, sacroiliitis is not life-threatening. Go to the emergency room right away if you experience any signs of infection, like a fever or confusion.
Your doctor may be able to alleviate your SI joint pain, but a few simple moves at home may also be beneficial. It helps to be active but start slowly, by walking, swimming, or riding a stationary bike for a few minutes each day. Increase your exercise time to 20 or 30 minutes at a time if your pain level does not rise.
Because lying on your back relieves pressure on the SI joint, it can be helpful. Putting a cushion under your legs can likewise assist with letting some free from the strain on the SI joint. Sleep on a mattress that is both supportive and not too soft or hard.