KT TECHNIQUE FOR ANKLE SPRAIN
Table of Contents
Introduction:
- Elastic therapeutic tape, also called kinesiology tape or kinesiology therapeutic tape is an elastic cotton strip with an acrylic adhesive that is purported to ease pain and disability from athletic injuries and a variety of other physical disorders.
- Kinesiological tapping is a rehabilitative cum protective use of stretchable kinesiological tapes to provide reduction of
- reduction of pain
- enhancing performance
- preventing injuries
- support to the joint
- repositioning of structure
- facial and ligamentous correction.
- It facilitates the healing process while providing full ROM with support to the joints suppotive structure as well as mobilization effects.
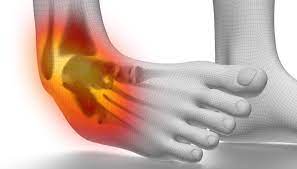
- A sprained ankle is an injury that occurs when you roll, twist, or turn your ankle in an awkward way. This can stretch or tear the tough bands of tissue
- (ligaments) that help hold your ankle bones together.
- Ligaments help stabilize joints, preventing excessive movement. A sprained ankle occurs when the ligaments are forced beyond their normal range of
- motion. Most sprained ankles involve injuries to the ligaments on the outer side of the ankle.
- Treatment for a sprained ankle depends on the severity of the injury. Although self-care measures and over-the-counter pain medications may
- be all you need, a medical evaluation might be necessary to reveal how badly you’ve sprained your ankle and to determine the appropriate treatment.
Anatomy of ankle sprain:
- An ankle sprain occurs when the strong ligaments that support the ankle stretch beyond their limits and tear.
- Ankle sprains are common injuries that occur among people of all ages. They range from mild to severe, depending upon how much damage there is to
- the ligaments.
- Most sprains are minor injuries that heal with home treatments like rest and applying ice. However, if your ankle is very swollen and painful to walk on
- or if you are having trouble putting weight on your ankle at all, be sure to see your doctor.
- Without proper treatment and rehabilitation, a more severe sprain can weaken your ankle making it more likely that you will injure it again.
- Repeated ankle sprains can lead to long-term problems, including chronic ankle pain, arthritis, and ongoing instability.
- Ligaments are strong, fibrous tissues that connect bones to other bones. The ligaments in the ankle help to keep the bones in proper position and
- stabilize the joint.
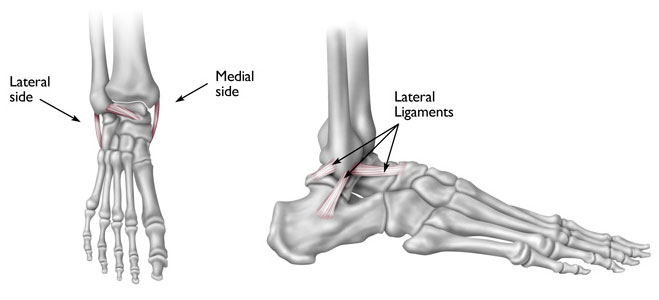
- Most sprained ankles occur in the lateral ligaments on the outside of the ankle. Sprains can range from tiny tears in the fibers that make up the ligament
- to complete tears through the tissue.
- If there is a complete tear of the ligaments, the ankle may become unstable after the initial injury phase passes. Over time, this instability can result in
- damage to the bones and cartilage of the ankle joint.
Ankle sprain causes :

- An ankle sprain often occurs when the foot suddenly twists or rolls, forcing the ankle joint out of its normal position. During physical activity,
- the ankle may twist inward as a result of sudden or unexpected movement. This causes one or more ligaments around the ankle to stretch or tear.
- Some swelling or bruising can occur as a result of these tears. You may also feel pain or discomfort when you place weight on the affected area.
- Tendons, cartilage, and blood vessels might also be damaged due to the sprain.
- Ankle sprains can happen to anyone at any age. Participating in sports, walking on uneven surfaces, or even wearing inappropriate
- footwear can all cause this type of injury.
- Ankle — Walking or exercising on an uneven surface, landing awkwardly from a jump
- Knee — Pivoting during an athletic activity
- Wrist — Landing on an outstretched hand during a fall
- Thumb — Skiing injury or over extension when playing racquet sports, such as tennis
- Children have areas of softer tissue, called growth plates, near the ends of their bones. The ligaments around a joint are often stronger than these growth
- plates, so children are more likely to experience a fracture than a sprain.
Symptoms :
- Signs and symptoms will vary, depending on the severity of the injury, and may include:
- Pain
- Swelling
- Bruising
- Limited ability to move the affected joint
- Hearing or feeling a “pop” in your joint at the time of injury
Risk factors:
- Factors contributing to sprains include:
- Environmental conditions. Slippery or uneven surfaces can make you more prone to injury.
- Fatigue. Tired muscles are less likely to provide good support for your joints. When you’re tired, you’re also more likely to succumb to forces that could
- stress a joint. Poor equipment. Ill-fitting or poorly maintained footwear or other sporting equipment can contribute to your risk of a sprain.
Grades of ankle sprain:
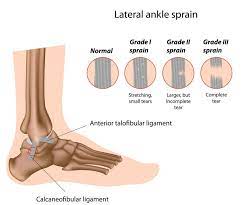
Grade 1 Sprain (Mild)
Slight stretching and microscopic tearing of the ligament fibers
Mild tenderness and swelling around the ankle.
Grade 2 Sprain (Moderate)
Partial tearing of the ligament
Moderate tenderness and swelling around the ankle
If the doctor moves the ankle in certain ways, there is an abnormal looseness of the ankle joint.
Grade 3 Sprain (Severe)
Complete tear of the ligament
Significant tenderness and swelling around the ankle
If the doctor pulls or pushes on the ankle joint in certain movements, substantial instability occurs.
Two types of tapping techniques:
- kinesio tapping : Kinesio Taping Method is a therapeutic tool utilised by the rehabilitation specialists in all programs
- (paediatric, geriatric, orthopaedic, neurological, oncology, and others) and levels of care (acute care, inpatient rehabilitation, outpatient, home care and Day Rehab).
- The idea of using elastic tape to mimic the therapist’s hands was first presented by Dr Kenzo Kase in the 1970s. Since then it became the modality used
- in pain management, soft tissue injury, tissues and joints malalignment, oedema, and more.
- Rigid tapping : Rigid tapping also known as athlet tapping. Mainly Useful in Joint Injuries, Such as sprains, or conditions that need rest, support and immobilization to facilitate healing of tissues.
eg.Muscle Pull,Strain,Sprain, Ligament Laxity, Subluxation Of Weak Joint. They include regular white cloth athletic tapes and brown tapes. The white athletic tapes are commonly used for Preventive Measure purposes whereas the stronger brown tapes are designed for specific taping techniques, like joint realignment, deformity corrective measures etc.
KT for ankle sprain:
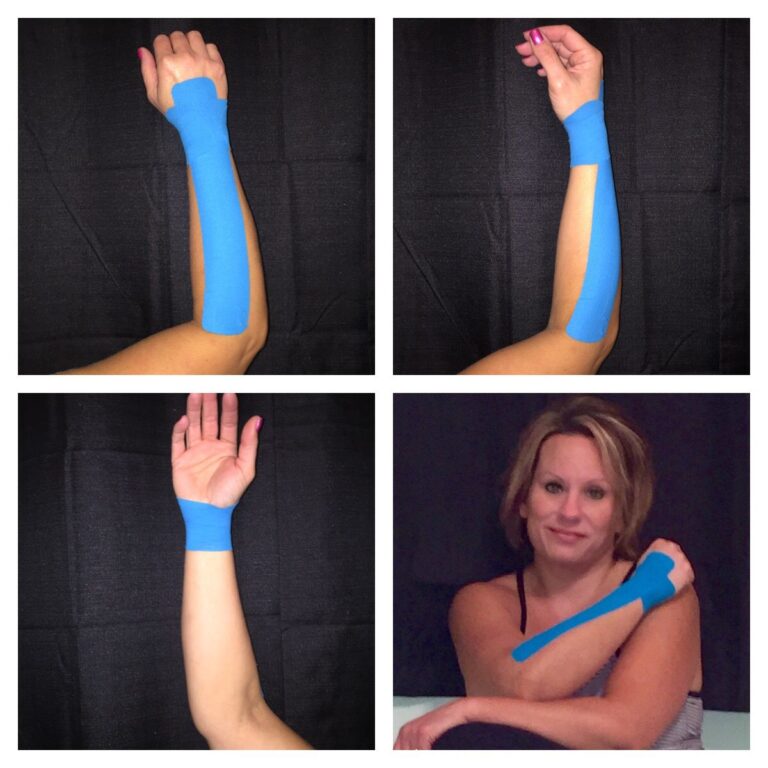
- Kinesiology tape for your ankle sprain may be one option that your physical therapist uses to treat your condition .
- Kinesiology taping, also known as K-tape, is a treatment that can be used to decrease your pain, inhibit muscle spasm, or facilitate the correct muscle
- contraction of your elbow and wrist muscles.
Application of KT :
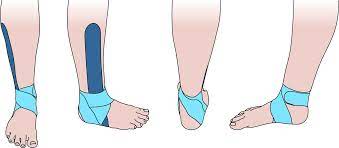
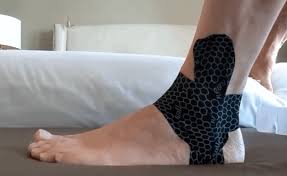
- 1. Ask the patient to adopt a long sitting position and place a towel or pillow under the calf to raise the leg.The patient then dorsiflexes their ankle and everts their foot.Once the patient is holding this position, apply an I strip from the medial side ,just above the medial malleolus with 100% stretch of the tape as this will promote stability. Continue under the foot and finish on the lateral side just above the lateral malleolus. Make sure that the lateral ligaments are covered.
- 2. Apply another I strip from the medial side of the calcaneus in a transverse direction and guide the tape posterior to the calcaneus, so that the tape flows under the planter surface of the foot.Apply 50% stretch to the tape and finish on the dorsal surface of the foot.
- 3. Repeat the same technique,but this time apply an I strip from the lateral side and, as the tape comes under the planter surface , apply 50% stretch to the tape and finish on the dorsal surface of the foot. These two strips have a similarity to what is called a figure 8 lock technique.
Application of rigid tapping :
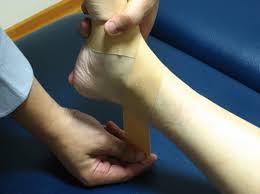
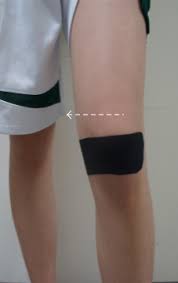
- Anchor: Place a strip of tape around the lower 1/3 of the shin. This should be applied gently to prevent circulatory problems and is used as a fixation point for the other ankle taping techniques.
- Stirrups: Keeping the foot and ankle in a neutral position (foot and toes pointing vertically upwards), start the tape at the level of the anchor on the inner aspect of the ankle and lower leg. Begin this taping technique by following the black arrows and conclude this taping technique at the level of the anchor at the outer aspect of the ankle and lower leg by firmly following the white arrows . Do 2-3 stirrups just slightly forwards and backwards of each other depending on the amount of support required.
- Figure-of-6’s :Keeping the foot and ankle in a neutral position, start the tape at the level of the anchor on the inner aspect of the ankle and lower leg. Begin this taping technique by following the black arrows (figure 4) and conclude this taping technique by firmly following the white arrows to the inner aspect of the ankle . Do 1-3 Figure-of-6’s slightly forwards and backwards of each other depending on the amount of support required.
How to remove :
- So now you’ve got your tape on and you’ve gotten that extra support during your chosen sporting activity, it’s time to take it off,
- so let us ease the process of removing kinesiology tape for you The best tip we can offer when it comes to removing your kinesiology tape is to peel the skin from the tape, not the tape from the skin.
- But in terms of the actual process, firstly make sure you’re removing the tape in the same direction as the growth of the hair underneath it, and whatever you do don’t rip the tape off like a plaster!
- Start slowly, folding the corners of the edge back gradually, ensuring that you’re laying the removed tape on the back of the applied tape, as opposed to pulling the tape above and away from your arm.
- As you’re peeling off the tape, hold your skin down with your other hand and either tap it or pull it gently in the opposite direction of the tape.
- This helps the skin and the tape to separate more efficiently but with no discomfort.
- If the tape has been applied over a particularly hairy part of the body, it helps to press down on the tape as you are peeling it off, as the pressure helps avoid further pain.
- It’s wise to have shaved the area before applying the tape but, as this isn’t always practical, taking this precaution will be necessary to some.
- Need a little extra assistance? Apply oil directly onto the tape, rub it in and wait around 10 to 20 minutes before removing it slowly.This will help reduce the stickiness of the tape and make it easier to remove