TAPING TECHNIQUE FOR LATERAL COLLATERAL LIGAMENT TEAR
Table of Contents
Introduction:
Taping for lateral collateral ligament tear is most used technique to relive pain and further support to the injured ligament.This is most effective and supportive treatment.It is give static as well as dynamic support to the injured knee.
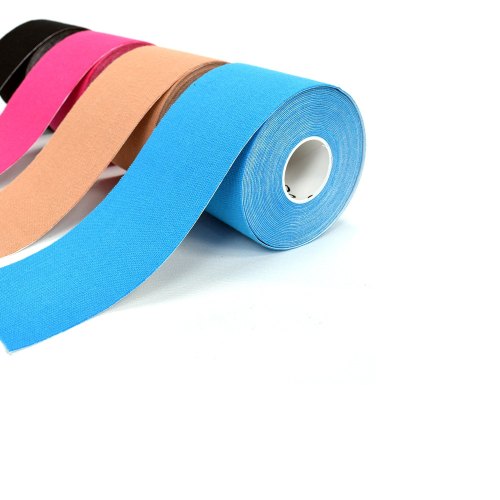
kinesio taping give dynamic stability to the joint while typical taping give static stability to lateral collateral ligament injury. it is also called kinesiology tape or kinesiology therapeutic tape. is an elastic cotton strip with an acrylic adhesive that is purported to ease pain and disability from athletic injuries and a variety of other physical disorders.
Taping on your knee can help stabilize it when you are active and can give relief from pain.it is most popular technique. mostly use in sport injuries because during playing any sport knees are more prone to injured. it is because of sudden thrust on knees or twisting of the knee during the sport. the lateral collateral ligament also more pron to injured during road traffic accident.
Kinesiological tapping could be a rehabilitative cum protecting use of elastic kinesiological tapes to supply :
- reduction in knee pain whereas LCL abraded
- enhancing performance of affected knee
- preventing any injuries to the knee
- support to the knee joint
- repositioning of structure of knee
- facial and ligamentous correction of knee.
- It facilitate the healing methodology whereas providing full computer memory with support to the joints suppotive structure still as mobilization effects.
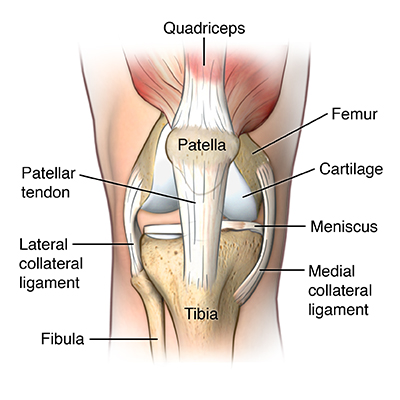
- The lateral collateral ligament is a thin band of tissue running along the outside of the knee. It connects the thighbone (femur) to the fibula, which is the small bone of the lower leg that runs down the side of the knee and connects to the ankle.is one of the major stabilizers of the knee joint with a primary purpose of preventing excess varus and posterior-lateral rotation of the knee.
- Although less frequent than other ligament injuries, an injury to the lateral collateral ligament (LCL) of the knee is most commonly seen after a high-energy blow to the anteromedial knee, combining hyperextension and extreme varus force.
- The lateral collateral ligament can also be injured with a non-contact varus stress or non contact hyperextension of knee. The lateral collateral ligament most commonly occurs in sports (40%) with high velocity pivoting and jumping such as soccer basketball, skiing, football or hockey. Tennis and gymnastics have been shown to have the highest likelihood of an isolated lateral collateral ligament injury.
- The lateral collateral ligament is rarely injured alone and therefore additional damage of the anterior cruciate ligament (ACL), posterior cruciate ligament (PCL), and posterior-lateral corner (PLC) is common along with the lateral collateral ligament when the lateral knee structures are injured.
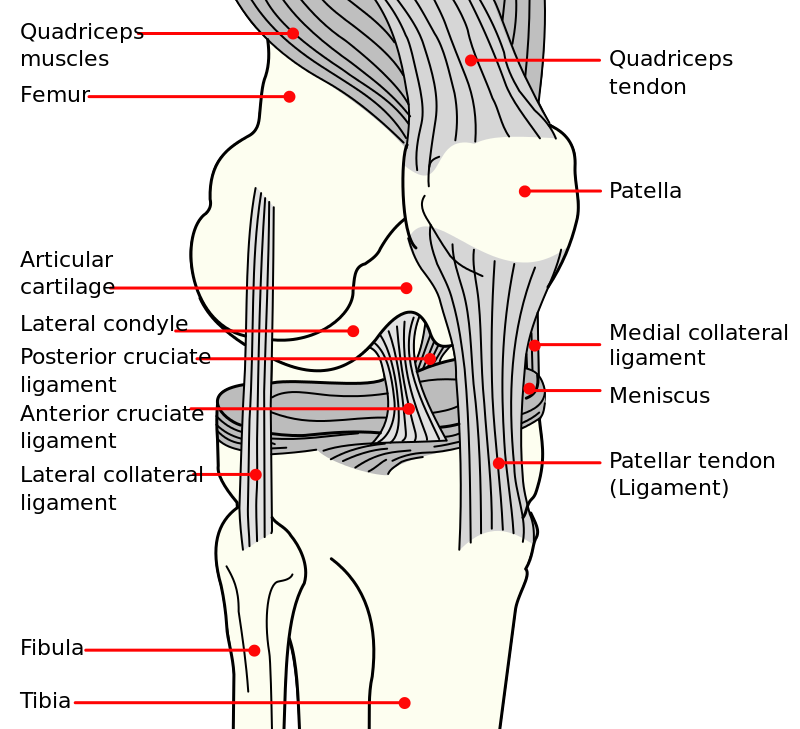
Relevant Anatomy of LCL :
origin : posterior (3.1 mm) and proximal (1.4 mm) to lateral epicondyle
posterior and proximal to origin of popliteus
popliteus origin is 18.5 mm from lateral collateral ligament origin
insertion : anterolateral fibular head
covers 38% of the fibular width
most anterior structure on proximal fibula
order of insertion from anterior to posterior
LCL → popliteofibular ligament → biceps femoris
Blood supply : anterior tibial recurrent arteries and inferolateral geniculate arteries.
The lateral collateral ligament is a cord-like structure of the arcuate ligament complex, together with the biceps femoris tendon, popliteus muscle and tendon, popliteal meniscal and popliteal fibular ligaments, oblique popliteal, arcuate and fabellofibular ligaments and lateral gastrocnemius muscle.
The lateral collateral ligament is a strong connection between the lateral epicondyle of the femur and the head of the fibula, with the function to resist varus stress on the knee and tibial external rotation and thus a stabilizer of the knee. When the knee is flexed to more than 30°, the lateral collateral ligament is loose. The ligament is strained when the knee is in extension.
Causes of LCL tear:
- Lateral collateral ligament tears typically happen when you’re playing a sport that involves:
- Bending.
- Hard contact.
- Quick changes of direction.
- Twisting.
- Jumping.
- Weaving.
- Stop-and-go movements.
- The riskiest sports for LCL tears include:
- Football.
- Skiing.
- Soccer.
Symptoms of LCL tear:
Acute :
- Patients with an acute lateral collateral ligament injury will present with a history of an acute incident which most commonly consisted of a blow to the medial knee while in full extension or extreme non contact varus bending of the knee. Pain, swelling and ecchymosis are often present at the lateral joint line along with difficulty in full weight bearing.
- Less common complaints consist of a thrust gait, foot kicking during mid stance, paresthesia down the lateral lower extremity as well as weakness and/or foot drop.
- Upon evaluation, a patient with an acute lateral collateral ligament injury may present with reduced range of motion, instability/giving way during weight bearing as well weakness of the quadriceps (inability to perform a straight leg raise). The patient will present with pain as well as increased carbs movement when performing a Varus Stress Test.
Sub-Acute:
- Patients who present with a sub-acute lateral collateral ligament injury will present with lateral knee pain, stiffness with end of range flexion or extension of knee, overall weakness and possible instability/giving way.
Chronic:
- Patients with a chronic lateral collateral ligament injury will present with unspecific knee pain, significant weakness throughout the entire kinetic chain as well as potential instability and mal-adaptive movement patterns of knee.
Grades of LCL tear:
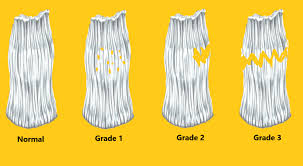
Grade 1: Knee injuries are mild. Your lateral collateral ligament is not completely torn. You should heal with only at home treatment as well as the utilization of your crutches. Your healthcare provider might also have you wear a hinged knee brace when you are allowed to put some weight on your knee. You will likely feel better after about three to four weeks.
Grade 3: Knee injuries are severe. Your lateral collateral ligament is separated or torn completely and may take eight to 12 weeks to heal. You will use a hinged brace for several months. Your healthcare supplier might recommend surgery.
Grade 2: Knee injuries are considered moderate. You have a partial tear in your lateral collateral ligament. For a grade 2 injury, you have need to use crutches and then a hinged knee brace. Recovery will take about eight to twelve weeks.
Special test for LCL tear:
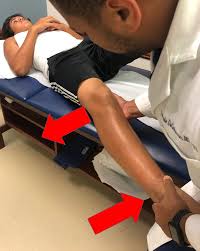
1-Varus Stress Test– The most help full special test when assessing a LCL injury. With the femur stabilized, a varus force is applied with special attention to the lateral joint line. The test is first performed in 30 degrees flexion. Increased laxity or gaping is may be an LCL injury with possible PLC involvement. Test is then performed with knee in full extension. Improved stability indicates an isolated LCL injury while continued gaping is a positive test for LCL and PLC injury.
2-External Rotation Recurvatum Test- With the patient in supine, a supra patellar force is applied while the great toe is used to lift and externally rotate the tibia. Excessive hyperextension when compared to the uninvolved limb is indicative of a positive test.
3-Posterolateral Drawer Test- With the patient in prone, the knee is flexed to 90 degrees and externally rotated 15 degrees. The examiner then provides a posterior force to the femoral condyles. Excessive Posterolateral translation is a positive test and indicative of a PLC injury.
4-Reverse Pivot Shift- With the patient in prone, the examiner slowly extends the knee while providing a valgus and external rotating force. The test is positive if a ‘clunk’ is felt at 30 degrees. Test must be performed bilaterally, as false-positives have been identified on the non-involved limb.
5-Dial Test– With the patient in prone, the examiner stabilizes the femur while the lower limb is externally rotated. The test is performed bilaterally at 30 degrees and 90 degrees of knee flexion. Ten degrees or more of external rotation is a positive test and indicative of a PLC injury.
Aim of LCL sprain taping:
- The aim of taping for a lateral collateral ligament sprain is to produce support and protection to the injured ligament. The lateral collateral ligament is a narrow ligament which connects the femur (thigh bone) to the fibula on the outside of the knee.
- If the lateral collateral ligament is sprained, this suggest it is stretched, partially torn or in rare cases completely ruptured. Support strips of tape are applied along the length of the injured ligament to ‘reinforce’ it. The support strips help prevent sideways movement of the knee joint or prevent further damage to knee joint, which would put stress on the lateral collateral ligament and as a result prevent healing of lcl tear.
- If you have had badly torn or stretched ligaments in the past then lateral knee ligament taping provides extra support and stability to the knee joint,also prevent further damage of knee. in the same way a hinged knee brace give support as well as stability to knee.
- Tape provides a high level of support for a shorter period of time. Tape will naturally stretch within the first hour or two, depending on the demands you place on it. Then it should be re-applied.
Taping for LCL tear:
- Taping used in employed in the field of rehabilitation as a method of treatment for knee injuries but much of the evidence is contradictory.
- Taping is one among the adjunct treatments that we have a tendency to as physiotherapists would possibly use with our patients together with well supported techniques like patient education and exercise therapy.
- we have a tendency to could argue that if tape includes a positive impact, be it placebo or mechanical, then we must always use it.
- provides a firm support, holds and reduces movement of a joint with a powerful and sticky material, examples include Strappal or Endura Fix.
- Rigid strapping tape usually used in tape or strapping is commonly referred to as “sports tape” or “athletic tape” and is most frequently a rigid type of strapping tape.
- Elastic husky tape may be used once less rigidity or support is needed.
- There are two type of taping for LCL tear 1.Rigid taping 2.Kinesio taping .this two are given below with description.
1.Rigid taping:
- Rigid strapping is most commonly applied before training, or a match, and is designed to stabilize a joint and support tendons and ligaments attachments. Muscle injuries and support is mostly better treated with rigid tape, K-Tape or Cohesive tape. Over-taping the joint and/or taping too often can sometimes lead to other injuries, as other joints and muscles can be forced to compensate for the dislocated area and it’s lack of natural movement. Always seek professional medical advice for injuries.
- All tapes work best on dry and clean skin surfaces. Avoid moisturizing the skin and very hairy skin as this will form a barrier and adversely affect the adhesive qualities of any tape. Rigid tape sticks better to itself than to skin, so overlapping tapeon-tape, or fixing onto a tape anchor works best. Rigid tape is non-stretchy. Try to handle and place the tape carefully to avoid creasing the tape wherever possible.
Application:

- 1- This taping example is a very symmetrical type of taping.Create an anchor tape wrap with no tension 10cm above the knee.
- 2- Create an anchor wrap with no tension 10cm below the knee.
- 3- With two strip of rigid tape( cur long enough to reach from top to bottom anchor strip at an angle.) Create an ‘X’ shape.
- 4- Anchor points for the initial 2 strips of ‘X’ tape at the front and back of the knee and are onto the anchor wrap tapes.They are in line with the middle of the knee cap (12 O’clock for tape strip.) The overlapping section of ‘X’ taping strips should be directly over the bony inside aspect of the knee.
- 5- Continue creating more ‘X’ taping strips inside strip and in symmetrical manner until they meet in the middle . Ensure each strip of new ‘X’ tape applied is slightly over lapping the immediate previous strip placed.The crossover part of the ‘X’ always being placed directly over the bony lateral collateral ligament.
- 6- Using elastic adhesive bandage now support the rigid tape by adding another layer of tape. Now follow the line of the very first strip of ‘X’ tape placed from top to bottom,crossing directly over the bony lateral collateral ligament.
- 7- Follow the lower anchor tape strapping around the leg once or twice a small amount of stretch.This is creating a figure 8 of tape shape from top anchor to lower anchor around the thigh and shin.
- 8- Complete the final part of the elastic adhesive bandage tape ‘X’ from lower to upper leg.again taping over the bony lateral collateral ligament. Then complete a final wrap once around the top thigh anchor wraps.With little stretch/pressure.Taping closer to the patella will support knee cap further.
- 9- A final small strip of rigid tape can be applied over the end of the elastic adhesive bandage taping,if desired to adhesive strength and help the tape from becoming unstuck due to friction or abrasion.
2.Kinesio taping :
Kinesio Taping Method is a therapeutic tool utilised by the rehabilitation specialists in all programs (paediatric, geriatric, orthopaedic,neurological, oncology and others) and levels of care (acute care, inpatient rehabilitation, outpatient, home care and Day Rehab). The idea of using elastic tape to mimic the therapist’s hands was first presented by Dr Kenzo Kase in the 1970s.
Application :
Causes of outer knee pain may include IT Band Syndrome, overuse, over training, poor training form, or training on hills or stairs. KT Tape relieves knee pain and promotes the healing process.
What you need :
2 strips of KT TAPE
1 full 25cm strip
1 full 25cm strip cut in half
Apply before activity:
Apply one hour before beginning activity
Clean skin:
Clean dirt, oils and lotions from area where we apply tape .
Activate adhesive:
After application rub tape vigorously to activate adhesive so effect is produce at that time.
Application :
Body position of the subject is setting or supine with knee at a 90 degree bend.
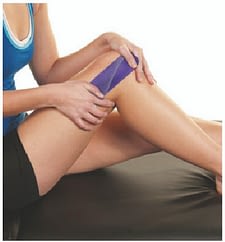
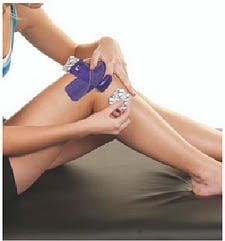
80% Stretch :
Anchor the middle of a half strip of tape over the point of pain with 80% stretch.
0% Stretch:
Lay ends down without stretch.
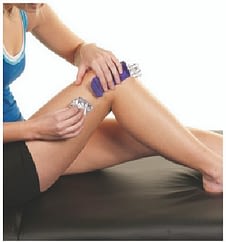
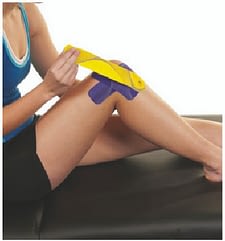
80% Stretch:
Anchor the middle of a second half strip in an X pattern over the first strip with 80% stretch
0% Stretch:
Apply ends of tape without stretch.
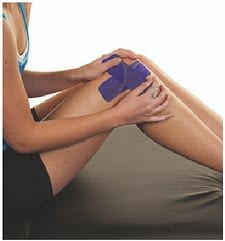
0% Stretch:
Anchor a full strip between the lower ends of the X without stretch.
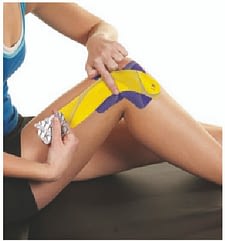
25% Stretch:
Apply the tape up the thigh as shown with 25% stretch.
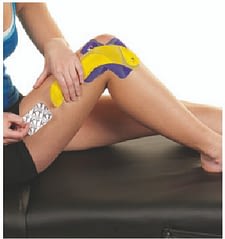
0% Stretch:
Apply the last 5cm of tape without stretch.
How to remove?
- So presently you’ve got your tape on and you’ve gotten that additional support throughout your chosen sporting activity, it’s time to need it off, so enable the United States to ease the tactic of removing physiology tape for you. the foremost effective tip we are going to provide once it involves removing your physiology tape is to peel the skin from the tape, not the tape from the skin.
- But in terms of the actual methodology, 1st ensure you’re removing the tape in an equivalent direction as a result of the expansion of the hair below it, and despite what you’re doing don’t rip the tape off kind of a plaster!
- Start slowly, folding the corners of the sting back bit by bit, guaranteeing that you’re birth the removed tape on the rear of the applied tape, as opposition propulsion the tape on top of and aloof from your arm.
- As you’re scraping the tape, hold your skin down beside your completely different hand and either regulator it or pull it gently among the opposite means of the tape. This helps the skin and so the tape to separate heaps expeditiously but with no discomfort.
- If the tape has been applied over a furred region of the body, it helps to maneuver on the tape as you are peeling it off, as a result of the pressure helps avoid a lot of pain.
- It’s knowing have shaved the realm before applying the tape but, as this isn’t frequently smart, taking this precaution square measure reaching to be necessary to some.
- want a bit additional assistance? Apply oil directly onto the tape, rub it in and wait around 10 to twenty minutes before removing it slowly. This will facilitate reducing the viscousness of the tape and build it easier to induce obviate.