
What is Back Flexion Exercise?
Back Flexion Exercise is an important exercise helps to relive back pain and improve flexibility and strength of Back muscles mainly Back flexors. This exercise have many health benefits and reduces the lordotic posture.
- Back flexion is known as William’s abdominal exercise.
- This is type of stabilized exercise, which is used in rehabilitation of spine involves forward bending from the trunk.
- Williams back exercises are prescribed by Physiotherapist for people with low back pain.
- It improves lumbar mobility reduces low back pain. it also strengthens the gluteal and abdominal muscles, reduces law back pain. it also stretches the erector spinae, hamstring, and tensor fascia latae muscles and the iliofemoral ligament.
- As it can be done during lying down and it gives minimal strain on the back; it is the best exercise to perform. you can do back flexion to avoid lumbar extension, which aggravates low back pain. when there is the absence of a formal diagnosis, people can do these exercises for different types of injury.
- The exercises were first given to males younger than 50 years of age and females younger than age 40 who had moderate to severe lumbar lordosis, whose plain radio logical features shown reduced disc space between the lumbar segments L1-S1.
Table of Contents
When to use Back Flexion Exercise?
- When patients feel comfortless and feel better it is most effective in back pain.
Centralization-
- If your thigh or leg pain goes towards your spine, called centralization, then this is a good sign. it is an indication that exercise is appropriate for you to perform.
- In contrast, If your pain moves away from your spine and symptoms become worse in your buttock, thigh, or leg as you do the exercise it is considered a “red signal.”The closer the pain is to your spine, the better. (e.g. the pain is better in your foot than in your knee). it is better as long as pain in the leg is not increasing. a patient must consult and take advice from a physician or physical therapist before performing this exercise to ensure whether it is correct or not.
Spinal canal stenosis:
- The space in the spinal reduces due to the degeneration of the vertebrae. it generates pressure in the spinal canal which leads to compression on nerves. it causes radiating pain from the spine to the lower limb.
- forward bending opens up the pressure in the canal and aids to reduce pain.
Lumbar Spondylolisthesis:
- In this, one vertebral body slips to the adjacent vertebral body causing mechanical or radicular symptoms. it causes weakness in muscles, an incorrect posture of the spine and lumbar instability.
lumbar facet syndrome:
- In this, painful irritation occurs at the posterior part of the lumbar spine. As swelling from surrounding area Swelling from the surrounding area increases, pressure on nerves roots also increases. due to trauma little capsular tears occurs at the level of the posterior facet joints. flexed activity helps to reduce swelling and pain at posterior facets. while extension causes more pain in this condition. so you can starts William’s exercise
Postural deformities:
- An increase in lordotic posture proportionally increases the shearing strain or stress on Back in the anterior direction and shifts the center of gravity anteriorly. This increased angle and stress are associate with poor posture and back pain. From a biomechanical point of view, the accentuated lumbar lordosis associates with an increased prevalence of low back pain. However several studies have concluded that low back pain is not directly related to lumbar hyperlordosis. Some factors contribute to a higher amount of lumbar lordosis. These causative factors, like the weakness of the trunk, short back muscles, weak thighs, hamstrings, etc. in turn can cause low back pain. .
- When a patient is recovering from a disc herniation or bulging of the disc as a progression for sciatica, he can begin this. However, precautions should be taken while performing lumbar flexion because an acute disc bulge or herniation may be aggravated.
When to avoid Back Flexion Exercise?
Following are specific conditions when lumbar flexion should not be advised.
- First and foremost is when symptoms of patients get worsened while flexing back, the patient should stop it.
- Vertebral compression fractures.
- Neurological conditions such as problems of the bladder( difficulty in urination) difficulty in controlling bowel. If weakness increased in any leg or foot.
What are the goals of Back Flexion Exercise?
- Reduce pain and to stabilize the spine.
- Improve mobility.
- Correct posture(lordosis) and alignment.
- Open the intravertebral foramina.
- Stretch the lumbar extensors, hip flexors, and facets.
- Strengthen the gluteal and lumbar flexors.
- Mobilize the lumbosacral junctions.
- Reduce belly fat.
Back flexion exercise:
There are mainly two types of Exercises:
- Back Strengthening flexion exercises
- Back stretching flexion exercises
A- List of Back Flexion strengthening Exercise
- posterior pelvic tilt
- partial sits up
- The diagonal partial sits up
- Seated lumbar flexion
- Back flexion in standing
- Lumbar flexion in long sitting
- Lumbar flexion with rotation
- Full squats
- Lunges
B- List of Back Stretching Exercise.
- Single knee to chest stretch
- Double knee to chest
- lying glute stretch
- Hamstring stretch
- Cat stretch
- Prayer stretch
Back Flexion Strengthening Exercise:
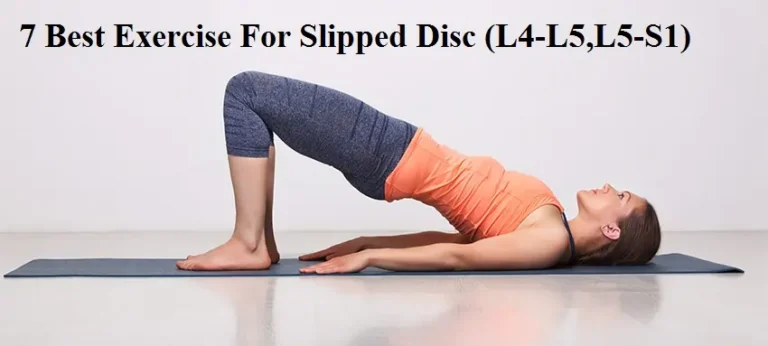
Posterior pelvic tilt exercise :

- Start with lying on your back, both hands at side and knees bent.
- Then you have to tighten the muscles of the lower abdomen and buttocks, to flatten back against the floor. do hold for 5 to 10 seconds. This is the pelvic tilt (flat back) position.
Partial sits up exercise :
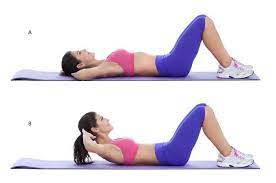
- Do lie on your back, both hands at the side and knees bent. Then, you have to use your abdominal muscles to bring your upper back upward side ( off the plinth)while exhaling. rise only enough to get your shoulder blades off the plinth. Furthermore, you should not thrust yourself off the floor or should not move his head with your hands.
- You can feel the muscle contraction in their abdominal muscles. then lower your upper back in a relaxed and smooth motion.
The partial diagonal sits up :
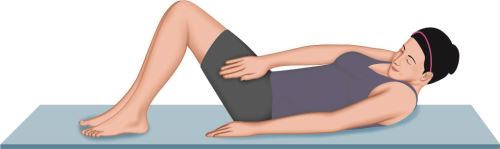
- It begins the same as partial seats up. you have to exhale and use abdominal muscles. Then raise your upper body off the plinth with one shoulder above the opposite one.
- You should not thrust yourself off the plinth or move your head with arms but keep your knees flexed and your feet flat on the plinth. you can feel the contraction only in your abdominal muscles.
- You should done smoothly and calmly while lowering the upper back.
- Lumbar flexion in sitting
- This is a progression of back flexion in a lying position. after 15 days of back flexion in lying in less pain you can switch seated lumbar flexion .
- Do sit in an upright position in a chair. you have to urge them slowly bend forward until you feel the strain in his back. also, you should not bend your knees while performing this movement. slowly bend forward, sliding your hands down to your legs until you feel the strain in your back.
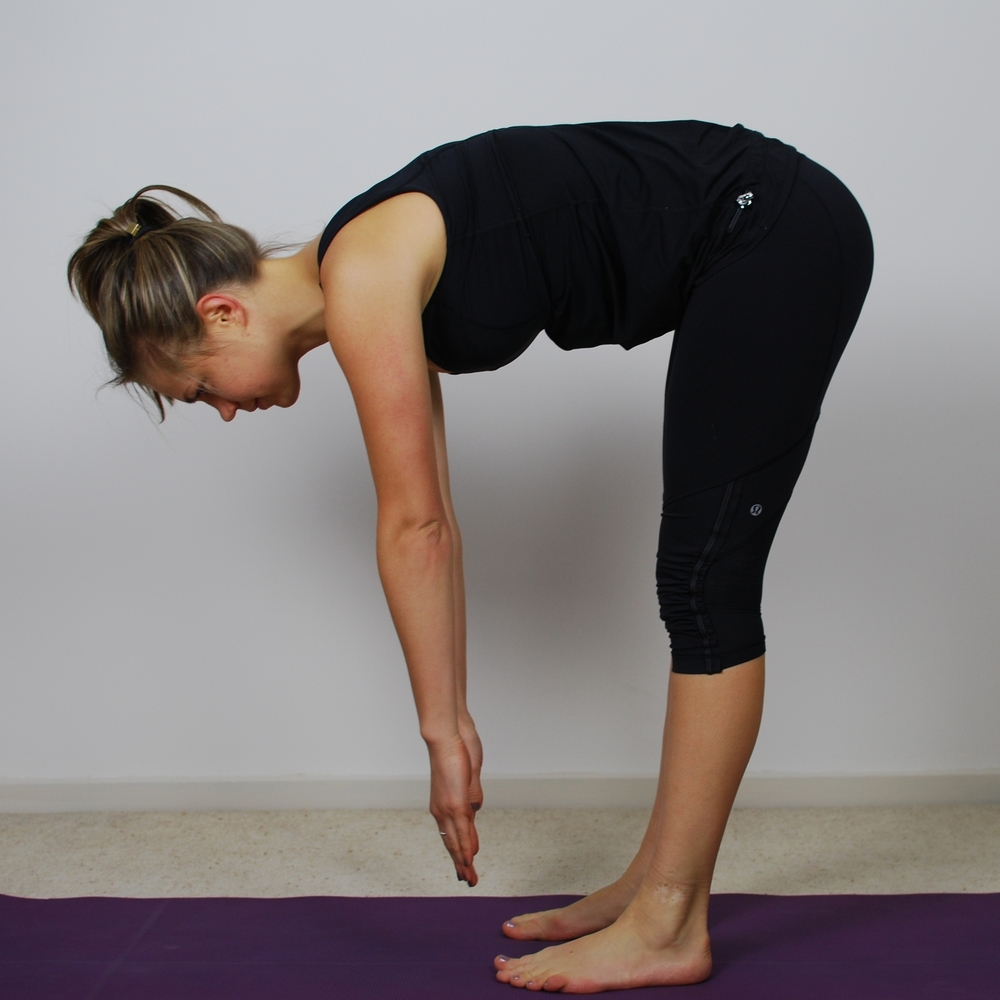
Lumbar flexion in standing :
- Stand straight with your feet and shoulders normally apart. then Slowly bend forward, sliding your hands down to your legs, until you feel the tension in your back. then come back in a standing position.
Lumbar flexion with rotation :

- lie on plinth with knees and hips bent to 90 degrees with feet flat.
- Then you have to gently rotate your knees to one side until you contact your hips to a plinth.
- Hold for 10 seconds.
- Repeat this with the opposite side.
Full squats:
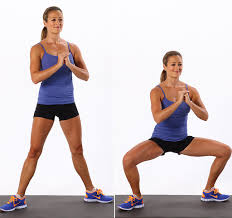
- You have to stand with a proper base of support. In William’s squat position, your feet should be typically shoulder-width apart and flat on the floor, the hip and knees would into the maximum flexion, and the lumbar spine is rounded into flexion. 7-degree toe-out position or straight ahead, trunk and pelvis are erect and in an aligned position.
- Ideally, the pelvis will remain in a neutral position, without tucking inside or tilting posteriorly.
- Patient squats down as if he sits in the chair. hips, knees, and ankles will bend together, whereas spend remains straight your ankles, As you begin to go down, knees will come forward over ankles and toes, and your hips will go backward to keep the center of gravity over feet.
- Feet should remain flat on the floor during the entire movement. Finally, push the floor through his feet with his weight centered just in front of your ankles and return to the starting position.
- Upon reaching maximum range, the patient “bounces the buttocks upward and downward 15 to 20 times, with 2 to 3 inches of excursion on each bounce, then repeats 4-5 times.
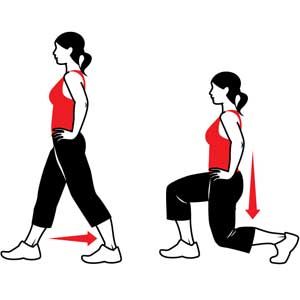
Lunges:
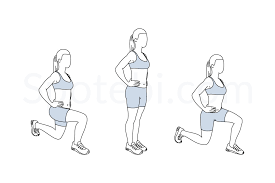
- This is a good stretching and strengthening exercise for the entire lower body, mainly for the iliopsoas muscle, which may be a cause of low back pain if this muscle is in spasm or abnormally in tightness. Stand with feet hip-width apart.
- Then step forward higher than a walking stride so the front leg is ahead of the torso and the opposite one is behind. front leg’s foot should land flat and remain flat while it’s on the floor.
- Bends your knees to approximately 90 degrees as you go down by yourself until the back knee stays in only less distance from the floor and heel rise off the floor.
- Keep your shoulder upright and core muscles contracted.
- Then, forcefully pushed the floor by the front leg to come back to the starting position. At the bottom of the movement, the front thigh is parallel to the ground, the back knee points toward the floor, and weight is equally distributed to both limbs.
Variation of Lunges :
a. Static lunges :
- The Static lunges, also known as the split squat, in which you neither need to take a forward step nor need to take a backward step.
- It is a body-weight exercise to increase strength in the core and lower body. Nevertheless, it may seem the same as the forward lunge, this exercise uses a smaller range of motion.
- A patient comes to the lunge position and he strictly holds his lower body that targets quadriceps, hamstrings, and hip flexors. Practicing static lunges properly will help the patient to improve strength and coordination so that he can go into progression to perform several lunge variations such as side lunges, walking lunges, and split squats.
b. Back lunge :

- This exercise is same as the forward-stepping lunge, except the rare foot, goes back longer than a walking stride.
- Patient lowers hips so that the thigh (front leg) goes parallel to the ground with the opposite knee positioned directly over the same ankle. so that leg remains ahead of the torso and others behind it
- You should bend the left knee at a 90-degree angle and pointing toward the ground with the left heel lifted. after that, return to a standing position by putting the right heel on the floor. then you will repeat the same movement with an alternate leg.
- In this backward movement, there is less muscle work on the quadriceps and more emphasis on the lower limb trunk mainly gluteus and hamstring muscles. the patient should keep his trunk upright and his hips at the level.
c. Lateral lunge :
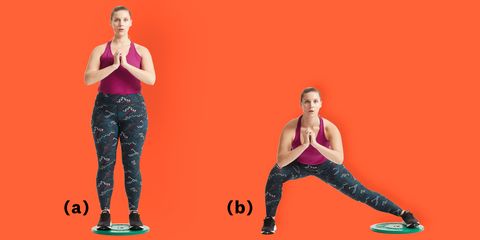
- The lateral lunge involves a step out to the side instead of forwarding or back.
- Because of the lateral movement pattern, the inside groin muscles (the adductors) are more active in this variation than in the other types of lunges.
- It also emphasizes the medial quadriceps
- Stand with your feet hip-width apart. Step out wide to the side while keeping your other foot flat.
- Bend your “stepping” knee while keeping the other knee straight. Your body will hinge forward slightly, and your shoulders will go ahead of your knee compared with forwarding and backward lunges. Forcefully push off from your foot to return to the starting position.
Stretching Exercise :

Single knee to chest stretch:
- The single knee to chest motion would be given in the supine lying position. take one leg off to the table and bend his knee.
- Following that, you grasp your both hands around the bent knee to support the leg.
- Bring the knee towards his chest at his maximal level. do hold for 15 to 30seconds. Now, relax and lower the knee to starting position and
- Repeat on the alternate knee.
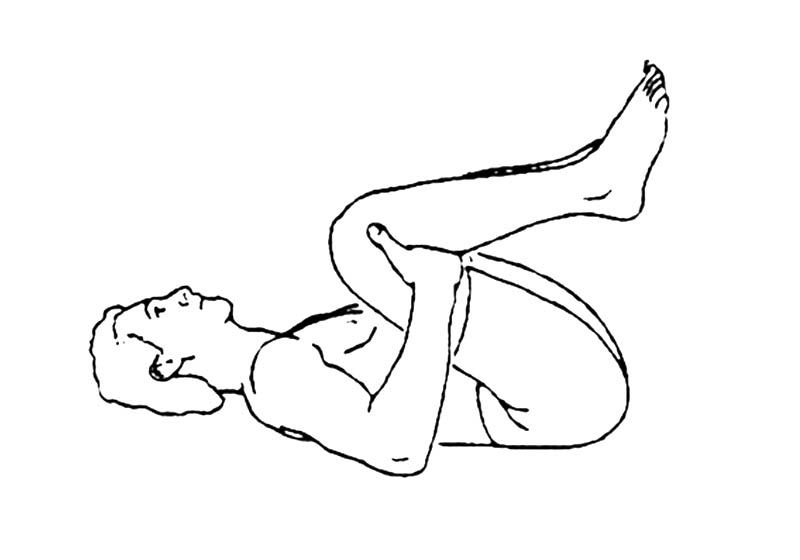
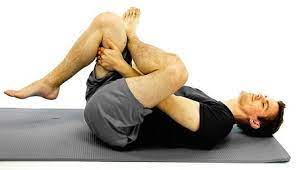
Double knee to chest stretch :
- The double knee to chest stretch is also performed in the supine position.
- Bring both his knees, one at a time, to your chest. With your hands held together, pull your knees towards your chest and curl your head forward. While performing the movement, keep your knees together and have your shoulders flat on the floor.
- Do hold for 15 to 30 seconds.
Lying glute stretch
- This stretch helps to relieve pain in gluteal region.
- lie on back in mat or bed.
- Bend both the knees with feet on bed.
- Cross one(lower) leg over thigh of other leg.
- Grasp back of thigh of lower leg with both hands.
- hold for 15 to 30 seconds. then repeat with another leg.
Hamstring stretch :
- The spine is anchored between two hip bones. These two hip bones make the pelvis.
- The lumbar spine and the pelvis move simultaneously. this movement leads to posterior pelvic tilt, in which hamstring muscles contract. when hamstring muscles are tight, it keeps the pelvic pulled back due to the long contraction of the hamstring.
- This straightens ups the normal arch of the lower back which causes back pain. this causes back muscles to overstretch or weaken. Regularly stretching of hamstrings can help ease and prevent back pain.
- When you do these hamstring stretches, be careful not to go beyond the limit.
- Do Hold each stretch for about 30 seconds comfortably. the patient should feel the stretch but should not feel any pain.
Variations of a hamstring stretch
Towel hamstring stretch :
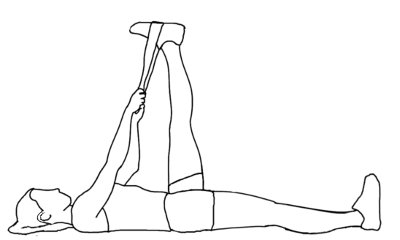
- Your position would be supine lying, you have to put a towel around the back of one thigh and support the thigh or calf by holding each end of the towel. when a towel is not available, you could used both hands to grasp the thigh. The other leg remains straight on the floor. then slowly straightens the knee until you feel a stretch in the back of the thigh, trying to bring the bottom of the foot parallel with the ceiling.
- Always extend the leg and straighten the knee only until the stretch is comfortable. do Hold the position initially for 10 seconds, and gradually work up to 30 seconds
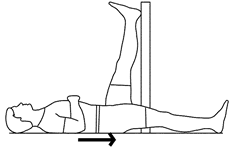
Wall hamstring stretch :
- This stretch performed at the corner of a wall or near a plinth: Keeping one leg on the floor, place the other leg facing towards a wall or arm of a couch. Gently push the knee to keep the raised leg straight as far as possible.
- Do Hold the position initially for 10 seconds, and gradually progress to 30 seconds.
- Perform this stretch with each leg, one at a time, 4 to 5 times for one complete set. perform 2 sets daily.
Seated hamstring stretch :

- The seated hamstring stretch position is less gentle than lying on the back, but in this movement, core muscles would work to perform back flexion.
- In a sitting position, the degree of stretch must be adjusted based on the bearability of pain. The main part of this exercise is to avoid rounding the lower back; instead, fold forward at the hip.
- Instruct the patient to sit on the edge of a chair, straighten one leg in front of the body with the heel on the floor. Straighten the spine by sitting tall and rolling the pelvis forward.
- Hold this stretch for 30 seconds.
Hamstring stretch on the edge of a bed :
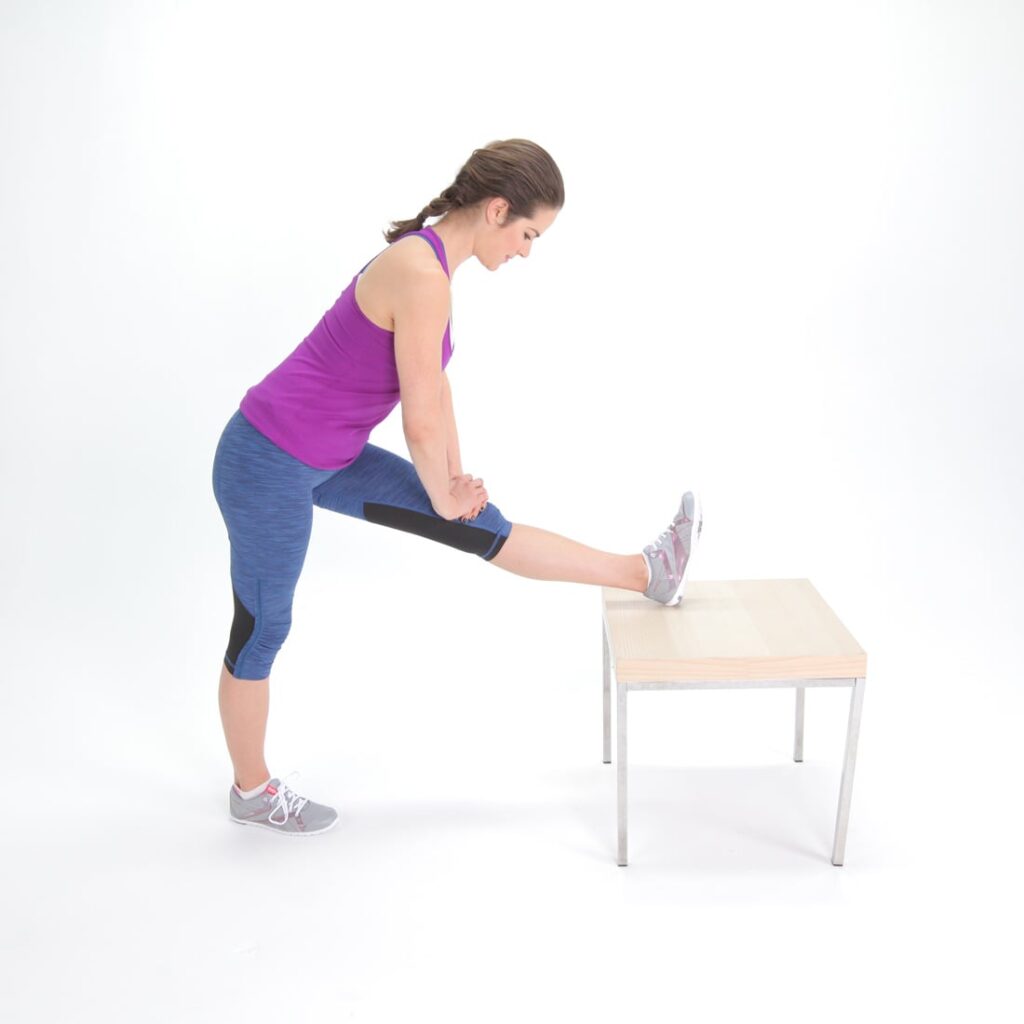
- For this stretch, sit on the edge of a bed and put one leg along the edge of the bed while the other leg is placed down with the foot resting on the ground. Bend forward at the hip, maintaining the spine straight. Try to keep the leg on the plinth as straight as possible without any pain.
- Hold this stretch for 30 seconds. Repeat 3 times for each leg.
Cat-cow stretch :

- The Cat-Cow Stretch (Chakravakasana) is a yoga essential and good for lumbar flexibility. It consists of two movements: starting from moving the spine from a rounded position (flexion) to an arched one (extension).
- Each movement is done in cooperation with either inhaling or exhaling a breathe, making this a simple vinyasa (linking breath to movement). forward and back bending the spine can help to increase circulation in the discs in the back.
- It’s a basic motion, but can be effective in supporting the back, reducing pain, and maintaining a healthy spine; especially when you do prolonged sitting. start on your hands and knees as a table pose, with a neutral spine. As you take a breath inside move into cow pose, raise your sit bones upwards, lower your chest, and allow your belly to contract.
- Lift your head, relax your shoulders away from your ears, and look straight ahead. during this movement pelvic shifts anteriorly.
- Tip your pelvis forward, tucking your tailbone. Come into cat pose while exhaling and rounding your spine outward, tucking in your tailbone, and taking your pubic bone forward. Drop your head toward the floor — just don’t give4 more strain your chin to your chest. Most importantly, just relax. Repeat the Cat-Cow Stretch on each inhale and exhale, matching the movement to your breath.
- Continue for 5 to 10 breaths, moving the whole spine. After your final exhales, come back to a neutral spine.
- Cat-Cow Stretch can help you improve your posture and balance. It is a good stress-reliever and calming pose since you link the movements with your breathing.
Prayer stretch :
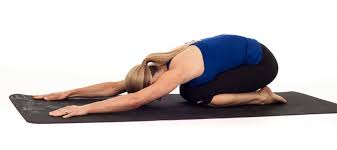
- The prayer stretch is a great stretch that primarily focuses on the extensor muscles of the lumbar.
- This stretch is good because it decreases the loading placed on the low back while performing the stretch and allows you to fully relax, and lets gravity do the work for you.
- It is one of the best stretches you can do to protect yourself from a low back injury or pain and to aid relieve pain during the rehabilitation of a low back injury. When people get an injury of the low back, the muscles of the surrounding area of the injury will tighten to guard the area against further damage. The problem is that this constant tension in these muscle groups may grow pain due to involvement of nerve and reduce blood flow to this area. decreased blood flow leads to an increased duration of healing. So stretching the muscles in this region will assist to break this cycle and allow the spinal structure to heal. Kneel on a yoga mat or padded surface, with your knees slightly apart.
- Allow your buttocks to rest back onto your heels, or as close to your heels as is comfortable.
- This is your starting position. add a pillow or extra support between your calves and thighs to help relieve pressure between your knees. After that, Reach your arms forward to lengthen your spine, hands on the floor as you lower your torso towards the ground.
- Tuck your head in and extend your hands further up the yoga mat until you feel the stretch in your lower back. Hold the stretch for around 10-20 seconds, making sure your breath throughout, before slowly returning to the starting position.
- Remember a good stretch should be fairly comfortable and certainly without any pain. If you feel pain, stop immediately.

3 Comments